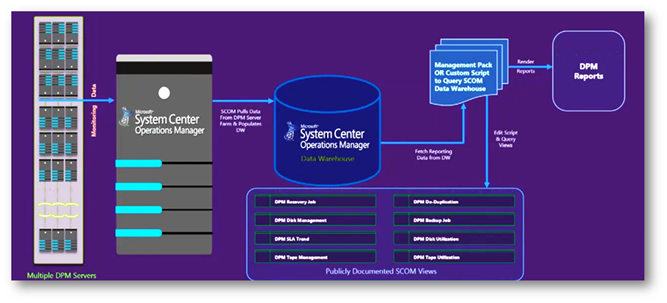
A while back I posted about the enhanced reporting for DPM here: https://www.buchatech.com/2014/11/dpm-2012-r2-reporting-improvements/ I wanted to create another blog post on how to deploy and configure the new enhanced reporting for Data Protection Manager (DPM) 2012 R2 and as a follow up to my Enterprise Backup session @ Microsoft Ignite (http://meme.ms/d5gpbrq). Here is a diagram of the new DPM reporting framework:
This new reporting for DPM is a part of Operations Manager (SCOM). SCOM can monitor your DPM server/s so it only made sense to build this new reporting framework in SCOM. Data from your DPM server/s is brought over to SCOM through the monitoring and placed in SCOM’s data ware house database. This data is then accessed via a new set of DPM SQL views and served up to the reports.
Following is a breakdown of what you need to get the new reporting framework put in place and configured.
What do you need?
- Need SCOM 2012 R2 deployed w/ DW working.
- DPM management packs must be imported to SCOM and central console must be deployed.
- DPM 2012 R2 and Central console must be on UR5.
- Must configure SLA’s on your DPM servers using Set-DPMProtectionGroupSLA CMDLet to get SLA data in reports. More on this later.
- The FileServices MP is a pre-req of the DedupReporter MP.
You must be careful about how you install/upgrade the DPM central console and management packs on SCOM as you can run into problems if you do not pay attention. I have had to re-deploy a SCOM server once in a lab to get this to work. Here is the order I follow and have had the best success with:
How to deploy the reporting?
1st: Import RTM 4.2.1126 MP’s in SCOM (You may already have these loaded. They are DPM 2012 R2 RTM MP’s and are named:
– Microsoft.SystemCenter.DataProtectionManager.2012.Discovery.MP
– Microsoft.SystemCenter.DataProtectionManager.2012.Library.MP
2nd: Install Central console (This is DPM 2012 R2 RTM)
– You will find this on the DPM media
3rd: Apply UR5 to your DPM server/s.
For a list of DPM version build numbers and download links visit:
– UR5 is version 4.2.1292.0. UR5 with the latest hotfix is version 4.2.1297.0.
4th: Apply UR5 to Central console.
NOTE: When updating the DPM Central Console be sure to run the correct .exe.
See the following screenshot that highlights the correct one for the Central Console.
5th: On your SCOM server import the new DPM management packs version 4.2.1276 MP’s. These will automatically upgraded the RTM DPM 4.2.1126 MPs.
– The System Center Management Packs for Data Protection Manager 2012 R2 Reporting, DedupReporter, Discovery and Monitoring can be downloaded from here: https://www.microsoft.com/en-us/download/details.aspx?id=45525.
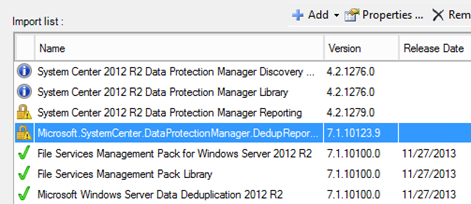
NOTE: With the new DPM MP’s there are two additional MP’s that were not part of the DPM RTM MP’s. There is the Microsoft.SystemCenter.DataProtectionManager.2012.Reporting.mp which is required for the new reporting and there is the Microsoft.SystemCenter.DataProtectionManager.DedupReporter.mp that is optional if you want to get reporting around de-duplication on your DPM servers.Here is a screenshot of importing the new DPM MP’s and the File Services MP:
After you import the new DPM MP’s you should have the following management packs loaded in your SCOM:
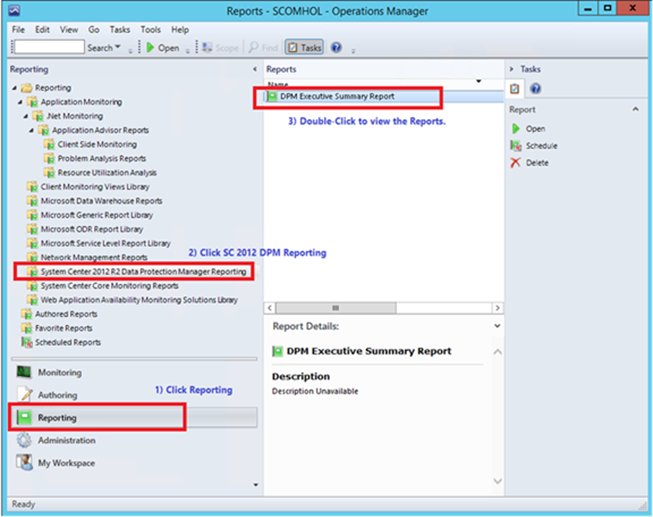
In SCOM if you navigate to the Reporting workspace you will have System Center 2012 R2 Data Protection Manager Reporting. Here you will find the DPM Executive Summary Report.
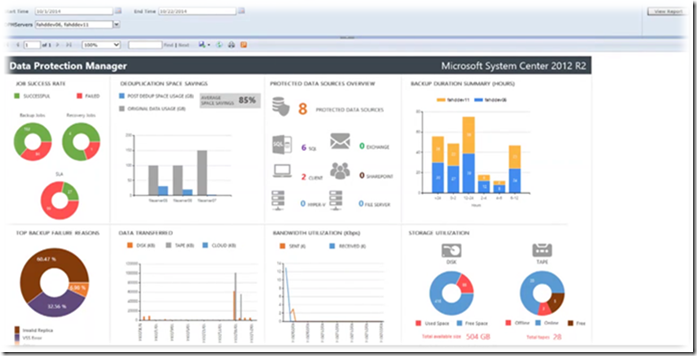
The following screenshot is what the DPM Executive Summary Report looks like.
6th (Optional): Configure SLA’s on your DPM server/s using Set-DPMProtectionGroupSLA CMDLet to get SLA data in reports. This has to be done on each DPM server per each protection group that you want to receive SLA reporting on. The steps to do this are:
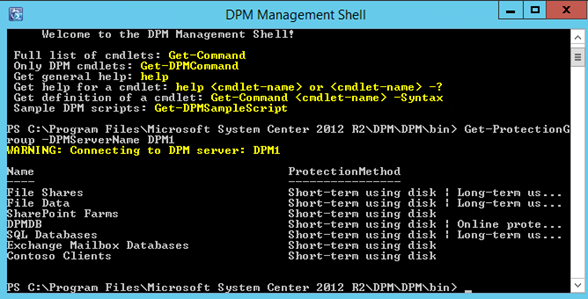
Launch the DPM Management Shell. Run Get-ProtectionGroup -DPMServerName YOURDPMSERVERNAMEHERE to get a list of Protection Groups.
Run Get-DPMProtectionGroup | where {$_.Name –ieq ‘Exchange Mailbox Databases’} | Set-DPMProtectionGroupSLA –SLAInHours 24 to set the SLA on a protection group.
That is it. Now you have set an SLA for your protection group. The SLA is defined in hours. DPM will check the SLA once a day and an event is written to the DPM backup event in the event log.
That’s all for the setup and configuration. Stay tuned for a post on how to build out custom reporting in the enhanced reporting framework in the near future.





1 thought on “Deploy & Configure DPM Enhanced Reporting”