Microsoft has made a new version of the SQL resource provider (RP) for Azure Stack TP2 available. It can be found here in the documentation: https://docs.microsoft.com/en-us/azure/azure-stack/azure-stack-sql-resource-provider-deploy. This RP is an add-on for Azure Stack and allows you to offer SQL as PaaS.
This is a great SQL self-service scenario for Hybrid Cloud. The aforementioned link contains documentation on how to deploy the SQL RP. There are some “Gotchas” with the RP and some other information that is important when deploying and configuring this RP.
I am going to walk through my deployment and configuring experience covering the “Gotchas” and other important information in this blog post. This post will be broken out into the following sections:
- Deployment
- RP Configuration
- Offer/Plan Setup
- Tenant provisioning of SQL PaaS
Ok. Now let’s dive into it.
– DEPLOYMENT –
Before you begin go to the document link and review the RP documentation. You can download the RP on this page from the Download the SQL Server RP installer executable file link.
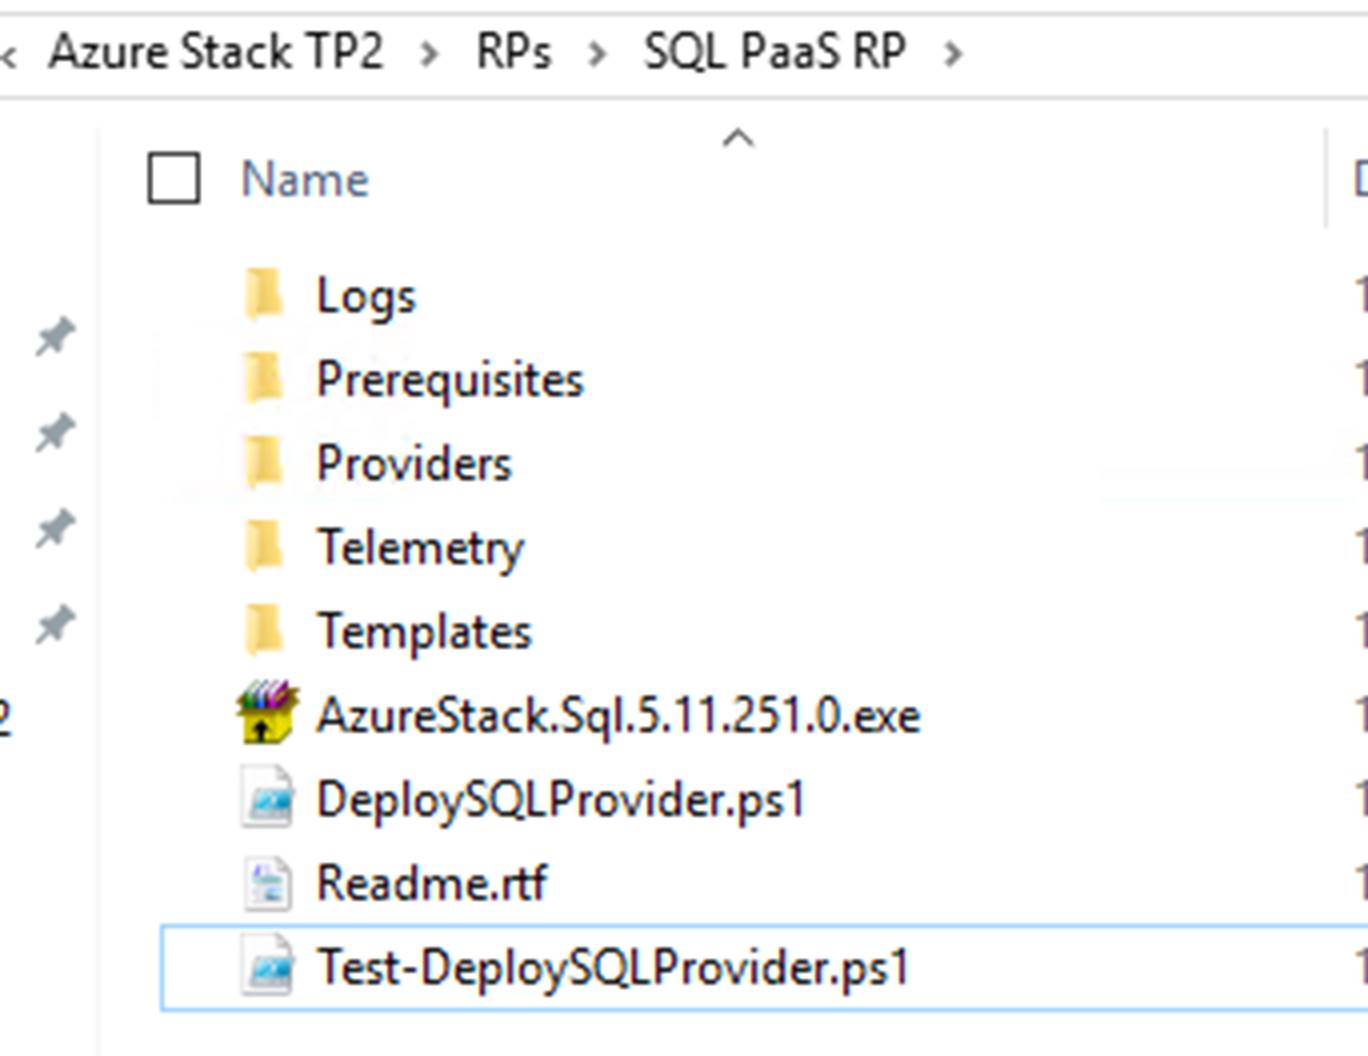
Once the RP is downloaded extract the files and scripts by running AzureStack.Sql.5.11.251.0.exe. You should have the following:
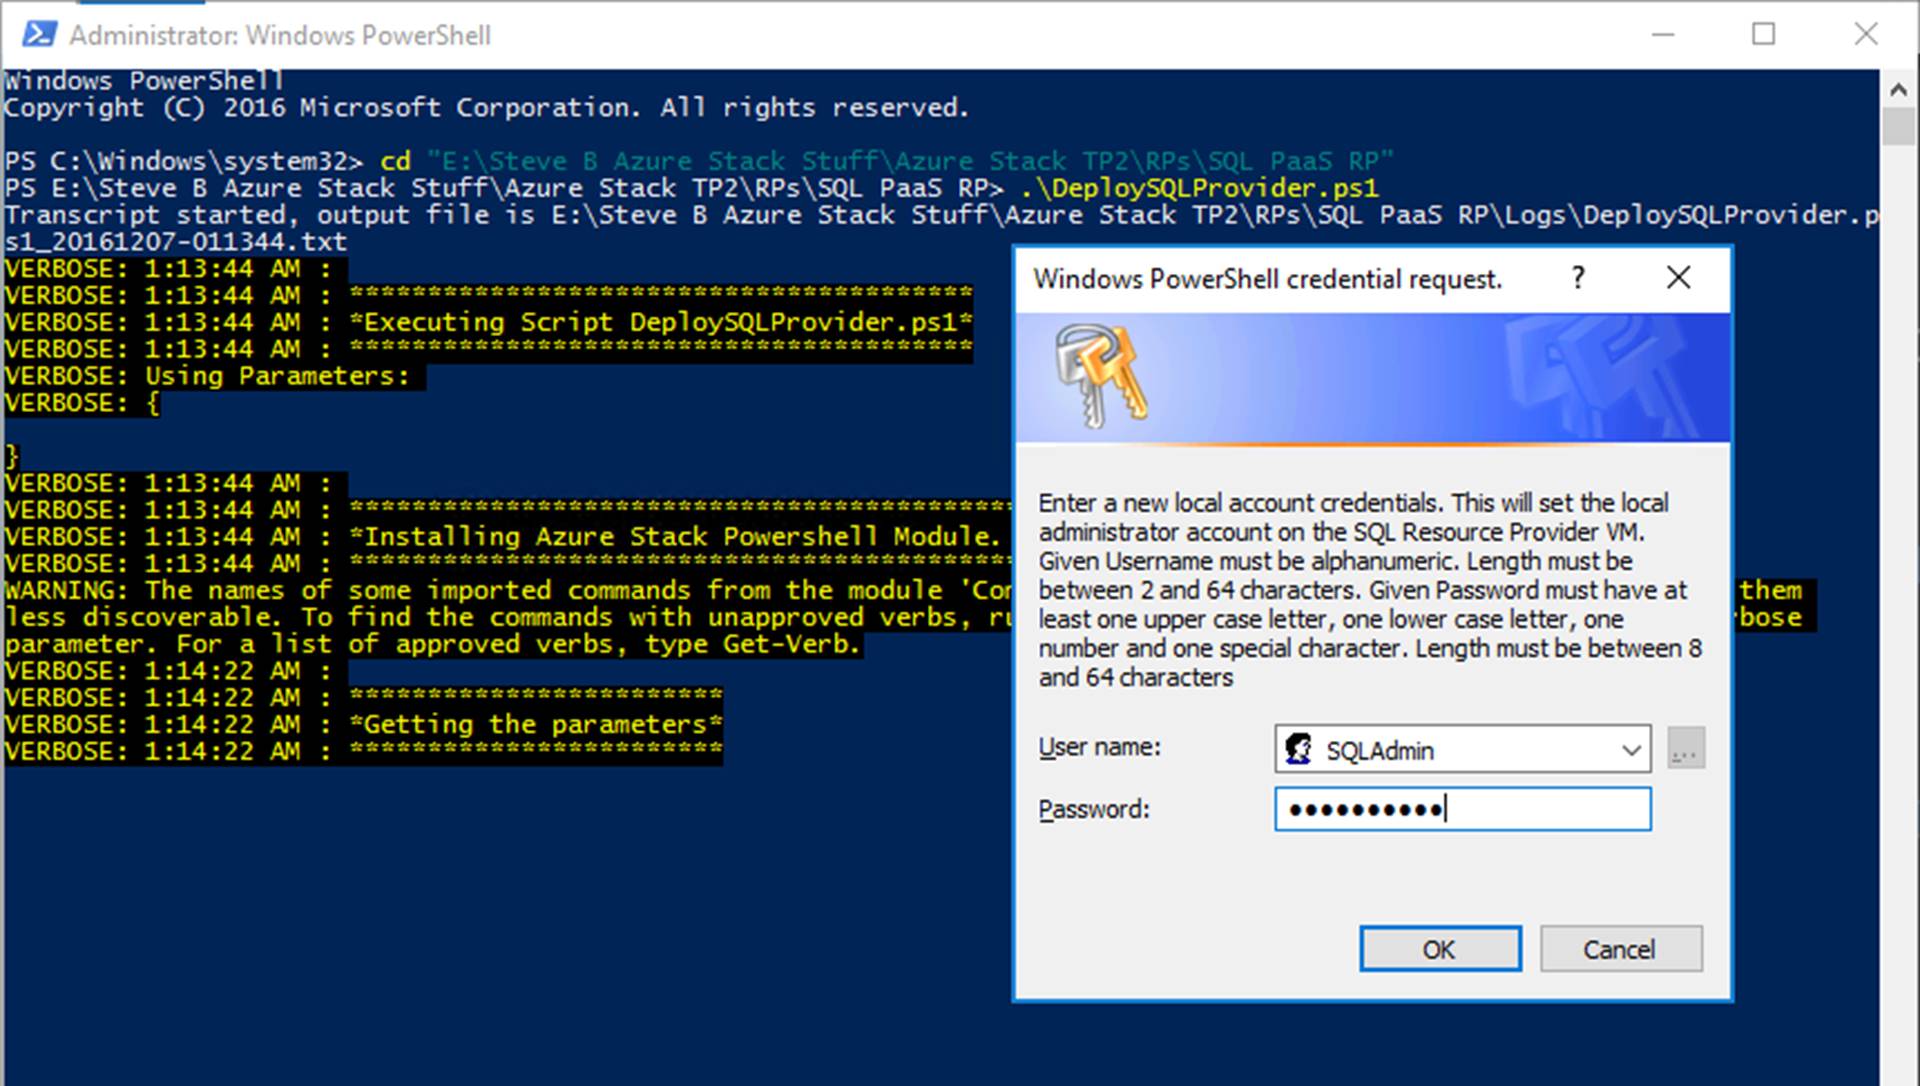
Now from an elevated PowerShell window run DeploySQLProvider.ps1.
NOTE: Important this should not be run from PowerShell ISE. It fails when it is run from ISE and you may end up with a partial deployment that requires cleanup.
NOTE: Also you can specify a local location for the SQL 2014 SP1 Enterprise Evaluation ISO if you have it downloaded already. To do this run the script with a parameter of -DependencyFilesLocalPath. If not specified the ISO will be downloaded during deployment. I prefer to let the script download it as a part of the deployment.
This script will do the following:
The script will prompt you to input local admin account info. Note that the password you input here will also be used for the SQL SA account.
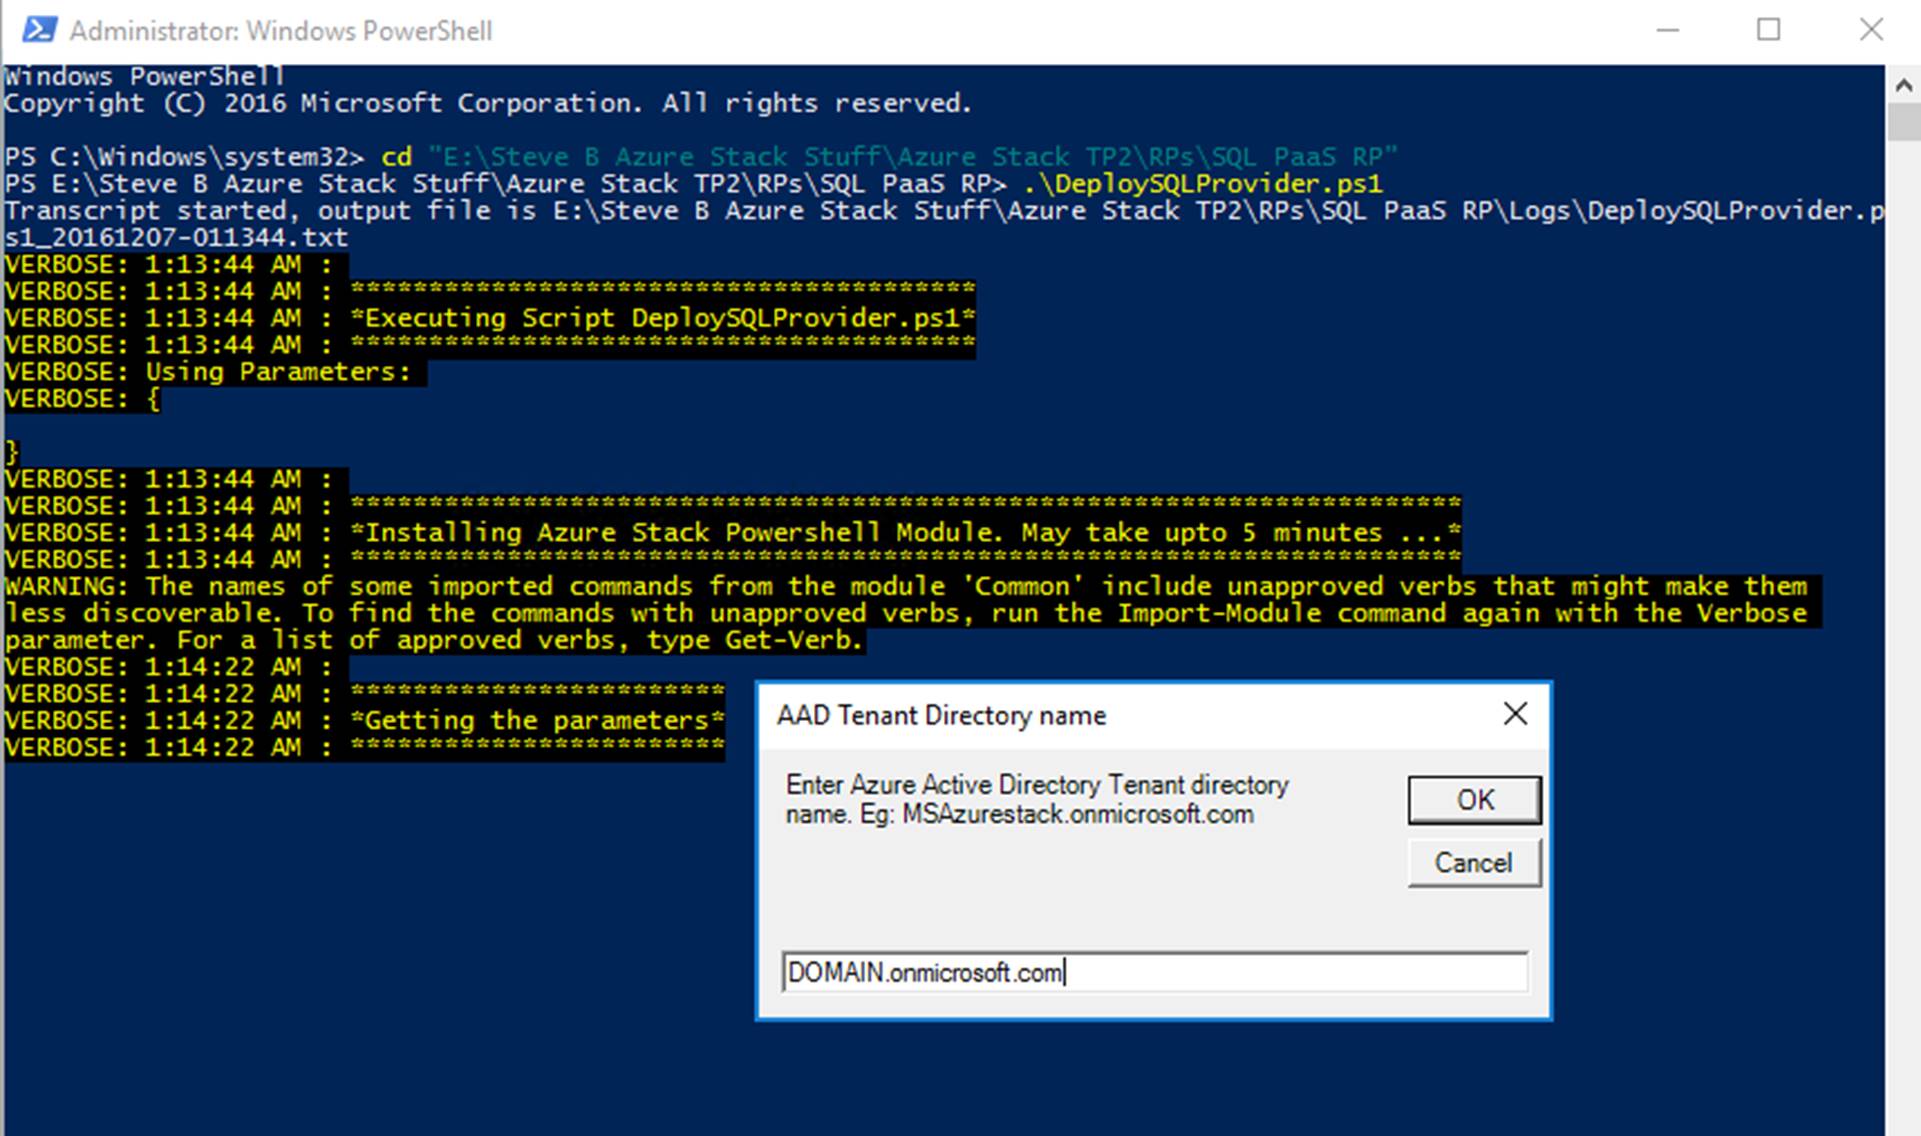
The script will then prompt you for your Azure Active Directory tenant name. This is YOURDOMAIN.onmicrosoft.com.
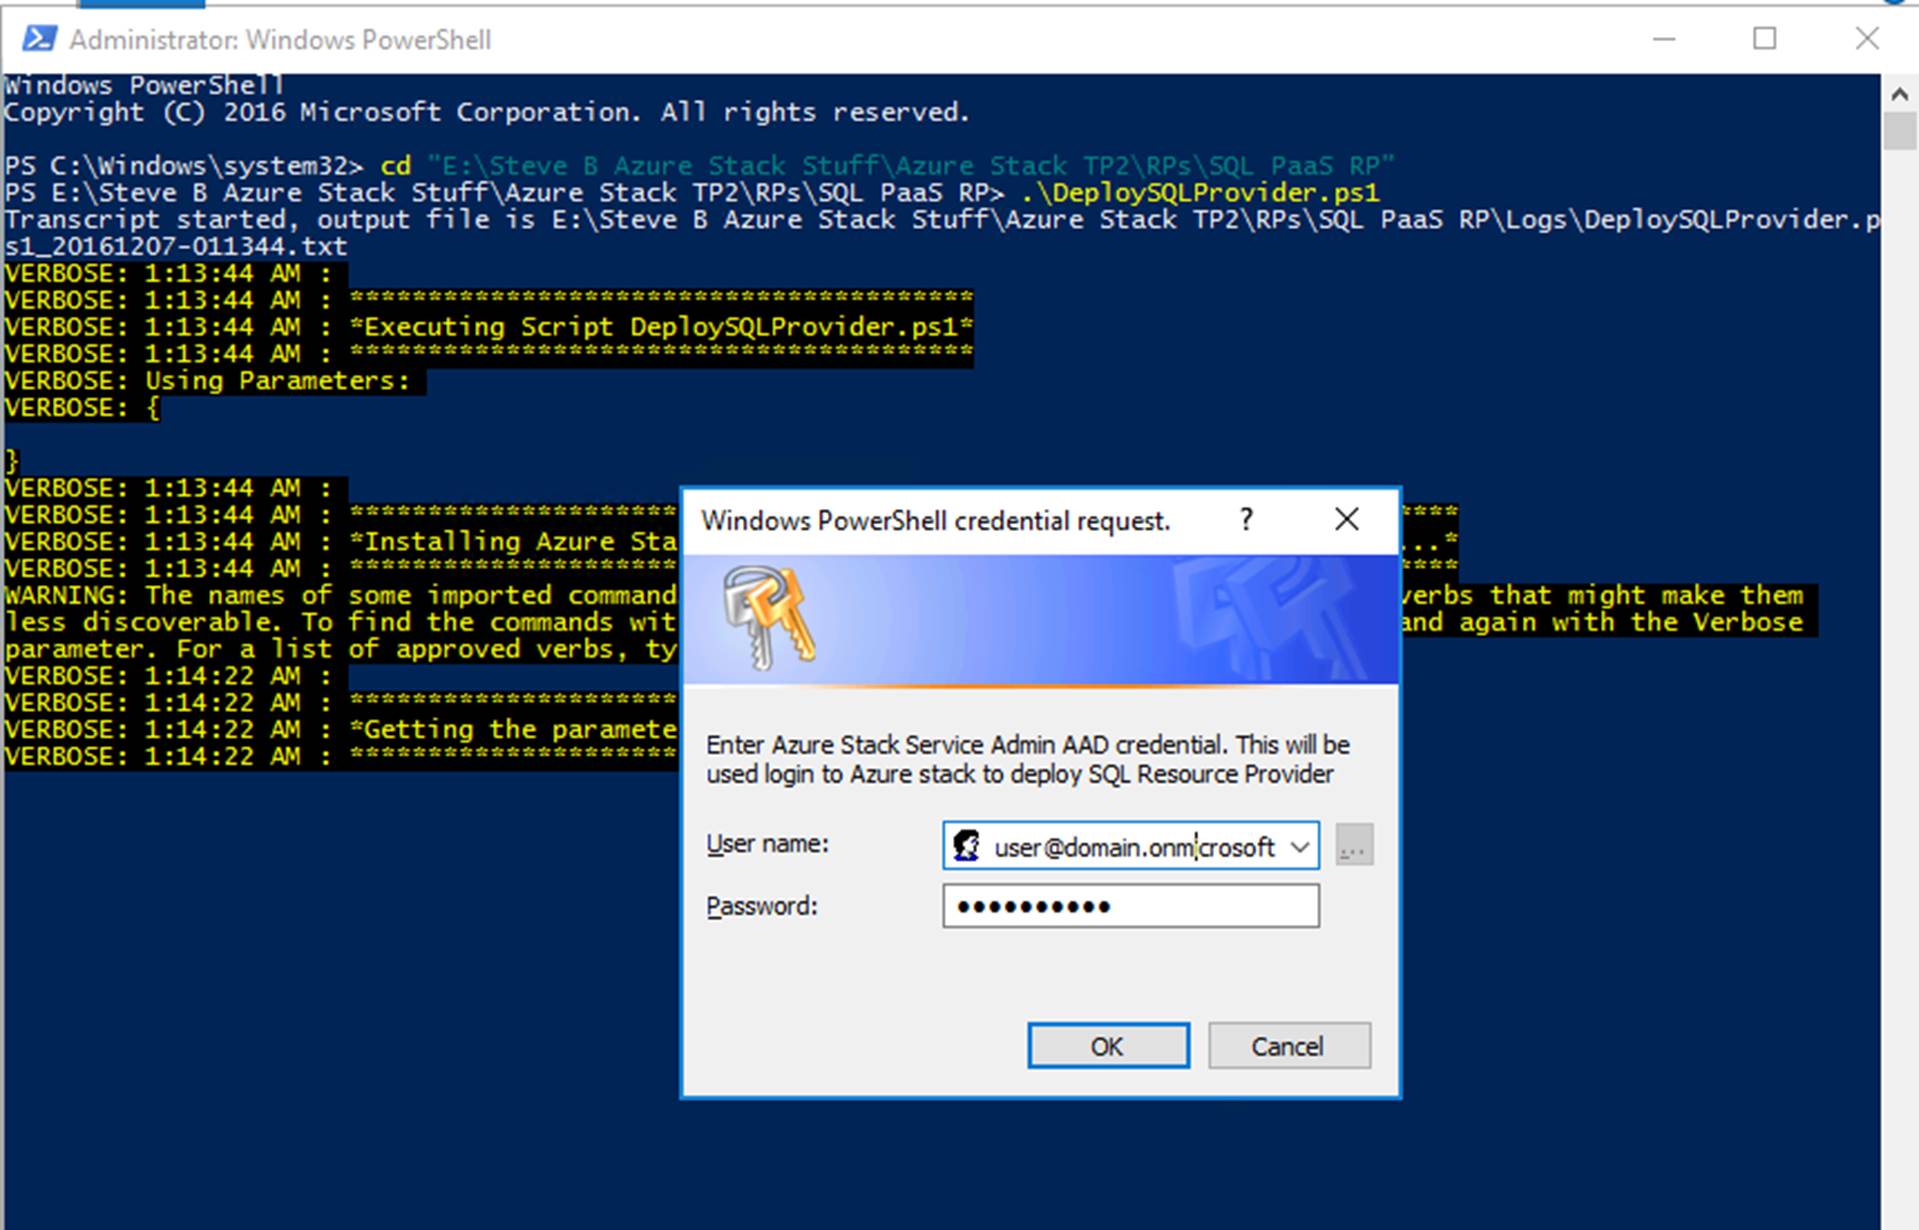
You will then be prompted for an Azure Active Directory account. This should be the account you deployed Azure Stack TP2 with. This will be used to access Azure Stack and create stuff such as the resource provider, resource group and other resources needed by the RP.
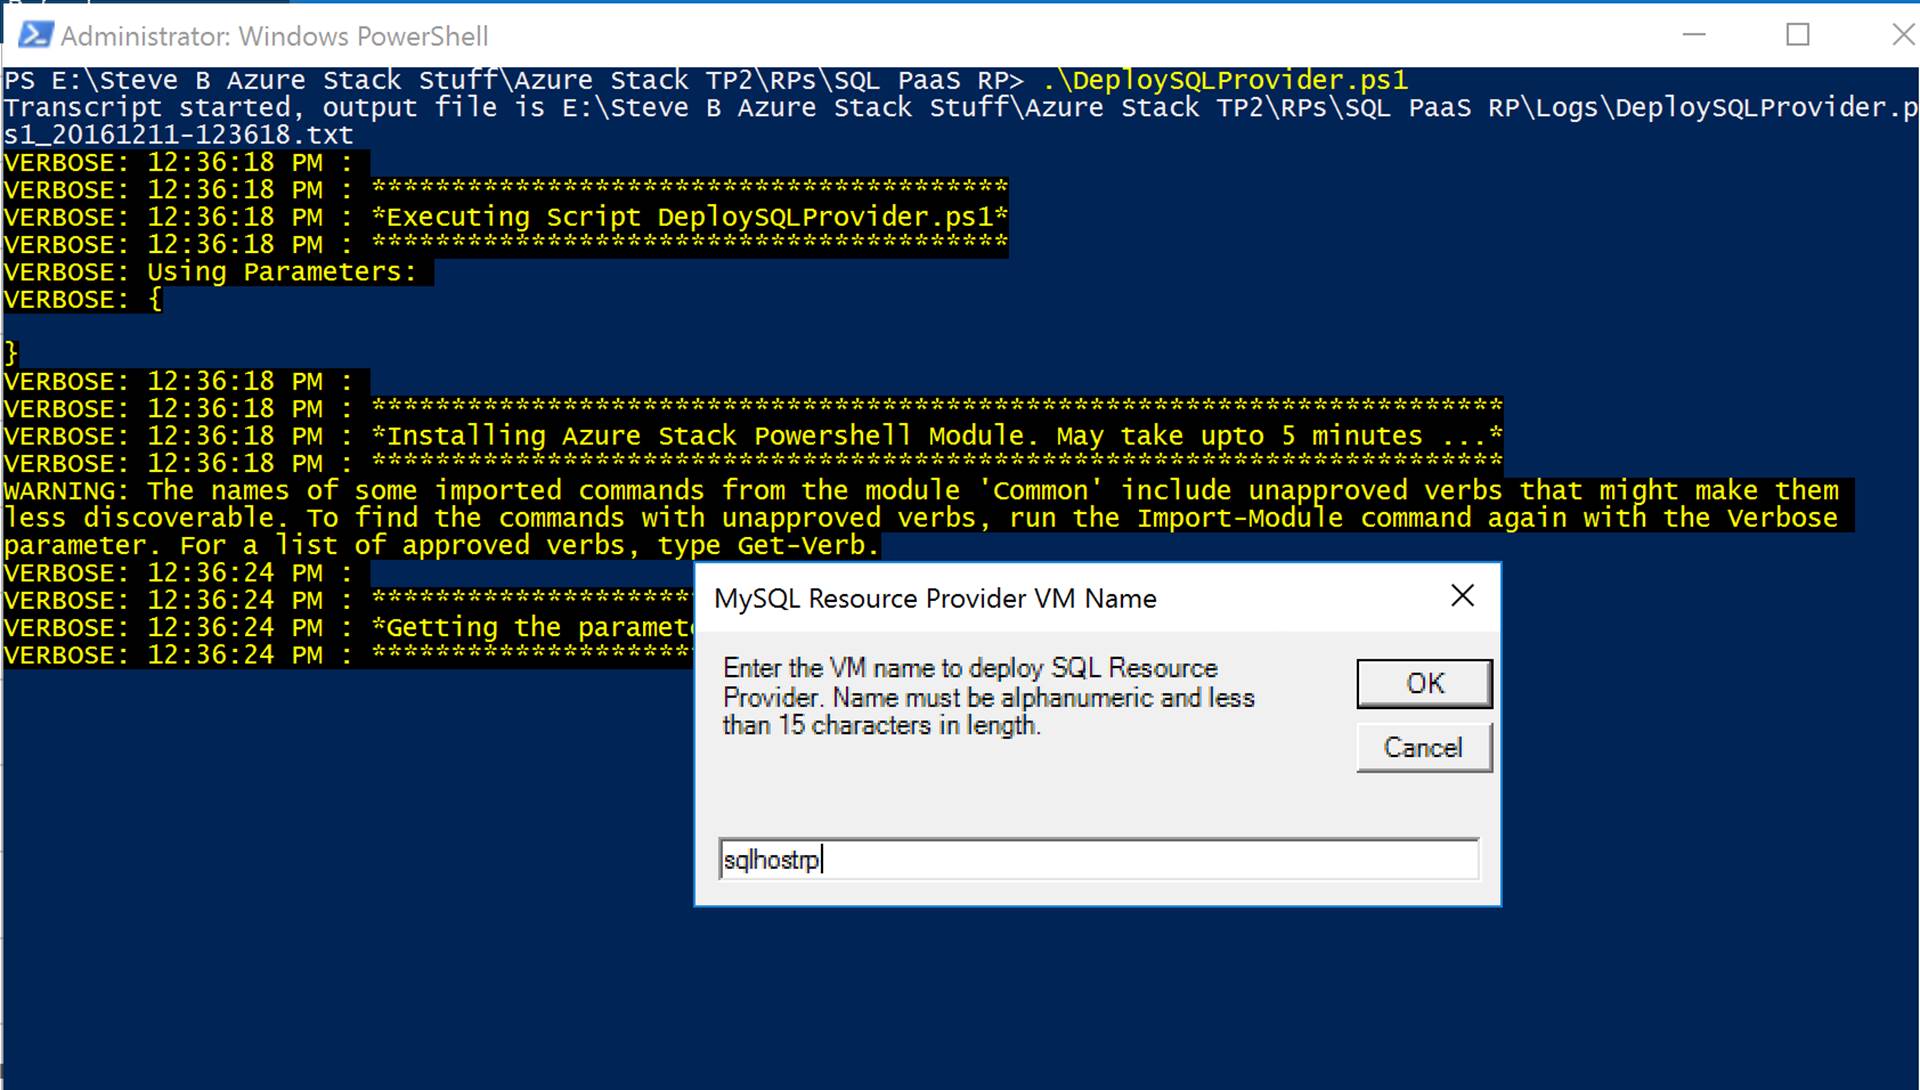
You need to enter a resource group name. You can leave the default if you want.
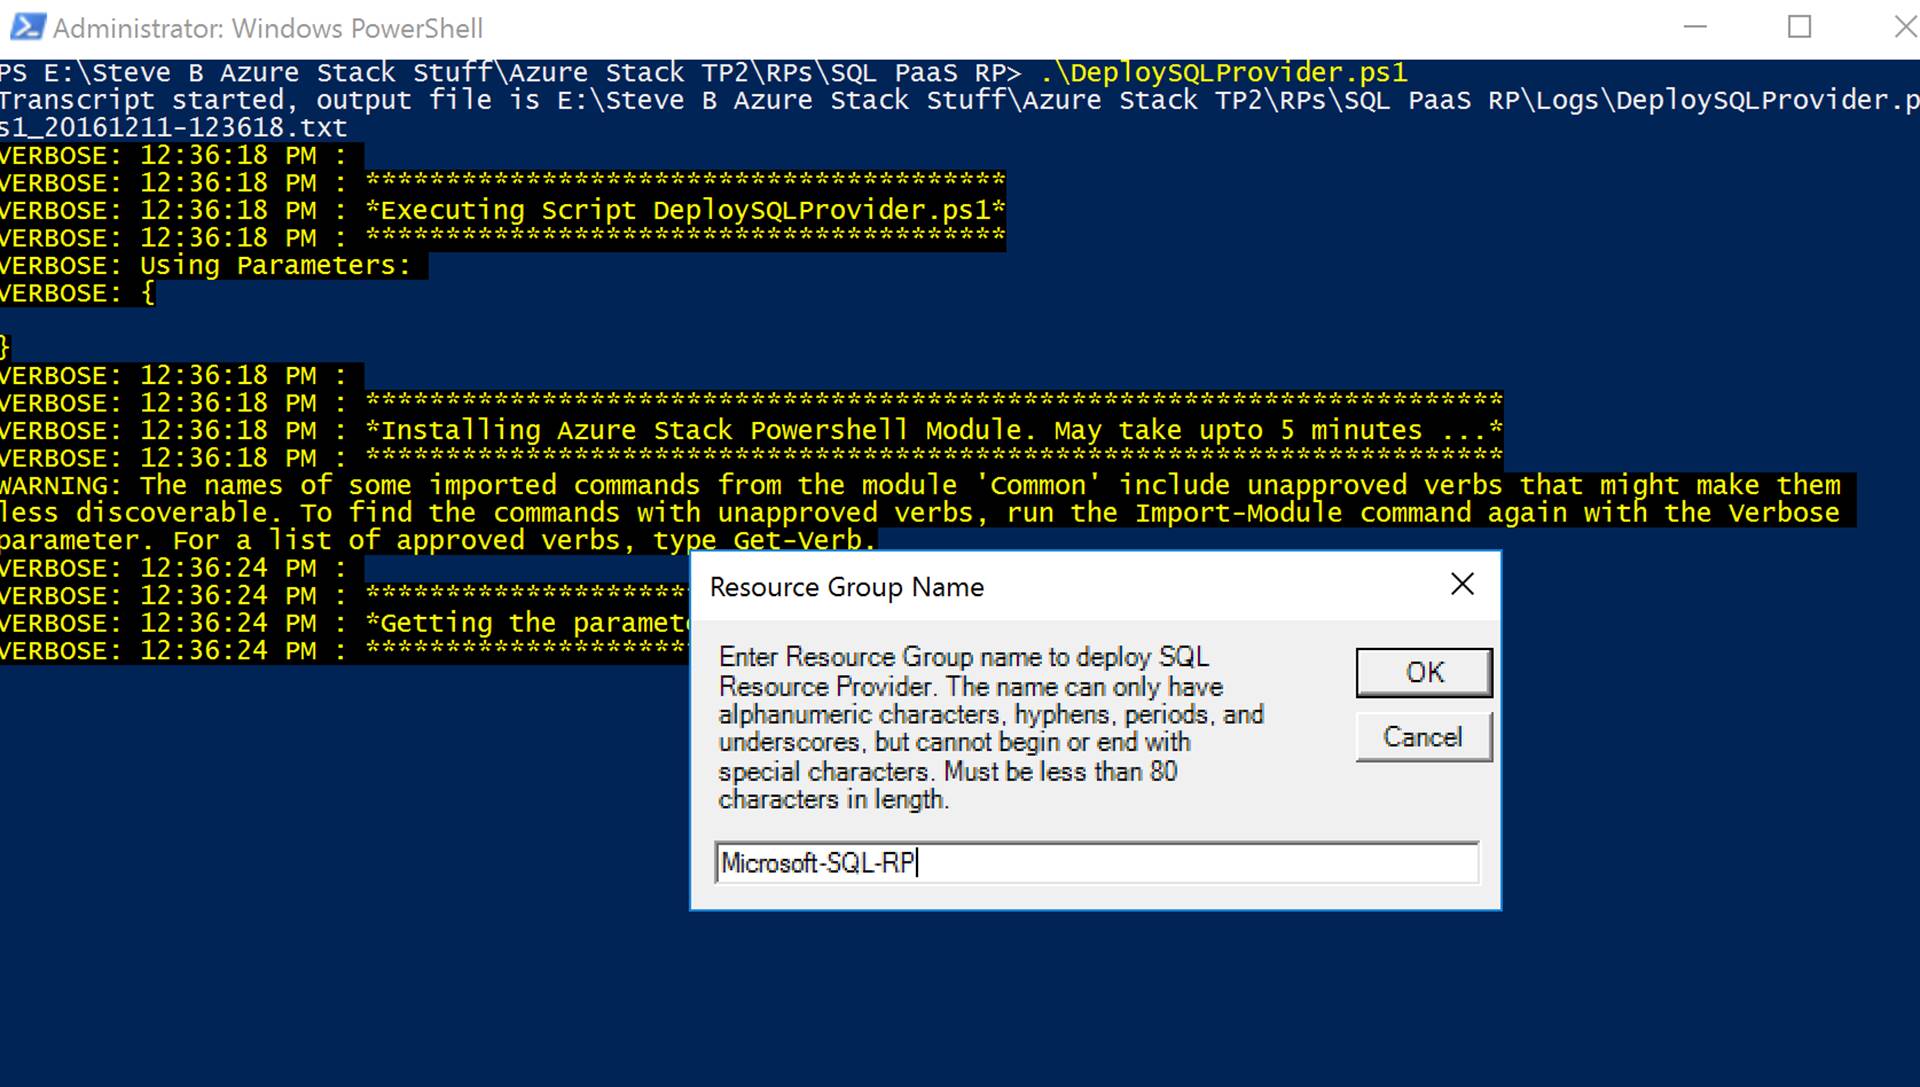
You will then be prompted for the SQL server VM Name. Ignore the title of the pop-up here.
The script will then run through all of its steps. Here is what the script does as detailed in the official documentation:
- If necessary, download a compatible version of Azure PowerShell.
- Create a wildcard certificate to secure communication between the resource provider and Azure Resource Manager.
- Download an evaluation build of SQL Server SP1 from the internet or from a local file share.
- Upload the certificate and all other artifacts to a storage account on your Azure Stack.
- Publish gallery package so that you can deploy SQL database through the gallery.
- Deploy a VM using the default Windows Server 2012 R2 image that comes with Azure Stack.
- Register a local DNS record that maps to your resource provider VM.
- Register your resource provider with the local Azure Resource Manager.
- Connect the resource provider to the SQL server instance on the RP VM
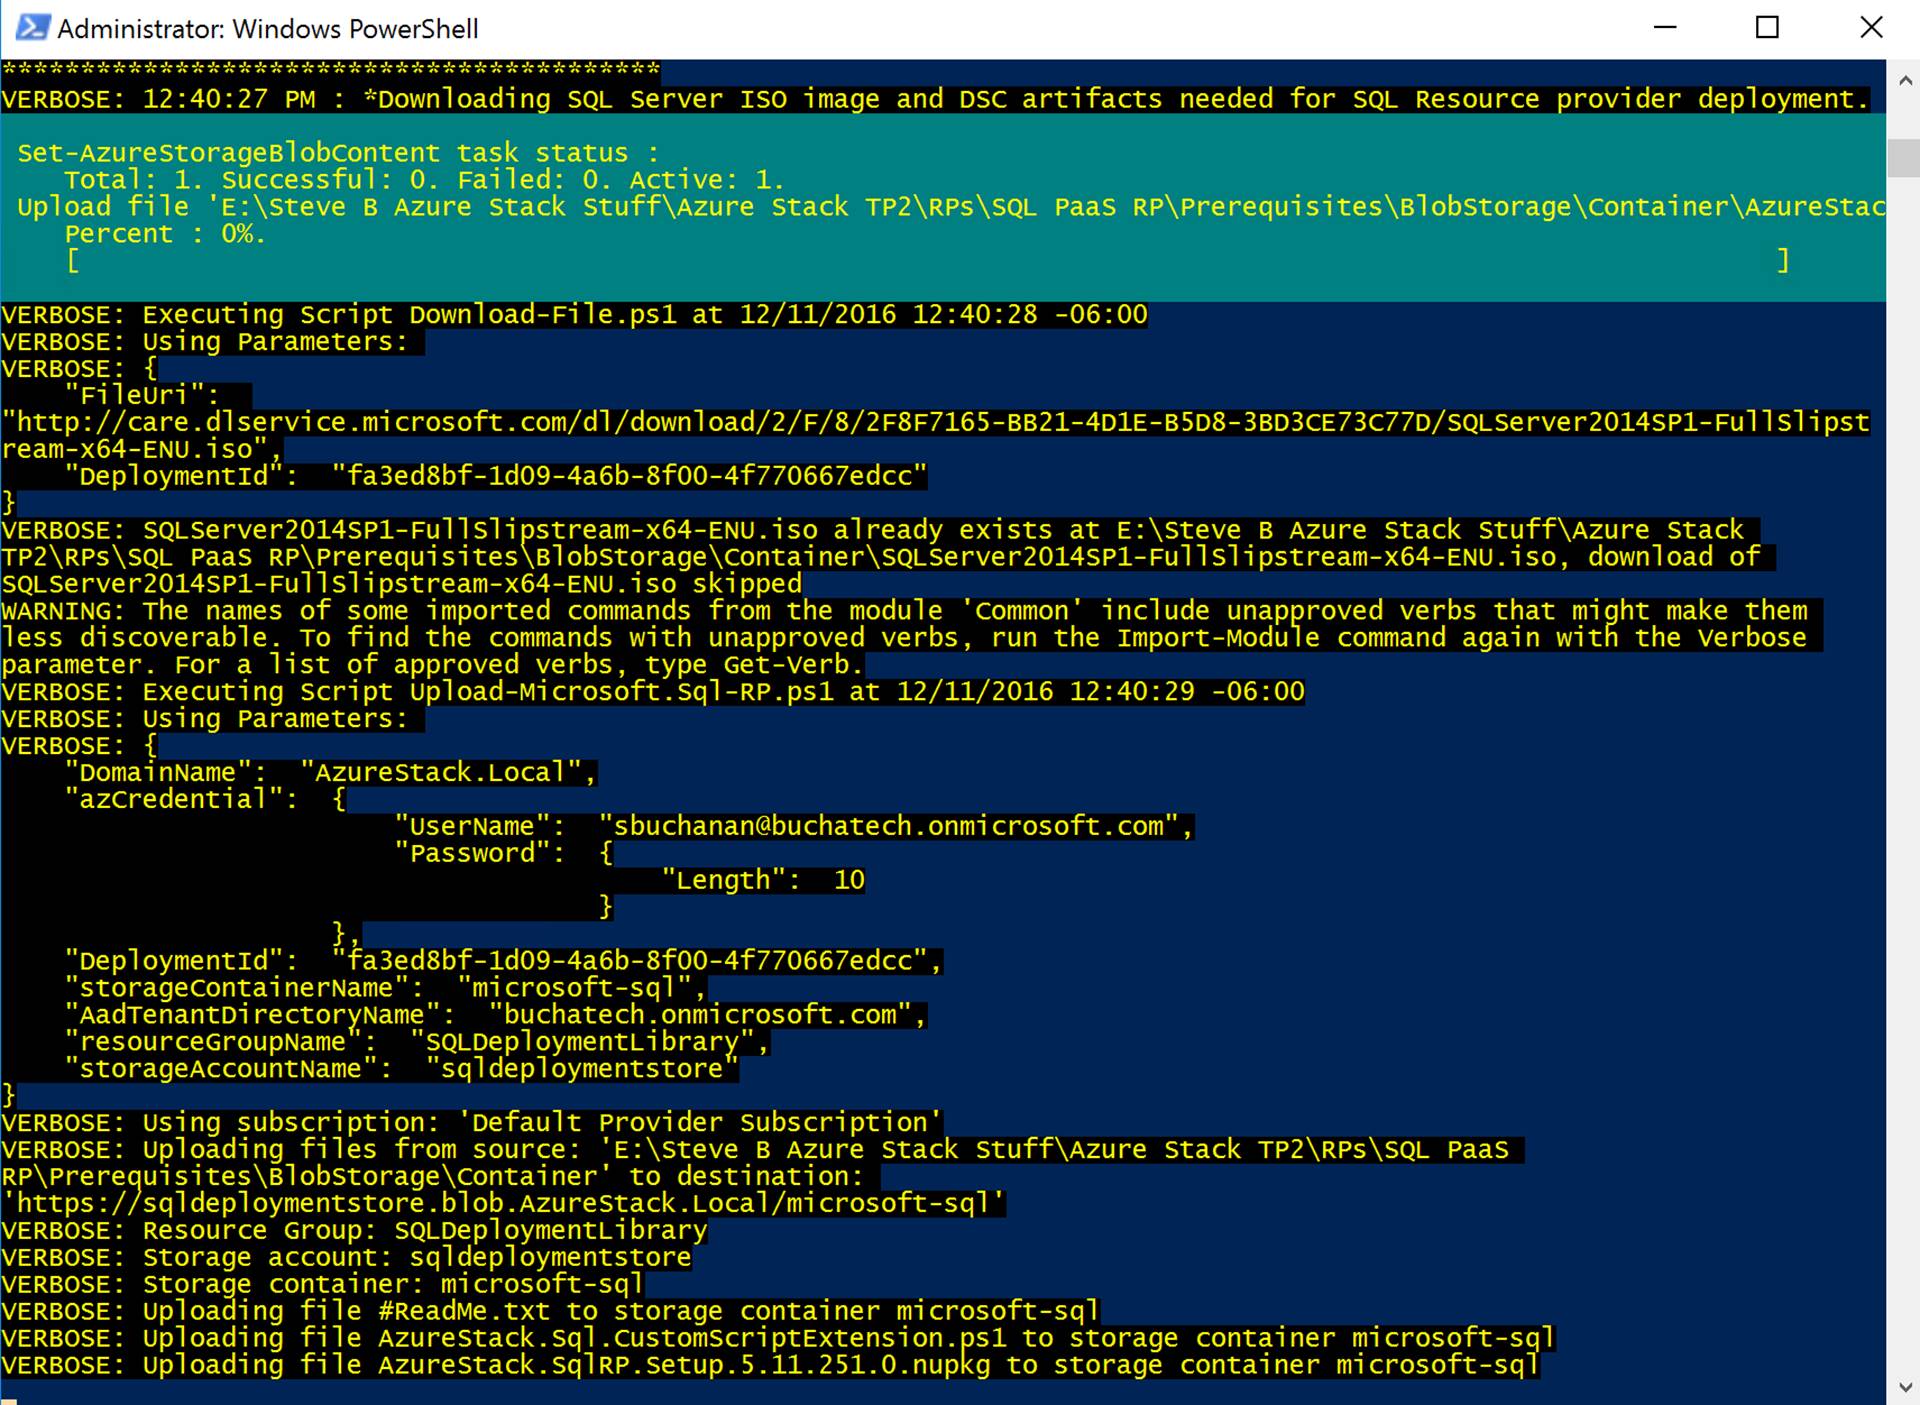
As the script runs you will see it run through each of the steps with detail and status. Be patient. I have had this take anywhere from 30 minutes to 45 minutes. Good time to go take a break.
Once the script is done it will show that the installation is successful as shown in the following screenshot.

NOTE: You could run the deployment script with the required parameters to avoid the prompts. For example:
DeploySQLProvider.ps1 -AadTenantDirectoryName “YOURDOMAIN.onmicrosoft.com” -AzCredential “user@YOURDOMAIN.onmicrosoft.com” -LocalCredential “username”
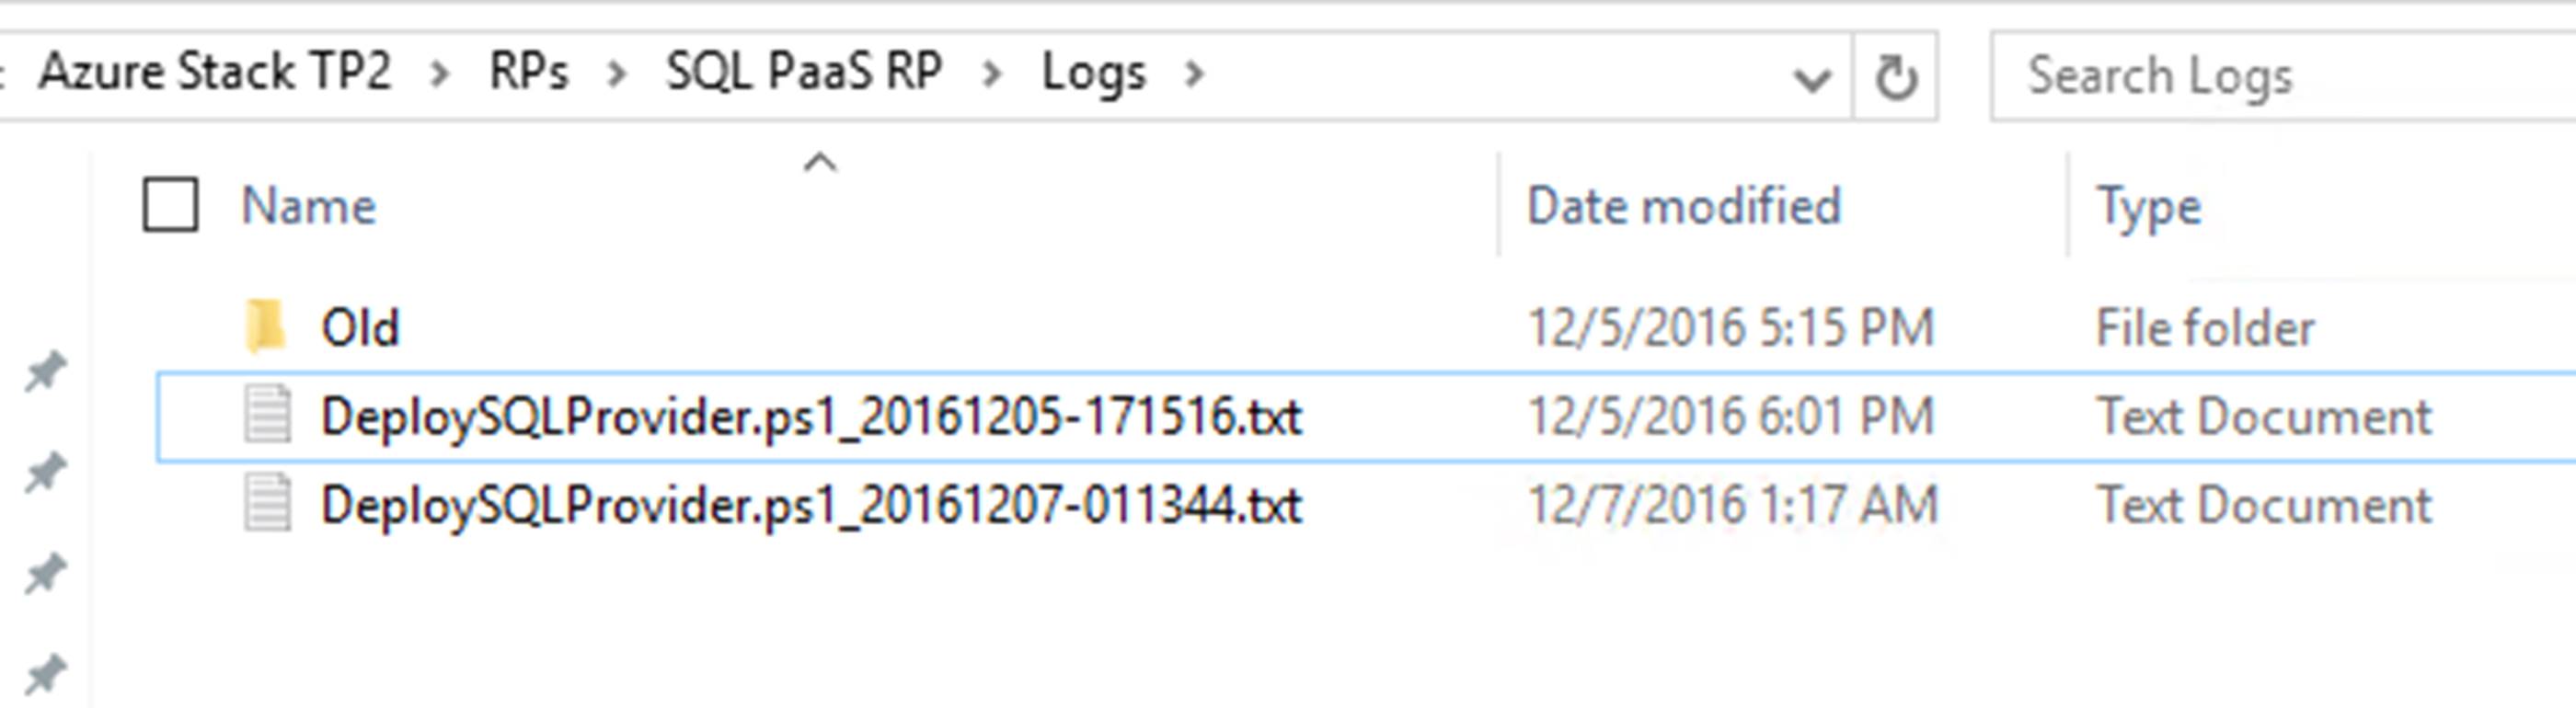
If for some reason the RP deployment fails you will need to view the logs to troubleshoot. Logging will be found in: LOCATIONOFYOURDOWNLOADEDRP\SQL PaaS RP\Logs in the following format DeploySQLProvider.ps1_20161205-171516.txt as shown in the following screenshot.
– RP CONFIGURATION –
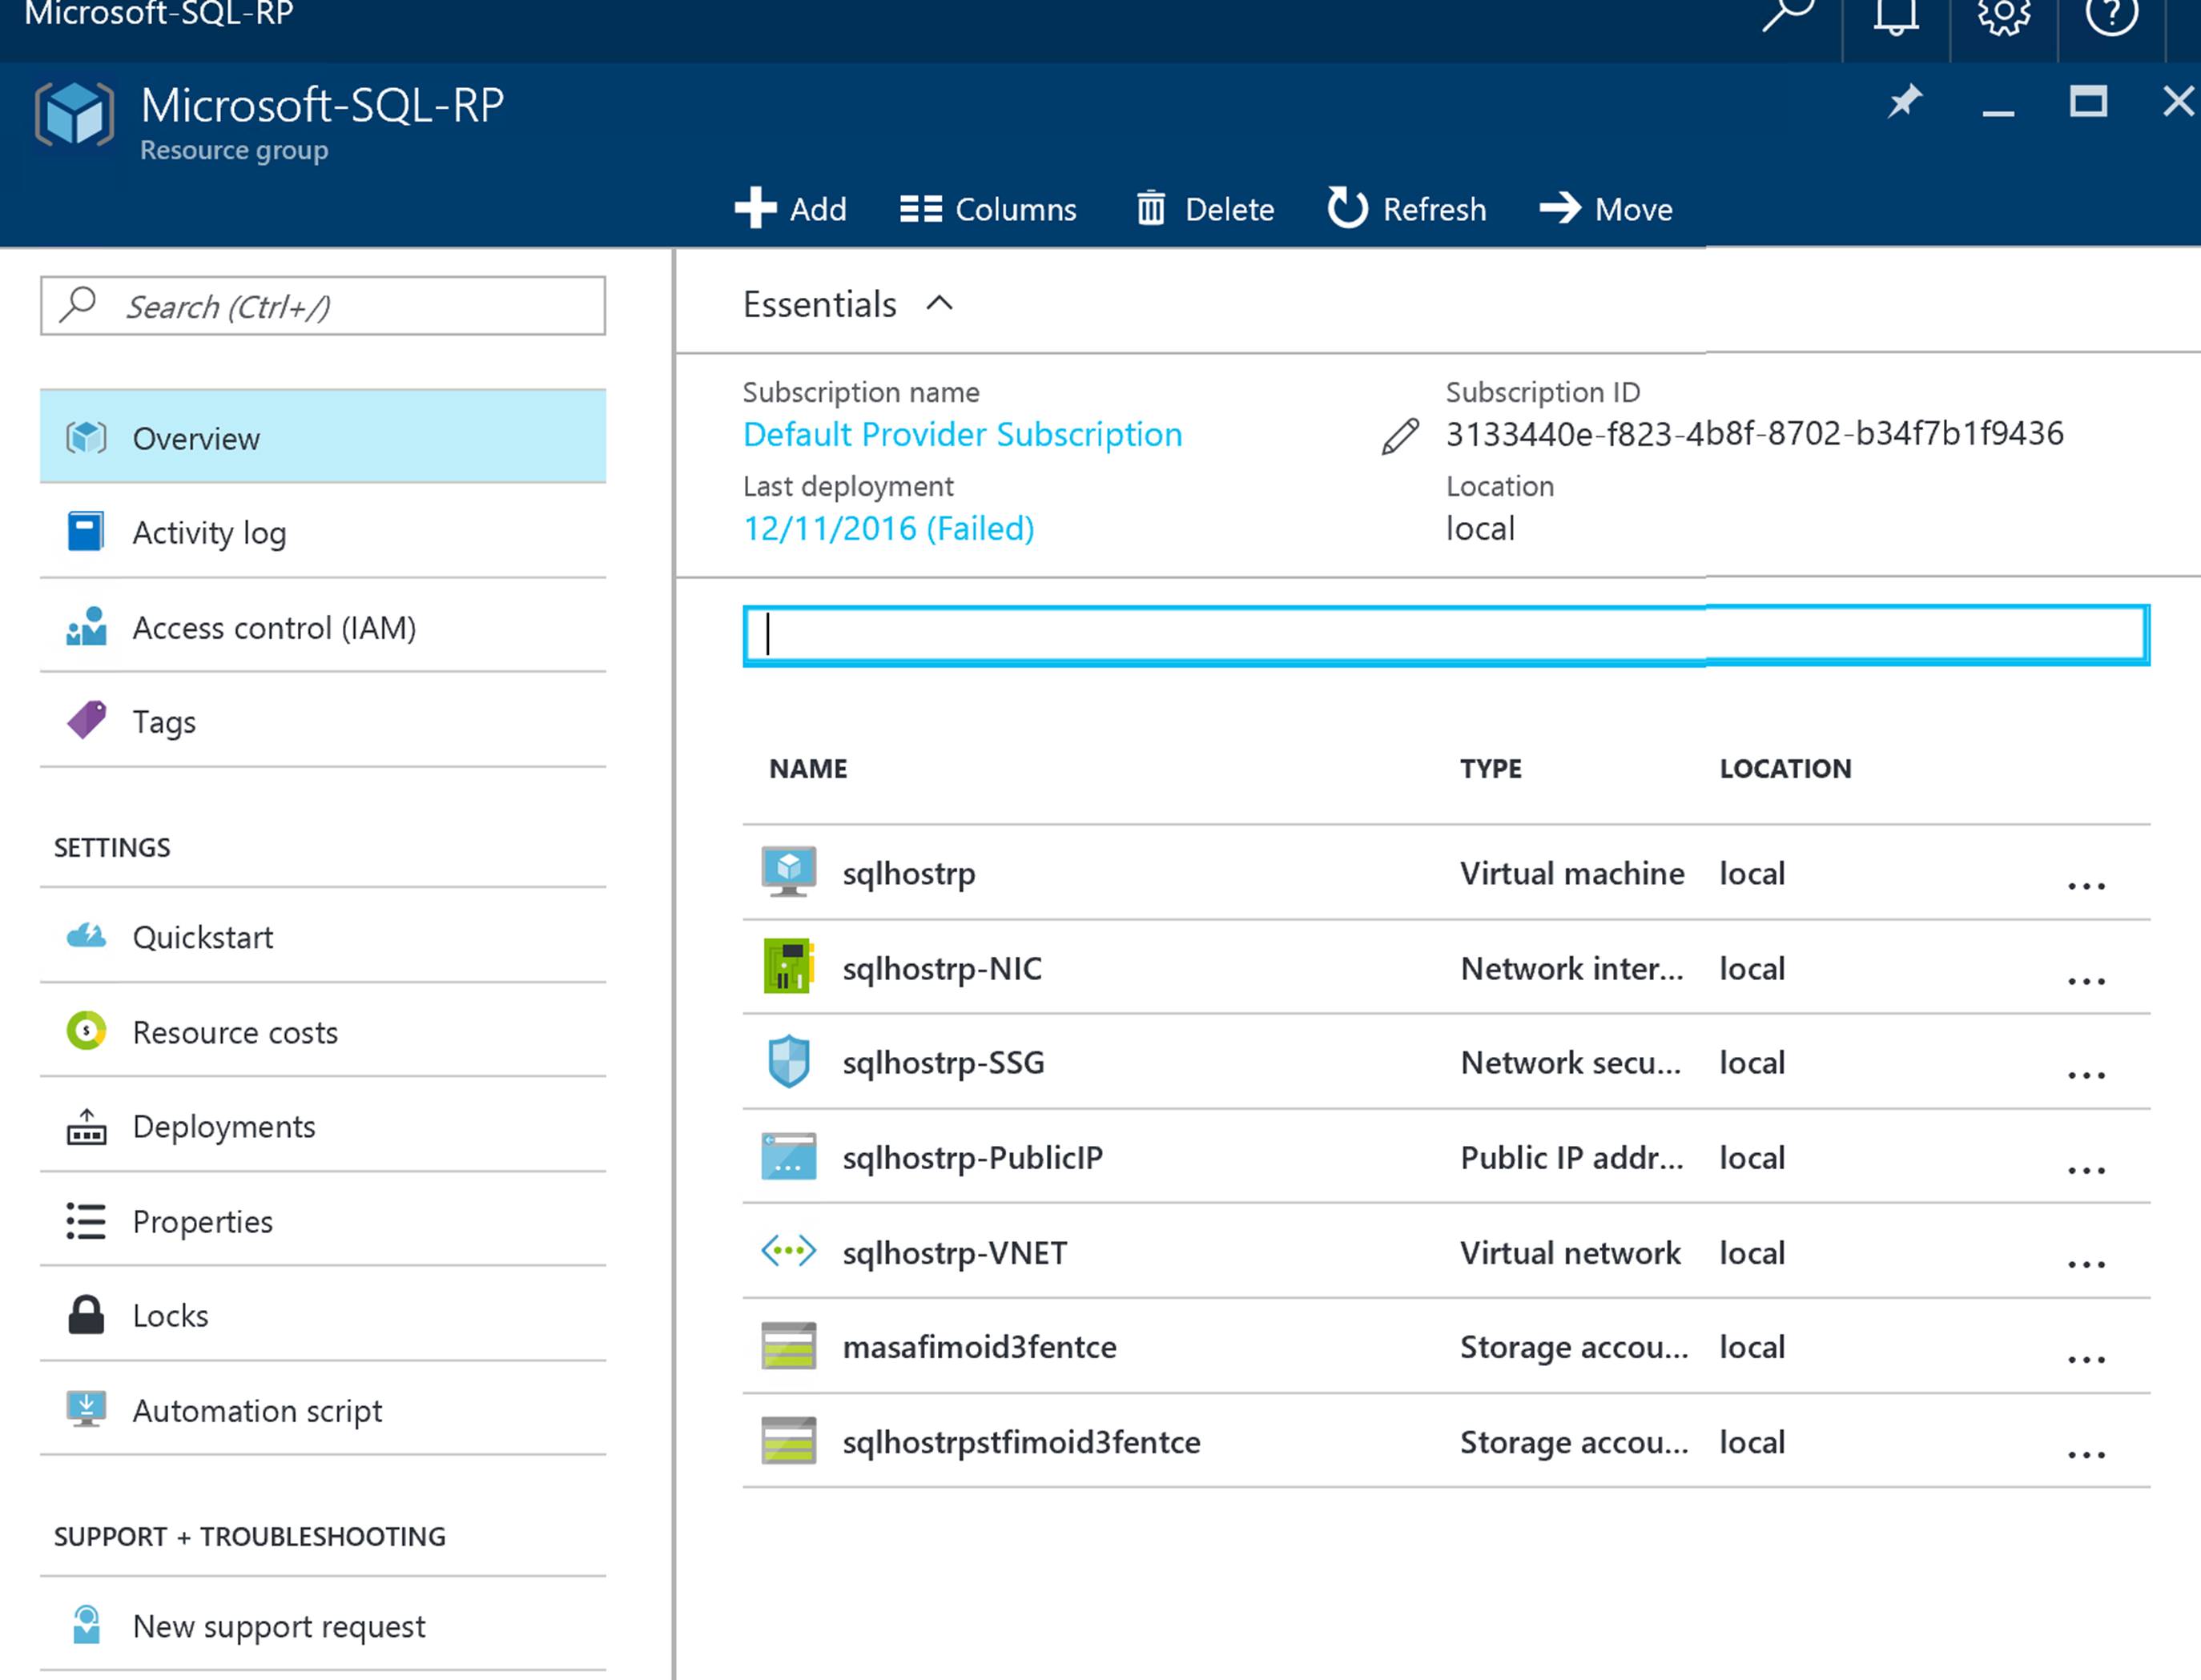
After the SQL is deployed you can see it in the Azure Stack portal at https://portal.azurestack.local. The first thing you will want to look for is the resource group. Mine is named Microsoft-SQL-RP. Default is Microsoft-SQL-RP1. The RG is shown in the following screenshot.
Next you will want to ensure the SQL Resource Provider is listed in Resource Providers as shown in the following screenshot.
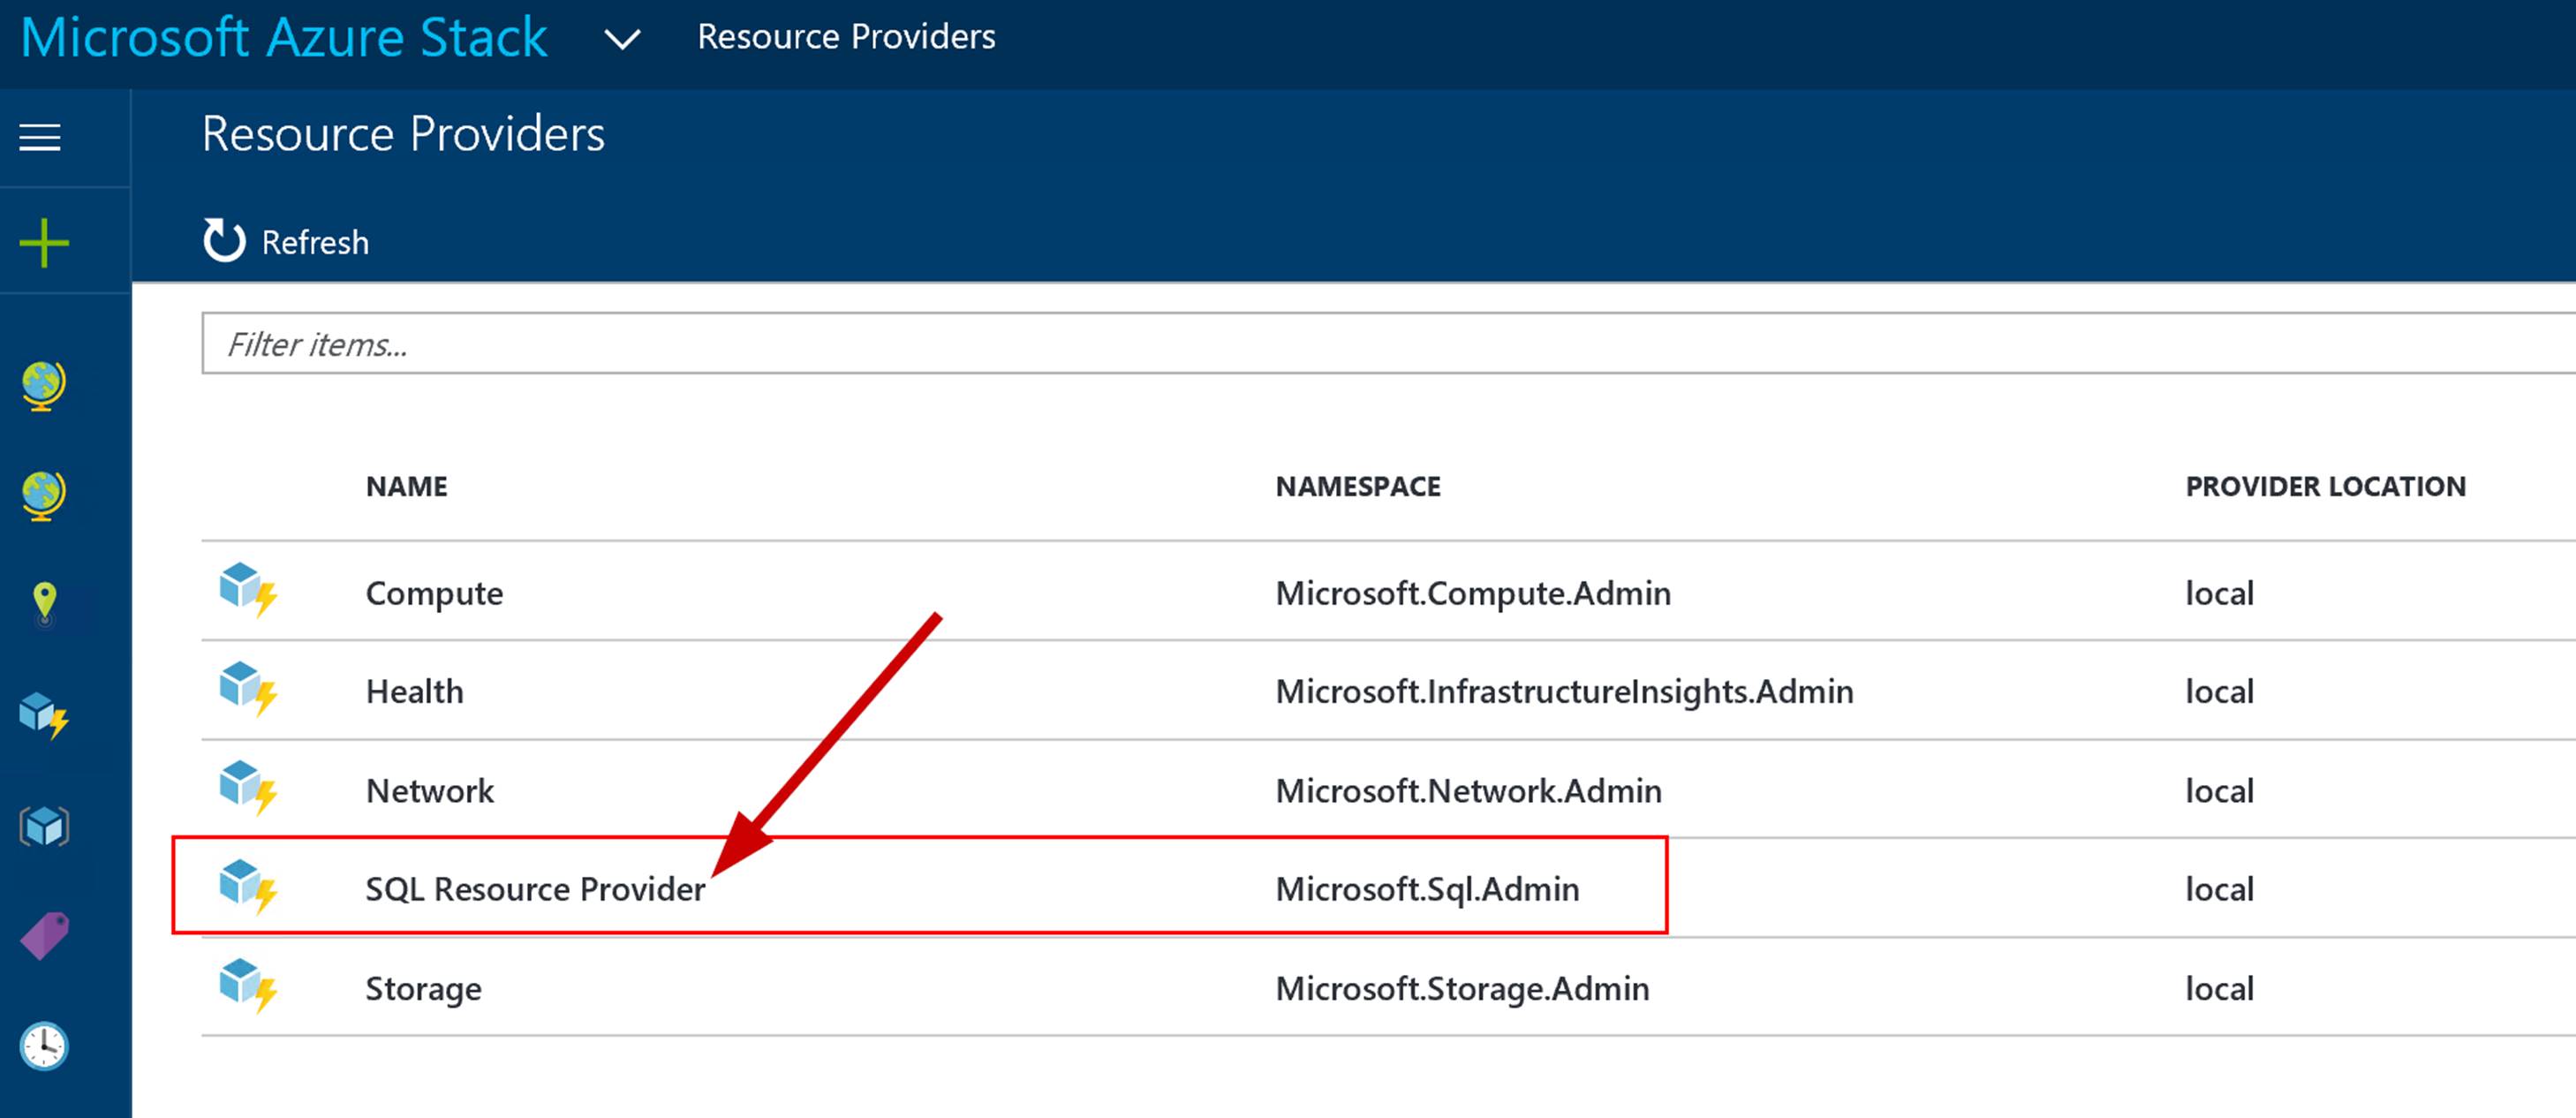
Go ahead and click on the resource provider to display its details. The first thing you will notice is that we don’t have any SQL Hosting Servers. This is normal and does not mean the script forgot to deploy the SQL server.

Click on SQL Hosting Servers. Now click on + Add.
Input the same name that you put in when prompted for the VMName in the script. This is the SQL VM that was deployed as a part of the deployment.
Put SA in for the username. This is important. Do not put in the local admin account you specified during the script be sure to put in SA.
Now in the password go ahead and put in the password you used when prompted for the local admin account.
Specify a new or use existing RG and click Create.

Now you should have a SQL hosting server now. You could actually go and create a new SQL database if you want to test this out. See the following screenshot. Note that this will deploy on the default provider subscription. In order to expose this to tenants you still need to setup a plan, offer and tenants need to subscribe to it.
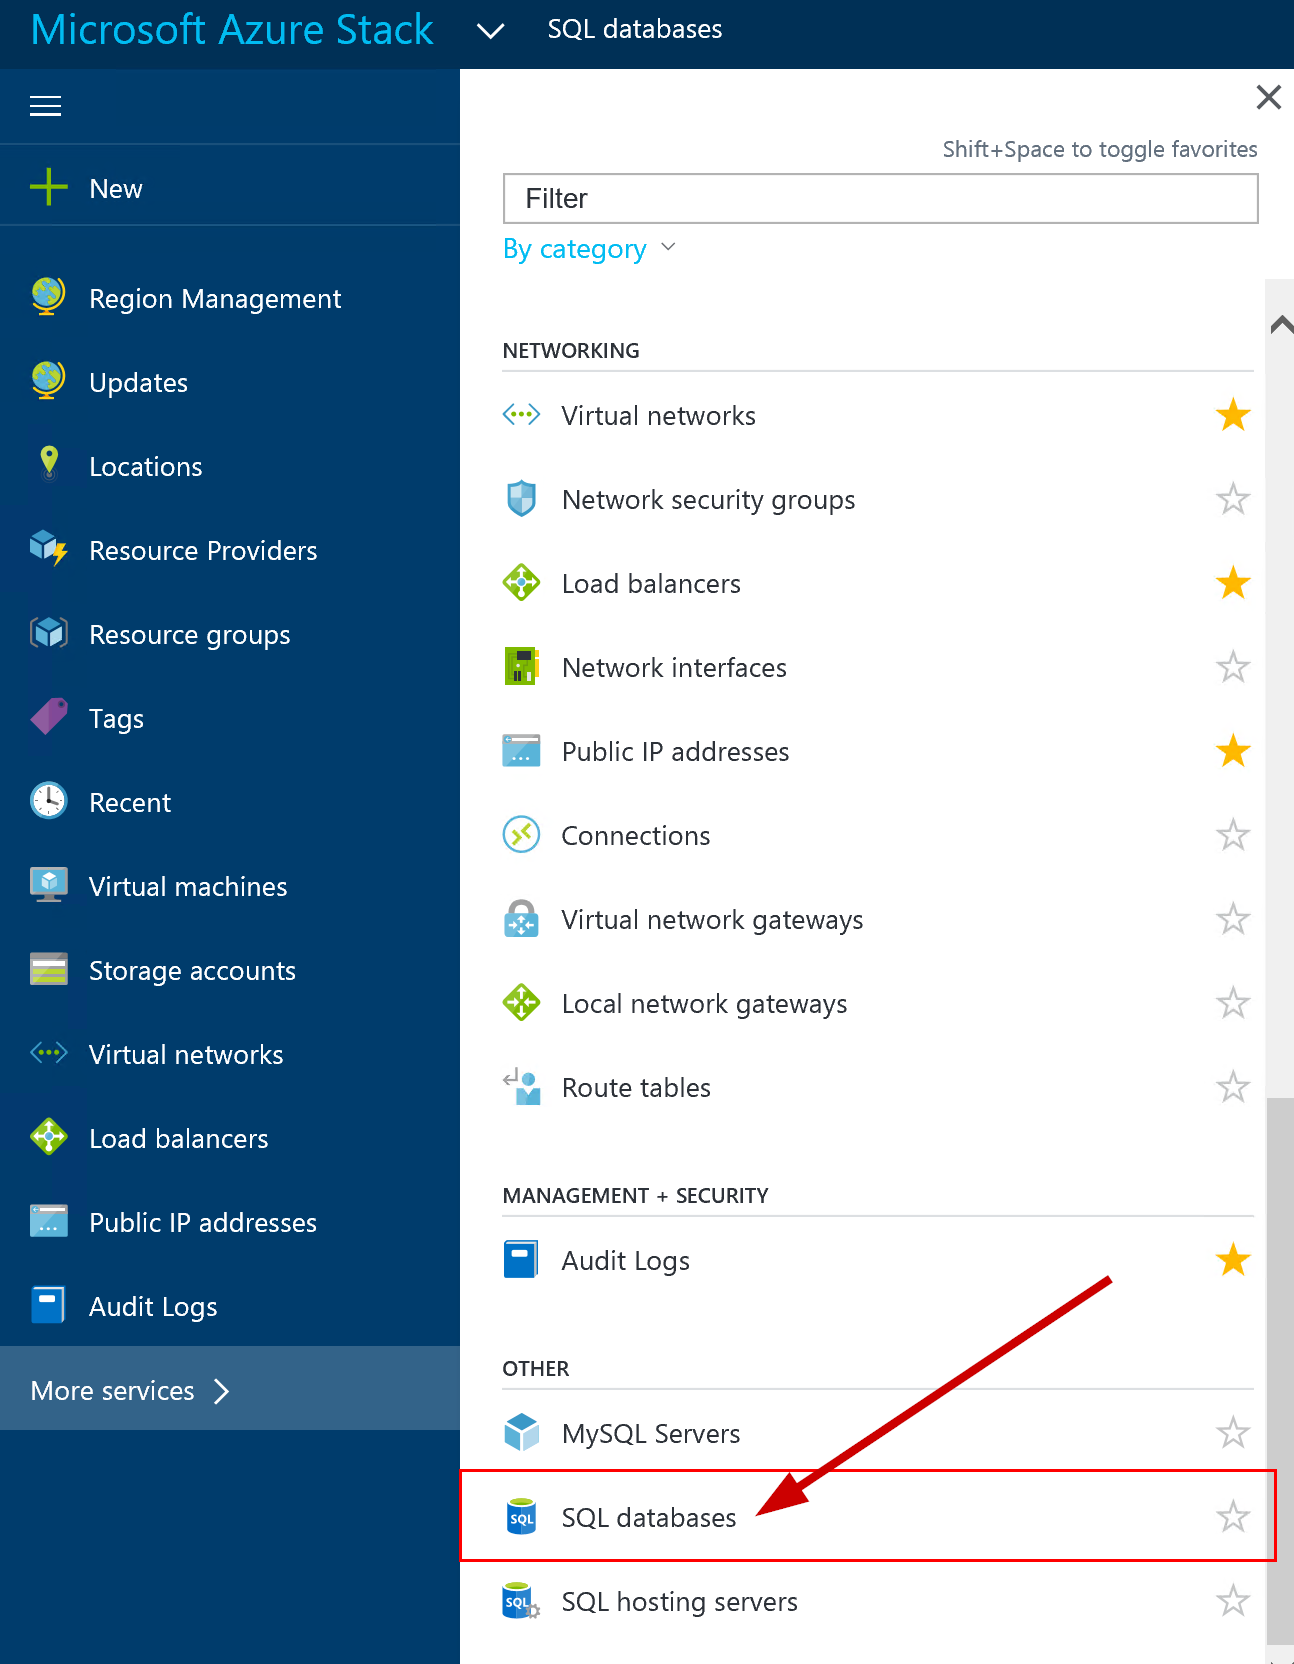
Expand services and click on SQL databases.
Click on add to add a new one.
Or you can click on Add New>Data + Storage and SQL Server Database.
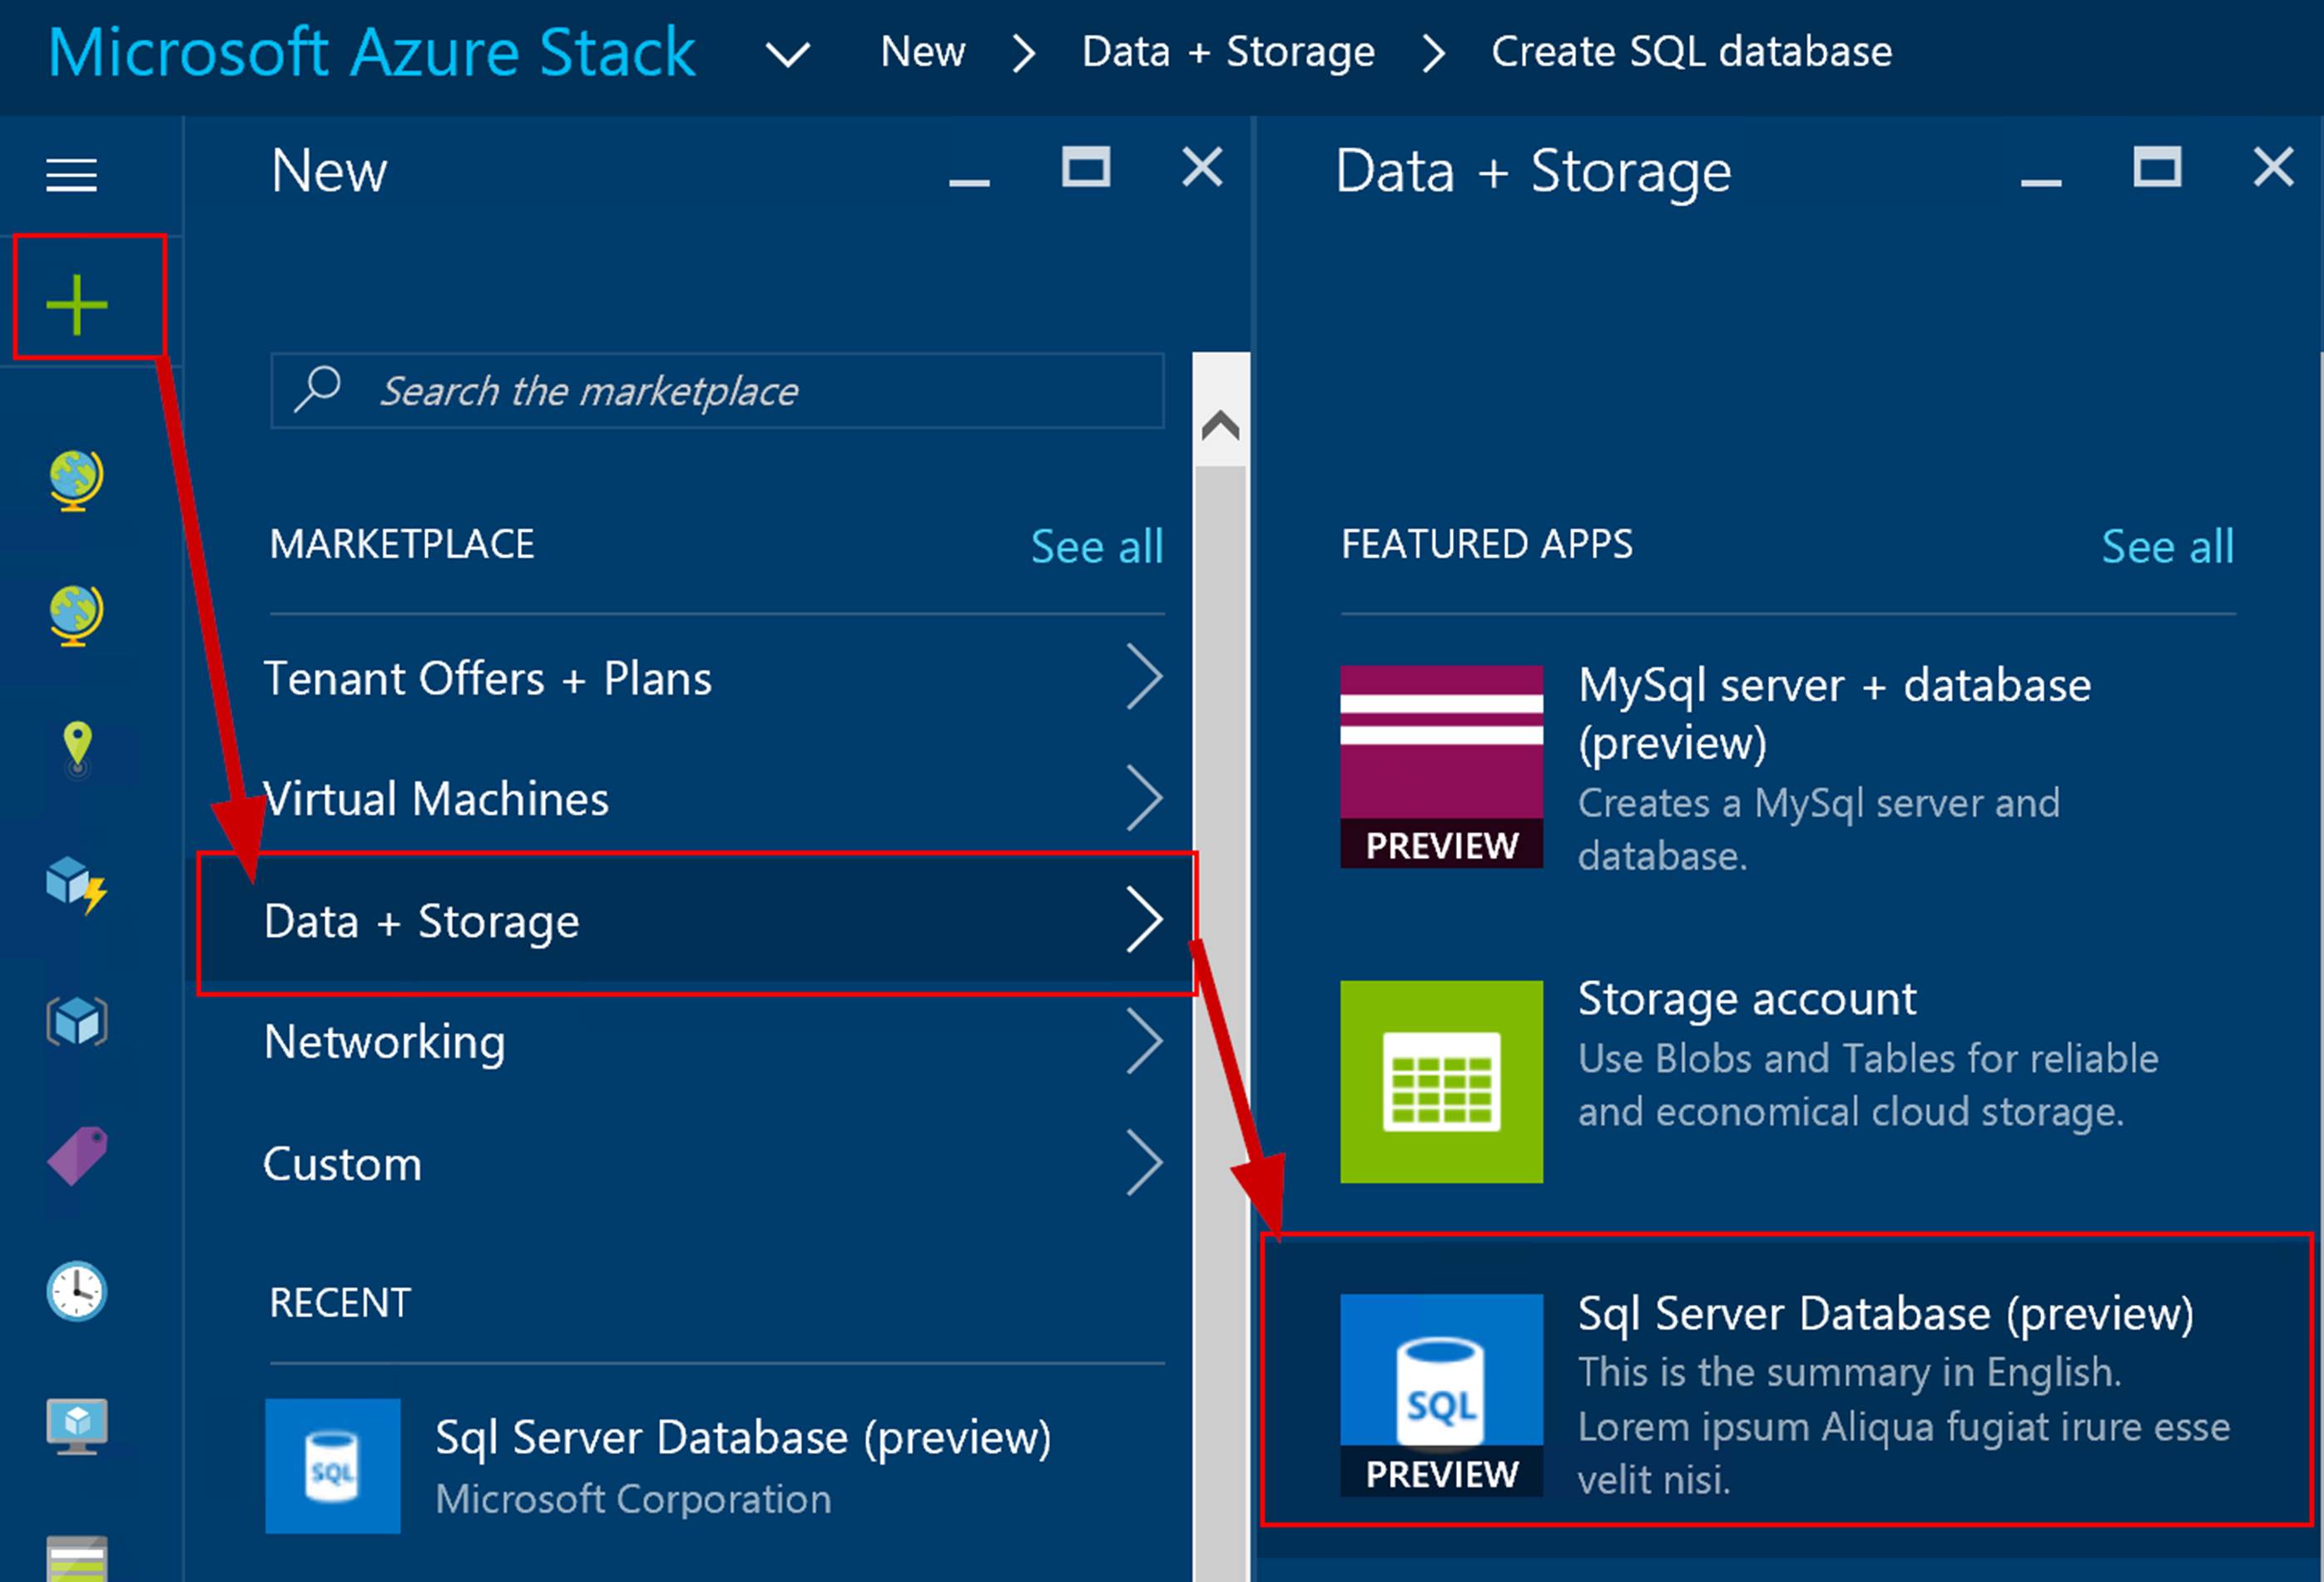
Regardless of the way you get to adding a new SQL database you will see the following screenshot as a next step.
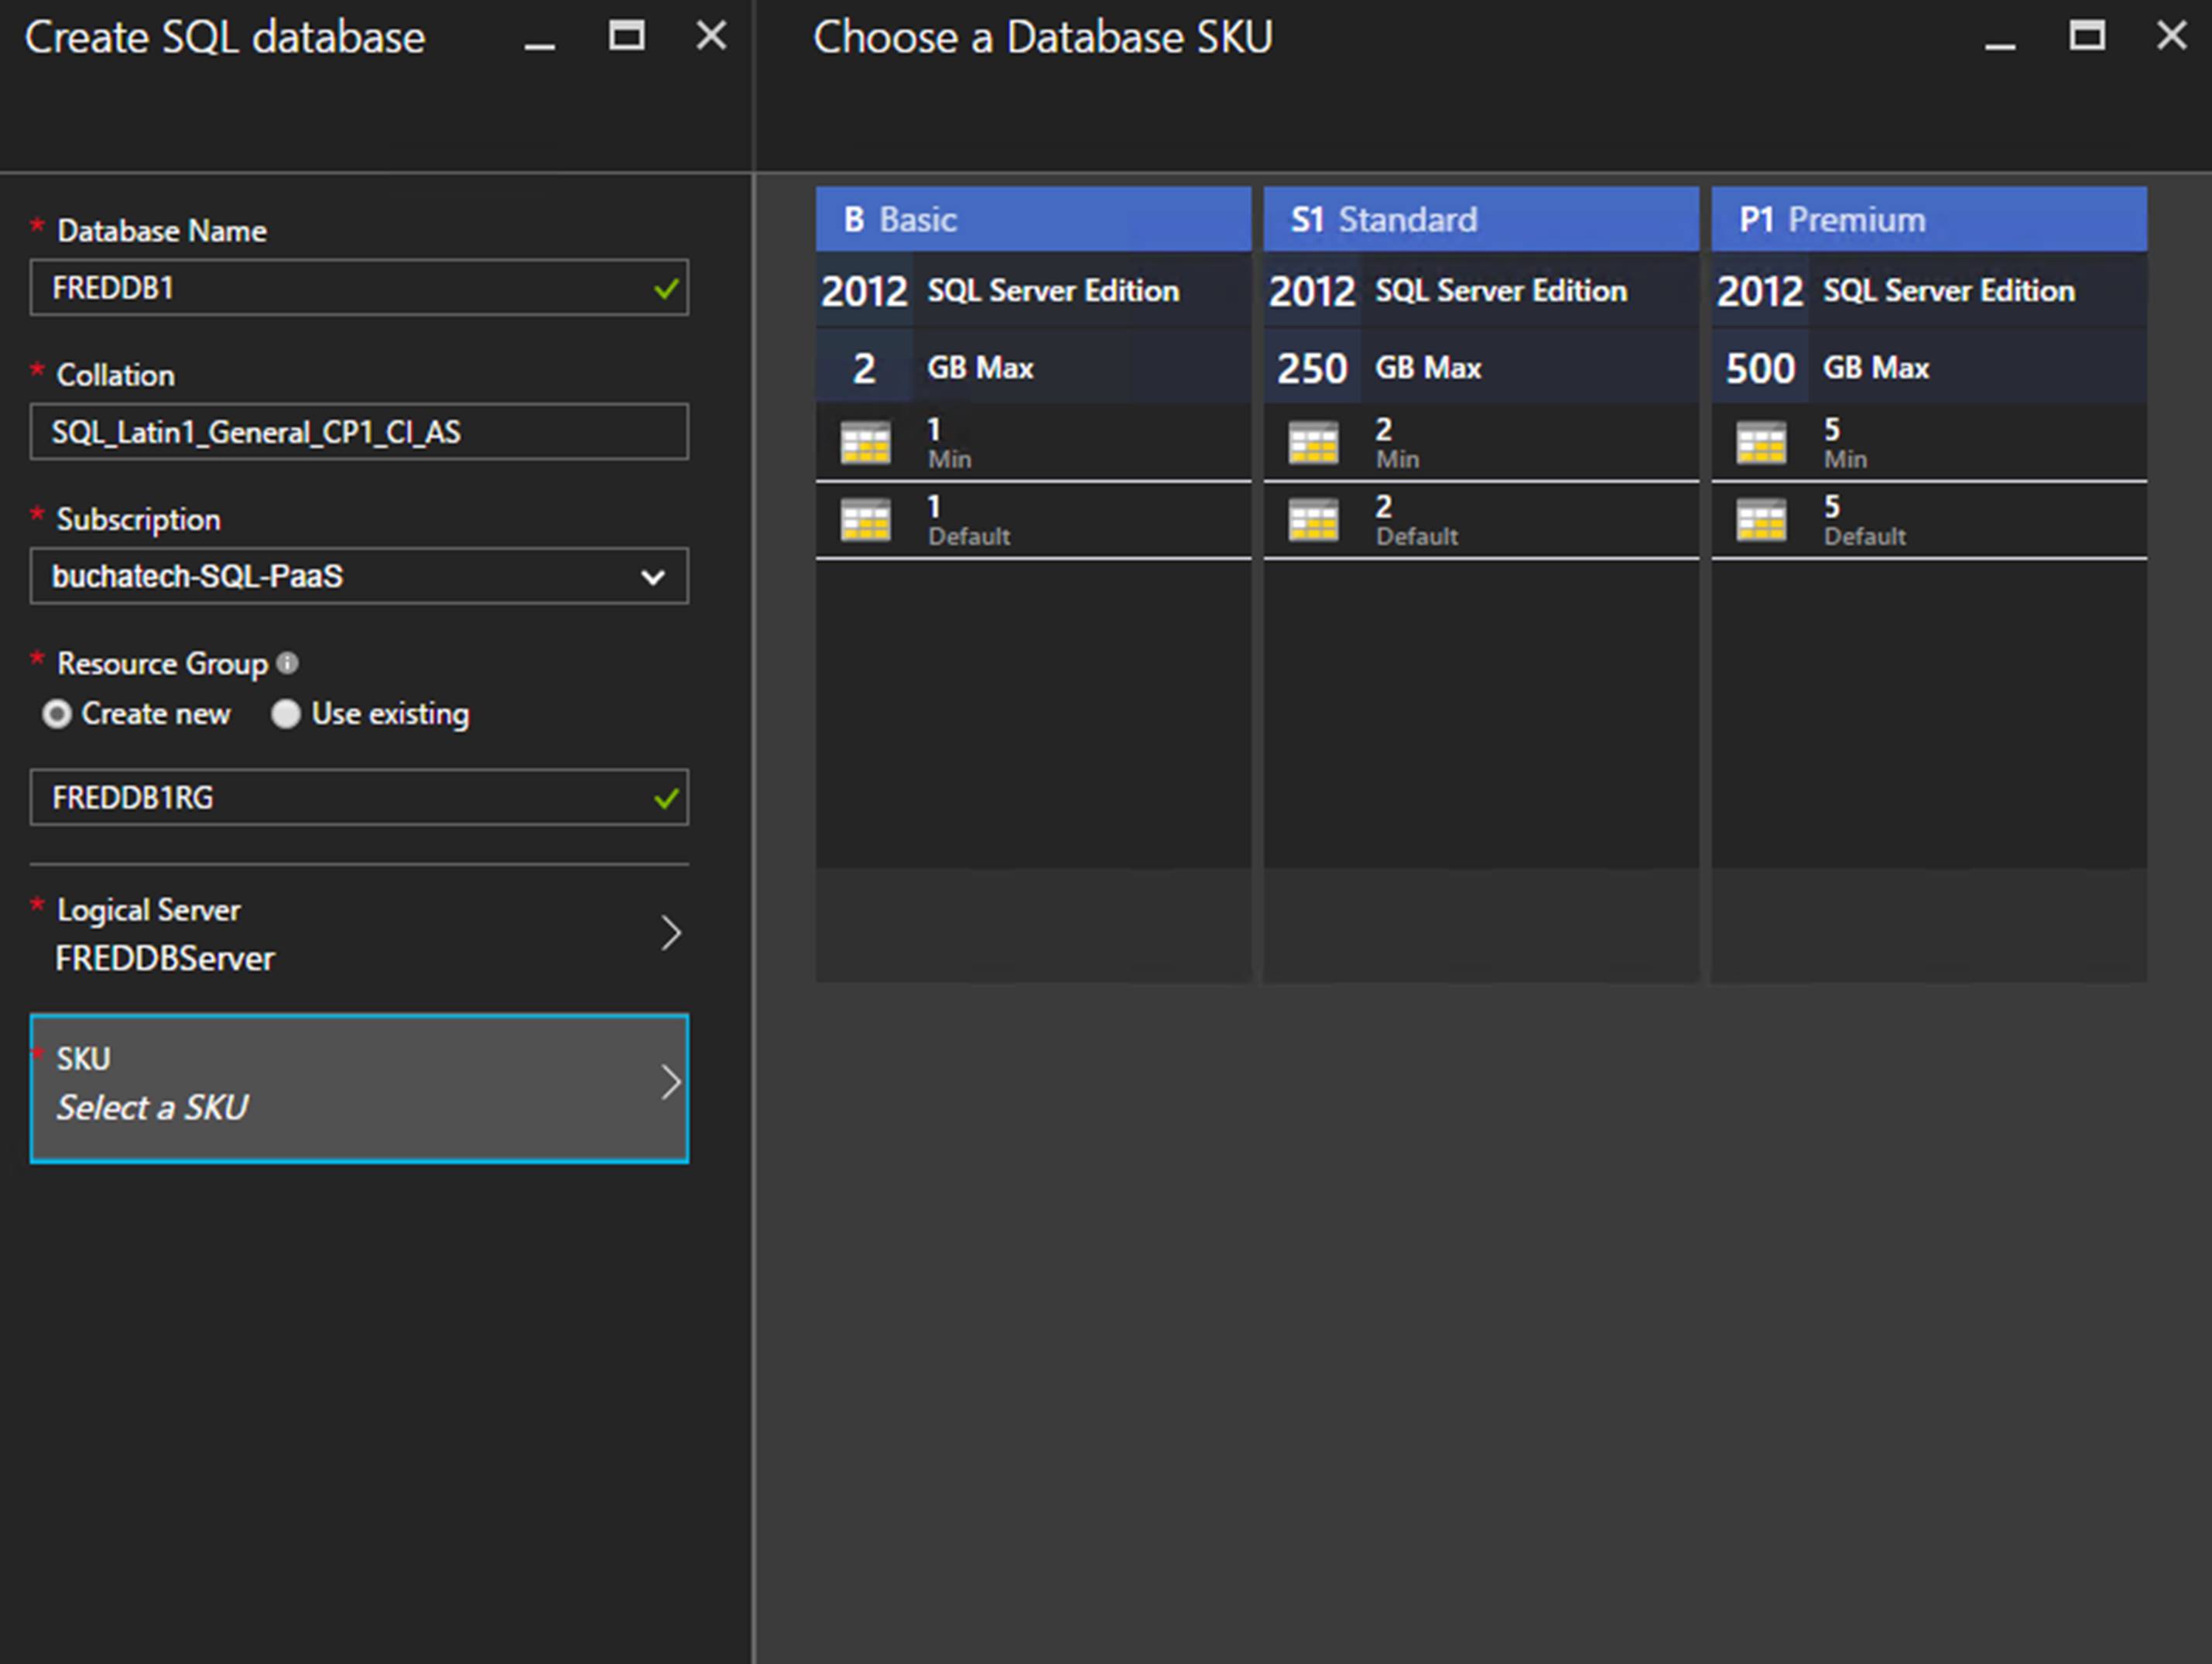
Complete the following fields and click on Create. There is a gotcha with the Logical server and we will cover this later in this post.
– PLAN/OFFER SETUP –
For your tenants to have self-service SQL PaaS you need to setup an offer and a plan and offer then attach to a tenant subscription. Here are the steps to do this.
Go to all services and then plan.
Click on the + Add button to Create a new Plan.
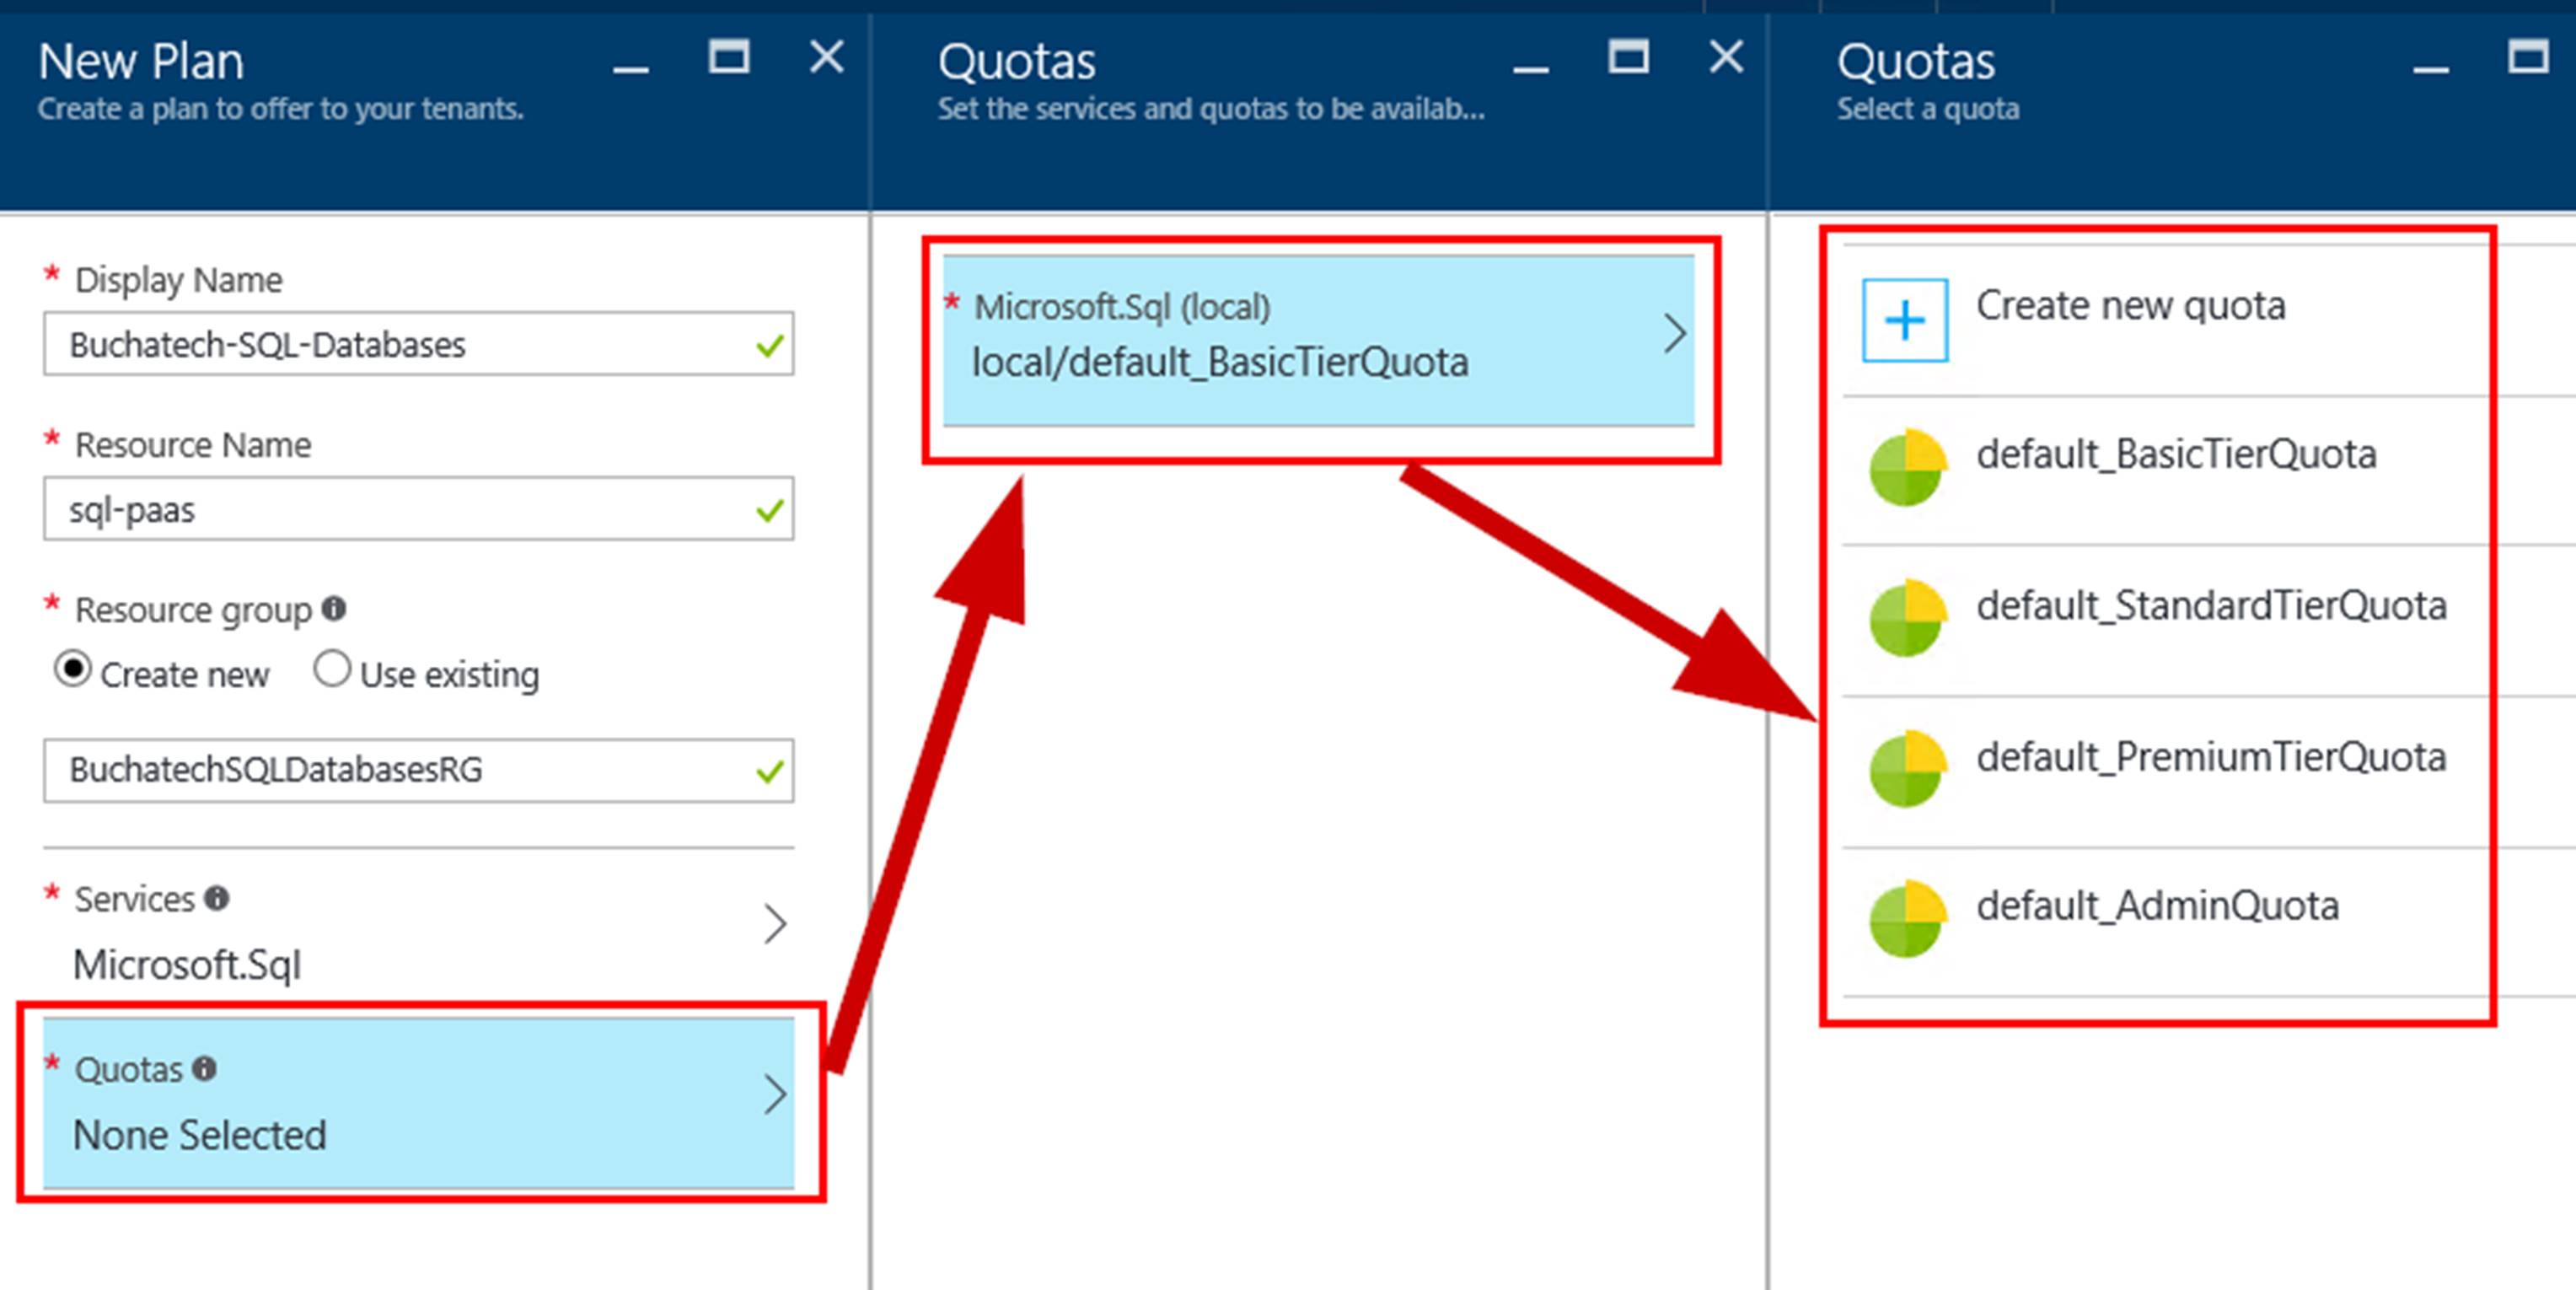
Give the plan a name, resource name, a resource group, and then select Microsoft.Sql in services.
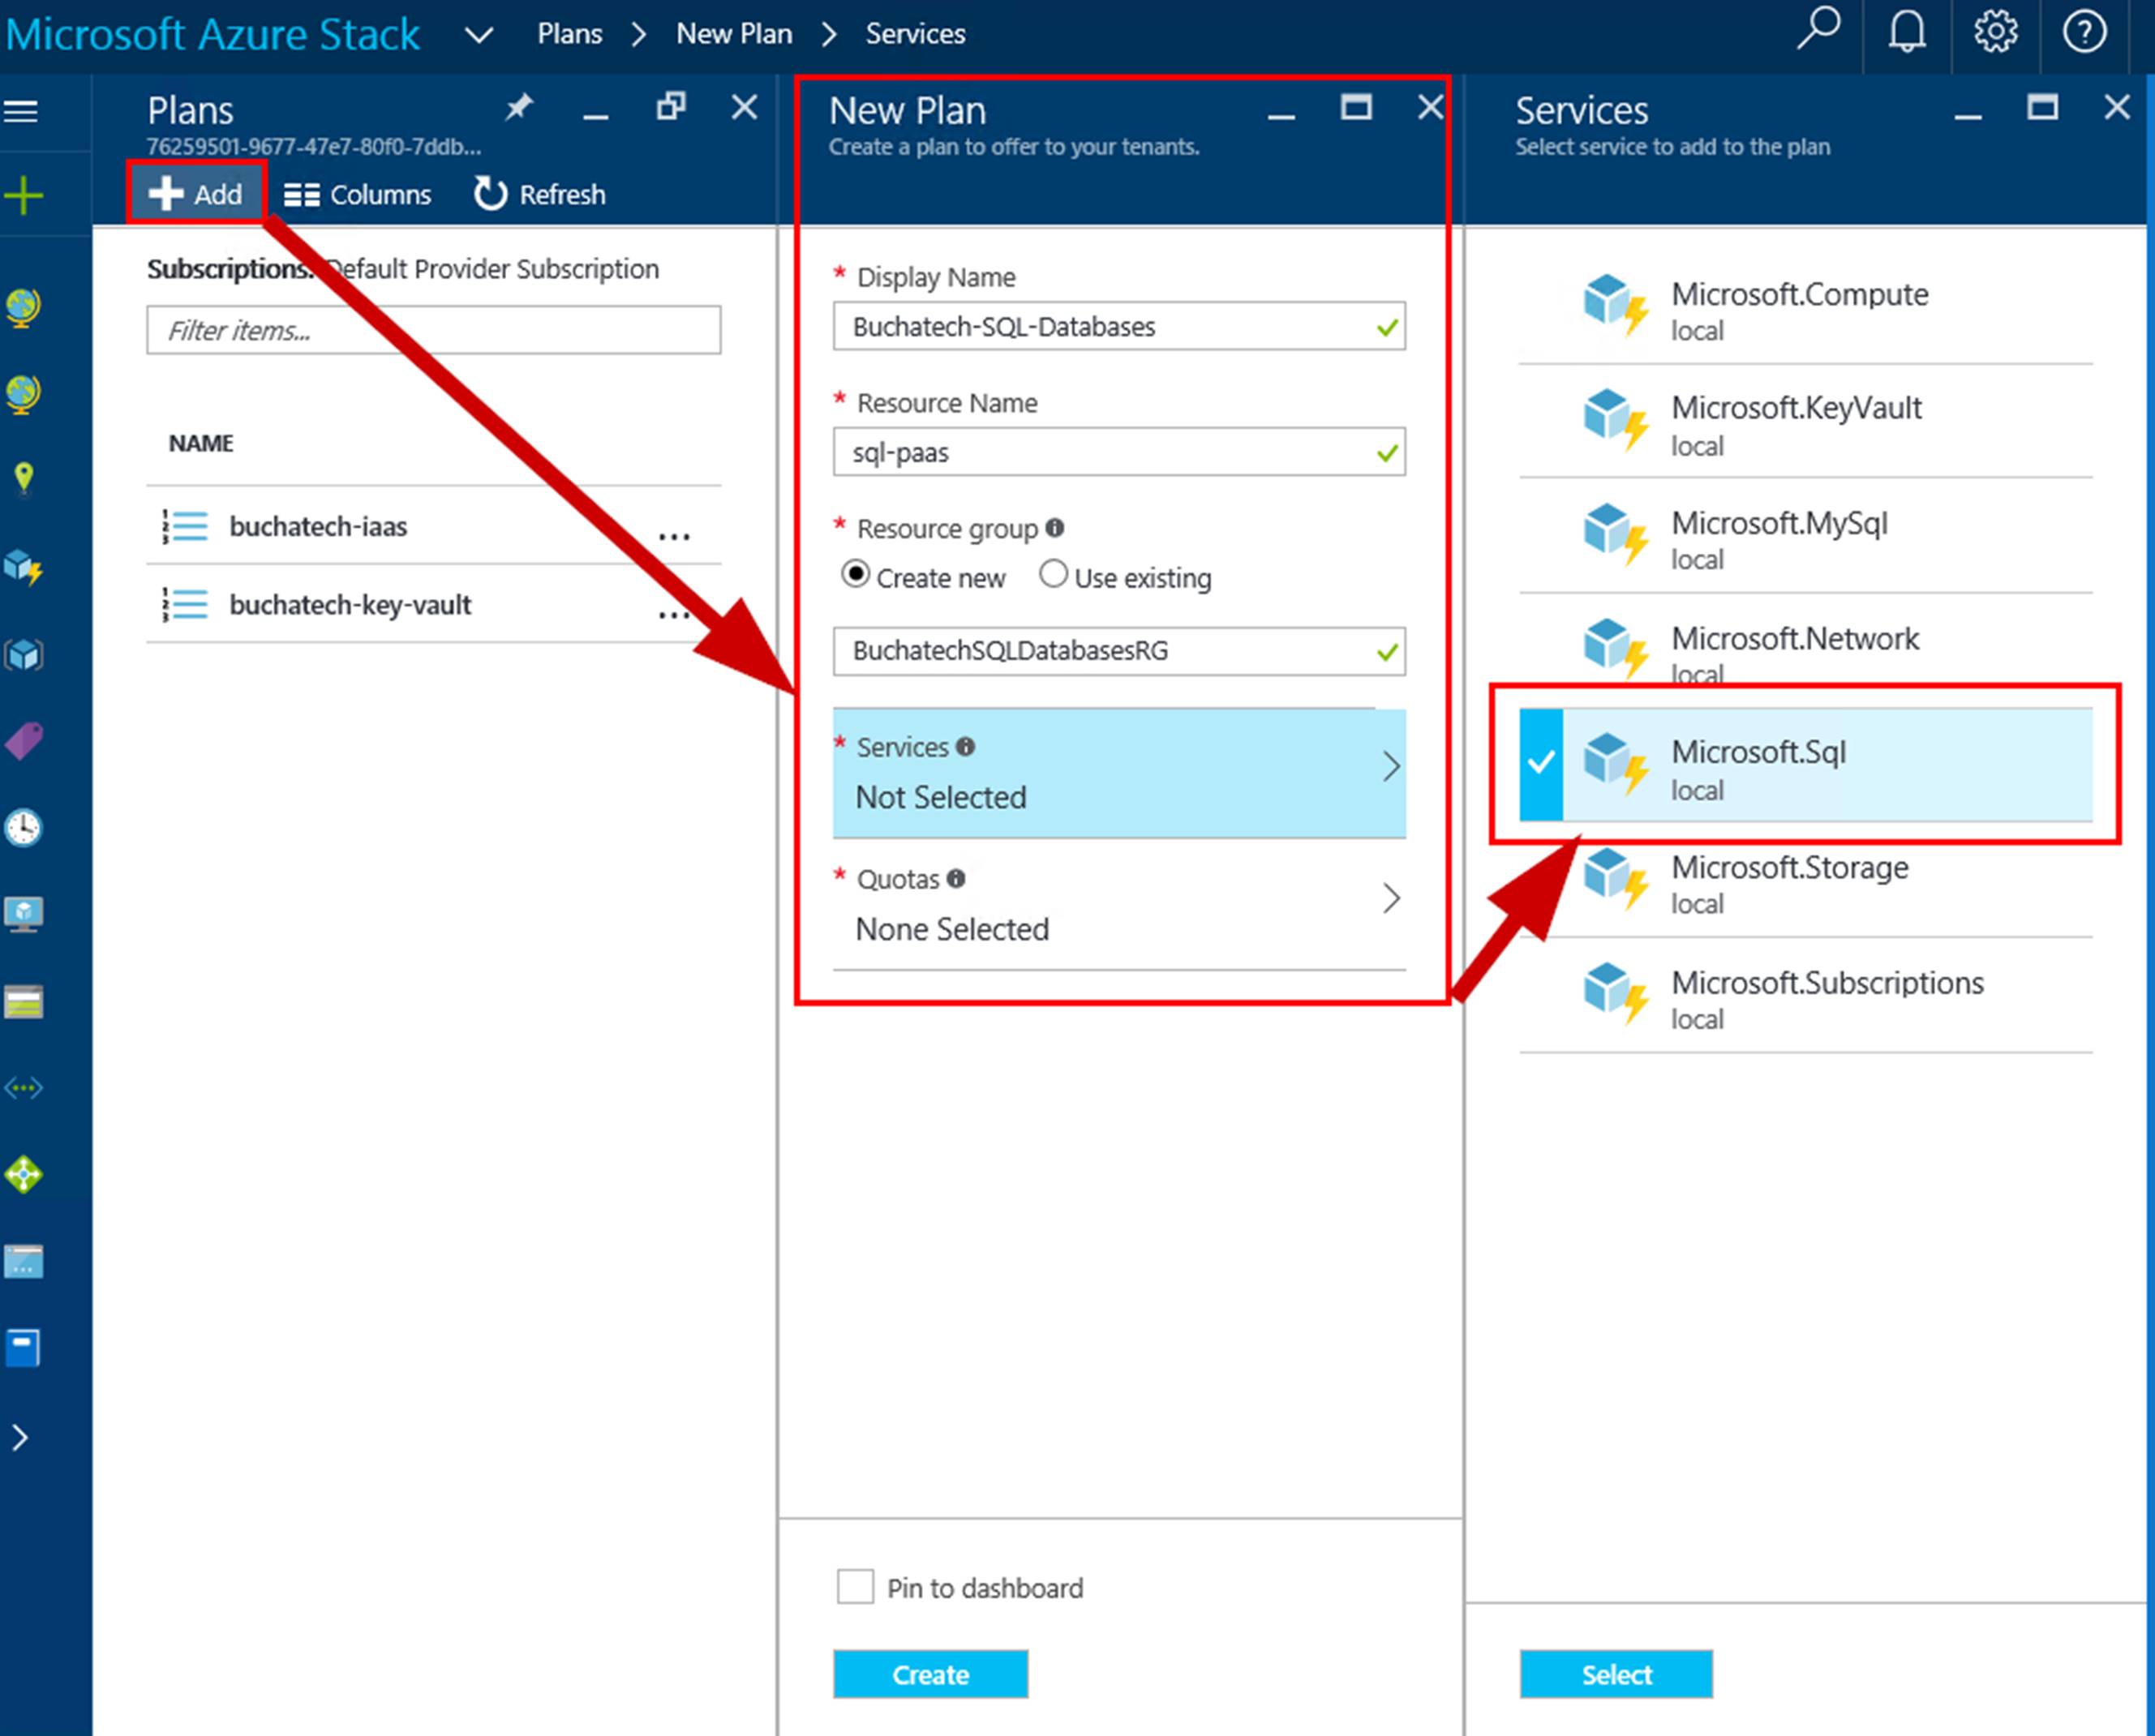
Now select one of the default Quotas or create a new one.
Next you need to Create an Offer. This is similar to creating a plan.
Go to Offers. Click on + Add. Complete the fields here. Be sure to select the SQL PaaS plan that you just created.
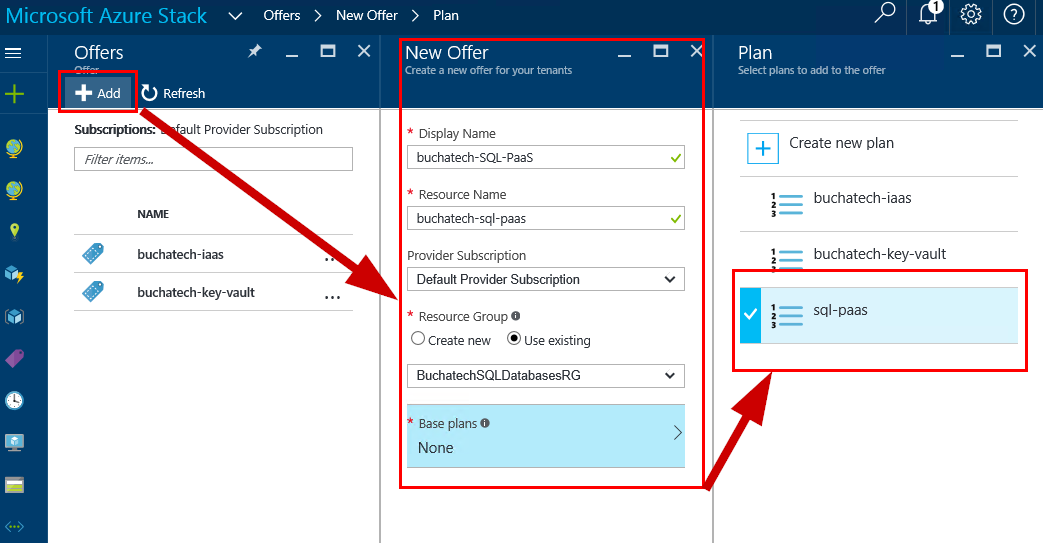
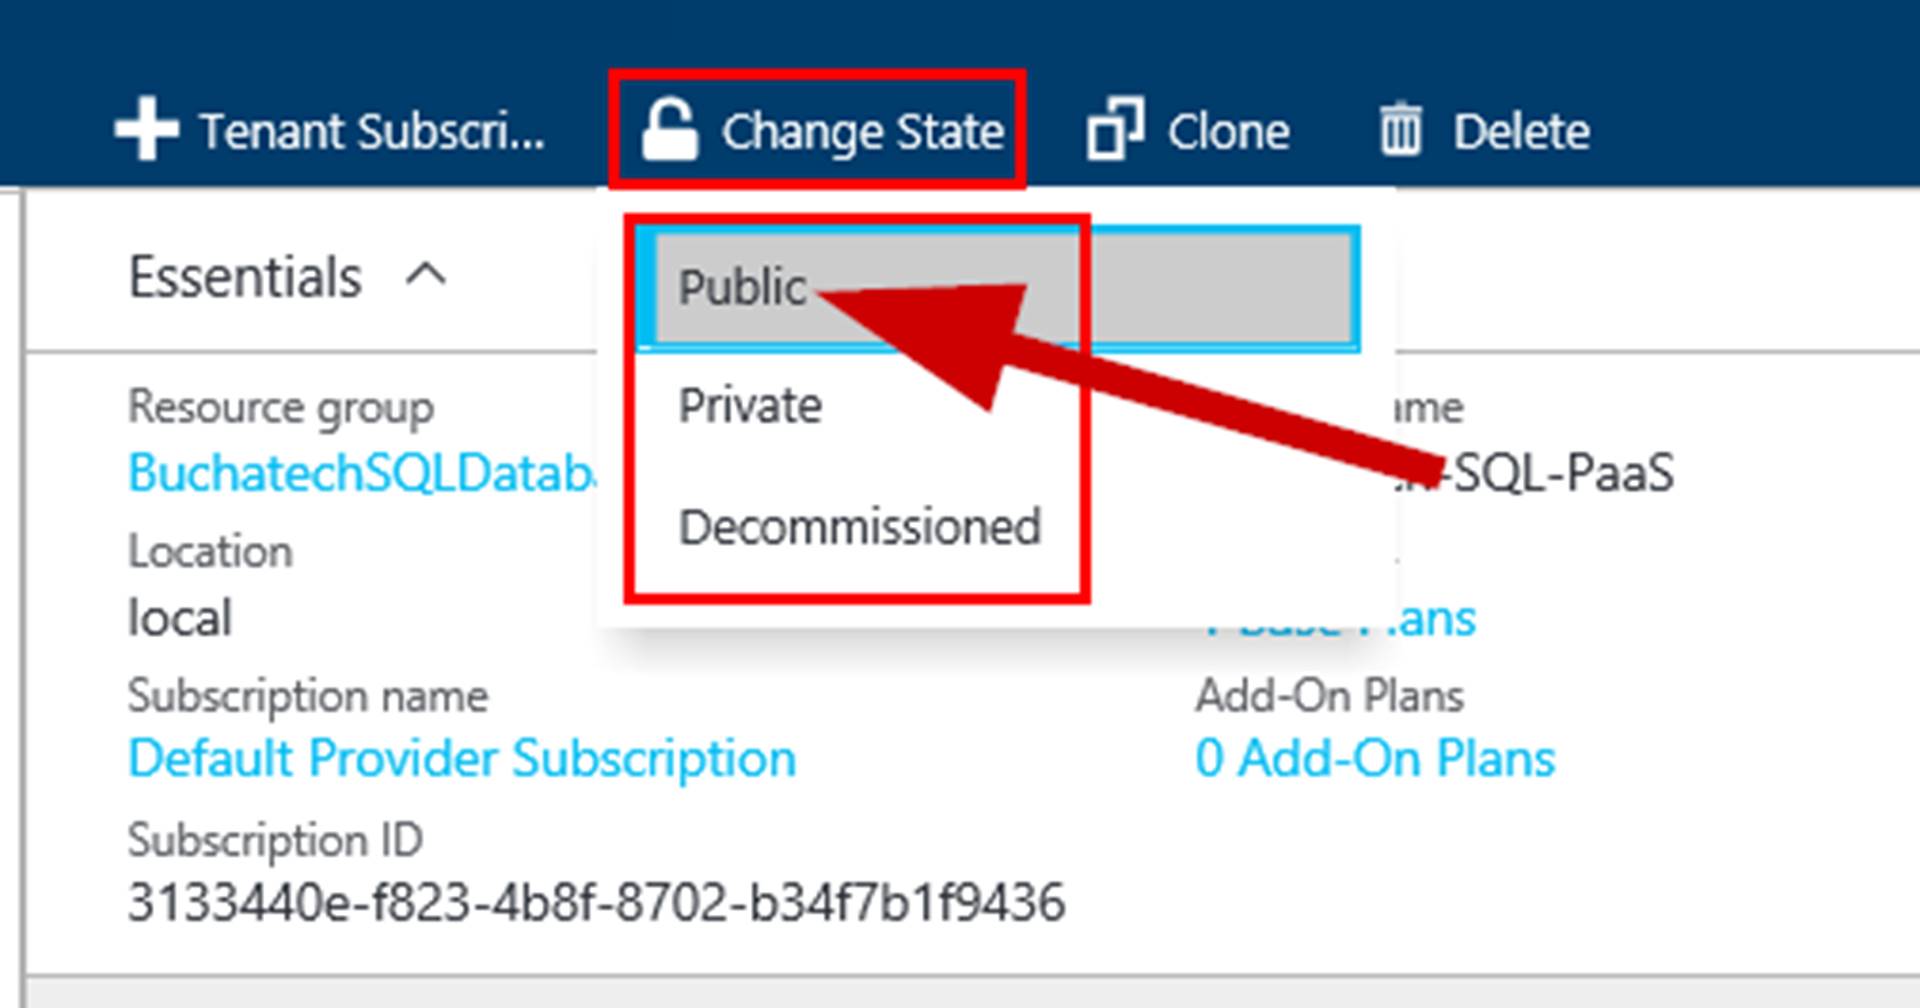
Now you need to make the offer public. If an offer is not public tenants will not be able to subscribe to it. You also could add a tenant subscription to it directly leaving the offer private. To make public click on the SQL offer and click on change state.
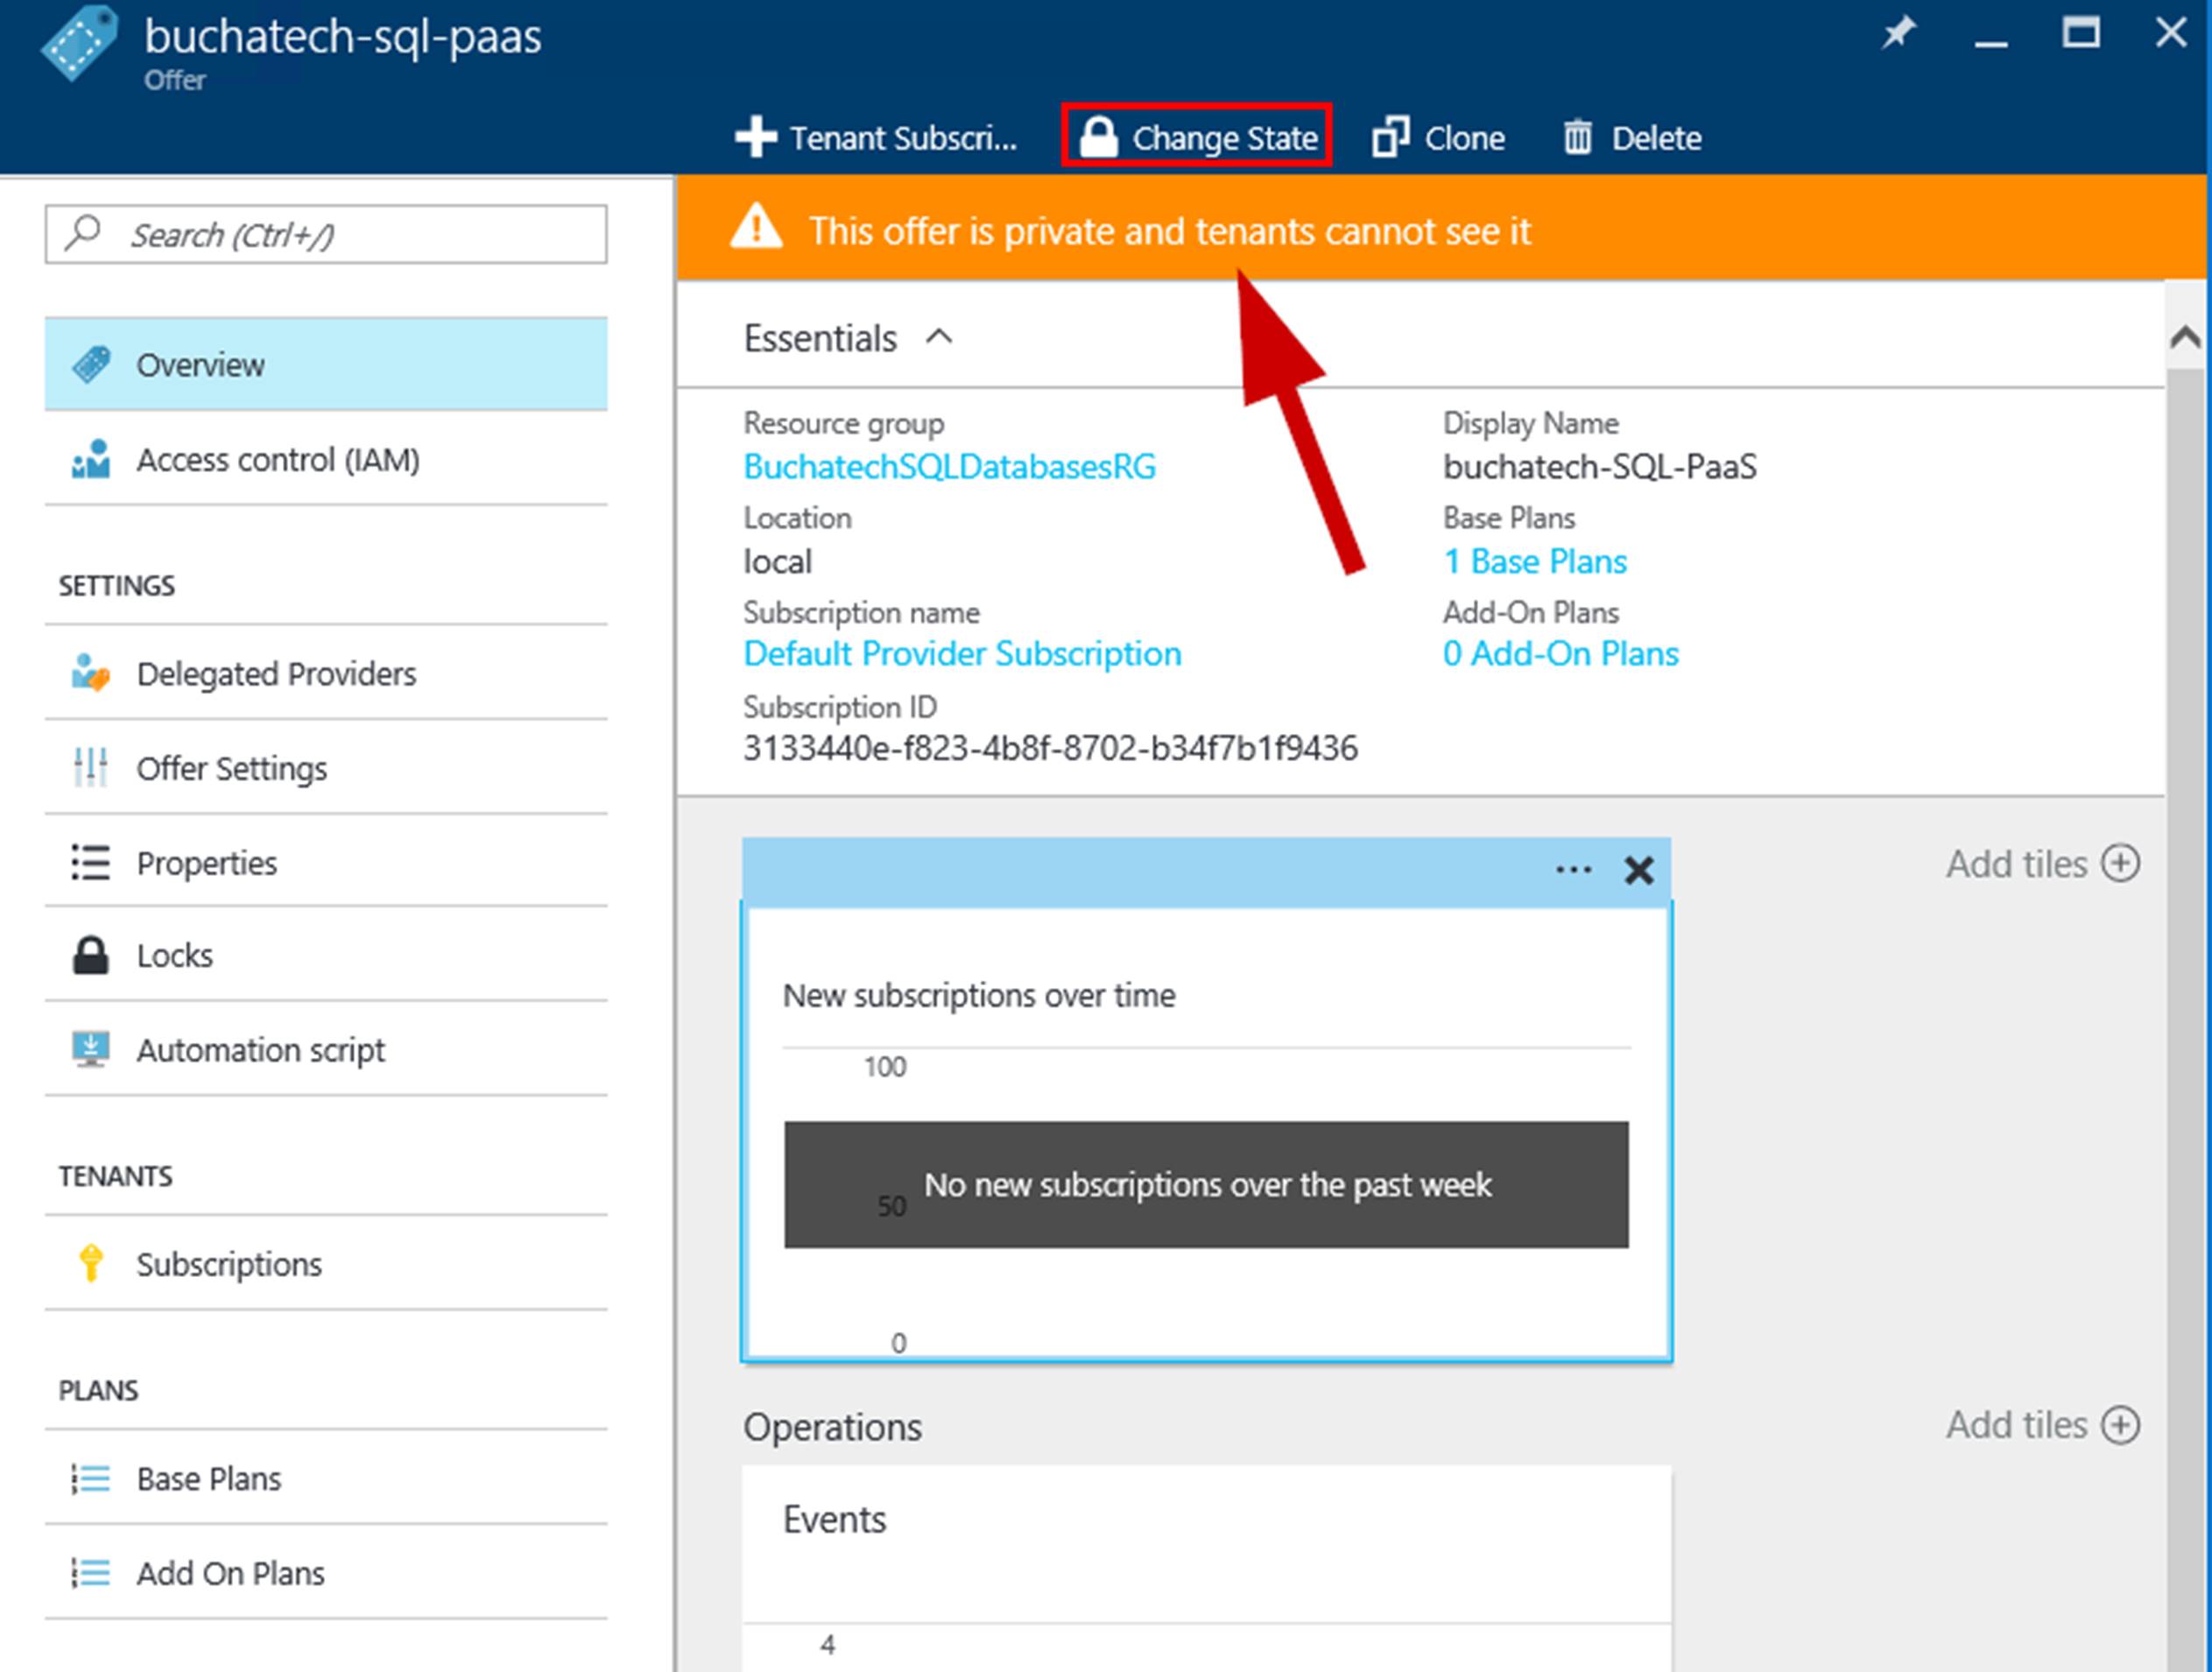
The following screenshot shows the options for Change State on the offer.
– TENANT PROVISIONING OF SQL PAAS OFFER –
The next step is to log into the portal as the tenant and subscribe to the new offer.
As a tenant navigate to Subscriptions then click on + Add.

Give the new offer subscription some time to load everything. If you go to create a DB right away you might run into this error:
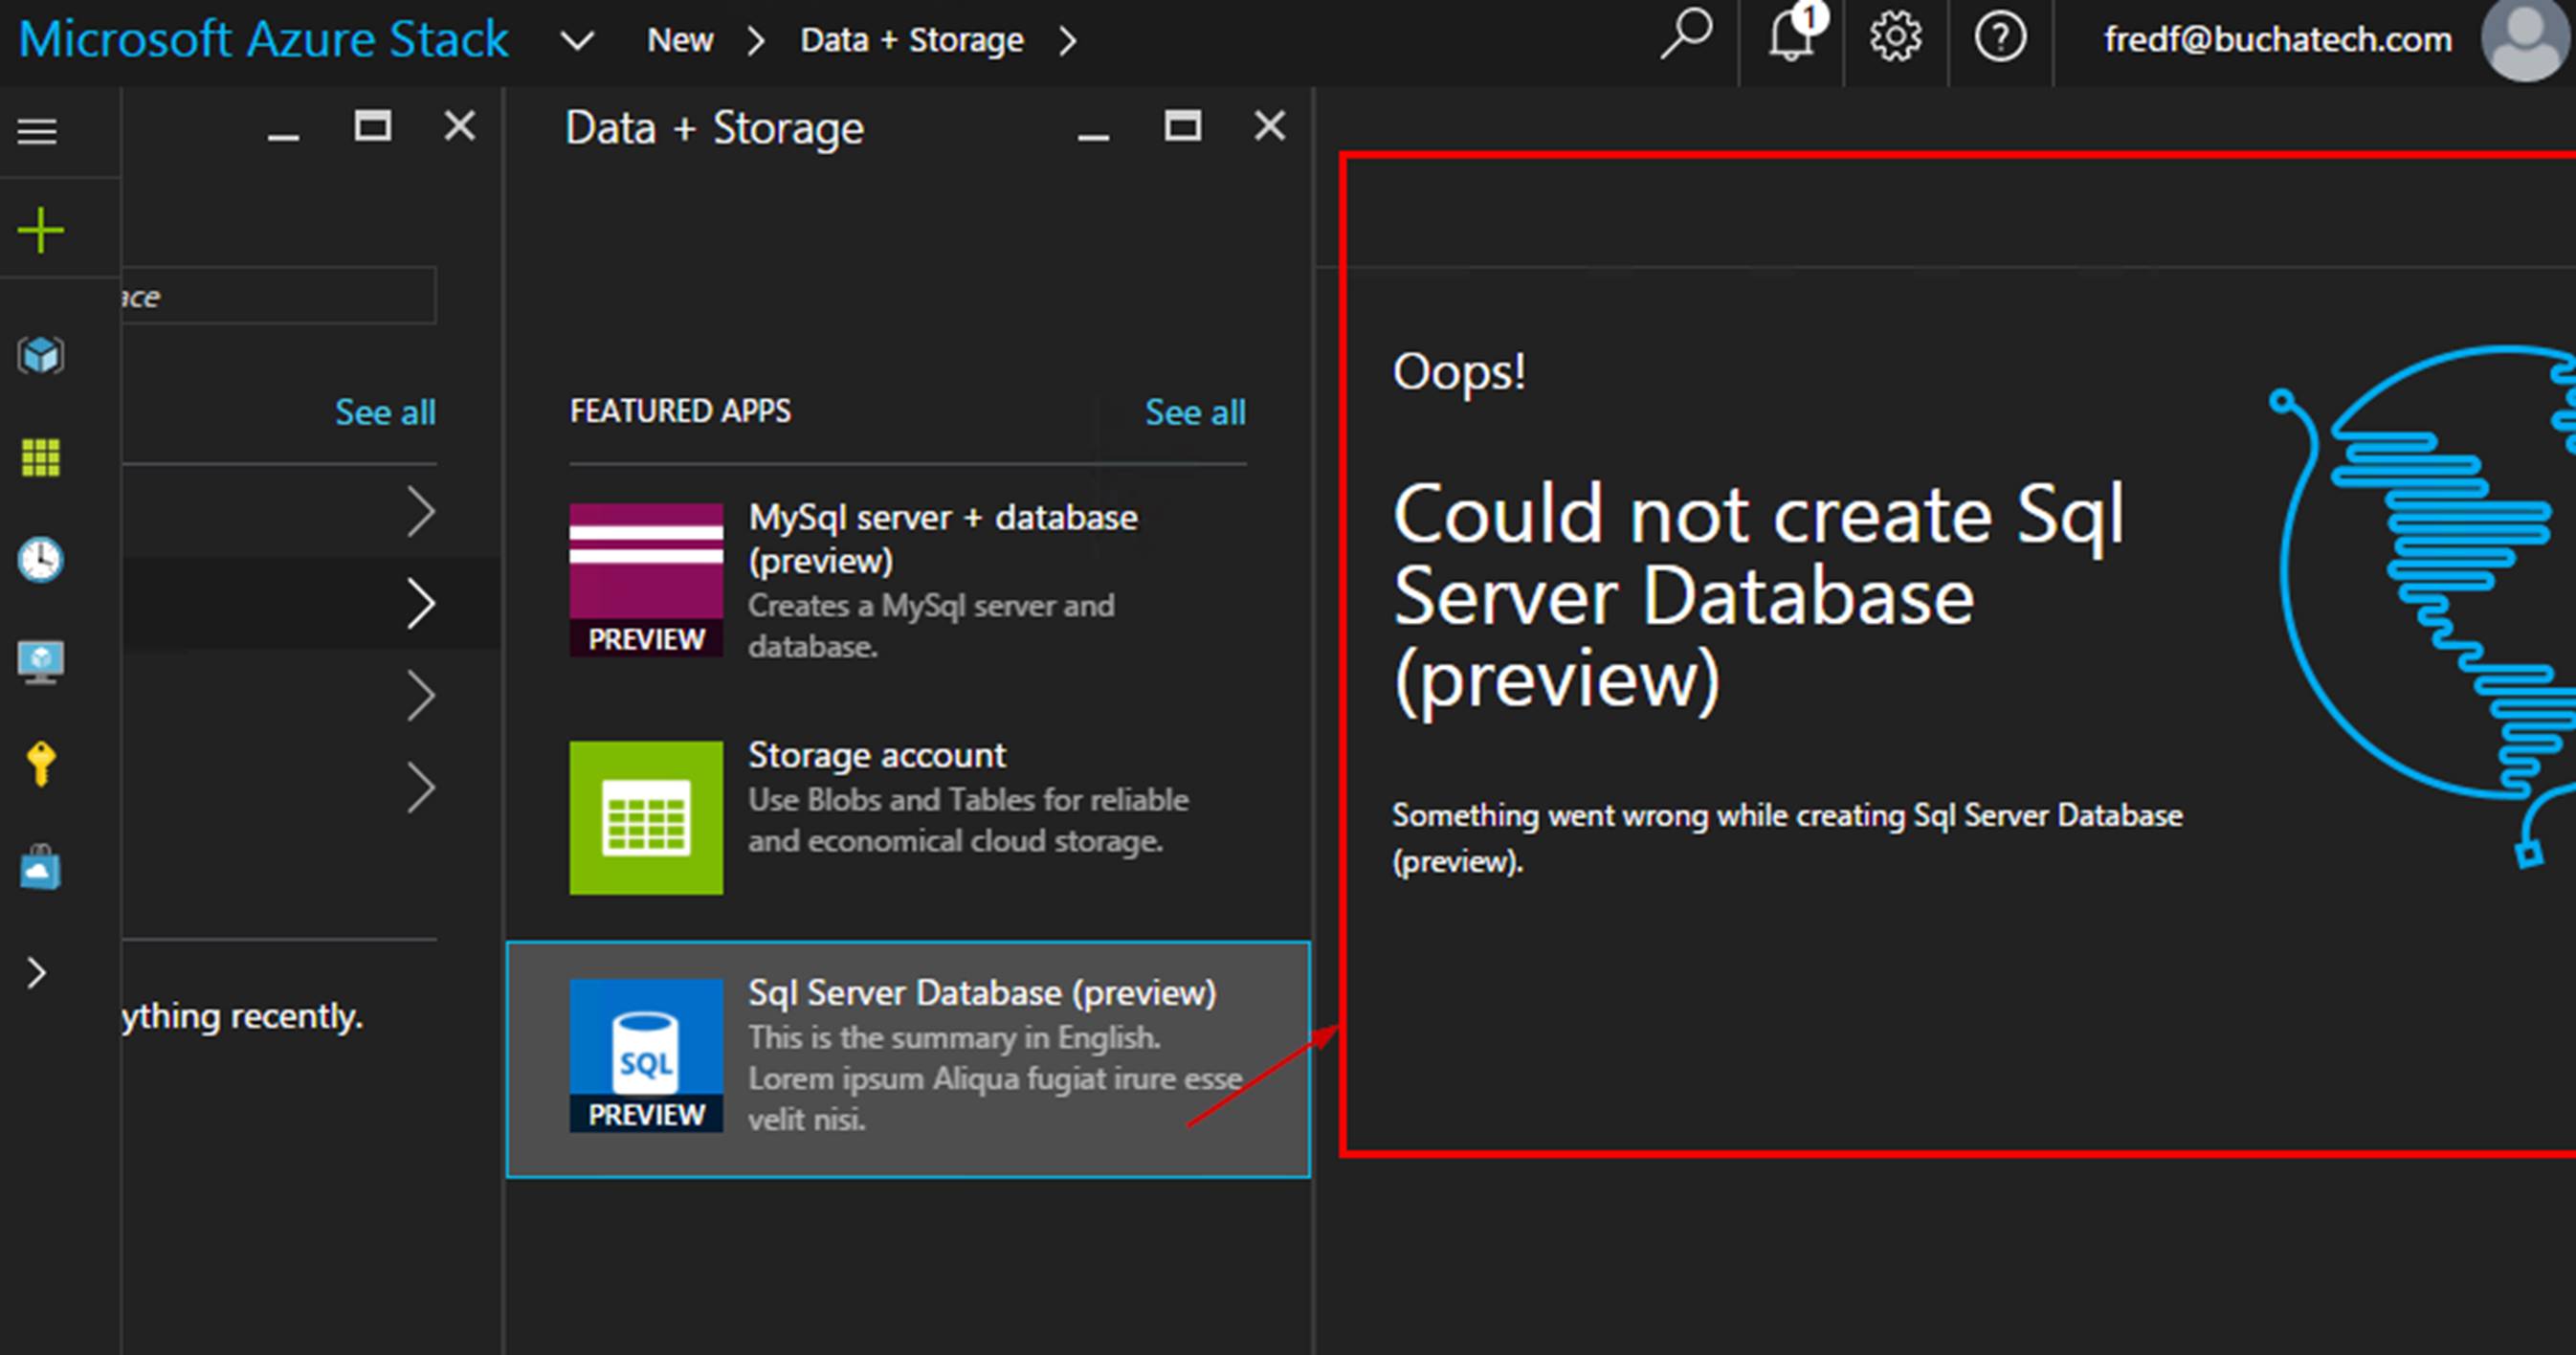
After 2-3 minutes go to either more services and click on SQL databases or click on Add New>Data + Storage and SQL Server Database.
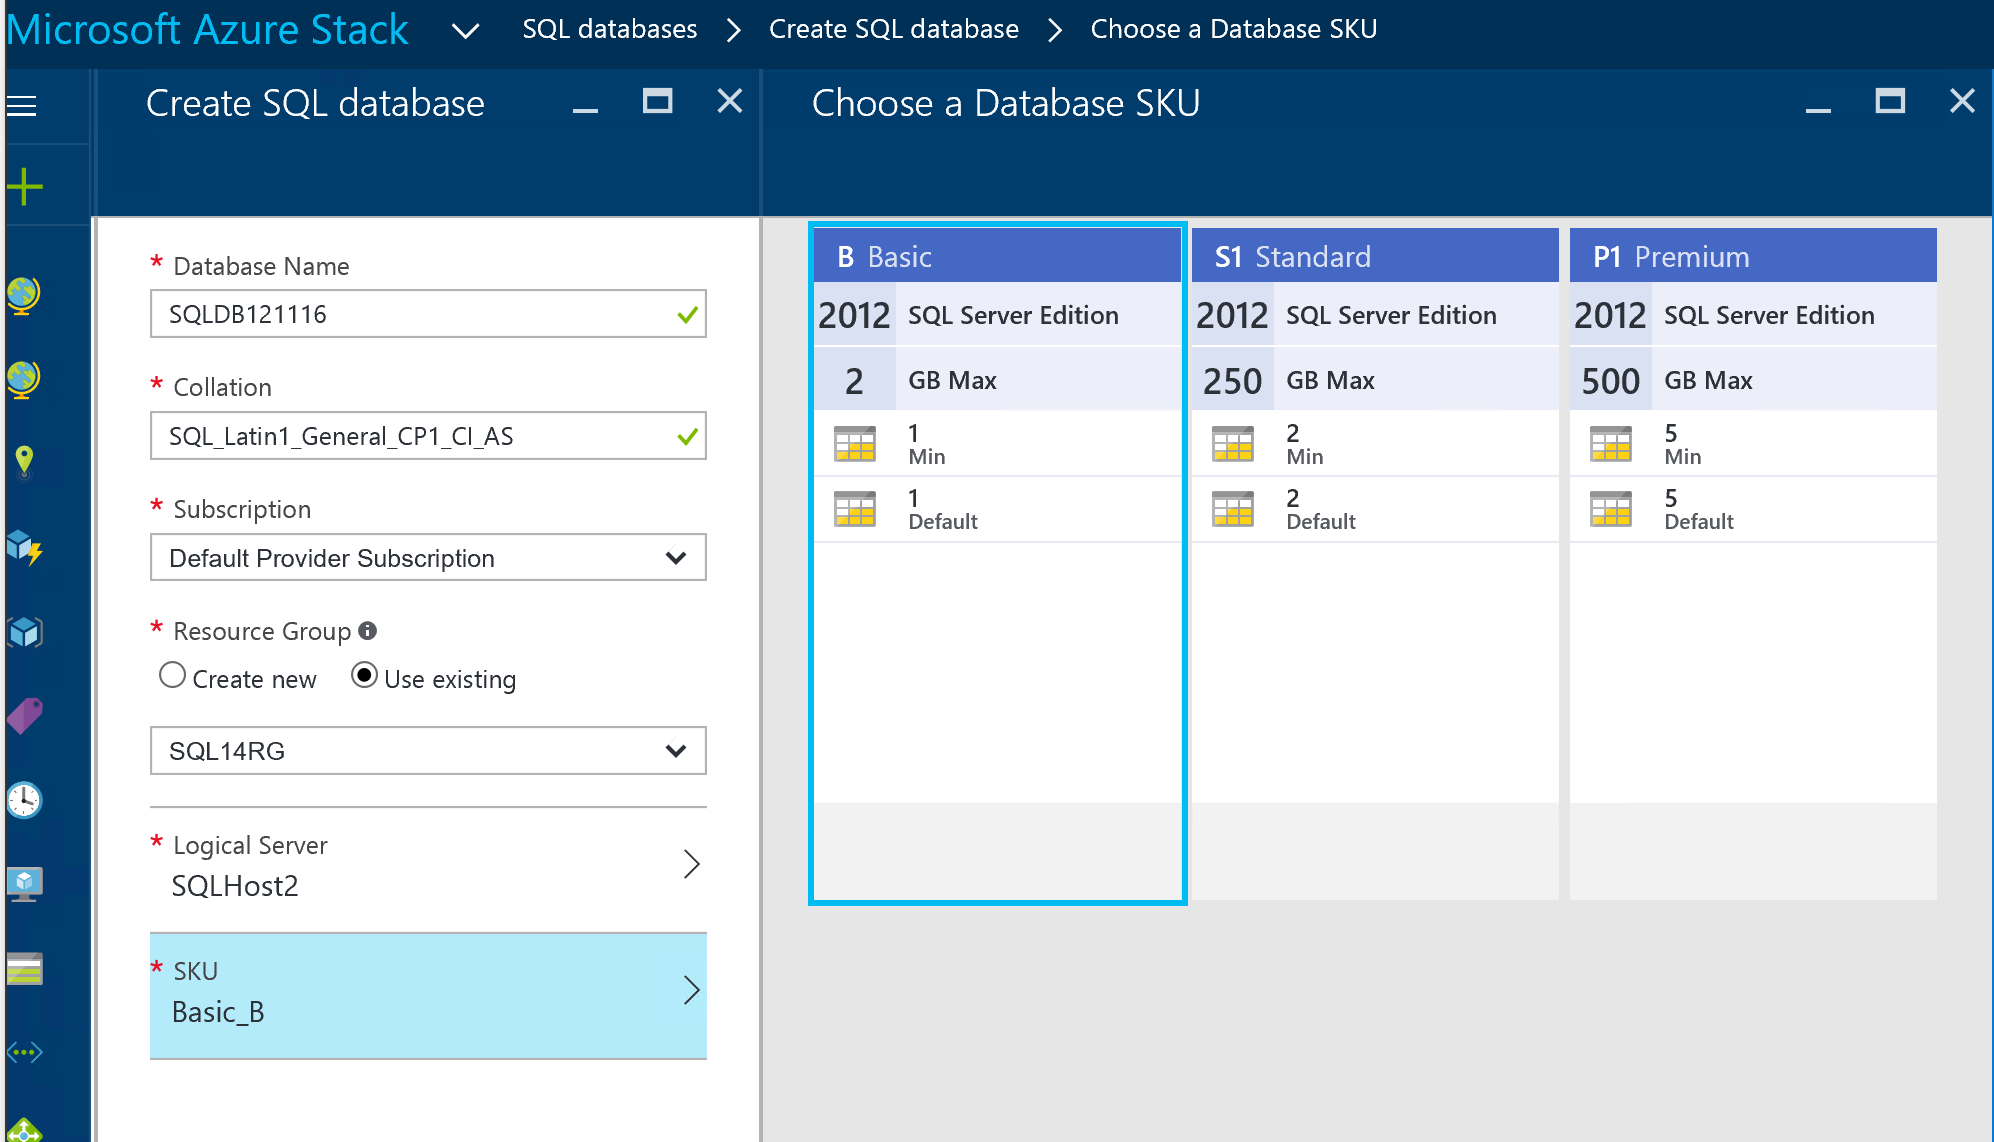
Click on Create SQL database. Give your database a name, select a subscription, create or use an existing resource group then click on Logical Server.
On the Logical Server screen you need to click on Create a new server. Go ahead and give it any name you want along with a server admin login and password.
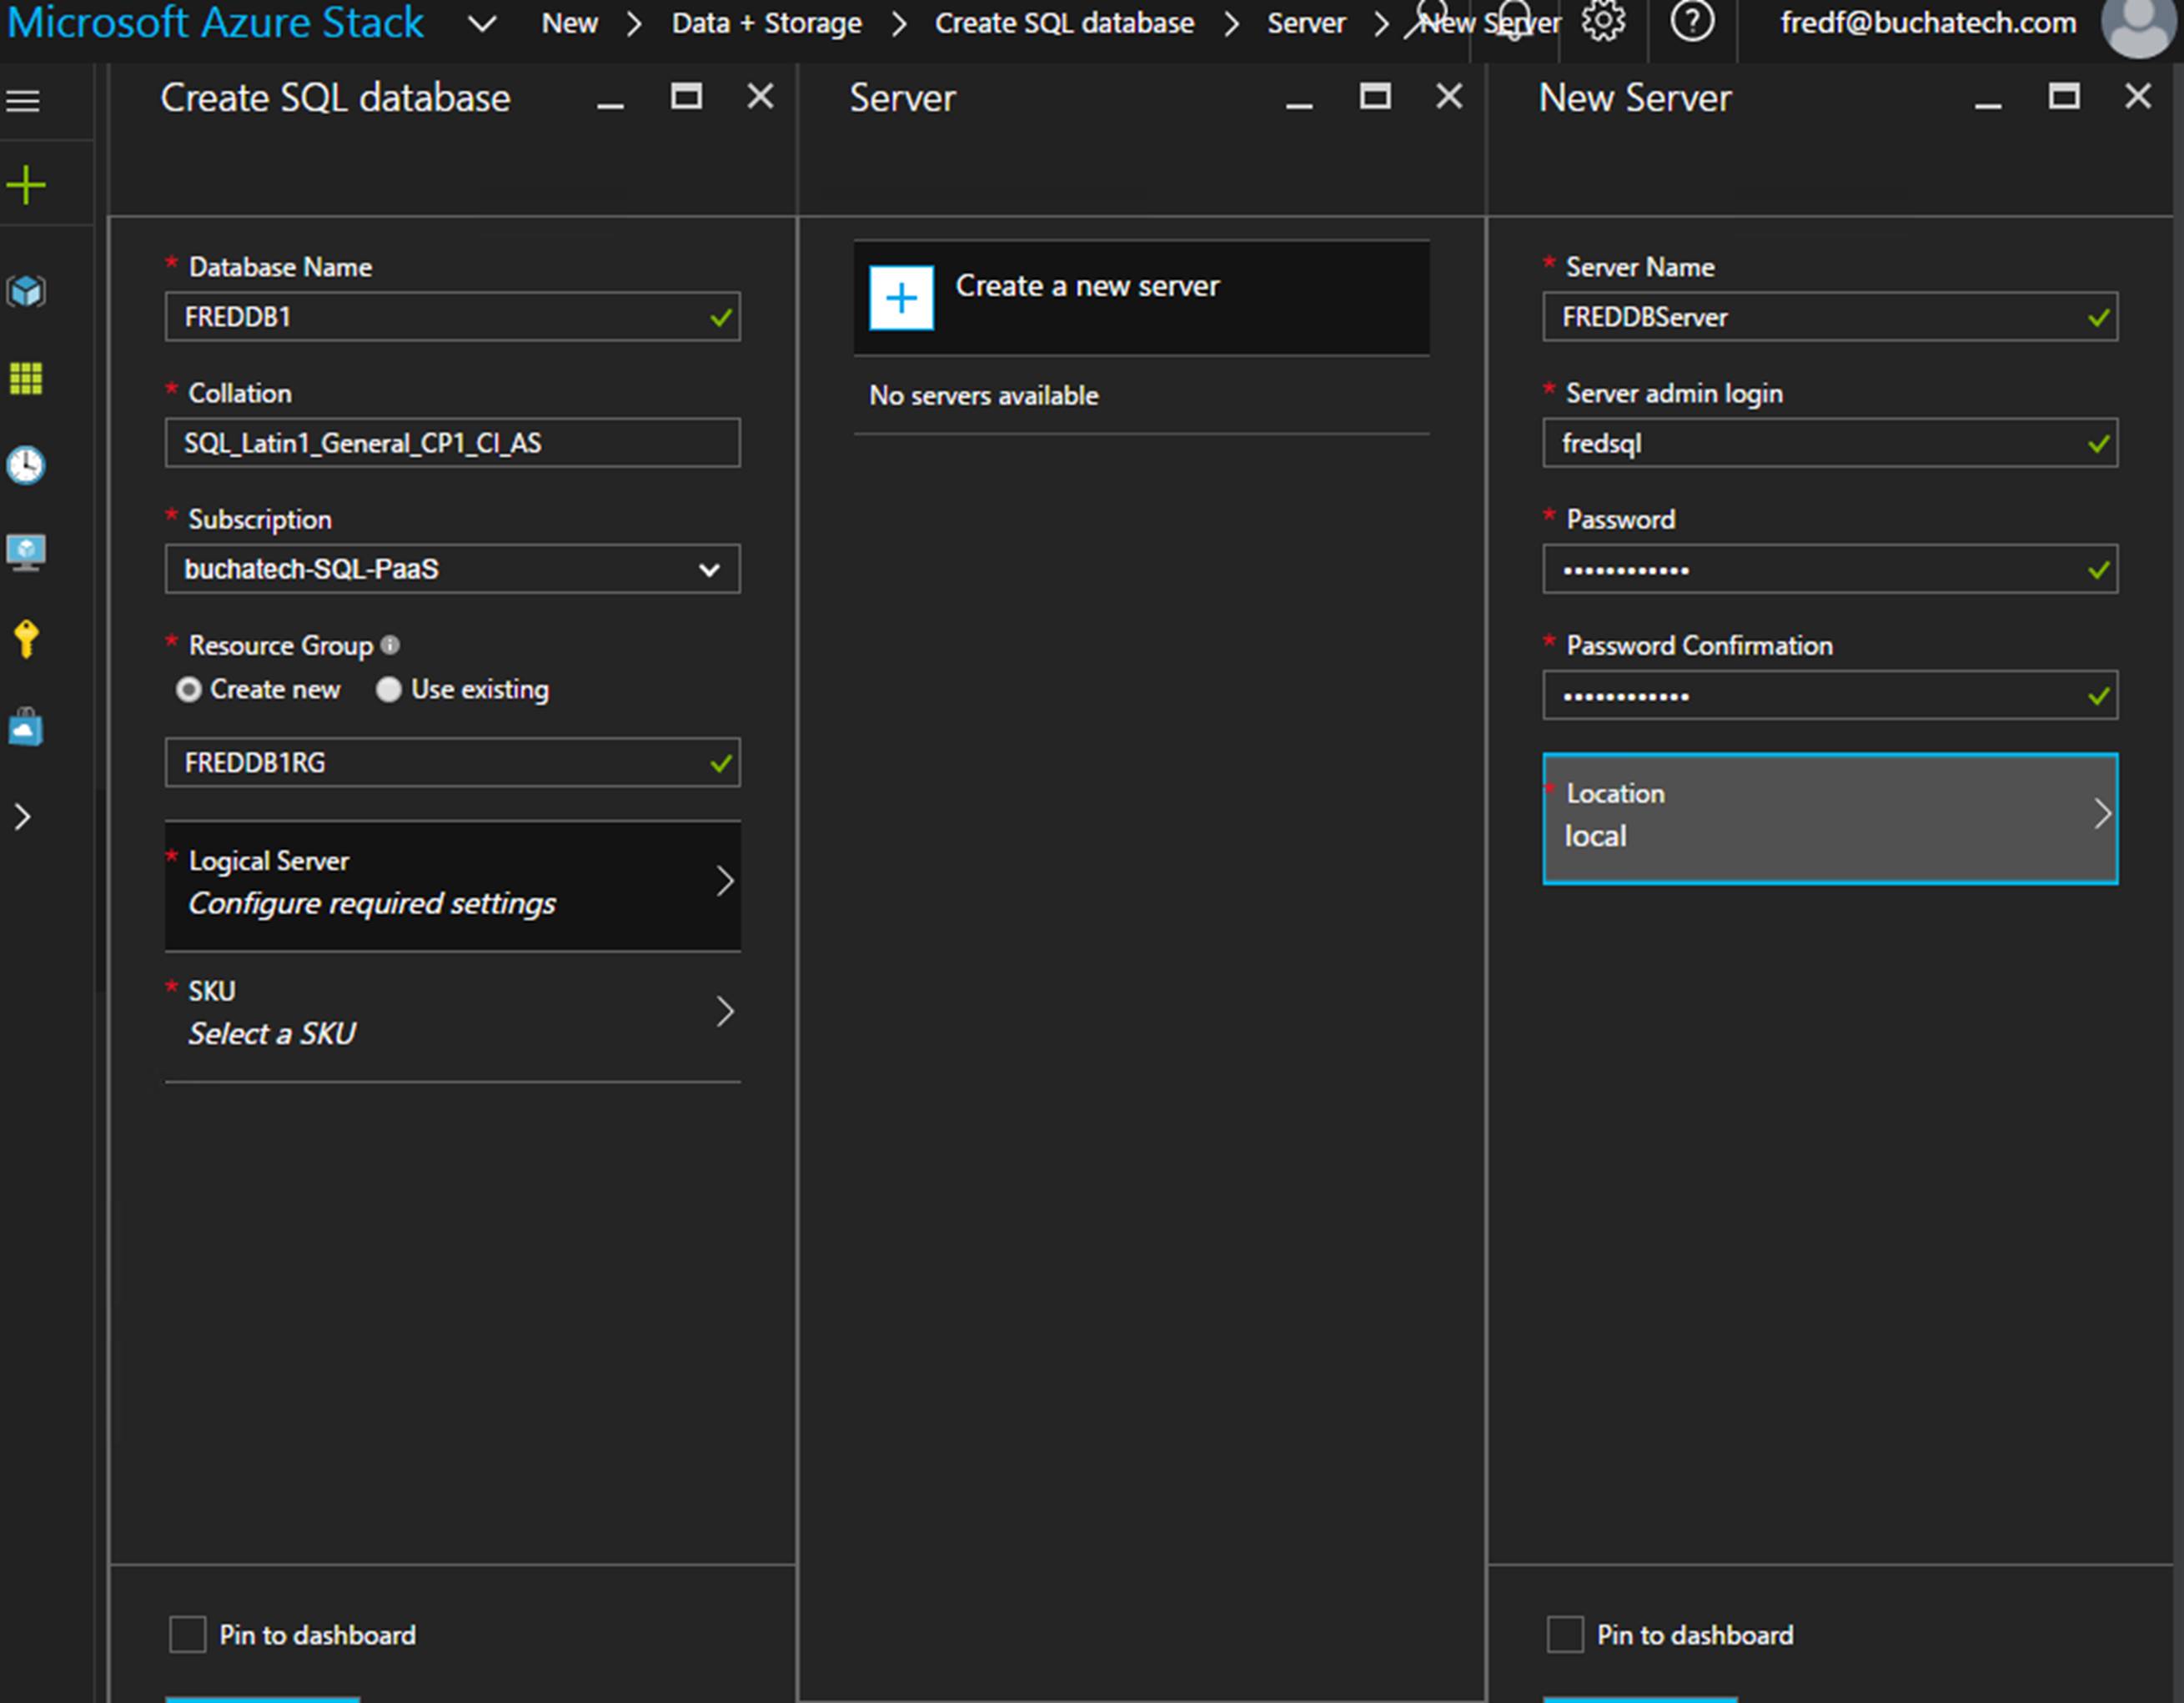
Next click on SKU. You have the following SKU’s available for now in TP2. Select one.
Click on Create.
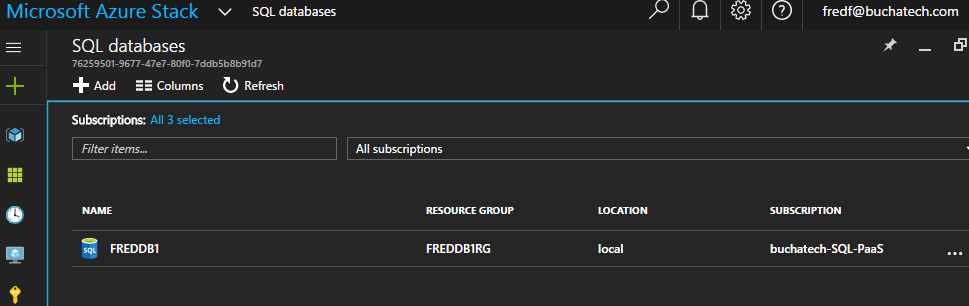
The new database should be provisioned and should show under SQL Databases now.
You can click on the database to show the properties of it. Take note of the Connection String. Copy this as this is how you can connect to this database via an application or SQL management studio.
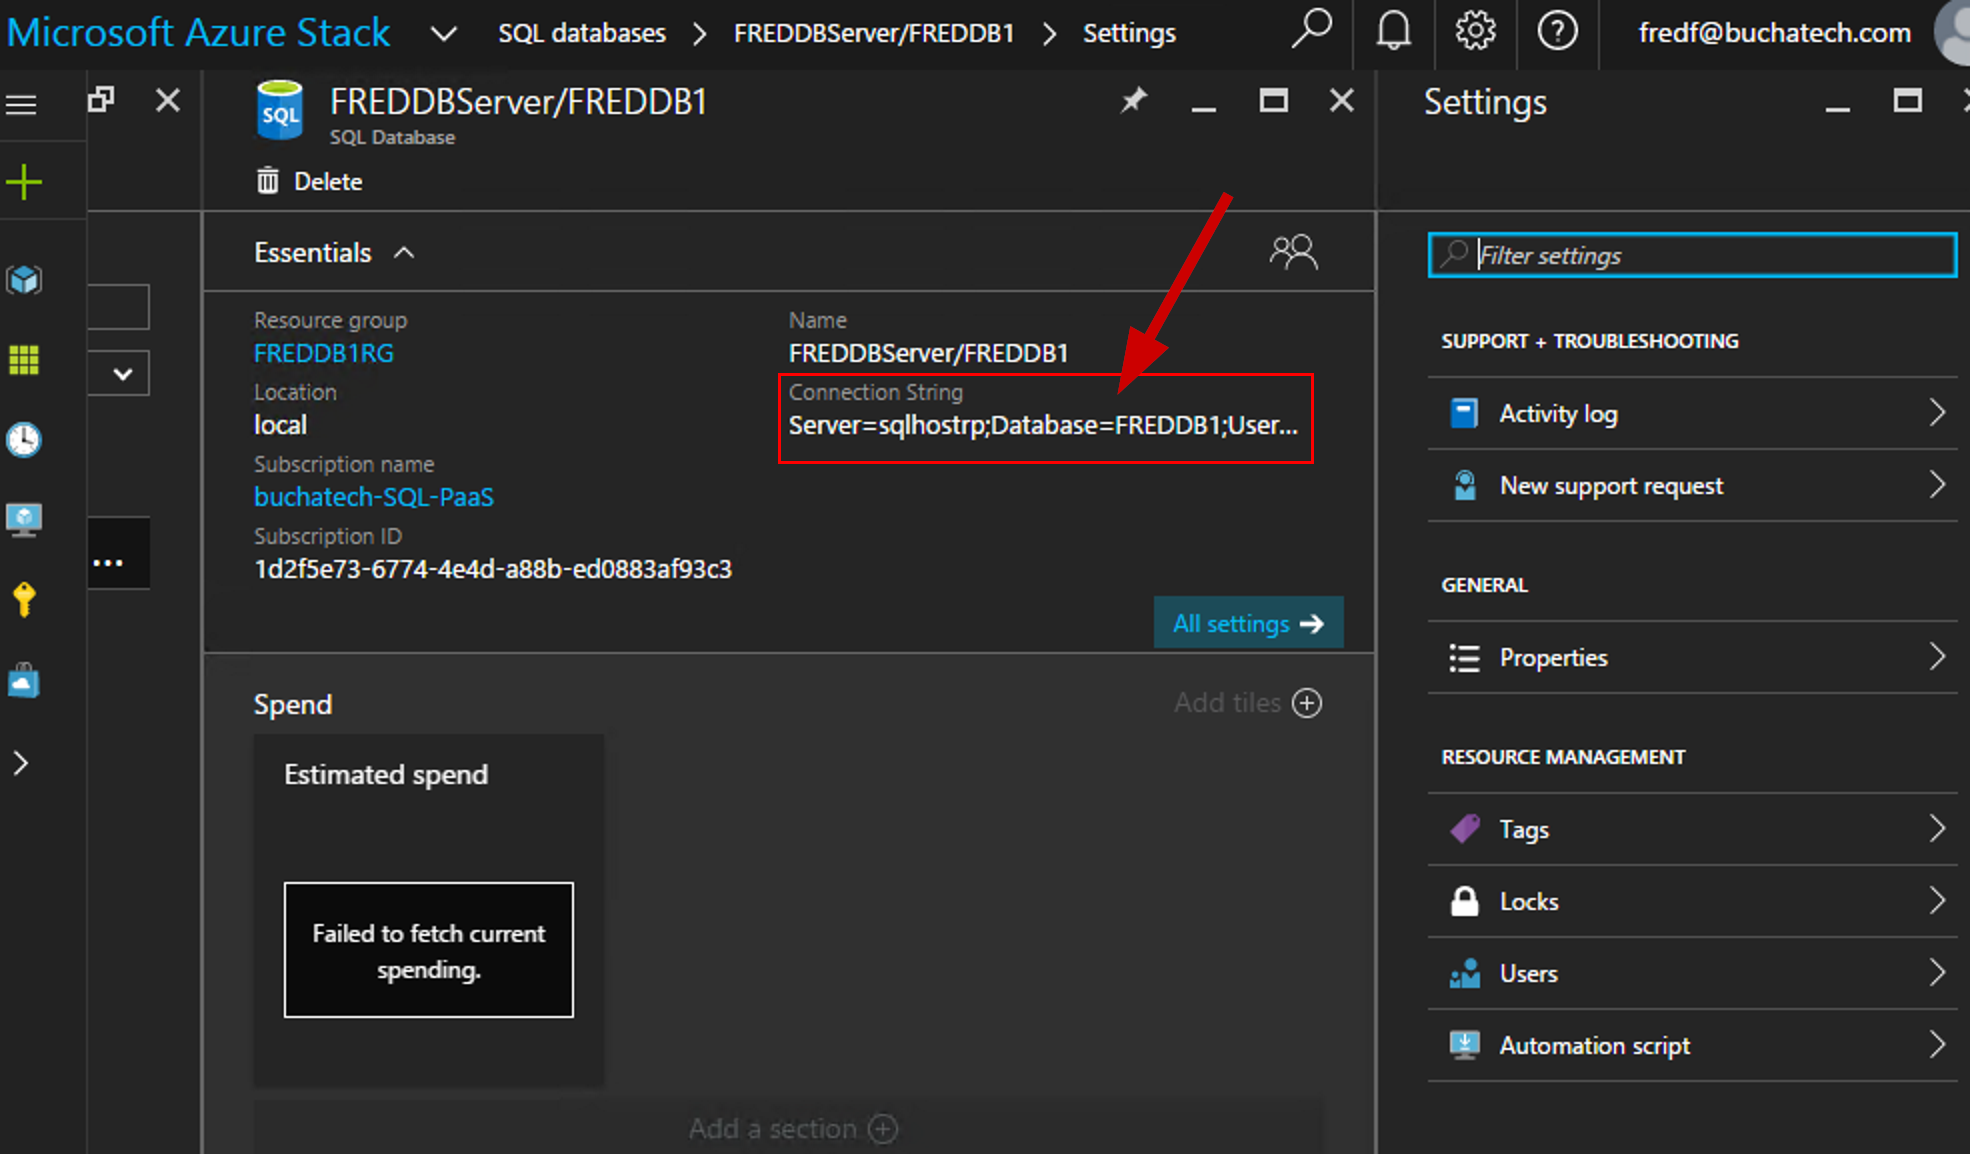
Here is what should be in the connection string :
Server=sqlhostrp;Database=FREDDB1;User Id=fredsql@FREDDBServer;Password=********
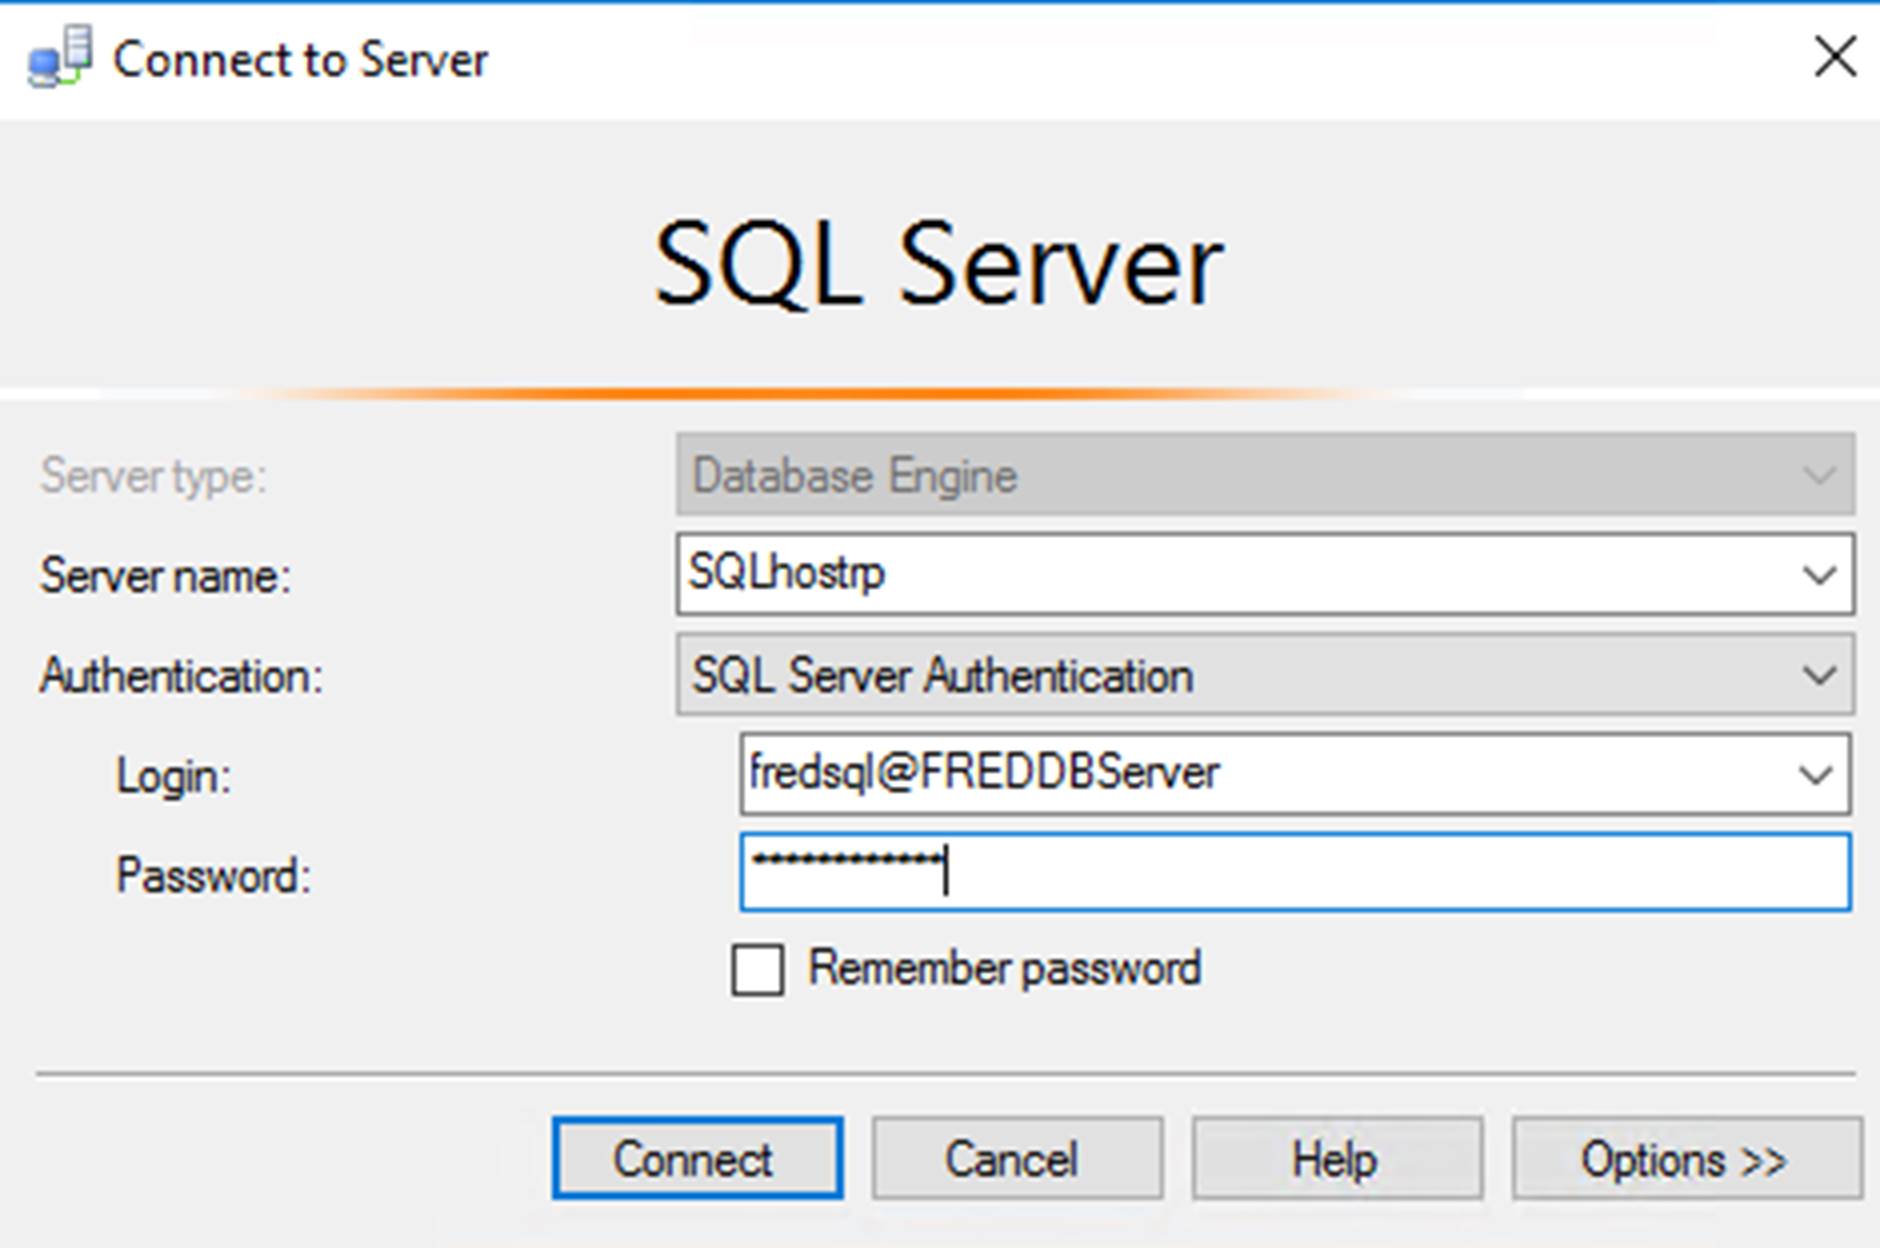
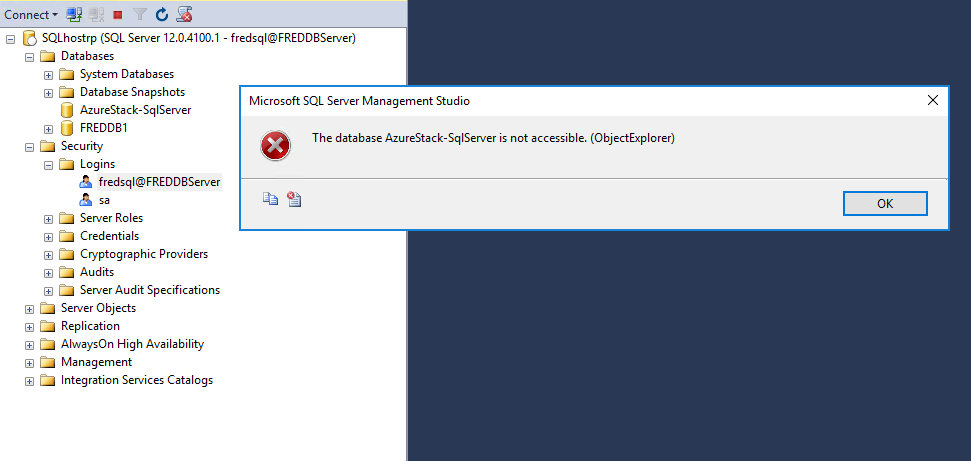
Notice the Server is the name of your SQL Hosting Server not the logical server name. You can use this as the Server Name in SQL management studio when needing to connect to this SQL instance. Also notice the user login info you specified when creating the logical server is the user account you use when connecting to the SQL instance. This is shown in the following screenshot.
Once you login you will see the database you created and will be able to access. Notice there is another DB named AzureStack-SqlServer. This is for the SQL RP. Don’t worry this account does not have access to this database. Only SA does. You can see this in the following screenshot.
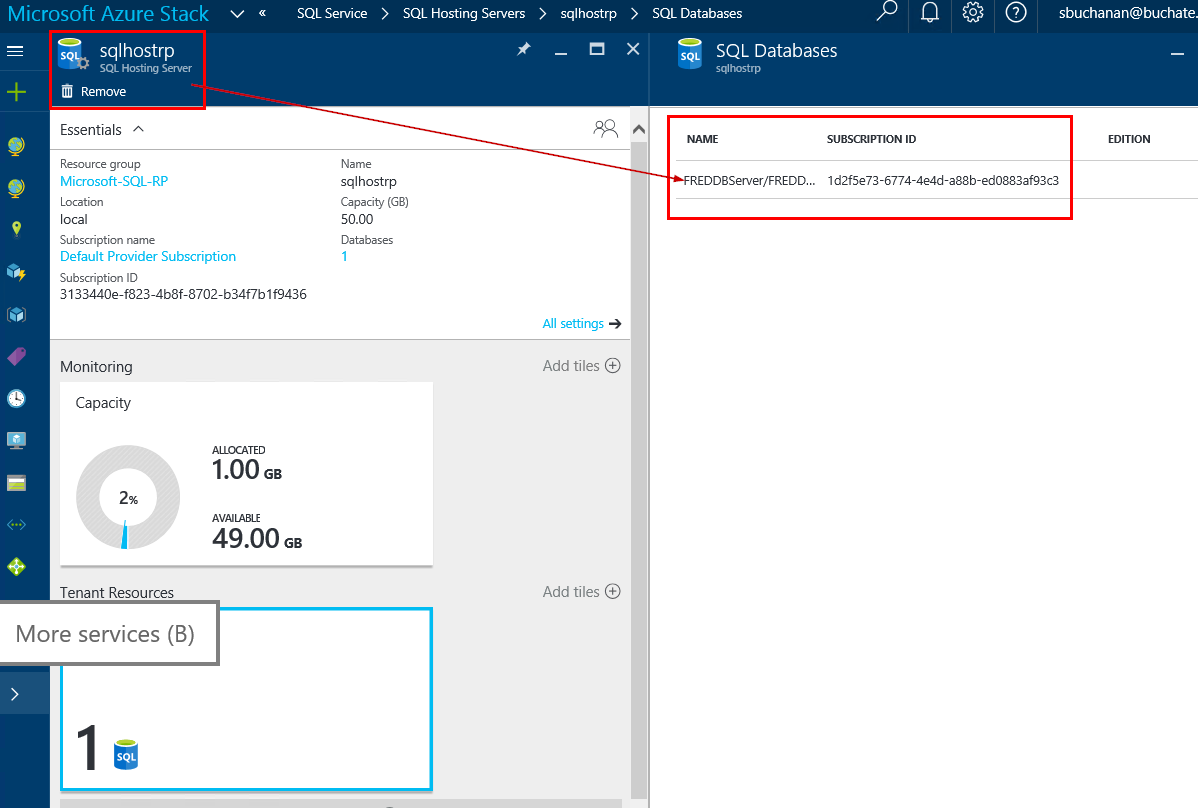
Now back in the administrative of the SQL resource provider you can see the database and the subscription info as shown in the following screenshot.
That is the end of my post. If you have Azure Stack TP2 deployed go out and try out the SQL resource provider along with the others.
Happy Stacking!
