Master Azure with VS Code

At Experts Live Europe 2019 I presented a session titled “Master Azure with VS Code”. This was a fun session with an engaging audience that took to twitter after the session. There was some chatter asking this session was recorded. It was not. I did note that I planned to write a blog post on this topic.

Here is that blog post and it is the first one of 2020 for me! In this post, we are going to dive into how VS code is helpful when working with Azure and many extensions I find useful when working with Azure. This post is not set to be an end-all to using VS Code with Azure but from my experience. Use this post as a starting point or a reference for expanding your use of VS Code with Azure. Also, check out the many other community experts and Microsoft MVPs for their additional knowledge plus tips and tricks on this topic.

VS Code Overview

First off if you are not using VS Code stop reading this right now, go download it and install it then come back to finish reading. 🙂 VS Code is a must-have in your toolbox and it is free! For those that are new to VS Code, it is an open-source – code editor developed by Microsoft that runs on Windows, Linux, and macOS. Here is a shortlist of the many benefits of VS Code:

  • Has support for hundreds of languages.
  • Has Integrated Terminal.
  • Also powerful developer tool with functionality, like IntelliSense code completion and debugging.
  • Includes syntax highlighting, bracket-matching, auto-indentation, box-selection, snippets, and more.
  • Integrates with build and scripting tools to perform common tasks making everyday workflows faster.
  • Has support for Git to work with source control.
  • Large Extension Marketplace of third-party extensions.

Note that yes, VS Code is for the “IT Pro”. Not just developers.

Azure Extensions in VS Code

VS Code has a ton of extensions in general. There are a number of Azure specific extensions and you can work with Azure directly from VS Code.

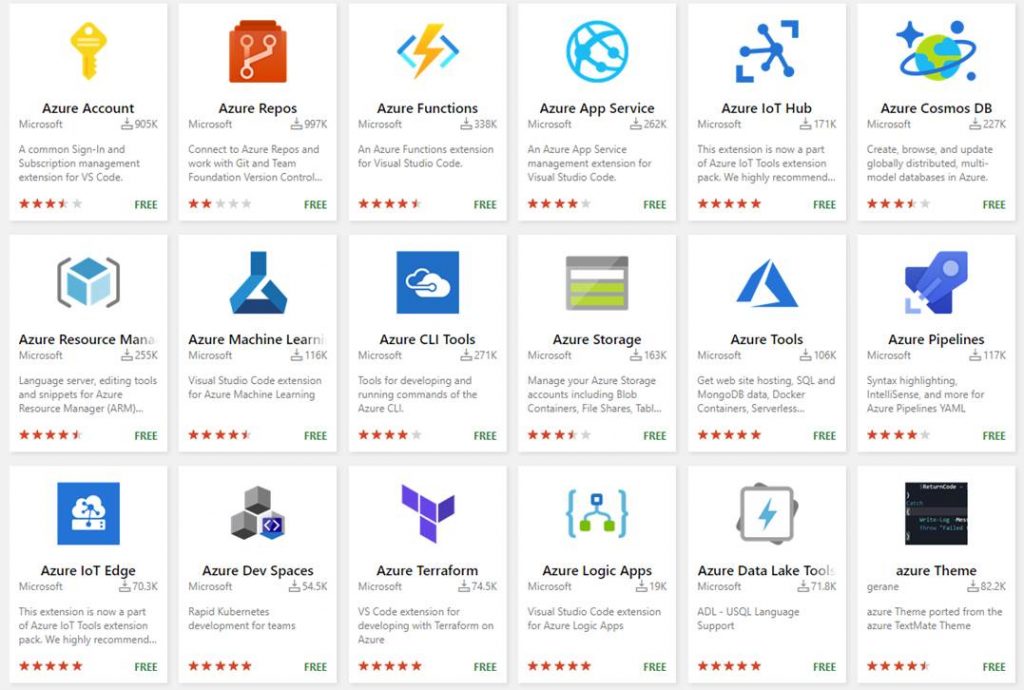
If you go to the VS Code Marketplace here: https://marketplace.visualstudio.com/vscode and search on Azure you will see results for many published by Microsoft and many community based extensions for Azure. As of the time of writing this blog post, there are 93. Here is a screenshot showing some of the results:

You can also go directly to the Azure Tools extension from Microsoft here: 

https://marketplace.visualstudio.com/itemdetails?itemName=ms-vscode.vscode-node-azure-pack

Or the

Azure Extensions from Microsoft here:

https://code.visualstudio.com/docs/azure/extensions

In the rest of this post, I am going to share some key extensions I use with Azure. I will post the marketplace links at the end of each extension I talk about and if it is maintained by community or Microsoft.

Deploy to Azure using VS Code

It is important to note that not all of the Azure extensions available in VS Code can be used to deploy to Azure. Some can but most can’t here is a list of the services that you can deploy to from extensions in VS Code.

Azure Service Description
Azure Functions Build and manage Azure Functions serverless apps directly in VS Code with the Azure Functions extension.
App Service Manage Azure resources directly in VS Code with the Azure App Service extension.
Docker Deploy your website using a Docker container.
Azure CLI Create, deploy, and update a website using a terminal and the Azure CLI.
Static website Create, deploy, and update a static website on Azure Storage.

NOTE: This list is current at the time of writing this blog post. This will change over time.

Azure Cloud Shell in VS Code

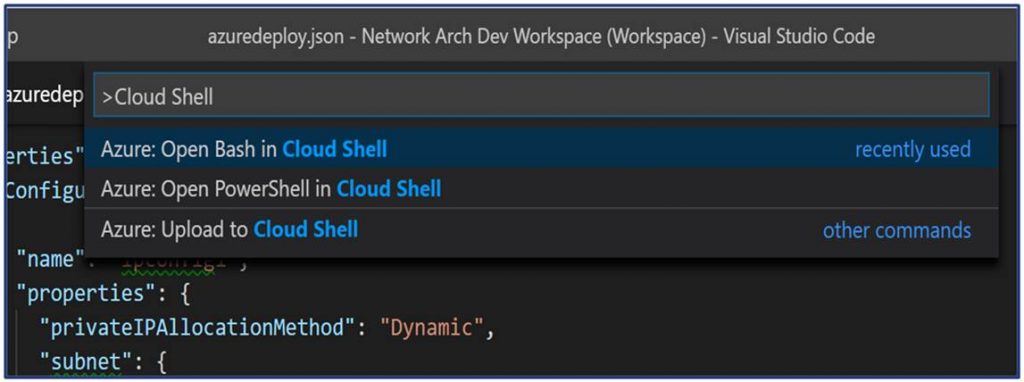
Cloud Shell is something you should be using with Azure to make your life easier. It is an interactive command-line shell. You are authenticated to your Azure account when you launch it, It typically runs in the browser and is used for managing Azure resources. When you launch it you can choose the shell experience that best for you, either Bash or PowerShell. With VS Code you can launch Cloud Shell directly in VS Code!

Cloud Shell is a part of the Azure Account extension. Here are some key points on using Cloud Shell with VS Code:

  • Free (storage consumed has costs.)
  • Launch Azure Cloud Shell directly in VS Code.
  • Launch Bash, PowerShell, or Upload.
  • Works in the Integrated Terminal.

Azure and open-source Tooling in Cloud Shell:

Azure Tools:
blobxfer Azure CLI and Azure classic CLI Azure Functions CLI AzCopy Service Fabric CLI Batch Shipyard  
Open-Source:
Bash Terraform Packer Ansible Chef InSpec Puppet Bolt Docker Kubectl Helm DC/OS CLI iPython Client Cloud Foundry CLI

PowerShell Modules in Cloud Shell

You get the following PowerShell modules in Cloud Shell:
Azure Modules (Az.Accounts, Az.Compute, Az.Network, Az.Resources, Az.Storage)
Azure AD Management (Preview)
Exchange Online (In development)
MicrosoftPowerBIMgmt
SqlServer

Marketplace Link:

Azure Account: https://marketplace

Maintained By Microsoft

Read more

Enhance Azure ARM Template Authoring in VS Code

For anyone working with Azure sooner or later, you will end up authoring Azure Resource Manager (ARM) Templates. Working with ARM templates, in the beginning, can seem painful but once you get the hang of them it is a great way to build out and deploy your Azure as code. In this blog post, I am not going to go into detail on authoring ARM Templates. In this blog post, I am going to list out the extensions that I use in VS Code to enhance the ARM Template authoring experience. Recently whenever I am demoing or showing others my ARM Templates in VS Code they ask me how they can also make their VS Code look like mine when working with ARM Templates. I figured it makes sense to write up a blog about how I have my VS Code configured for ARM Templates.

If you are not using VS code, you should change that and start using it today! I use it pretty much for any scripting such as PowerShell, coding, any time I need a text editor and more. I even use it to work directly with Azure via cloud shell and to work with Docker containers and Kubernetes clusters. Here is a quick snapshot of what VS Code is for anyone not familiar with it. VS Code is an open source – code editor developed by Microsoft that is cross-platform able to run on Windows, Linux and macOS.​ At a high level here is what VS Code includes:

  • Has support for hundreds of languages.​
  • Has Integrated Terminal.​
  • Powerful developer tool with functionality, like IntelliSense code completion and debugging. ​
  • Includes syntax highlighting, bracket-matching, auto-indentation, box-selection, snippets, and more.​
  • Integrates with build and scripting tools to perform common tasks making everyday workflows faster. ​
  • Has support for Git to work with source control systems such as Azure DevOps, Bitbucket and more.​
  • Large Extension Marketplace of third-party extensions.​

As you can see there is a ton of stuff you can do with VS Code. VS Code is a must have for anyone doing CloudOps work with Azure and more. Now let’s look at the VS Code extensions I use for ARM Templates. I am including the link for each extension I will talk about. You can also simply load these right in VS Code.

Azure Resource Manager Tools:   https://marketplace.visualstudio.com/items?itemName=msazurermtools.azurerm-vscode-tools​

The Azure Resource Manager Tools extension provides language support for ARM Templates and language expressions. It can be used to create and edit Azure Resource Manager templates. ​High-level features include:

  • ARM Template Outline.​
  • IntelliSense.​
  • Support for built-in ARM functions, Parameter references, Variable references, resourceGroup() properties, subscription() properties, and more.
  • Bracket matching, Errors/Warnings and more.​

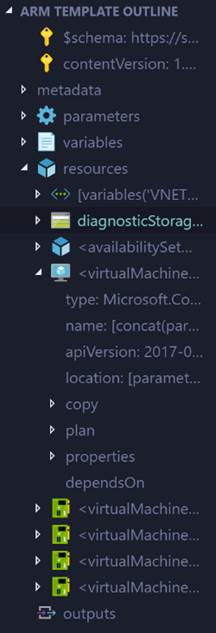
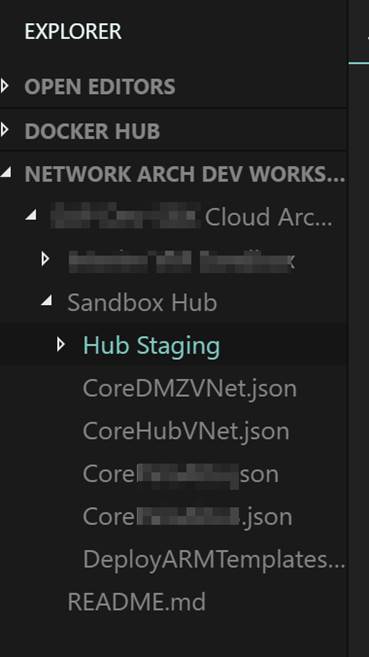
VS Code natively supports JSON. Azure Resource Manager Tools makes VS Code ARM Template aware. One of the biggest benefits it gives me is the ARM Template Outline making it much easier and faster to navigate the sections of an ARM Template. Here is what it looks like.

Next up is two extensions that both should be added. It is Material Theme and Material Theme Icons.

Material Theme –   https://marketplace.visualstudio.com/items?itemName=Equinusocio.vsc-material-theme

This extension gives you some very cool themes and works in combination with the Azure Resource Manager Tools extension to give you the new color coding of your ARM Template code. The color coding highlights different parts of the ARM Template code such as parameters, variables, functions and more making it much easier to read through all of the code in ARM templates. Here is an example:

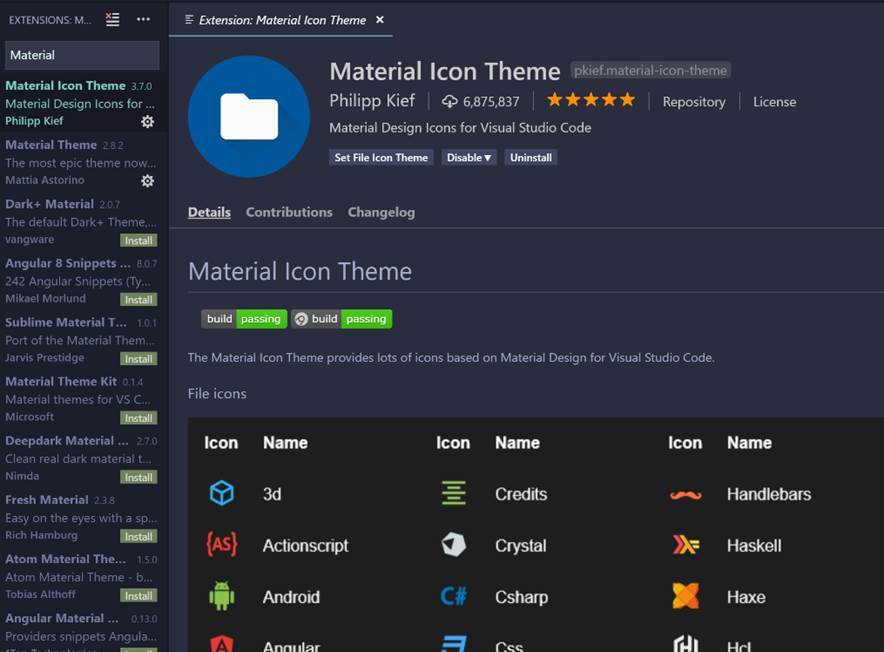
Material Icons Themehttps://marketplace.visualstudio.com/items?itemName=PKief.material-icon-theme

This extension adds a nice set of icons to your VS code. This extends beyond just ARM Templates. Again this makes it visually easier when navigating around VS code and ARM Templates. I typically use a PowerShell deployment script to deploy ARM Templates from VS Code into Azure. This icon them makes it easy to see ARM Template files and PowerShell files.

Here is a what it looks like without and with the Materials Icon Theme.

Without it:

With it:

ARM Snippets –  https://marketplace.visualstudio.com/items?itemName=samcogan.arm-snippets

The final extension I want to cover is ARM Snippets. This extension was developed by Sam Cogan (@samcogan) a fellow Microsoft MVP. In addition to the aforementioned marketplace link for this extension, you can find Sam’s Github repo for it here https://github.com/sam-cogan/arm-snippets-vscode.

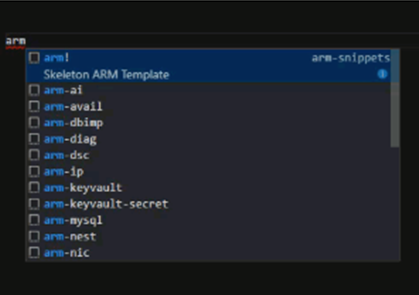
This extension adds snippets to VS Code for creating Azure Resource Manager Templates. This is helpful when you are working in VS Code and need to add something to your template for example a parameter, resource etc. You simply type arm and a menu appears with a list of the available snippets. For example if you want to add a virtual machine you could type arm-vm and a list of Windows and Linux VM resources snippets will appear. Click on the one you want and it will add the code block for you. This makes authroing templates much-much faster. This is shown in the following screenshot:

​The snippets include:​

  • Skeleton ARM Template​ (Note: This will load a skeleton for a fresh new ARM Template.)
  • Windows and Linux Virtual Machines​
  • Azure Web Apps​
  • Azure Functions​
  • Azure SQL​
  • Virtual Networks, Subnets and NSG’s​
  • Keyvault​
  • Network Interfaces and IP’s​
  • Redis​
  • Application Insights​
  • DNS​
  • Virtual Machines​
  • And more……

Note that the ARM Snippets extension is derived from the Cross Platform Tooling Samples. The Cross Platform Tooling Samples are a set of templates, snippets, and scripts for creating and deploying Azure Resource Management Templates in cross-platform environments. It sounds like this is updated more often and worth looking into loading. It does not have a friendly installer though like the ARM Snippets extension does though. Here is the link to the Cross Platform Tooling Samples Github repo: https://github.com/Azure/azure-xplat-arm-tooling

End Result:

Below is a screenshot of what your ARM Templates will look like after loading all of the extensions mentioned in this blog post into your VS Code.

That wraps up this blog post. I hope this is helpful to those out there working with ARM Templates in VS Code. If you have any additional tips to share please add a comment. Happy authoring!

Read more

Architect your Cloud with Azure Blueprints

Today as a part of the Azure Governance and management announcements at Microsoft Ignite 2018 Azure Blueprints Public Preview was announced. Azure Blueprints are a core part of the cloud governance and management story. They go hand and hand with Management Groups and will take the enterprise management story of Azure up a level. In this blog post I will take a deep dive into Azure Blueprints explaining what they are and give an example of how they can be used.

NOTE: This is a long blog post so I have also published this content as a whitepaper. The whitepaper PDF can be downloaded here.

BLUEPRINTS OVERVIEW

At a high-level Azure Blueprints help you meet organizational cloud standards, patterns, and requirements through governed subscriptions enabled and enforced by the grouping of artifacts like ARM templates, Azure policies, RBAC role assignments, and resource groups within a Blueprint.

Blueprints can be used to lay a cloud foundation, as cloud patterns, and group cloud governance frameworks. Blueprints are a one-click solution for deploying a cloud foundation, pattern, or governance framework to an Azure subscription. Think of an Azure Blueprint as re-usable design parameters for cloud that can be shared and used across an enterprise.

Azure architects typically map out and plan the many aspects of a cloud foundation for an organization such as access management, networking, storage, policy, security/compliance, naming conventions, tagging, monitoring, backup, locations, and more. Now Azure architects can step this designing a step further build these designs as Azure Blueprints and then apply them to subscriptions. The Blueprints give architects a way to orchestrate the deployment of grouped components to speed up the development and provisioning of new Azure environments ensuring they are meeting organizational compliance.

BLUEPRINTS ARE NOT AZURE POLICY

Azure policy is a service targeted to resource properties that exists or when being deployed with allow or explicit deny policies. It is used to ensure resources in an Azure subscription adhere to requirements and standards of an organization.

Azure policies can exist on their own or be a part of an Azure Blueprint. Blueprints do not replace Policy they are one of the Artifact types that make up a Blueprint.

THE MAKEUP OF A BLUEPRINT

Definition

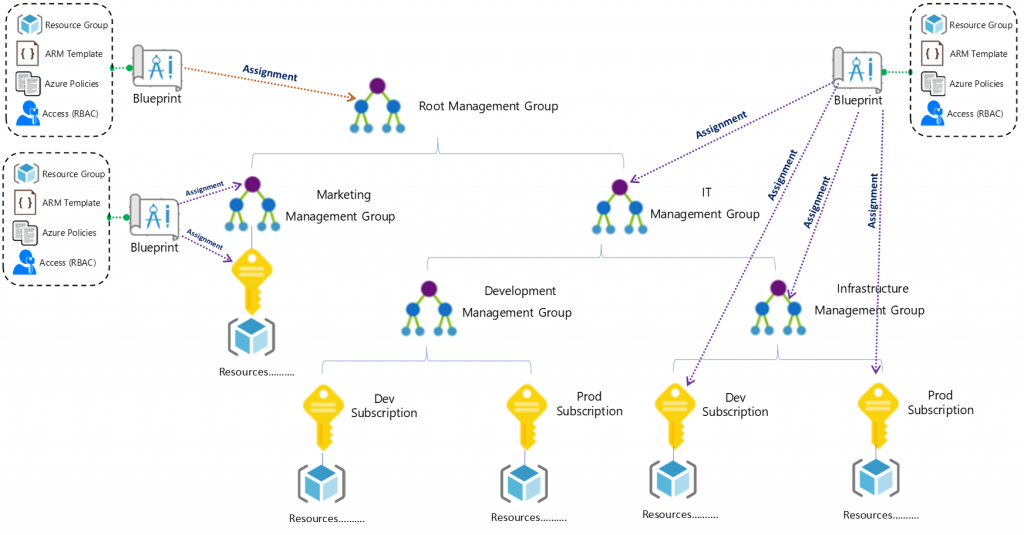
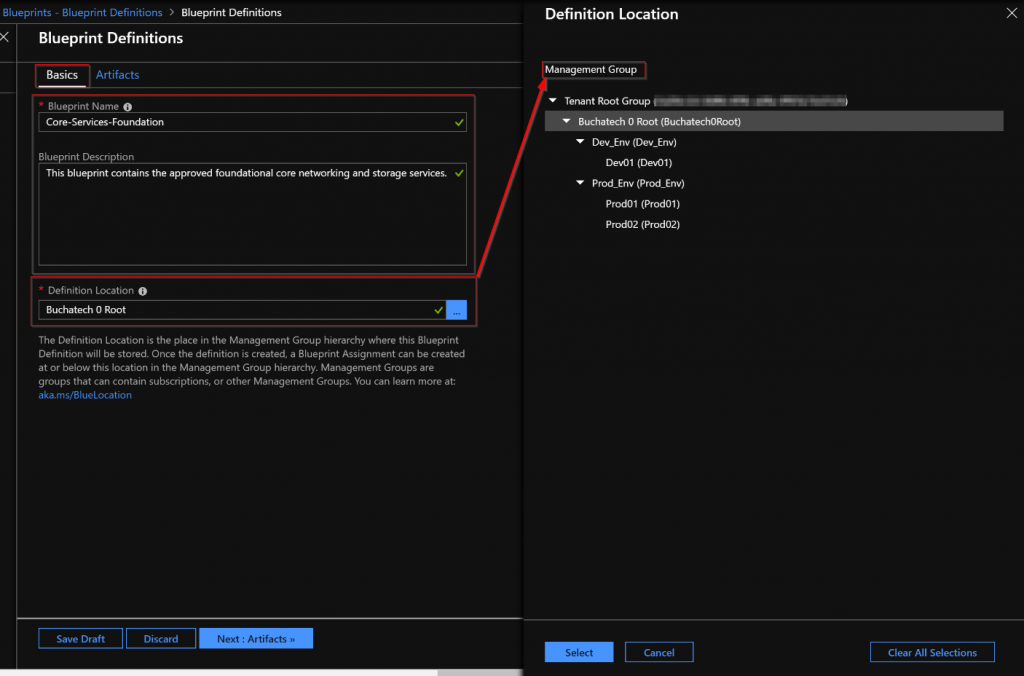
A Blueprint consists of a Definition. The Definition is the design of what should be deployed it consists of the name of the Blueprint, the description and the Definition location. The Definition Location is the place in the Management Group hierarchy where this Blueprint Definition will be stored and determines the level assignment is allowed at. Currently you must have Contributor access to a Management Group to be able to save a Blueprint Definition to it. A Blueprint can be assigned at or below the Management Group it has set in its Definition Location. Here is a diagram to visualize Blueprint Assignment in relation to Management Group hierarchy:

Azure Blueprint Assignment

Artifacts

The Definition is where Blueprint Artifacts are added. As of right now the following is a list of the Artifact types:

  • Policy Assignments – Lets you add an Azure Policy. This can be a built-in or custom policy.
  • Role Assignments – Lets you add a user, app, or group and set the role. Only built-in roles are currently supported.
  • Azure Resource Manager templates – Lets you add an ARM Template. This does not let you import a parameters file. It does let you pre-set the parameters or set the parameters during assignment of the Blueprint.
  • Resource Groups – Lets you add a Resource Group to be created as a part of this Blueprint.

In my opinion the ARM Template artifact is the most impactful of the Blueprint artifact types because you can define such a variety of resources here. It opens the Blueprint to the power of ARM in general. Hopefully in the future we will see more scripting capability or the ability to load PowerShell scripts, runbooks, and or Functions.

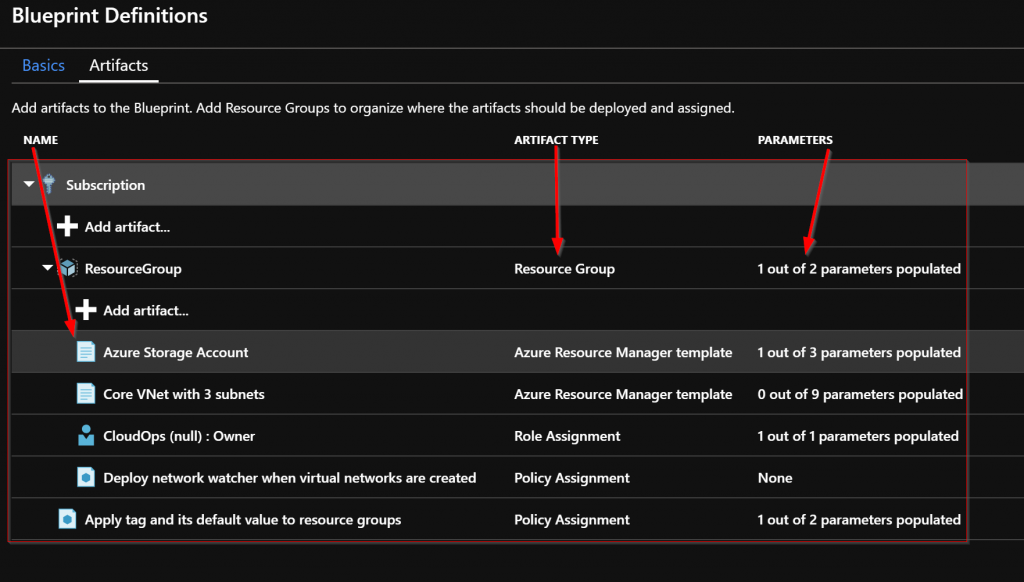
There are two levels in the Artifacts. The first level is Subscription. The second level is Resource Group. Resource Group artifacts cannot be added to a Resource Group artifact. A Resource Group artifact can be created in a Subscription. An ARM Template artifact can only be created in a Resource Group artifact. A Policy Assignments or Role Assignments can be created at either the Subscription or Resource Group level.

Assignment

After a Blueprint has been built it needs to be applied. Applying a Blueprint is known as Blueprint assignment. The assignment is essentially the “what was deployed” for a Blueprint. This is how the artifacts are pushed out to Azure and used to track and audit deployments in Azure.

Sequencing

When the assignment of a Blueprint is processed the default order of resource creation is:

  • Role assignment artifacts at the Subscription level
  • Policy assignment artifacts at the Subscription level
  • Azure Resource Manager template artifacts at the Subscription level
  • Resource group artifacts and its child artifacts (role assignment, policy assignment, ARM Templates) at the Resource Group level

When a blueprint includes multiple Azure Resource Manager templates there may be a need to customize the sequencing order in which the Blueprint will deploy artifacts during assignment. You customize the artifact deployment sequence by deploying a Blueprint from an ARM Template declaring a dependency within it or declaring a dependency within an ARM Template artifact in the Blueprint. You declare a dependency using the dependsOn property in JSON. This essentially is a string array of artifact names.

Resource Locking

In cloud environments consistency is key. Naturally Azure Blueprints can also leverage resource locking in Azure. Blueprints have a Locking Mode. This Locking Mode can be applied to None or All Resources and is determined during the assignment of the Blueprint. The decision on cannot be changed later. If a locking state needs to be removed, then you must first remove the Blueprint assignment.

Some Blueprint artifacts create resources during assignment. These resources can have the following state:

  • Not Locked – Can be changed. Can be deleted.
  • Read Only – Can’t be changed and can’t be deleted.
  • Cannot Edit / Delete – Create, update, and delete within the resource group.

Artifacts that become Resource groups get the state of Cannot Edit / Delete automatically but you can create, update, and delete resources within them.

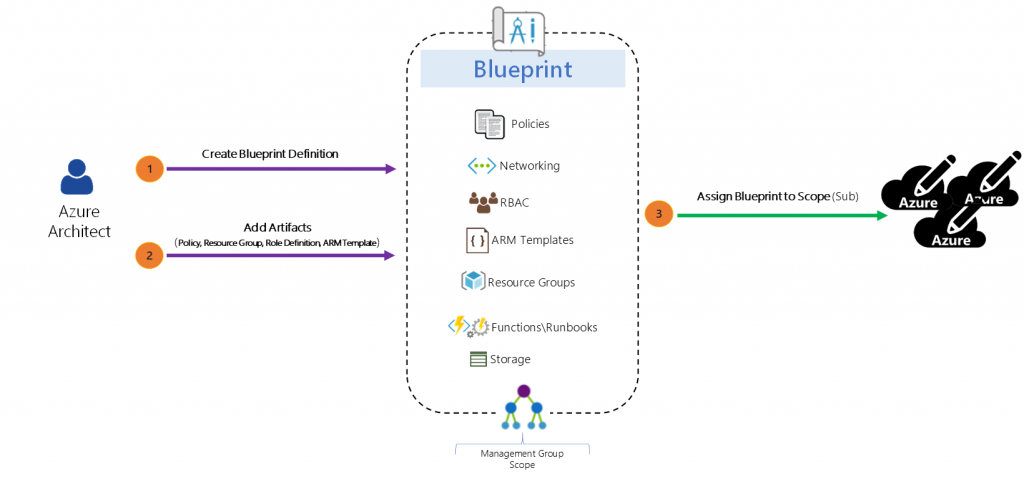
The high-level stages of an Azure Blueprint are Create it, assign it to a scope, and track it.

Anatomy of a Blueprint:

Azure Blueprint Anatomy


Blueprint does have a REST API. I am not covering the REST API in this blog post as I have not had the opportunity to spend much time working with it yet.

Now let’s look at building and assigning an Azure Blueprint.

BUILD A BLUEPRINT

Now I am going to give an example of building and using an Azure Blueprint in a cloud foundation mock scenario. In my mock scenario I have 3 Azure subscriptions. Each subscription should have a Core services Resource Group consisting of a core VNet with 3 subnets, an NSG for each subnet, and the web subnet should be ready for DMZ traffic. For the core VNet and any additional VNet added to the Core Services Resource Group I need network watcher deployed to it.

Each subscription also should have a core storage account and a blob storage that is ready for general storage needs. I want a tag applied to any Blueprint assignment labeling it with the assignment name, so it is easy to track. The last requirement I have is that I need the CloudOps team to automatically be owner of all core services resources. To accomplish all of this I created the following Blueprint:

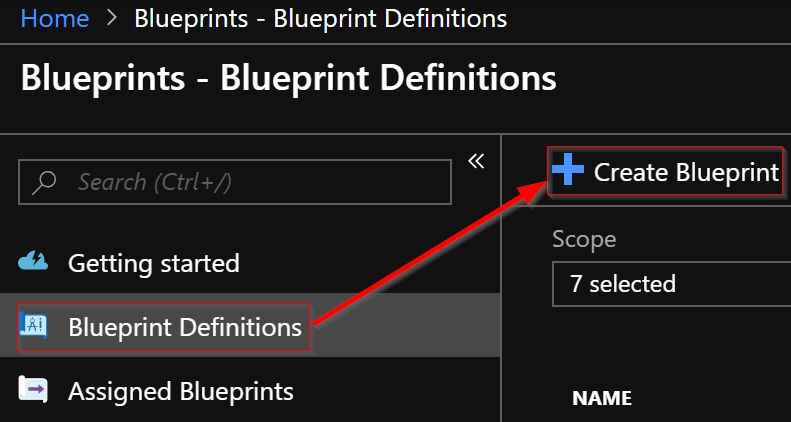
Now let’s walk through the parts of creating and assigning the Blueprint. The first step is to create the Blueprint Definition.

In the basics step I give it a meaningful name and meaningful description. I set the Definition Location to the root of my Management groups. Doing this will allow me to assign this Blueprint to all 3 subscriptions in turn creating the core services RG in each subscription.

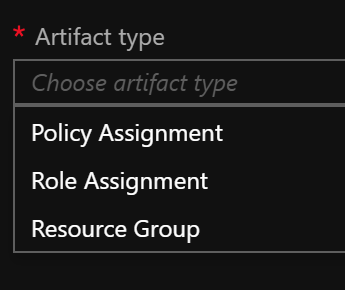
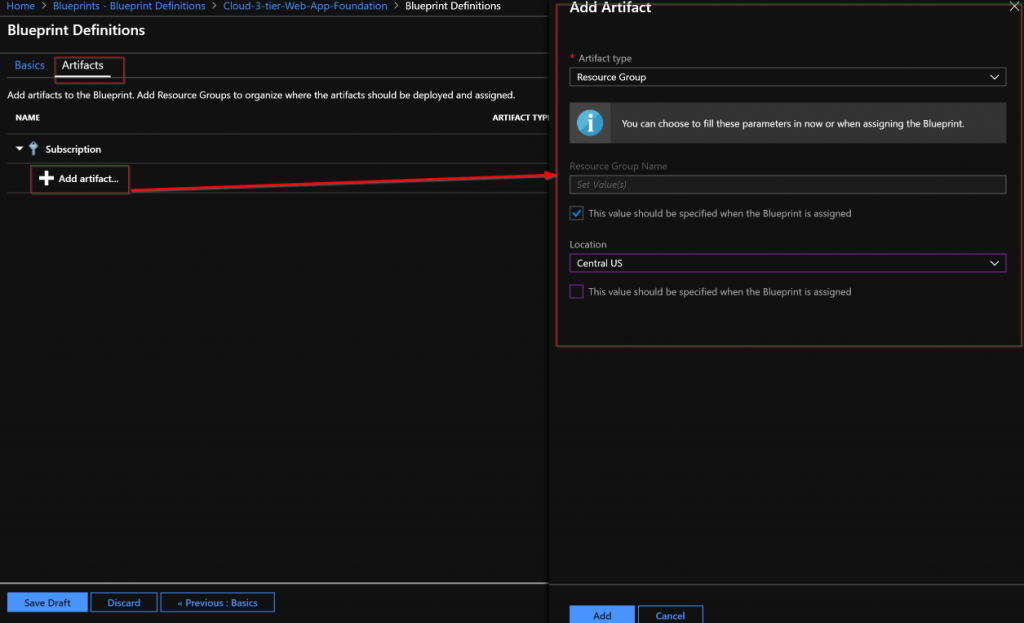
Next the Artifacts need to be added. Note that when adding an Artifact at the Subscription level you have these options as types:

The Resource Group Artifact type is only available at the subscription level and the ARM template Artifact type is only available at the Resource Group level. I added the Resource Group that the core networking and core storage will be deployed into.

Read more

Multiple Linux VM Deployment ARM Template

I looked for an existing ARM template that would create multiple Linux VM’s. I found only one that creates some in a scale set. The use case I was working with did not call for a scale set so I needed a different template.

I found a simple ARM template for creating multiple Windows VM’s on Azure here. It had exactly what I needed for my use case but did not cover Linux.

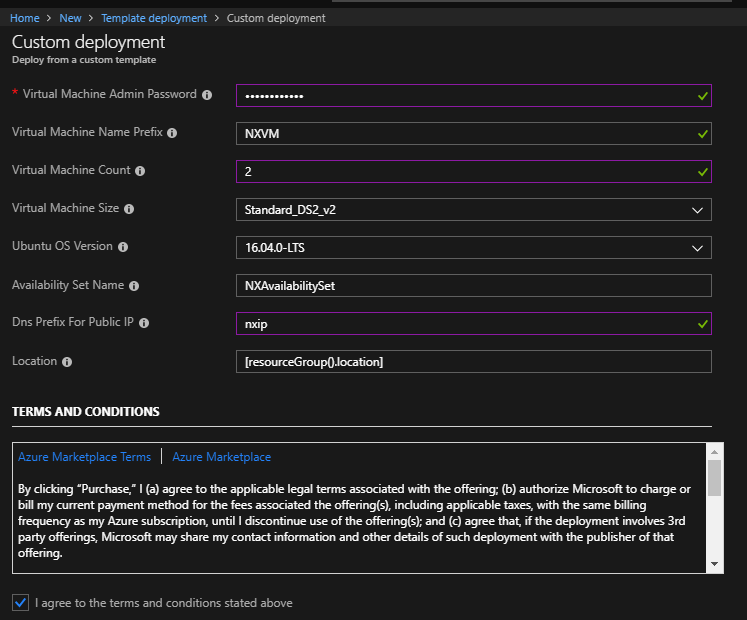
I modified the template and uploaded to Github in case this is helpful to anyone else. The repo has two templates. There is one for Ubuntu and one for SUSE. When you deploy the template it will need the following parameters:

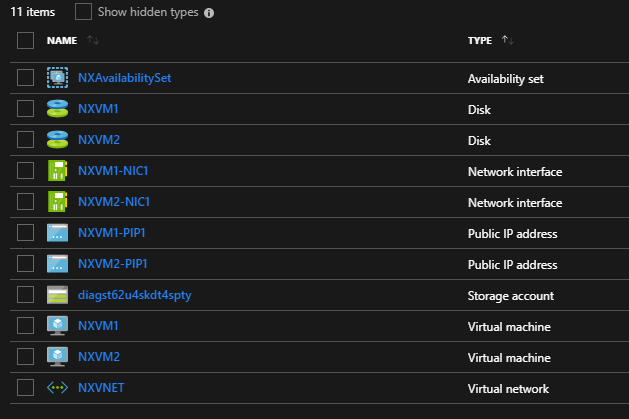
The ARM template will create an availability set (AS) with N number of VM’s put in that AS, network interfaces, and public IP’s for each VM along with a VNet and Subnet as shown in the following screenshot:

Here is the link to download the ARM Template:

https://github.com/Buchatech/Multiple-Linux-VM-Deployment-ARM-Template

Read more

Microsoft Professional Program for DevOps Finished!

I am a firm believer that no matter how old you are, how far along you are in your career, and regardless of the industry you are in it is important to continue educating yourself. This helps you expand your skillset, stay relevant, and sets you up for new opportunities as they come along. My field of information technology has been changing at a rapid pace and so for a while, I wanted a good way to ramp up on DevOps as a whole. A while back I found out that Microsoft added a new track to their Professional Program for DevOps. When I checked it out I found it to be very thorough and it was not just focused on Microsoft’s DevOps tooling but included non-Microsoft as well. I jumped in without hesitation and started learning.

I finally completed the program last week. Here is my certificate https://academy.microsoft.com/en-us/certificates/67284e84-8afe-4f13-b477-d7620949fb18. I am planning to dive into the program they have for cloud next. If you have not heard of Microsoft’s Professional Program DevOps before here more information about it:

“DevOps is the union of people, process, and products to enable continuous delivery of value to end users. This program helps the student learn about continuous integration and deployment, infrastructure as code, testing, databases, containers, and application monitoring: skills necessary for a DevOps culture in today’s workplace. This program focuses on Microsoft DevOps technologies as well as some OSS (Open Source Software) DevOps tools. Some of the Microsoft DevOps technologies covered in this course consist of Azure, Azure Resource Manager, IaaS, PaaS, IIS, Azure App Service, DevTest labs, Desired State Configuration (DSC), Azure Automation, OMS, Application Insights, SQL, Nuget, TFS, VSTS, and Visual Studio. Some of the OSS DevOps tools covered in this course consist of Jenkins, Git, Github, New Relic, Nagios, Chef, Docker, DC/OS, swarm, and Kubernetes.”

Here is a link to it:  https://academy.microsoft.com/en-us/tracks/devops

This program consists of 8 required courses. Each course runs for three months and starts at the beginning of a quarter. In the end, there is a capstone that has to be completed. This capstone course is the 8th one. You have four weeks to complete the capstone. The capstone is a bunch of hands-on stuff you have to do. Courses average 16-32 hours per course to complete and are taken via the edX.org platform https://www.edx.org/microsoft-professional-program-devops.

Here is a list of all of the DevOps program courses:

      • Introduction to Dev Ops Practices
      • Infrastructure as Code
      • Continuous Integration and Continuous Deployment
      • Configuration Management for Containerized Delivery
      • DevOps Testing
      • DevOps for Databases
      • Application Monitoring and Feedback Loops
      • Microsoft Professional DevOps Capstone Project
      • The DevOps Capstone Project contains:
        • Automation
          • Use ARM templates to deploy and configure Infrastructure in Azure
        • Continuous Integration
          • Implement Continuous Integration solution using Visual Studio Team services (VSTS)
        • Continuous deployment
          • Implement Continuous Deployment solution using Visual Studio Team Services (VSTS)
        • Testing
          • Implement Unit tests
          • Implement Testing in Production
        • Application Monitoring
          • Implement application monitoring solution using Application Insights

As you can see from that list this program is not just all about VSTS. There is a lot of Azure baked in as well as other non-Microsoft DevOps tooling. I highly recommend this course for anyone jumping into DevOps, or CloudOps and especially for folks with an IT pro background. If CloudOps is foreign to you here are a couple of blogs related to this topic: Sys Admin to Cloud Admin…ITSM to CloudOps…On-Prem to Azure Stack/Azure and Native Cloud Management in Azure.

My personal opinion is that Microsoft should move away from the certifications as they are and to this format. This format combines training and testing. When Microsoft first started the Professional Program for they only had a track for data scientists. They have added more and more tracks over time. Today there are tracks also for Big Data, Web Development, Software Development, AI, IT Support, and Cloud Administration.

Here is a link for all the tracks so you can check them out: https://academy.microsoft.com/en-us/professional-program/tracks. These programs are a great way to expand your learning. Check them out!

Read more

Setup CI/CD pipeline with VSTS & Azure Stack

We all know that DevOps brings together people, processes, and technology. In the Microsoft DevOps world A large part of the technology piece is utilizing Visual Studio Team Services (VSTS) for continuous deployment of workloads to Azure.

Microsoft launched their Hybrid Cloud on July 10th 2017. Azure Stack is the secret sauce of Microsoft’s the Hybrid Cloud. Microsoft’s offering is the only one true Hybrid Cloud in the market bringing Azure to on-premises data centers.

As Microsoft continues to move their Hybrid Cloud forward the DevOps integration and capabilities we have for Azure extend to Azure Stack. Again I was fortunate to participate in a preview of the VSTS integration with Azure Stack. I was happy to see Microsoft putting a priority on this functionality because DevOps on Azure Stack is a HUGE need. Cloud is often the catalyst to helping organizations adopt a DevOps culture fostering digital transformation. Some organizations not being able to put all workloads in public cloud Azure Stack is a good way for them to get the same cloud capabilities on-premises DevOps integration being one of them. The setup and integration between VSTS and Azure Stack is working nicely. The team at Microsoft has given me permission to share about this topic via my blog.

In this blog post I am going to cover setting up VSTS to work with Azure and setting up a continuous-integration and-continuous deployment (CI/CD) pipeline to Azure Stack. With Microsoft DevOps you can utilize the pieces of VSTS that make sense for you to use leaving the control up to you. Through VSTS you can use many other DevOps tools such as Jenkins, Octopus deploy, GitHub, Bitbucket etc into your pipeline making Azure Stack just as flexible as Azure is. Let’s Jump in!

Steps to prep Azure Stack for Visual Studio Team Services (VSTS)

#1 Ensure you have installed the Azure Stack PowerShell and Azure PowerShell modules.

Details can be found here:

https://docs.microsoft.com/en-us/azure/azure-stack/azure-stack-powershell-install

#2 Add the Azure Stack environment using the following syntax

# Navigate to the downloaded folder and import the **Connect** PowerShell module

Set-ExecutionPolicy RemoteSigned

Import-Module PATH\AzureStack.Connect.psm1

# Register an AzureRM environment that targets your Azure Stack instance

Add-AzureRMEnvironment `

-Name “AzureStackAdmin” `

-ArmEndpoint “https://adminmanagement.local.azurestack.external

# Set the GraphEndpointResourceId value

Set-AzureRmEnvironment `

-Name “AzureStackAdmin” `

-GraphAudience “https://graph.windows.net/

# Get the Active Directory tenantId that is used to deploy Azure Stack

$TenantID = Get-AzsDirectoryTenantId `

-AADTenantName “YOURDOMAIN.onmicrosoft.com” `

-EnvironmentName “AzureStackAdmin”

# Sign in to your environment

Login-AzureRmAccount `

-EnvironmentName “AzureStackAdmin” `

-TenantId $TenantID

NOTE: You will need the environment name and the tenant ID for the next script.

#3 Create SPN

Original SPN creation script can be found here:

https://github.com/Microsoft/vsts-rm-documentation/blob/master/Azure/SPNCreation.ps1

Documentation on creating an SPN can be found here:

https://www.visualstudio.com/en-us/docs/build/concepts/library/service-endpoints#sep-azure-rm

Below I will display the script I used. Note that you will need the following parameters for the script:

$subscriptionName

“Enter Azure Stack Subscription name. You need to be Subscription Admin to execute the script”)]

$password

“Provide a password for SPN application that you would create”

$environmentName

“Provide Azure Stack environment name for your subscription”

$AzureStackTenantID

“Provide tenant ID from when Azure Stack enviroment was added”

EXAMPLE:

.\CreateSPN.ps1 -subscriptionName “Default Provider Subscription” -password PASSWORDHERE -environmentName AzureStackAdmin -AzureStackTenantID ID HERE

Here is the script I used that you can run:

param

(

[Parameter(Mandatory=$true, HelpMessage=”Enter Azure Stack Subscription name. You need to be Subscription Admin to execute the script”)]

[string] $subscriptionName,

[Parameter(Mandatory=$true, HelpMessage=”Provide a password for SPN application that you would create”)]

[string] $password,

[Parameter(Mandatory=$false, HelpMessage=”Provide a SPN role assignment”)]

[string] $spnRole = “owner”,

[Parameter(Mandatory=$false, HelpMessage=”Provide Azure Stack environment name for your subscription”)]

[string] $environmentName,

[Parameter(Mandatory=$false, HelpMessage=”Provide tenant ID from when Azure Stack enviroment was added”)]

[string] $AzureStackTenantID

)

#Initialize

$ErrorActionPreference = “Stop”

$VerbosePreference = “SilentlyContinue”

$userName = $env:USERNAME

$newguid = [guid]::NewGuid()

$displayName = [String]::Format(“VSO.{0}.{1}”, $userName, $newguid)

$homePage = “http://” + $displayName

$identifierUri = $homePage

#Initialize subscription

$isAzureModulePresent = Get-Module -Name AzureRM* -ListAvailable

if ([String]::IsNullOrEmpty($isAzureModulePresent) -eq $true)

{

Write-Output “Script requires AzureRM modules to be present. Obtain AzureRM from https://github.com/Azure/azure-powershell/releases. Please refer https://github.com/Microsoft/vsts-tasks/blob/master/Tasks/DeployAzureResourceGroup/README.md for recommended AzureRM versions.” -Verbose

return

}

Import-Module -Name AzureRM.Profile

Write-Output “Provide your credentials to access Azure subscription $subscriptionName” -Verbose

Login-AzureRmAccount -SubscriptionName $subscriptionName -EnvironmentName $environmentName -TenantId $AzureStackTenantID

$azureSubscription = Get-AzureRmSubscription -SubscriptionName $subscriptionName

$connectionName = $azureSubscription.SubscriptionName

$tenantId = $azureSubscription.TenantId

$id = $azureSubscription.SubscriptionId

#Create a new AD Application

Write-Output “Creating a new Application in AAD (App URI – $identifierUri)” -Verbose

$azureAdApplication = New-AzureRmADApplication -DisplayName $displayName -HomePage $homePage -IdentifierUris $identifierUri -Password $password -Verbose

$appId = $azureAdApplication.ApplicationId

Write-Output “Azure AAD Application creation completed successfully (Application Id: $appId)” -Verbose

#Create new SPN

Write-Output “Creating a new SPN” -Verbose

$spn = New-AzureRmADServicePrincipal -ApplicationId $appId

$spnName = $spn.ServicePrincipalName

Write-Output “SPN creation completed successfully (SPN Name: $spnName)” -Verbose

#Assign role to SPN

Write-Output “Waiting for SPN creation to reflect in Directory before Role assignment”

Start-Sleep 20

Write-Output “Assigning role ($spnRole) to SPN App ($appId)” -Verbose

New-AzureRmRoleAssignment -RoleDefinitionName $spnRole -ServicePrincipalName $appId

Write-Output “SPN role assignment completed successfully” -Verbose

#Print the values

Write-Output “`nCopy and Paste below values for Service Connection” -Verbose

Write-Output “***************************************************************************”

Write-Output “Connection Name: $connectionName(SPN)”

Write-Output “Subscription Id: $id”

Write-Output “Subscription Name: $connectionName”

Write-Output “Service Principal Id: $appId”

Write-Output “Service Principal key: <Password that you typed in>”

Write-Output “Tenant Id: $tenantId”

Write-Output “***************************************************************************”

Output should be similar to this:
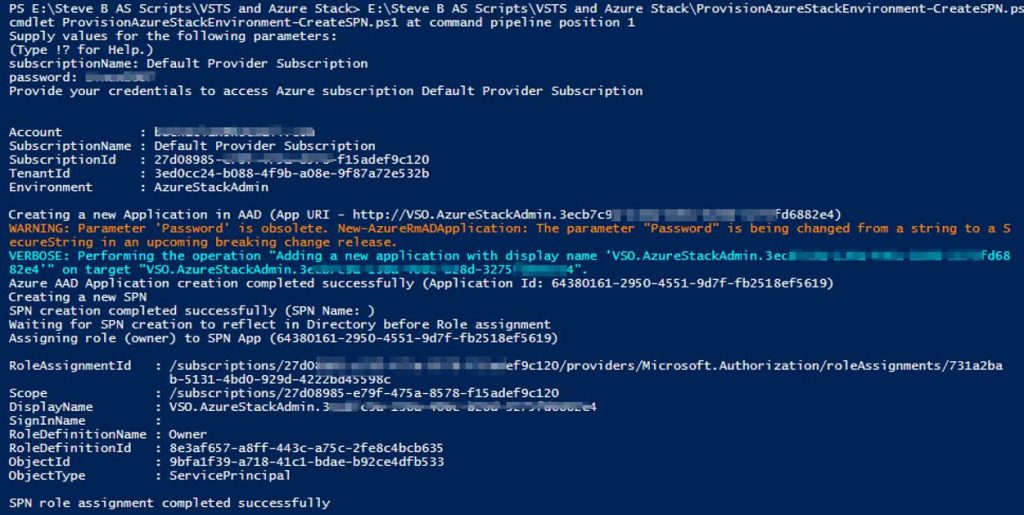
You will use information from the Service Connection output in the next step.

Steps to configure Azure Stack as a Service Endpoint in VSTS

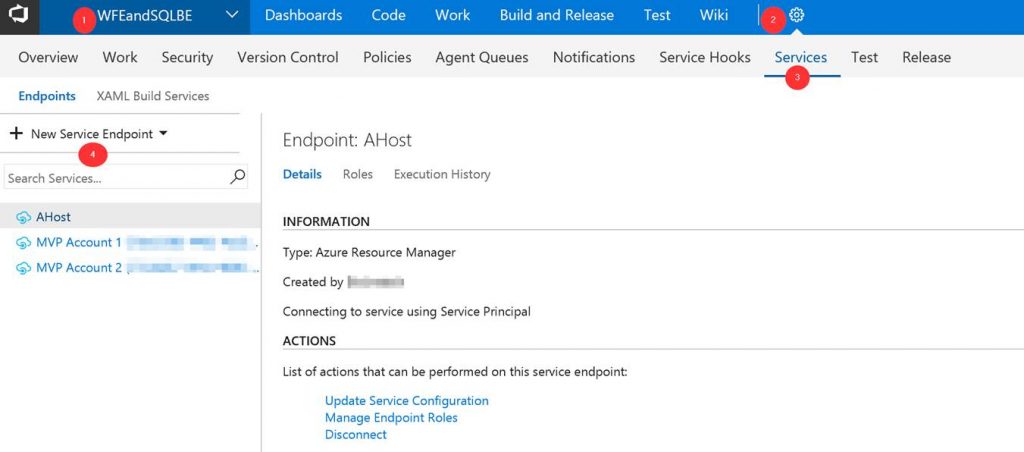
Log into your VSTS account at visalstudio.com

Navigate to one of your projects.

Go into Settings.

Click on Services.

Click on New Service Endpoint
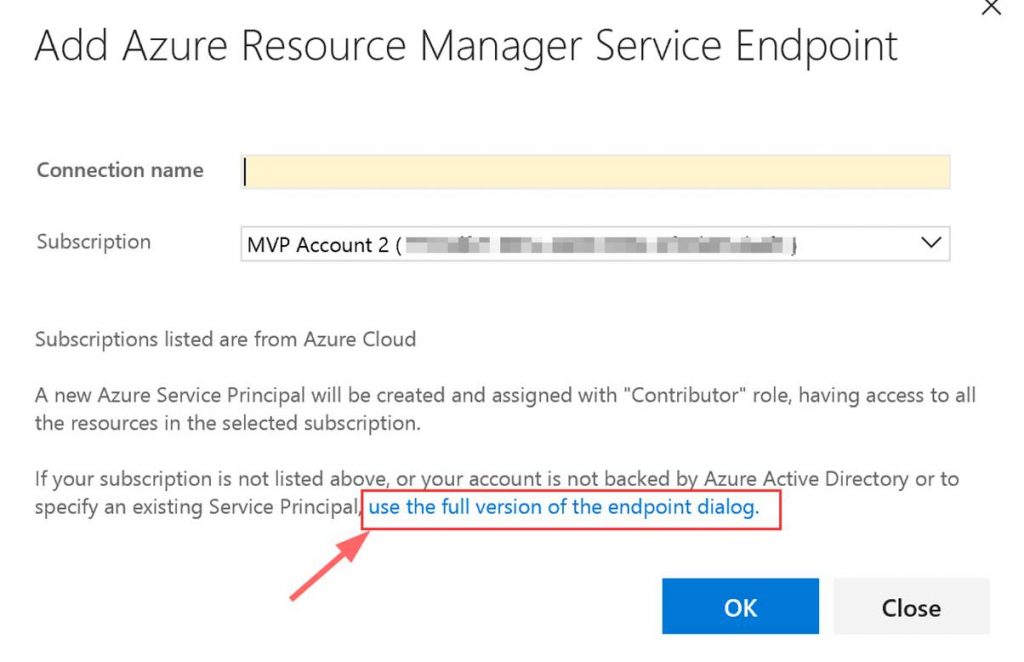
A window will pop up. Click on “use full version of the endpoint dialog.”
Next input the needed data. This data comes from the Service Connection info that you copied.
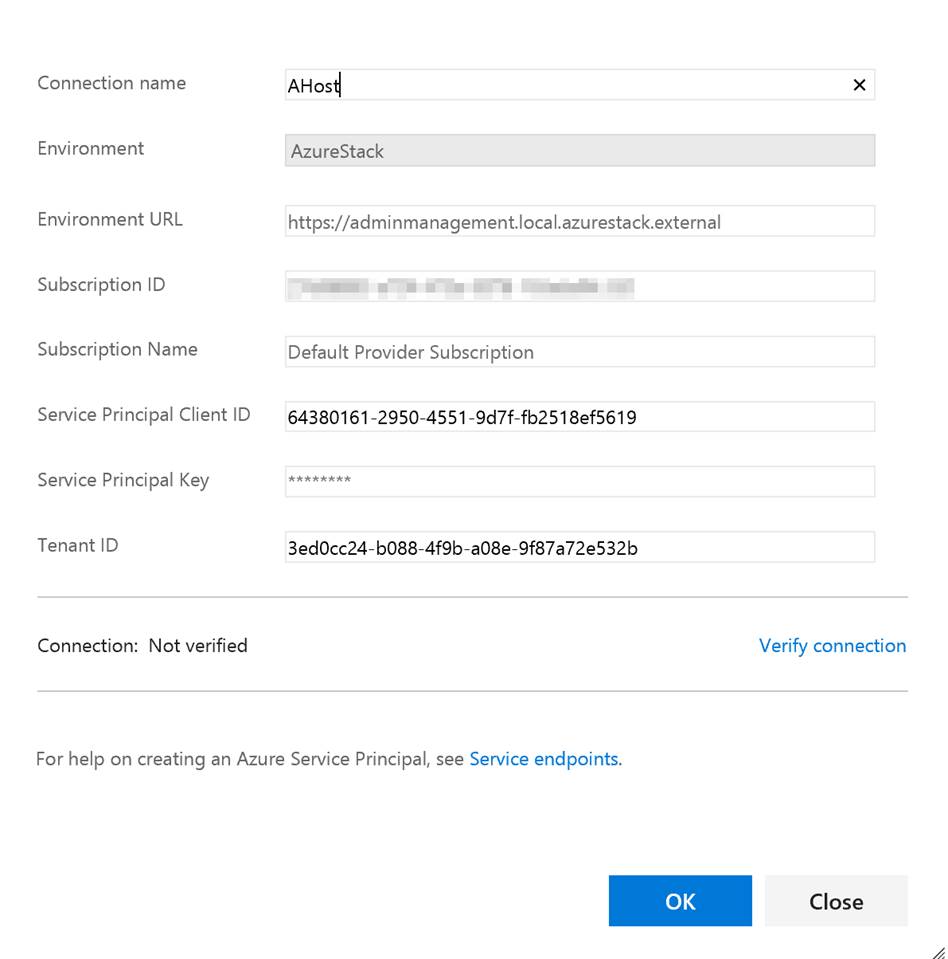
You can put whatever you want in the Connection name and the Subscription Name. Note do not verify the connection. It will not succeed as VSTS cannot access your private Azure Stack yet. Click OK when done.

Setup build agent on Azure Stack host

Next you need to setup the build agent on the Azure Stack host. (Note: In this post I am using the ASDK.) From within VSTS download the Windows agent. Extract the download to a local folder.
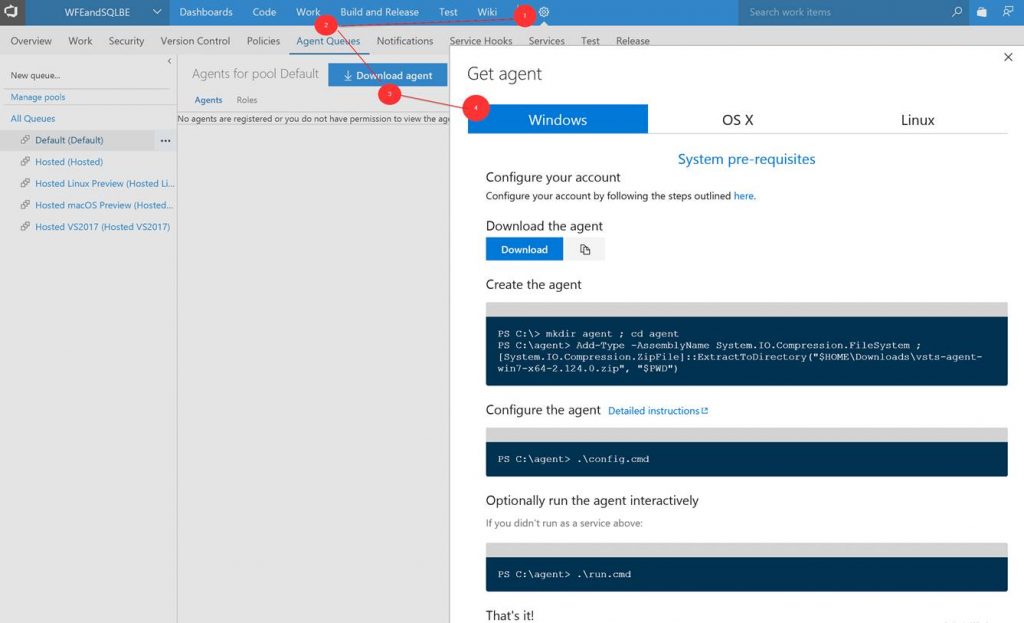
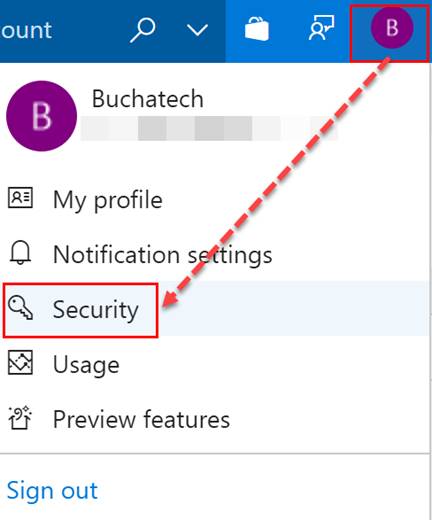
Go to Security under your profile in VSTS.
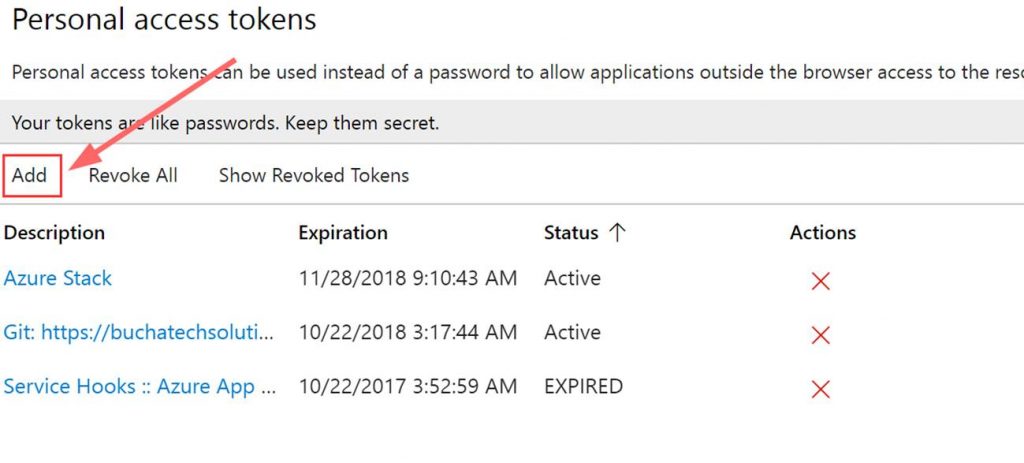
Next add a Personal access token (PAT) for Azure Stack.
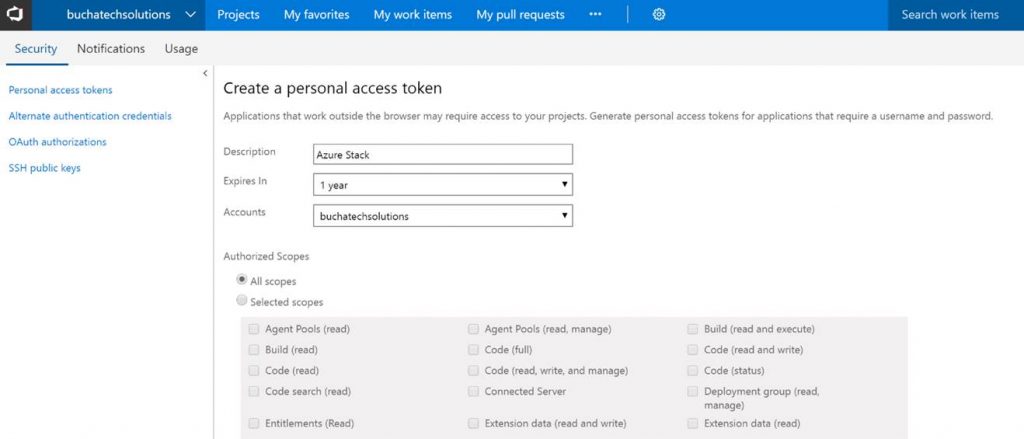
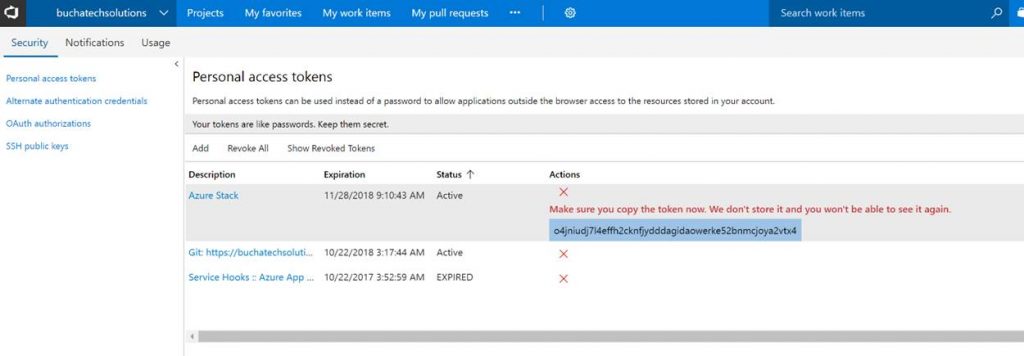
Copy the token. Note it will not be shown again ever after you leave this screen.
In the folder with the extracted build agent you will see the following. We need to run the run.cmd file from an elevated command prompt.

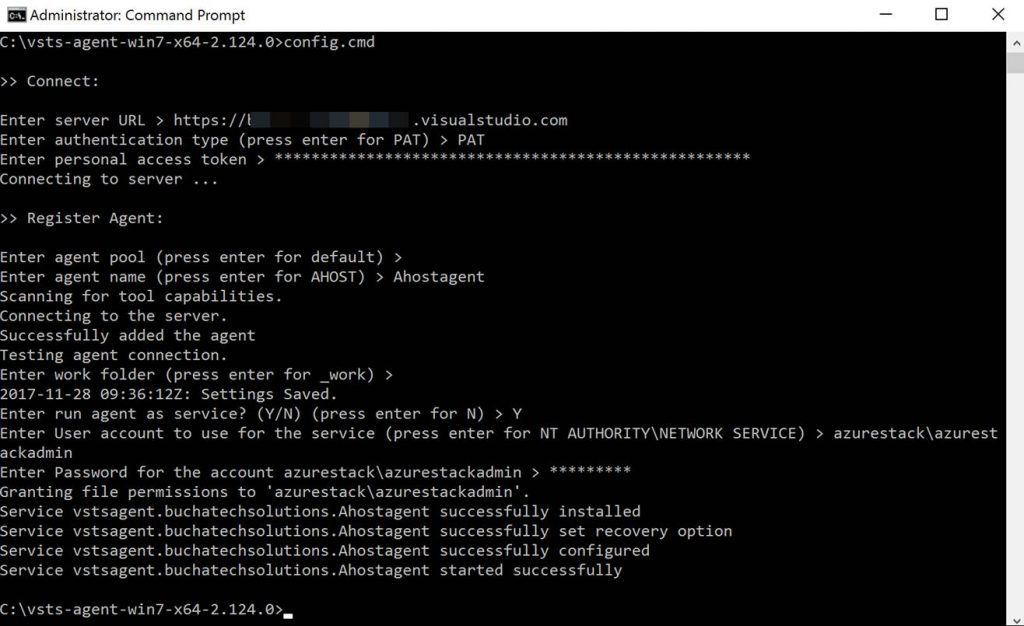
Here is a screenshot of running the run.cmd. I recommend deploying the build agent as a service. You will use your personal access token (PAT) here and the azure stack admin account.
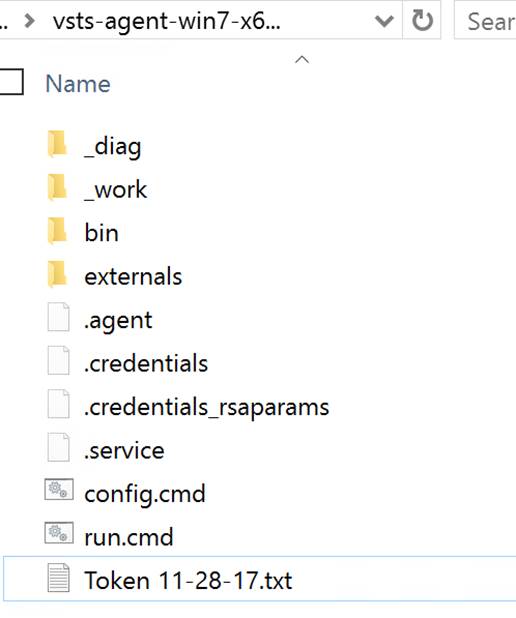
After the run.cmd finished the folder with the extracted contents should look like the following:
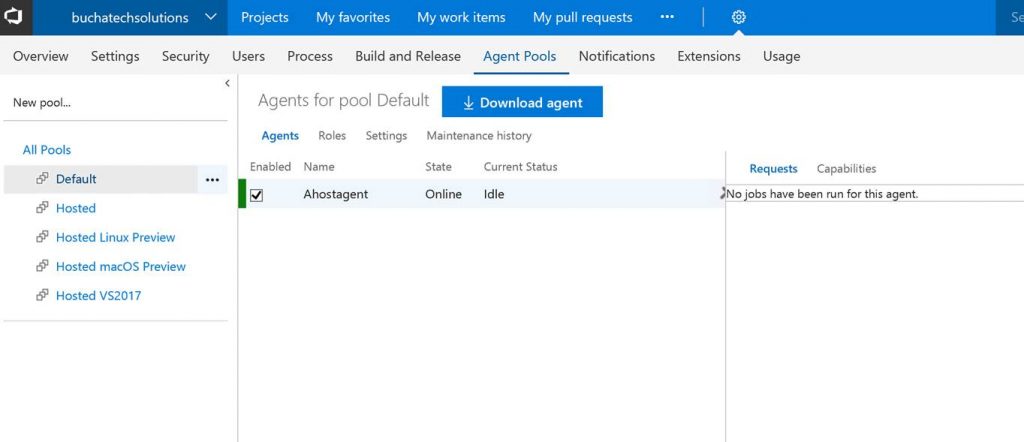
You can now see the agent in VSTS.
That’s it for the setup for connecting VSTS to Azure Stack. Next let’s look at setting up a continuous-integration and-continuous deployment (CI/CD) pipeline for VM-deployment to Azure Stack.


THE BUILD

What I cover here is focused on infrastructure as code (IaC) using ARM templates. If you need to set up CI/CD to Azure Stack for Web Apps, Mobile Apps, Containers, etc the process is the same as it is on Azure with the only difference being that you point to Azure Stack. Also note that in this post I am using the ASDK not multi-node.

Within VSTS create a new repository and place your ARM template in it.
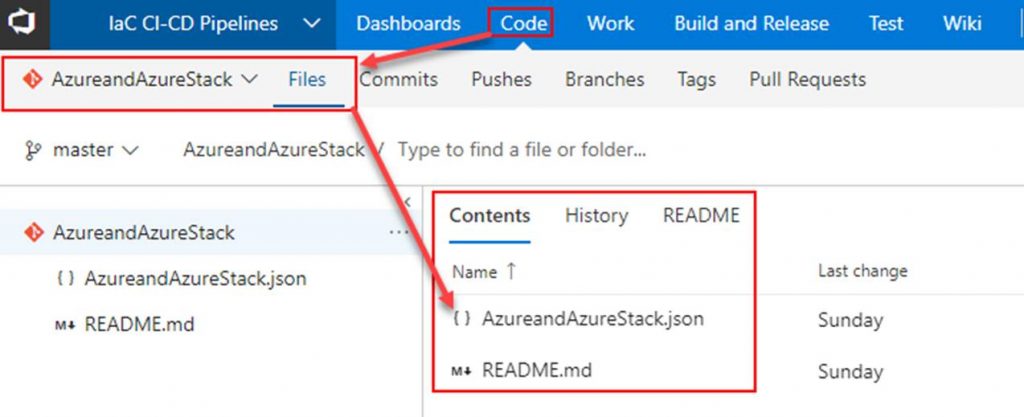
Next click on Build and Release. Create a new Build Definition.
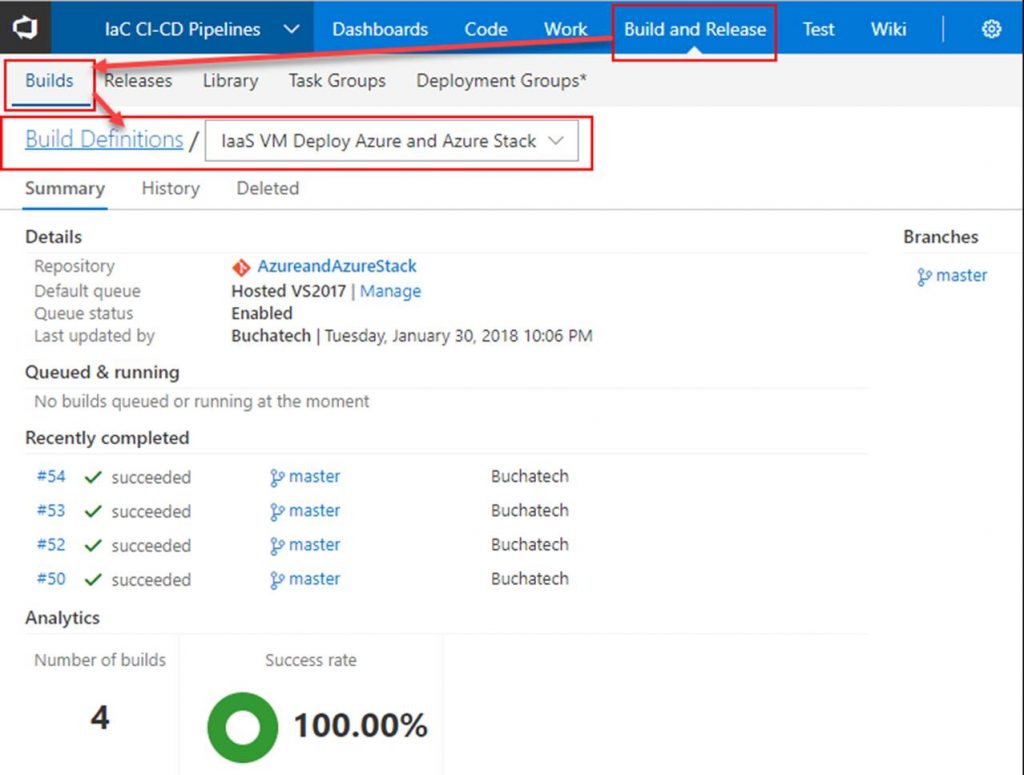
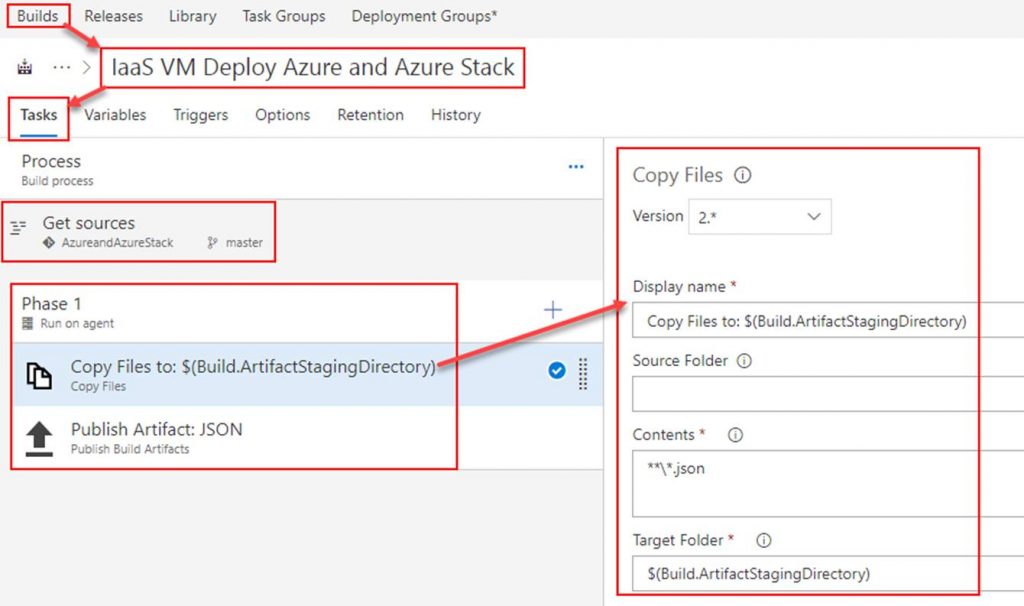
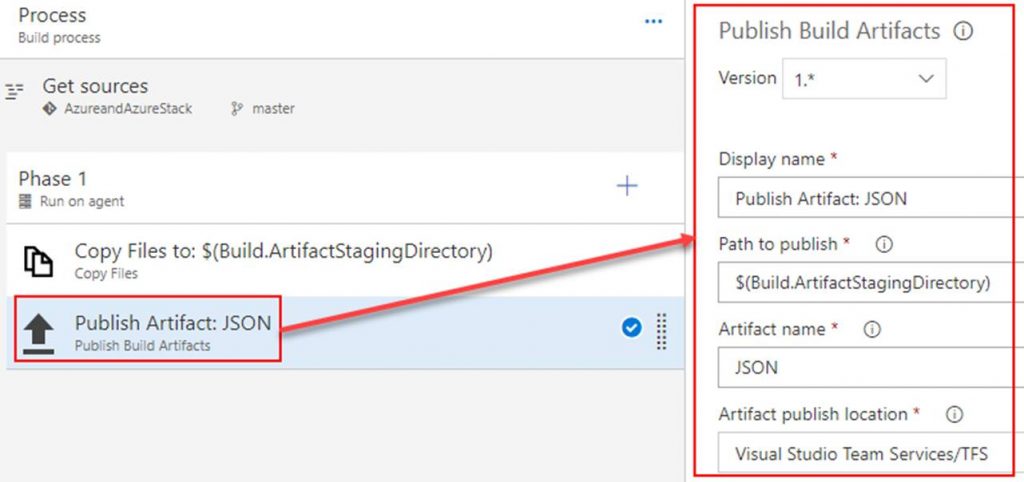
In the build definition. Point the Get sources to the repository you just created. Add 2 tasks under Phase 1. The first task will copy the ARM template to the build staging directory. The second task will publish the ARM template so that a release definition can pick it up. Both tasks are shown in the following screenshots.

Copy Files to task
Publish Artifact task
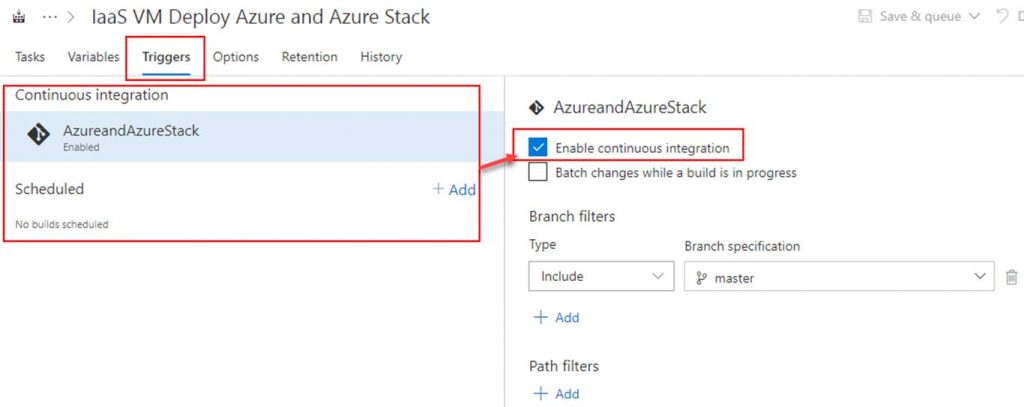
OPTIONAL: To setup continuous integration click on Triggers. Here you can set a schedule to run the builds or you can click on the repository as shown in the screenshot and then check Enable continuous integration. By checking the box next to Enable continuous integration it tells VSTS that anytime content in the repo is changed to run a build.
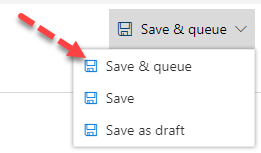
Click on Save & queue. This will start the build.
The build will start. As long as everything is setup properly within your build it will succeed as shown in the following Screenshot.
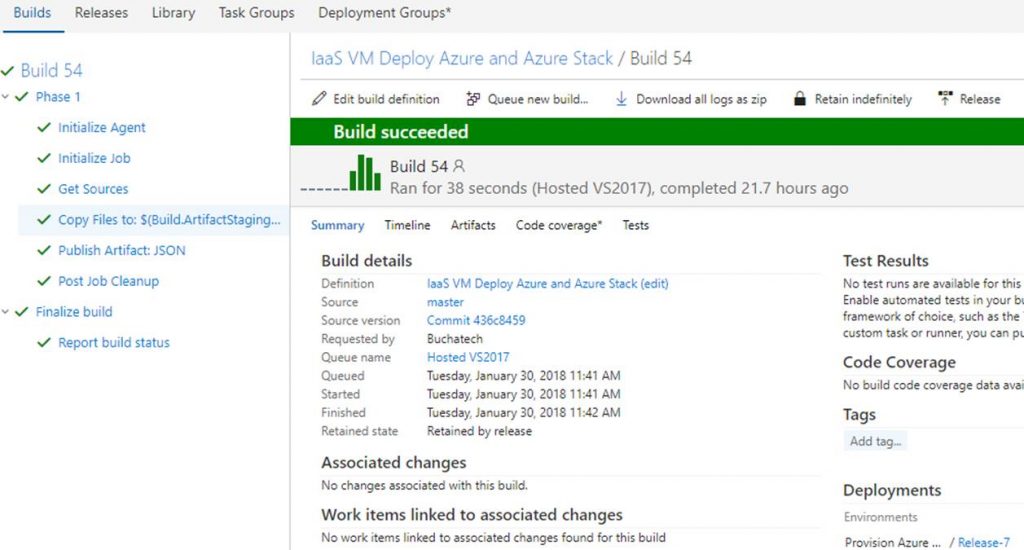
That’s all for our build. Next up we need to create a release definition (RD) pipeline. The RD will take the build artifacts and deploy to an environment/s you specify.

Read more
Resource Group Clean-up in Azure Stack

If you are like me, you end up creating a ton of resource groups in Azure Stack when testing things out. I needed a way to delete them without having to click one each one via the portal. The best option of course is to leverage PowerShell. I threw together some PowerShell to handle this. I came up with two options #1 can be used to delete a bunch of RG’s that have a common name. For example, I had a bunch of VM00* resource groups. I use the script to go loop through and delete all resource groups with VMO in the name. Option #2 pop’s up a GUI window so I could select the RG’s I wanted to delete. It put them in an array and then looped through to delete them in one shot.

This is great because I can kick this off and go do something else. I will share both below in this blog post along with some screenshots. I won’t have a download for the PowerShell syntax so just copy from this post if you want to use it. Be sure to use AzureStack.Connect.psm1 for connecting to your Azure Stack environment before running any of the following code.

Code:
#1

#Create Variable of RG’s with common name
$Resourcegroups = Get-AzureRmResourceGroup | where {$_.ResourceGroupName -like (‘*VM0*’)}

#Create array of RG’s
$RGLIST = $Resourcegroups.ResourceGroupName

#Loop to remove each resource group in the array
ForEach(
$rg in $RGLIST
)
{
Get-AzureRmResourceGroup -Name $rg -ErrorAction SilentlyContinue | Remove-AzureRmResourceGroup -Force -Verbose
}

This image shows the array of RG’s that will be looped through. I highlighted vm003rg in the array and in the PowerShell status message.

rgcleanup-1

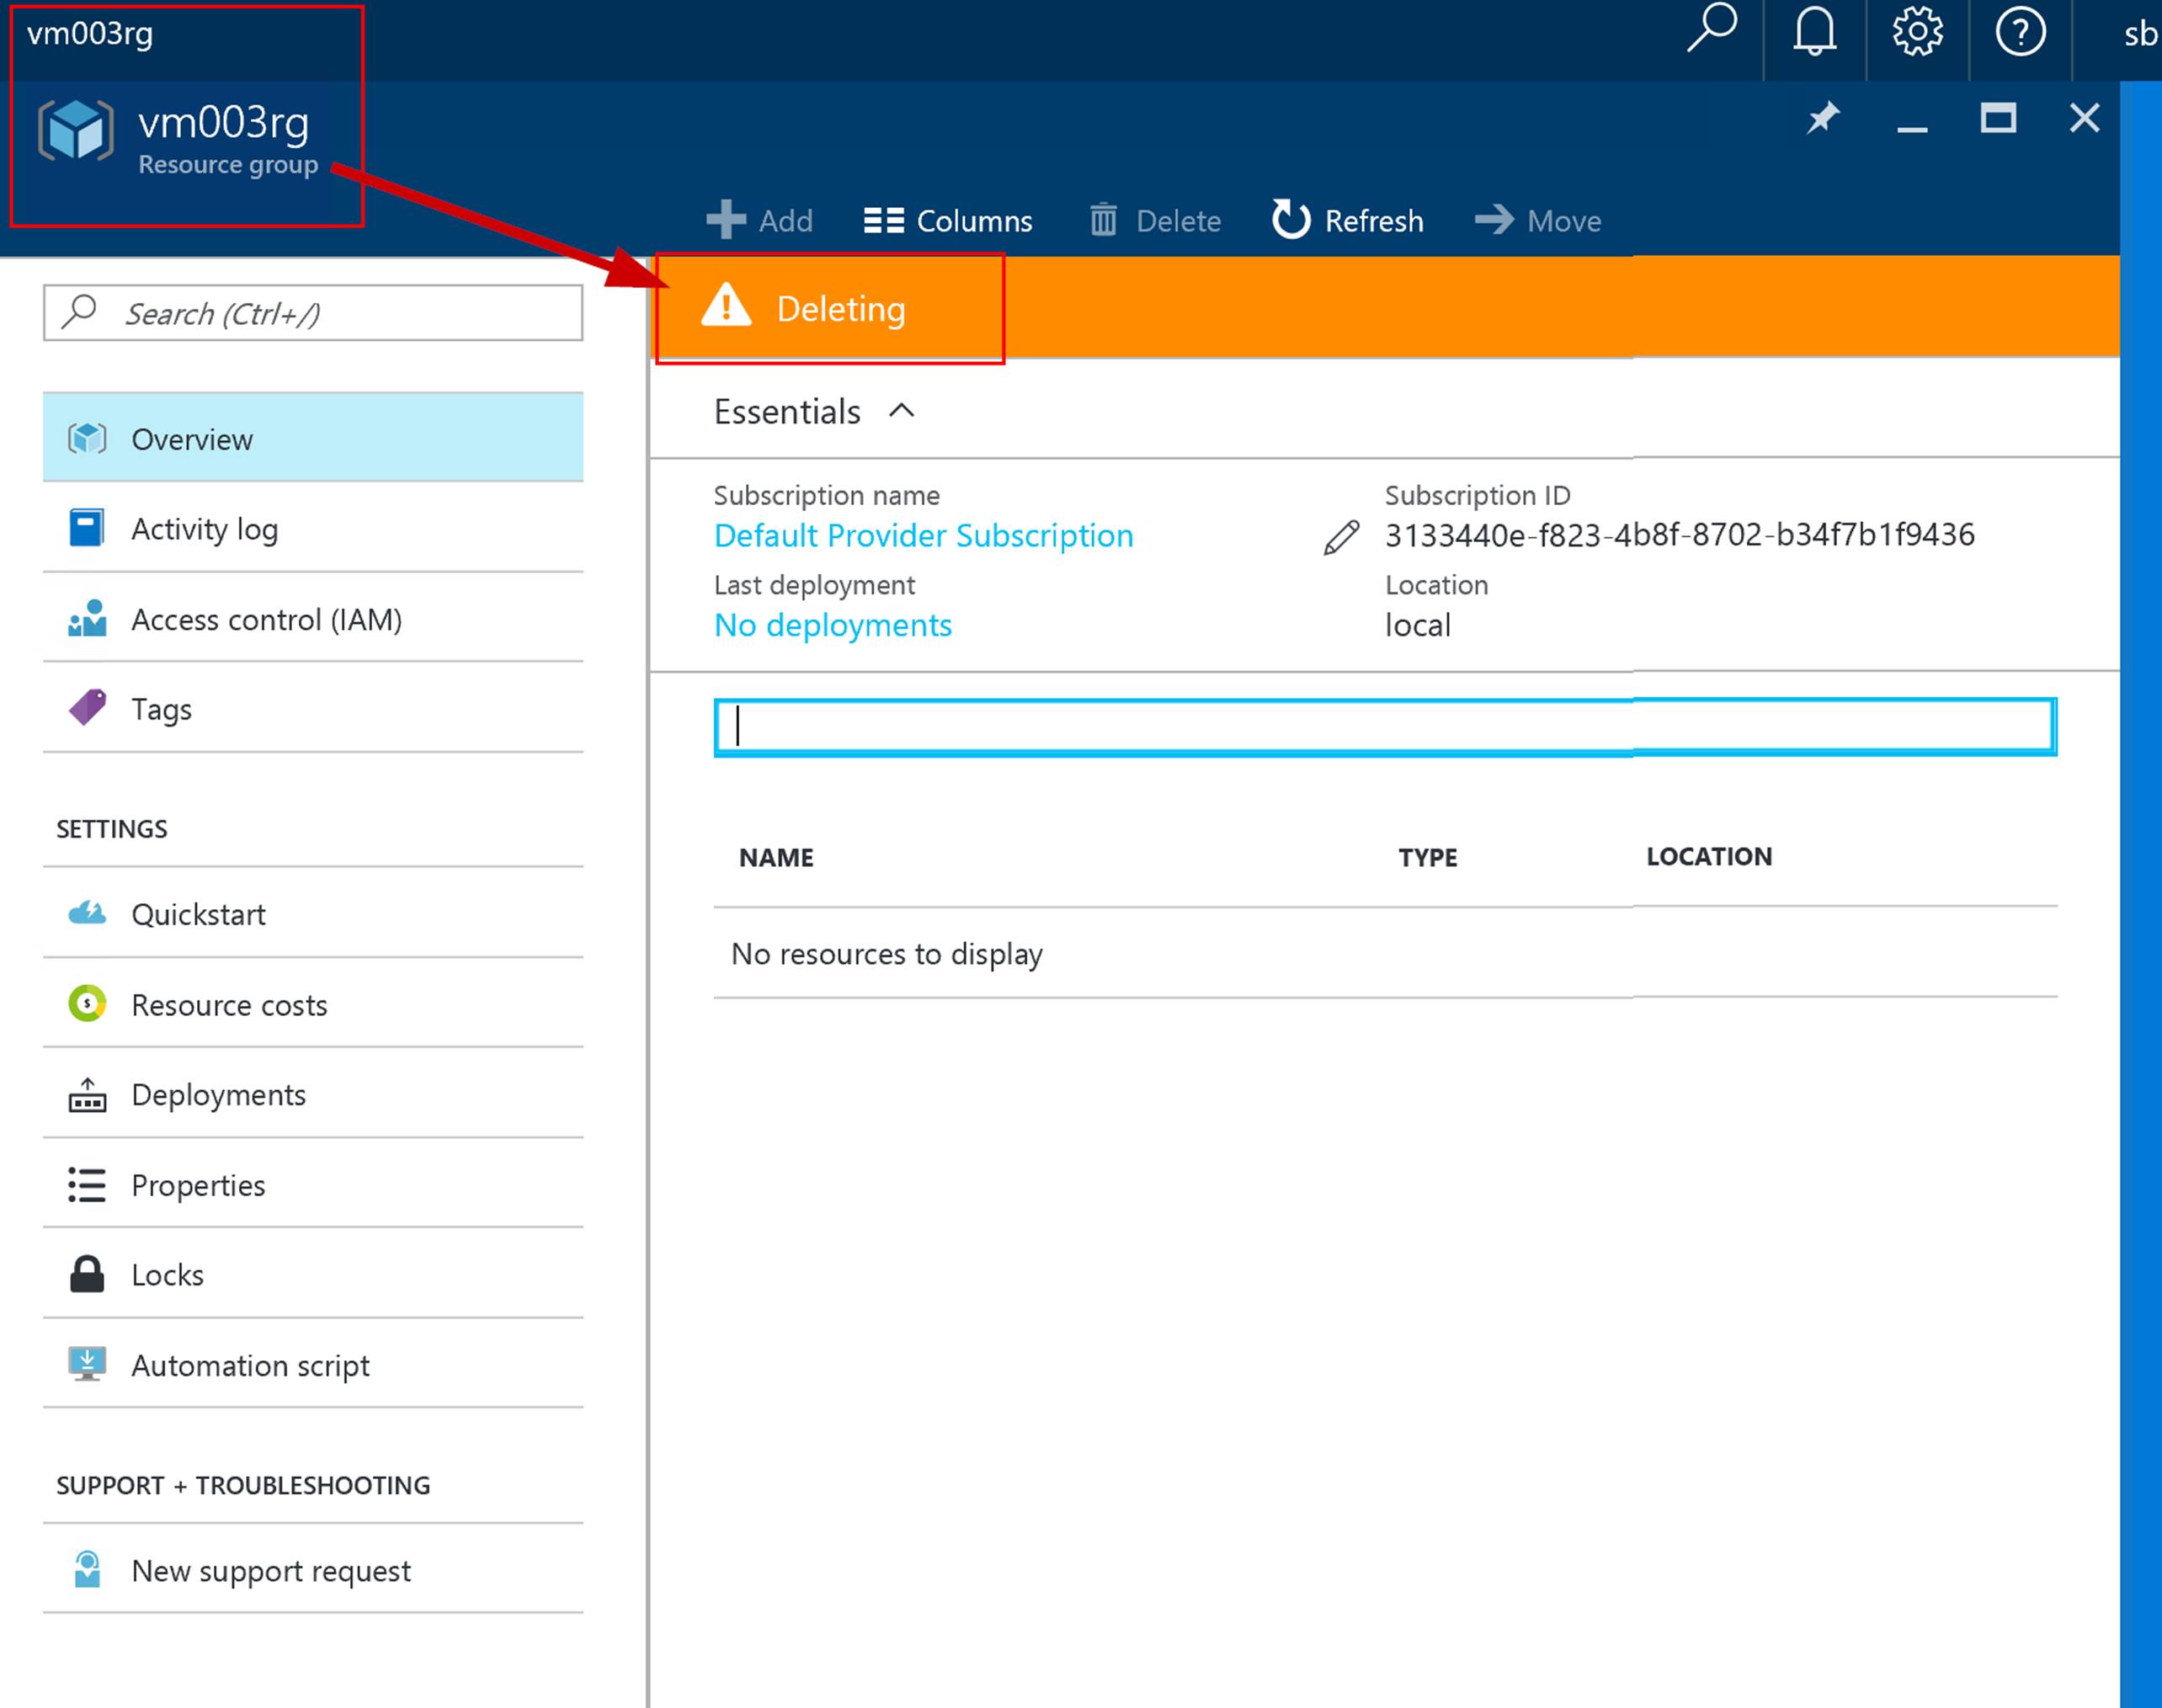
The following screenshot shows VM003RG being deleted in the Azure Stack portal.

rgcleanup-2

#2

#Create Variable of RG’s from GUI selection
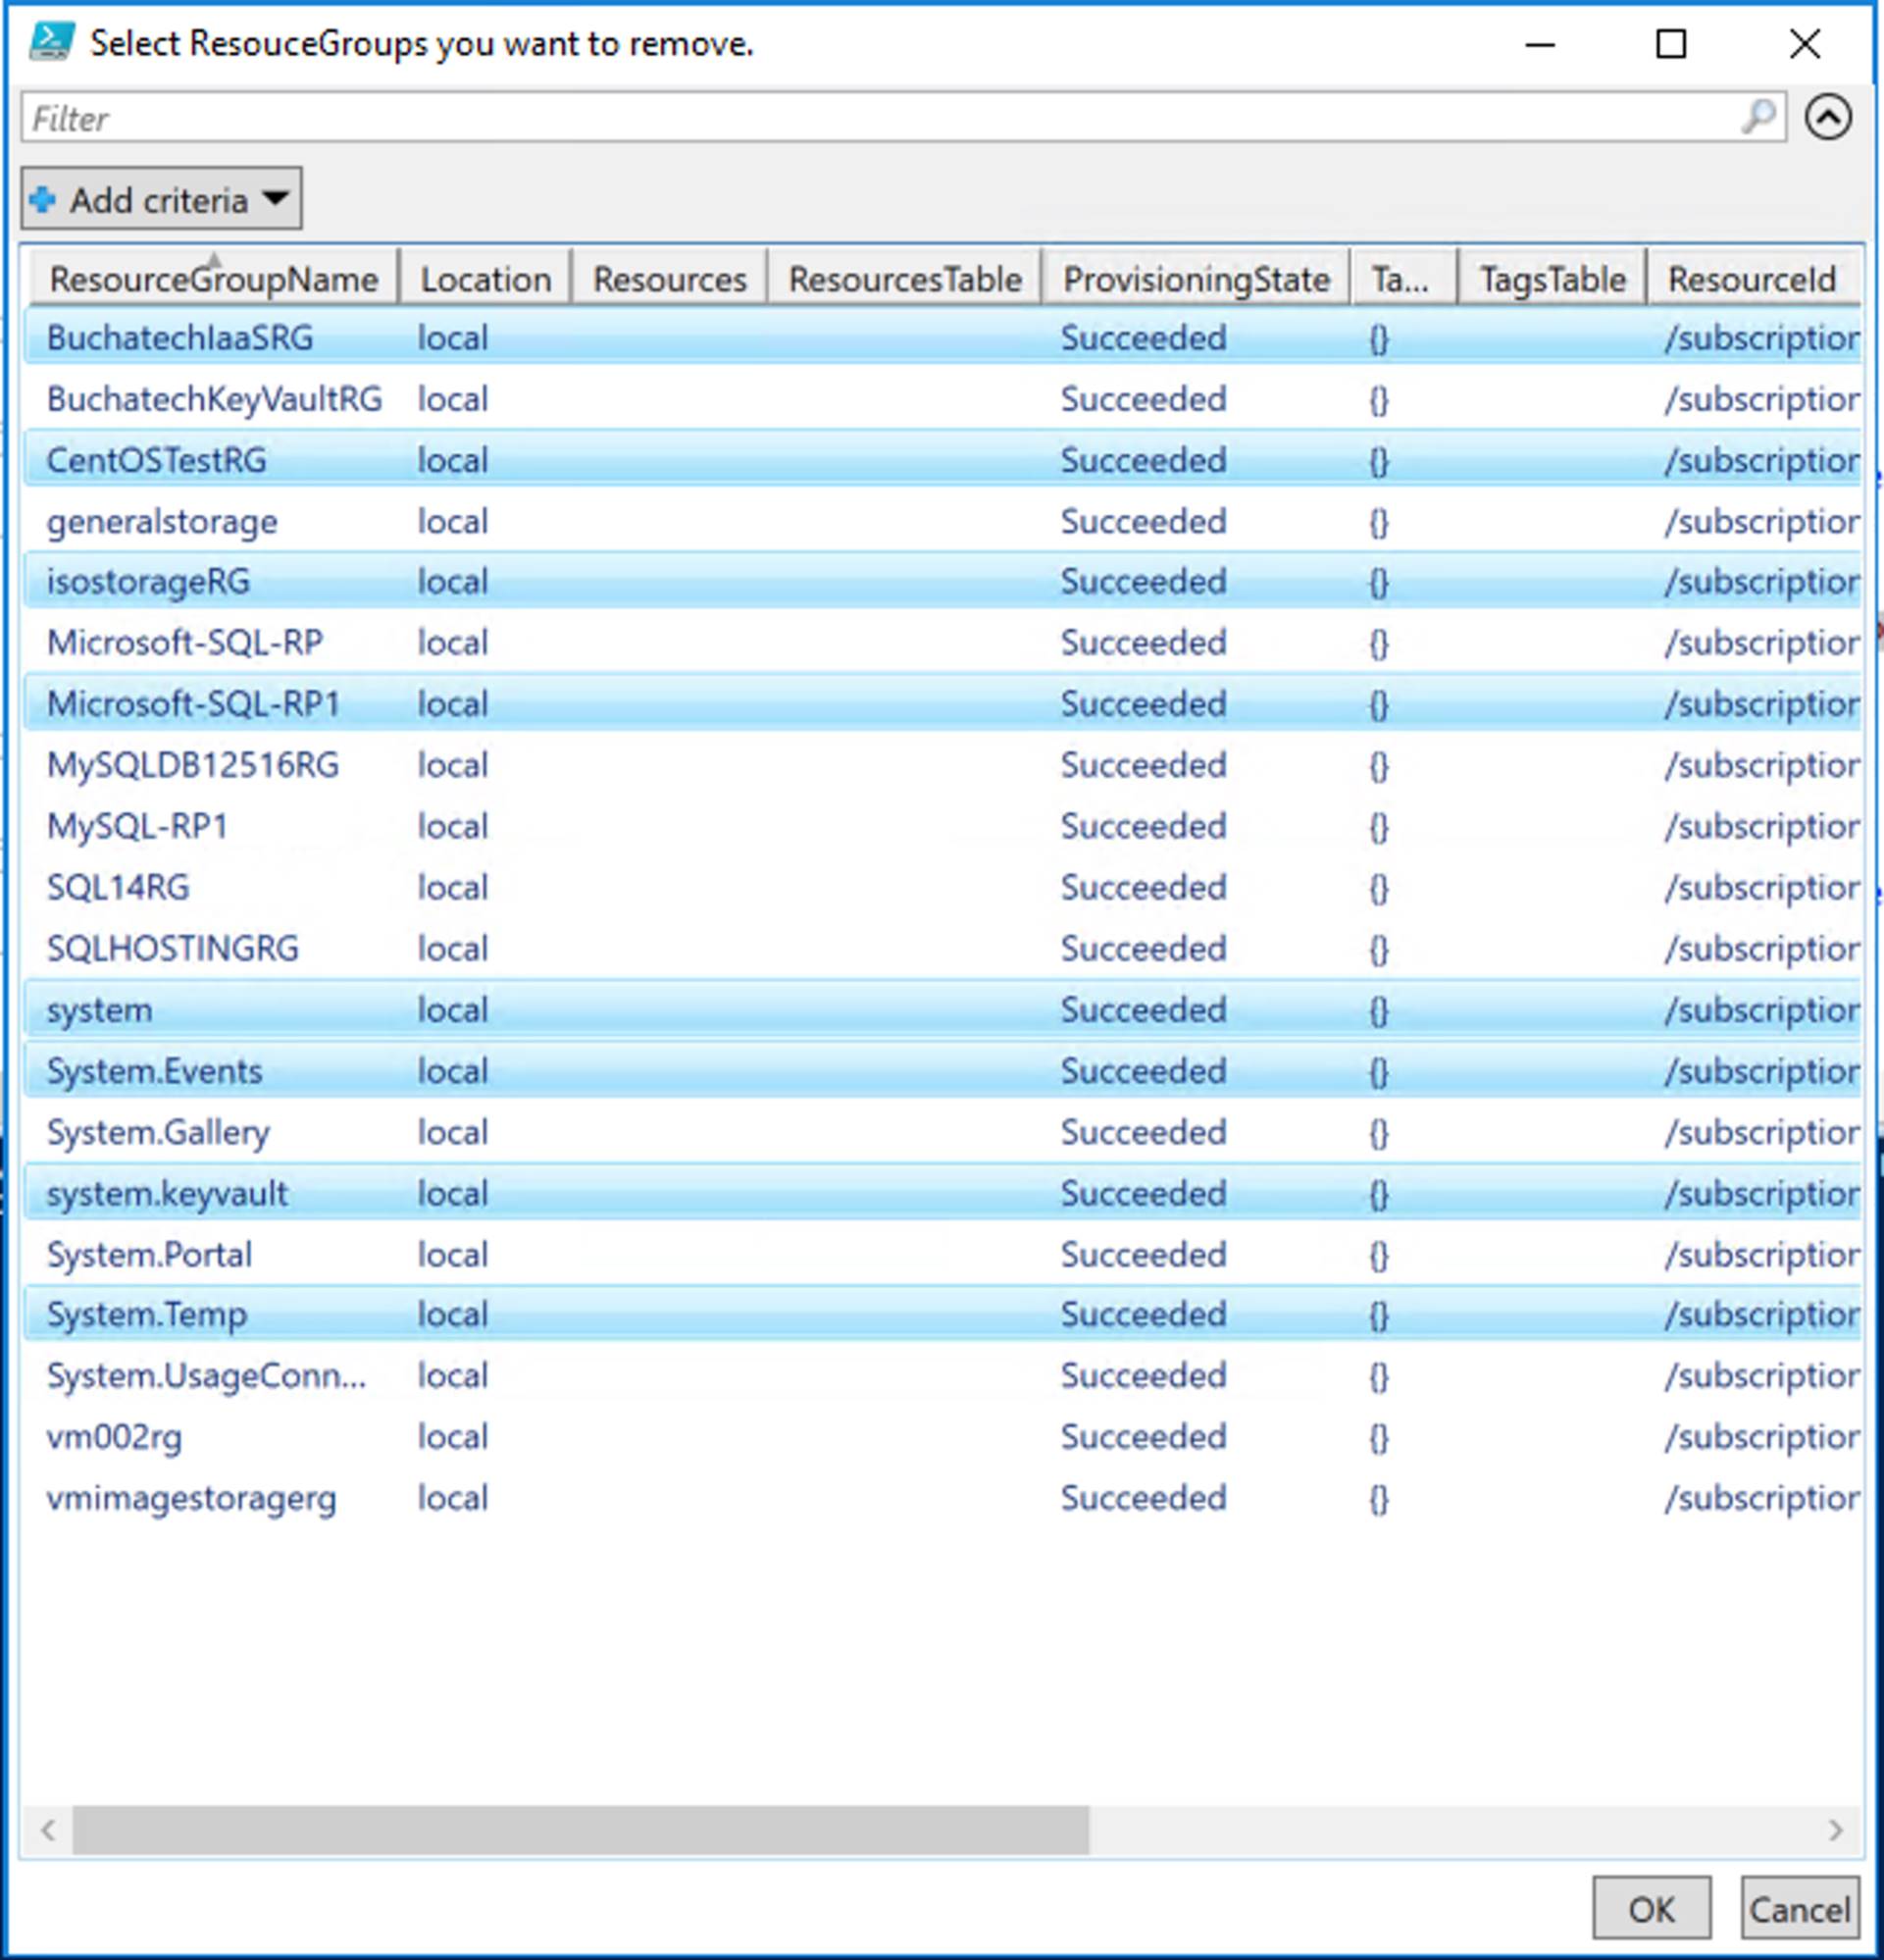
$selectedrgs = (Get-AzureRmResourceGroup | Out-GridView ` -Title “Select ResouceGroups you want to remove.”` -PassThru).ResourceGroupName

#Loop to remove each resource group in the array
ForEach(
$rg in $selectedrgs
)
{
Get-AzureRmResourceGroup -Name $rg -ErrorAction SilentlyContinue | Remove-AzureRmResourceGroup -Force -Verbose
}

After running the Create Variable of RG’s from GUI selection part of the code a window as shown in the following screenshot will pop up. Select the RG’s you want to remove, click Ok and they will be placed into an array.

rgcleanup-3

Below if the output of the array. Run the Loop to remove each resource group in the array part of the code and each of the RG’s will be removed.

rgcleanup-4

I have also used this when a resource group would not delete from the portal. On some stubborn resource groups I have had to run this a couple of times. This is a short post. I hope this helps someone out!

Read more

Azure & RRAS Site to Site VPN Setup (Azure Resource Manager)

Background

I have not seen a lot of posts out there on setting up Azure Site to Site VPN Setup Azure Resource Manager. The ones I did follow had some missing steps. Setting up the AS2S is a pretty detailed process so I wanted to put the steps I had to follow in a blog post.

What you will need:

On-Premises

  • RRAS installed on an on-premises server.
  • At least 1 NIC on your RRAS server.
  • Your public IP. This will not work with dynamic DNS. You have to have a public IP. If you don’t own a public IP you can still use the dynamic public IP your ISP has assigned to you. You will need to just watch it and manually update it in Azure when it changes.
  • UDP Ports 500, 4500, and 1701 forwarded to your RRAS server. This is if your RRAS server is behind a NAT device.
  • Either your servers pointed to RRAS for their gateway or static routes setup on the VM’s you want to be able to communicate with Azure.

Azure:

Addressing:

For on-premises you can use whatever you want. I use 192.168.0.x/24.

For Azure we will use 10.121.0.x/16 and 10.121.0.0/24 and 10.121.1.0/24.

Steps:

~ AZURE CONFIGURATION FIRST! ~

First we will start off with configuring the network components we need up in Azure. Start by going to the Azure portal at https://portal.azure.com.

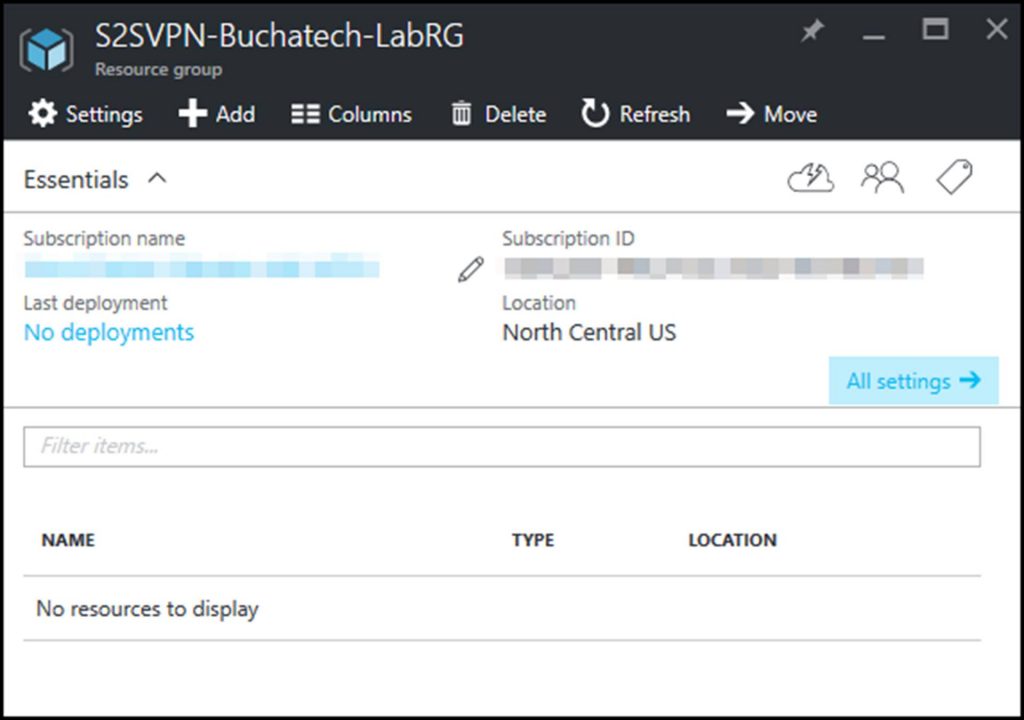
STEP 1: I would setup a resource group. You will put all of your resources for the site to site VPN in here for better tracking and management. As an example I named mine: “S2SVPN-Buchatech-LabRG“.

as2svpn-29

NOTE: Our resource group is empty at this point.

STEP 2:  Let’s start off by creating a virtual network. Go to:

Virtual networks>Create virtual network and click on Add. Let’s name this “S2SVPN-RRAS-Vnet“.

Give it “10.121.0.0/16” for the address space. This has to have enough room to place two subnets into it.

For the first subnet make the Subnet Name “Azure-VMs“. Make the Subnet address range “10.121.0.0/24“. Set it to the resource group you created in the previous step.

NOTE: I recommend placing all resources that will be a part of your site to site VPN in the same region. I used North Central US.

as2svpn-1

STEP 3:

We will be creating a virtual network gateway. This network gateway will contain the second subnet.

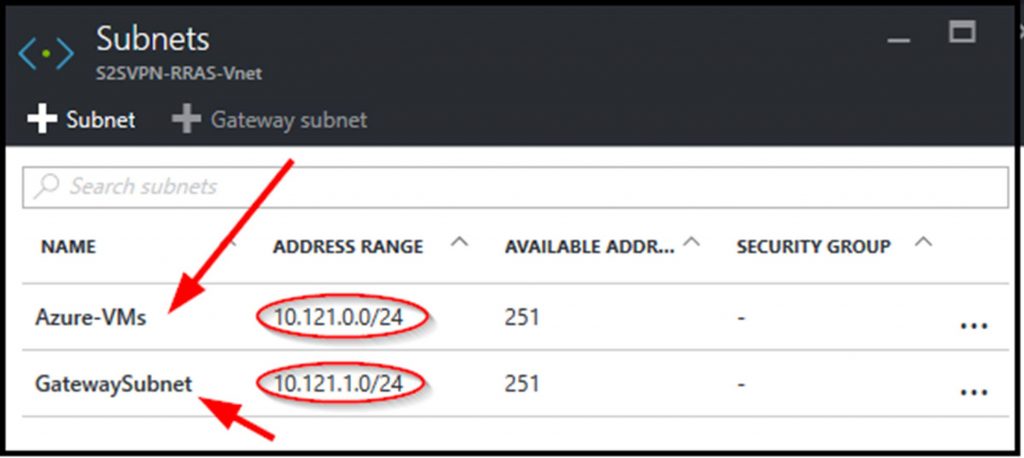
Go to Virtual networks>S2SVPN-RRAS-Vnet>Settings>Subnets.

Click on + Gateway subnet. For the Address Range use “10.121.1.0/24“. This address range is the IP range for your RRAS server to use.

So in your virtual network you should now have the two following Subnets:

as2svpn-2

STEP 4:

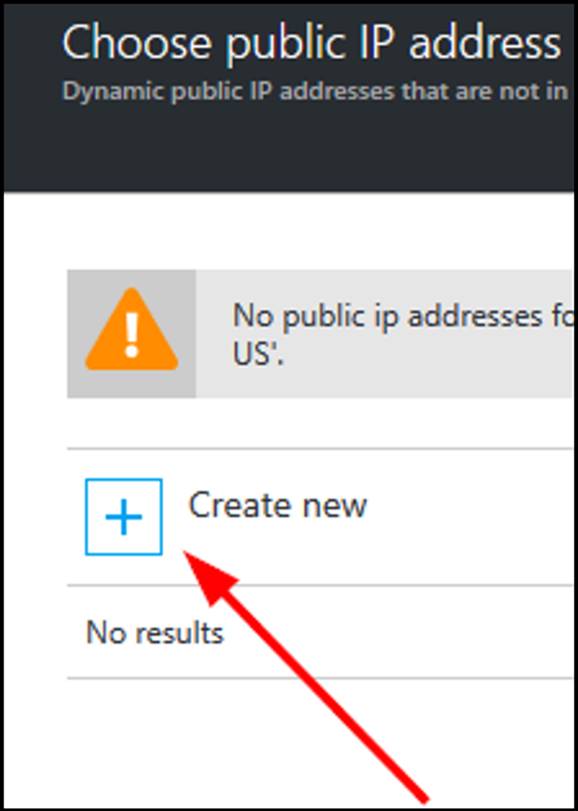
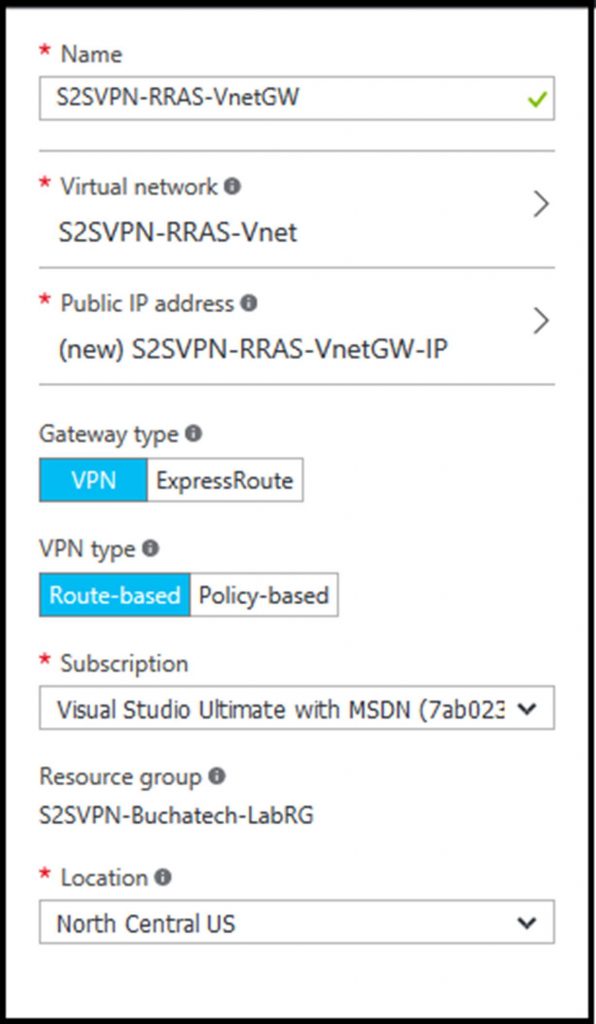
Now navigate to Virtual network gateways and click on Add. Name the gateway “S2SVPN-RRAS-VnetGW“. For the virtual network select our existing one named S2SVPN-RRAS-Vnet. Leave the gateway type to VPN, and leave VPN type to Route-based. For the public IP we don’t have one so we will need to create one here. Click on Choose a public IP address and a blade will fly out. Click on Create New.

as2svpn-3

I give it a name of “S2SVPN-RRAS-VnetGW-IP“. Your settings should look like this:

as2svpn-4

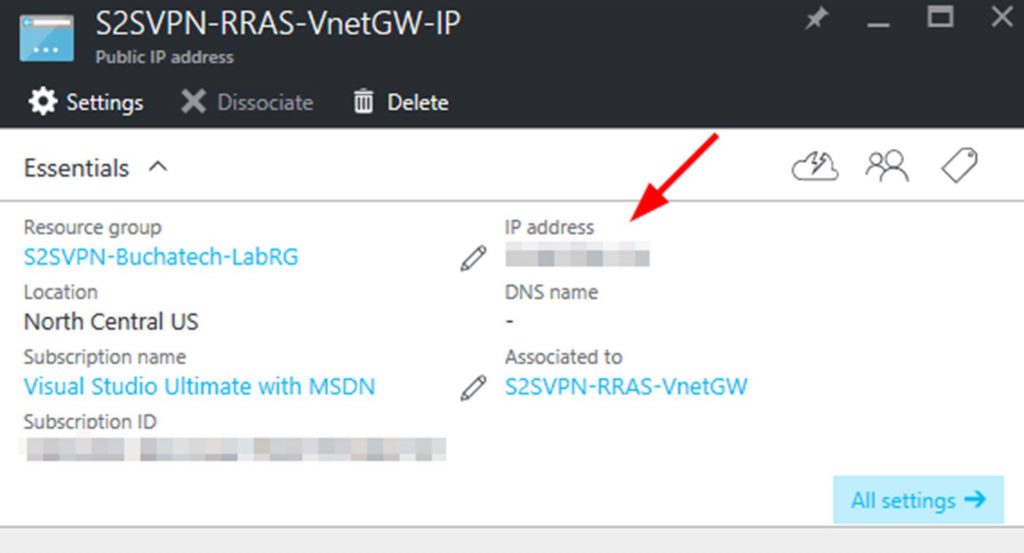
After the Virtual network gateways is created go and get the public IP addresses. We will need to plug this into RRAS later. You can get this by going here: Virtual network gateways>S2SVPN-RRAS-VnetGW>S2SVPN-RRAS-VnetGW-IP>Settings.

as2svpn-5

NOTE: It may take some time to provision the public IP so be patient here.

STEP 5:

Next up we need to configure a Local network gateway. Go to:

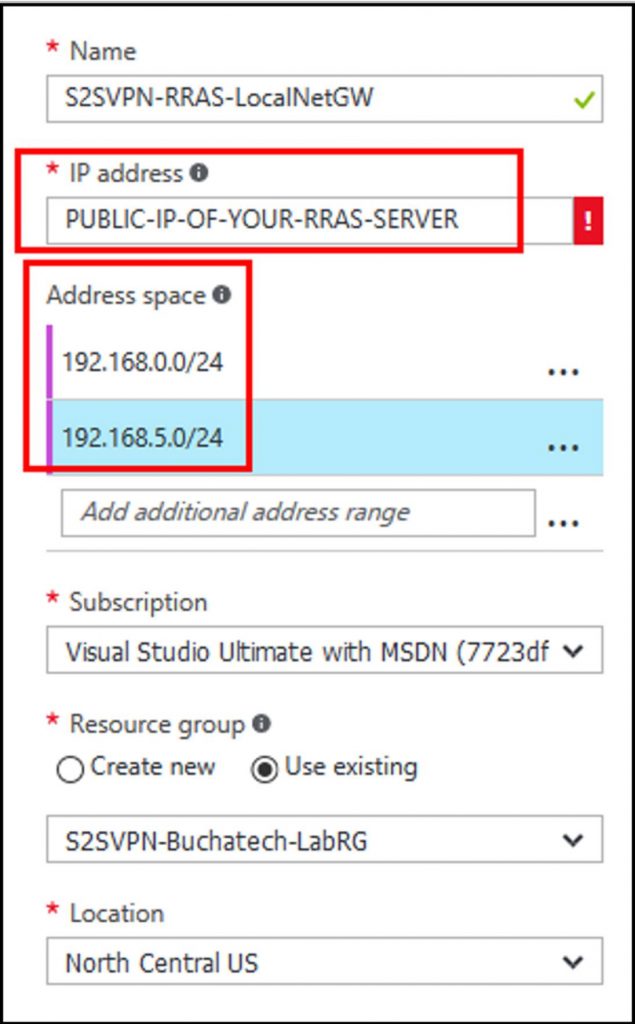
Local network gateways and click on +Add.  On Create local network gateway name it

S2SVPN-RRAS-LocalNetGW“, enter the public IP of your RRAS server, In the address space enter an IP range or ranges for your on-premises network , and select your RG.

as2svpn-6

NOTE: If you do not know what the public IP is on your RRAS server’s network just visit http://ipchicken.com and it will display it.

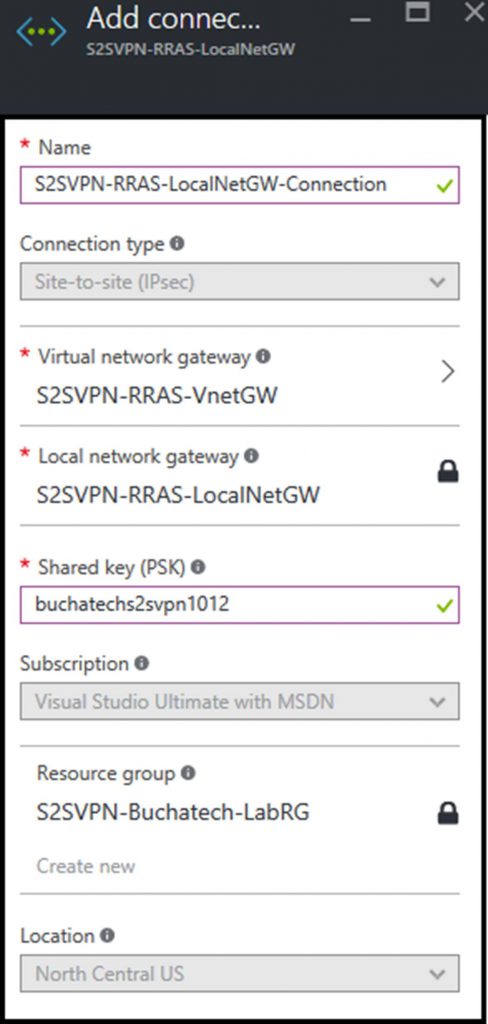
Now we need to create a connection in our local gateway. To do this navigate to the settings>connections and click on + Add. Name this “S2SVPN-RRAS-LocalNetGW-Connection“.

The Connection type will default to Site-to-site (IPsec). Leave this. Set the Virtual network gateway to “S2SVPN-RRAS-VnetGW“. Set a Shared key (PSK) to be used and remember this will also be used on the RRAS server so document this somewhere.

as2svpn-7

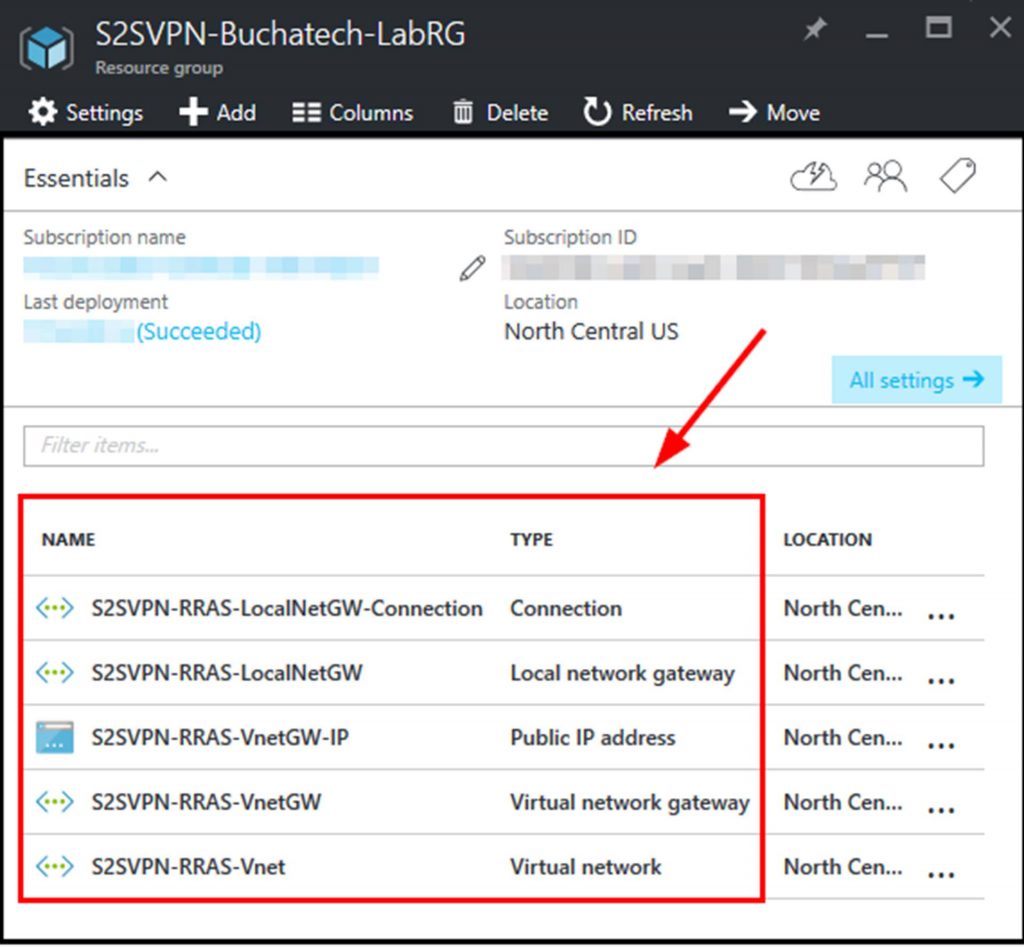
That’s it for the network configuration up in Azure. As long as everything was followed in these steps you should now have the following in your resource group.

as2svpn-8

~ RRAS CONFIGURATION! ~

Read more

Write once, deploy anywhere (Azure or Azure Stack)

This blog post is a follow up to the MMS 2016 session I recently delivered together with Microsoft Azure Stack PM Daniel Savage. The session title is “Future-proof your Career with Azure Stack in the New Hybrid Cloud World!” link here: https://www.buchatech.com/2016/04/presenting-at-mms-2016-azure-stack-backup-oms.

My demo is this session was titled “Write once, deploy anywhere“. The purpose of this demo was to show using a single ARM template (JSON file) and a single PowerShell script to deploy a VM regardless of deploying to Azure or Azure Stack. The demo was a success so yes this is really possible. In this post I will break down the JSON file, the PowerShell script, how it works and the download link for the files.

Getting the JSON file and the PowerShell script just right was a challenge as there are still some slight differences between the settings of Azure and Azure Stack. Note that this is the case with Azure Stack TP1 and I fully expect that this will change when it GA’s. In any case it is good to look at this stuff now to start to learn the ins and outs. In the end it was the combined Power of the ARM template and PowerShell to overcome any challenges. Let’s start off by taking a look at the differences in ARM between Azure and Azure Stack in the following table:

Property

Azure

Azure Stack

Location

Azure region (example: CentralUS)

local

blobStorageEndpoint

blob.core.windows.net

blob.azurestack.local

vmSize

Standard_D1

Standard_A1

vmName apiVersion

2015-06-15

2015-06-15

StorageAccountName apiVersion

2015-06-15

2015-06-15

nicName apiVersion

2015-06-15

2015-05-01-preview

vrtualNetworkName apiVersion

2015-06-15

2015-05-01-preview

networkSecurityGroupName apiVersion

2015-06-15

2015-05-01-preview

dnsNameForPublicIP apiVersion

2015-06-15

2015-05-01-preview

torageAccountName apiVersion

2015-06-15

2015-05-01-preview

NOTE: For the apiVersion on the resources Azure Stack requires 2015-05-01-preview. Resources in Azure ARM templates default to apiVersion 2015-06-15. So if we left the resources in the ARM template at apiVersion 2015-06-15 the deployment would fail on Azure Stack. However we are in luck as Azure will accept apiVersion 2015-05-01-preview. So I set vmName and StorageAccountName to apiVersion 2015-06-15 and the rest of the resources apiVersion to 2015-05-01-preview.

vmName and StorageAccountName use the same apiVersion for both Azure and Azure Stack. So Azure Stack accepts 2015-06-15 for both. Even those these are not different across Azure and Azure Stack I still wanted to list it anyway in the table.

If you have multiple subscriptions you will need to input the subscription ID. In my case my Azure has multiple subscriptions but my Azure Stack does not in this lab. In my script for Azure you need the subscription ID. In Azure Stack you do not. You may need to modify this behavior in the script if your scenario is different.

For the deployment it consists of two files. These files are:

Writeonceblog (1) AzureandAzureStack.json

CreateVMAzureorAzureStack.ps1

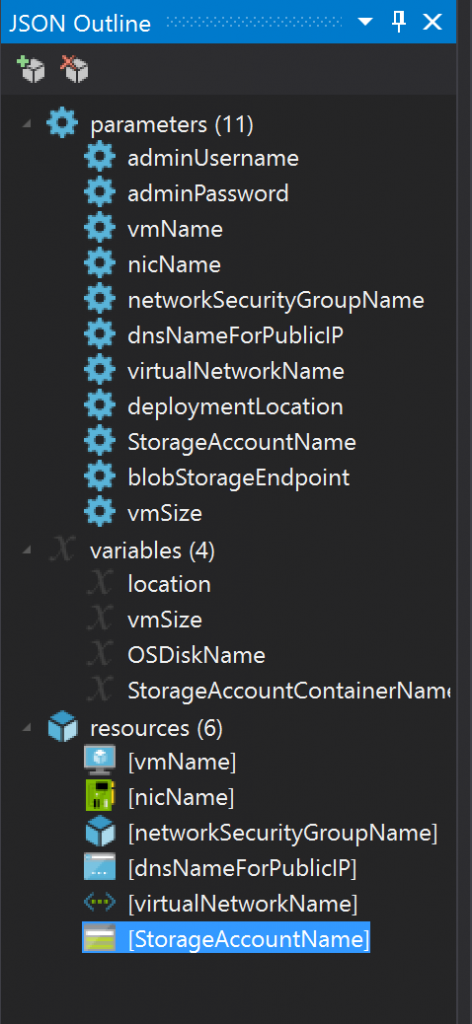
Here is what we have if we crack open the JSON file.

Writeonceblog (2)

A few things to note about the PowerShell script is that

  1. We prompt to identify if it is an Azure or Azure Stack deployment. We then run the appropriate block of code.
  2. In each of the deployment types (Azure or Azure Stack) we have some things hard coded in (for example blobStorageEndpoint and vmSize) and somethings pulled in dynamically by prompting for them during the script execution (for example subscriptionId and adminPassword).
  3. We are pulling in the parameter and variable values when using New-AzureRmResourceGroup and New-AzureRmResourceGroupDeployment.

NOTE: I am not a PowerShell expert. I am sure there are better more efficient ways to accomplish what I am doing here in the PowerShell script. Nothing was available to accomplish the write once, deploy anywhere goal so I put something together. Feel free to enhance the script and release back to the community.

Here is an example of the location parameter and variable in the JSON file.

The parameter:

Writeonceblog (3)

The variable:

Writeonceblog (4)

Referenced in the vmName resource:

Writeonceblog (5)

Here is an example of how we are leveraging this in the PowerShell script.

For Azure:

Writeonceblog (6)

For Azure Stack:

Writeonceblog (7)

Writeonceblog (8)

Writeonceblog (9)

Note that you can deploy VM’s to Azure or Azure Stack in many ways (Visual Studio, the portal etc..). I decided to leverage PowerShell to do the deployment’s as it gives me a great amount of flexibility. For the official article on using PowerShell to deploy VM’s to Azure Stack visit:

https://azure.microsoft.com/en-us/documentation/articles/azure-stack-deploy-template-powershell

Now let’s look at deploying a VM to both Azure and Azure Stack using a single PowerShell script and a single ARM template.

— AZURE —

Run the script and you are prompted for some of the VM info.

Writeonceblog (10)

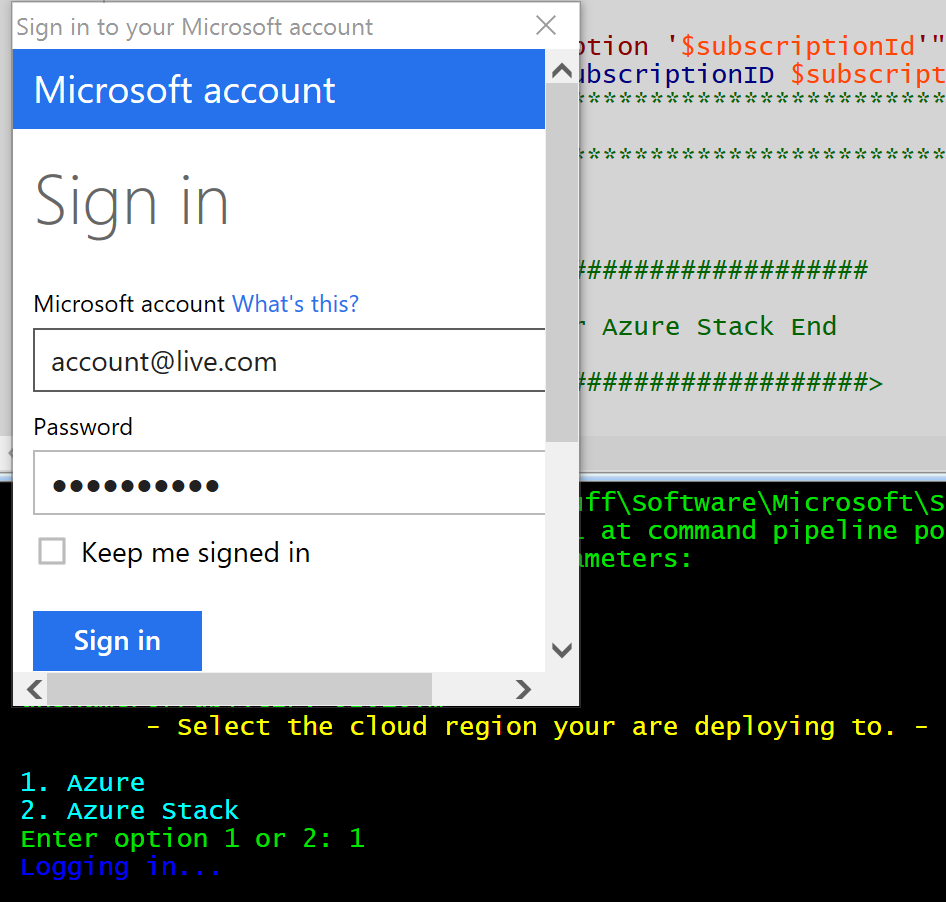
Then you are prompted to log into your Azure account.

Writeonceblog (11)

Read more