Build & release a Container Image from Azure DevOps to Azure Web App for Containers

I recently published a blog post on 4sysops.com about Web App for Containers on Azure here: https://4sysops.com/archives/web-app-for-containers-on-azure. That blog post is about the often-overlooked service in Azure that can be used to host a container/s on a web app in Azure App service.

This is a great service if you just need to run a single container or even a couple of containers that you have in Docker Compose. This service is PaaS and abstracts away an orchestration system like Kubernetes. If you need insight into the Azure App Service Web App for Containers service check out the blog post on 4sysops.

In this long blog post I am going to take things a step further and walk-through the build & release of a Container from Azure DevOps to Azure Web App for Containers. The overall goal of this post is to help someone else out if they want to setup a build and release pipeline for building and deploying a container to Azure App Service. We will use a very simple PHP web app I built that will run in the container.

Here are the components that are involved in this scenario:

  • Azure Container Registry (ACR): We will use this to store our container image. We will be pushing up the container image and pull it back down from the registry as a part of the build and release process.
  • Azure DevOps (ADO): This is the DevOps tooling we will use to build our container, push it up to ACR, pull it down into our release pipeline and then deploy to our Azure App Service.
  • App Service Web App for Containers: This is the web server service on Azure that will be used to host our container. Under the hood this will be a container that is running Linux and Apache to host the PHP web app.

Here is the data Flow for our containerized web app:

  1. Deploy the Azure App Service Web App for Containers instance
  2. Deploy the Azure Container Registry
  3. Deploy the Azure DevOps organization and project, create repository to host the code, clone repository in VS Code (Not shown in this blog post. Assume you know how to this up.)
  4. Update the application code (PHP code and Docker image) in Visual Studio code
  5. Commit application code from Visual Studio code to the Azure DevOps repo (Not shown in this blog post. Assume you know how to this up.)
  6. Setup build and then run container build and push the container image to ACR
  7.  Setup release pipeline and then kick off the release pipeline pulling down the container image from ACR and deploys the container to the App Service Web App for Containers instance.

Here is a diagram detailing out the build and release process we will be using:

Click to enlarge

Note that all code used in this blog post is hosted on my GitHub here: https://github.com/Buchatech/EOTD-PHP-APP-DOCKER-CONTAINER

Ok. Let’s get into the setup of core components of the solution and the various parts of the build and release pipeline.

For starters this solution will need a project in Azure DevOps with a repo. Create a project in Azure DevOps and a repo based on Git. Name the repo exerciseoftheday. Next up let’s create the core framework we need in Azure.

Deploy Azure App Service Web App for Containers

Let’s create the Azure App Service Web App for Containers that will be needed. We will need a resource group, an app service plan and then we can setup the app service. The PHP app we will be running is named Exercise Of The Day (EOTD) for short so our resources will use EOTD. Use the following steps to set all of this up.

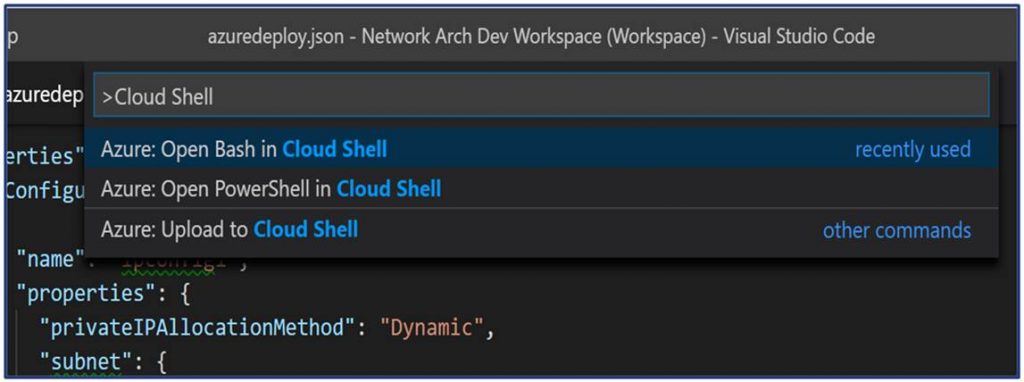
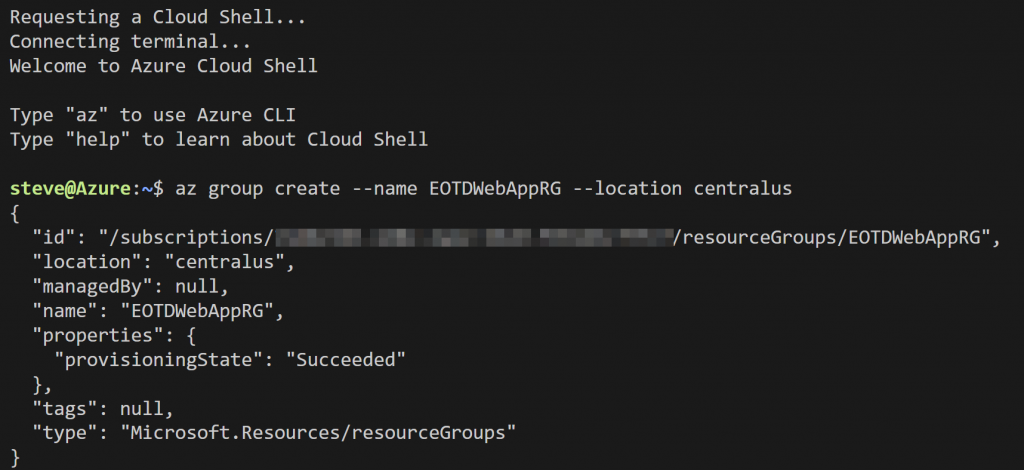
We will do everything via Azure Cloud Shell. Go to https://shell.azure.com/ or launch Cloud Shell within VS Code.

Run the following Syntax:

# Create a resource group

az group create –name EOTDWebAppRG –location centralus

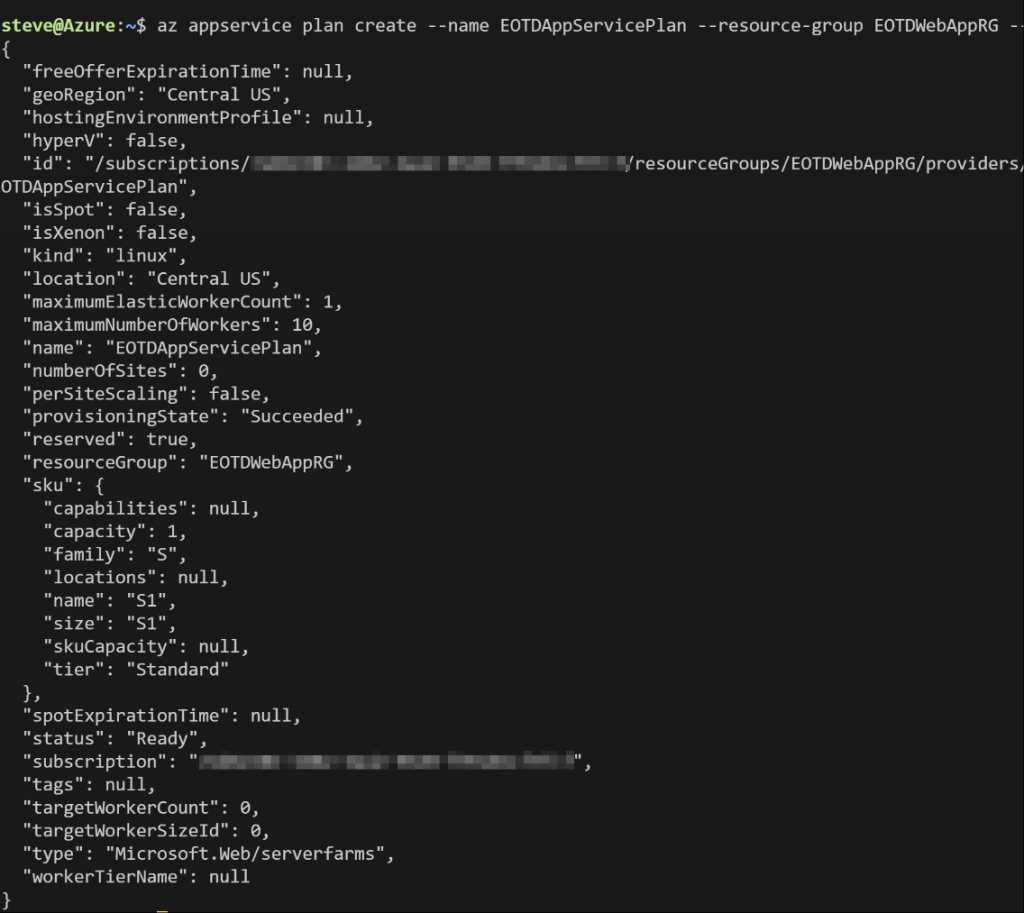
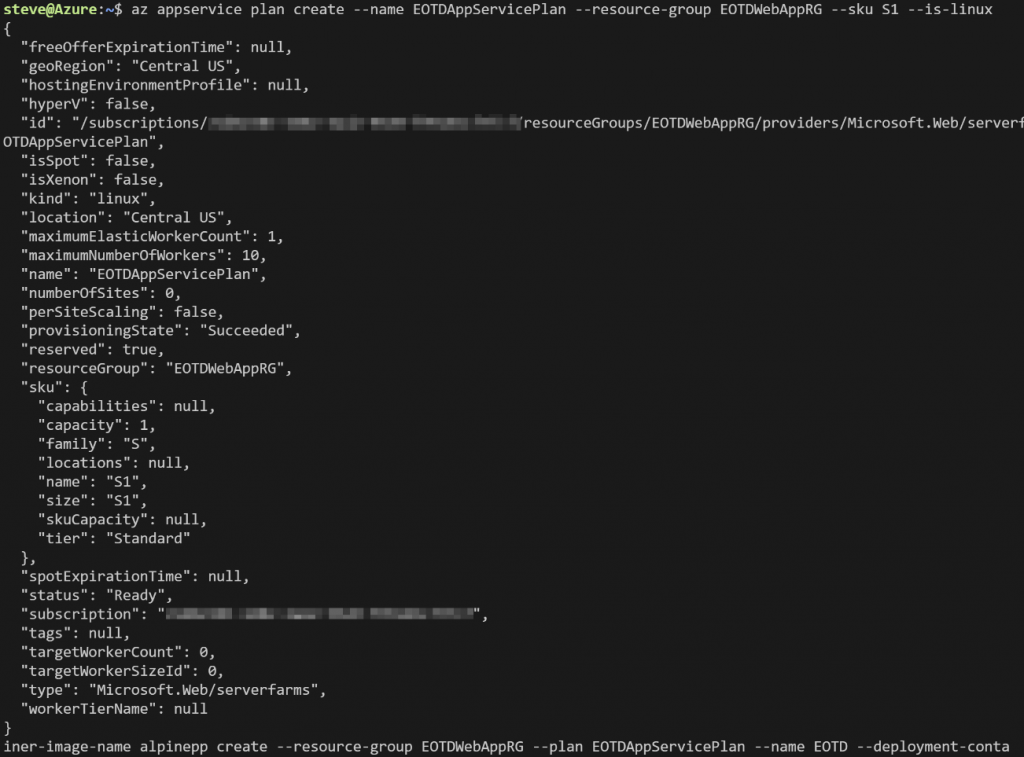
# Create an Azure App Service plan

az appservice plan create –name EOTDAppServicePlan –resource-group EOTDWebAppRG –sku S1 –is-linux

# Create an Azure App Service Web App for Containers

az webapp create –resource-group EOTDWebAppRG –plan EOTDAppServicePlan –name EOTD –deployment-container-image-name alpine

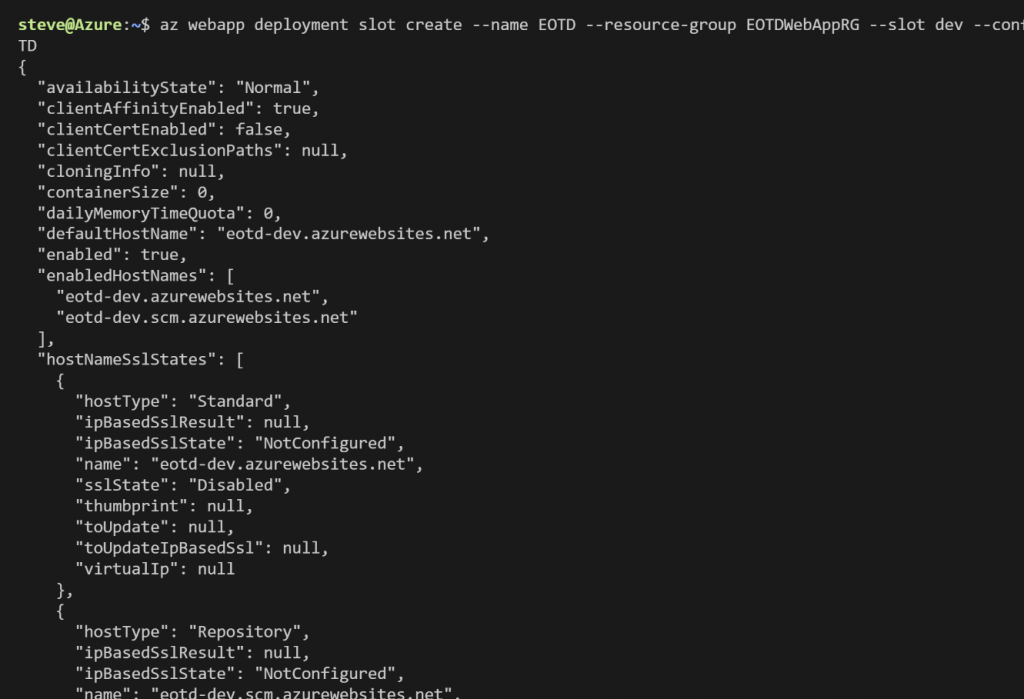
# Create a deployment slot for the Azure App Service Web App for Containers

az webapp deployment slot create –name EOTD –resource-group EOTDWebAppRG –slot dev –configuration-source EOTD

Deploy Azure Container Registry

Now let’s create the Azure Container Registry. Again, this is where we will store the container image. Run the following Syntax:

# Create Azure Container Registry

az acr create –resource-group EOTDWebAppRG –name eotdacr –sku Basic –admin-enabled false –location centralus

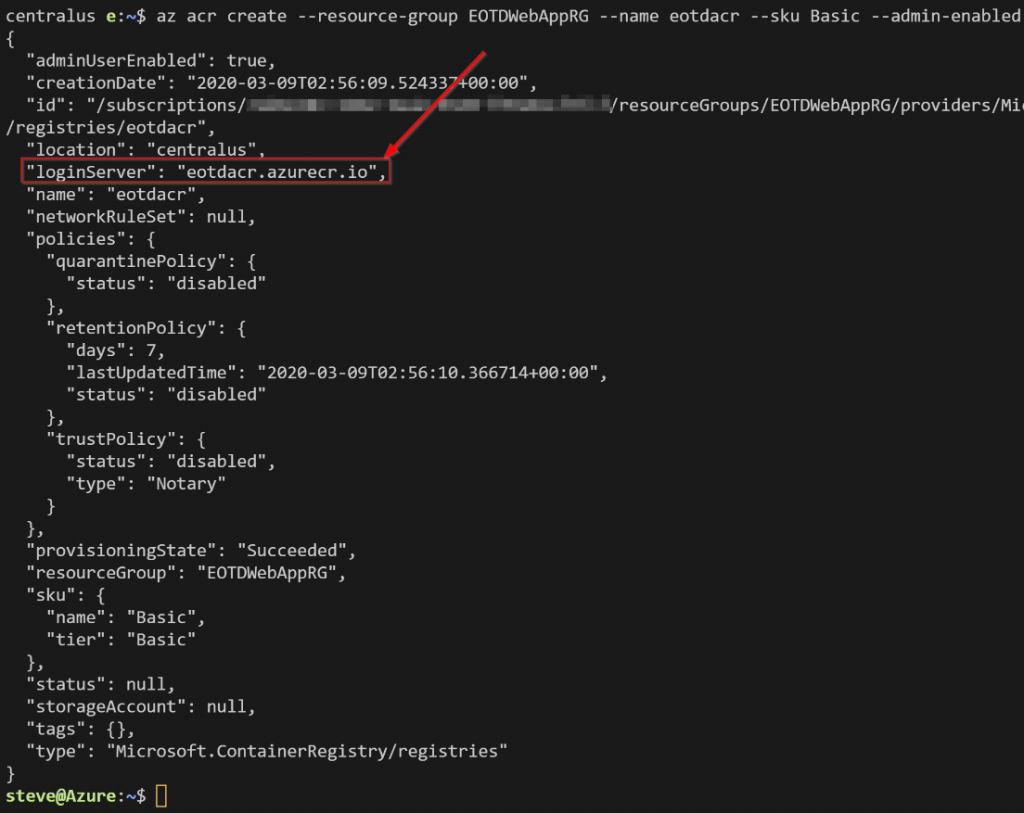
Note the loginServer from the output. This is the FQDN of the registry. Normally we would need this, admin enabled, and the password to log into the registry. In this scenario we won’t need admin enabled or the password because we will be adding a connection to Azure DevOps and the pipelines will handle pushing to and pulling the image from the registry.

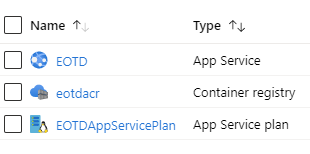
When it’s all done you should see the following resources in the new resource group:

Next, we will need to build an application and a container image.

Read more

Passed – Docker Certified Associate (Study guide)

Today I passed the Docker Certified Associate exam! In this post, I will share some details about the exam and the resources I used to study for it.

The certification is good for 2 years after passing the exam. It demonstrates that you have foundational real-world Docker skills. It is multiple choice with 55 questions, you have 1.5 hours to finish it and costs $195 USD. It is recommended that you have 6 to 12 months of hands-on experience with Docker before taking the exam. You can read about and sign up for the exam here: https://success.docker.com/certification.

I have had some folks ask me why I would waste my time taking the Docker exam. They say to focus on Kubernetes and Open Shift instead of Docker. Lets talk about why I chose to pursue the Docker certification. First off you have to run containers on those orchestration platforms mentioned before and chances are you will run Docker containers on them. Therefore before diving into an orchestration platform it is important to be knowledgable on containers. Also, I have seen many scenarios in the cloud where it makes sense to run containers directly on the cloud platform itself and again chances are those will be Docker containers. Docker is still a leader in the container space. There are several reports and articles that point to this. Here are some of the reports and articles backing this up:

Docker listed as the leader in the “Container Tools Used” section of the RightScale 2019 State of the Cloud Report” here:

Docker is listed as #2  with 31.35% market share on Datanyze 2020 “Containerization Market Share Competitor Analysis Report” here:

Source: https://www.datanyze.com/market-share/containerization–321

In “Sysdiags 2018 Docker usage report” they show “What container runtimes are in use?” showing Docker as the leader. 

Source: https://sysdig.com/blog/2018-docker-usage-report/

And finally this article arguing that Docker is better than LXC here:

https://www.upguard.com/articles/docker-vs-lxc

I will call out that the Docker exam covers Swarm mode orchestration platform that is included with Docker. Swarm mode is a lot easier to learn and use compared to Kubernetes however, Kubernetes has won the orchestration platform war. It would be nice if Docker would revamp the exam reducing or removing Swarm and replace with some Kubernetes objectives. This would make more sense because there is a strong chance Swarm will not be used in the real world. 

The Docker exam was not an easy exam and you definitely want to have some hands-on with Docker before taking it. There are a ton of resources out there that you can leverage beyond hands-on to assist in your study for this certification. There are many books available. You can do a quick search on Amazon and check the reviews for one that would be a good fit for you. I have read a couple of books on Docker and have co-authored a book on AKS with a chapter dedicated to Docker in it.

Here is the list of what I used to study.

Free Hands on Docker labs (This resource was huge for me. It gave me environments to use and scenarios for training with Docker and Docker Swarm mode.):

I attended a “Docker JumpStart Virtual Workshop” by Microsoft MVP Mike Pfeiffer and Microsoft MVP/Docker Captain Dan Wahlin (This workshop ocurred in the past but I beleive you can sign up and watch the recordings from the workshop.):

Free Docker Certification review questions here (This blogger has a bunch of review questions to help you get in the right mindset. They cover all the exam areas.): 

Docker courses and learning checks on Pluralsight (The courses are great. I found the learning checks very useful becuase it was a good way to check my knowledge in all of the exam areas.):

Spent time working with Docker on some projects (self explanatory).

Overall the Docker certification is a good move for your career as an IT Pro, developer, if you work in DevOps, and with cloud. I definitely recommend getting this certification. If you decide to go after it good luck!

Stay tuned for more blog posts with insights on certifications in the future.

Read more

Composer in a Docker Image

This will be a short post and this one is mostly for me so I can easily find this information in the future when I need it again. 🙂

Recently I was containerizing some PHP websites that use Composer. If you are not familiar with Composer but you are working with PHP, you will run across it at some point. Composer is a dependency package manager for PHP. Composer manages (install/update) any required libraries and dependencies needed for your PHP site.

To use Composer you must first declare the libraries and dependencies in a composer.json file in your site directory and then you would run Composer and it will do its magic. For more information on Composer visit: https://getcomposer.org/doc/00-intro.md

Back to my task, I needed to install Composer in the containers I was building and run it to install all the dependencies. I needed these actions in the Dockerfile so it would all happen during the container build. After some research on Composer I was able to pull something together. Here is the syntax that I ended up putting in the Dockerfile:

# Install Composer
RUN curl -sS https://getcomposer.org/installer | php -- --install-dir=/usr/local/bin --filename=composer

# Set working directory for composer (Contains the composer.json file)
WORKDIR /var/www/html/sitename

# Run Composer
RUN composer install

Note: I placed the above code at the end of the Dockerfile ensuring Apache, PHP etc was all in place first.

Thanks for reading and happy Containerizing!

Read more

Master Azure with VS Code

At Experts Live Europe 2019 I presented a session titled “Master Azure with VS Code”. This was a fun session with an engaging audience that took to twitter after the session. There was some chatter asking this session was recorded. It was not. I did note that I planned to write a blog post on this topic.

Here is that blog post and it is the first one of 2020 for me! In this post, we are going to dive into how VS code is helpful when working with Azure and many extensions I find useful when working with Azure. This post is not set to be an end-all to using VS Code with Azure but from my experience. Use this post as a starting point or a reference for expanding your use of VS Code with Azure. Also, check out the many other community experts and Microsoft MVPs for their additional knowledge plus tips and tricks on this topic.

VS Code Overview

First off if you are not using VS Code stop reading this right now, go download it and install it then come back to finish reading. 🙂 VS Code is a must-have in your toolbox and it is free! For those that are new to VS Code, it is an open-source – code editor developed by Microsoft that runs on Windows, Linux, and macOS. Here is a shortlist of the many benefits of VS Code:

  • Has support for hundreds of languages.
  • Has Integrated Terminal.
  • Also powerful developer tool with functionality, like IntelliSense code completion and debugging.
  • Includes syntax highlighting, bracket-matching, auto-indentation, box-selection, snippets, and more.
  • Integrates with build and scripting tools to perform common tasks making everyday workflows faster.
  • Has support for Git to work with source control.
  • Large Extension Marketplace of third-party extensions.

Note that yes, VS Code is for the “IT Pro”. Not just developers.

Azure Extensions in VS Code

VS Code has a ton of extensions in general. There are a number of Azure specific extensions and you can work with Azure directly from VS Code.

If you go to the VS Code Marketplace here: https://marketplace.visualstudio.com/vscode and search on Azure you will see results for many published by Microsoft and many community based extensions for Azure. As of the time of writing this blog post, there are 93. Here is a screenshot showing some of the results:

You can also go directly to the Azure Tools extension from Microsoft here: 

https://marketplace.visualstudio.com/itemdetails?itemName=ms-vscode.vscode-node-azure-pack

Or the

Azure Extensions from Microsoft here:

https://code.visualstudio.com/docs/azure/extensions

In the rest of this post, I am going to share some key extensions I use with Azure. I will post the marketplace links at the end of each extension I talk about and if it is maintained by community or Microsoft.

Deploy to Azure using VS Code

It is important to note that not all of the Azure extensions available in VS Code can be used to deploy to Azure. Some can but most can’t here is a list of the services that you can deploy to from extensions in VS Code.

Azure Service Description
Azure Functions Build and manage Azure Functions serverless apps directly in VS Code with the Azure Functions extension.
App Service Manage Azure resources directly in VS Code with the Azure App Service extension.
Docker Deploy your website using a Docker container.
Azure CLI Create, deploy, and update a website using a terminal and the Azure CLI.
Static website Create, deploy, and update a static website on Azure Storage.

NOTE: This list is current at the time of writing this blog post. This will change over time.

Azure Cloud Shell in VS Code

Cloud Shell is something you should be using with Azure to make your life easier. It is an interactive command-line shell. You are authenticated to your Azure account when you launch it, It typically runs in the browser and is used for managing Azure resources. When you launch it you can choose the shell experience that best for you, either Bash or PowerShell. With VS Code you can launch Cloud Shell directly in VS Code!

Cloud Shell is a part of the Azure Account extension. Here are some key points on using Cloud Shell with VS Code:

  • Free (storage consumed has costs.)
  • Launch Azure Cloud Shell directly in VS Code.
  • Launch Bash, PowerShell, or Upload.
  • Works in the Integrated Terminal.

Azure and open-source Tooling in Cloud Shell:

Azure Tools:
blobxfer Azure CLI and Azure classic CLI Azure Functions CLI AzCopy Service Fabric CLI Batch Shipyard  
Open-Source:
Bash Terraform Packer Ansible Chef InSpec Puppet Bolt Docker Kubectl Helm DC/OS CLI iPython Client Cloud Foundry CLI

PowerShell Modules in Cloud Shell

You get the following PowerShell modules in Cloud Shell:
Azure Modules (Az.Accounts, Az.Compute, Az.Network, Az.Resources, Az.Storage)
Azure AD Management (Preview)
Exchange Online (In development)
MicrosoftPowerBIMgmt
SqlServer

Marketplace Link:

Azure Account: https://marketplace

Maintained By Microsoft

Read more

New Azure Kubernetes Service (AKS) book coming soon

These days the growth of Kubernetes is on fire! Azure Kubernetes Service (AKS) Microsoft’s managed Kubernetes offering is one of the fastest-growing products in the Azure portfolio of cloud services with no signs of slowing down. For some time me and two fellow Microsoft MVPs Janaka Rangama (@JanakaRangama) and Ned Bellavance (@Ned1313) have been working hard on an Azure Kubernetes Service (AKS) book. We are excited that the book has been finished and is currently in production. The publisher Apress plans to publish it on December 28th, 2019.

Besides my co-authors, we had additional rock stars to help with this project. For the Tech Review, we had the honor to work with Mike Pfeiffer (@mike_pfeiffer) Microsoft MVP, Author, Speaker, CloudSkills.fm podcast and Keiko Harada (@keikomsft) Senior Program Manager – Azure Compute – Containers. Shout out to them and huge thanks for being a part of this!

We also had the honor of the foreword being written by Brendan Burns (@brendandburns) Distinguished Engineer at Microsoft and co-founder of Kubernetes. A shout out to him and a world of thanks for taking the time to help with this project!

Books like this are only possible with a great team of people contributing to them. The book is titled “Introducing Azure Kubernetes Service: A Practical Guide to Container Orchestration” and can be pre-ordered here: https://www.amazon.com/gp/product/1484255186 or here: https://www.apress.com/gp/book/9781484255186. Here is the cover:

In this book, we take a journey inside Docker containers, container registries, Kubernetes architecture, Kubernetes components, and core Kubectl commands. We then dive into topics around Azure Container Registry, Rancher for Kubernetes management, deep dive into AKS, package management with HELM, and using AKS in CI/CD with Azure DevOps. The goal of this book is to give the reader just enough theory and lots of practical straightforward knowledge needed to start running your own AKS cluster.

For anyone looking to work with Azure Kubernetes Service or already working with it, this book is for you! We hope you get a copy and it becomes a great tool you can use on your Kubernetes journey.

Again you can get the book here: https://www.amazon.com/gp/product/1484255186

Read more

Docker JumpStart Virtual Workshop

I want to share here about Docker training I will be attending later this month June 24th/25th, 2019. It is a Docker JumpStart Virtual Workshop. I am excited about this training because it will be delivered by a fellow Microsoft MVP’s Dan Wahlin and Mike Pfeiffer. Also Dan Wahlin is a Docker Captain.

For those that don’t know a Docker Captain is like a Microsoft MVP but for Docker. There will even be some Kubernetes covered on day 2. This is shaping up to be some great training.

As of now there is still room in this class and its less than $300 USD! If you have wanted to get up to speed on Docker this is a good low cost way to do it. Here is a link to sign up: Docker JumpStart Workshop

Here is what will be covered across the 2 days (from the training website):

Day 1:

Read more

Featured on Cloudskills.fm and New Azure course

FEATURED ON CLOUDSKILLS.FM ~

CloudSkills.fm is a podcast by fellow Microsoft MVP Mike Pfeiffer and veteran in the tech space with 5 books under his belt and numerous courses on Pluralsight. The podcast can be found here: cloudskills.fm. Mike is an all around good guy and I was honored to be a featured guest on one of his podcast episodes. The podcast is weekly with technical tips and career advice for people working in the cloud computing industry. The podcast is geared for developers, IT pros, those making move into cloud.

On this episode Mike and I talked about managing both the technical and non-technical aspects of your career in the cloud computing industry. We also discuss DevOps stuff around Docker, Azure Kubernetes Service, Terraform and cloud stuff around Azure management including my 5 points to success with cloud. You can listen to the podcast here:

https://cloudskills.fm/015

Also on you can listen here: iTunes: https://podcasts.apple.com/ca/podcast/cloudskills-fm/id1448194100 and PlayerFM: https://player.fm/series/cloudskillsfm/ep-015-managing-your-cloud-career .

NEW AZURE COURSE ~

I’m very excited Opsgility recently published a new Azure course by me titled: “Deploy and Configure Infrastructure”. This course is part of the AZ 300 certification learning path for Microsoft Azure Architect Technologies. More about the AZ 300 certification can be found here: https://www.microsoft.com/en-us/learning/exam-az-300.aspx. The course is over 4 hours of Azure content!

Description of the course:

In the course learn how to analyze resource utilization and consumption, create and configure storage accounts, create and configure a VM for Windows and Linux, create connectivity between virtual networks, implement and manage virtual networking, manage Azure Active Directory, and implement and manage hybrid identities.

Objectives of the course:

  • Configure diagnostic settings on resources
  • Create baseline for resources
  • Utilize Log Search query functions
  • Configure network access to the storage account
  • Implement Azure storage replication
  • Configure high availability
  • Deploy and configure scale sets
  • Modify ARM Templates
  • Configure Azure Disk Encryption for VMs
  • Create and configure VNET peering
  • Install and configure Azure AD Connect

It can be watched here:

https://skillmeup.com/courses/player/deploy-and-configure-infrastructure

Read more

Deploy Rancher on Azure for Kubernetes Management

Lately I have been hearing a lot about a solution named Rancher in the Kubernetes space. Rancher is an open source Kubernetes Multi-Cluster Operations and Workload Management solution. You can learn more about Rancher here: https://www.rancher.com.

In short you can use Rancher to deploy and manage Kubernetes clusters deployed to Azure, AWS, GCP their managed Kubernetes offerings like GCE, EKS, AKS or even if you rolled your own. Rancher also integrates with a bunch of 3rd party solutions for things like authentication such as Active Directory, Azure Active Directory, Github, and Ping and logging solutions such as Splunk, Elasticsearch, or a Syslog endpoint.

Recently training opened up for some Rancher/Kubernetes/Docker training so I decided to go. The primary focus was on Rancher while also covering some good info on Docker and Kubernetes. This was really good training with a lot of hands on time, however there was one problem with the labs. The labs had instructions and setup scripts ready to go to run Rancher local on your laptop or on AWS via Terraform. There was nothing for Azure.

I ended up getting my Rancher environment running on Azure but it would have been nice to have some scripts or templates ready to go to spin up Rancher on Azure. I did find some ARM templates to spin up Rancher but they deployed an old version and it was not clear in the templates on where they could be updated to deploy the new version of Rancher. I decided to spend some time building out a couple of ARM templates that can be used to quickly deploy Rancher on Azure and add a Kubernetes host to Rancher. In the ARM template I pulled together it pulls the Rancher container from Docker Hub so it will always deploy the latest version. In this blog post I will spell out the steps to get your Rancher up and running in under 15 minutes.

First off you can find the ARM Templates here on my Github here: https://github.com/Buchatech/DeployRanchertoAzure.

The repository consists of ARM templates for deploying Rancher and a host VM for Kubernetes. NOTE: These templates are intended for labs to learn Rancher. They are not intended for use in production.

In the repo ARM Template #1 named RancherNode.JSON will deploy an Ubuntu VM with Docker and the latest version of Rancher (https://hub.docker.com/r/rancher/rancher) from Docker Hub. ARM Template #2 named RancherHost.JSON will deploy an Ubuntu VM with Docker to be used as a Kubernetes host in Rancher.

Node Deployment

Deploy the RancherNode.JSON ARM template to your Azure subscription through “Template Deployment” or other deployment method. You will be prompted for the following info shown in the screenshot:

Host Deployment

Deploy the RancherHost.JSON ARM template to your Azure subscription through “Template Deployment” or other deployment method. Note that that should deploy this into the same Resource Group that you deployed the Rancher Node ARM template into. You will be prompted for the following info shown in the screenshot:

After the Rancher Node and Rancher Host ARM templates are deployed you should see the following resources in the new Resource Group:

NameType
RancherVNet Virtual network
RancherHost Virtual machine
RancherNode Virtual machine
RancherHostPublicIP Public IP address
RancherNodePublicIP Public IP address
RancherHostNic Network interface
RancherNodeNic Network interface
RancherHost_OSDisk Disk
RancherNode_OSDisk Disk

Next navigate the Rancher portal in the web browser. The URL is the DNS name of the Rancher Node VM. You can find the DNS name by clicking on the Rancher Node VM in the Azure portal on the overview page. Here is an example of the URL:

https://ranchernode.centralus.cloudapp.azure.com

The Rancher portal will prompt you to set a password. This is shown in the following screenshot.

After setting the password the Rancher portal will prompt you for the correct Rancher Server URL. This will automatically be the Rancher Node VM DNS name. Click Save URL.

You will then be logged into the Rancher portal. You will see the cluster page. From here you will want to add a cluster. Doing this is how you add a new Kubernetes cluster to Rancher. In this post I will show you how to add a cluster to the Rancher Host VM. When it’s all said and done Rancher will have successfully deployed Kubernetes to the Rancher Host VM. Note that you could add a managed Kubernetes such as AKS but we won’t do that in this blog. I will save that for a future blog post!

Click on Add Cluster

Under “From my own existing nodes” Click on custom, give the cluster a name and click Next.

Next check all the boxes for the Node Options since all the roles will be on a single Kubernetes cluster. Copy the code shown at the bottom of the page, click done and run the code on the Rancher Host.

In order to run the code on the Rancher Host you need to SSH in and run it from there. To do this follow these steps:

  1. In the Azure Portal, from within the resource group click on the Rancher Host VM.
  2. On the Overview page click on Connect.
  3. Copy “ssh ranchuser@rancherhost.centralus.cloudapp.azure.com” from the Connect to virtual machine pop up screen.
  4. Open a terminal in either Azure cloud shell or with something like a terminal via VS Code and past the “ssh ranchuser@rancherhost.centralus.cloudapp.azure.com” in.

Running the code will look like this:

When done you can run Docker PS to see that the Rancher agent containers are running.

In the Rancher portal under clusters you will see the Rancher host being provisioned

The status will change as Kubernetes is deployed.

Once it’s done provisioning you will see your Kubernetes cluster as Active.

From here you can see a bunch of info about your new Kubernetes cluster. Also notice that you could even launch Kubectl right from hereand start running commands! Take some time to click around to see all the familiar stuff you are used to working with in Kubernetes. This is pretty cool and simplifies the management experience for Kubernetes. 

If you want to add more nodes or need the configuration code again just click the ellipsis button and edit.

In Edit Cluster you can change the cluster name, get and change settings and copy the code to add more VMs to the cluster.

That’s the end of this post. Thanks for reading. Check back for more Azure, Kubernetes, and Rancher blog posts.

Read more

Where to host Docker Containers on Azure (AKS, ASE, or ASF)?

Azure Kubernetes Service (AKS) service Azure App Service Environment (ASE) Azure Service Fabric (ASF) Comparison

Scenario:

So, your team recently has been tasked with developing a new application and running it. The team made the decision to take a microservices based approach to the application. Your team also has decided to utilize Docker containers and Azure as a cloud platform. Great, now it’s time to move forward right? Not so fast. There is no question that Docker containers will be used, but what is in question is where you will run the containers. In Azure containers can run on Azure’s managed Kubernetes (AKS) service, an App Service Plan on Azure App Service Environment (ASE), or Azure Service Fabric (ASF). Let’s look at each one of these Azure services including an overview, pro’s, cons, and pricing.

This Azure Kubernetes Service (AKS) Pros and Cons chart is clickable.
This Azure App Service Environment (ASE) Pros and Cons chart is clickable.
This Azure Service Fabric (ASF) Pros and Cons chart is clickable.

Conclusion:

Choose Azure Kubernetes Service if you need more control, want to avoid vendor lock-in (can run on Azure, AWS, GCP, on-prem), need features of a full orchestration system, flexibility of auto scale configurations, need deeper monitoring, flexibility with networking, public IP’s, DNS, SSL, need a rich ecosystem of addons, will have many multi-container deployments, and plan to run a large number of containers. Also, this is a low cost.

Choose Azure App Service Environment if don’t need as much control, want a dedicated SLA, don’t need deep monitoring or control of the underlying server infrastructure, want to leverage features such as deployment slots, green/blue deployments, will have simple and a low number of multi-container deployments via Docker compose, and plan to run a smaller number of containers. Regarding cost, running a containerized application in an App Service Plan in ASE tends to be more expensive compared to running in AKS or Service Fabric. The higher cost of running containers on ASE is because with an App Service Plan on ASE, you are paying costs for a combination of resources and the managed service. With AKS and ASF you are only paying for the resources used.

Choose Service Fabric if you want a full micros services platform, need flexibility now or in the future to run in cloud and or on-premises, will run native code in addition to containers, want automatic load balancing, low cost.

A huge thanks to my colleague Sunny Singh (@sunnys101) for giving his input and reviewing this post. Thanks for reading and check back for more Azure and container contents soon.

Read more

Monitoring Azure Kubernetes Service (AKS) with Azure Monitor & Log Analytics

Part of running Kubernetes is being able to monitoring the cluster, the nodes, and the workloads running in it. Running production workloads regardless of PaaS, VM’s, or containers requires a solid level of reliability. Azure Kubernetes Service comes with monitoring provided from Azure bundled with the semi-managed service. Kubernetes also has built in monitoring that can also be utilized.

It is important to note that AKS is a free service and Microsoft aims to achieve at least 99.5% availability for the Kubernetes API server on the master node side.

But due to AKS being a free service Microsoft does not carry an SLA on the Kubernetes cluster service itself. Microsoft does provide an SLA for the availability of the underlying nodes in the cluster via the Azure Virtual Machines SLA. Without an official SLA for the Kubernetes cluster service it becomes even more critical to understand your deployment and have the right monitoring tooling and plan in place so when an issue arises the DevOps or CloudOps team can address, investigate, and resolve any issues with the cluster.

The monitoring service included with AKS gives you monitoring from two perspectives including the first one being directly from an AKS cluster and the second one being all AKS clusters in a subscription. The monitoring looks at two key areas “Health status” and “Performance charts” and consists of:

Insights – Monitoring for the Kubernetes cluster and containers.

Metrics – Metric based cluster and pod charts.

Log Analytics – K8s and Container logs viewing and search.

Azure Monitor

Azure Monitor has a containers section. Here is where you will find a health summary across all clusters in a subscription including ACS. You also will see how many nodes and system/user pods a cluster has and if there are any health issues with the a node or pod. If you click on a cluster from here it will bring you to the Insights section on the AKS cluster itself.

If you click on an AKS cluster you will be brought to the Insights section of AKS monitoring on the actual AKS cluster. From here you can access the Metrics section and the Logs section as well as shown in the following screenshot.

Insights

Insights is where you will find the bulk of useful data when it comes to monitoring AKS. Within Insights you have these 4 areas Cluster, Nodes, Controllers, and Containers. Let’s take a deeper look into each of the 4 areas.

Cluster

The cluster page contains charts with key performance metrics for your AKS clusters health. It has performance charts for your node count with status, pod count with status, along with aggregated node memory and CPU utilization across the cluster. In here you can change the date range and add filters to scope down to specific information you want to see.

Nodes

After clicking on the nodes tab you will see the nodes running in your AKS cluster along with uptime, amount of pods on the node, CPU usage, memory working set, and memory RSS. You can click on the arrow next to a node to expand it displaying the pods that are running on it.

What you will notice is that when you click on a node, or pod a property pane will be shown on the right hand side with the properties of the selected object. An example of a node is shown in the following screenshot.

Controllers

Click on the Controllers tab to see the health of the clusters controllers. Again here you will see CPU usage, memory working set, and memory RSS of each controller and what is running a controller. As an example shown in the following screenshot you can see the kubernetes dashboard pod running on the kubernetes-dashboard controller.

The properties of the kubernetes dashboard pod as shown in the following screenshot gives you information like the pod name, pod status, Uid, label and more.

You can drill in to see the container the pod was deployed using.

Containers

On the Containers tab is where all the containers in the AKS cluster are displayed. An as with the other tabs you can see CPU usage, memory working set, and memory RSS. You also will see status, the pod it is part of, the node its running on, its uptime and if it has had any restarts. In the following screenshot the CPU usage metric filter is used and I am showing a containers that has restarted 71 times indicating an issue with that container.

 In the following screenshot the memory working set metric filter is shown.

You can also filter the containers that will be shown through using the searching by name filter.

You also can see a containers logs in the containers tab. To do this select a container to show its properties. Within the properties you can click on View container live logs (preview) as shown in the following screenshot or View container logs. Container log data is collected every three minutes. STDOUT and STDERR is the log output from each Docker container that is sent to Log Analytics.

Kube-system is not currently collected and sent to Log Analytics. If you are not familiar with Docker logs more information on STDOUT and STDERR can be found on this Docker logging article here:  https://docs.docker.com/config/containers/logging.

Read more