20th Pluralsight Course Published – “Getting Started with Drupal”

Last week I published a new course on Pluralsight. This one is a milestone as it marks my 20th course! This course is titled “Getting Started with Drupal“. Startups, enterprises and more continue to adopt content management systems at a fast rate with Drupal being one of the top Content Management Systems used.

Drupal is one of the top choices for startups and enterprises. It is used for many uses from web apps, marketing tools, e-commerce, and even a company’s main website.

I have been working with Drupal and other content management systems in various aspects for over sixteen years. I have used Drupal for my own websites, hosted it for businesses, administered Drupal sites for customers, Drupal development for customers, and even managed the development of Drupal modules. With all of my history with Drupal, I was excited when the opportunity came up to build a course about it.

This course is ideal for bloggers, entrepreneurs, Product Managers, Marketing managers, Marketing executives, Marketing consultants, Marketing employees, web developers, project managers, business analysts, web designers, graphic designers, UX/UI, designers, and anyone interested in content management systems specifically Drupal.

This course will take you from little to no knowledge of Drupal to a place where you can be confident enough to get started. Whether you want to create a personal blog, a business website, or an online store, Drupal is a skill you should have and this course has you covered.

In this course, Getting Started with Drupal, you’ll learn its many uses, features, tech stack, and you’ll also explore hosting it. Next, you’ll learn how to install it. Finally, you’ll discover its user interface and general configuration.

Some of the major topics that are covered in this course include:

  1. Core Drupal knowledge.
  2. About its tech stack such as web servers like Apache, language PHP, Composer, Drush, & databases like MySQL & how these work with Drupal.
  3. How to acquire a domain & hosting for Drupal.
  4. & Finally, how to install and configure Drupal.

By the end of this course, you will have a better understanding of content management systems, & Drupal itself, its uses, features, & tech stack. As well as knowledge of how to get a domain name, hosting, and install Drupal along with a tour of its interface and general configuration.

This course is the 1st in a Drupal Path named “Drupal Fundamentals” on Pluralsight. The 2nd course in the path is “Drupal 10 Site Administration”. You can check out the full path here:

https://www.pluralsight.com/paths/drupal-fundamentals

Check out the “Getting Started with Drupal“ course here:

https://www.pluralsight.com/courses/drupal-getting-started

I hope you find value in this new Getting Started with Drupal course. Be sure to follow my profile on Pluralsight so you will be notified as I release new courses

Here is the link to my Pluralsight profile to follow me:

https://www.pluralsight.com/authors/steve-buchanan

Read more

19th Pluralsight Course Published – “Getting Started with WordPress”

This week I published a second course on Pluralsight this year. This marks my 19th course! This course is titled “Getting Started with WordPress“. Startups, enterprises and more continue to adopt content management systems at a fast rate with WordPress owning a 60% market share. WordPress is the number one choice from startups to enterprises. It is being used for many uses from web apps, a marketing tool, e-commerce, or even a company’s main website.

I have been working with WordPress in various aspects for over sixteen years. I use WordPress for this blog, have used it for websites, hosted it for businesses, administered WordPress sites for customers, WordPress development for customers, and even managed the development of WordPress plugins. With all of my history with WordPress, I was excited when the opportunity came up to build a course about it.

This course is ideal for bloggers, entrepreneurs, Product Managers, Marketing managers, Marketing executives, Marketing consultants, Marketing employees, web developers, project managers, business analysts, web designers, graphic designers, UX/UI, designers, and anyone interested in content management systems specifically WordPress.

This course will take you from little to no knowledge of WordPress to a place where you can be confident enough to get started. Whether you want to create a personal blog, a business website, or an online store, WordPress is a skill you should have and this course has you covered.

In this course, Getting Started with WordPress, you’ll learn its many uses, features, tech stack, and you’ll also explore hosting it. Next, you’ll learn how to install it. Finally, you’ll discover its user interface and general configuration.

By the end of this course, you will have a better understanding of content management systems, & WordPress itself, its uses, features, & tech stack. As well as knowledge of how to get a domain name, hosting, and install WordPress along with a tour of its interface and general configuration.

Check out the “Getting Started with WordPress“ course here:

https://www.pluralsight.com/courses/wordpress-getting-started

I hope you find value in this new Getting Started with WordPress course. Be sure to follow my profile on Pluralsight so you will be notified as I release new courses

Here is the link to my Pluralsight profile to follow me:

https://www.pluralsight.com/authors/steve-buchanan

Read more

Dok Talks #121 – Running Stateful Apps in Kubernetes Made Simple

I am giving a talk for the Data on Kubernetes Community (DoKC) Community next week. They are a user group like community that focuses on how to build and operate data-centric applications on Kubernetes. Be sure to check them out! The DoK website is: https://dok.community.

My talk is titled: “Running Stateful Apps in Kubernetes Made Simple

ABSTRACT OF THE TALK

Eventually, the time will come to run a stateful app in Kubernetes. This can be a scary thing adding more moving parts to a Kubernetes cluster and deploying as well as managing your app on Kubernetes when it requires state.

In this talk, Steve Buchanan will take you through a journey of understanding how storage works in Kubernetes, how to Persistent state with pods, what storage options are available with Azure Kubernetes Service, best practices, and a demo of deploying a stateful app to AKS.

In the demo, I will show how to deploy stateful Worpress & Jenkins workloads on Azure Kubernetes Service using the GitOps model with Argo CD.

KEY TAKE-AWAYS FROM THE TALK

Overview of Storage in Kubernetes covering Storage Classes, Persistent Volumes, & Persistent Volume Claims. Overview of Azure Storage, Best Practices to running stateful apps in Kubernetes.

Register here:

https://www.meetup.com/Data-on-Kubernetes-community/events/284283907/

——-Update——-

If you missed the session you can stream it here:

Read more

Deploy MySQL and WordPress on Azure Kubernetes Service (AKS)

In this blog post I am going to walk through the steps for deploying WordPress to Azure Kubernetes Service (AKS) using MySQL and WordPress Docker images. Note that using the way I will show you is one way. Another way to deploy WordPress to AKS would be using a Helm Chart. Here is a link to the WordPress Helm Chart by Bitnami https://bitnami.com/stack/wordpress/helm. Here are the images we will use in this blog post:

MySQL WordPress
apiVersion: v1
kind: Service
metadata:
name: wordpress-mysql
labels:
app: wordpress
spec:
ports:
– port: 3306
selector:
app: wordpress
tier: mysql
clusterIP: None

apiVersion: v1
kind: PersistentVolumeClaim
metadata:
name: mysql-pv-claim
labels:
app: wordpress
spec:
accessModes:
– ReadWriteOnce
resources:
requests:
storage: 20Gi

apiVersion: apps/v1 # for versions before 1.9.0 use apps/v1beta2
kind: Deployment
metadata:
name: wordpress-mysql
labels:
app: wordpress
spec:
selector:
matchLabels:
app: wordpress
tier: mysql
strategy:
type: Recreate
template:
metadata:
labels:
app: wordpress
tier: mysql
spec:
containers:
– image: mysql:5.6
name: mysql
env:
– name: MYSQL_ROOT_PASSWORD
valueFrom:
secretKeyRef:
name: mysql-pass
key: password
ports:
– containerPort: 3306
name: mysql
volumeMounts:
– name: mysql-persistent-storage
mountPath: /var/lib/mysql
volumes:
– name: mysql-persistent-storage
persistentVolumeClaim:
claimName: mysql-pv-claim
apiVersion: v1
kind: Service
metadata:
name: wordpress
labels:
app: wordpress
spec:
ports:
– port: 80
selector:
app: wordpress
tier: frontend
type: LoadBalancer

apiVersion: v1
kind: PersistentVolumeClaim
metadata:
name: wp-pv-claim
labels:
app: wordpress
spec:
accessModes:
– ReadWriteOnce
resources:
requests:
storage: 20Gi

apiVersion: apps/v1 # for versions before 1.9.0 use apps/v1beta2
kind: Deployment
metadata:
name: wordpress
labels:
app: wordpress
spec:
selector:
matchLabels:
app: wordpress
tier: frontend
strategy:
type: Recreate
template:
metadata:
labels:
app: wordpress
tier: frontend
spec:
containers:
– image: wordpress:4.8-apache
name: wordpress
env:
– name: WORDPRESS_DB_HOST
value: wordpress-mysql
– name: WORDPRESS_DB_PASSWORD
valueFrom:
secretKeyRef:
name: mysql-pass
key: password
ports:
– containerPort: 80
name: wordpress
volumeMounts:
– name: wordpress-persistent-storage
mountPath: /var/www/html
volumes:
– name: wordpress-persistent-storage
persistentVolumeClaim:
claimName: wp-pv-claim

The first thing we need to do is save these files as mysql-deployment.yaml and wordpress-deployment.yaml respectively.

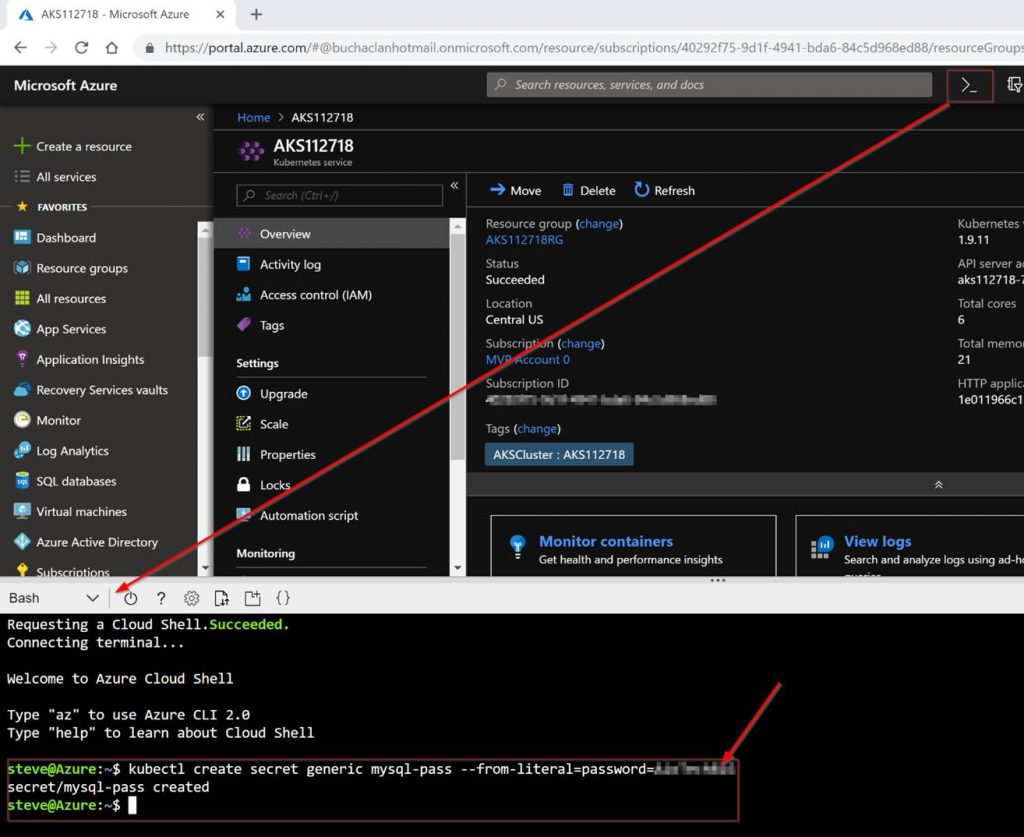
Next, we need to setup a password for our MySQL DB. We will do this by creating a secret on our K8s cluster. To do this launch the bash or PowerShell in Azure cloud shell like in the following screenshot and run the following syntax:

kubectl create secret generic mysql-pass –from-literal=password=”YOURPASSWORDHERE”

Note: Replace “PASSWORDHERE” in the syntax with your own password.

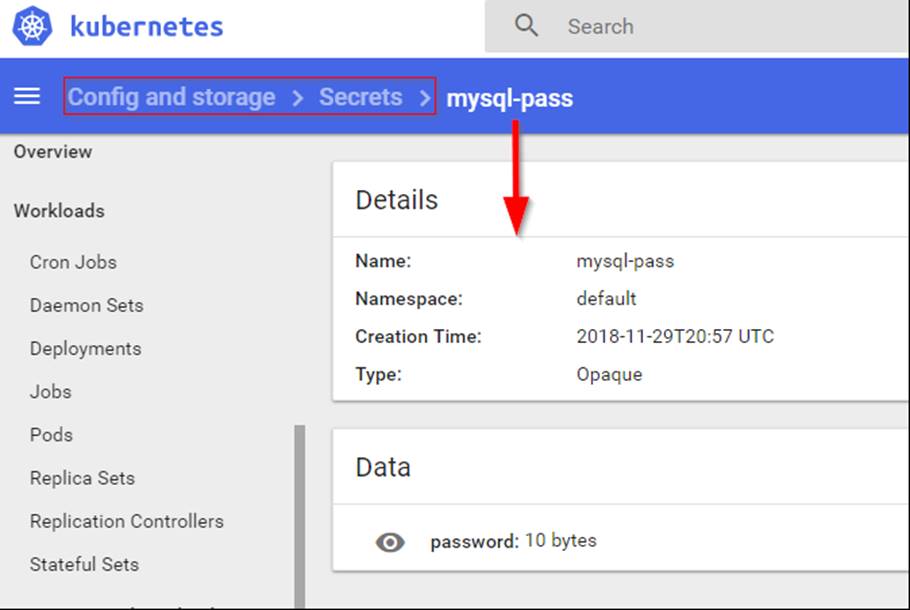
The secret is now created. To ensure it was created you can run the following syntax to list the secrets:

kubectl get secrets

You also can see the secret in the Kubernetes dashboard as shown in the following screenshot.

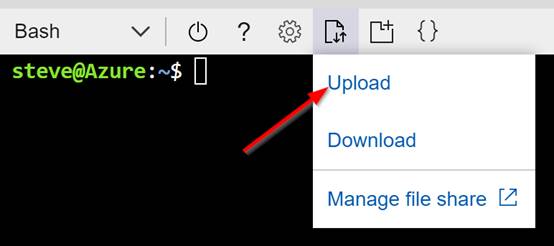
Next the mysql-deployment.yaml and wordpress-deployment.yaml files from the beginning of this post need to be uploaded to Azure cloudrive storage.

You can also do this in the Cloudshell as shown in the following screenshot.

Run ls in the shell to make sure the files are on your clouddrive.

You will need your home drive. Mine was. /home/steve. To see this, click on Download. It will show you what yours is.

Next create the MySQL Pod and service by running the following syntax.

kubectl apply -f /home/steve/mysql-deployment.yaml

NOTE: You could use kubectl create /home/steve/mysql-deployment.yaml instead of apply to create the MySQL pod and service. I use apply because I typically use the declarative object configuration approach. kubectl apply essentially equals kubectl create + kubectl replace. In order to update an object after it has been created using kubectl create you would need to run kubectl replace.

There are pros and cons to using each and it is more of a preference for example when using the declarative approach there is no audit trail associated with changes. For more information on the multiple Kubernetes Object Management approaches go here: https://kubernetes.io/docs/concepts/overview/object-management-kubectl/overview.

Note that in the mysql yaml file it has syntax to create a persistent volume. This is needed so that the database stays in tact even if the pod fails, is moved etc. You can check to ensure the persistent volume was created by running the following syntax:

kubectl get pvc

Also, you can run the following syntax to verify the mysql pod is running:

kubectl get pods

Deploying the WordPress Pod and service is the same process. Use the following syntax to create the WordPress pod and service:

kubectl apply -f /home/steve/wordpress-deployment.yaml

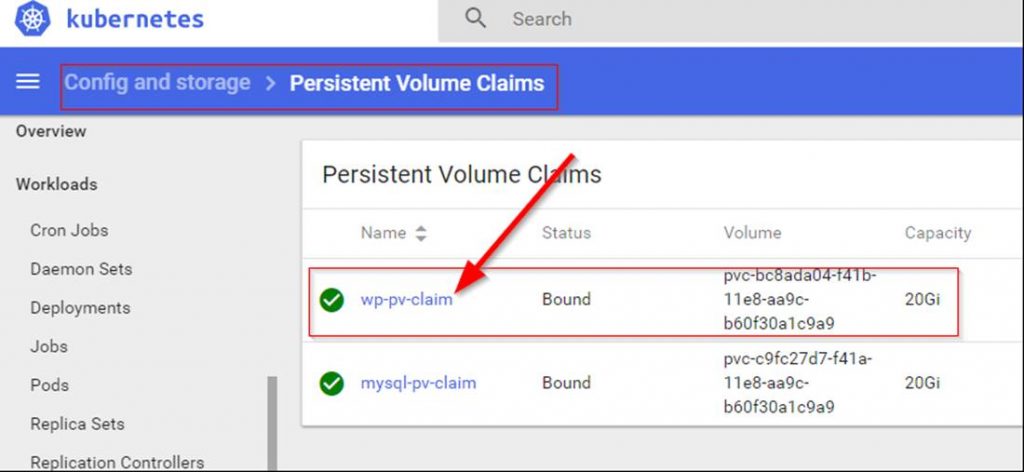
Again, check to ensure the persistent volume was created. Use the following syntax:

kubectl get pvc

NOTE: When checking right after you created the persistent volume it may be in a pending status for a while like shown in the following screenshot:

You can also check the persistent volume using the K8s dashboard as shown in the following screenshot:

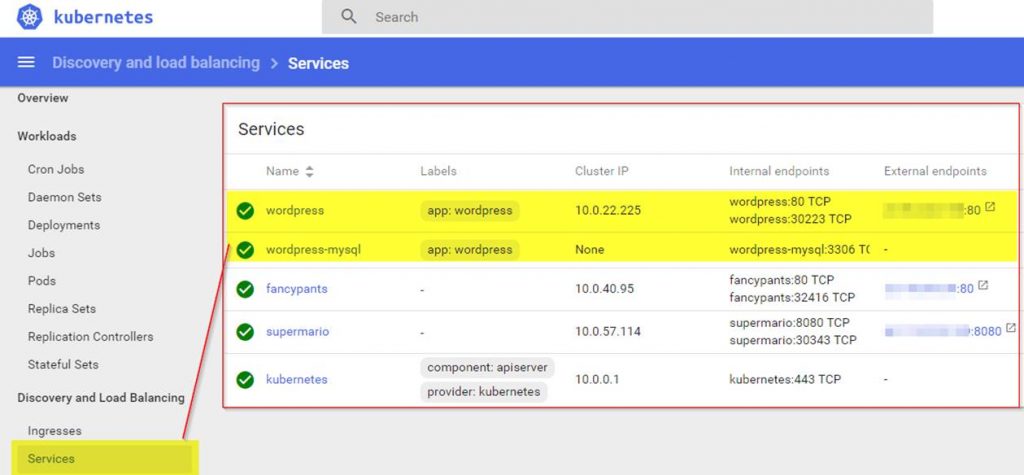
With the deployment of MySQL and WordPress we created 2 services. The MySQL service has a clusterip that can only be accessed internally. The WordPress service has an external IP that is also attached to an Azure Load Balancer for external access. I am not going to expand on what Kubernetes services are in this blog post but know that they are typically used as an abstracted layer in K8s used for access to Pods on the backend and follow the Pods regardless of the node they are running on. For more information about Kubernetes services visit this link: https://kubernetes.io/docs/concepts/services-networking/service.

In order to see that the services are running properly and find out the external IP you can run the following syntax:

kubectl get services (to see all services)

or

kubectl get services wordpress (to see just the WordPress service)

You also can view the services in the K8s dashboard as shown in the following screenshot:

Well now that we have verified the pods and the services are running let’s check out our new WordPress instance by going to the external IP in a web browser.

Thanks for checking out this blog post. I hope this was an easy to use guide to get WordPress up and running on your Azure Kubernetes Service cluster. Check back soon for more Azure and Kubernetes/Container content.

Read more

Automatically backup MySQL database

I needed to backup a couple of MySQL databaes automatically. Here is what I did to accomplish this. I created a folder called mysqlbackup. I then created a script called “mysqldbbackup.sh” and put this script file in the mysqlbackup folder. It contains “rm /mysqlbackup/DBNAME_backup.sql mysqldump -u USERNAME -pPASSWORD DBNAME > /mysqlbackup/DBNAME_backup.sql” I used the “rm” command to … Read more