Planning for protection as a part of an IT Service Continuity plan often takes into consideration backup of applications and data as well as restore. But what about security?
When planning for protection of applications and data in your environment security should right up there in the forefront. “Backup Security” should be a key part of the plan.
Security in the context of backup can be thought of #1 as securing the backups, and #2 backups being used as an added measure for security breach mitigation. Let me break this down further.
In regards to securing backups you want to do things like encrypt backup data as it travels offsite, encrypting backup data at rest, being able to protect encrypted data, requiring security pins or further authentication of admins and more.
In regards to backup as an added measure for security backup becomes a direct part of Security planning in organizations. Sometimes when security measures fail backups are the only thing that can save you as a last resort. Backups are commonly becoming a way to recover from ransomware attacks as an alternative to paying the hackers. Here is a real world example.
Recently an unnamed hosting providers entire data center became hostage to a ransomware attack. This hacker got in due to a mistake of one of the system admins (more on how to protect at this level later) and basically had full domain admin rights to everything. Keep in mind majority of the servers in this scenario are for customers.
In this case the hosting provider had two choices. Option #1 go to the dark web via a tor network and pay a ton of money in bitcoin for the decryption key. Option #2 Restore everything from offsite backups and pray.
This hosting provider went for option #2 and thank goodness it worked. In this case if it weren’t for a solid offsite backup solution this hosting provider would have been up a creek without a paddle.
It is becoming more common that ransomeware will actually target backups because these are a high target and hackers understand this is a last resort for companies to save themselves. If the backups are deleted there is no other choice but to pay the ransom. This raises the security level of the backups. Administrative actions on backups need an extra layer of security.
Microsoft Business Continuity products help with not only protection but also security. These products consist of System Centers Data Protection Manager (DPM) and Operations Management Suites Azure Backup (AB) and Azure Site Recovery (ASR). In this post I am only going to touch on DPM and AB.
Some exciting things have been happening with Azure Backup and Data Protection Manager to ensure security is front and center as a part of your enterprise backup solution. Microsoft’s goal with the backup security is to provide prevention, alerting, and recovery.
More about this including a video can be found here:
https://azure.microsoft.com/en-us/blog/azure-backup-security-feature
Just yesterday DPM update rollup 12 for 2012 and update rollup 2 for 2016 was announced. Along with UR2 comes some enhanced security features for DPM. These will be called out later in this blog post. Microsoft has rolled out some great security features to both across hybrid clouds. I will go ahead and break these down.
– Azure Backup –

Encrypted backup data at rest
Described in DPM section.
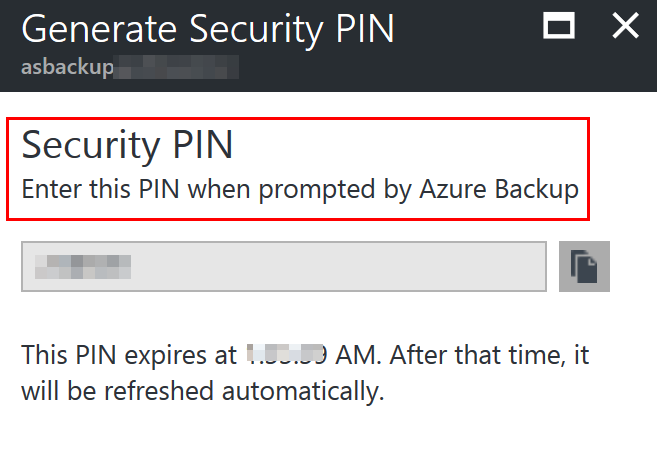
Security PIN
With Azure Backup you can require a security pin for sensitive operations such as removing protection, deleting data, or changing other settings in Azure Backup itself such as changing a Passphrase.
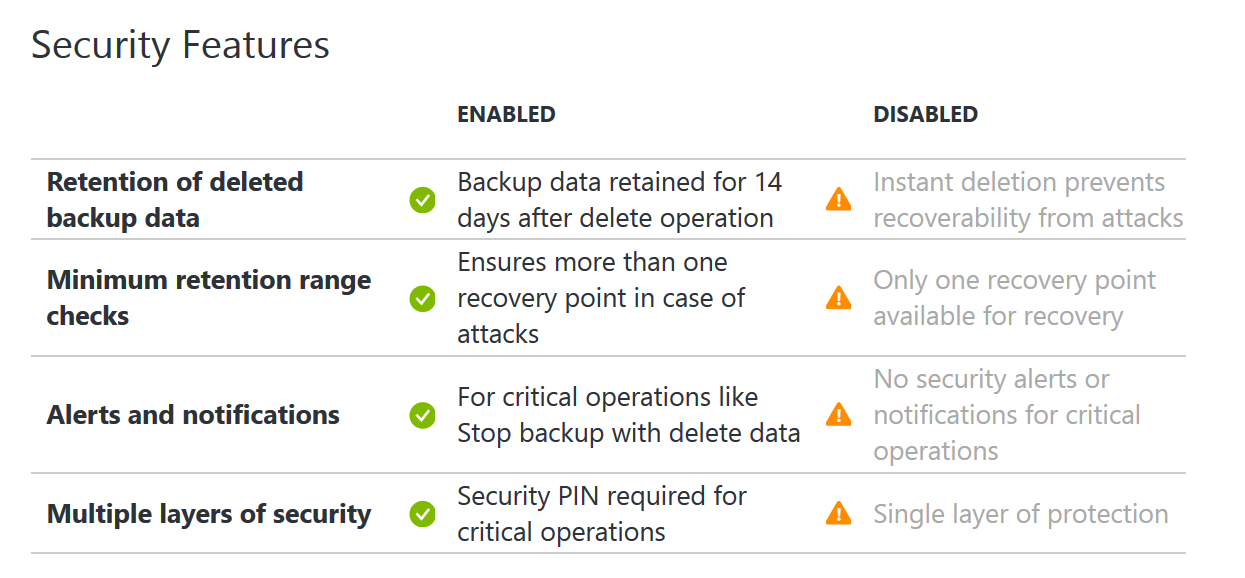
Azure Backup also has some other security measures in place like a minimum retention range to ensure a certain amount of backup data is always available and notifications upon critical operations to subscription admins or others as specified.
NOTE: These security features are now also available in DPM with the UR’s (UR 12 for 2012 and UR2 for 2016) announced yesterday. When an administrator changes the passphrase, or delete backup data, you need to enter the PIN if you have Enhanced Security Enabled. Also, there is a minimum retention range of 14 days for cloud protected data that is deleted.
MFA
MFA is Multi-Factor Authentication. Microsoft has MFA available as a part of Azure Active Directory. Within Azure Backup you can configure it to require MFA of admins when performing critical operations. By enabling MFA you would then ensure via authentication from a second device usually physical to the user that they are who they say they are.
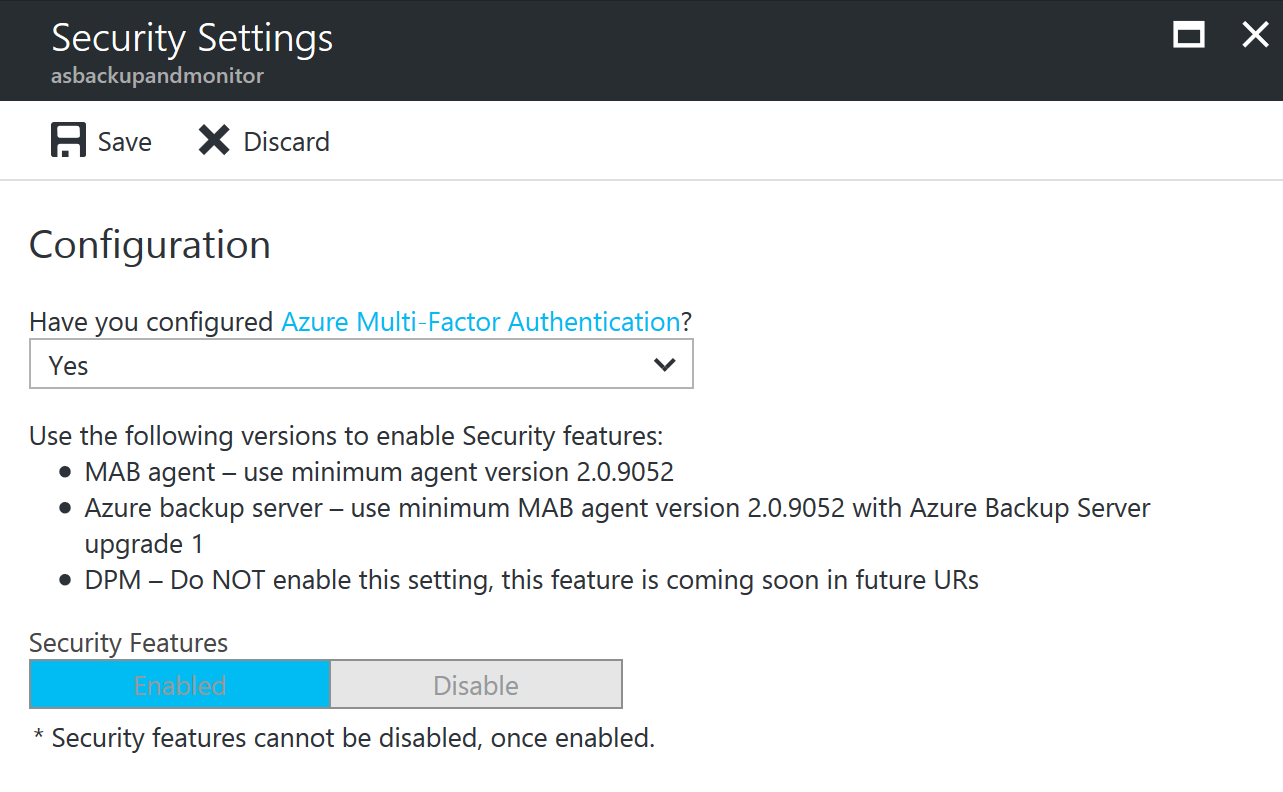
NOTE: When you enable security settings they cannot be disabled.
Ransomware attacks
Described in DPM section.
– Data Protection Manager –
Backup data encrypted during offsite transfer
When data is sent from DPM to Azure Backup it is encrypted before it even leaves your four walls. Data is encrypted on the on-premises server/client/SCDPM machine using AES256 and the data is sent over a secure HTTPS link.
Encrypted backup data at rest
Once backup data is on Azure it is encrypted at rest. Microsoft does not decrypt the backup data at any point. The customer is the only one with the encryption key that can decrypt the backup data. If this key is lost not even Microsoft can decrypt your backup data. This is very secure.
Protection and recovery of encrypted computers
The release of Hyper-V on Windows Server 2016 included a new feature known as Shielded virtual machines (VM’s). This feature essentially utilizes Virtual Trusted Platform Module (vTPM) technology and BitLocker to encrypt a VM to encrypt virtual machines at the virtual layer. This means if a VM is physically copied off a Hyper-V host whoever has the VM will not be able to get to the data on the virtual hard drive.
With the release of DPM 2016 it supports protecting Shielded VM’s. DPM can protect Shielded VM’s regardless if they are VHD or VHDX. This is great news because as a secure organization you should want to encrypt your virtual machines and DPM can protect them. This gives you an added layer of security on top of having backups.
Ransomware attacks
In today’s world ransomware attacks are a common thing. These type of attacks are targeted at small, medium, and large enterprise businesses. No company is too small or too big to be put in the crosshairs of ransomware attacks. A well-known attack is Cryptolocker.
As mentioned before in this blog post backups are an alternative to paying the ransom of a ransomware attack. They key here is to ensure you have a solid offsite backup in place such as Azure Backup. Having that offsite backup will ensure you can get your data back even if the ransomware attack get ahold of your onsite backup data.
I even go as far as to recommend sticking to the 3-2-1 rule (3 copies of backup data 2 offsite and 1 onsite). This way if something happens to one of your offsite copies of data you have another one. It may seem overkill to have 2 offsite copies but you would be surprised how often offsite backup data is accidently destroyed.
So there you have it. Security is a critical part of any backup solution. It is clear that Microsoft realizes this based on the security enhancements they have made to both Azure Backup and Data Protection Manager 2016. Their goal is to ensure both backup solutions are enterprise ready. I have been working with DPM for years and Azure Backup as soon as it came out. I know the team behind these products have a lot of new features and functionality planned for the future of these products and I am looking forward to it.
Read more


![clip_image001[4]](https://www.buchatech.com/wp-content/uploads/2015/05/clip_image00141.png "clip_image001[4]")