The “argument is null or empty” error in Azure Automation Runbook

I was recently working on an Azure Automation runbook that provisions an empty resource group in Azure. I was running into an issue when the runbook ran that the variable being used with New-AzureRmRoleAssignment was null. The errors I was receiving are:

New-AzureRmRoleAssignment : Cannot validate argument on parameter ‘SignInName’. The argument is null or empty. Provide
an argument that is not null or empty, and then try the command again.
At line:96 char:39
+ New-AzureRmRoleAssignment -SignInName $RequesterSignIn -RoleDefinitio …
+ ~~~~~~~~~~~~~~~~
+ CategoryInfo : InvalidData: (:) [New-AzureRmRoleAssignment], ParameterBindingValidationException
+ FullyQualifiedErrorId :
ParameterArgumentValidationError,Microsoft.Azure.Commands.Resources.NewAzureRoleAssignmentCommand

and

New-AzureRmRoleAssignment : Cannot validate argument on parameter ‘ObjectId’. Specify a parameter of type ‘System.Guid’
and try again.
At line:97 char:37
+ New-AzureRmRoleAssignment -ObjectID $RequesterID -RoleDefinitionName  …
+                                     ~~~~~~~~~~~~
+ CategoryInfo          : InvalidData: (:) [New-AzureRmRoleAssignment], ParameterBindingValidationException
+ FullyQualifiedErrorId :
ParameterArgumentValidationError,Microsoft.Azure.Commands.Resources.NewAzureRoleAssignmentCommand

It turned out to be a permission issue with AzureRM.Resources CMDLETS not being able to talk to AAD specifically Get-AzureRmADUser that I was using for a variable.

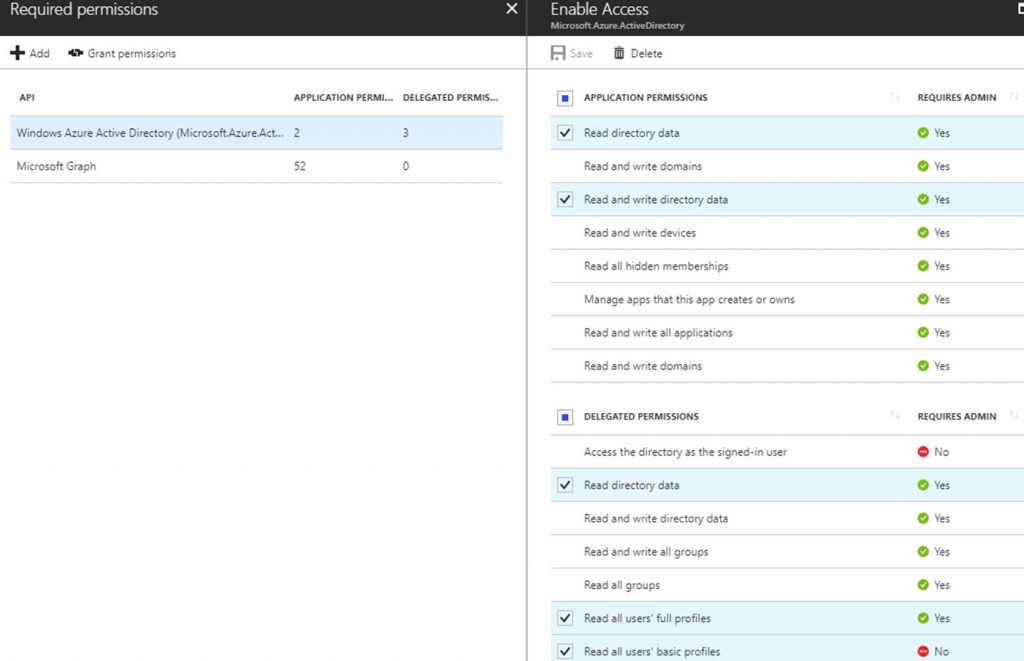
To fix this I had to give the following permissions for the AAD directory to the AzureServicePrincipal Run As Account:

Windows Azure Active Directory (AAD)
Application Permissions

·       Read/Write directory data
·       Read directory data

Delegated Permissions
·       Read directory data
·       Read all users’ full profiles
·       Read all users’ basic profiles
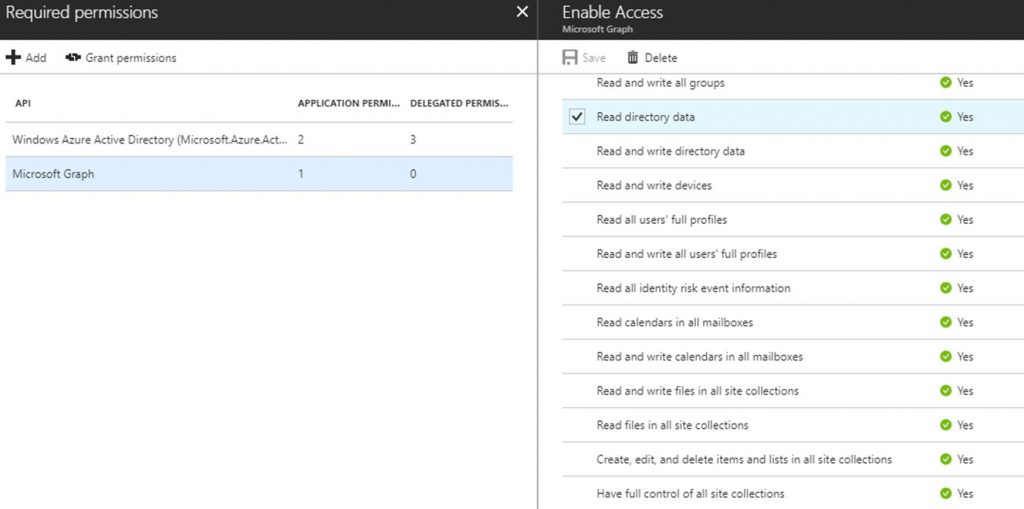
Microsoft Graph
App Permissions
·       Read directory data

In your runbook code you will typically have

# Authenticate to Azure resources
$connectionName = “AzureRunAsConnection”

# Get the connection “AzureRunAsConnection “
$servicePrincipalConnection = Get-AutomationConnection -Name $connectionName
“Logging in to Azure…”
Login-AzureRmAccount `
-ServicePrincipal `
-TenantId $servicePrincipalConnection.TenantId `
-ApplicationId $servicePrincipalConnection.ApplicationId `
-CertificateThumbprint $servicePrincipalConnection.CertificateThumbprint

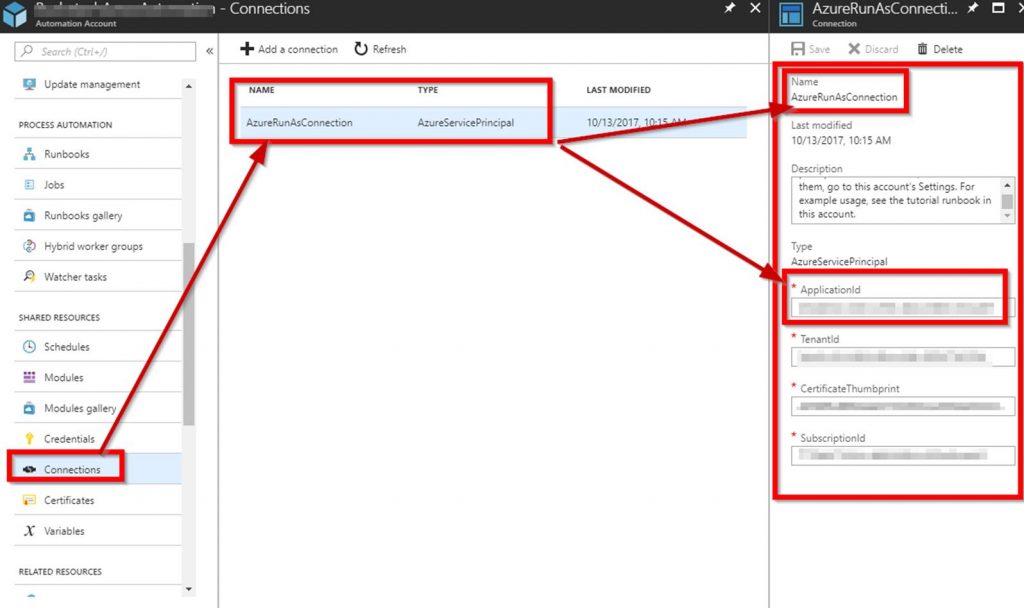
You may have a some differences like the connection variable and the name of the runasconnection. The point here is that the runas connection is what needs to have the proper permissions. You can find this account here to get the name and ApplicationID:

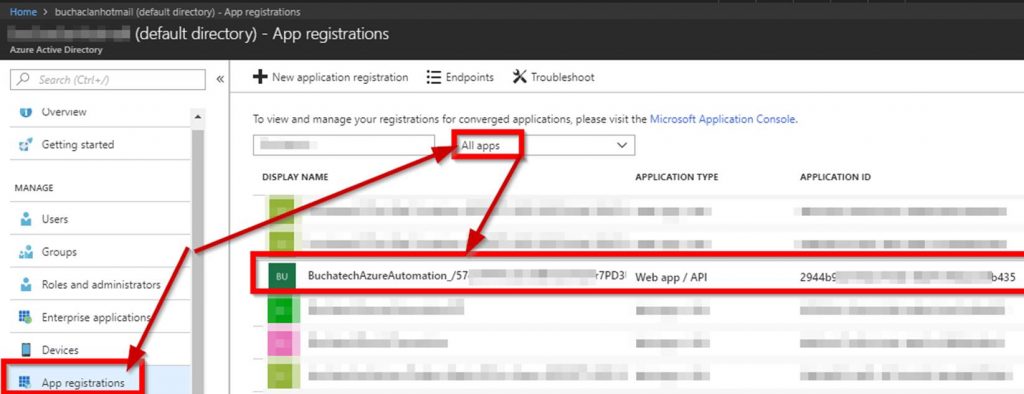
To give the permissions go to Azure Active Directory>the directory you are using in this automation>App registrations>and search based on the ApplicationID. Don’t forget to select All apps in the drop down.

Click on Add first and add the AAD and then Microsoft Graph permissions.

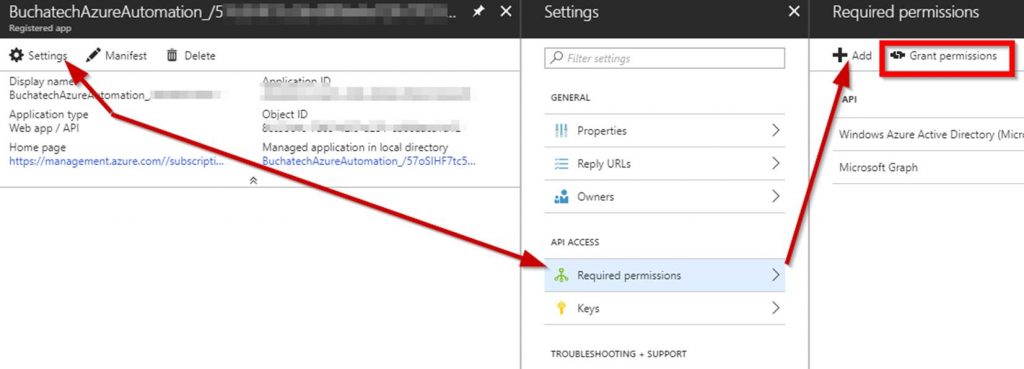
After you add the proper permissions make sure you click on Grant Permissions. The permissions are not actually applied until you do this. Once you click on Grant permissions you will see the prompt shown in the screenshot. Click Yes.

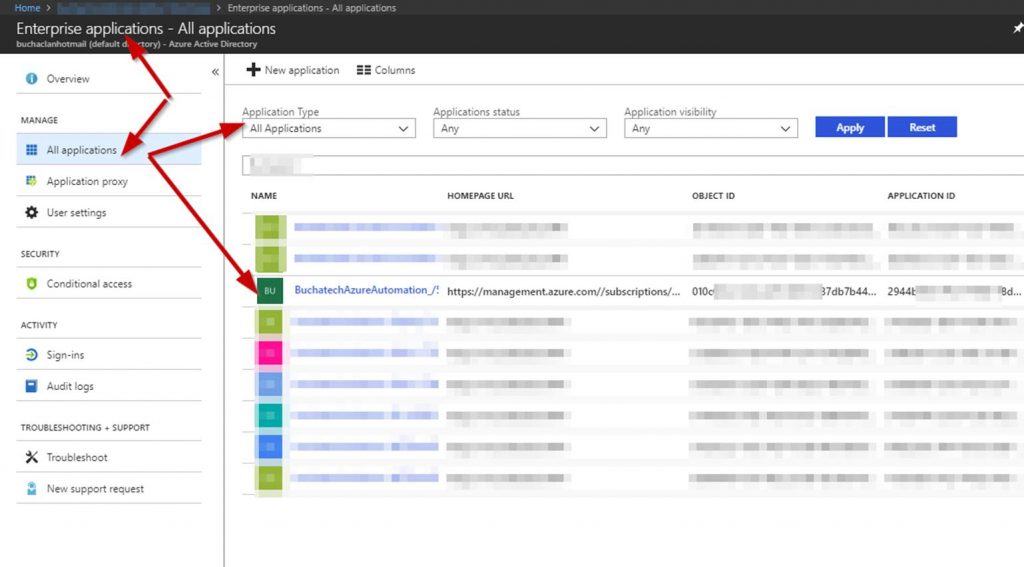
Verify the permissions have been added properly. In AAD go to All applications>select All applications. Find your service principle application.

Click on the service principle applications permissions.

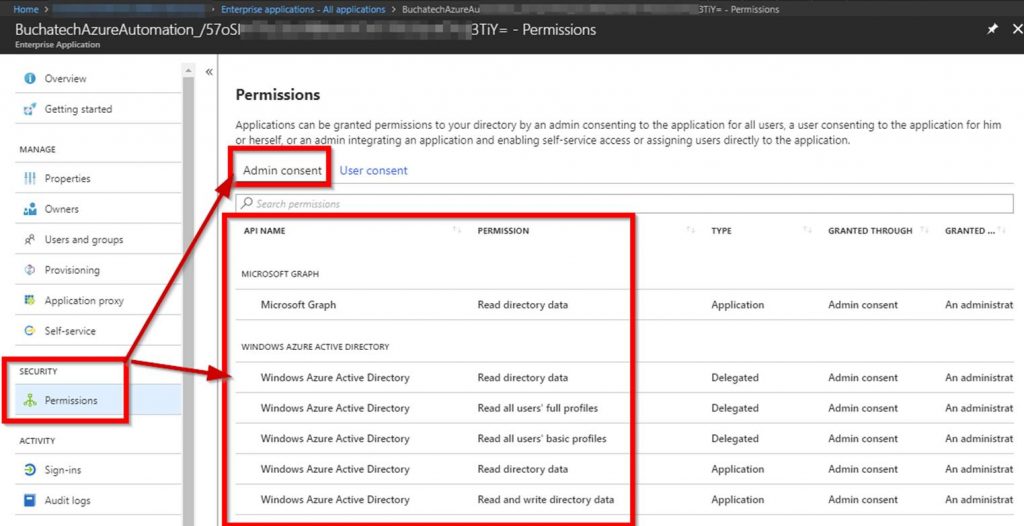
Verify the AAD and graph permissions are listed. If the AAD and graph permissions are listed then the runbook should be good to go.

Read more

Launch a Runbook from a Service Manager Console Task

I recently ran across the question of “How Can I Launch a Runbook from a Console Task?” in this forum thread:

http://social.technet.microsoft.com/Forums/systemcenter/en-US/5cd957fa-5114-41fe-a727-3294df74a7b0/how-can-i-launch-a-runbook-from-a-console-task?forum=customization .

I started thinking about how this could be useful in certain scenarios and how this would work. I decided to figure this out and blog about it so here it is. First you will need a tool that can connect to Orchestrators web service and start runbooks. There is such a tool called Orchestrator Remote Tools 2.51.

With this tool you also have the ability to discover information about runbooks on an Orchestrator server, pass parameters to the tool and see the status on if the runbook started successfully or failed. This tool has a GUI and command line interface.

This tool only discovers runbooks that have an “Initialize Data” activity. This tool launches runbooks looking to a generated .XML template with information about the runbook or it can launch runbooks directly without the XML template file (CLI mode only). for The tool consists of three components:

  1. UI Generator (ORTUIGenerator.exe): This is what discovers all your runbooks and allows you to browse them. You also use this component to generate the XML template files.
  2. Remote Runbook Launcher (ORTRunbookLauncher.exe): Is the graphical way to launch runbooks.
  3. Remote Runbook Launcher CLI (ORTRunbookLauncherCLI.exe): Is the command line way to launch runbooks.

You can learn more about the tool here:

http://blogs.technet.com/b/yasc/archive/2011/11/17/orchestrator-remote-tools-2-0-fka-the-opalis-ui-generator.aspx

It can be downloaded here:

http://orchestrator.codeplex.com/releases/view/76983

Let’s work with the tool to prepare for using it with Service Manager. Create a share on your Service Manager management server. This can be something like \\SMSERVER\ORT\.

Copy the Orchestrator Remote Tools into it. You should have the following:

clip_image001[4]

Now click on ORTUIGenerator.exe . You will see this popup message:

clip_image002[4]

Click OK. This is telling you it is the first time you have run the tool and you need to put in your Orchestrator settings.

You will see the following window and will need to complete all the fields.

NOTE: Once you put in the data base server it will automatically pull in the Orchestrator database. If your SCORCH DB is not named Orchestrator you will be able to click the drop down and select it.

Click Save when you are done. Clicking Save will create a Config.xml file in your ORT directory.

clip_image003[4]

Now the UI Generator window will pop up. This is the window you use to generate the .XML template file.

On the left hand side you are able to browse through the discovered runbooks. Keep in mind it only finds runbooks that have an “Initialize Data” activity. To configure the template for a runbook browse to it on the right hand side, select it and click the “Get details for the selected runbook” button. It will then expose the settings of the “Initialize Data” activity for the runbook on the right hand side. Here is where you can configure values for the parameters and give the runbook a description for those that will be running it. Note you are not required to configure values for the parameters. When you are ready to generate the .XML template click on the “Create Runbook Launcher configuration file” button.

clip_image004[4]

You should now have a policy_template.xml in your ORT directory. By default when you run ORTRunbookLauncher.exe or ORTRunbookLauncherCLI.exe the policy_template.xml will be used allowing you to only have settings for one runbook at a time. You can elect to use another file by using the /ORTXML switch. What this does is allows you to store multiple XML templates in the same directory by different names and launch the specific one you want.

The /ORTXML switch only works using ORTRunbookLauncherCLI.exe as it is passed as a parameter. Another way around this if you are stuck on using the GUI component is to create multiple folders and put the exe’s, config file in each folder as it will have its own policy_template.xml file. That however could become a nightmare to manage and requires more space. I recommend using the /ORTXML switch.

Let’s look at the GUI component. In the ORT folder launch ORTRunbookLauncher.exe. The Runbook Launcher window will pop up. It should look similar to the following screenshot.

Input the parameters and click “Start Runbook” button.

clip_image005[4]

It is that easy to remotely launch a runbook using this tool. Using the ORTRunbookLauncherCLI.exe is basically doing the same thing except it is running from a command line allowing you to pass in the values for the parameters right in the command. The syntax for starting a runbook using the ORTRunbookLauncherCLI.exe would look like this:

ORTRunbookLauncherCLI.exe /LastName=Sinatra /Location=”Building 45″ /Department=Sales /Title=”VP of Sales” /FirstName=Frank /SamAccount=Franks /”Reporting To”=”John Adams”


NOTE: If the parameters’ names or values have spaces, you need to enclose them using double quotes.

clip_image006[4]

Ok, so now let’s combine the tool with Service Manager and its CMDB. Think about all the possibilities. There are a lot of useful scenarios in which these two could be utilized. A couple of possibilities I can think of off the top of my head are: Pass a user from Service Managers CMDB to this tool as a parameter and have a runbook disable a user in AD, pick up a computer from the CMDB pass it as a parameter to a runbook and move the computer from one OU to another in AD.

I don’t see this tool as a replacement for using Runbooks with Service Requests in Service Manager. I see this as more of a way to give the administrative team a quick and easy way to launch runbooks without ever leaving the Service Manager console.

Let’s look at how we can bring the Orchestrator Remote Tools and Service Manager together, create a console task and accomplish a task.

For this blog post we are going to use a very simple disable user runbook. To do this we need to create a console task using the ORT tool. Use the following steps to do this:

Read more