IT financial management (ITFM) is an important part of IT operations as business dependency on IT continues to grow in the age of digital transformation. ITFM is a part of ITIL as a Service Strategy element in the framework. ITFM is a key part of CloudOps as well because spending in the cloud is based on an OPEX model and every single cost is tracked. ITFM and cost management in the cloud should be used to effectively and concisely connect the dollars spent on IT to the value delivered to the business. We can do this with Azure Cost Management. In this post, I am going to give an overview of Azure cost management highlighting many of the things you can do with it. Let’s dive into the solution now.
Overview
In June of 2017, Microsoft acquired Cloudyn a startup that had tooling for cloud monitoring and analytics tools focused on cloud financial management. Cloudyn’s solution is multi-cloud covering Azure, Azure Stack, AWS, and GCP. Through the acquisition of Cloudyn Microsoft was able to bring the tooling into the Azure ecosystem giving Azure customers an enhanced way to track and control cloud spend improving the improving the Azure cloud governance story. As of right now, there is a free level and a paid level for Azure cost management. The following table lists what features are available with each level.
FREE capabilities:
|
PAID capabilities:
|
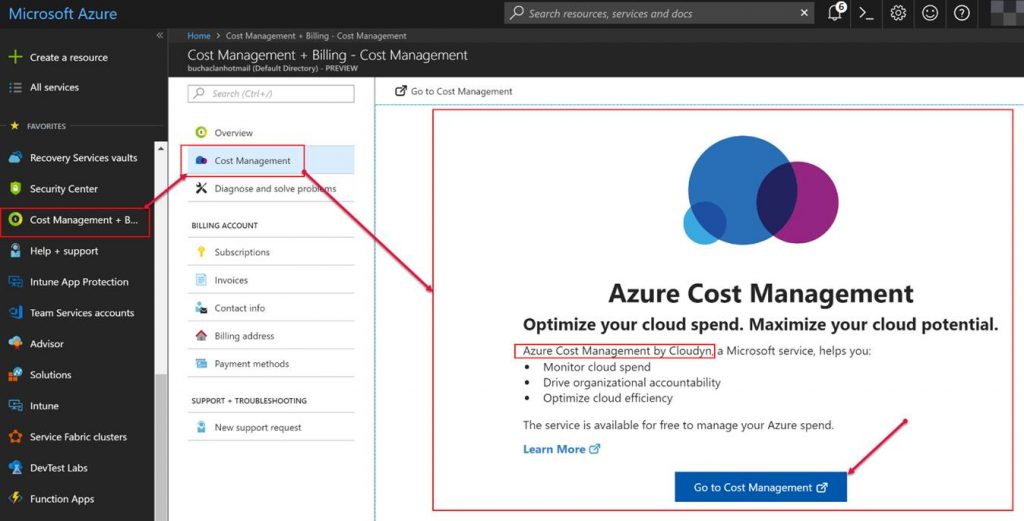
Since the acquisition, Microsoft has added a link to the Cloudyn portal directly in Azure and integration with your Azure subscriptions giving you the ability to launch a new Cloudyn account that is tied to your subscription. Microsoft added Cost Management in Azure and this is where you will find Cloudyn and sign up. As shown in the following screenshot you can see the “Go to Cost Management” button. After clicking on that you will go the Cloudyn portal and will be able to add your various cloud accounts. The thing that I really like about Azure cost management is that there is a ton of data and dashboards that are available right out of the box after adding a cloud account. There is not a bunch of configuration that you need to do to get the default dashboards and optimization tools.
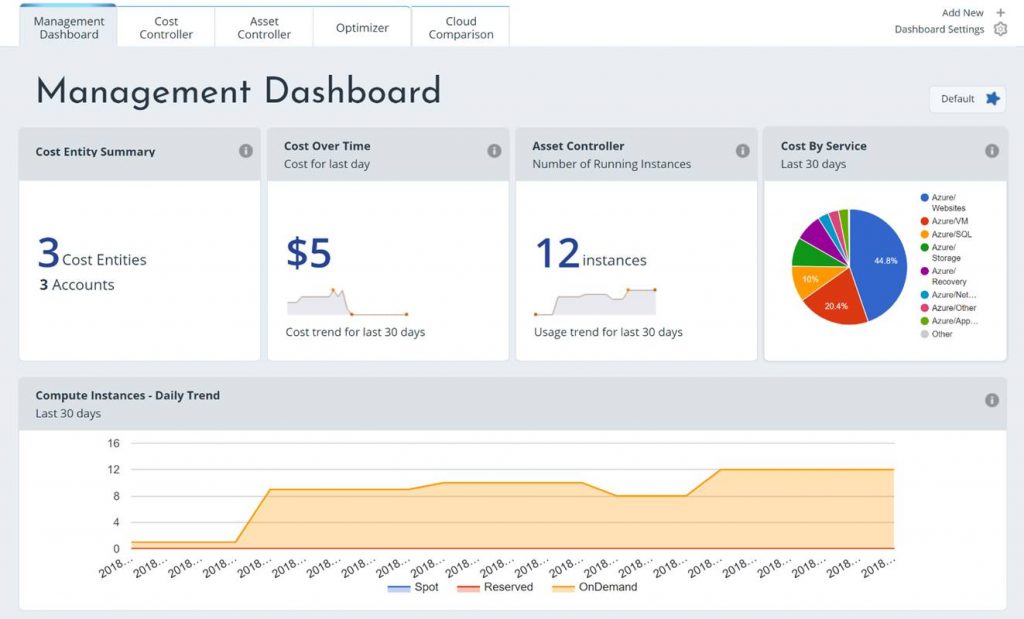
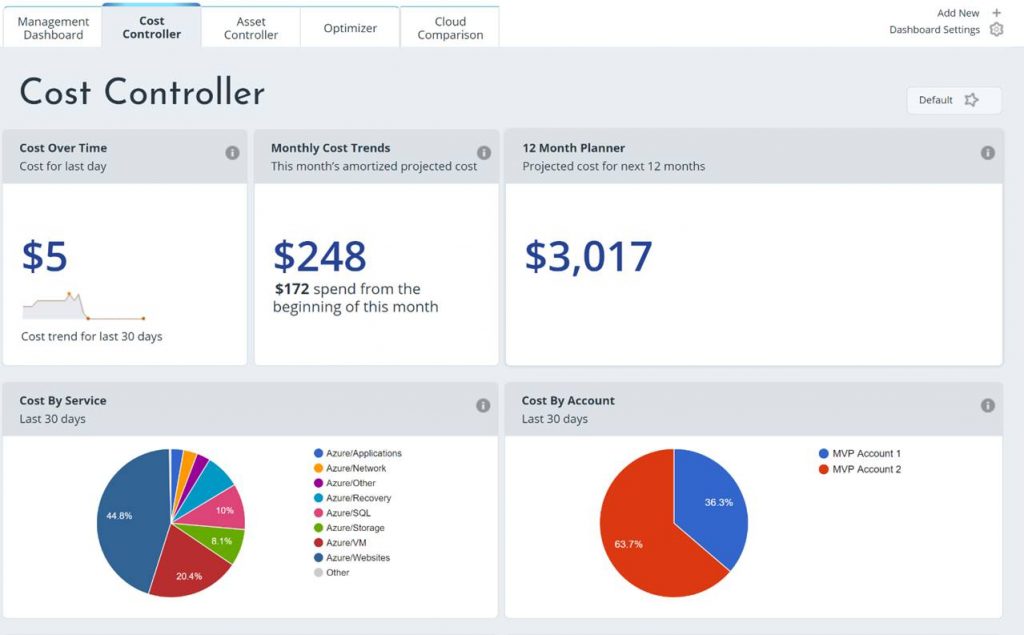
After you are all signed up and have your cloud accounts added your dashboards will start to show data. The next two screenshots show a couple of the default dashboards.
The management dashboard gives a good summary of your cloud financials on one pane of glass.
The cost controller dashboard shows cost trends, some forecasting info, a breakdown of costs and more.
As you can see from the previous screenshots there are several other dashboards with other content. You can modify any of these dashboards adding or removing widgets. You also can create your own dashboard adding whatever widgets you want to it.
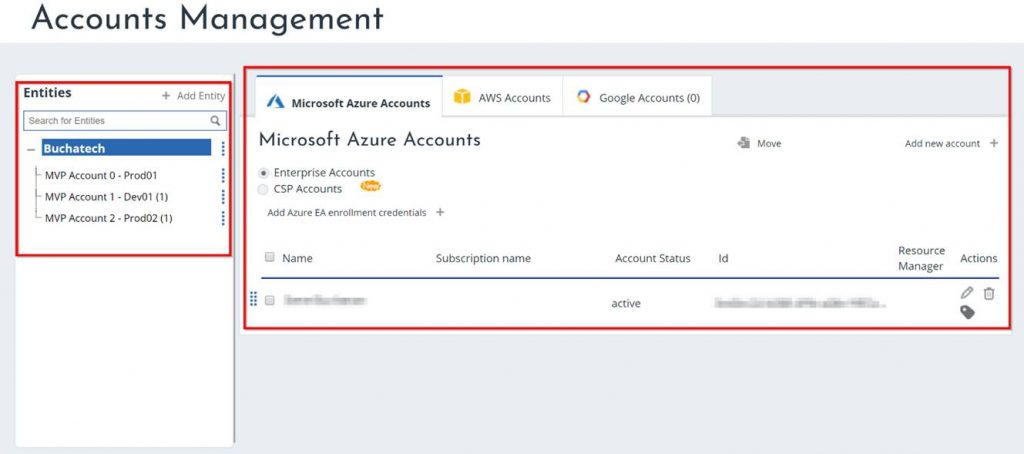
In Azure cost management, you can add cost centers known as Cost Entities. Entities are intended to mirror your organization’s hierarchical structure such as business units, divisions, departments, or teams within your organization some examples are engineering, R&D, development, marketing etc. The goal of the entities is to give you a way to track cloud spend by the entities. Keep in mind the cost entities can be anything that fits the way you want to structure and track cloud costs. You also can leverage tags, add budgets, and then associate costs and or budgets to the cost entities into cost models. Cost models give you a way to distribute and allocate costs. You can track costs back to these cost entities and you can track costs against budgets for showback or chargeback scenarios. Below is a screenshot of the cost entities screen. Keep an eye out for a detailed blog from me walking through how to structure and set up this part of Azure cost management. This area of Azure cost management warrants its own dedicated blog.
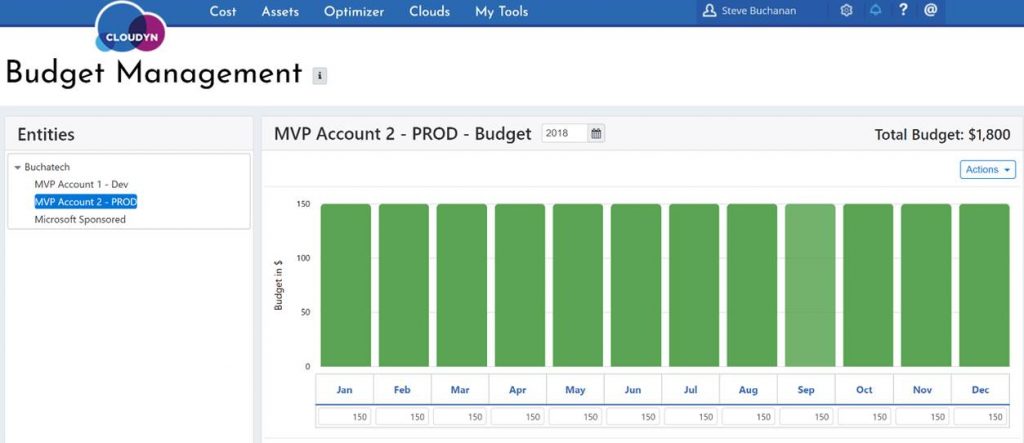
Here is an example of a budget set on a cost entity.
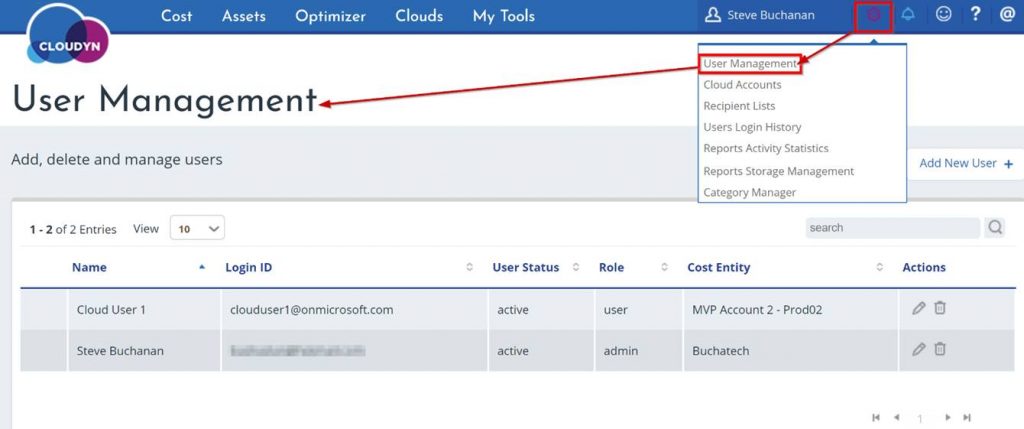
Azure cost management has its own user access. The user access can be found under user management as shown in the following screenshot. The user management allows you to add additional users and assign what they can and cannot access with Azure cost management (Cloudyn). You can give a user admin or user level access. The idea of user access is to extend the ability to view and create reports to people in your organization that need to access their cloud spend data.
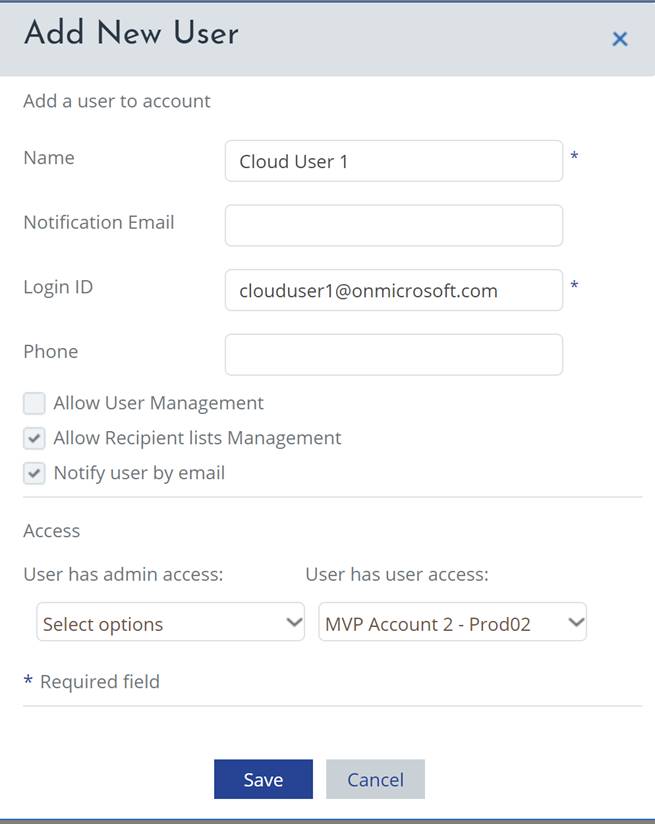
The following screenshot shows the experience of adding a new user.
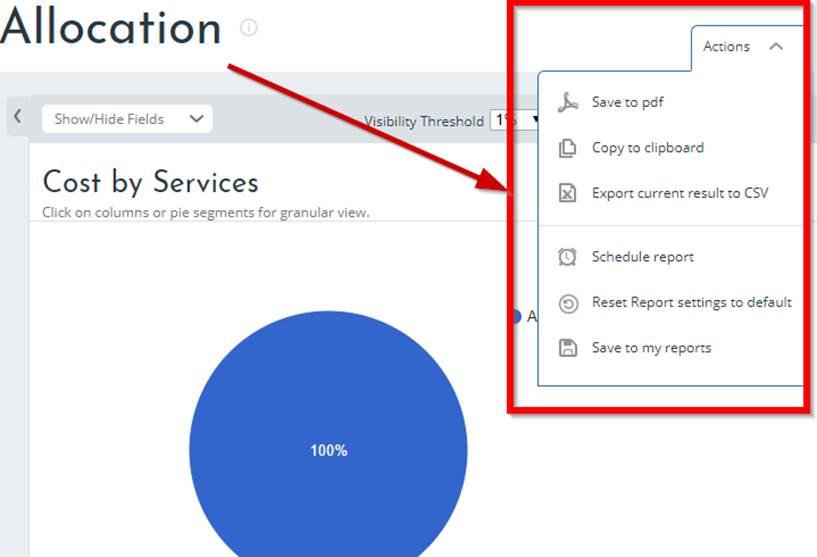
Azure cost management (Cloudyn) has report functionality. While viewing cost data on the various dashboards and widgets you have reporting options under the Actions tab as shown in the following screenshot such as exporting the view as a PDF.
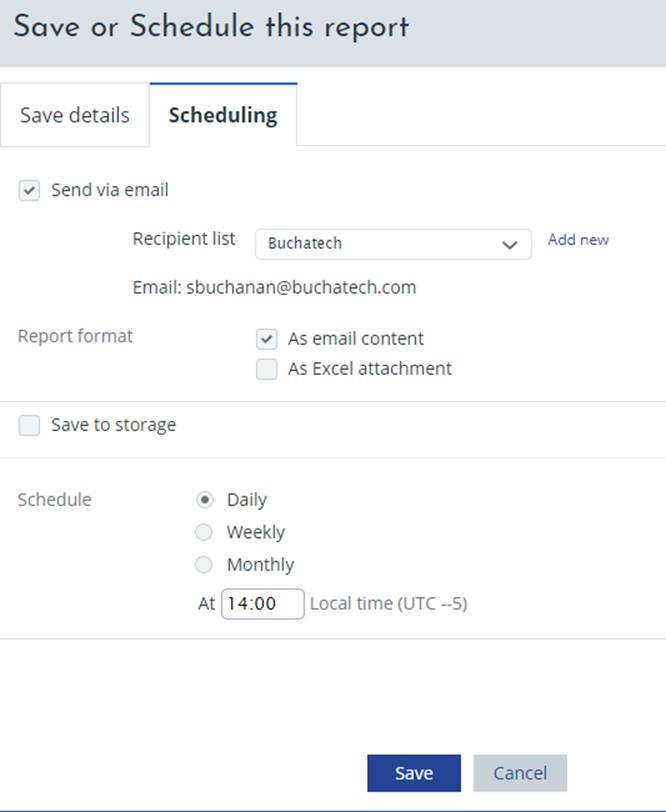
One of the other actions is the ability to schedule reports as shown in the following screenshot.
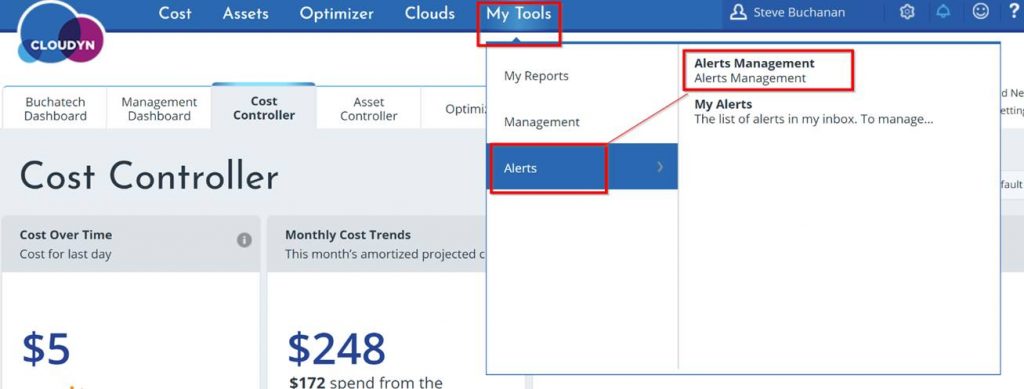
It is recommended to use cost entities. Users can be assigned to cost entities as a way to help isolate access to cost data in a segmented way that is aligned to your organizational structure. Azure cost management has the ability for you to set up spending alerts. The spending alerts can be found under My Tools and Alerts. Here you can see any alerts within your Azure cost management (Cloudyn) inbox or you can manage alerts.
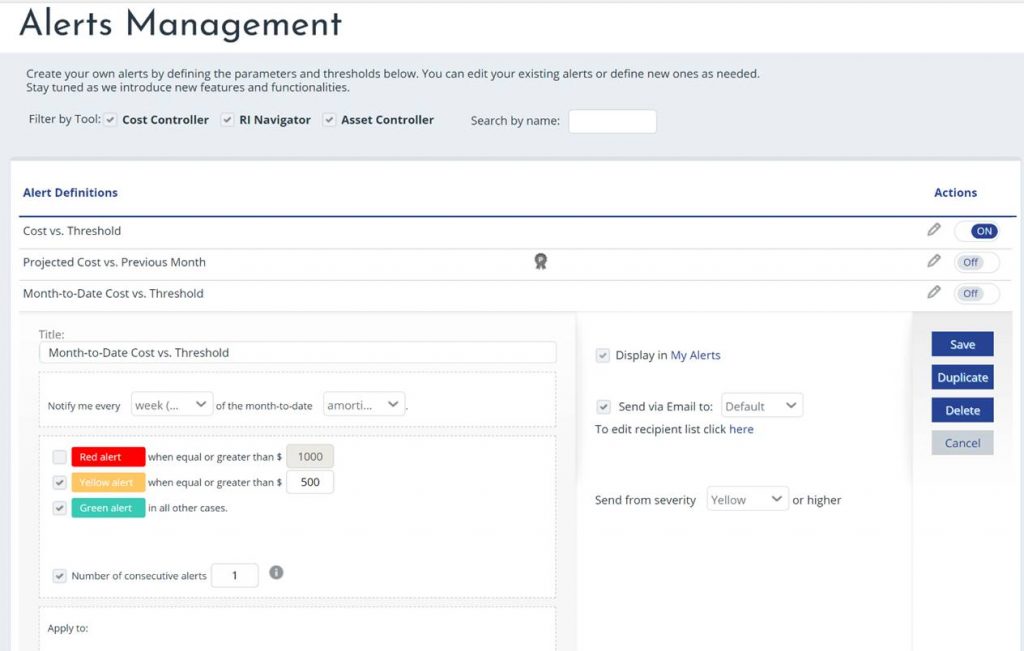
In the Alerts Management, you have the ability to create new alerts or edit and delete existing alerts. There is a set of built-in alert definitions. As of right now, you cannot create custom alert definitions. Here is the current list of Alert Definitions:
- Active Instances vs. Previous Period
- Active Instances vs. Threshold
- Untagged Instances
- Reservations about to Expire
- Cost vs. Previous Period Cost
- Cost vs. Threshold
- Month-to-Date Cost vs. Threshold
- Month-to-Date Cost vs. Previous Period
- Projected Cost vs. Threshold
- Projected Cost vs. Previous Month
These alerts can be used as a way to be notified if costs are going to surpass your budget and for other alerting scenarios. The following screenshot shows the edit view of an alert. You can see that you can have alerts appear in your Cloudyn inbox, emailed to you, you can set the severity level and control the number of consecutive alerts that are sent. An alert can be applied to all or individual accounts.
One of the benefits of using Azure cost management (Cloudyn) is the cloud optimization features and functionality. These features will help you optimize cloud spend & identify usage inefficiencies. The first one I want to share is the Porting Your Deployment – Cost Analysis that is shown in the following screenshot. Porting Your Deployment – Cost Analysis is used to perform a cloud comparison to help optimize cloud spend. You can use this to see what your cloud workloads would cost with the other cloud providers.

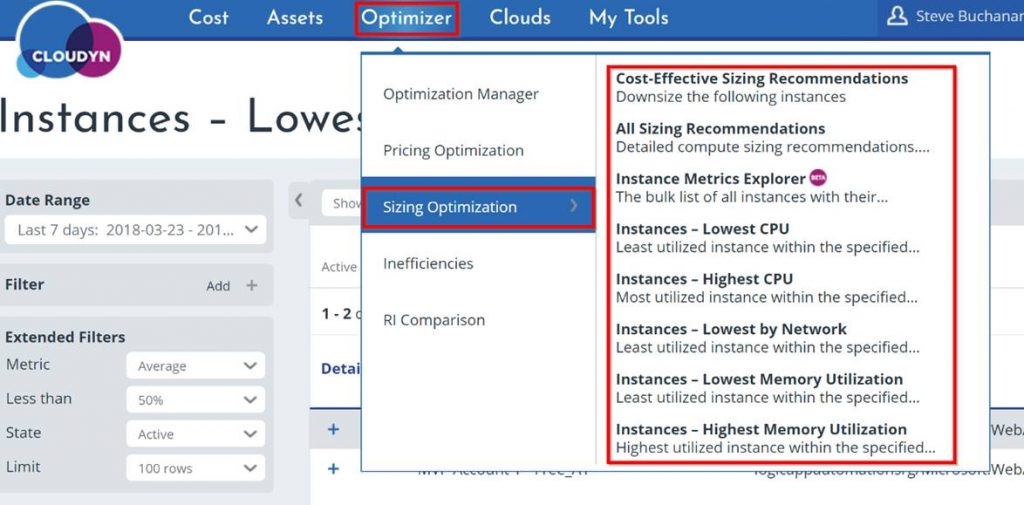
Another area of analysis tools is the Sizing optimization. The dashboards and reports here will help you identify usage inefficiencies. The options here can help you optimize cloud spend & identify usage inefficiencies. For example, you could see Instances with low CPU, network, and memory usage and look into moving IaaS VM’s to lower sizes at a cheaper cost. Another thing you could do is simply run the All Sizing Recommendations report to see where you can size appropriately reducing costs.
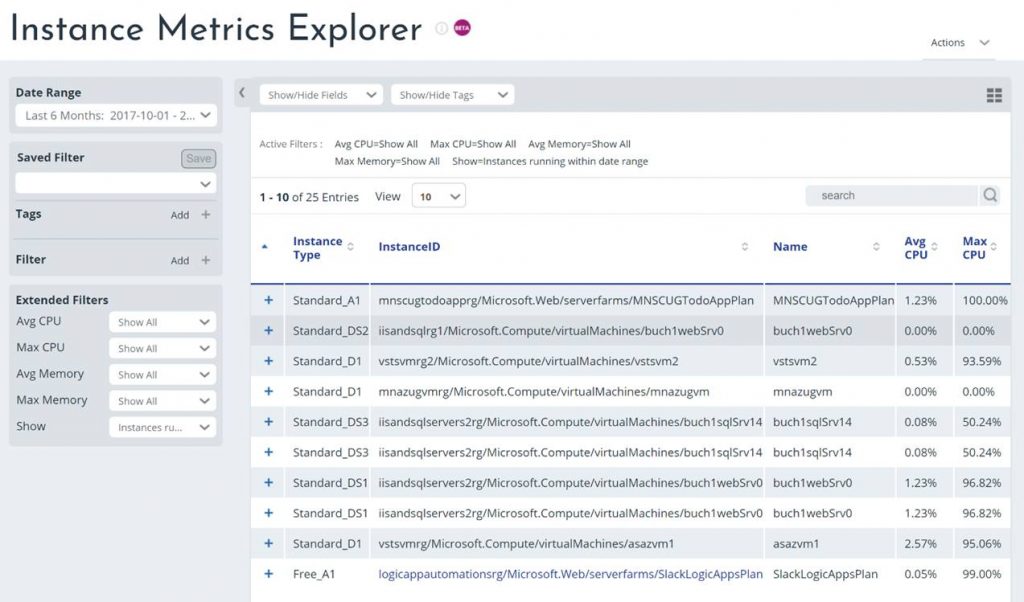
The Instance Metrics Explorer shown in the following screenshot can help you see what the average utilization has been across your cloud resources.
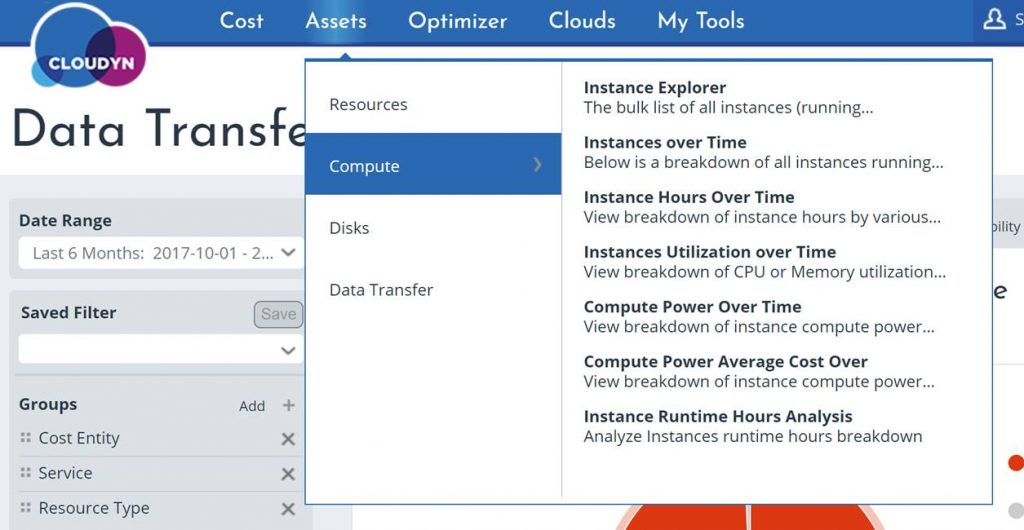
Azure cost management (Cloudyn) also has the ability to report on usage over time for things like compute, active disks, and data transfer.
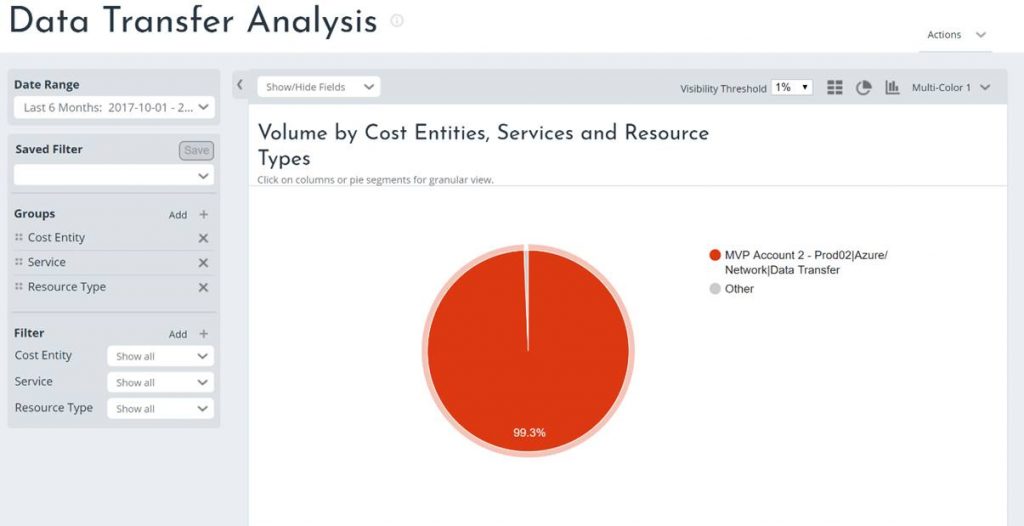
In the following screenshot, you can out of all of my accounts (I have Show all on) only 1 account has had a majority of the data transfer.
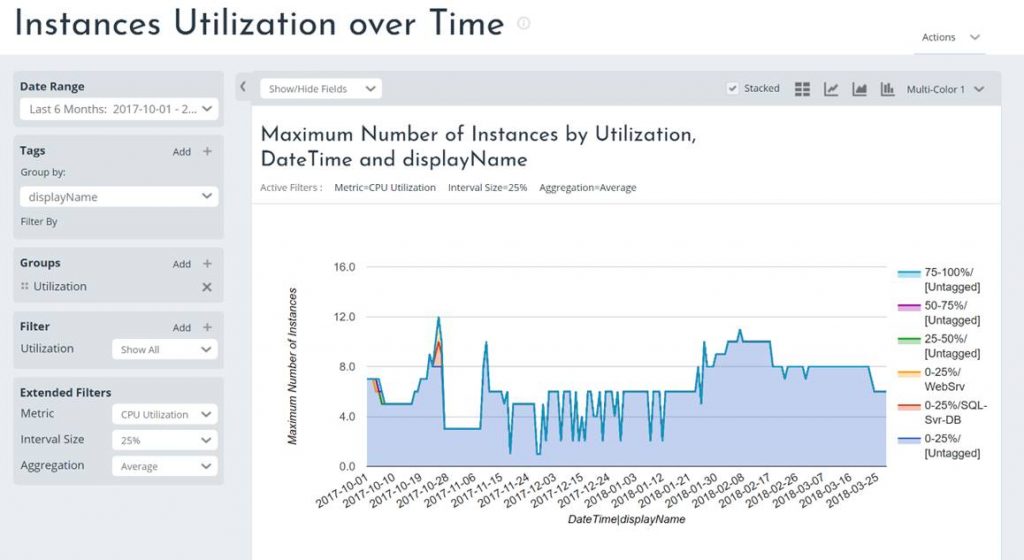
The following screenshot is an example of CPU utilization of 25% across my instances for the last 6 months.
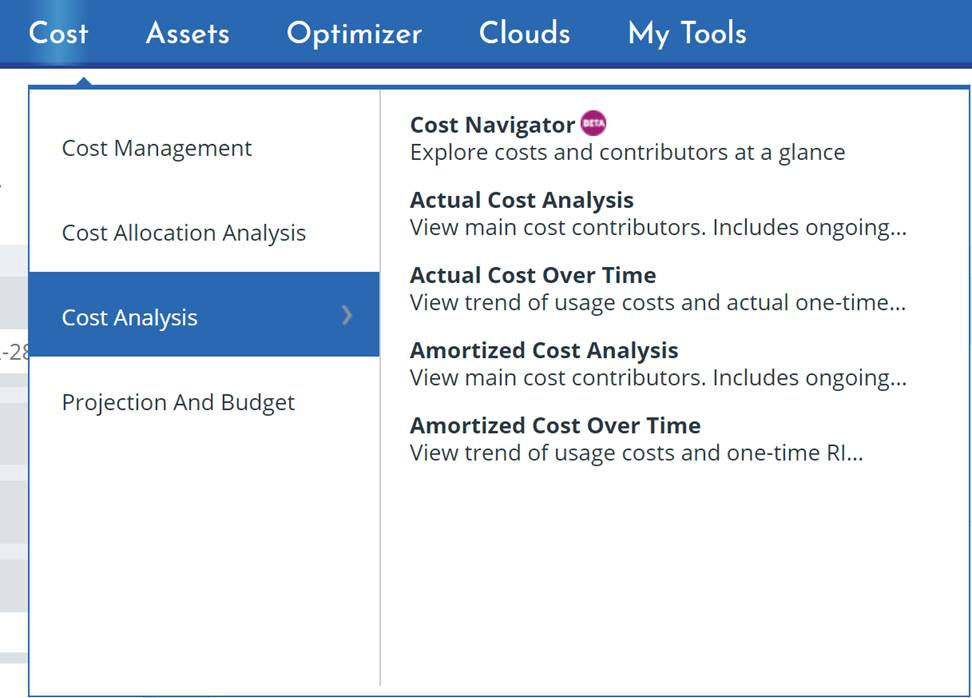
In this last section, we are going to finally look at viewing costs in Azure cost management (Cloudyn). On the Cloudyn menu, there is a menu for Cost. This is where you will find the cost related areas such as the Cost Analysis shown in the following screenshot. I am going to show a series of screenshots of the various Budgets and spend forecasting dashboards using my Azure lab environments.
I really like the ability to show projected costs as this helps you know if you are trending beyond your budget so you can manage your costs accordingly. It gives you a total overall and a total projection per resource.
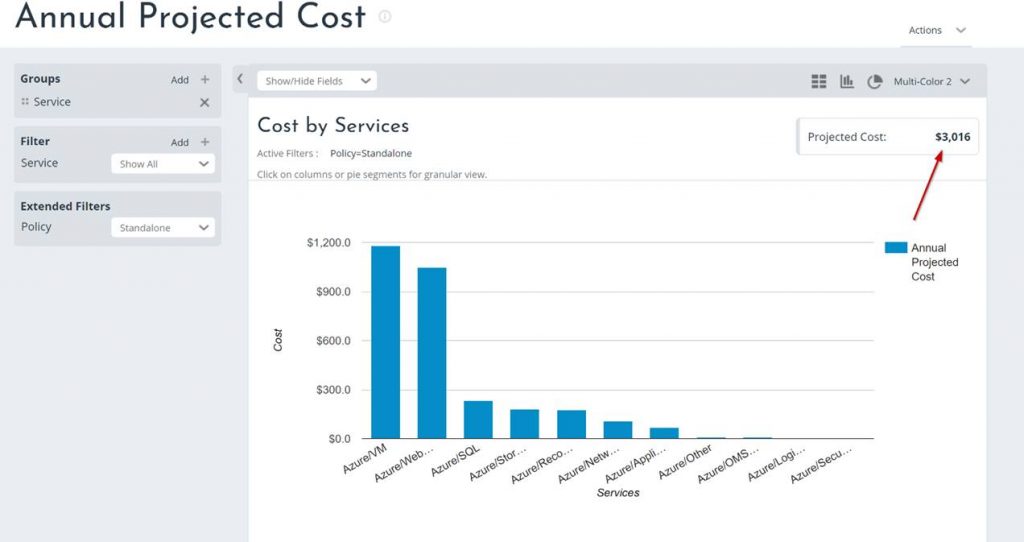
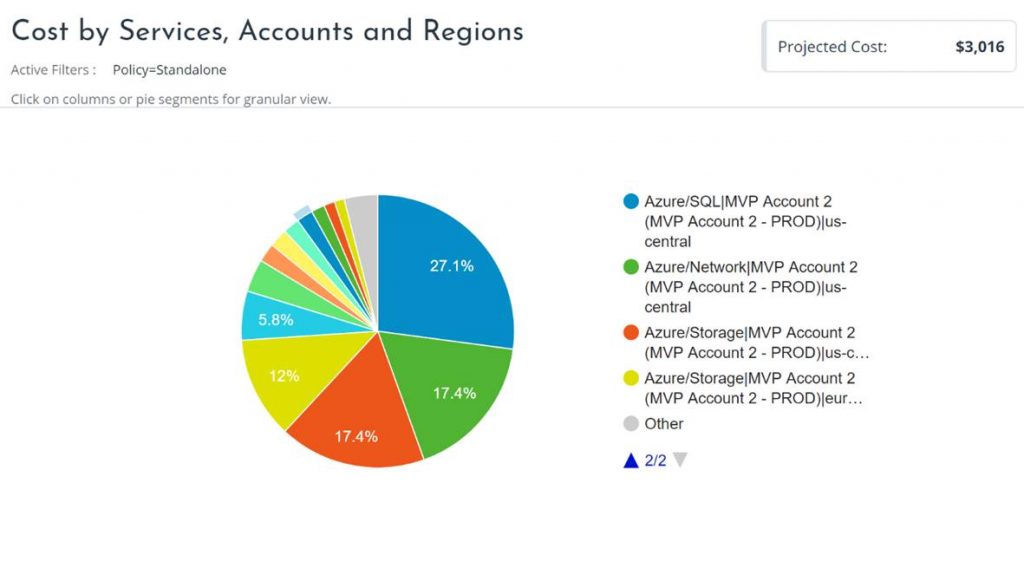
The previous screenshot showed the projected costs in a bar chart the next screenshot shows the same data but in a pie chart.
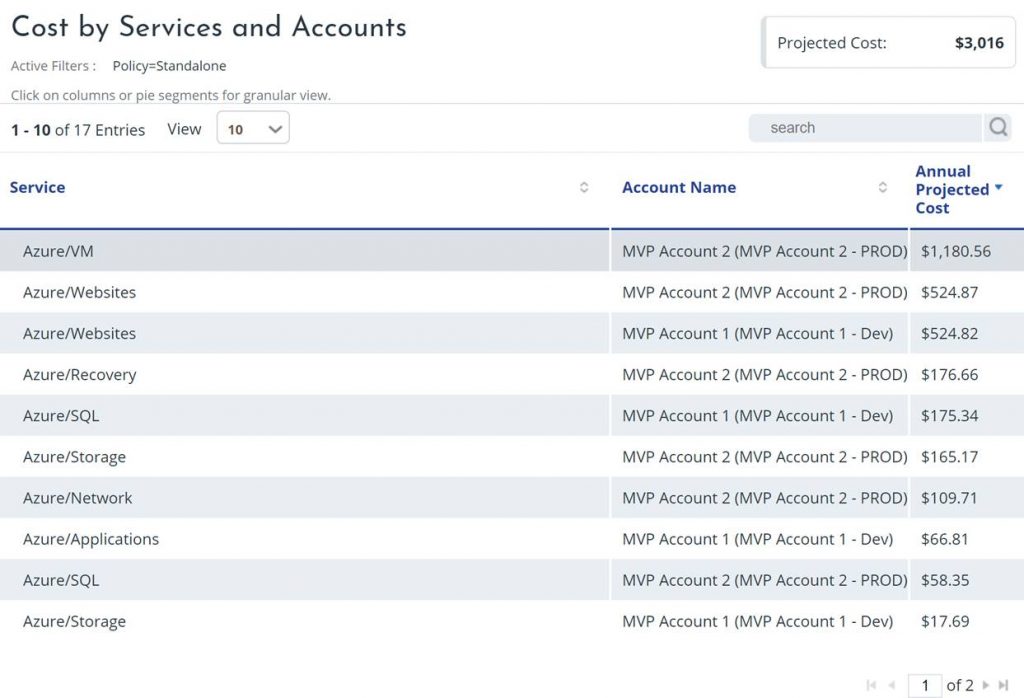
The same data is shown in a table format.
The following screenshots show a filtered view of my dev costs only.
The following screenshots show a filtered view of my prod costs only.

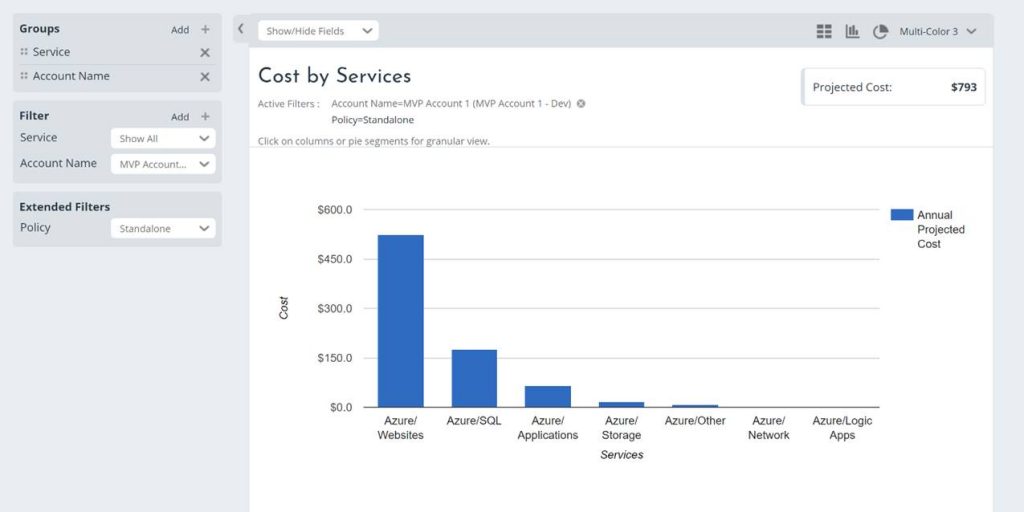
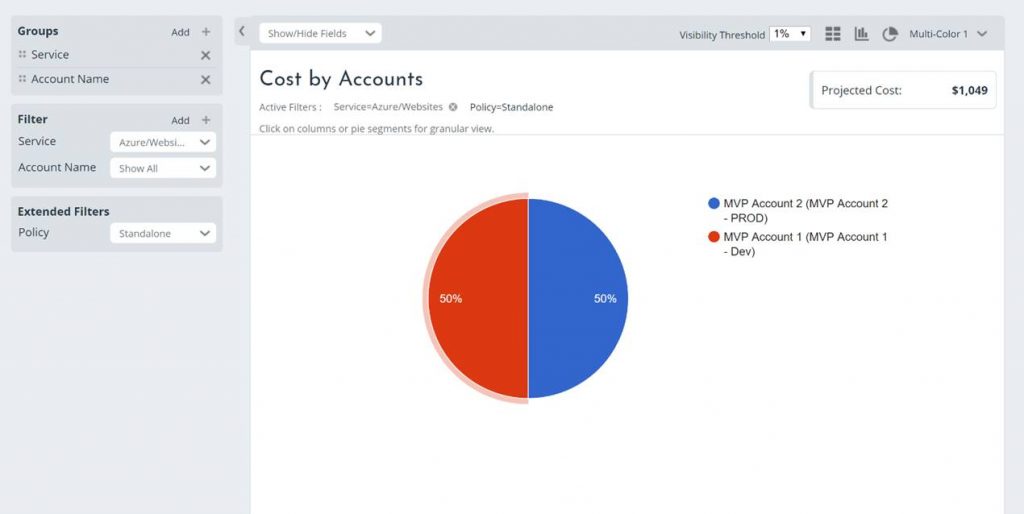
Here I am showing that you can compare the costs of individual resources across subscriptions (cost entities).
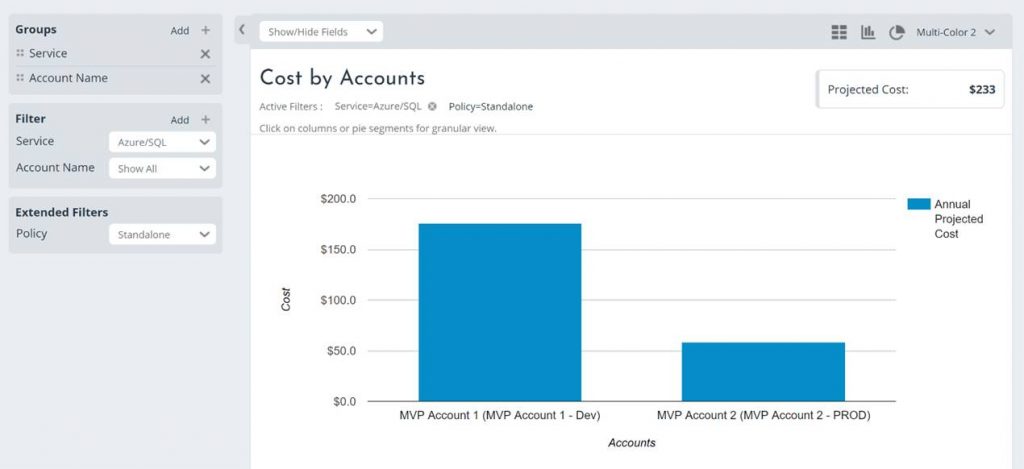
A similar view here for SQL resources only.
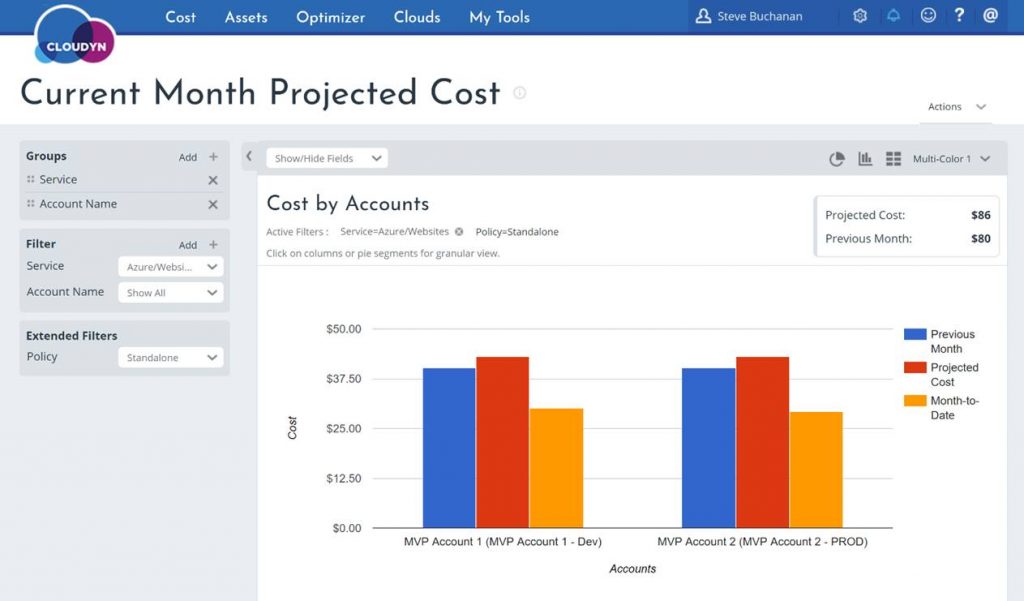
We can see the projected costs for a month as shown in the following screenshot.
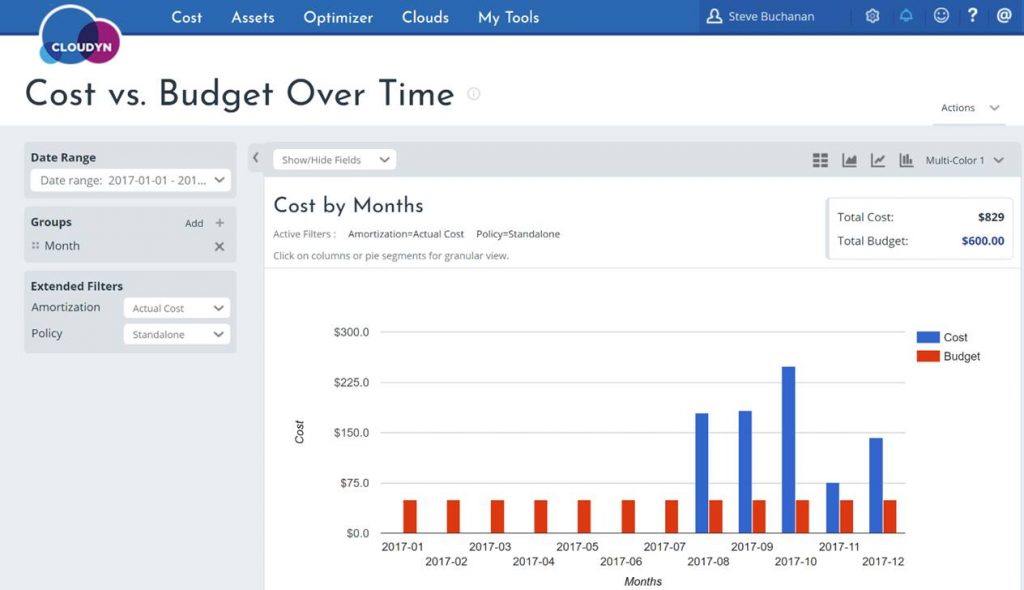
And the last up here is a screenshot of Cost vs budget over time by month.
Thanks for hanging through this long post. There is a lot to the Azure Cost management (Cloudyn) service and I still did not cover everything in this blog post. Look for a couple more Cloudyn posts in the future diving into some of the areas such as cost modeling and showback.

1 thought on “Azure Cost Management (Cloudyn)”