I recently had the honor of being a guest on the “Lisa at the Edge” Podcast. Lisa is a Microsoft Hybrid Cloud Strategist and an influencer in the hybrid cloud community based out of Scotland. She runs a blog and this year she started a popular podcast.
On Lisa’s podcast, she covers Careers in Tech and Microsoft Hybrid Cloud and a range of other topics with experts across the tech community.
This is an episode you don’t want to miss. This was one of the most entertaining podcasts I have been on. It took some interesting turns in regards to topics and very engaging. In the podcast episode Lisa and I talk about:
Evolving your career as technology evolves
Transformation of IT dept to Strategic Business Partner
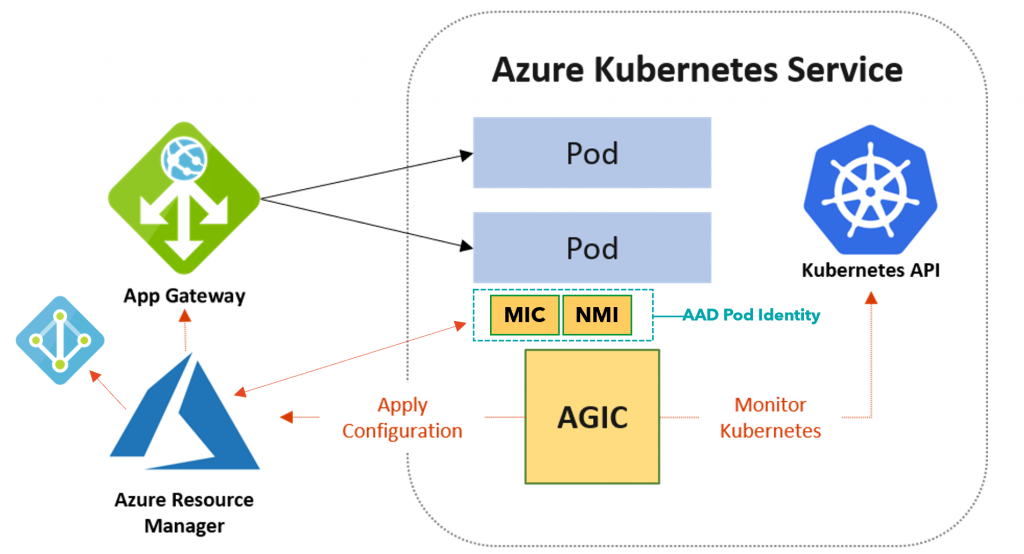
In Kubernetes, you have a container or containers running as a pod. In front of the pods, you have something known as a service. Services are simply an abstraction that defines a logical set of pods and how to access them. As pods move around the service that defines the pods it is bound to keeps track of what nodes the pods are running on. For external access to services, there is typically an Ingress controller that allows access from outside of the Kubernetes cluster to a service. An ingress defines the rules for inbound connections.
Microsoft has had an
Application Gateway Ingress Controller for Azure Kubernetes Service AKS in
public preview for some time and recently released for GA. The Application
Gateway Ingress Controller (AGIC) monitors the Kubernetes cluster for ingress
resources and makes changes to the specified Application Gateway to allow
inbound connections.
This allows you to leverage the Application Gateway service in Azure as the entry into your AKS cluster. In addition to utilizing the Application Gateway standard set of functionality, the AGIC uses the Application Gateway Web Application Firewall (WAF). In fact, that is the only version of the Application Gateway that is supported by the AGIC. The great thing about this is that you can put Application Gateways WAF protection in front of your applications that are running on AKS.
This blog post is not a detailed deep dive into AGIC. To learn more about AGIC visit this link: https://azure.github.io/application-gateway-kubernetes-ingress. In this blog post, I want to share a script I built that deploys the AGIC. There are many steps to deploying the AGIC and I figured this is something folks will need to deploy over and over so it makes sense to make it a little easier to do. You won’t have to worry about creating a managed identity, getting various id’s, downloading and updating YAML files, or installing helm charts. Also, this script will be useful if you are not familiar with sed and helm commands. It combines PowerShell, AZ CLI, sed, and helm code. I have already used this script about 10 times myself to deploy the AGIC and boy has it saved me time. I thought it would be useful to someone out there and wanted to share it.
I typically deploy RBAC enabled AKS clusters so this script is set up to work with an RBAC enabled AKS cluster. If you are deploying AGIC for a non-RBAC AKS cluster be sure to view the notes in the script and adjust a couple of lines of code to make it non-RBAC ready. Also note this AGIC script is focused on brownfield deployments so before running the script there are some components you should already have deployed. These components are:
VNet and 2 Subnets (one for your AKS cluster and one for the App Gateway)
AKS Cluster
Public IP
Application Gateway
The script will
deploy and do the following:
Deploys the AAD Pod Identity.
Creates the Managed Identity used by the AAD Pod Identity.
Gives the Managed Identity Contributor access to Application Gateway.
Gives the Managed Identity Reader access to the resource group that hosts the Application Gateway.
Downloads and renames the sample-helm-config.yaml file to helm-agic-config.yaml.
Updates the helm-agic-config.yaml with environment variables and sets RBAC enabled to true using Sed.
Adds the Application Gateway ingress helm chart repo and updates the repo on your AKS cluster.
Installs the AGIC pod using a helm chart and environment variables in the helm-agic-config.yaml file.
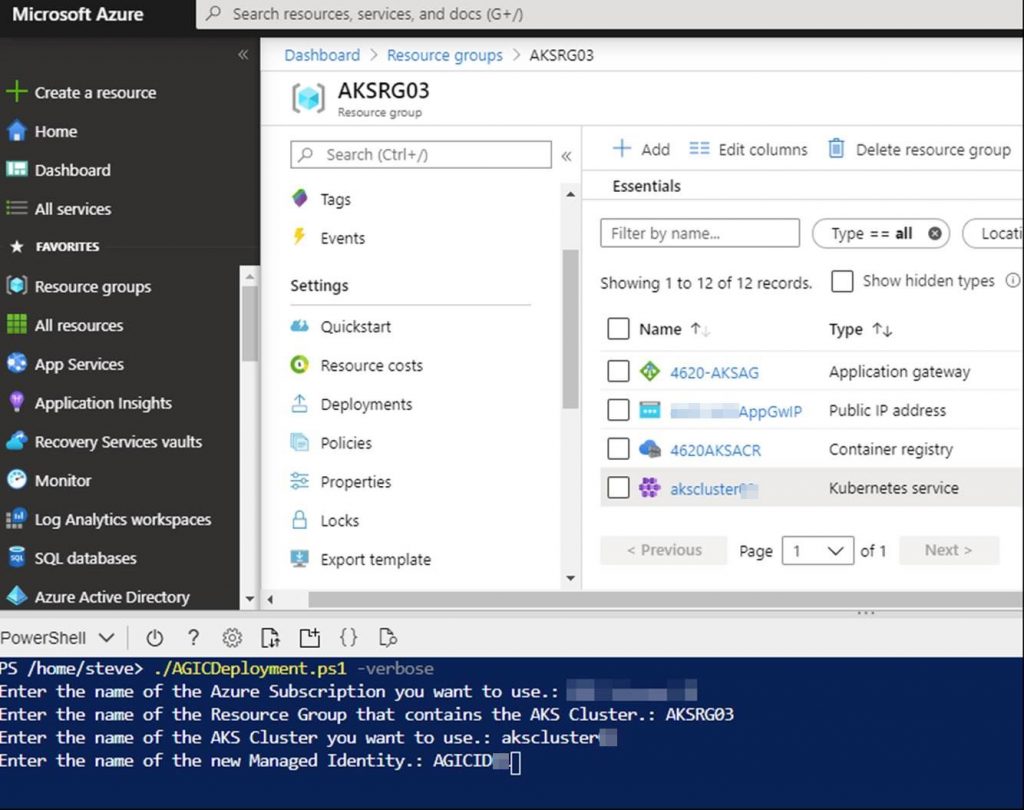
Now let’s take a look at running the script. It is recommended to upload to and run this script from Azure Cloud shell (PowerShell). Run:
./AGICDeployment.ps1 -verbose
You will be prompted
for the following as shown in the screenshot:
Enter the name of the Azure Subscription you want to use.:
Enter the name of the Resource Group that contains the AKS Cluster.:
Enter the name of the AKS Cluster you want to use.:
Enter the name of the new Managed Identity.:
Here is a screenshot
of what you will see while the script runs.
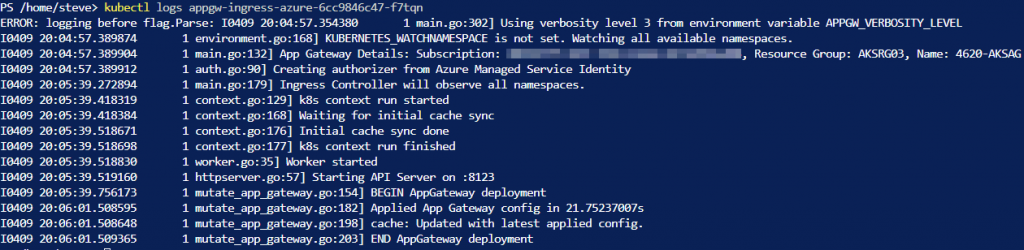
That’s it. You don’t have to do anything else except entering values at the beginning of running the script. To verify your new AGIC pod is running you can check a couple of things. First, run:
kubectl get pods
Note the name of my
AGIC pod is appgw-ingress-azure-6cc9846c47-f7tqn.
Your pod name will be different.
Now you can check
the logs of the AGIC pod by running:
kubectl logs appgw-ingress-azure-6cc9846c47-f7tqn
You should not have
any errors but if you do they will show in the log. If everything ran fine the
output log should look similar to:
After its all said and done you will have a running Application Gateway Ingress Controller that is connected to the Application Gateway and ready for new ingresses.
This script does not deploy any ingress into your AKS cluster. That will need to be done in addition to this script as you need. The following is an example YAML code for an ingress. You can use this to create an ingress for a pod running in your AKS cluster.
At Experts Live Europe 2019 I presented a session titled “Master Azure with VS Code”. This was a fun session with an engaging audience that took to twitter after the session. There was some chatter asking this session was recorded. It was not. I did note that I planned to write a blog post on this topic.
Here is that blog post and it is the first one of 2020 for me! In this post, we are going to dive into how VS code is helpful when working with Azure and many extensions I find useful when working with Azure. This post is not set to be an end-all to using VS Code with Azure but from my experience. Use this post as a starting point or a reference for expanding your use of VS Code with Azure. Also, check out the many other community experts and Microsoft MVPs for their additional knowledge plus tips and tricks on this topic.
VS Code Overview
First off if you are not using VS Code stop reading this right now, go download it and install it then come back to finish reading. 🙂 VS Code is a must-have in your toolbox and it is free! For those that are new to VS Code, it is an open-source – code editor developed by Microsoft that runs on Windows, Linux, and macOS. Here is a shortlist of the many benefits of VS Code:
Has support for hundreds of languages.
Has Integrated Terminal.
Also powerful developer tool with functionality, like IntelliSense code completion and debugging.
Includes syntax highlighting, bracket-matching, auto-indentation, box-selection, snippets, and more.
Integrates with build and scripting tools to perform common tasks making everyday workflows faster.
Has support for Git to work with source control.
Large Extension Marketplace of third-party extensions.
Note that yes, VS
Code is for the “IT Pro”. Not just developers.
Azure Extensions in VS Code
VS Code has a ton of
extensions in general. There are a number of Azure specific extensions and you
can work with Azure directly from VS Code.
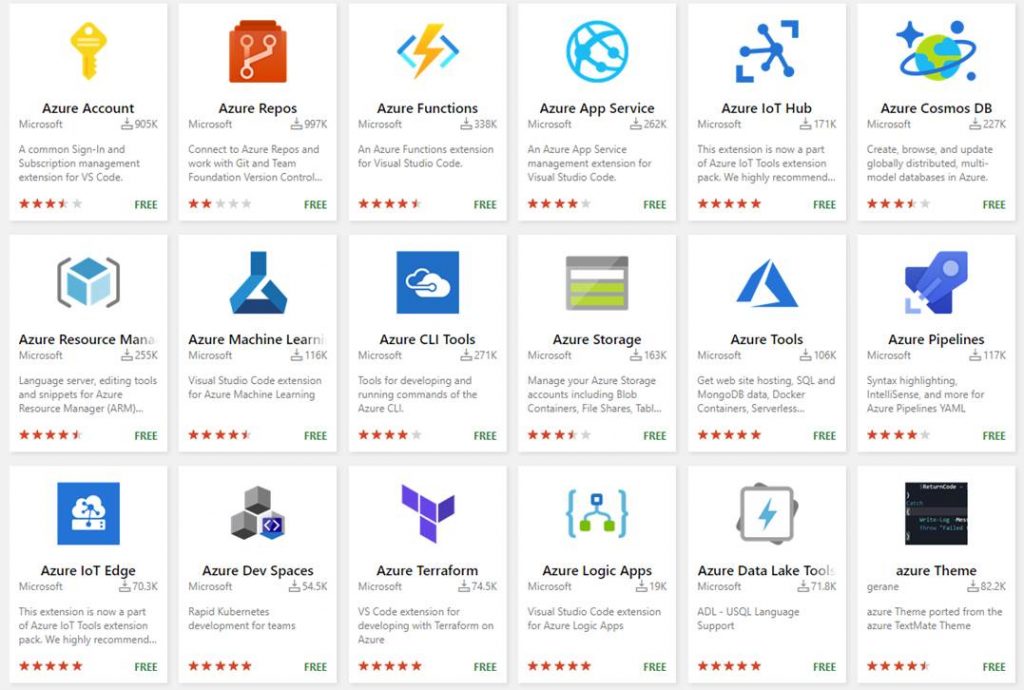
If you go to the VS Code Marketplace here: https://marketplace.visualstudio.com/vscode and search on Azure you will see results for many published by Microsoft and many community based extensions for Azure. As of the time of writing this blog post, there are 93. Here is a screenshot showing some of the results:
You can also go
directly to the Azure Tools extension from Microsoft here:
In the rest of this post, I am going to share some key extensions I use with Azure. I will post the marketplace links at the end of each extension I talk about and if it is maintained by community or Microsoft.
Deploy to Azure using VS Code
It is important to
note that not all of the Azure extensions available in VS Code can be used to
deploy to Azure. Some can but most can’t here is a list of the services that
you can deploy to from extensions in VS Code.
Azure Service
Description
Azure Functions
Build and manage Azure Functions serverless apps directly in VS Code with the Azure Functions extension.
App Service
Manage
Azure resources directly in VS Code with the Azure App Service extension.
Docker
Deploy your website using a Docker container.
Azure CLI
Create,
deploy, and update a website using a terminal and the Azure CLI.
Static website
Create,
deploy, and update a static website on Azure Storage.
NOTE: This list is current at the time of
writing this blog post. This will change over time.
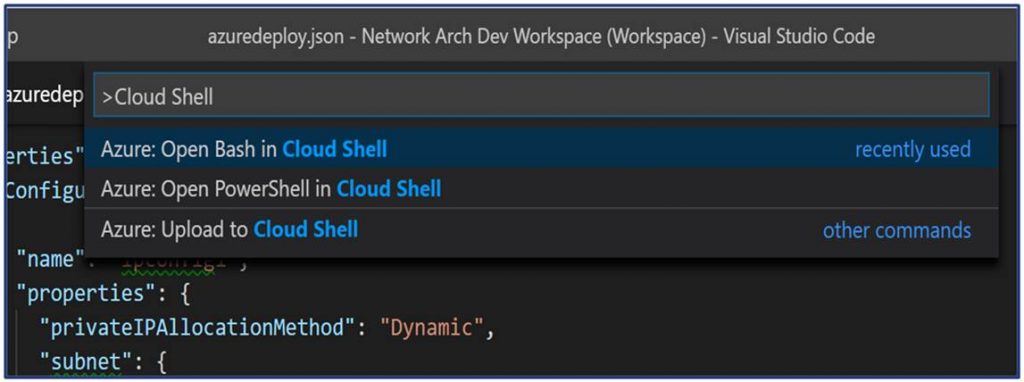
Azure Cloud Shell in VS Code
Cloud Shell is something you should be using with Azure to make your life easier. It is an interactive command-line shell. You are authenticated to your Azure account when you launch it, It typically runs in the browser and is used for managing Azure resources. When you launch it you can choose the shell experience that best for you, either Bash or PowerShell. With VS Code you can launch Cloud Shell directly in VS Code!
Cloud Shell is a part of the Azure
Account extension. Here are some key points on using Cloud Shell with VS
Code:
Free (storage consumed has costs.)
Launch Azure Cloud Shell directly in VS
Code.
Launch Bash, PowerShell, or Upload.
Works in the Integrated Terminal.
Azure and open-source Tooling in Cloud Shell:
Azure Tools: blobxfer Azure CLI and Azure classic CLI Azure Functions CLI AzCopy Service Fabric CLI Batch Shipyard
You get the following PowerShell modules in Cloud Shell: Azure Modules (Az.Accounts, Az.Compute, Az.Network, Az.Resources, Az.Storage) Azure AD Management (Preview) Exchange Online (In development) MicrosoftPowerBIMgmt SqlServer
These days the growth of Kubernetes is on fire! Azure Kubernetes Service (AKS) Microsoft’s managed Kubernetes offering is one of the fastest-growing products in the Azure portfolio of cloud services with no signs of slowing down. For some time me and two fellow Microsoft MVPs Janaka Rangama (@JanakaRangama) and Ned Bellavance (@Ned1313) have been working hard on an Azure Kubernetes Service (AKS) book. We are excited that the book has been finished and is currently in production. The publisher Apress plans to publish it on December 28th, 2019.
Besides my co-authors, we had additional rock stars to help with this project. For the Tech Review, we had the honor to work with Mike Pfeiffer (@mike_pfeiffer) Microsoft MVP, Author, Speaker, CloudSkills.fm podcast and Keiko Harada (@keikomsft) Senior Program Manager – Azure Compute – Containers. Shout out to them and huge thanks for being a part of this!
We also had the honor of the foreword being written by Brendan Burns (@brendandburns) Distinguished Engineer at Microsoft and co-founder of Kubernetes. A shout out to him and a world of thanks for taking the time to help with this project!
In this book, we take a journey inside Docker containers, container registries, Kubernetes architecture, Kubernetes components, and core Kubectl commands. We then dive into topics around Azure Container Registry, Rancher for Kubernetes management, deep dive into AKS, package management with HELM, and using AKS in CI/CD with Azure DevOps. The goal of this book is to give the reader just enough theory and lots of practical straightforward knowledge needed to start running your own AKS cluster.
For anyone looking to work with Azure Kubernetes Service or already working with it, this book is for you! We hope you get a copy and it becomes a great tool you can use on your Kubernetes journey.
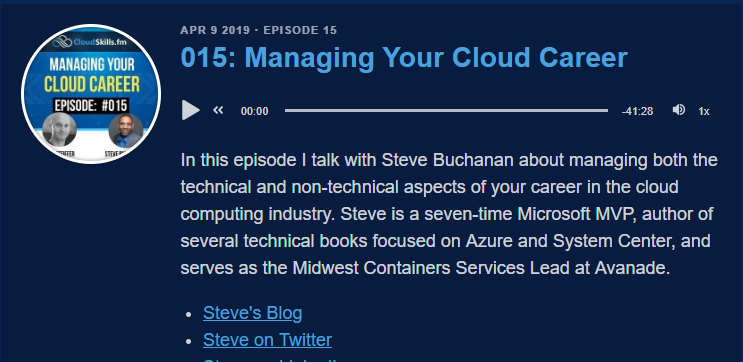
CloudSkills.fm is a podcast by fellow Microsoft MVP Mike Pfeiffer and veteran in the tech space with 5 books under his belt and numerous courses on Pluralsight. The podcast can be found here: cloudskills.fm. Mike is an all around good guy and I was honored to be a featured guest on one of his podcast episodes. The podcast is weekly with technical tips and career advice for people working in the cloud computing industry. The podcast is geared for developers, IT pros, those making move into cloud.
On this episode Mike
and I talked about managing both the technical and non-technical aspects of
your career in the cloud computing industry. We also discuss DevOps stuff
around Docker, Azure Kubernetes Service, Terraform and cloud stuff around Azure
management including my 5 points to success with cloud. You can listen to the
podcast here:
I’m very excited
Opsgility recently published a new Azure course by me titled: “Deploy and
Configure Infrastructure”. This course is part of the AZ 300 certification
learning path for Microsoft Azure Architect Technologies. More about the AZ 300
certification can be found here: https://www.microsoft.com/en-us/learning/exam-az-300.aspx.
The course is over 4 hours of Azure content!
Description of the course:
In the course learn
how to analyze resource utilization and consumption, create and configure
storage accounts, create and configure a VM for Windows and Linux, create
connectivity between virtual networks, implement and manage virtual networking,
manage Azure Active Directory, and implement and manage hybrid identities.
Lately I have been hearing a lot about a solution named Rancher in the Kubernetes space. Rancher is an open source Kubernetes Multi-Cluster Operations and Workload Management solution. You can learn more about Rancher here: https://www.rancher.com.
In short you can use
Rancher to deploy and manage Kubernetes clusters deployed to Azure, AWS, GCP
their managed Kubernetes offerings like GCE, EKS, AKS or even if you rolled
your own. Rancher also integrates with a bunch of 3rd party solutions for
things like authentication such as Active Directory, Azure Active Directory,
Github, and Ping and logging solutions such as Splunk, Elasticsearch, or a
Syslog endpoint.
Recently training
opened up for some Rancher/Kubernetes/Docker training so I decided to go. The
primary focus was on Rancher while also covering some good info on Docker and
Kubernetes. This was really good training with a lot of hands on time, however
there was one problem with the labs. The labs had instructions and setup
scripts ready to go to run Rancher local on your laptop or on AWS via
Terraform. There was nothing for Azure.
I ended up getting
my Rancher environment running on Azure but it would have been nice to have
some scripts or templates ready to go to spin up Rancher on Azure. I did find
some ARM templates to spin up Rancher but they deployed an old version and it
was not clear in the templates on where they could be updated to deploy the new
version of Rancher. I decided to spend some time building out a couple of ARM
templates that can be used to quickly deploy Rancher on Azure and add a
Kubernetes host to Rancher. In the ARM template I pulled together it pulls the
Rancher container from Docker Hub so it will always deploy the latest version.
In this blog post I will spell out the steps to get your Rancher up and running
in under 15 minutes.
The repository consists of ARM templates for deploying Rancher and a host VM for Kubernetes. NOTE: These templates are intended for labs to learn Rancher. They are not intended for use in production.
In the repo ARM Template #1 named RancherNode.JSON will deploy an Ubuntu VM with Docker and the latest version of Rancher (https://hub.docker.com/r/rancher/rancher) from Docker Hub. ARM Template #2 named RancherHost.JSON will deploy an Ubuntu VM with Docker to be used as a Kubernetes host in Rancher.
Node Deployment
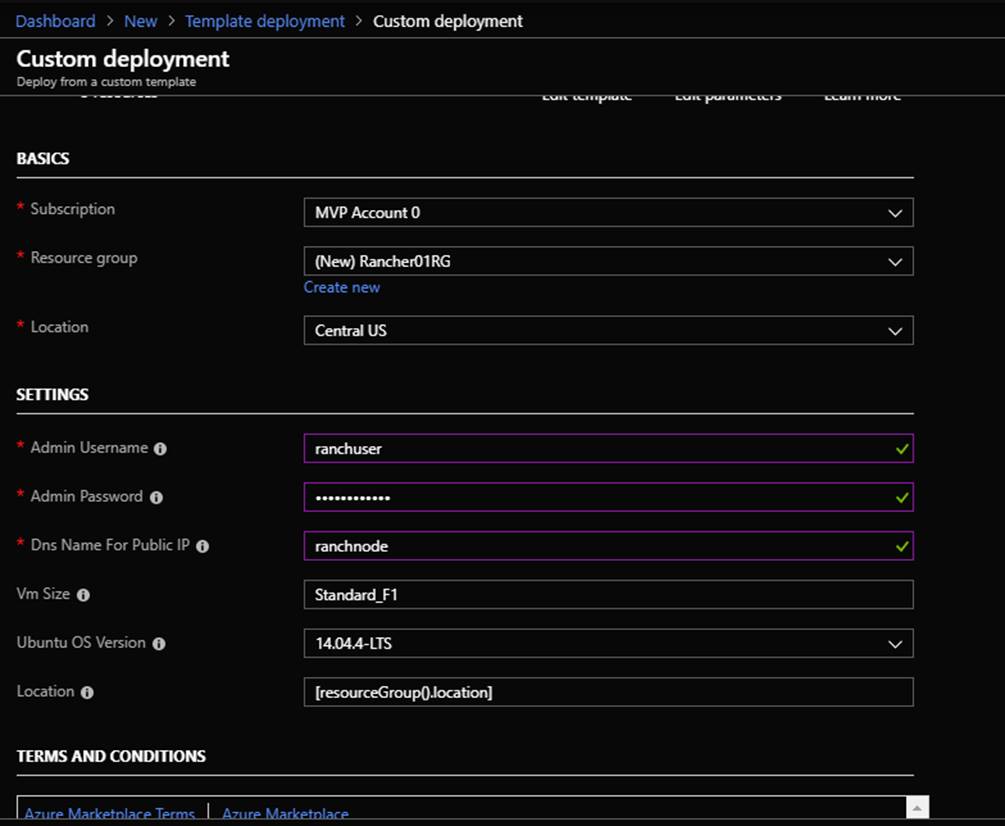
Deploy the
RancherNode.JSON ARM template to your Azure subscription through “Template
Deployment” or other deployment method. You will be prompted for the
following info shown in the screenshot:
Host Deployment
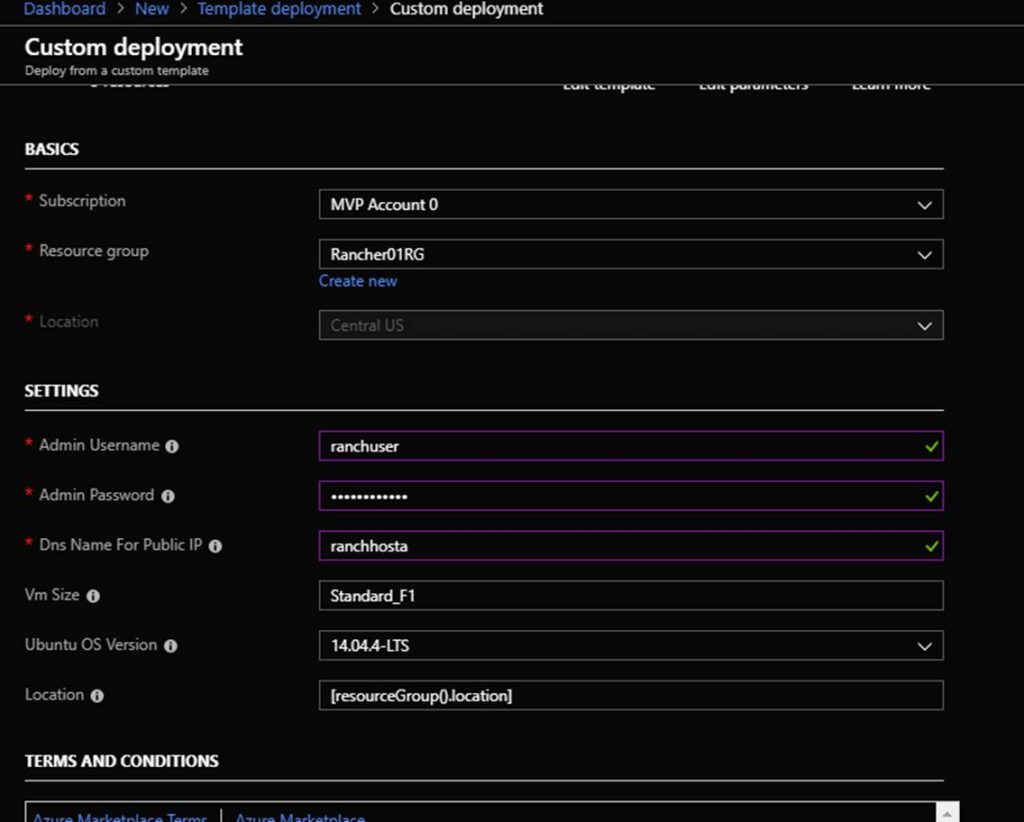
Deploy the
RancherHost.JSON ARM template to your Azure subscription through “Template
Deployment” or other deployment method. Note that that should deploy this
into the same Resource Group that you deployed the Rancher Node ARM template
into. You will be prompted for the following info shown in the screenshot:
After the Rancher
Node and Rancher Host ARM templates are deployed you should see the following
resources in the new Resource Group:
Name
Type
RancherVNet
Virtual
network
RancherHost
Virtual
machine
RancherNode
Virtual
machine
RancherHostPublicIP
Public
IP address
RancherNodePublicIP
Public
IP address
RancherHostNic
Network
interface
RancherNodeNic
Network
interface
RancherHost_OSDisk
Disk
RancherNode_OSDisk
Disk
Next navigate the
Rancher portal in the web browser. The URL is the DNS name of the Rancher Node
VM. You can find the DNS name by clicking on the Rancher Node VM in the Azure
portal on the overview page. Here is an example of the URL:
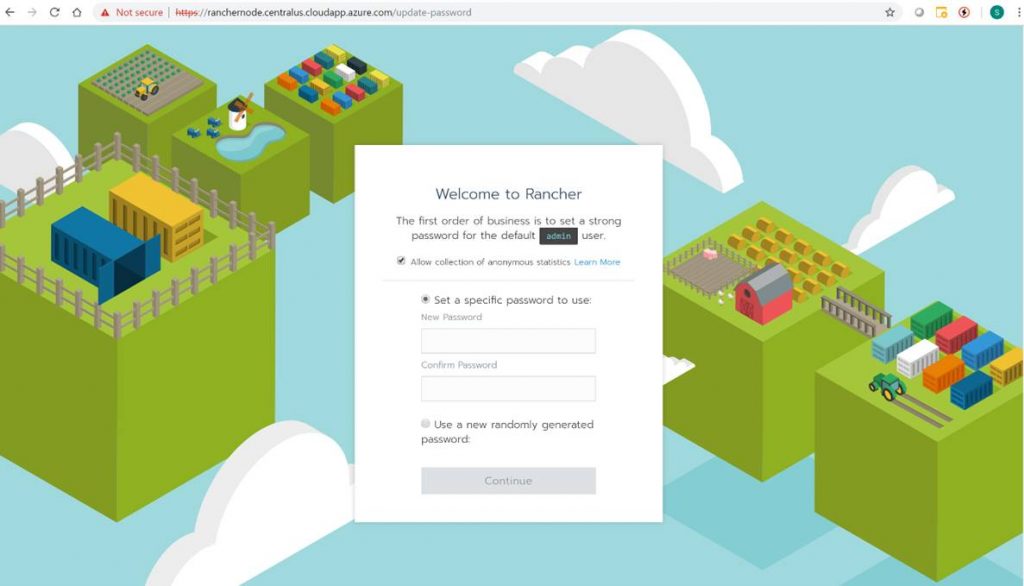
The Rancher portal
will prompt you to set a password. This is shown in the following screenshot.
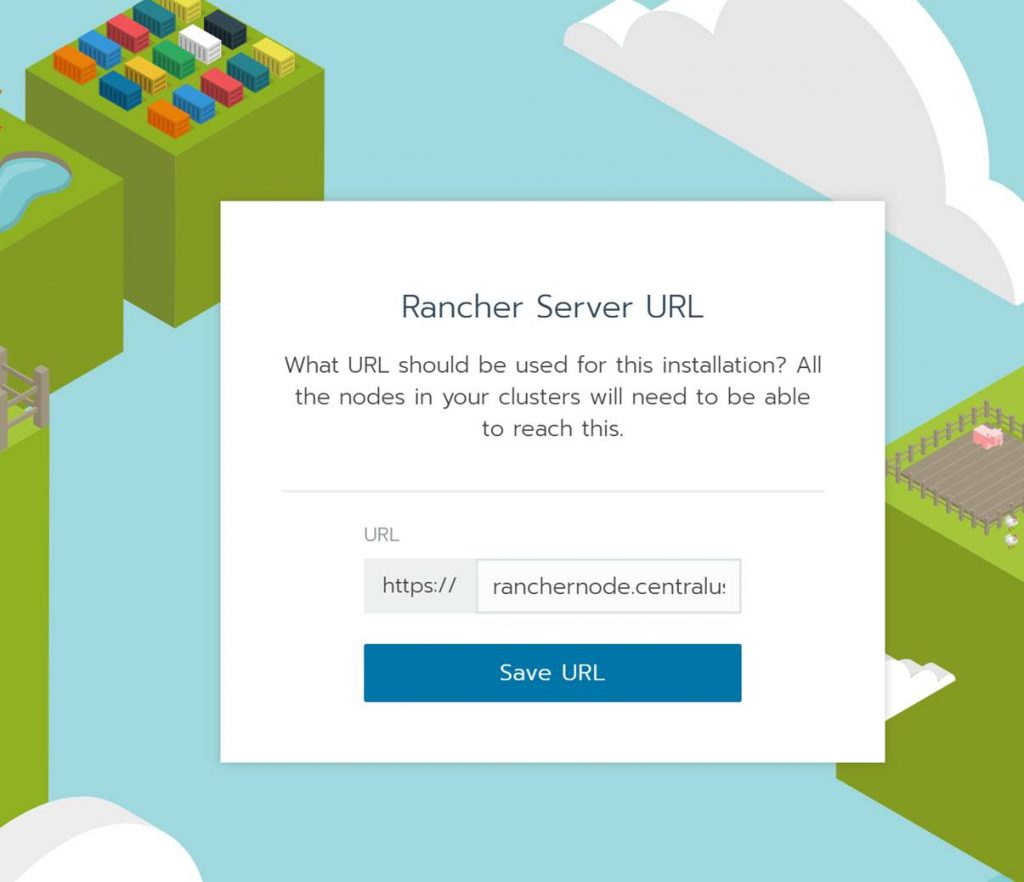
After setting the
password the Rancher portal will prompt you for the correct Rancher Server URL.
This will automatically be the Rancher Node VM DNS name. Click Save URL.
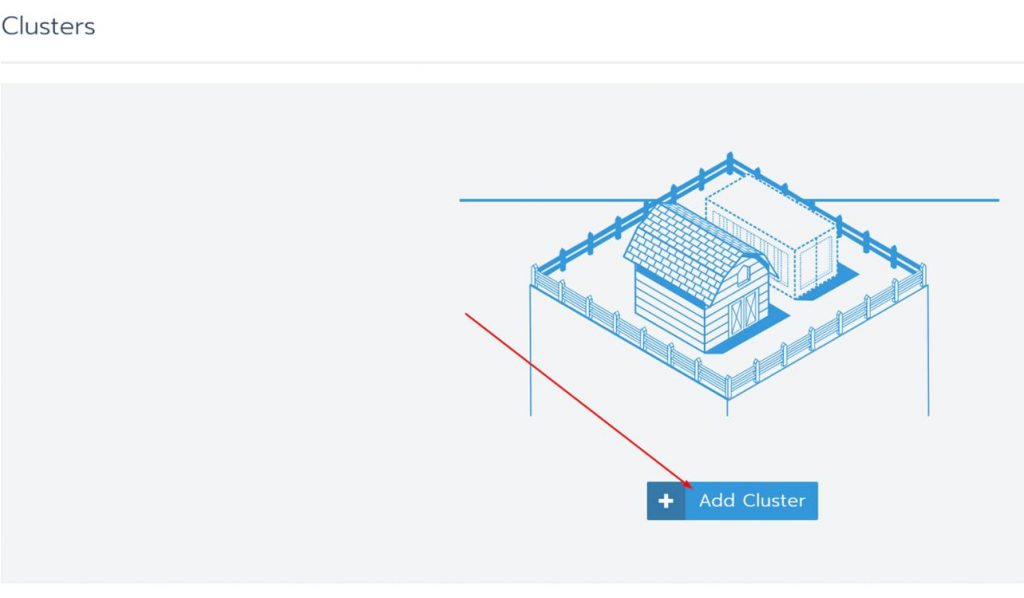
You will then be
logged into the Rancher portal. You will see the cluster page. From here you
will want to add a cluster. Doing this is how you add a new Kubernetes cluster
to Rancher. In this post I will show you how to add a cluster to the Rancher
Host VM. When it’s all said and done Rancher will have successfully deployed
Kubernetes to the Rancher Host VM. Note that you could add a managed Kubernetes
such as AKS but we won’t do that in this blog. I will save that for a future
blog post!
Click on Add Cluster
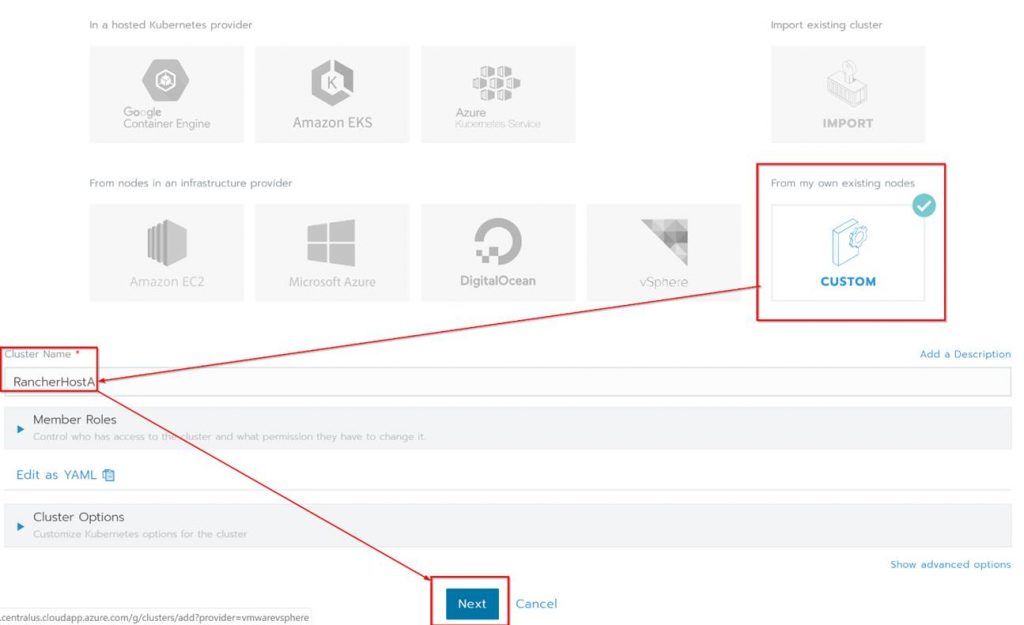
Under “From my
own existing nodes” Click on custom, give the cluster a name and click
Next.
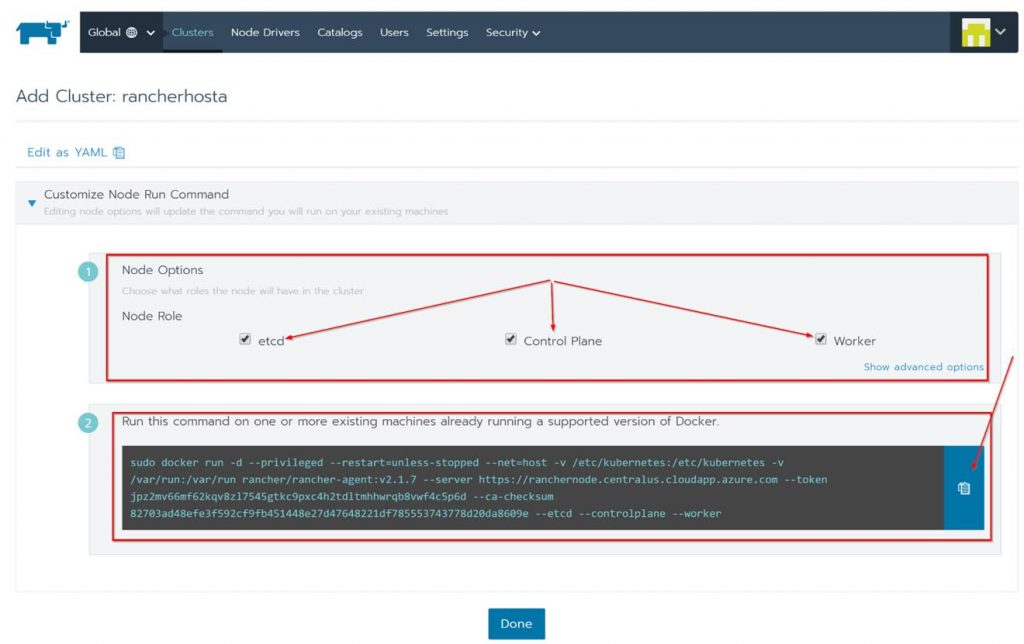
Next check all the
boxes for the Node Options since all the roles will be on a single Kubernetes
cluster. Copy the code shown at the bottom of the page, click done and run the
code on the Rancher Host.
In order to run the
code on the Rancher Host you need to SSH in and run it from there. To do this
follow these steps:
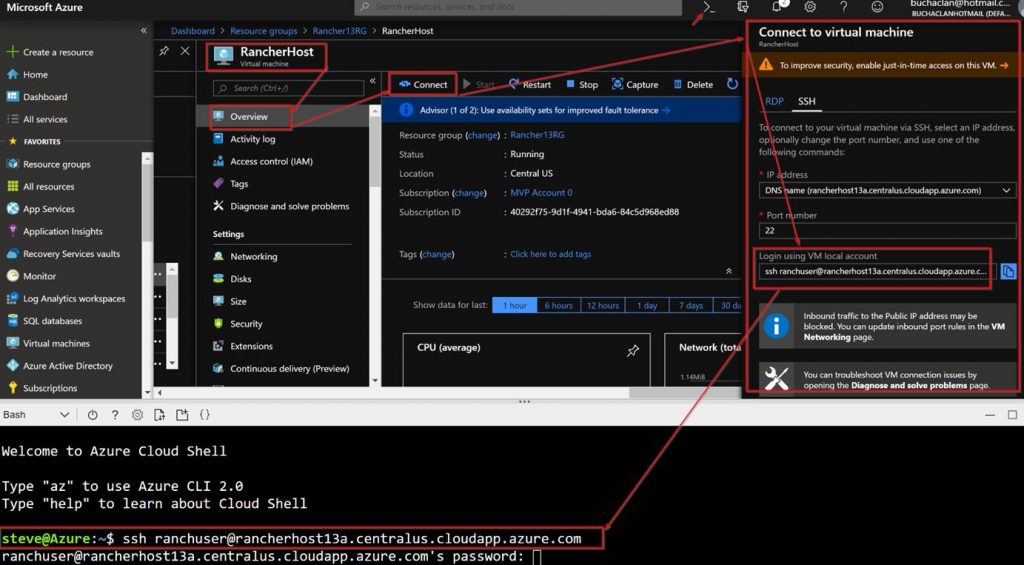
In the Azure Portal, from within the resource group click on the Rancher Host VM.
On the Overview page click on Connect.
Copy “ssh ranchuser@rancherhost.centralus.cloudapp.azure.com” from the Connect to virtual machine pop up screen.
Open a terminal in either Azure cloud shell or with something like a terminal via VS Code and past the “ssh ranchuser@rancherhost.centralus.cloudapp.azure.com” in.
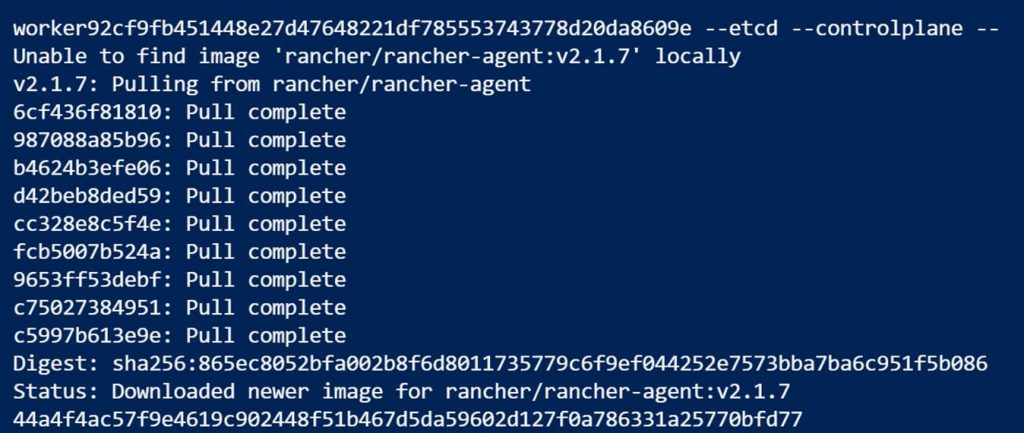
Running the code
will look like this:
When done you can
run Docker PS to see that the Rancher agent containers are running.
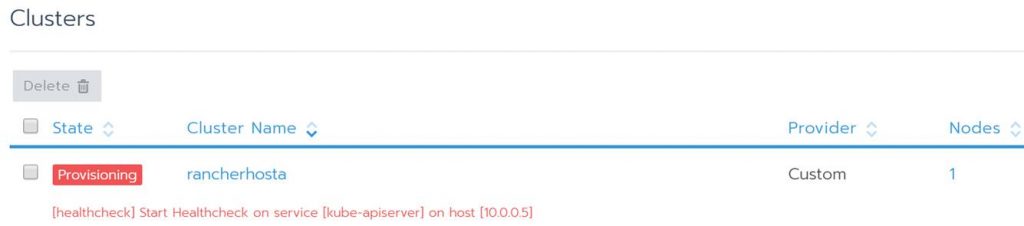
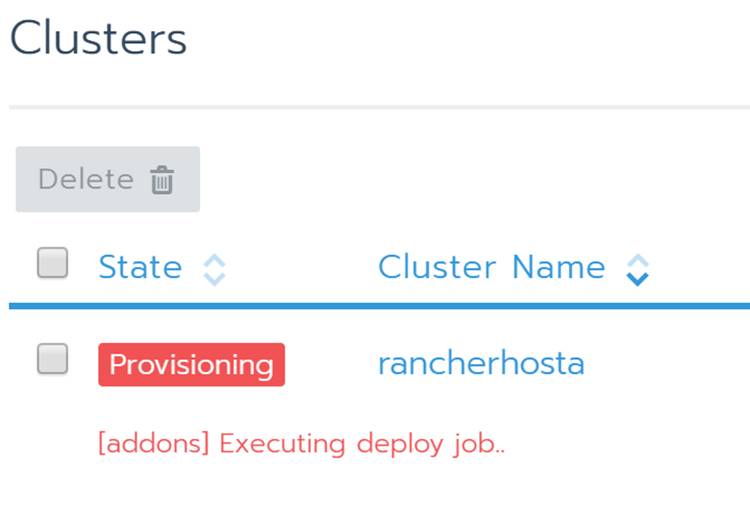
In the Rancher
portal under clusters you will see the Rancher host being provisioned
The status will
change as Kubernetes is deployed.
Once it’s done
provisioning you will see your Kubernetes cluster as Active.
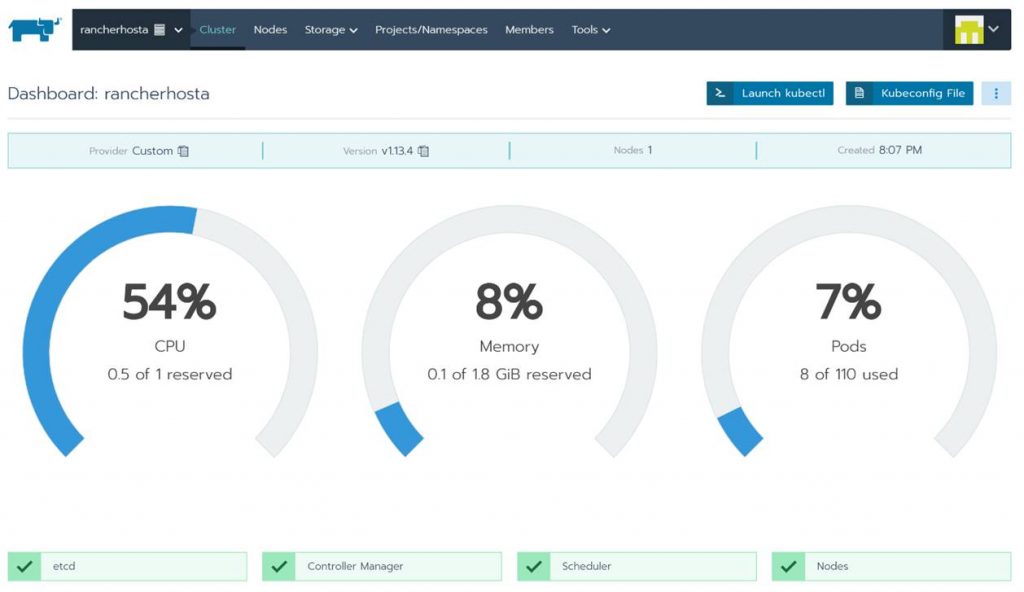
From here you can
see a bunch of info about your new Kubernetes cluster. Also notice that you
could even launch Kubectl right from hereand start running commands! Take some
time to click around to see all the familiar stuff you are used to working with
in Kubernetes. This is pretty cool and simplifies the management experience for
Kubernetes.
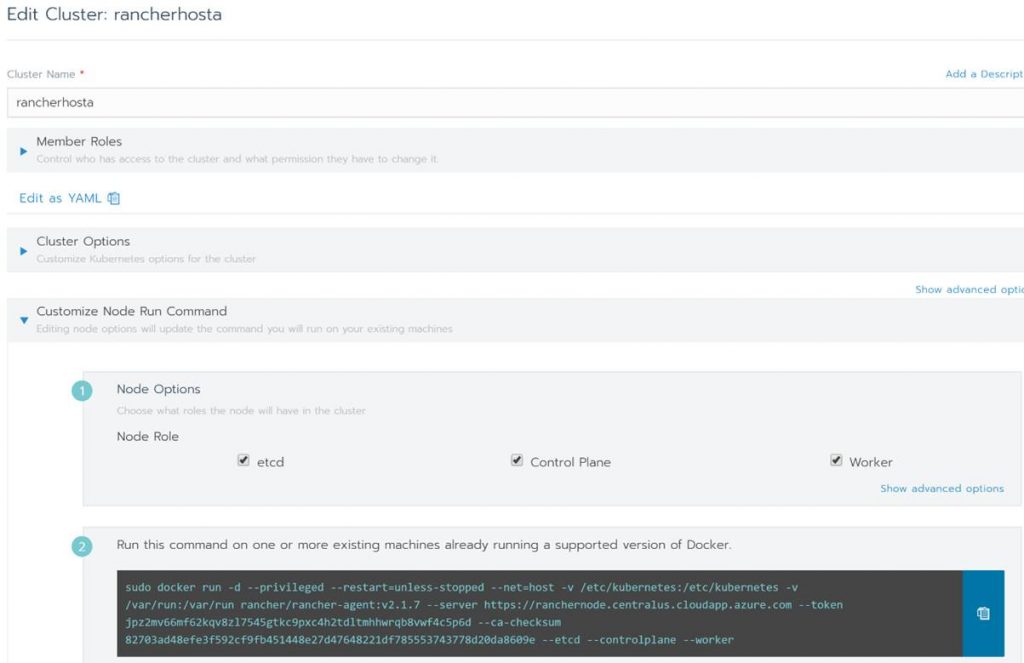
If you want to add
more nodes or need the configuration code again just click the ellipsis button
and edit.
In Edit Cluster you
can change the cluster name, get and change settings and copy the code to add
more VMs to the cluster.
That’s the end of
this post. Thanks for reading. Check back for more Azure, Kubernetes, and
Rancher blog posts.
Part of running Kubernetes is being able to
monitoring the cluster, the nodes, and the workloads running in it. Running
production workloads regardless of PaaS, VM’s, or containers requires a solid
level of reliability. Azure Kubernetes Service comes with monitoring provided
from Azure bundled with the semi-managed service. Kubernetes also has built in
monitoring that can also be utilized.
It is important to note that AKS is a free
service and Microsoft aims to achieve at least 99.5% availability for the
Kubernetes API server on the master node side.
But due to AKS being a free service Microsoft
does not carry an SLA on the Kubernetes cluster service itself. Microsoft does
provide an SLA for the availability of the underlying nodes in the cluster via
the Azure Virtual Machines SLA. Without an official SLA for the Kubernetes
cluster service it becomes even more critical to understand your deployment and
have the right monitoring tooling and plan in place so when an issue arises the
DevOps or CloudOps team can address, investigate, and resolve any issues with the
cluster.
The monitoring service included with AKS
gives you monitoring from two perspectives including the first one being
directly from an AKS cluster and the second one being all AKS clusters in a
subscription. The monitoring looks at two key areas “Health status”
and “Performance charts” and consists of:
Insights – Monitoring for the
Kubernetes cluster and containers.
Metrics – Metric based
cluster and pod charts.
Log Analytics – K8s and Container
logs viewing and search.
Azure Monitor
Azure Monitor has a containers section. Here
is where you will find a health summary across all clusters in a subscription
including ACS. You also will see how many nodes and system/user pods a cluster
has and if there are any health issues with the a node or pod. If you click on
a cluster from here it will bring you to the Insights section on the AKS
cluster itself.
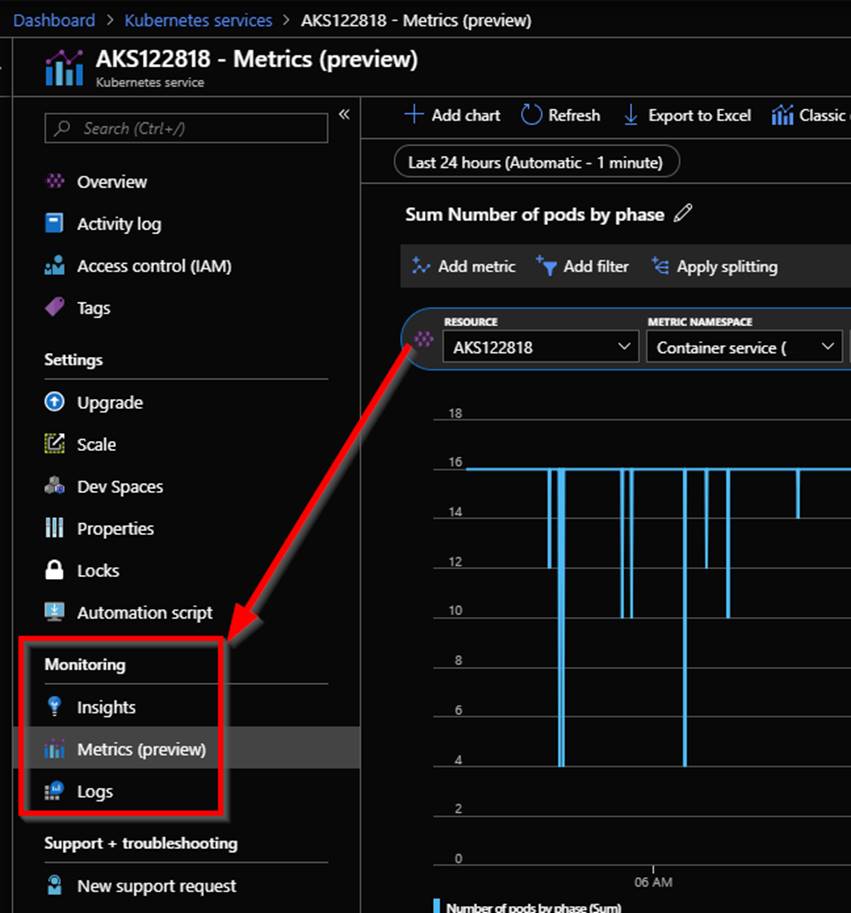
If you click on an AKS cluster you will be
brought to the Insights section of AKS monitoring on the actual AKS cluster.
From here you can access the Metrics section and the Logs section as well as
shown in the following screenshot.
Insights
Insights is where you will find the bulk of
useful data when it comes to monitoring AKS. Within Insights you have these 4
areas Cluster, Nodes, Controllers, and Containers. Let’s take a deeper look
into each of the 4 areas.
Cluster
The cluster page contains charts with key
performance metrics for your AKS clusters health. It has performance charts for
your node count with status, pod count with status, along with aggregated node
memory and CPU utilization across the cluster. In here you can change the date
range and add filters to scope down to specific information you want to see.
Nodes
After clicking on the nodes tab you will see
the nodes running in your AKS cluster along with uptime, amount of pods on the
node, CPU usage, memory working set, and memory RSS. You can click on the arrow
next to a node to expand it displaying the pods that are running on it.
What you will notice is that when you click
on a node, or pod a property pane will be shown on the right hand side with the
properties of the selected object. An example of a node is shown in the
following screenshot.
Controllers
Click on the Controllers tab to see the
health of the clusters controllers. Again here you will see CPU usage, memory
working set, and memory RSS of each controller and what is running a
controller. As an example shown in the following screenshot you can see the
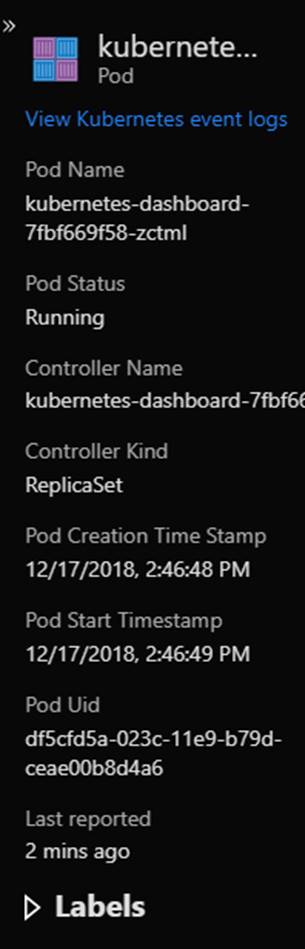
kubernetes dashboard pod running on the kubernetes-dashboard controller.
The properties of the kubernetes dashboard pod
as shown in the following screenshot gives you information like the pod name,
pod status, Uid, label and more.
You can drill in to see the container the pod
was deployed using.
Containers
On the Containers tab is where all the
containers in the AKS cluster are displayed. An as with the other tabs you can
see CPU usage, memory working set, and memory RSS. You also will see status,
the pod it is part of, the node its running on, its uptime and if it has had
any restarts. In the following screenshot the CPU usage metric filter is used
and I am showing a containers that has restarted 71 times indicating an issue
with that container.
In the
following screenshot the memory working set metric filter is shown.
You can also filter the
containers that will be shown through using the searching by name filter.
You also can see a containers logs in the containers tab. To do this select a container to show its properties. Within the properties you can click on View container live logs (preview) as shown in the following screenshot or View container logs. Container log data is collected every three minutes. STDOUT and STDERR is the log output from each Docker container that is sent to Log Analytics.
Kube-system is not currently collected and sent to Log Analytics. If you are not familiar with Docker logs more information on STDOUT and STDERR can be found on this Docker logging article here: https://docs.docker.com/config/containers/logging.
In this blog post I am going to walk through the steps for deploying WordPress to Azure Kubernetes Service (AKS) using MySQL and WordPress Docker images. Note that using the way I will show you is one way. Another way to deploy WordPress to AKS would be using a Helm Chart. Here is a link to the WordPress Helm Chart by Bitnami https://bitnami.com/stack/wordpress/helm. Here are the images we will use in this blog post:
The first thing we need to do is save these files as mysql-deployment.yaml and wordpress-deployment.yaml respectively.
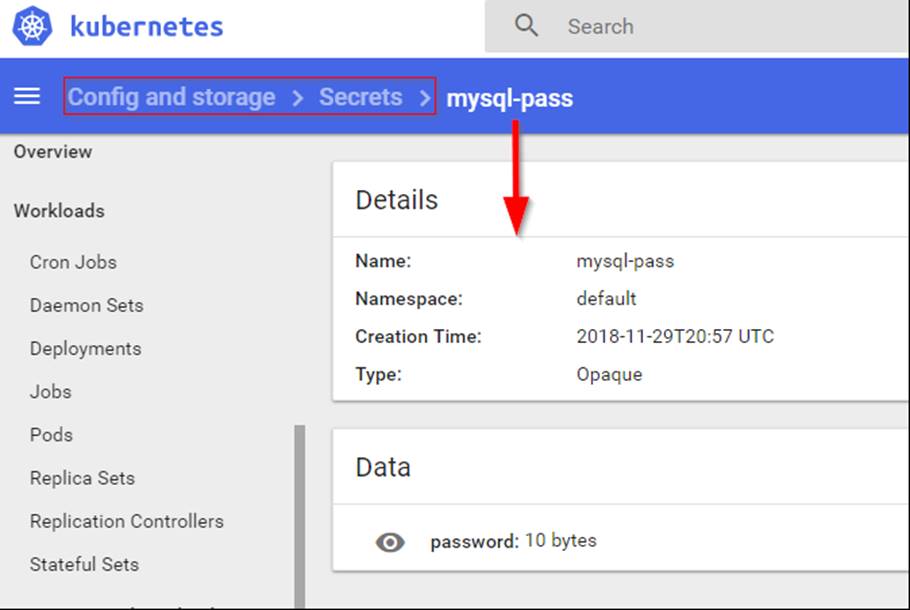
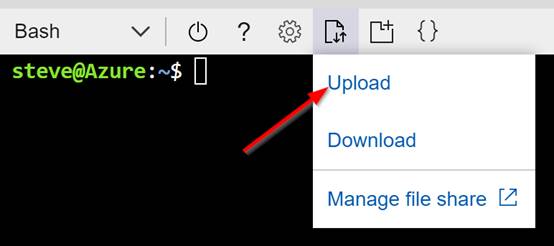
Next, we need to setup a password for our MySQL DB. We will do this by creating a secret on our K8s cluster. To do this launch the bash or PowerShell in Azure cloud shell like in the following screenshot and run the following syntax:
NOTE: You could use kubectl create /home/steve/mysql-deployment.yaml instead of apply to create the MySQL pod and service. I use apply because I typically use the declarative object configuration approach. kubectl apply essentially equals kubectl create + kubectl replace. In order to update an object after it has been created using kubectl create you would need to run kubectl replace.
There are pros and cons to using each and it is more of a preference for example when using the declarative approach there is no audit trail associated with changes. For more information on the multiple Kubernetes Object Management approaches go here: https://kubernetes.io/docs/concepts/overview/object-management-kubectl/overview.
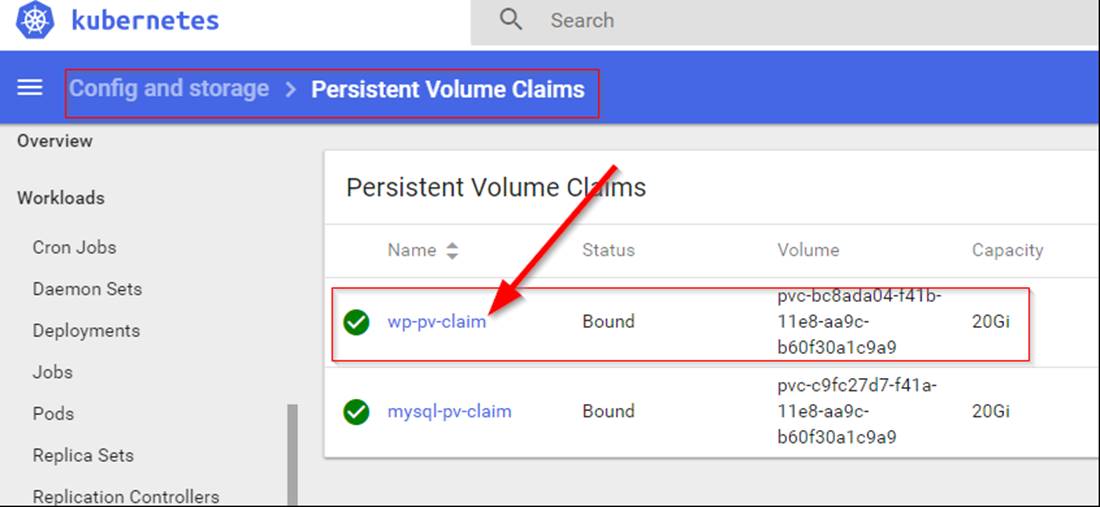
Note that in the mysql yaml file it has syntax to create a persistent volume. This is needed so that the database stays in tact even if the pod fails, is moved etc. You can check to ensure the persistent volume was created by running the following syntax:
kubectl get pvc
Also, you can run the following syntax to verify the mysql pod is running:
kubectl get pods
Deploying the WordPress Pod and service is the same process. Use the following syntax to create the WordPress pod and service:
Again, check to ensure the persistent volume was created. Use the following syntax:
kubectl get pvc
NOTE: When checking right after you created the persistent volume it may be in a pending status for a while like shown in the following screenshot:
You can also check the persistent volume using the K8s dashboard as shown in the following screenshot:
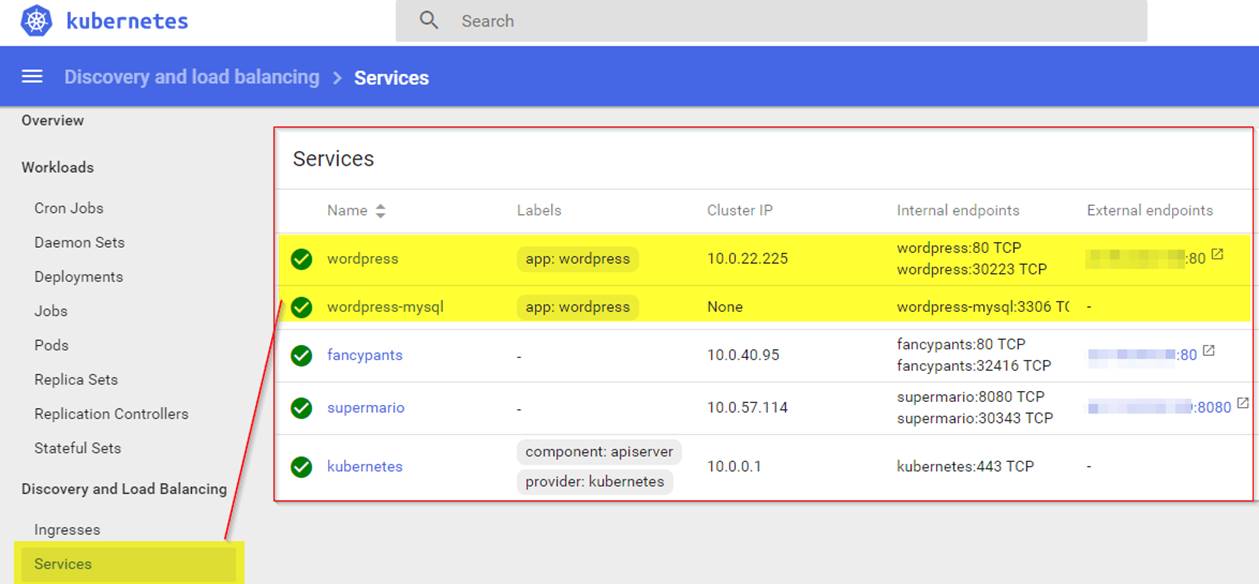
With the deployment of MySQL and WordPress we created 2 services. The MySQL service has a clusterip that can only be accessed internally. The WordPress service has an external IP that is also attached to an Azure Load Balancer for external access. I am not going to expand on what Kubernetes services are in this blog post but know that they are typically used as an abstracted layer in K8s used for access to Pods on the backend and follow the Pods regardless of the node they are running on. For more information about Kubernetes services visit this link: https://kubernetes.io/docs/concepts/services-networking/service.
In order to see that the services are running properly and find out the external IP you can run the following syntax:
kubectl get services (to see all services)
or
kubectl get services wordpress (to see just the WordPress service)
You also can view the services in the K8s dashboard as shown in the following screenshot:
Well now that we have verified the pods and the services are running let’s check out our new WordPress instance by going to the external IP in a web browser.
Thanks for checking out this blog post. I hope this was an easy to use guide to get WordPress up and running on your Azure Kubernetes Service cluster. Check back soon for more Azure and Kubernetes/Container content.
In this blog post I am going to walk through the setup of an AKS cluster step by step. This is to serve as a intro to AKS to show how easy it is to get started with Kubernetes in Azure. In a follow up blog post I will dive into AKS more showing how … Read more