Resource Group Clean-up in Azure Stack

If you are like me, you end up creating a ton of resource groups in Azure Stack when testing things out. I needed a way to delete them without having to click one each one via the portal. The best option of course is to leverage PowerShell. I threw together some PowerShell to handle this. I came up with two options #1 can be used to delete a bunch of RG’s that have a common name. For example, I had a bunch of VM00* resource groups. I use the script to go loop through and delete all resource groups with VMO in the name. Option #2 pop’s up a GUI window so I could select the RG’s I wanted to delete. It put them in an array and then looped through to delete them in one shot.

This is great because I can kick this off and go do something else. I will share both below in this blog post along with some screenshots. I won’t have a download for the PowerShell syntax so just copy from this post if you want to use it. Be sure to use AzureStack.Connect.psm1 for connecting to your Azure Stack environment before running any of the following code.

Code:
#1

#Create Variable of RG’s with common name
$Resourcegroups = Get-AzureRmResourceGroup | where {$_.ResourceGroupName -like (‘*VM0*’)}

#Create array of RG’s
$RGLIST = $Resourcegroups.ResourceGroupName

#Loop to remove each resource group in the array
ForEach(
$rg in $RGLIST
)
{
Get-AzureRmResourceGroup -Name $rg -ErrorAction SilentlyContinue | Remove-AzureRmResourceGroup -Force -Verbose
}

This image shows the array of RG’s that will be looped through. I highlighted vm003rg in the array and in the PowerShell status message.

rgcleanup-1

The following screenshot shows VM003RG being deleted in the Azure Stack portal.

rgcleanup-2

#2

#Create Variable of RG’s from GUI selection
$selectedrgs = (Get-AzureRmResourceGroup | Out-GridView ` -Title “Select ResouceGroups you want to remove.”` -PassThru).ResourceGroupName

#Loop to remove each resource group in the array
ForEach(
$rg in $selectedrgs
)
{
Get-AzureRmResourceGroup -Name $rg -ErrorAction SilentlyContinue | Remove-AzureRmResourceGroup -Force -Verbose
}

After running the Create Variable of RG’s from GUI selection part of the code a window as shown in the following screenshot will pop up. Select the RG’s you want to remove, click Ok and they will be placed into an array.

rgcleanup-3

Below if the output of the array. Run the Loop to remove each resource group in the array part of the code and each of the RG’s will be removed.

rgcleanup-4

I have also used this when a resource group would not delete from the portal. On some stubborn resource groups I have had to run this a couple of times. This is a short post. I hope this helps someone out!

Read more

Azure & RRAS Site to Site VPN Setup (Azure Resource Manager)

Background

I have not seen a lot of posts out there on setting up Azure Site to Site VPN Setup Azure Resource Manager. The ones I did follow had some missing steps. Setting up the AS2S is a pretty detailed process so I wanted to put the steps I had to follow in a blog post.

What you will need:

On-Premises

  • RRAS installed on an on-premises server.
  • At least 1 NIC on your RRAS server.
  • Your public IP. This will not work with dynamic DNS. You have to have a public IP. If you don’t own a public IP you can still use the dynamic public IP your ISP has assigned to you. You will need to just watch it and manually update it in Azure when it changes.
  • UDP Ports 500, 4500, and 1701 forwarded to your RRAS server. This is if your RRAS server is behind a NAT device.
  • Either your servers pointed to RRAS for their gateway or static routes setup on the VM’s you want to be able to communicate with Azure.

Azure:

Addressing:

For on-premises you can use whatever you want. I use 192.168.0.x/24.

For Azure we will use 10.121.0.x/16 and 10.121.0.0/24 and 10.121.1.0/24.

Steps:

~ AZURE CONFIGURATION FIRST! ~

First we will start off with configuring the network components we need up in Azure. Start by going to the Azure portal at https://portal.azure.com.

STEP 1: I would setup a resource group. You will put all of your resources for the site to site VPN in here for better tracking and management. As an example I named mine: “S2SVPN-Buchatech-LabRG“.

as2svpn-29

NOTE: Our resource group is empty at this point.

STEP 2:  Let’s start off by creating a virtual network. Go to:

Virtual networks>Create virtual network and click on Add. Let’s name this “S2SVPN-RRAS-Vnet“.

Give it “10.121.0.0/16” for the address space. This has to have enough room to place two subnets into it.

For the first subnet make the Subnet Name “Azure-VMs“. Make the Subnet address range “10.121.0.0/24“. Set it to the resource group you created in the previous step.

NOTE: I recommend placing all resources that will be a part of your site to site VPN in the same region. I used North Central US.

as2svpn-1

STEP 3:

We will be creating a virtual network gateway. This network gateway will contain the second subnet.

Go to Virtual networks>S2SVPN-RRAS-Vnet>Settings>Subnets.

Click on + Gateway subnet. For the Address Range use “10.121.1.0/24“. This address range is the IP range for your RRAS server to use.

So in your virtual network you should now have the two following Subnets:

as2svpn-2

STEP 4:

Now navigate to Virtual network gateways and click on Add. Name the gateway “S2SVPN-RRAS-VnetGW“. For the virtual network select our existing one named S2SVPN-RRAS-Vnet. Leave the gateway type to VPN, and leave VPN type to Route-based. For the public IP we don’t have one so we will need to create one here. Click on Choose a public IP address and a blade will fly out. Click on Create New.

as2svpn-3

I give it a name of “S2SVPN-RRAS-VnetGW-IP“. Your settings should look like this:

as2svpn-4

After the Virtual network gateways is created go and get the public IP addresses. We will need to plug this into RRAS later. You can get this by going here: Virtual network gateways>S2SVPN-RRAS-VnetGW>S2SVPN-RRAS-VnetGW-IP>Settings.

as2svpn-5

NOTE: It may take some time to provision the public IP so be patient here.

STEP 5:

Next up we need to configure a Local network gateway. Go to:

Local network gateways and click on +Add.  On Create local network gateway name it

S2SVPN-RRAS-LocalNetGW“, enter the public IP of your RRAS server, In the address space enter an IP range or ranges for your on-premises network , and select your RG.

as2svpn-6

NOTE: If you do not know what the public IP is on your RRAS server’s network just visit http://ipchicken.com and it will display it.

Now we need to create a connection in our local gateway. To do this navigate to the settings>connections and click on + Add. Name this “S2SVPN-RRAS-LocalNetGW-Connection“.

The Connection type will default to Site-to-site (IPsec). Leave this. Set the Virtual network gateway to “S2SVPN-RRAS-VnetGW“. Set a Shared key (PSK) to be used and remember this will also be used on the RRAS server so document this somewhere.

as2svpn-7

That’s it for the network configuration up in Azure. As long as everything was followed in these steps you should now have the following in your resource group.

as2svpn-8

~ RRAS CONFIGURATION! ~

Read more

WordPress as front-end for Azure Automation

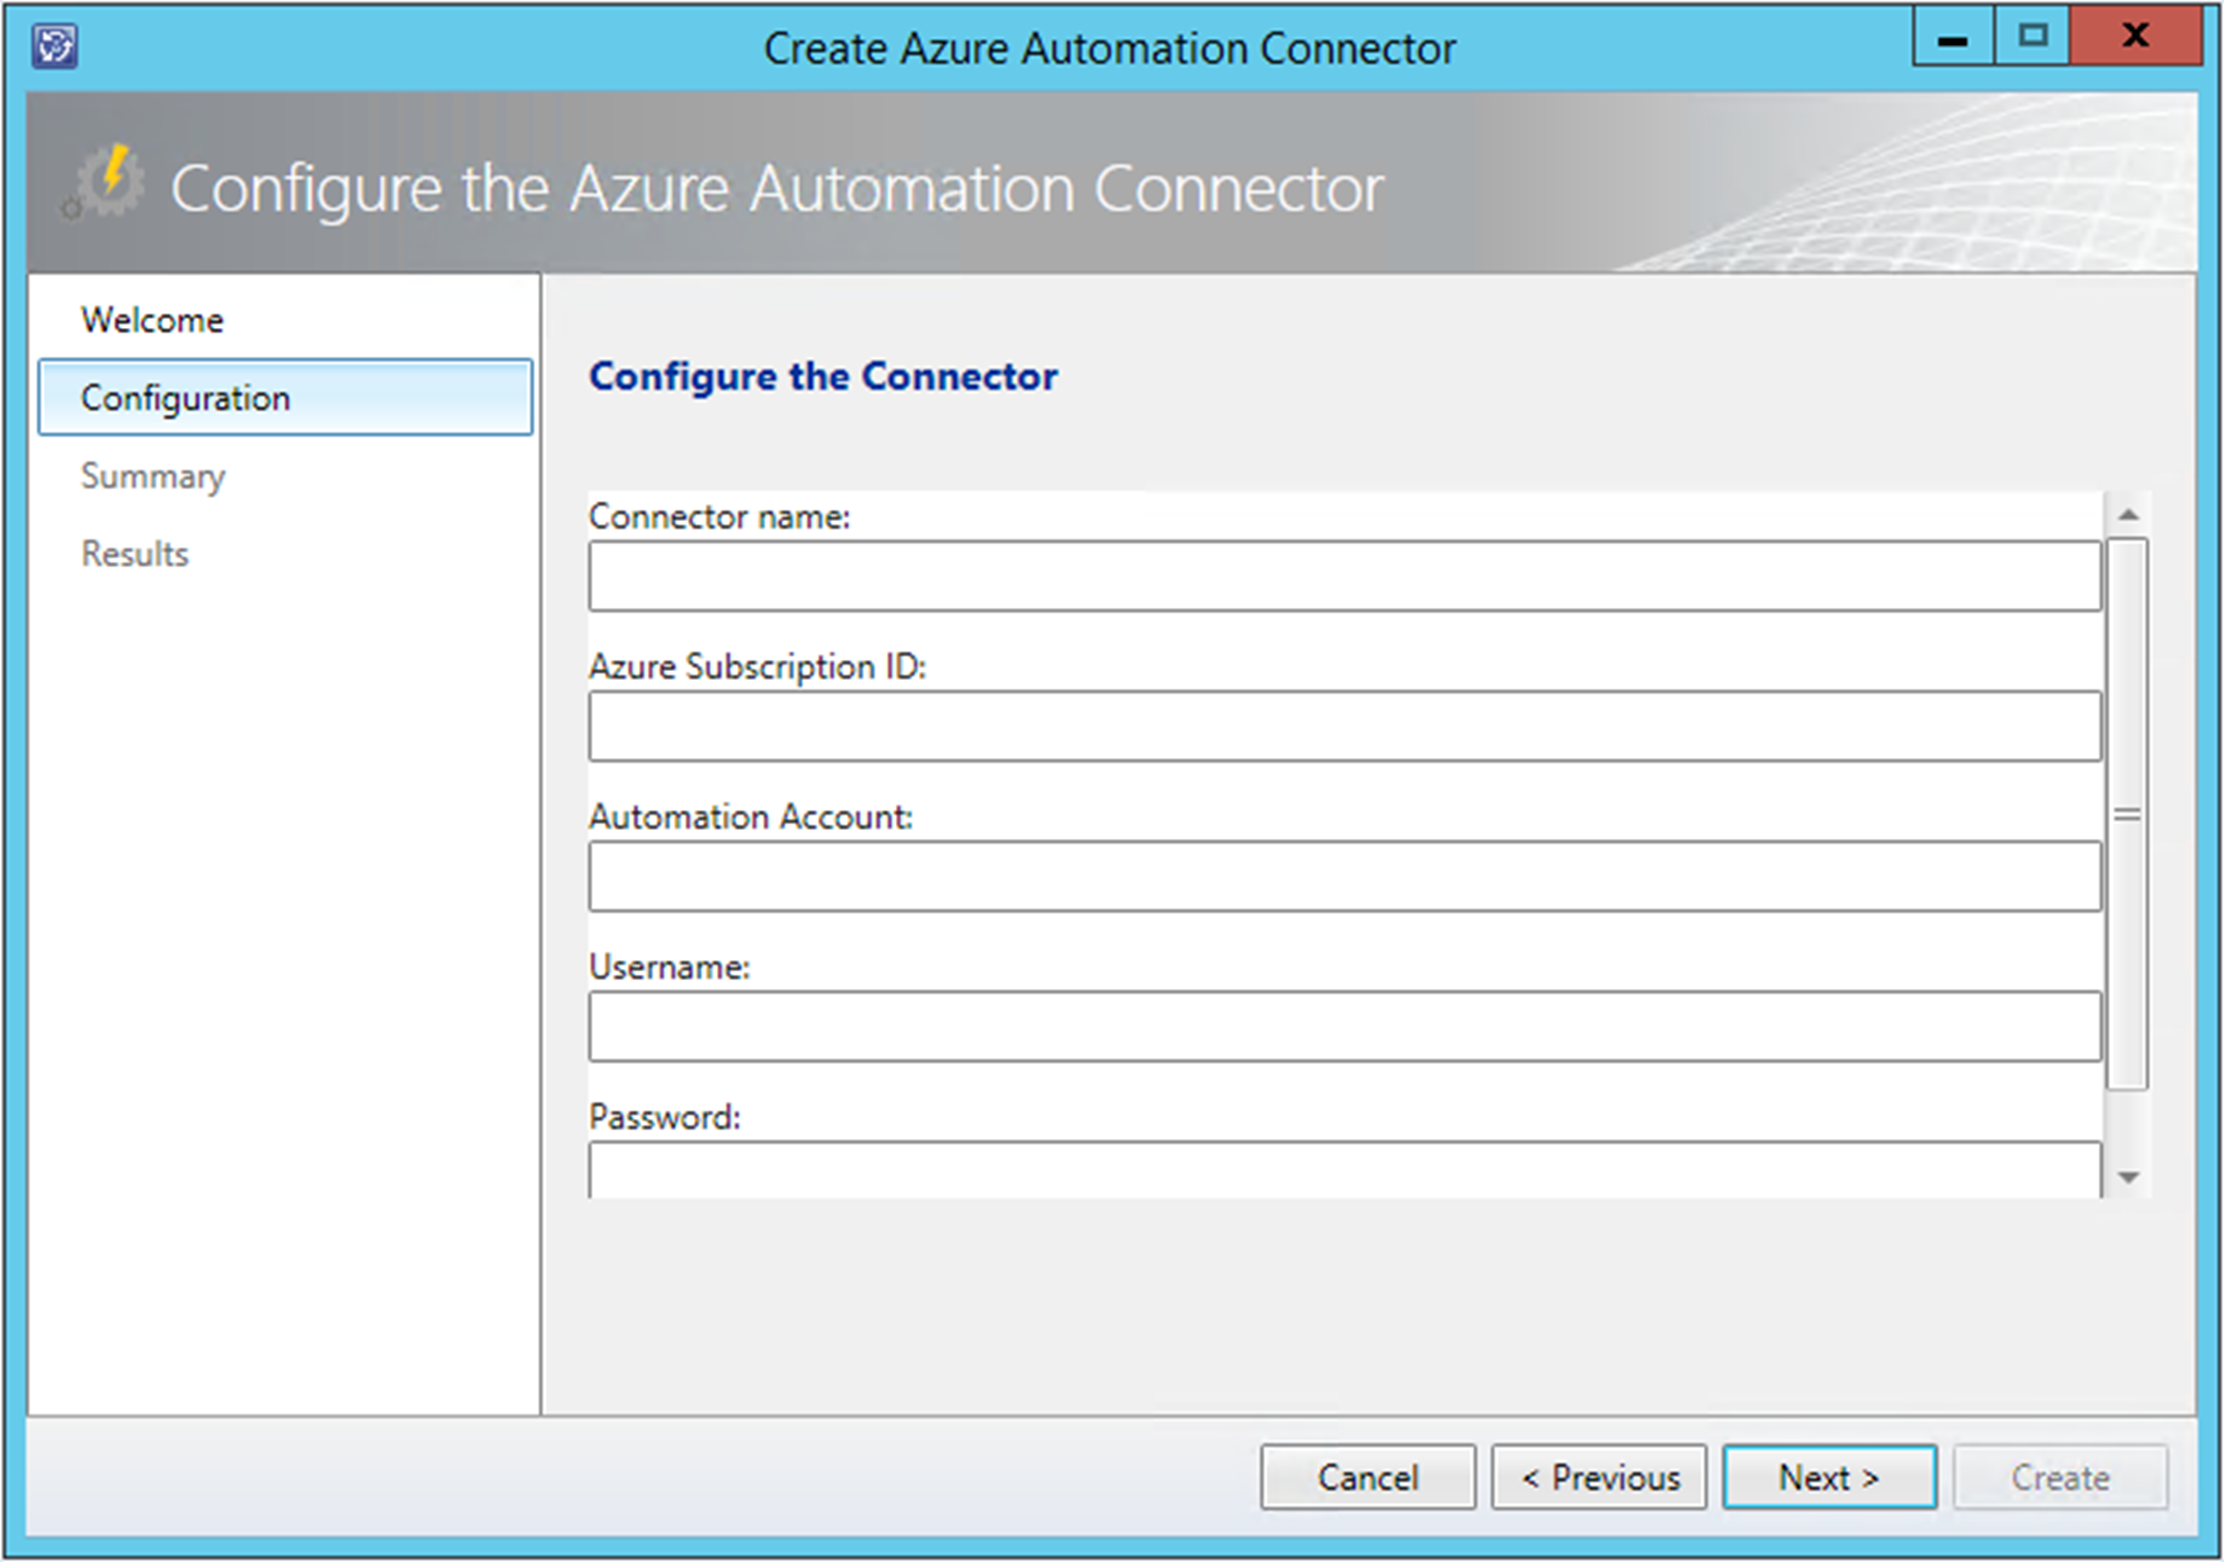
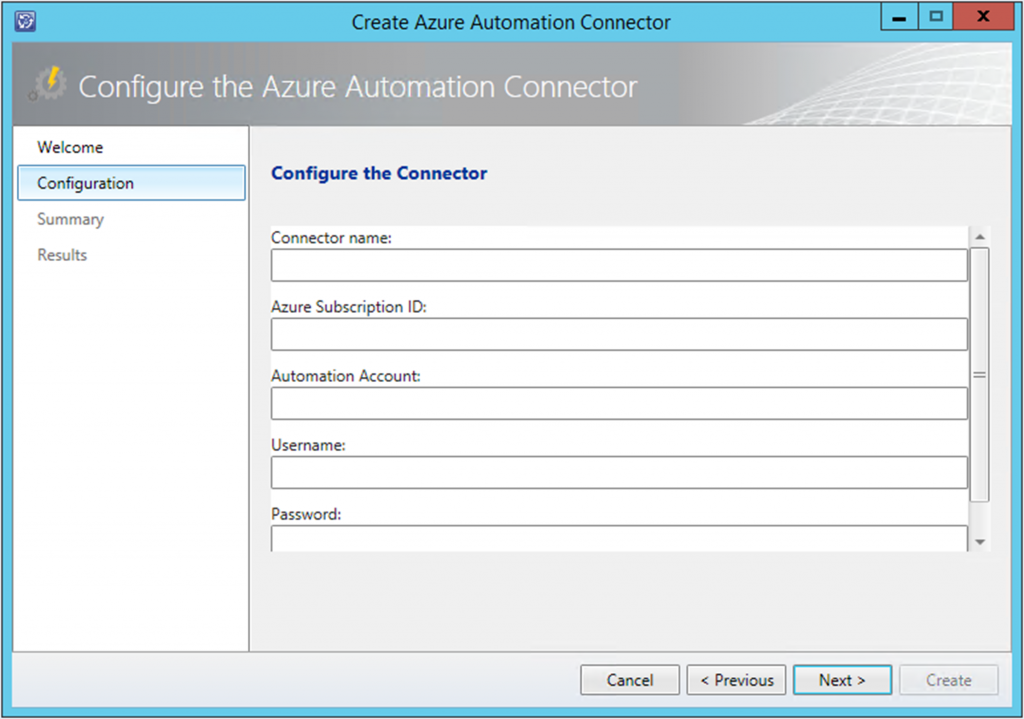
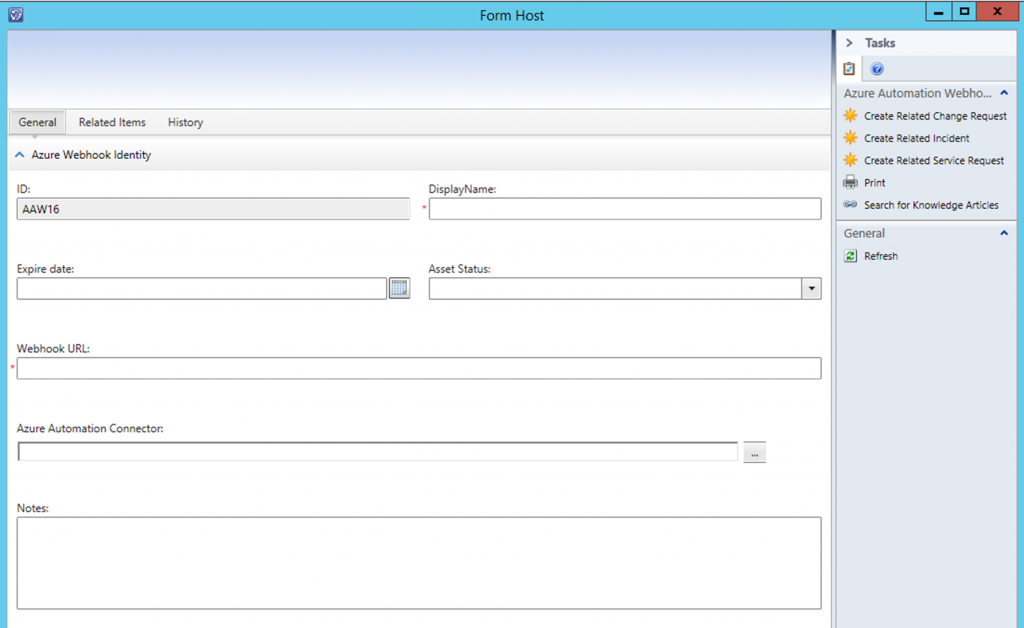
With Azure Automation there are cases where you will need to have a form that end users can go fill out to kick off an automation runbook. Back with System Center Orchestrator we could use Service Manager’s self-service portal as the front end for our automations. This was a solution that worked well. With Azure Automation we do not have that luxury at least not yet we don’t. There is a community based Azure automation webhook Service Manager (SCSM) connector in the works. One of my colleagues Rob Plank is a part of this project and says it should ready to release very soon. This connector will allow you to use the SCSM portal as the frontend of Azure Automation via webhooks, know when a webhook expires, and see a runbooks job status. Here are some teaser screenshots of the  connector.

image001

image002

There also are a few posts out there on how to leverage other platforms as the frontend for Azure Automation these are “how to use SharePoint as the frontend of Azure Automation” by Anders Bengtsson and “how to use an ASP website as the frontend to Azure Automation” by a friend of mine and fellow Microsoft MVP Florent Appointaire. Well in this post I am going to show you how to use the popular platform WordPress as the frontend for Azure Automation. The cool thing here is that this is another instance of showcasing the ability to utilize Microsoft and Open Source technologies together. 🙂

Here are the steps at a high level

  • Have an Azure Automation account on Azure
  • Setup your runbook/s in Azure Automation
  • Setup a webhook on your runbook/s in Azure Automation
  • Have a WordPress instance
  • Install Ninja Forms plugin in the WordPress instance
  • Install the Webhooks add on for Ninja Forms
  • Setup your runbook frontend form/s
  • Configure the runbook frontend form/s to connect to the Azure Automation webhook

Let’s get started!

Step 1: Have an Azure Automation account on Azure

To get started with Azure Automation go here: https://azure.microsoft.com/en-us/documentation/articles/automation-intro. I am not going to cover this within this blog post.

Step 2: Setup your runbook/s in Azure Automation

For this testing this scenario and this post I grabbed a couple of Azure Automation runbooks built by the Microsoft AzureAutomationTeam and made available in the Azure Automation Runbook Gallery. These runbooks start and stop Azure virtual machines.

Runbook #1 Name:

Start-AzureV2VMs

Description:

This runbook connects to Azure and starts all VMs in an Azure subscription or resource group.

Runbook #2 Name:

Stop-AzureV2VMs

Description:

This runbook connects to Azure and stops all VMs in an Azure subscription or resource group.

Both runbooks have two parameters they need. These are:

param (

[Parameter(Mandatory=$false)]

[String]  $AzureConnectionAssetName = “AzureRunAsConnection”,

[Parameter(Mandatory=$false)]

[String] $ResourceGroupName

We need to pay attention to these when setting up the webhooks and these often become your fields on your front end form.

Step 3: Setup a webhook on your runbook/s in Azure Automation

Here are the steps to setup a webhook for an Azure Automation Runbook.

First off make sure your runbook/s are in a published authoring status.

image003

Within https://portal.azure.com Navigate to

YOURAZUREAUTOMATIONACCOUNT

Runbooks

YOURRUNBOOK (Start-AzureV2VMs)
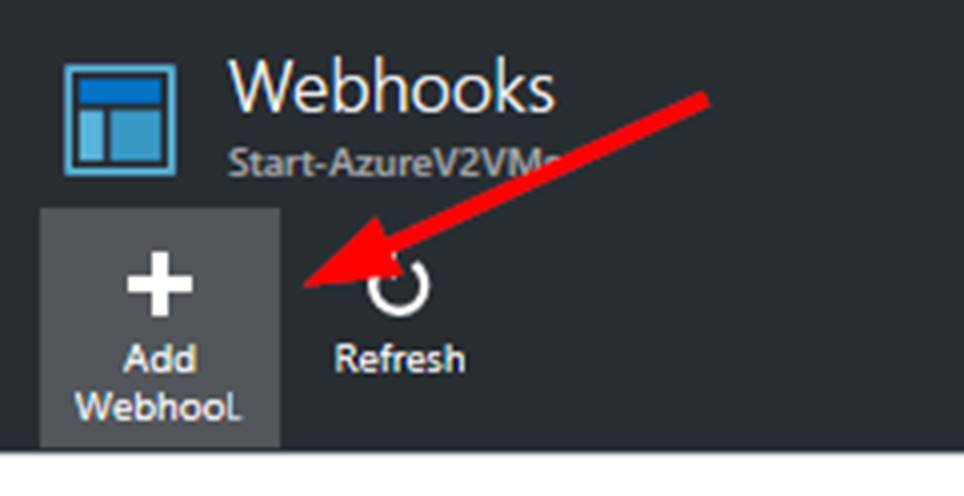
Webhooks

From here click on the Add Webhook button.

image004

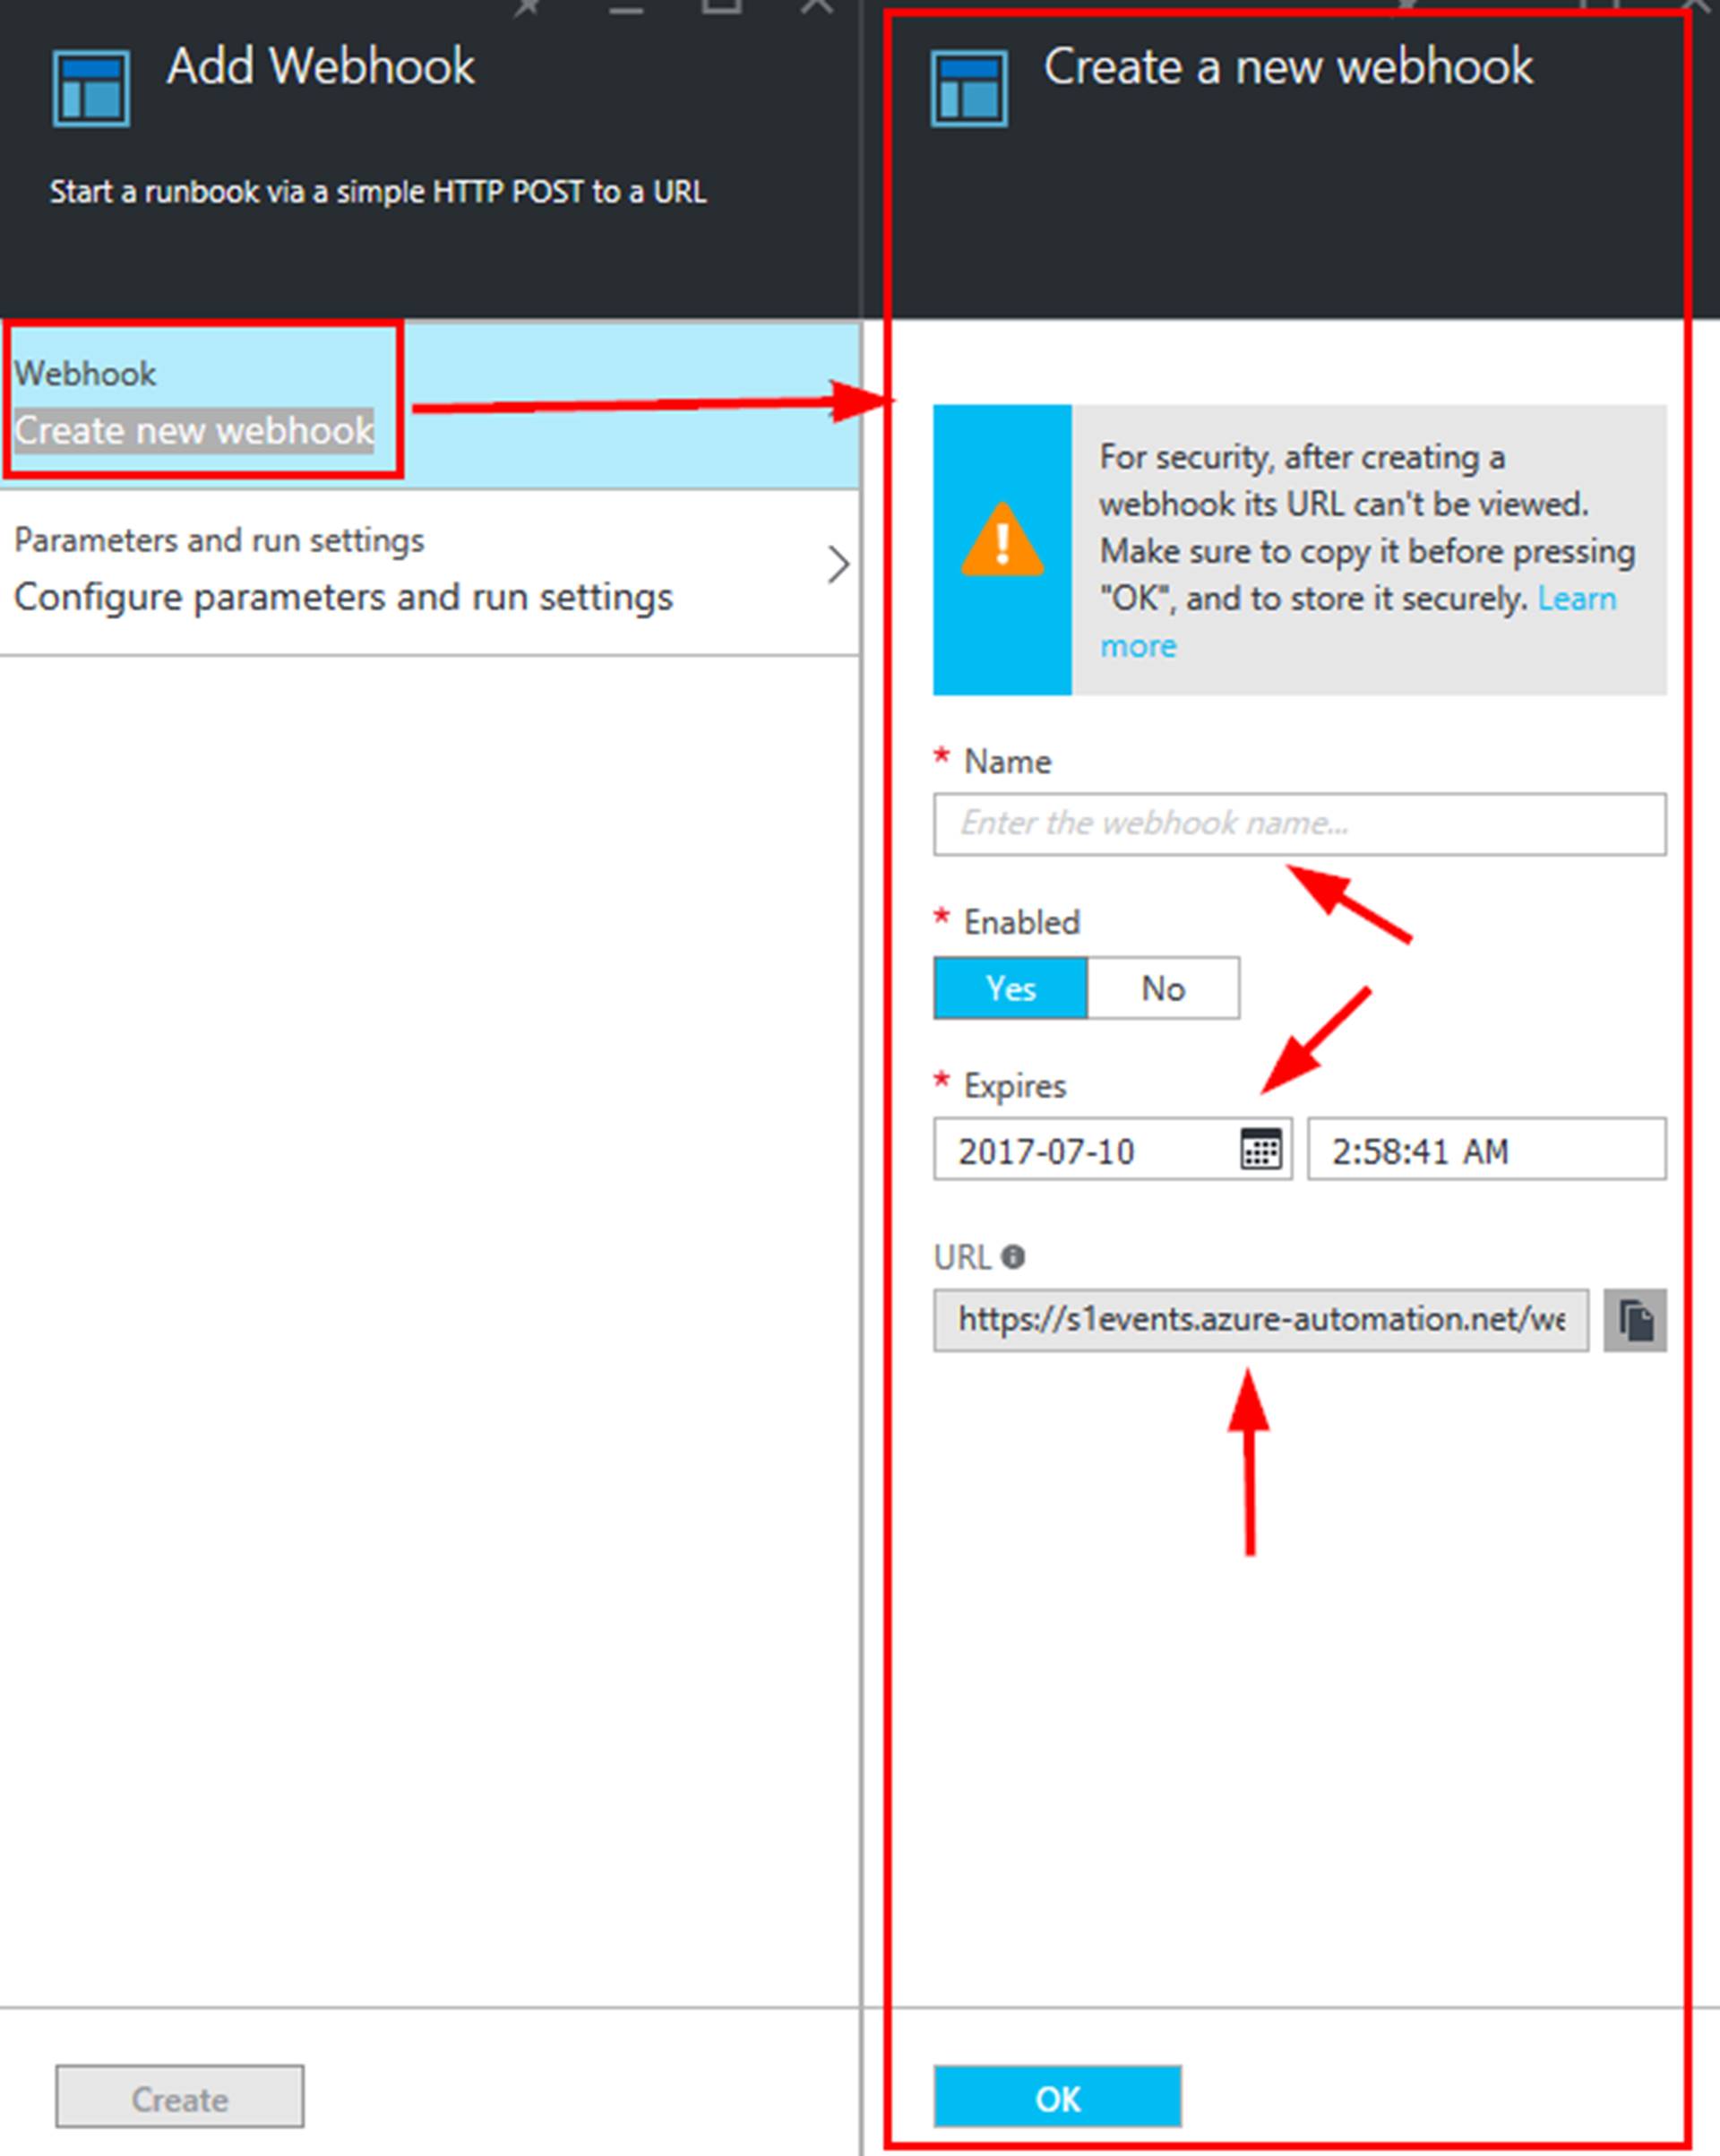
The Add Webhook blade will fly out. Here you will want to click on Create new webhook to make the next blade flyout.

Here you need to give your webhook a name, set to enabled, set when it will expire and COPY THE URL TO A SAFE PLACE.

NOTE: You will not be able to access the webhook URL after this.

image005

Click OK.

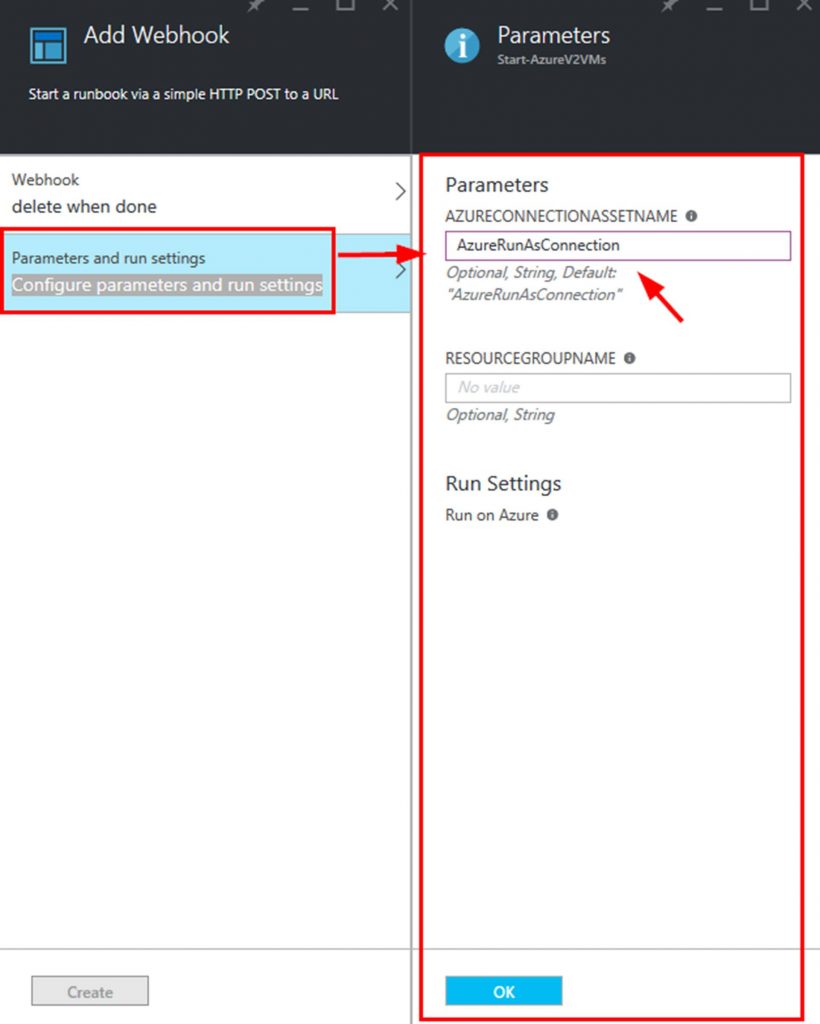
Next you need to click on Configure parameters and run settings. This is where you set the parameters from the runbook.

If your parameters are required you have to set them here. If they are optional you can leave them blank here and pass the data into the runbook from the frontend form via a $WebhookData object.

In my case I put AzureRunAsConnection directly in the webhook. I created a credentials asset in Azure Automation with the account containing the needed permissions to perform the actions from the runbook in my Azure account (Start/Stop VM’s).

I left the resourcegroupname blank as I will pass this in from the front end form. I left the Run Settings to run on Azure as I do not have a Hybrid Worker setup.

NOTE: A Hybrid Worker lets you run automation runbooks on premises in your data center.

image006

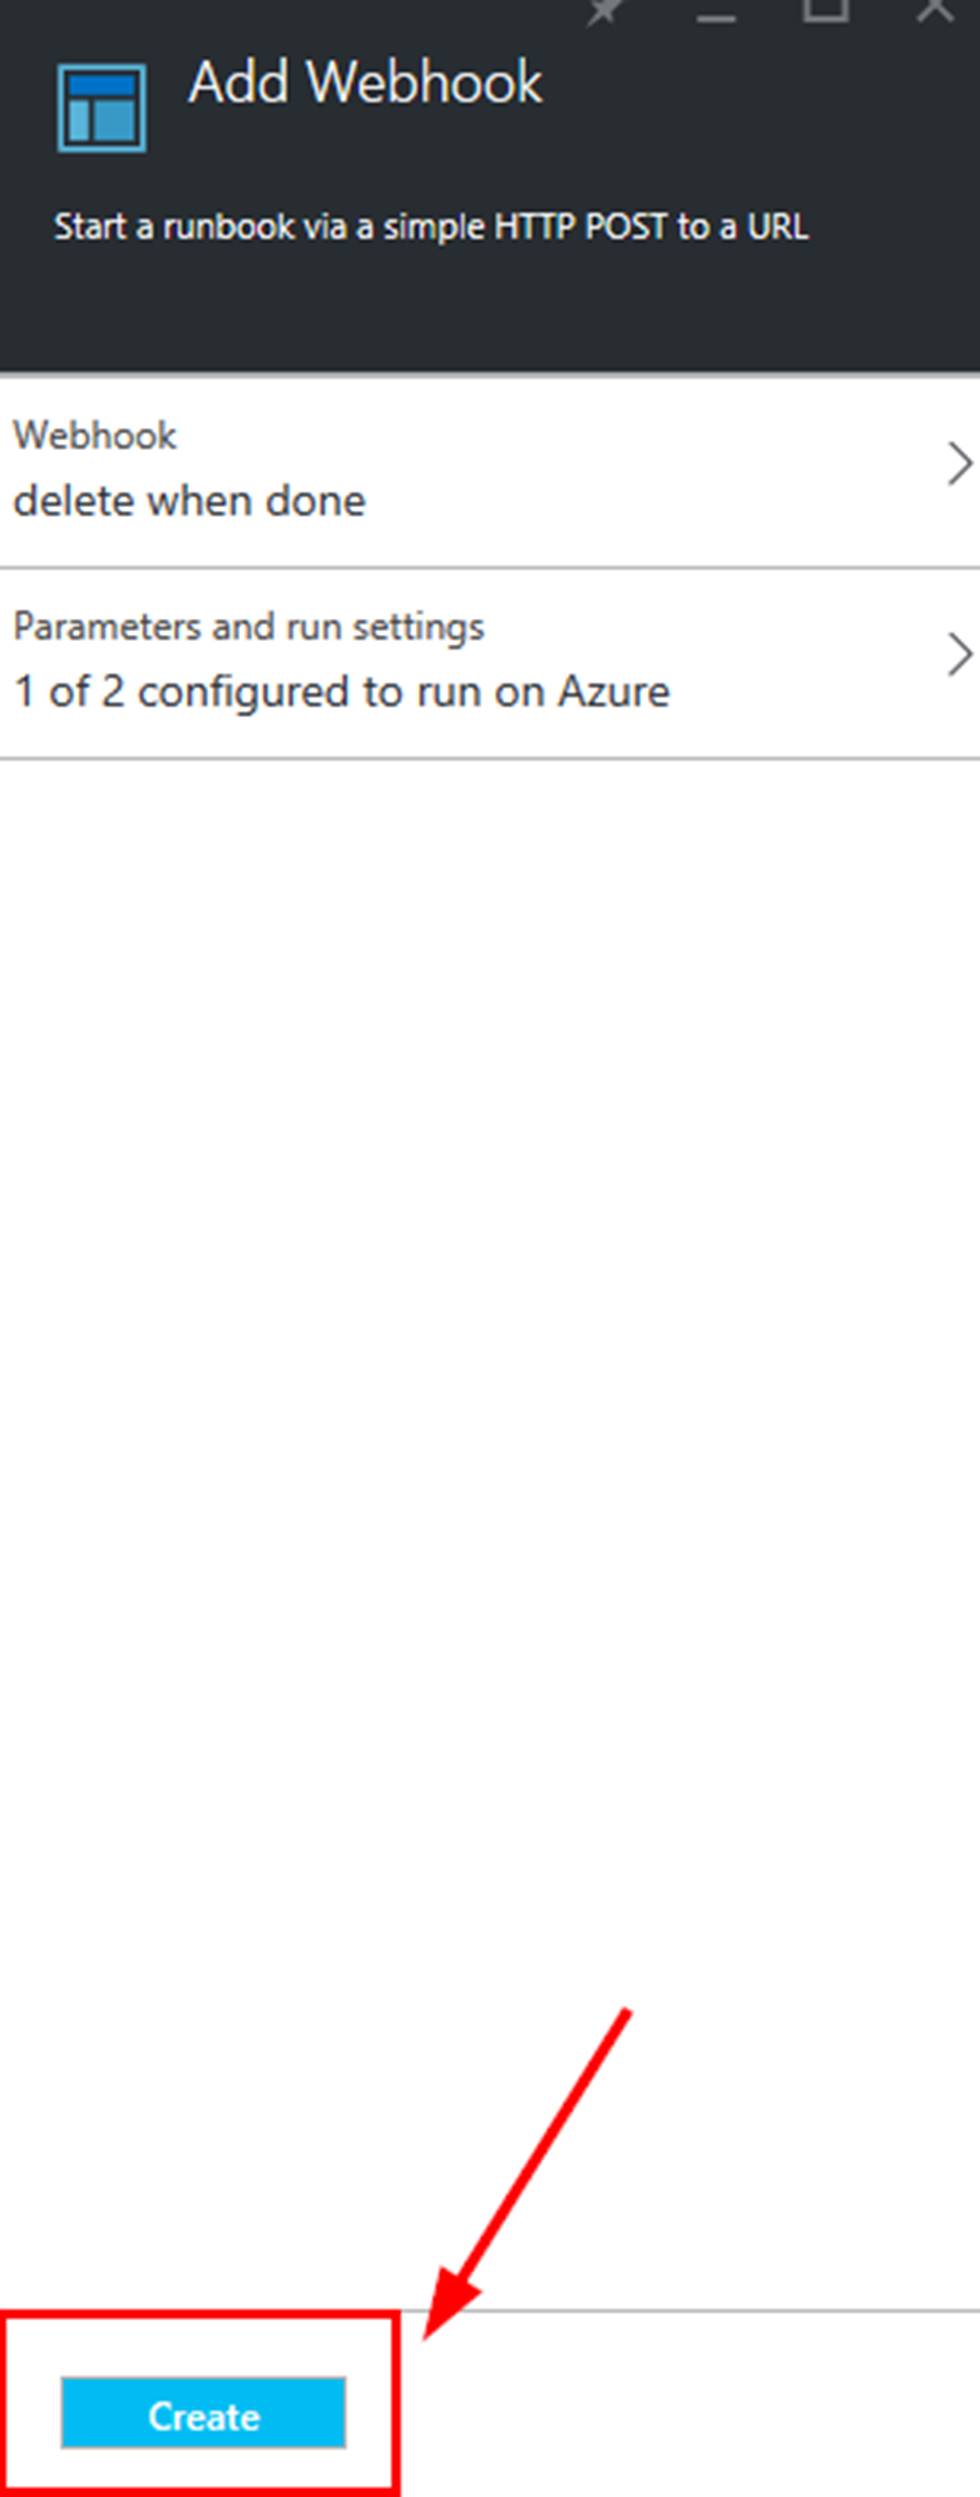
One you have the Webhook and parameters configured click on the Create button to actually create the webhook.

image007

You will now see your new webhook in the webhooks blade.

image008

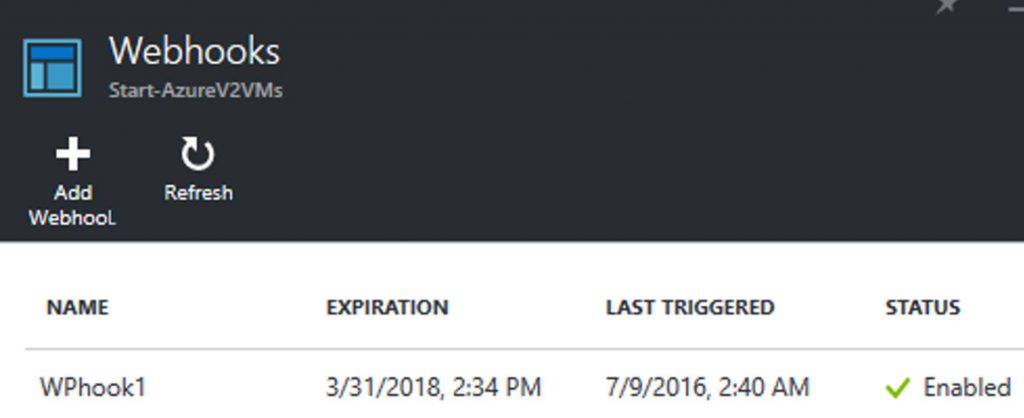
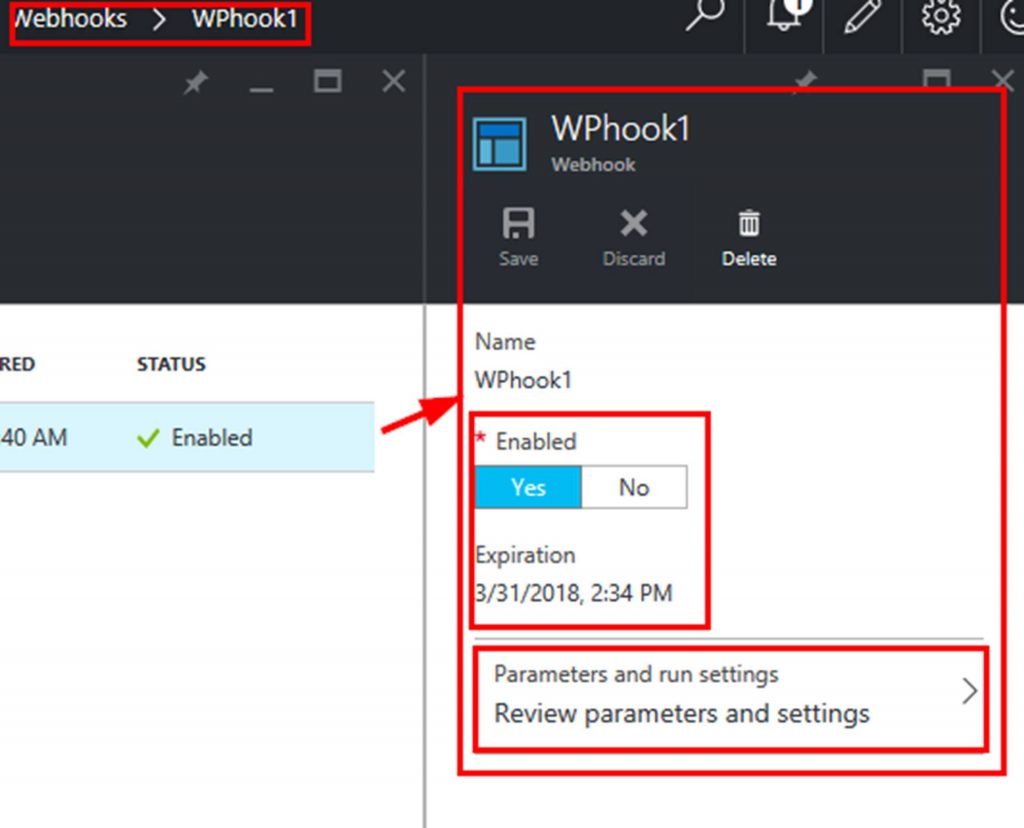
Note that if you click on a webhook you will not see the URL. You can enable or disable the webhook, see when it expires, and access the parameters. This is shown in the following screenshot.

image009

Step 4: Have a WordPress instance

You can host WordPress on WordPress.org on a hosting account, internally or even on Azure. Here is a link to a tutorial on how to run WordPress on Azure. https://azure.microsoft.com/en-us/documentation/articles/app-service-web-create-web-app-from-marketplace.  I am not going to cover how to setup a WordPress instance within this blog post.

Step 5: Install Ninja Forms plugin in the WordPress instance

Here are the steps to install Ninja Forms WordPress plugin.

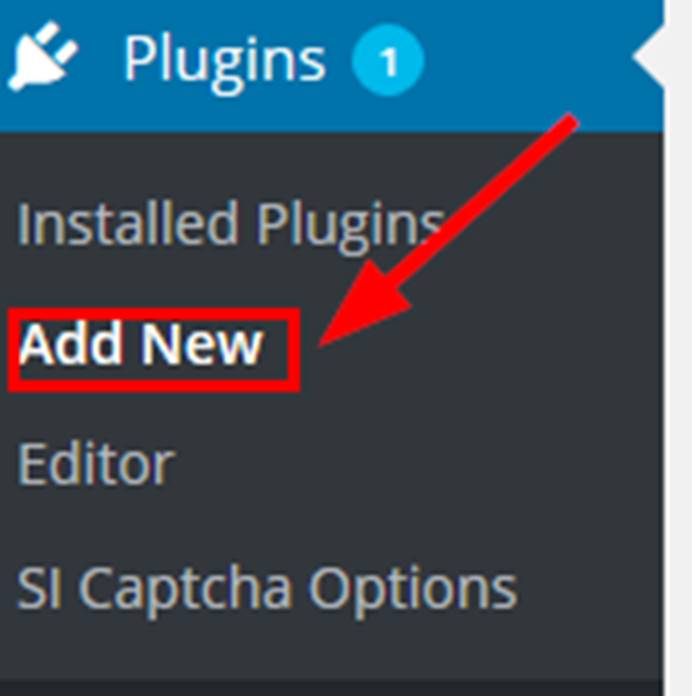
From within the WordPress admin dashboard click on Plugins.

Click on Add New.

image010

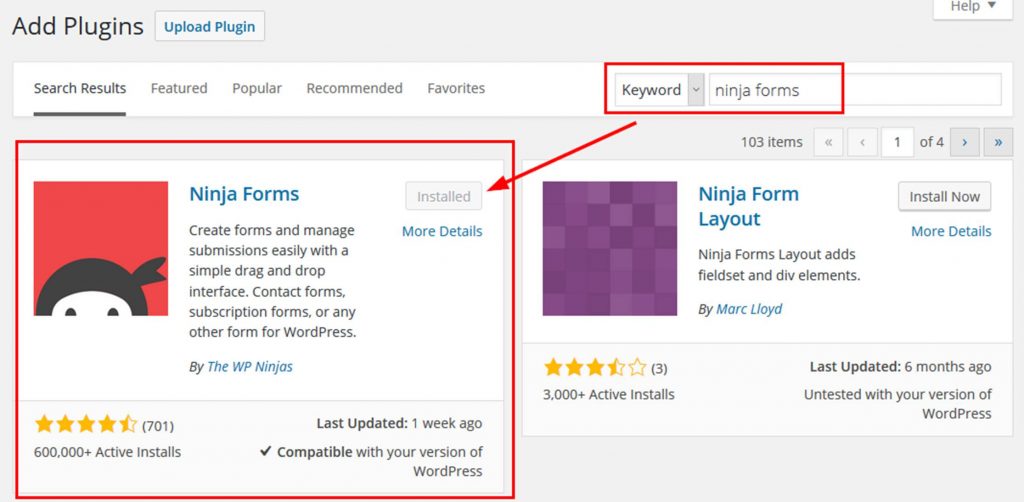
Search for Ninja Forms. Click on the Install button to add the plugin. Make sure you activate the plugin.

image011

You also could manually download and upload the plugin or load it directly into the plugins directory. I have shown you the steps for the easiest way to install it.

The Ninja Forms plugin page can be found here:

https://wordpress.org/plugins/ninja-forms

Step 6: Install the Webhooks add on for Ninja Forms

The Webhooks for Ninja Forms add on can be found here:

https://ninjaforms.com/webhooks-for-ninja-forms

This add on has to be purchased. It is $39 by itself for 1 WordPress instance.

After you buy it you will get the files for download. Again from within the WordPress admin dashboard click on Plugins.

Click on Add New. This time click on the Upload Plugin button and browse to your downloaded Webhooks for Ninja Forms zip folder.

After it is uploaded be sure to activate it.

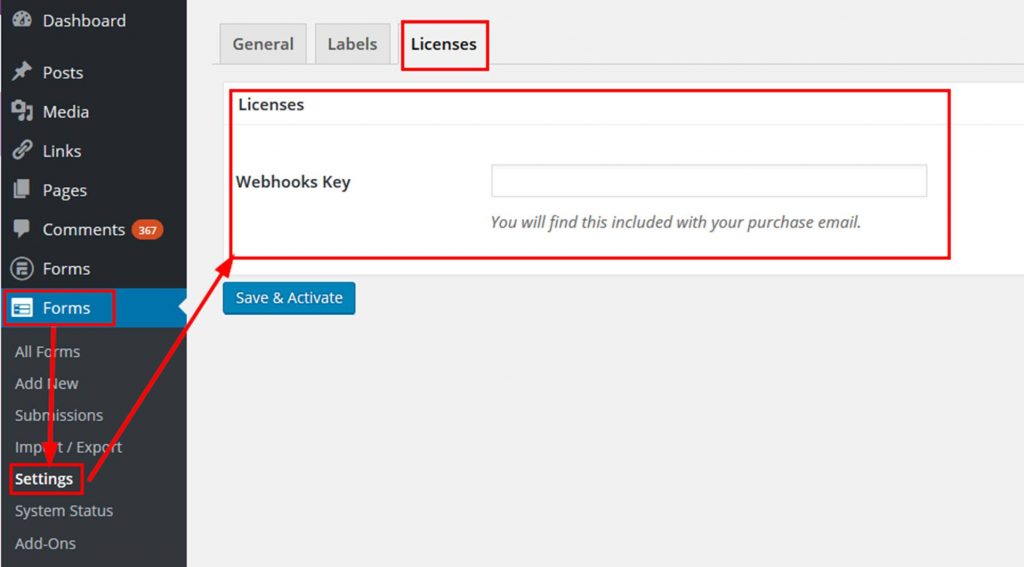
The final step is to install the license for the add on. To do this Click on Forms>Settings>Licenses and input the key that Ninja Forms sent in the Webhooks Key field. Click on Save & Activate.

image013

Step 7: Setup your runbook frontend form/s

Next we need to build the actual form. To do this follow the list of steps.

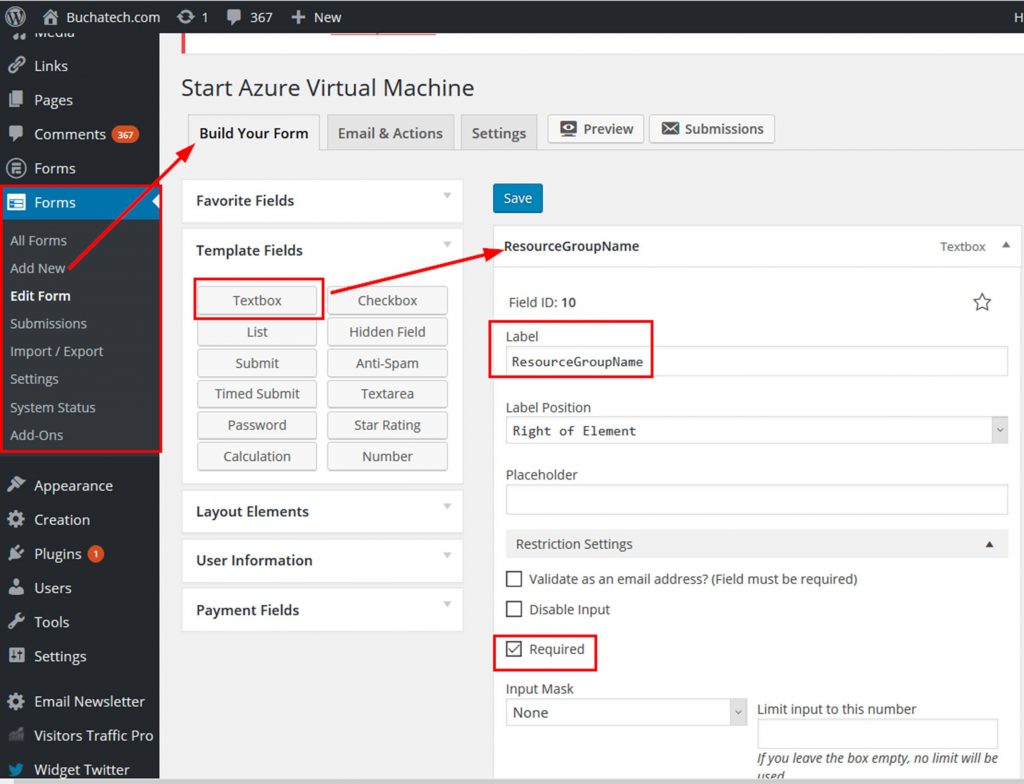
Click on Forms>Add New. Give your form a Title.

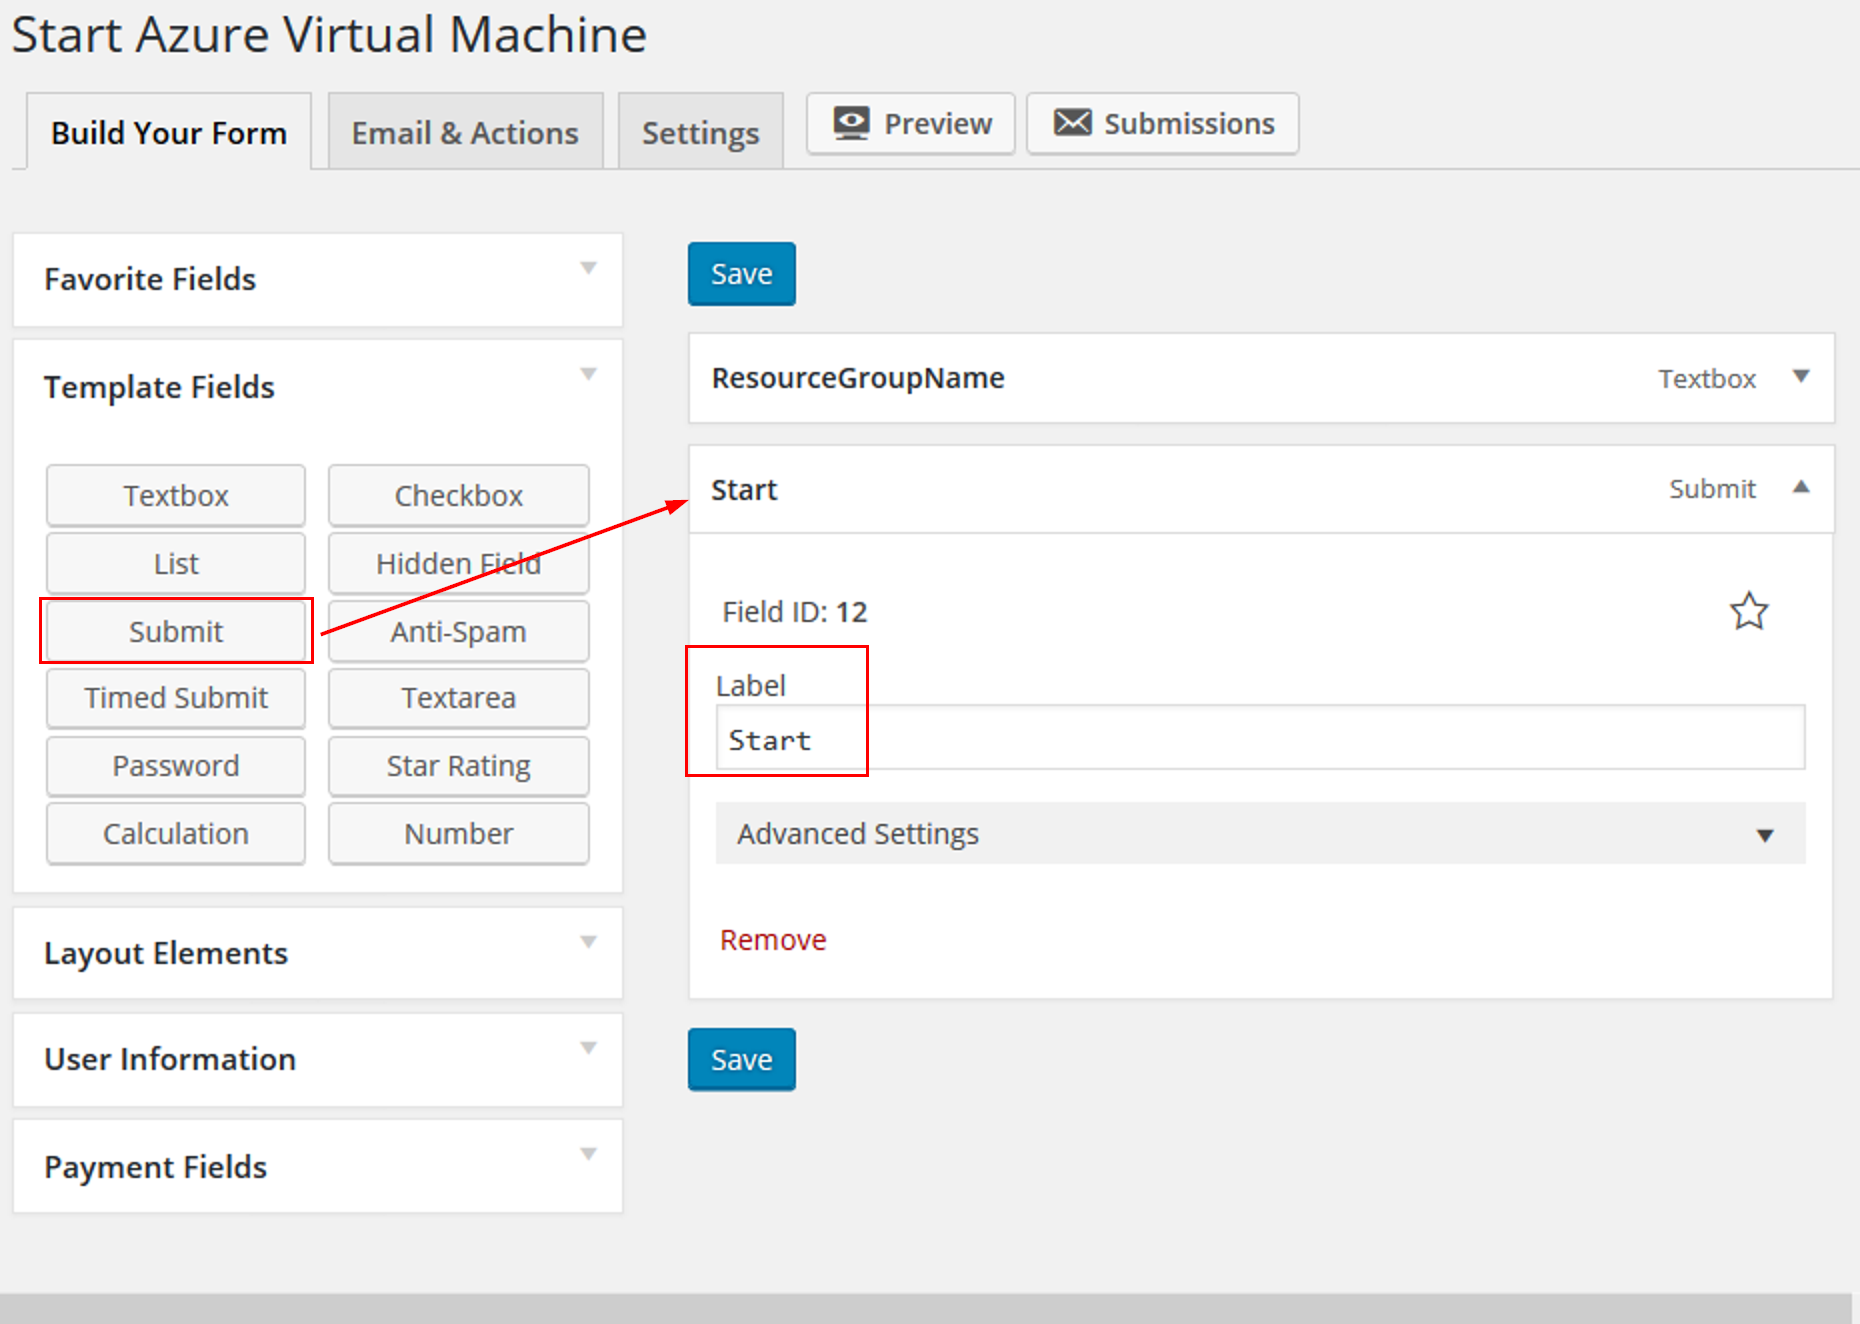
Add a Textbox and put in the label of ResourceGroupName.

I like to make it Required.

image014

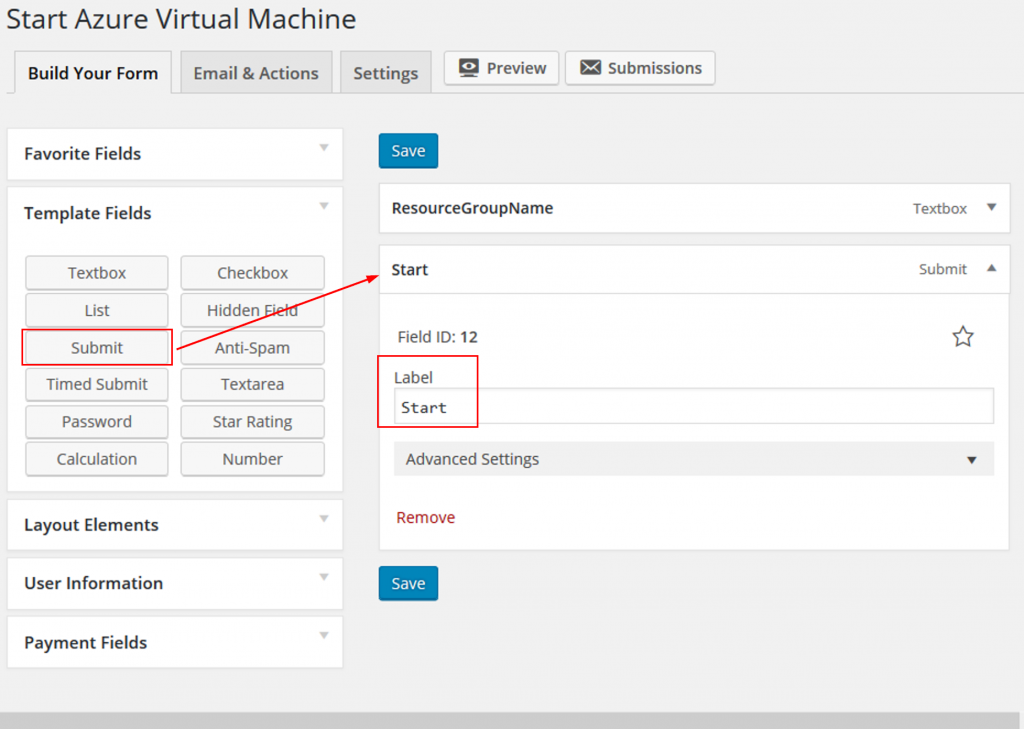
Add a Submit button to your form. I labeled it Start.

image015

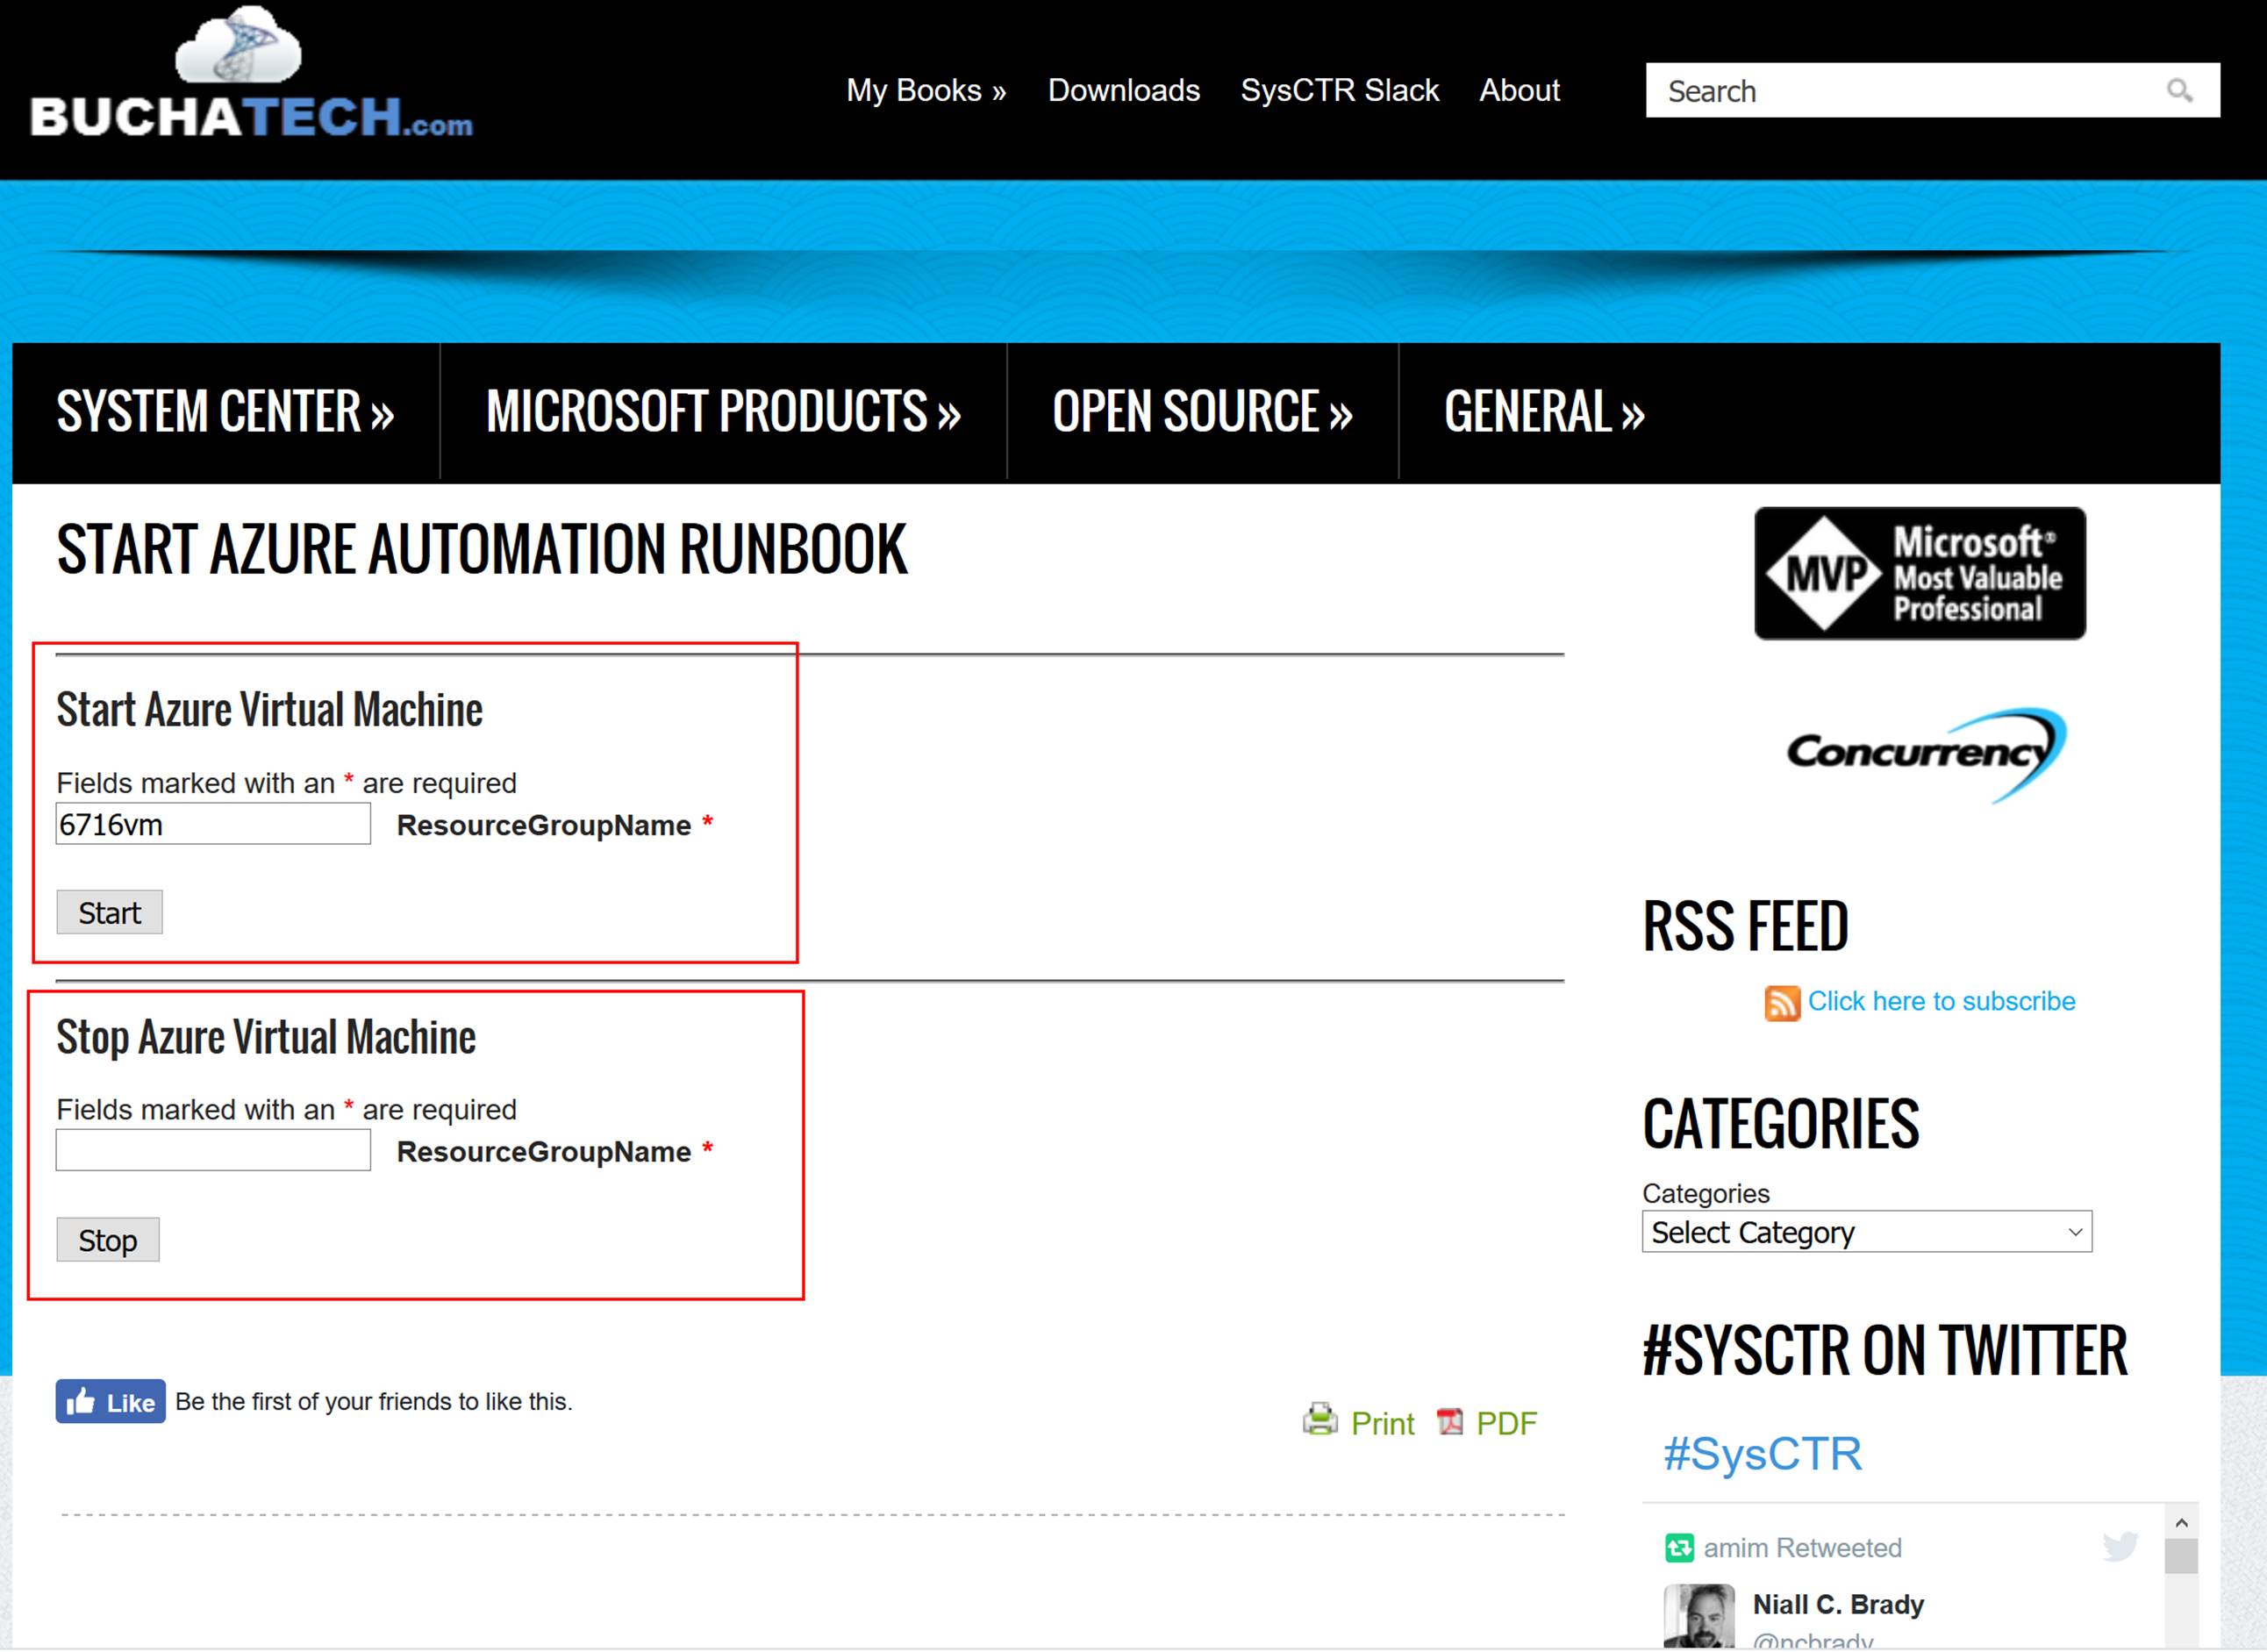
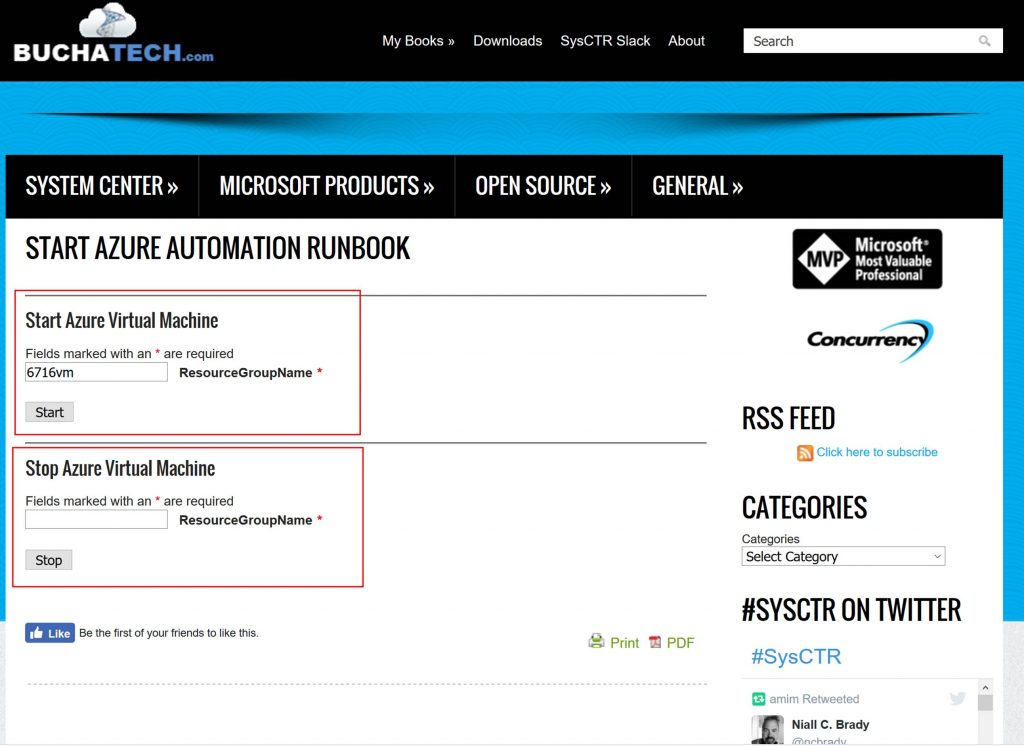
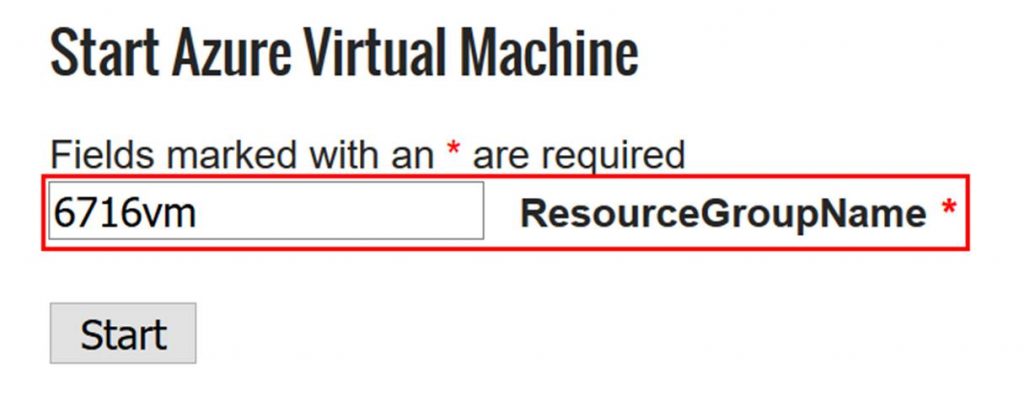
In the following screenshot is what the form looks like. Note that I have both forms loaded on the same page.

image016

Step 8: Configure the runbook frontend form/s to connect to the Azure Automation webhook

Now is the last step. This is the step in which we configure the form to send data to the Auzre Automation webhook upon submission. This is doing it via POST method.

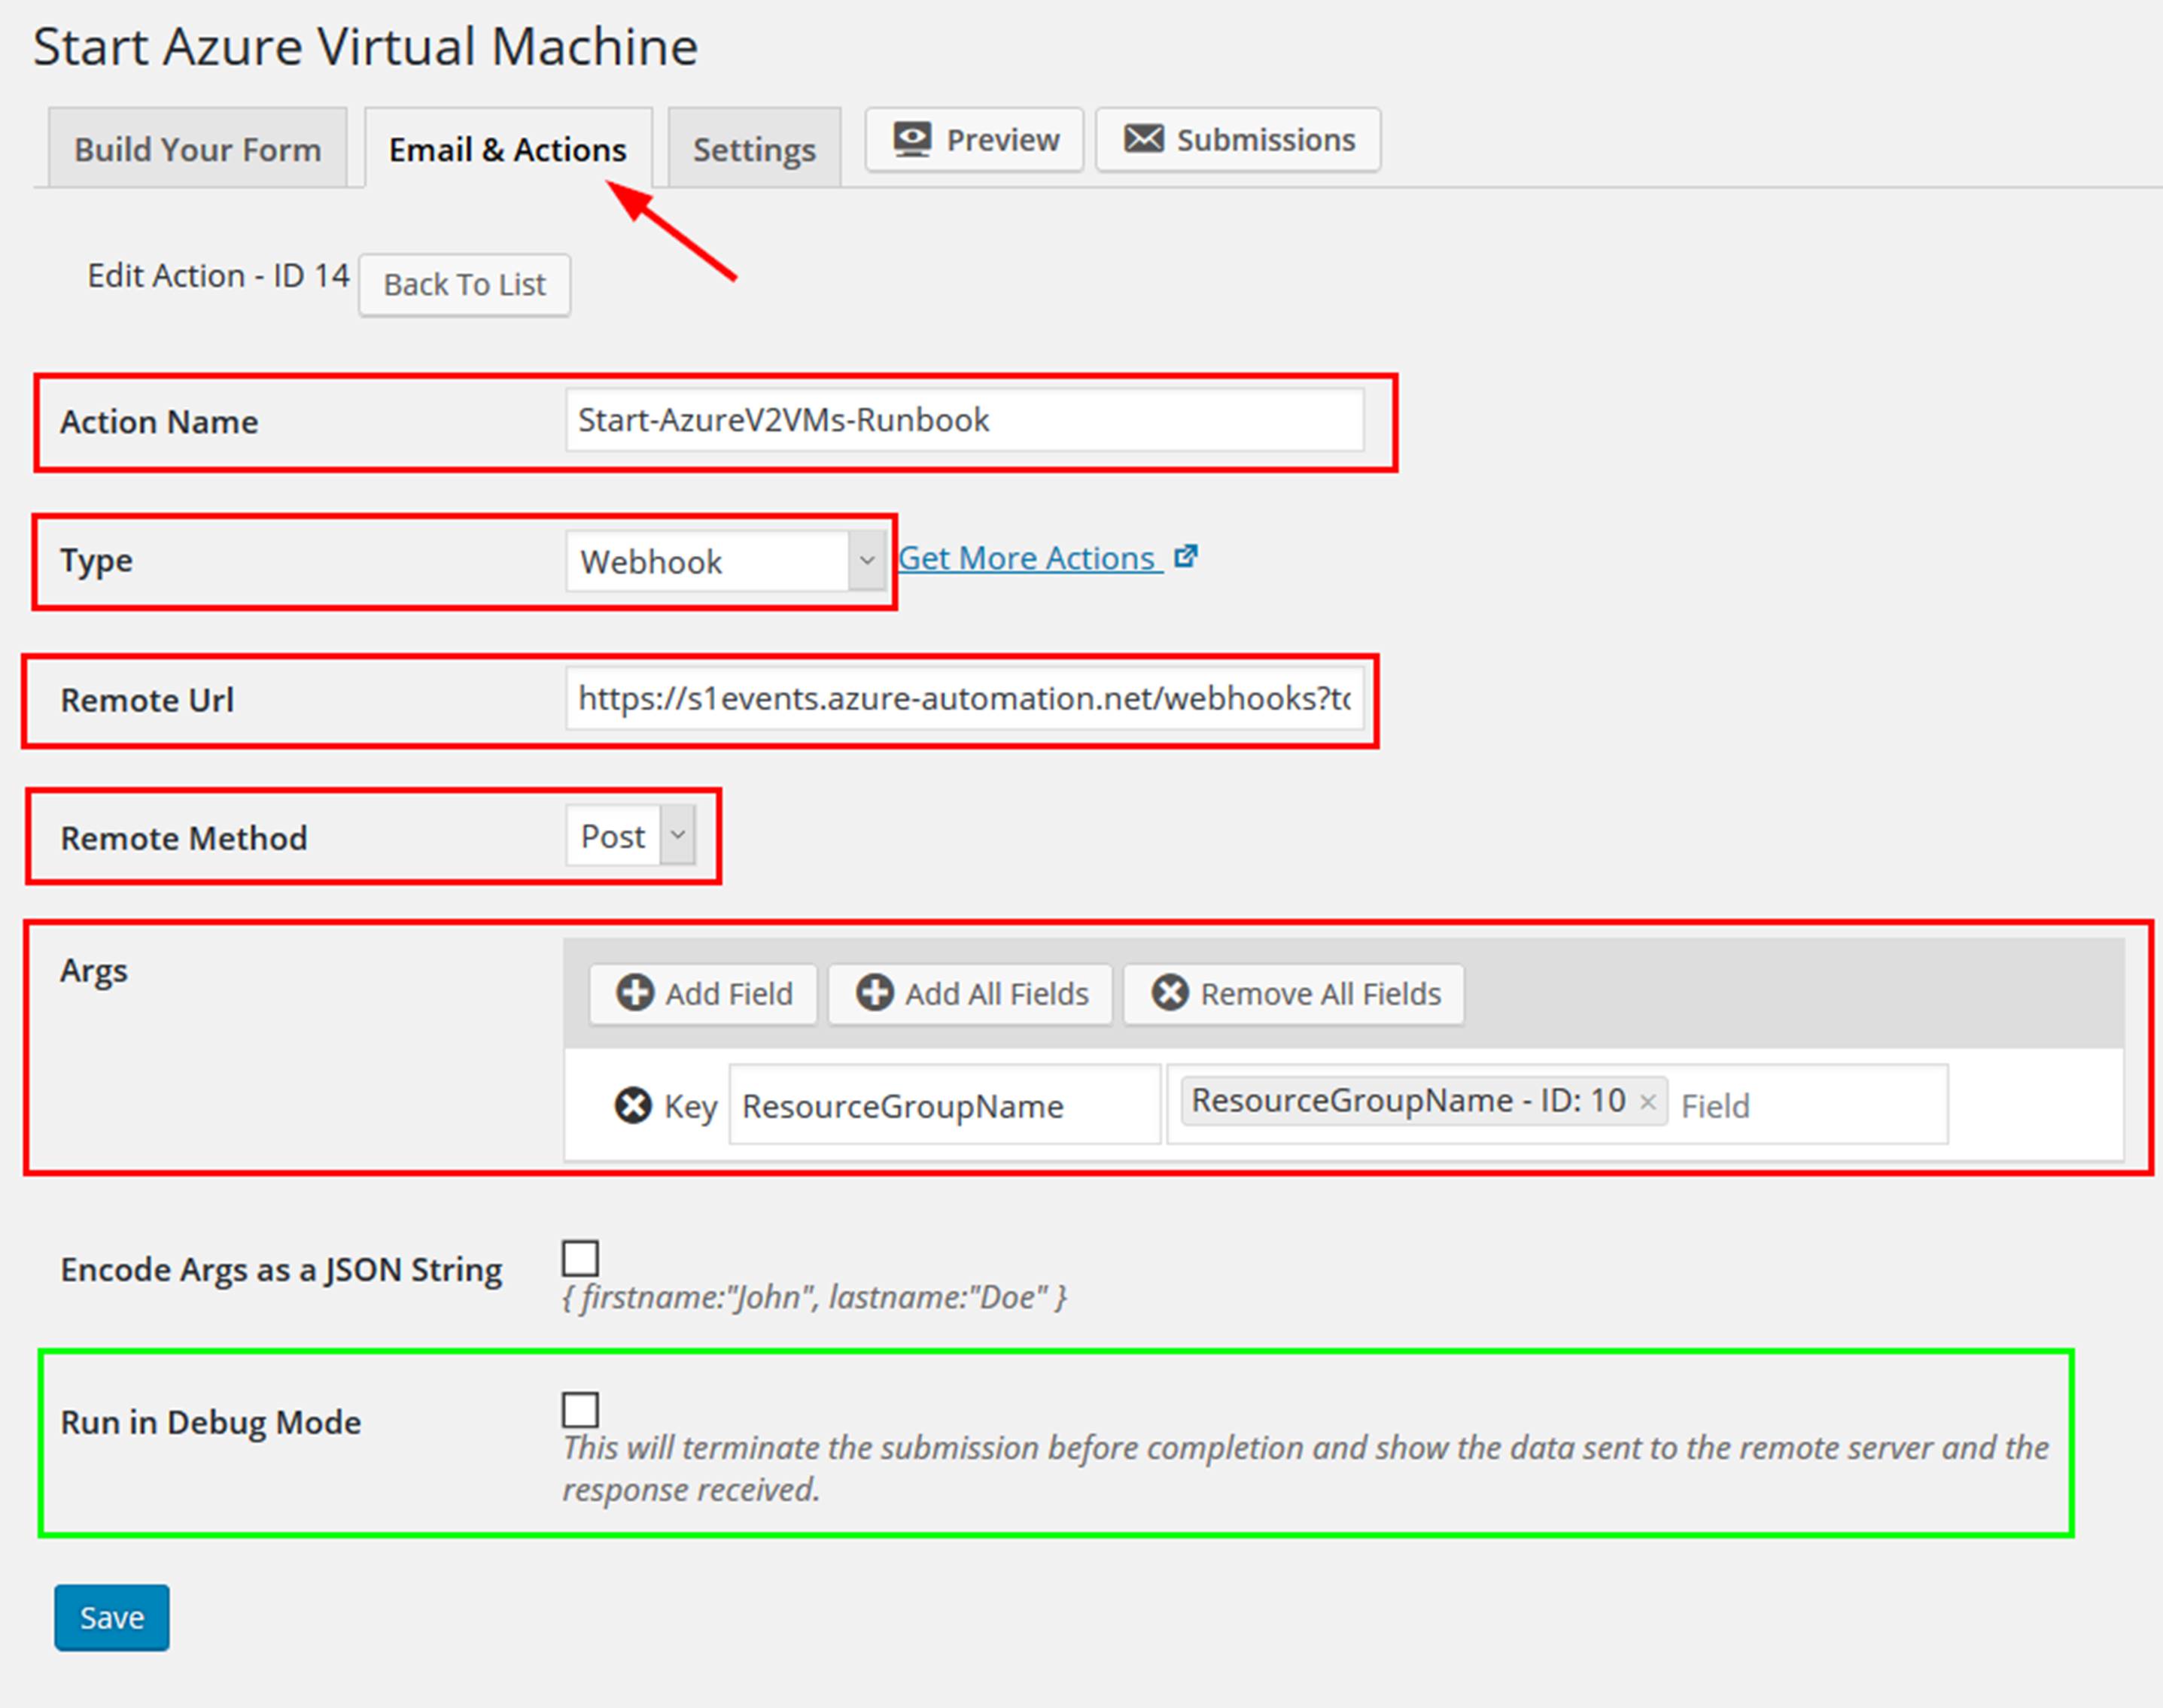
When editing the form click on the Email & Actions tab. Click on the Add New button.

Give this Action a name.

In the Type dropdown select Webhook.

Enter the Azure Automation webhook URL in the Remote Url field.

Select Post for the Remote Method.

For Args select enter the name of and select the field from your form of the parameters you need to send to the Azure Automation runbook.

You can see this all represented in the following screenshot.

image017

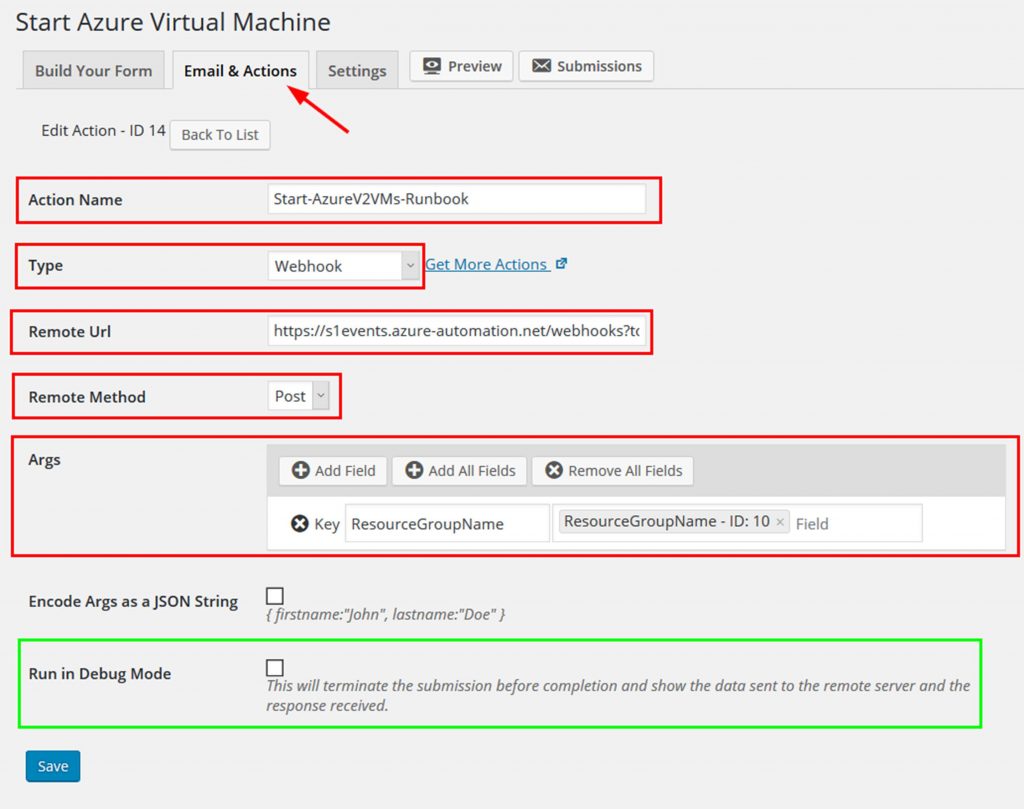
One of the cool things about this solution is we can test the webhook action before actually submitting it to make sure it will work as expected. This testing can be turned on by checking the Run in Debug Mode field. I have highlighted this in the screenshot in green. Checking this box and submitting the form will show debugging information like data sent and response.

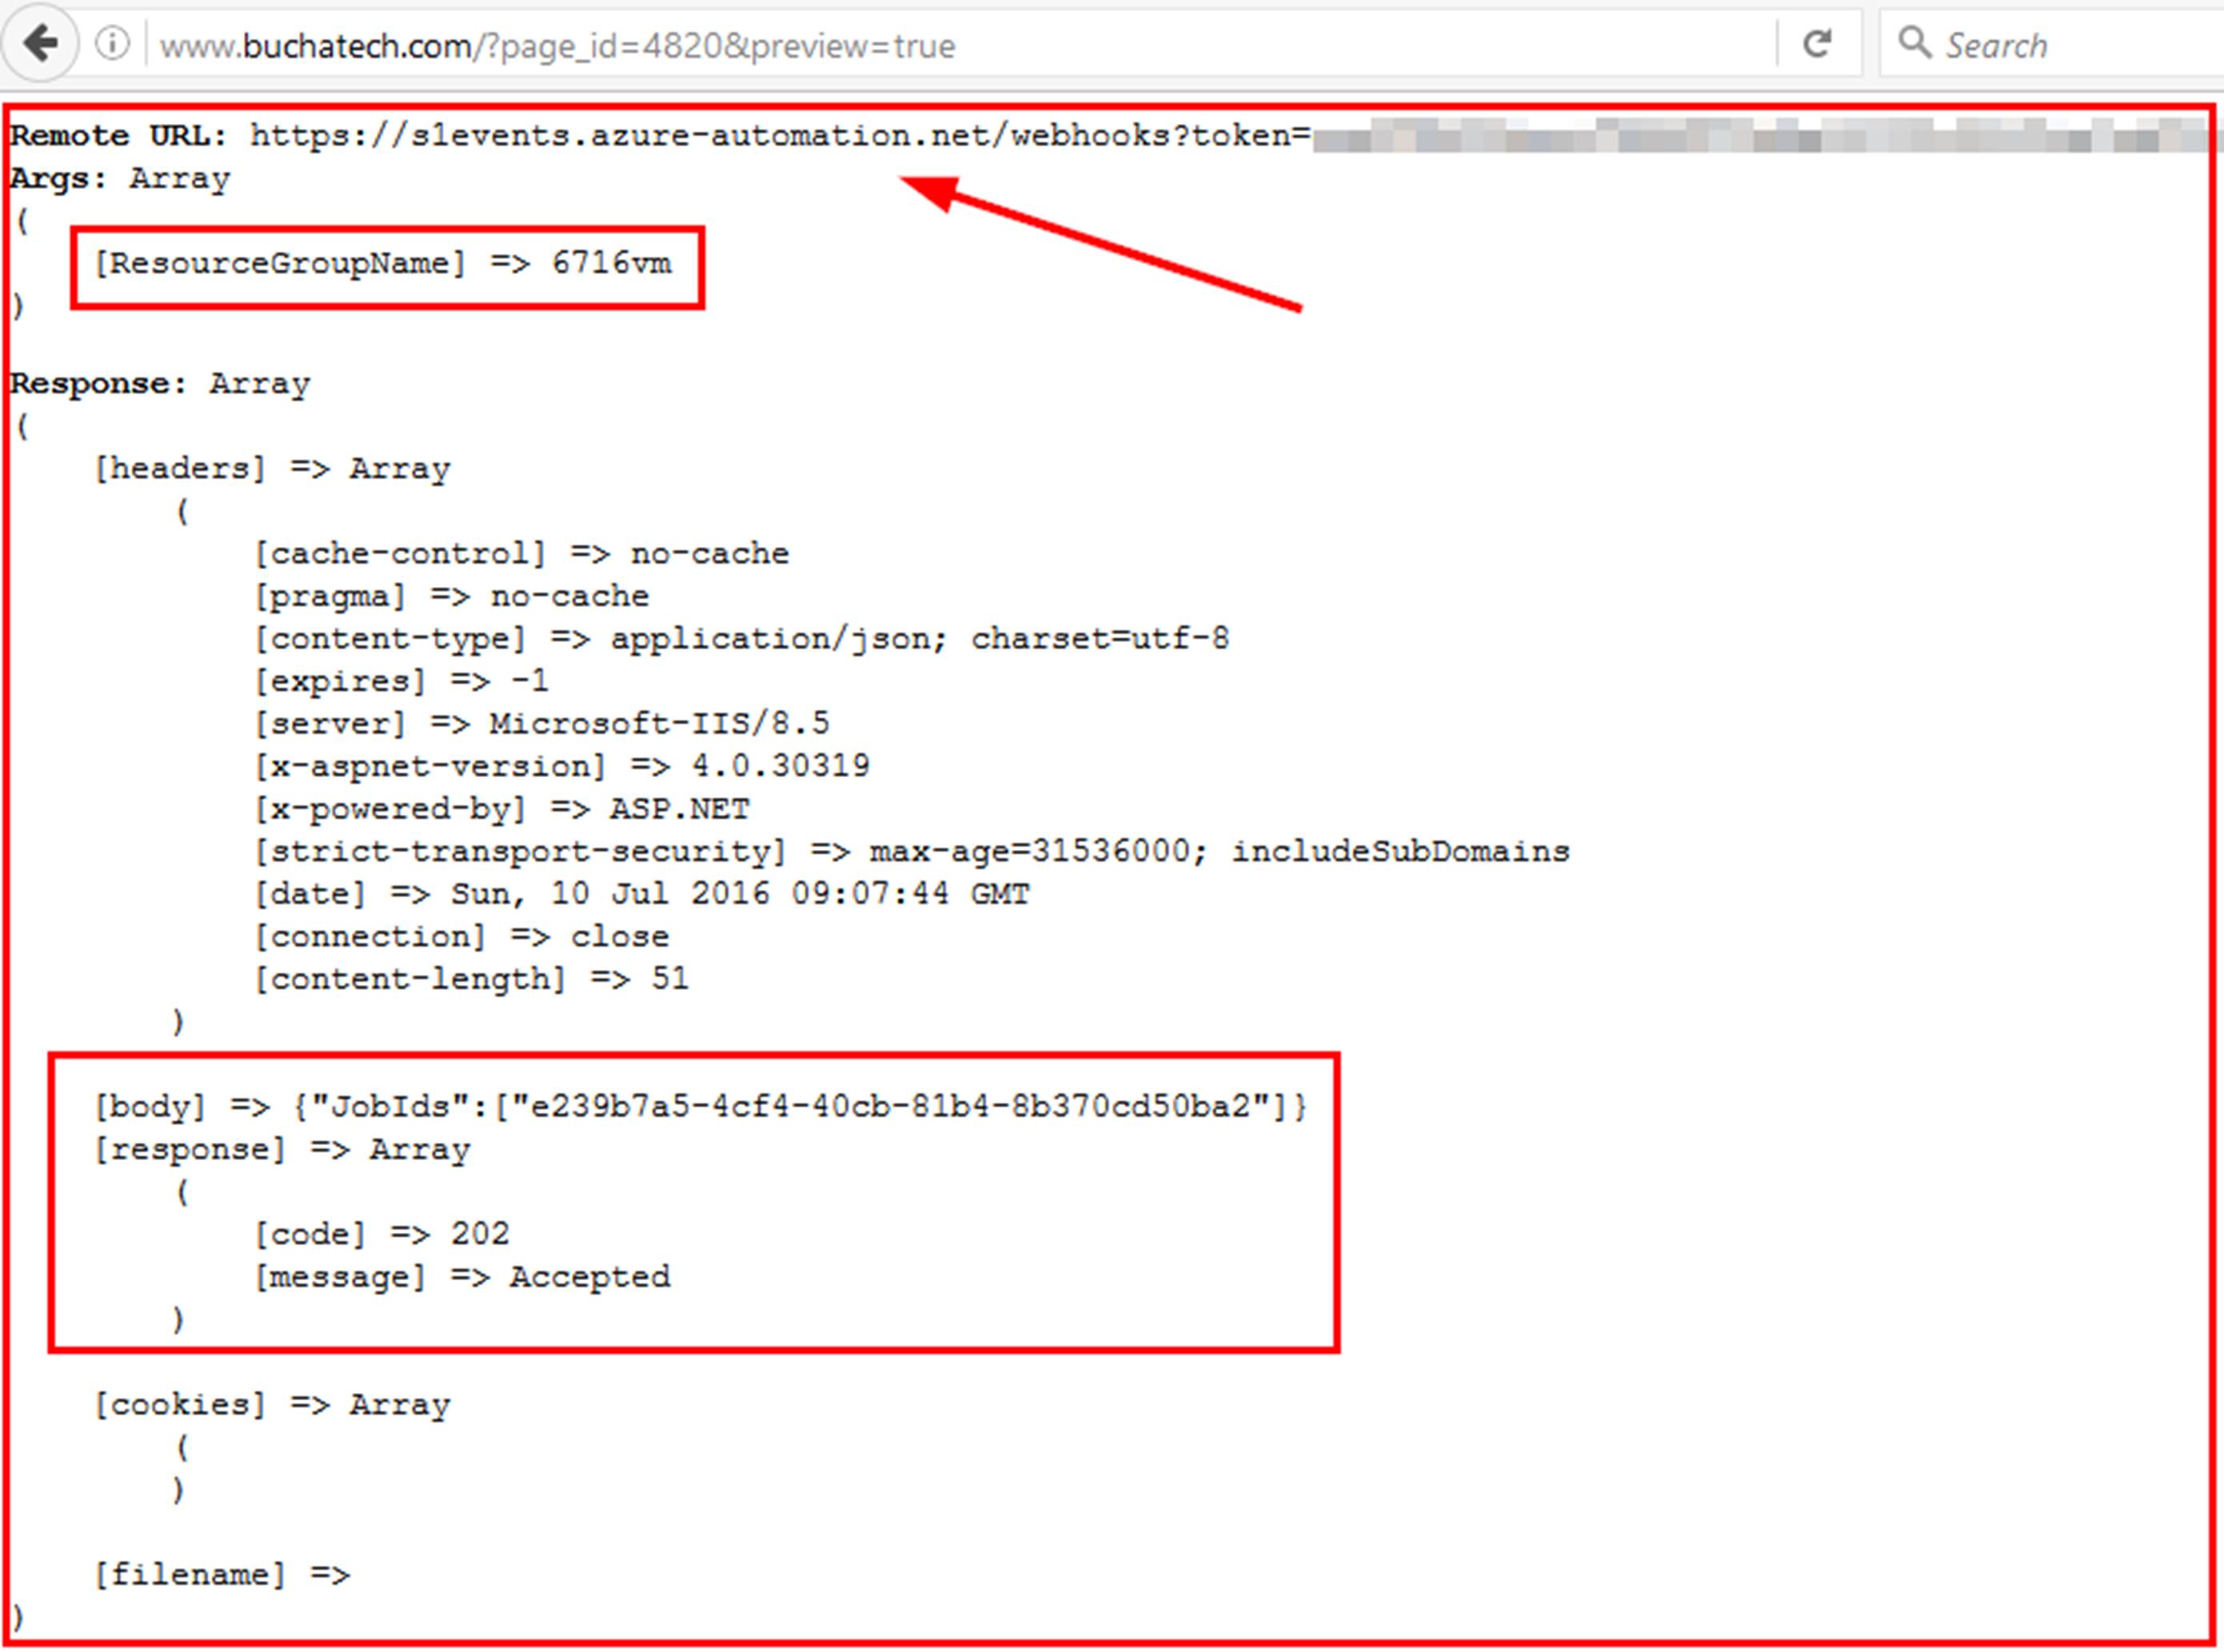
Here is an example of what the result in Debug mode will look like:

image018

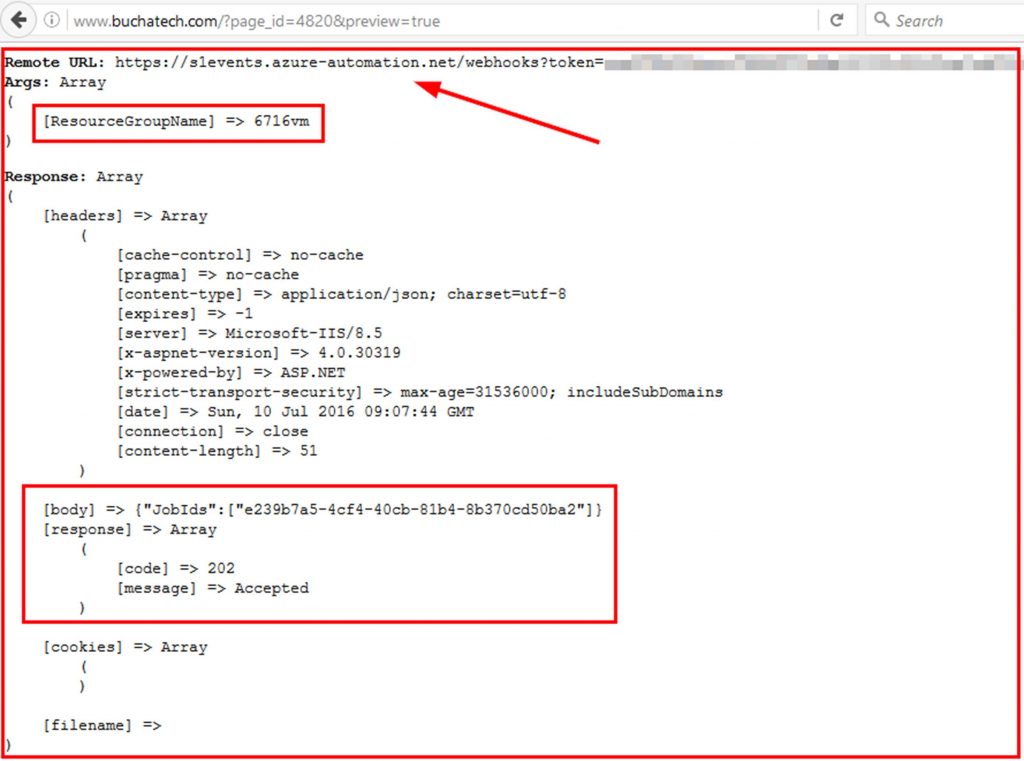
Make sure you uncheck the Run in Debug Mode field when you are ready to actually start your runbook/s.

Now let’s see what this looks like in Azure Automation when we submit the form.

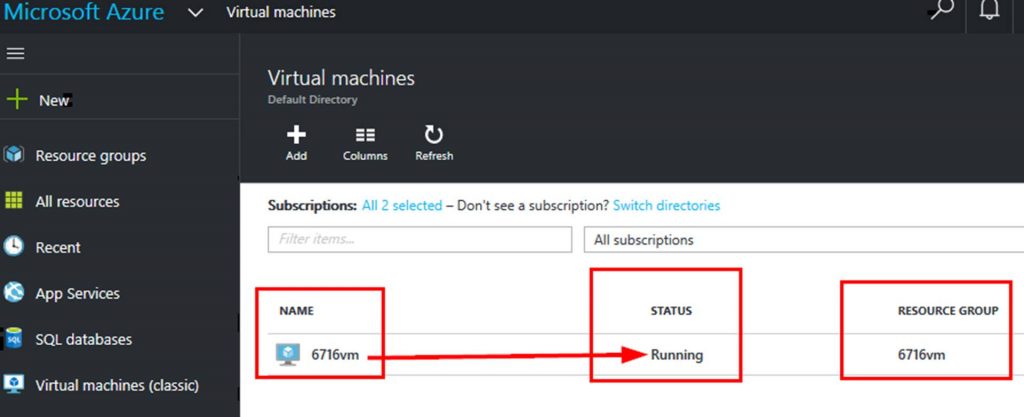
I have a resource group named 6716vm with one VM in it named 6716vm. So I will enter 6716vm on the form. 6716vm will be passed to the runbook as the resourcegroupname.

image019

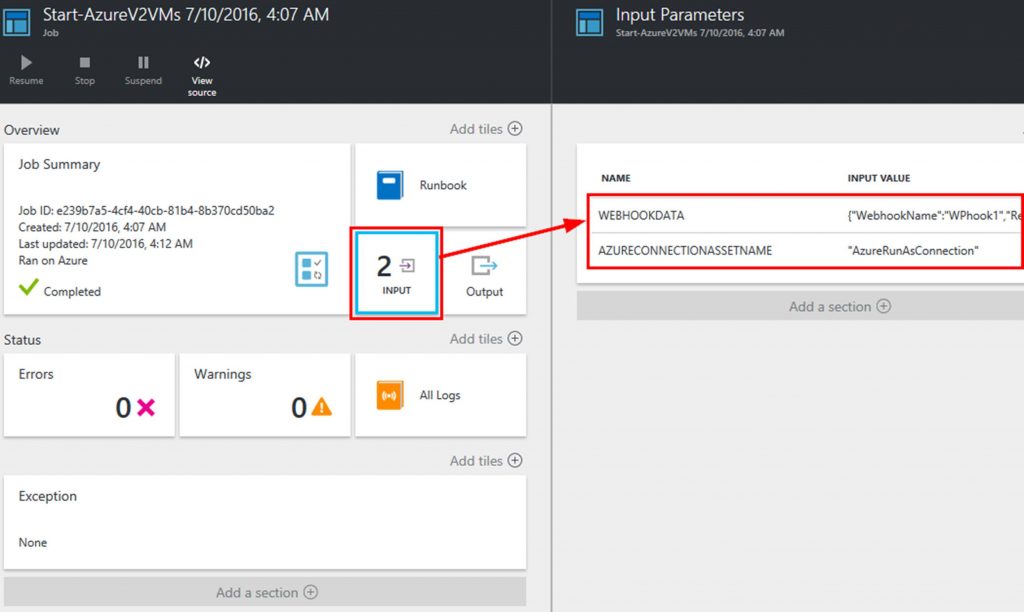
You can see the job running in Azure now.

image020

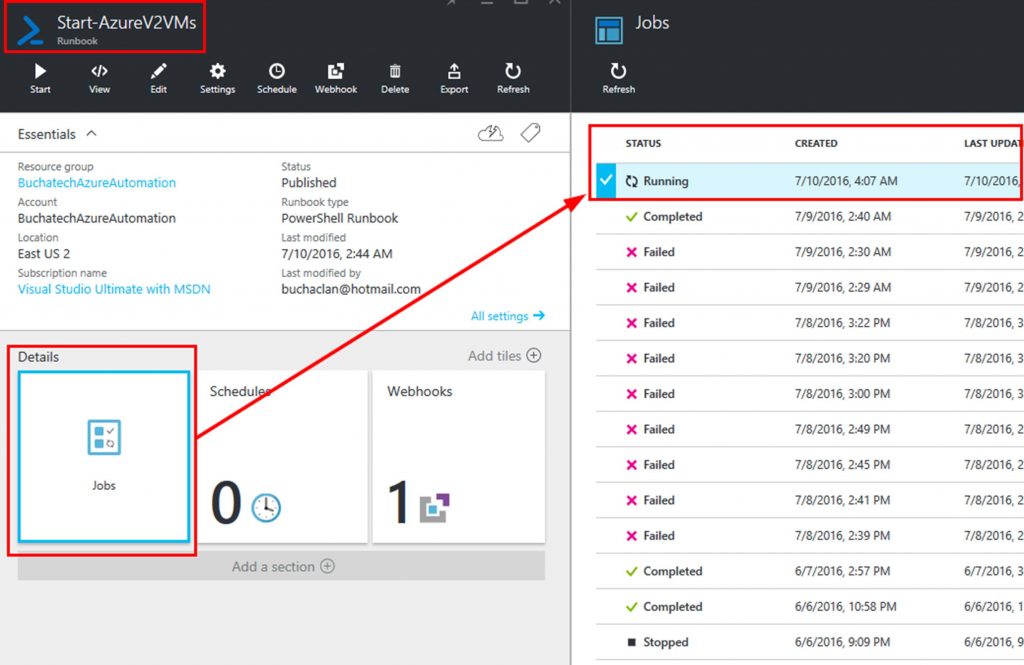
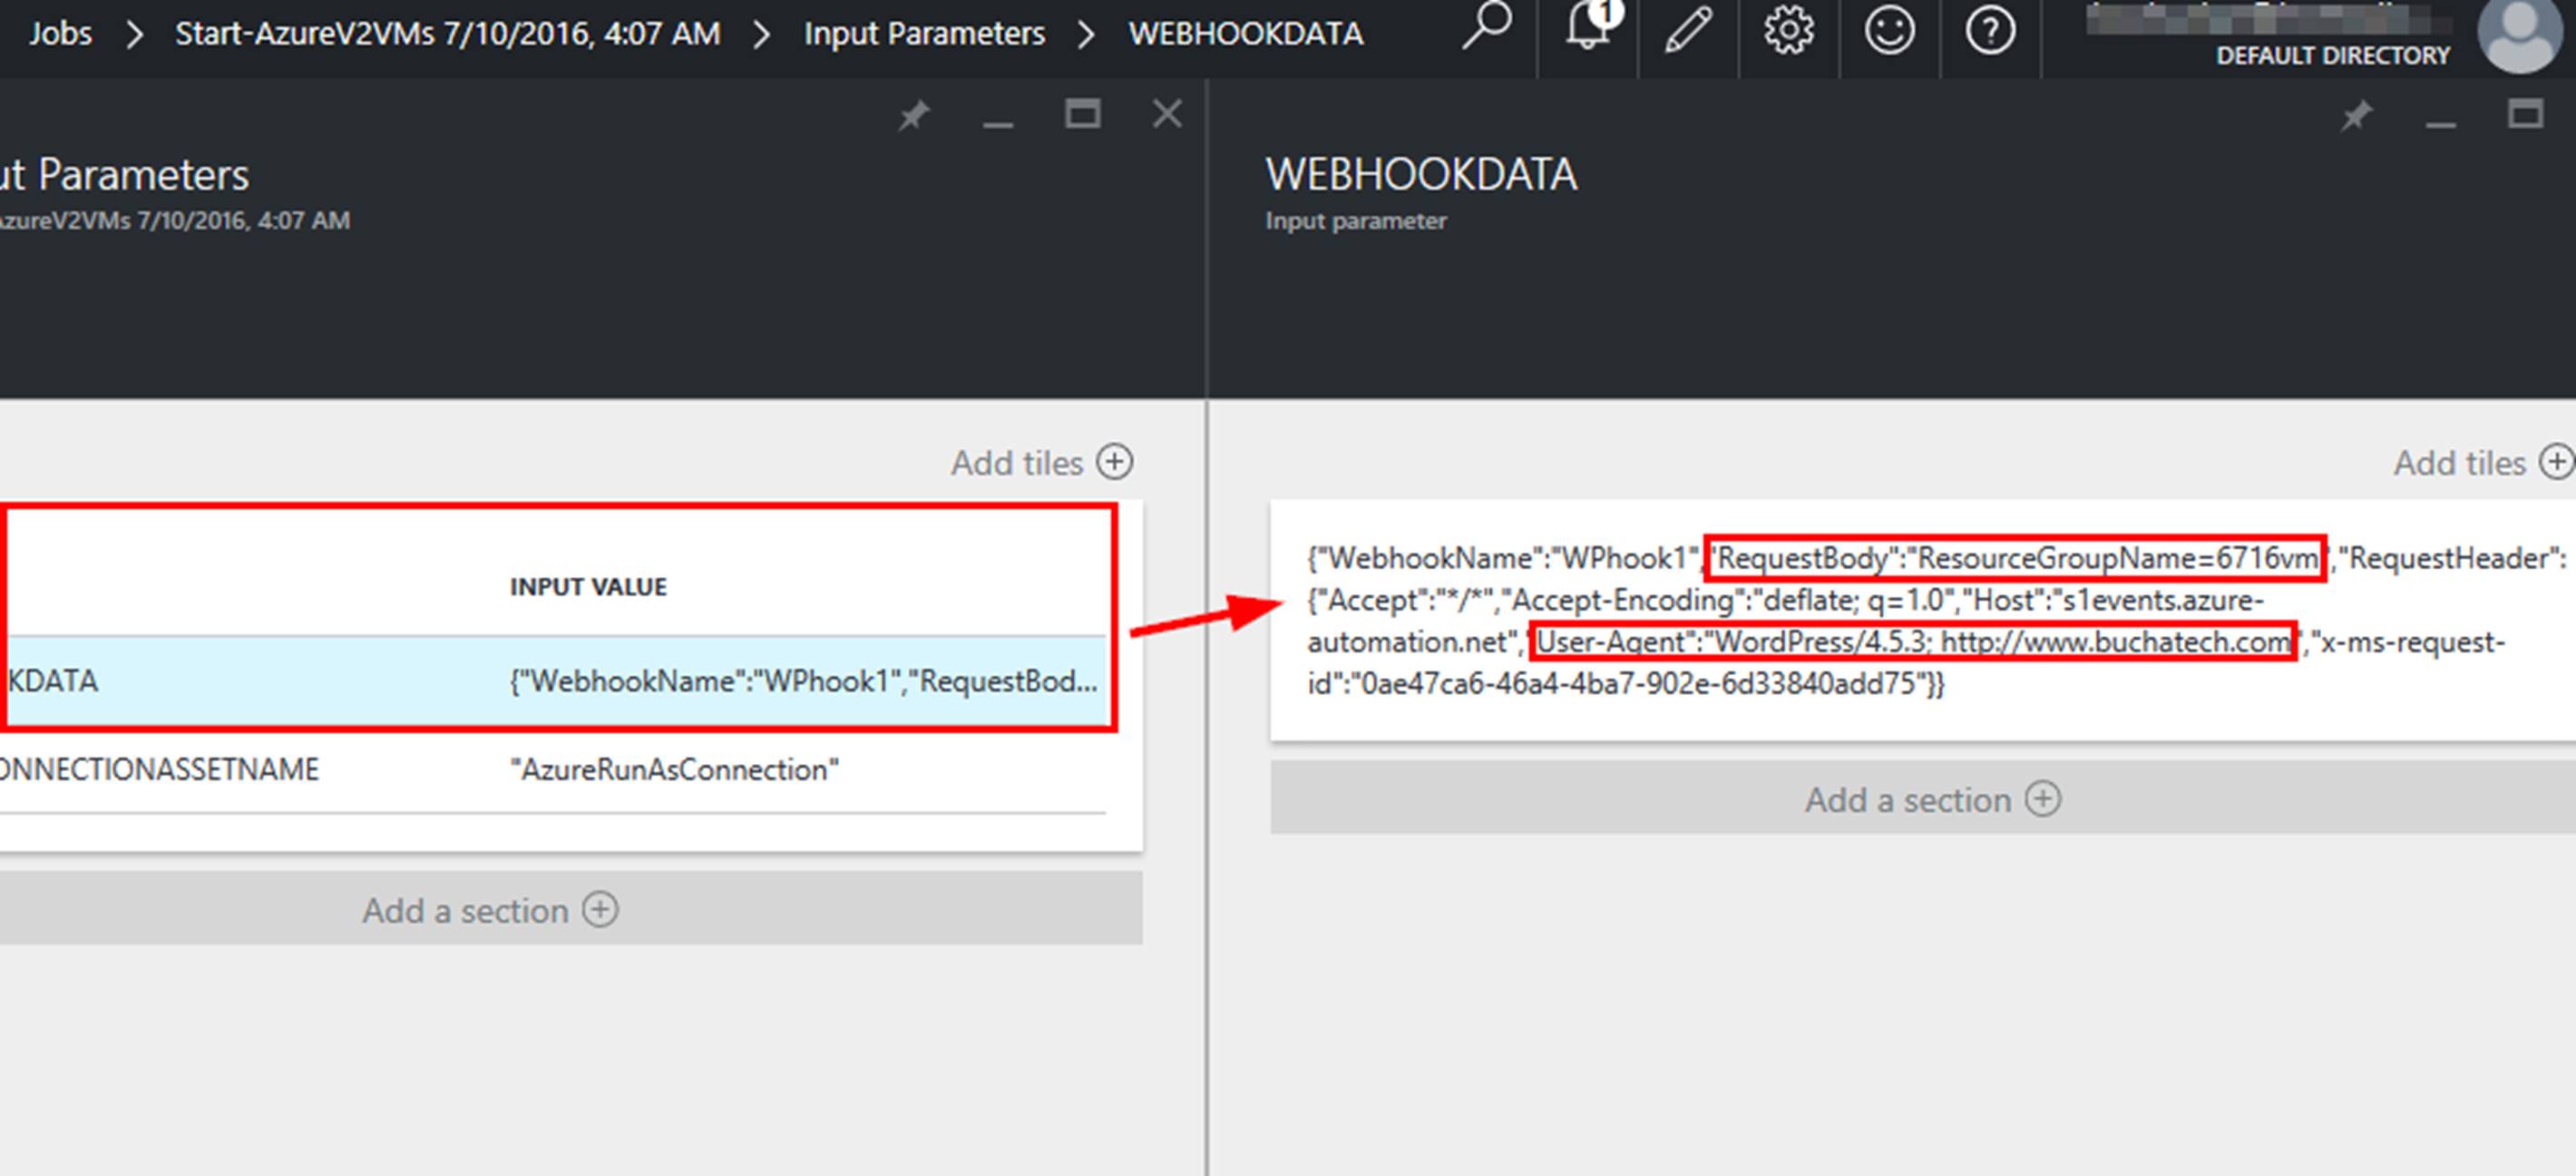
Within the job if you click on Input you can see it has 2 inputs. One is Webhookdata. This is where the 6716vm is located. The other is the Azureconnectionassetname. Remember we hardcoded this into the webhook itself. We can also see in the following screenshot that the job completed.

image021

If we look further at the webhookdata we can see several interesting things. We can see exactly where it put the 6716vm parameter for the resourcegroupname and we can see that this request came from my blog at www.buchatech.com.

image022

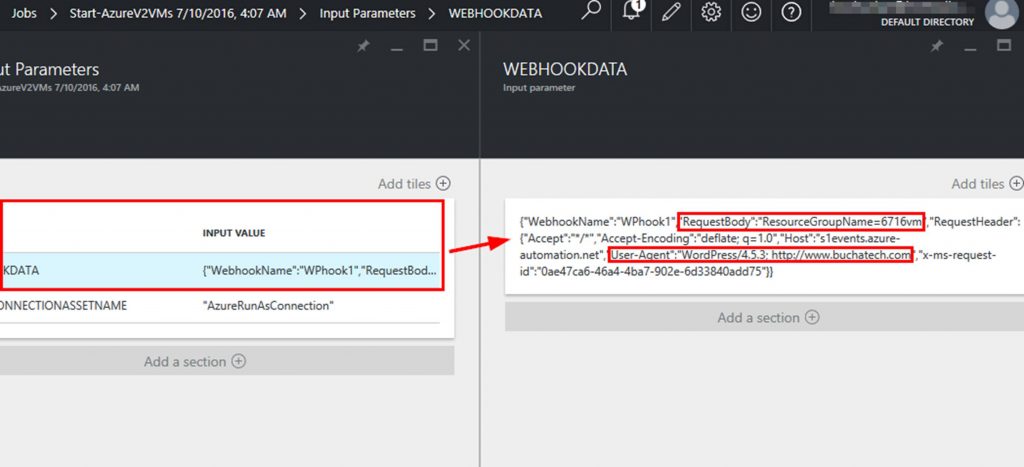
{“WebhookName”:”WPhook1″,”RequestBody”:”ResourceGroupName=6716vm”,”RequestHeader”:{“Accept”:”*/*”,”Accept-Encoding”:”deflate; q=1.0″,”Host”:”s1events.azure-automation.net”,”User-Agent”:”WordPress/4.5.3; https://www.buchatech.com”,”x-ms-request-id”:”0ae47ca6-46a4-4ba7-902e-6d33840add75“}}

Pretty cool right? Check out the VM now running:

image023

Now to shut it down I can go back to my WordPress and use the Stop Azure VM form. The possibilities here are endless. I know some of you may be thinking this is great but what if I want to control who can login to see this form and will it work with Active Directory. The answer is YES. WordPress has several plugins that integrate with Active Directly and even have SSO. A couple of these are Active Directory/LDAP Login for Intranet sites and Active Directory Integration. 

You can see that WordPress can make a great frontend for your Azure Automation runbooks. That is the end of the post. Happy automating!

Read more

5th Year Microsoft MVP!

Today was a special day as I received an email from Microsoft stating I was awarded as an MVP for the 5th year! Here is the email:

5th Year Microsoft MVP

This marks a special year. Microsoft awards you the special 5 year chip to add to your award. Here is a picture of the chip:

5th Year Microsoft MVP Chip

I am humbled to make it this long in the MVP program. A huge thanks goes out to everyone in the community and Microsoft. And as always I am honored to still be a part of such a great group of people. I have made many friends all over the world with other MVP’s, community, and Microsoft. I am looking forward to another exciting year of contributing to the community.

I will continue to do all that I can in the System Center community this year. Something new you will see from me this year is I will be contributing as much as I can also in the OMS and Azure Stack space. I am very excited about the new opportunities that are coming out of the growth of cloud.

My Microsoft MVP Profile: http://mvp.microsoft.com/en-us/mvp/Steve%20Buchanan-4039736

Congrats to all the other new and renewed MVP’s!

Read more

Write once, deploy anywhere (Azure or Azure Stack)

This blog post is a follow up to the MMS 2016 session I recently delivered together with Microsoft Azure Stack PM Daniel Savage. The session title is “Future-proof your Career with Azure Stack in the New Hybrid Cloud World!” link here: https://www.buchatech.com/2016/04/presenting-at-mms-2016-azure-stack-backup-oms.

My demo is this session was titled “Write once, deploy anywhere“. The purpose of this demo was to show using a single ARM template (JSON file) and a single PowerShell script to deploy a VM regardless of deploying to Azure or Azure Stack. The demo was a success so yes this is really possible. In this post I will break down the JSON file, the PowerShell script, how it works and the download link for the files.

Getting the JSON file and the PowerShell script just right was a challenge as there are still some slight differences between the settings of Azure and Azure Stack. Note that this is the case with Azure Stack TP1 and I fully expect that this will change when it GA’s. In any case it is good to look at this stuff now to start to learn the ins and outs. In the end it was the combined Power of the ARM template and PowerShell to overcome any challenges. Let’s start off by taking a look at the differences in ARM between Azure and Azure Stack in the following table:

Property

Azure

Azure Stack

Location

Azure region (example: CentralUS)

local

blobStorageEndpoint

blob.core.windows.net

blob.azurestack.local

vmSize

Standard_D1

Standard_A1

vmName apiVersion

2015-06-15

2015-06-15

StorageAccountName apiVersion

2015-06-15

2015-06-15

nicName apiVersion

2015-06-15

2015-05-01-preview

vrtualNetworkName apiVersion

2015-06-15

2015-05-01-preview

networkSecurityGroupName apiVersion

2015-06-15

2015-05-01-preview

dnsNameForPublicIP apiVersion

2015-06-15

2015-05-01-preview

torageAccountName apiVersion

2015-06-15

2015-05-01-preview

NOTE: For the apiVersion on the resources Azure Stack requires 2015-05-01-preview. Resources in Azure ARM templates default to apiVersion 2015-06-15. So if we left the resources in the ARM template at apiVersion 2015-06-15 the deployment would fail on Azure Stack. However we are in luck as Azure will accept apiVersion 2015-05-01-preview. So I set vmName and StorageAccountName to apiVersion 2015-06-15 and the rest of the resources apiVersion to 2015-05-01-preview.

vmName and StorageAccountName use the same apiVersion for both Azure and Azure Stack. So Azure Stack accepts 2015-06-15 for both. Even those these are not different across Azure and Azure Stack I still wanted to list it anyway in the table.

If you have multiple subscriptions you will need to input the subscription ID. In my case my Azure has multiple subscriptions but my Azure Stack does not in this lab. In my script for Azure you need the subscription ID. In Azure Stack you do not. You may need to modify this behavior in the script if your scenario is different.

For the deployment it consists of two files. These files are:

Writeonceblog (1) AzureandAzureStack.json

CreateVMAzureorAzureStack.ps1

Here is what we have if we crack open the JSON file.

Writeonceblog (2)

A few things to note about the PowerShell script is that

  1. We prompt to identify if it is an Azure or Azure Stack deployment. We then run the appropriate block of code.
  2. In each of the deployment types (Azure or Azure Stack) we have some things hard coded in (for example blobStorageEndpoint and vmSize) and somethings pulled in dynamically by prompting for them during the script execution (for example subscriptionId and adminPassword).
  3. We are pulling in the parameter and variable values when using New-AzureRmResourceGroup and New-AzureRmResourceGroupDeployment.

NOTE: I am not a PowerShell expert. I am sure there are better more efficient ways to accomplish what I am doing here in the PowerShell script. Nothing was available to accomplish the write once, deploy anywhere goal so I put something together. Feel free to enhance the script and release back to the community.

Here is an example of the location parameter and variable in the JSON file.

The parameter:

Writeonceblog (3)

The variable:

Writeonceblog (4)

Referenced in the vmName resource:

Writeonceblog (5)

Here is an example of how we are leveraging this in the PowerShell script.

For Azure:

Writeonceblog (6)

For Azure Stack:

Writeonceblog (7)

Writeonceblog (8)

Writeonceblog (9)

Note that you can deploy VM’s to Azure or Azure Stack in many ways (Visual Studio, the portal etc..). I decided to leverage PowerShell to do the deployment’s as it gives me a great amount of flexibility. For the official article on using PowerShell to deploy VM’s to Azure Stack visit:

https://azure.microsoft.com/en-us/documentation/articles/azure-stack-deploy-template-powershell

Now let’s look at deploying a VM to both Azure and Azure Stack using a single PowerShell script and a single ARM template.

— AZURE —

Run the script and you are prompted for some of the VM info.

Writeonceblog (10)

Then you are prompted to log into your Azure account.

Writeonceblog (11)

Read more

Free Cloud Resources for IT Pro’s

A couple of years ago Microsoft ended TechNet. A lot of IT Pro’s were unhappy with that decision. IT Pro’s used TechNet to practice in their own labs and get up to speed on new technologies. Well on April 20th, 2016 Microsoft has an answer for this (NOTE: this is my opinion not any official statement from Microsoft).

2016-04-21 01_58_40-Microsoft IT Pro Cloud Essentials

Microsoft has launched the “Microsoft IT Pro Career Center” and the the free “Microsoft IT Pro Cloud Essentials“.

The Microsoft IT Pro Career Center is a free online resource to help map your cloud career path. Learn what industry experts suggest for your cloud role and the skills to get you there. Follow a learning curriculum at your own pace to build the skills you need most to stay relevant.
Microsoft IT Pro Cloud Essentials is a free annual subscription for IT Pro’s that basically gives you Azure, EMS, O365 resources to practice and learn with. It even comes with a Pluralsight account. It includes:

Free Azure credits to try cloud scenarios like backup, disaster recovery, security & dev/test.
Free Pluralsight subscription for on-line training.
Free Priority support in the TechNet forums.
A free phone support incident for Azure or on-premises products.
A free certification exam voucher. [2]
Extended trials of Enterprise Mobility Suite and Office 365.

This is huge. Many of my IT buddies have said they want to jump in on cloud but could not afford to pay for the accounts out of pocket. Well this is no longer an excuse.

Recently Dice published a report that Azure was #2 on the list of the fastest-growing tech skills. Here is the link:

http://insights.dice.com/2016/04/12/dice-report-fastest-growing-tech-skills-2 . I would bet that with the pace Microsoft is moving with Azure this will become the #1 tech skill in the near future. As an IT Pro Azure is something you definitely want to be looking into.

If you are an IT Pro and you want to get started with cloud jump out there and get started today.

Microsoft IT Pro Career Center:

https://www.itprocloudessentials.com

Microsoft IT Pro Cloud Essentials:

https://www.itprocareercenter.com

Read more

How to add SUSE Linux image to Azure Stack

In Azure Stack you can publish your own images essentially virtual machines that can be used when deploying a new virtual machine. This is handy for publishing servers that need to be pre-configured in a certain way for consumers of your cloud. In order for your published images to show up as an option in compute within Azure Stack the images need to be added to the Platform Image Repository (PIR) within the Compute Resource Provider (CRP).

SUSE has recently published a pre-built SUSE Linux Enterprise Server 12 SP1 image that has been prepped specifically for Azure Stack. This image is ready to go and can be published to the CRP’s PIR without any needed prep of the virtual machine. In this blog post I am going to walk through the steps I took to add this image to my Azure Stack.

SUSE already has an image out there for Azure. The SUSE image used on Azure does not work right now on Azure Stack. As of right now Azure and Azure Stack have different “initialization code”. In the future I would expect these to be the same. The SUSE image also includes SUSE/azurectl a command line tool that helps you manage SUSE updates from a Linux VM hosted on Azure. More info on this here: https://github.com/SUSE/azurectl. To download the SUSE Azure Stack image go to https://download.suse.com and complete the fields as show in the following screenshot.

AS-Suse-1

You will be brought to a login page to access the download. If you do not have a SUSE account sign up for one and login. You will see the actual download at that point. Go ahead and download it onto your Azure Stack Host.

AS-Suse-2

Extract the SLE-12-SP1-Server-Azure-Stack-x86_64.vhd and copy it to C:\ClusterStorage\Volume1\Share\VM.

AS-Suse-3

Microsoft has the steps for adding images to Azure Stack’s Platform Image Repository (PIR). The process is essentially running a PowerShell script. The script is included with Azure Stack. The script creates the image directory needed in C:\ClusterStorage\Volume1\Share\CRP\PlatformImages, the JSON file in that directory, and makes a copy of the VHD in that directory. The JSON file contains the meta data about the image that shows in the Azure Stack Portal. Here is the link to the Microsoft document: https://azure.microsoft.com/en-us/documentation/articles/azure-stack-add-image-pir/

Here are the steps for running the script:

In PowerShell navigate to:

D:\CRP\VM\Microsoft.AzureStack.Compute.Installer\content\Scripts

Run this script in PowerShell:

.\CopyImageToPlatformImageRepository.ps1

NOTE: My DATAIMAGE drive letter was D. You may have a different letter.

You will be prompted for the following:

  • PlatformImageRepositoryPath use this \\SOFS\Share\CRP\PlatformImages\
  • ImagePath I put C:\ClusterStorage\Volume1\Share\VM\SLE-12-SP1-Server-Azure-Stack-x86_64.vhd
  • Publisher I put SUSE
  • Offer I put LinuxServer
  • Sku I put SUSE-Linux-Ent-12-SP1
  • Version I put 12.0.0
  • OsType I put Linux

AS-Suse-4

NOTE: These prompts are used to populate the JSON file for the image. Here is an example of the JSON file:

{

“Publisher”:”SUSE”,

“Offer”:”LinuxServer”,

“Sku”:”SUSE-Linux-Ent-12-SP1″,

“Version”:”12.0.0″,

“PlatformImage” :{

“OsDisk” : {

“OsType”:”Linux”,

“FileName”:”SLE-12-SP1-Server-Azure-Stack-x86_64″

}

}

}

Alternatively you could run the script as:

.\CopyImageToPlatformImageRepository.ps1 -PlatformImageRespositoryPath ‘\\SOFS\Share\CRP\PlatformImages’ -ImagePath ‘C:\ClusterStorage\Volume1\Share\VM\SLE-12-SP1-Server-Azure-Stack-x86_64.vhd’ -Publisher ‘SUSE’ -Offer ‘LinuxServer’ -Sku ‘SUSE-Linux-Ent-12-SP1’ -OsType ‘Linux’

As long as the script worked you should have the following as an end result in C:\ClusterStorage\Volume1\Share\CRP\PlatformImages:

AS-Suse-5

AS-Suse-6

If you have the Azure Stack portal open close out of the browser and go back in. It should be listed as an available image in Compute as shown in the following screenshot.

AS-Suse-7

Notice the difference between a Windows image and a Linux image. The Linux image gives you an authentication option of Password or SSH Key.

Windows Linux
 AS-Suse-8  AS-Suse-9

Read more

Service Manager vs. ServiceNow

I am often asked how does Service Manager compare to ServiceNow. I don’t have a solid canned response for this. I often respond that you really have to compare System Center to ServiceNow because you get the entire suite when you buy System Center not just Service Manager. Also it would be a bad decision to not consider using the other components such as Operations Manager, Orchestrator, and Configuration Manager given the tight out of the box integration with Service Manager and these components.

With ServiceNow you get an ITSM solution but have to pay additional monthly fee’s when you want to add on other functionality such as automation, event management (monitoring), CMDB, or asset management. With System Center you get all of this for the price of System Center and you simply have to turn and configure the additional functionality you want. One more point is that many organizations own and utilize Configuration Manager and or Operations Manager and will often already own the licensing they need to deploy Service Manager.

On December 9th 2015 System Center MVP’s Chris Ross and Pete Zerger held an awesome webinar on System Center + Cireson vs ServiceNow. This was a must see webinar. It covered the often asked about topic of “Service Manager vs ServiceNow“.

These guys did a great job covering the topic. One of the most important areas they covered was Real-world Total Cost of Ownership (TCO) Comparison. TCO is one of the top data points that matter to businesses when they are considering a new ITSM solution.

In this blog post I am going to look at some of the key topics that stuck out to me from the webinar in regards to Service Manager vs ServiceNow. Keep in mind that these comparisons also include Cireson’s software.

One of the setbacks for some organizations on going with Service Manager is that they believe there is no cloud option for it. That is wrong Service Manager can be deployed in Azure cloud. Also there are a couple of companies that have a SaaS offering for Service Manager. The following graphic looks at the different types of Service Manager deployments and their options.

clip_image001

This first chart looks the numbers of the TCO of Service Manager vs ServiceNow if you don’t already own the System Center ECAL licensing.

clip_image002

You will notice that over a 5 year period System Center including Cireson and Azure is lower TCO over ServiceNow. Wow. If this did not include Cireson or Azure the TCO of System Center would be even lower compared to ServiceNow.

This next chart looks at the TCO of System Center vs ServiceNow if your organization already owns the ECAL licenses or has an Enterprise Agreement (EA) with Microsoft.

clip_image003

This has even deeper savings compared to the first chart. Now remember this includes Cireson software and having Service Manager deployed in Azure.

This chart looks at the TCO of System Center vs ServiceNow with System Center being deployed on-premises.

clip_image004

Again the TCO savings with System Center goes even lower. This chart still includes Cireson with System Center. This does not include the cost of the data center fabric storage, VM’s etc… which would typically already be in place before deploying System Center.

The following table compares feature sets of System Center and ServiceNow.

clip_image005

Notice ServiceNow does offer features such as automation and system management but they come at an additional monthly cost. One more item to point out from this slide is that System Center offers functionality that ServiceNow does not such as enterprise and cloud backup through Data Protection Manager and Virtualization and Private cloud Management through Virtual Machine Manager and Azure Pack. ServiceNow does offer Event Management it requires an additional purchase and plugin install.

So I pulled out information from the webinar that stuck out to me. There is much more information in the webinar and context behind each of the charts I included in this blog post. I recommend you watch the full webinar. You can watch the entire webinar right here:

System Center + Cireson versus ServiceNow: A Head-to-Head Comparison from Team Cireson on Vimeo.

NOTE: Below is a link to another blog that covers Service Manager vs ServiceNow.

http://blog.navantis.com/reduce-it-spend-and-increase-performance-choosing-the-right-it-service-desk-tool/

Read more

What is Microsoft Azure Backup Server?

Want to have DPM without having to buy System Center? Now you can. It is called Microsoft Azure Backup Server (MABS). Well MABS is not really a full DPM but a scaled back DPM. Microsoft released Microsoft Azure Backup Server on October 7th, 2015. In this post I am going to break down what Microsoft Azure Backup Server is.

clip_image001

Microsoft Azure Backup Server’s goal is to solve some problems that have existed with Azure backup for a while. These problems are:

  • -No centralization of protected servers with Azure Backup. Historically if you did not have DPM and you only had Azure Backup but needed to protect on premises server you would install the Microsoft Azure Recovery Services Agent (MARS) agent on your on premises servers. They would then be protected up to Azure.
  • -Without DPM Azure Backup can only backup files and folders. To protect workloads like SQL, Exchange up to Azure you needed to protect with DPM first and then send the data up to Azure.
  • -Purchasing a System Center license is not economical for some organizations.

Microsoft Azure Backup Server solves these issues because it is an on premises backup server. Under the hood it is a scaled back DPM so it gives you similar functionality. It lets you protect the same workloads as DPM to disk on premises first and then up to Azure or you can backup directly to Azure. Essentially it gives you two types of protection:

  • – Disk (D2D), giving high RTOs for tier 1 workloads
  • – Azure (D2D2C) for long term retention

Tape protection with Microsoft Azure Backup Server is not possible. This is not included in the product.

MABS also gives you a centralized location on premises to backup your on prem servers to, manage the backup agent of your on prem servers and see the status of their protection. MABS does this without the cost of a System Center license. It can be used when you subscribe to Azure Backup. MABS will require you to provide backup vault credentials during the setup.

From the Microsoft site on MABS pricing: “Microsoft Azure Backup Server will continue to bill customers as per their existing Azure offers (e.g. Pay-as-you-go, EA, Open).” You can learn about Azure Backup pricing here: https://azure.microsoft.com/en-in/pricing/details/backup/

Now to get Microsoft Azure Backup Server you can either go download it directly here:

https://www.microsoft.com/en-us/download/details.aspx?id=49170

Or you can download from the Azure portal. Go to:

clip_image002

Then click on the “Download Microsoft Azure Backup Server for Applications” link as shown in the following screenshot.

clip_image003

Microsoft Azure Backup Server is great for organizations that need a backup solution without the cost of the entire System Center suite. Keep in mind this does not provide tape backup. However backup up to Azure for offsite is a cost effective solution and also now gives you on premises backup to disk as well.

Here is an official blog post on Microsoft Azure Backup Server along with “how to” videos. These videos will help you install and configure Microsoft Azure Backup Server. https://azure.microsoft.com/en-us/blog/announcing-microsoft-azure-backup-server/

Read more

Unpacking The Operations Management Suite Android App

A while back there was a suggestion on Azure Operational Insights (Before renamed to Operations Management Suite) User Voice for an Android APP. You can see that here: http://feedback.azure.com/forums/267889-azure-operational-insights/suggestions/6686744-android-mobile-app . This would allow us to access our OMS data from our Android mobile device! It is no secret I am an Android user so I was excited for this. On the User Voice thread Microsoft commented that we could expect an app in the fall of 2015. Well on October 15th one of my colleagues Rob Plank tweeted that there the OMS Android app was available in the Android market (https://twitter.com/rob_plank/status/654706738222907392). They kept their word and now we have an Android App for OMS! In this post we are going to take a tour of the new OMS Android App.

On your phone you can search Google Play for Microsoft OMS or click this link Operations Management Suite to find the app. Go ahead and install it.

clip_image001

Once installed you will find it with your other apps.

clip_image002

You can also place a shortcut to it on one of your main screens.

clip_image003

The first time you launch it you will need to either sign in or sign up.

clip_image004

Here is a screenshot of the sign in screen.

clip_image005

After you are logged in you need to select your workspace. You can see that I have 3 workspaces. Yes only a true geek would have multiple workspaces in OMS. LOL

clip_image006

After selecting your workspace you will have a similar look and feel to the web based version of OMS. You will also notice 3 main areas Dashboard, Overview, and Search. The first one you will land on is Dashboard. To access the other 3 main areas just scroll to the right. NOTE: I did not see a way to add solutions to OMS from the mobile app. You will need to do this from the web application itself.

The Dashboard view is equal to My Dashboard in the full OMS web application. So whatever you added to your My Dashboard is what you will see here.


Android OMS App Full OMS Web Application
clip_image007 clip_image008
clip_image009

Now if we go the Overview area this is the same view as we have on the full OMS web application. Overview has the solutions that you have added to your OMS. To see them all just scroll down.

Android OMS App Full OMS Web Application
clip_image010 clip_image011

You will notice the Searches view also matches what is in “Log Search” in the full OMS web application.

clip_image012

Read more