Presenting at MMS 2016 – Azure Stack, Backup, & OMS

It’s almost time for MMS 2016. By the end of Friday 4-22-16 MMS registration will be closed as the event has sold out! This year I have the opportunity to present twice and help facilitate one of the pre-con sessions. Here is a breakdown of my sessions.

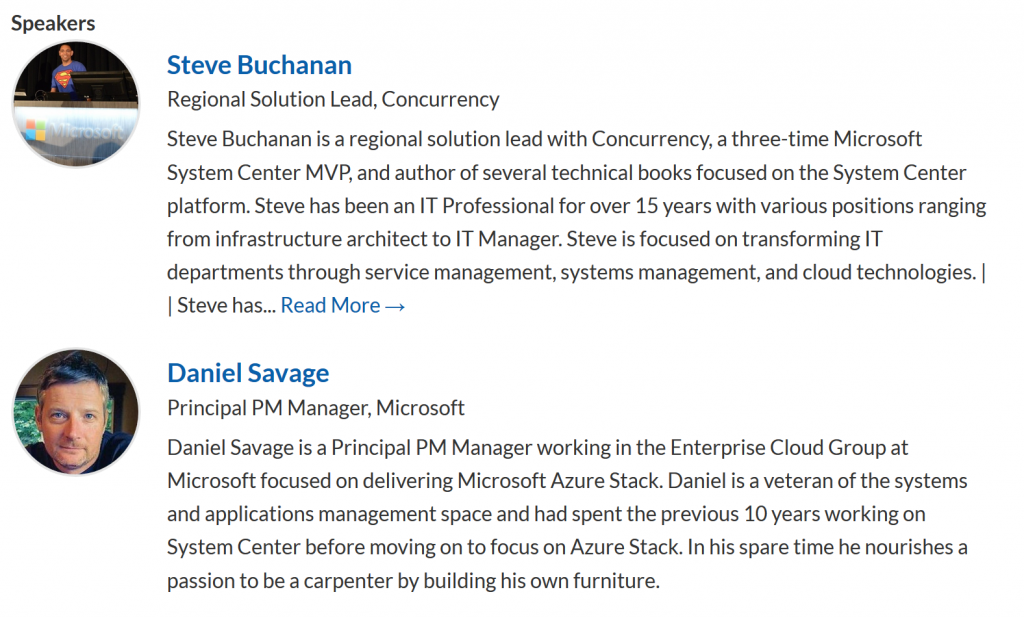
Session #1: My first session is on Azure Stack the new Hybrid solution from Microsoft! This session will include me and Daniel Savage an Azure Stack program manager from Microsoft! You never know what new never heard before stuff you might learn about in this session. I recommend you sign up. Here is the title, description, and link for this session:

TITLE: – Future-proof your Career with Azure Stack in the New Hybrid Cloud World! –

DESCRIPTION: “Write once, deploy anywhere”, “extension of Azure”, “cloud agility”, “Cloud in your data center” What do all these buzz words mean to you and your career? How does Azure Stack Microsoft’s Hybrid solution apply to you as an IT Pro? Does Hybrid Cloud really have a place in the enterprise?

Come to this session and let Azure Stack Program Manager Daniel Savage and MVP Steve Buchanan unpack it for you.

SPEAKER BIOS:

Future-proof your Career with AzureStack

LINK: http://sched.co/6Xjn

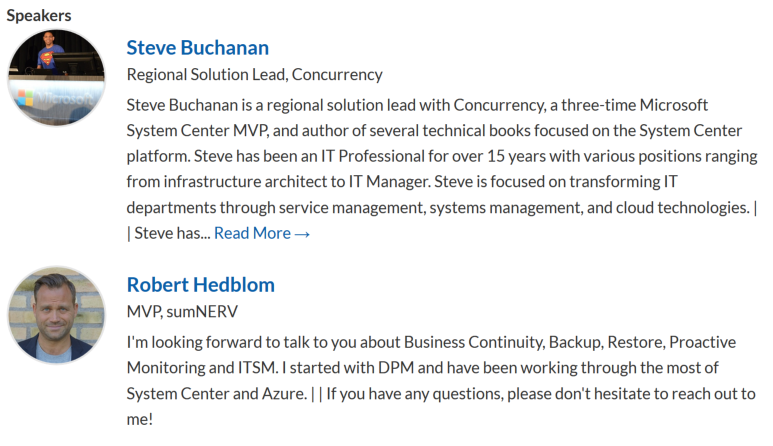
Session #2: In my second session I will be presenting with my good friend and fellow MVP Robert Hedblom. He is making the trip all the way across the pond from Sweden for this event. Our goal for this session is to save jobs! hahaha…. You don’t want to miss this session as we take you through the steps of designing your backup and restore strategies. Here is the title, description, and link.

TITLE: – Be a Hero or be Fired. Backup and Restore Strategy –

DESCRIPTION: Did you skip planning the backup strategy? If a disaster occurred could you restore or would you get fired?

Come see System Center MVP’s Steve Buchanan and Robert Hedblom walk you through building a bullet proof backup and restore strategy of your business services. These strategies can be used with Microsoft business continuity tools. Learn how to be a restore hero in the event of a disaster and keep your JOB!

SPEAKER BIOS:

Be a Hero or be Fired. Backup and Restor

LINK: http://sched.co/68×3

Session #3: The third session is actually a 4 hour pre-con session about Operations Management Suite (OMS). This is a session you don’t want to miss. This session will be jam packed with MVP and Microsoft rock-stars! It will be jam packed with deep knowledge and again you never know what new never heard before stuff you might learn about in here. In this session you will have direct access to the Microsoft product team that is behind OMS. I am honored to be a part of this session. I have the opportunity to help facilitate it. Here is the title, description, speaker bio’s and link for this session.

TITLE: OMS from “What is this?” to “Wow, it can do that?!” –

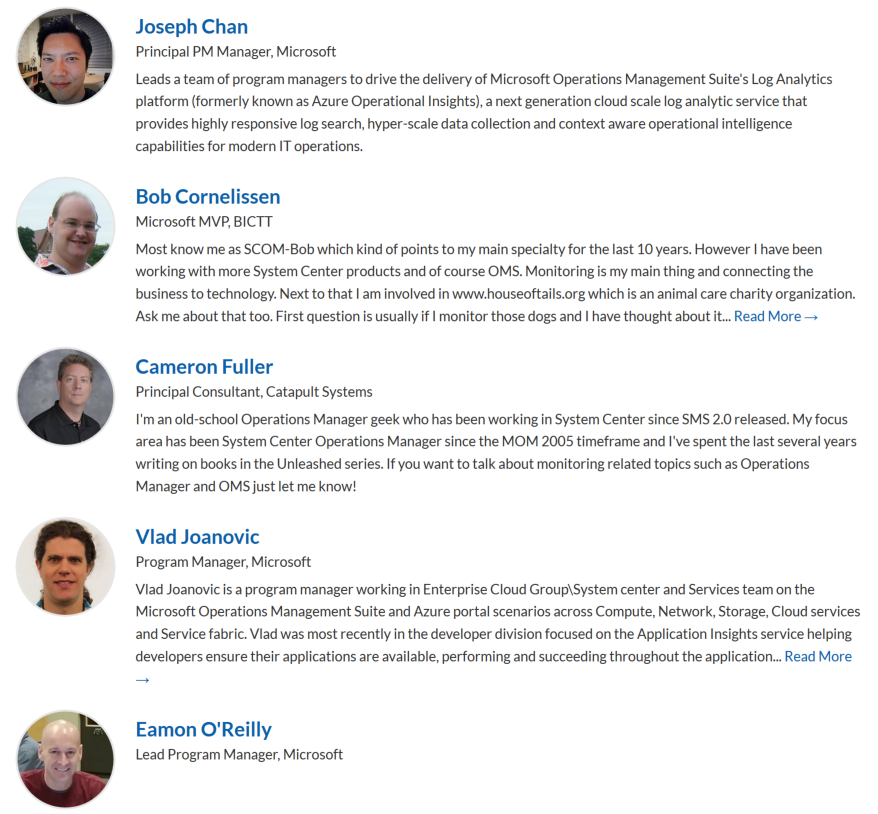
DESCRIPTION: This is a pre-con session where emcee’s Steve Buchanan and Cameron Fuller will facilitate a four hour session designed to explain what OMS is and what it can do for your organization.

In the first hour Bob Cornelissen (SCOMBob) and Cameron Fuller will provide an introduction to what OMS is and what benefits it can provide your organization.

In the second 1.5 hour session, join the Microsoft product team members as they dig in deep on IT automation within OMS.

In the final 1.5 hour session, join the Microsoft product team members as they dig in deep on Log Analytics & Security / Compliance.  

SPEAKER BIOS:

OMS Pre-con

LINK: http://sched.co/6MtU

See you at MMS 2016!

MMS

http://mmsmoa.com

Read more

All Work Item Assigned/Reassigned Notification

A few years ago I posted a blog about work item assignment/reassignment notification options in Service Manager. Here is the link to that previous post:

SCSM Assignment/Re-Assignment Notify Options

Recently I modified the management pack for the last option #4 “Community Work Item Assignment/Reassignment Notifications”. The Community Work Item Assignment/Reassignment Notifications management pack is originally from here: http://scsmsource.blogspot.com/2011/04/work-item-assignmentreassignment.html.

The management pack has been modified to include more work items and a notification template was created. This management pack now has one notification template to modify and will send out notifications on assignment and re-assignment for all work items. Work items it includes are:

  • Activity Assignments
  • Change Request Assignments
  • Incident Assignments
  • Problem Assignments
  • Release Record Assignments
  • Service Request Assignments

The notification template is generic so that it will fit all cases. The web link that is referenced in the notification template should be modified depending on the portal used in your Service Manager deployment.

Verified Service Manager Versions:

  • Service Manager 2012 SP1
  • Service Manager 2012 R2 (tested up to UR9)

Management Pack Name:

All.WorkItem.Assignment.Workflow.Library.xml

Version:

7.0.6555.1

Notification Template File Name:

All Work Item Assigned To Notification Template.html

Description:

Importing this Management Pack, will create 6 custom workflows:

6 workflows

The workflows cannot be modified in the Service Manager console. They can only be modified in XML in the management pack. They can be viewed in Service Manager at Administration\Workflows\Status.

And 1 new notification template:

  • All Work Item Assigned To Notification Template

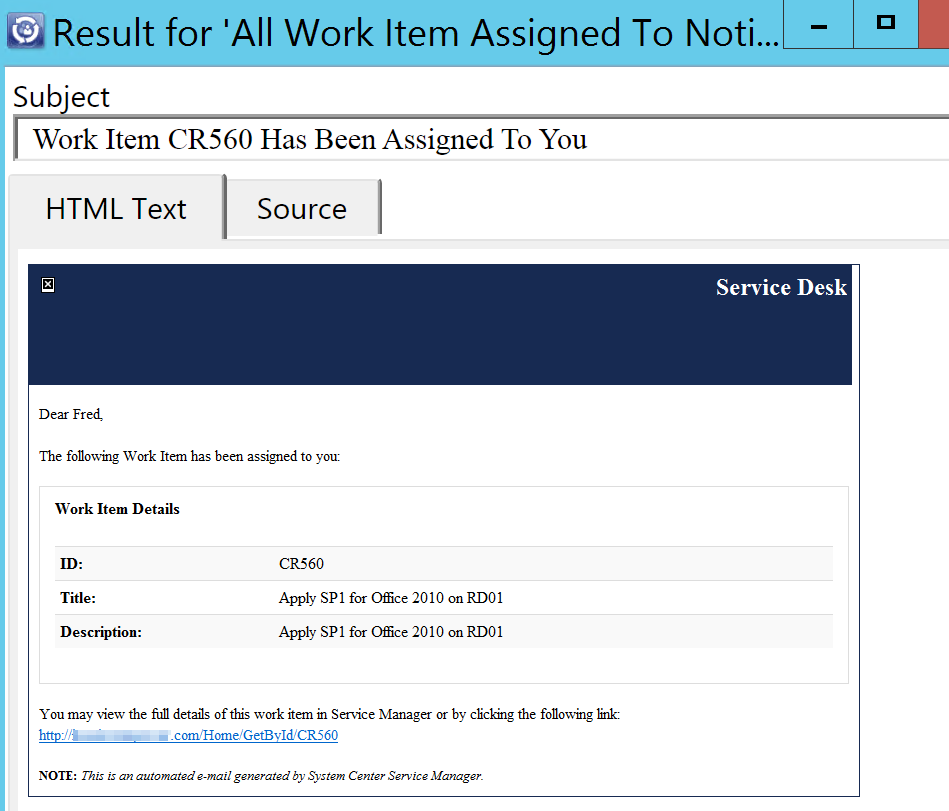
Every time a work item gets assigned or re-assigned to someone, it will send the “assigned to” person an e-mail. The notification template looks like this:

all work items notification template

Feel free to modify the notification templates as you see fit after you have imported the management pack. The .html file for the notification template is also included for easy editing outside of Service Manager.

You can download this solution here:

https://gallery.technet.microsoft.com/All-Work-Item-AssignedReass-96fe40c7

Read more

Customizations in the Service Manager HTML 5 SSP

Microsoft has released a great blog post about customizations that can be done to the Service Manager HTML 5 self-service portal. This article covers the following areas:

  • Title
  • Logo
  • Colors and Tiles
  • Icons
  • New sidebar link

In the article they talk about what is supported and what is not for customizations. They key is that if you make unsupported customizations be sure to back up your customizations. This is because they might be overwritten when an update rollup is applied and Microsoft will not guarantee those customizations will stay intact. This is no big deal if you back your customizations up as you could simply reapply them after an update rollup.

Here is the link to Microsoft’s blog post on this:

https://blogs.technet.microsoft.com/servicemanager/2016/03/15/basic-ui-customization-in-new-self-service-portal-html5/

Now I am writing this blog post for few reasons. #1 There are other customizations that have been blogged about by the community that are not included in Microsoft’s article. #2 I want a central location to document all of the customization articles out there. #3 I am using this as a way to document some of the customizations that I have made for later reference.  Here is the list:


Customising the Service Manager HTML5 Portal

This a blog post on general customizations of the HTMK5 portal.

By System Center MVP Steve Beaumont: http://www.systemcenter.ninja/2015/12/customising-service-manager-html5-portal.html


HTML5 Portal: Search Query!

This covers changing the Refresh box to Search and adding text to the search input box.

By Ryan Ephgrave:

http://www.ephingadmin.com/service-manager-html5-portal-search-query/


HTML5 Portal: Larger Description Text Box

This covers making the text box on forms larger. I know this is a common ask. This is a great blog post to bookmark.

By Ryan Ephgrave:

http://www.ephingadmin.com/service-manager-html5-portal-larger-description-text-box/


Display “Must Vote” by the side of the user name on Change Request Activity in the portal

This can be done by doing following changes in Views\MyActvities\ActtvitiyDetails.cshtml (addition & removal) –

<div class=”name col span_6″ style=”padding:1px;”>@Resources.SelfServicePortalResources.Name</div>

<div class=”name col span_6″ style=”padding:1px;”>Must Vote</div>

<div class=”status col span_6″>@Resources.SelfServicePortalResources.Status</div>

<div class=”comment col span_7″>@Resources.SelfServicePortalResources.Comment</div>

<div class=”voted col span_6 grey-text”>@Resources.SelfServicePortalResources.VotedBy</div>

————————–

<div class=”name col span_6″ style=”padding:1px;”>@reviewerItem.Item1</div>

<div class=”name col span_6″ style=”padding:1px;”>@reviewerDetails[“MustVote”]</div>

<div class=”status col span_6″>@decision</div>

<div class=”comment col span_7″ style=”padding:1px;”>@reviewerDetails[“Comments”]</div>

@if (!reviewerItem.Item2.IsEmpty())

{

<div class=”voted col span_6 grey-text”>@reviewerItem.Item2</div>

}

https://social.technet.microsoft.com/Forums/systemcenter/en-US/8c3af275-820d-4663-8165-46364d6e0040/new-html-5-portal-change-control-user-to-approve-info?forum=portals&tduid=(bbc82b3a96d3ba9c69f8efad24f74430)(256380)(2459594)(TnL5HPStwNw-5ocTrJtqN7jv7JWlYxWHgQ)()


NOTE: When looking for the code to change search for:

@foreach (var item in formData)


Customizations By System Center MVP Steve Buchanan:

GENERAL

clip_image001.png

In the Web.config file change

<!– Customizable fields starts here –>

FOR TITLE CHANGE:<add key=”CompanyName” value=”Buchatech Self-Service Portal”/>

FOR PORTAL LOGO (COMPANY LOGO) CHANGE: <add key=”CompanyLogoLocation” value=”../Content/images/System Center_Cloud_Logo_Transparent.png”/>

FOR NUMBER CHANGE:<add key=”ITPhone” value=”562-309-4042″/>

FOR EMAIL CHANGE:<add key=”ITEmail” value=”support@buchatech.com”/>

You will notice on my side menu I do not have email address and instead of an IT phone number I have “Service Desk Contact Info:” and my Powered By logo and text are custom.

clip_image002.png

To change these go to:

C:\inetpub\wwwroot\SelfServicePortal\Views\Shared

And modify the Sidebar.cshtml file.

Find “<div class=”side_nav_bottom”>” and modify:

<div class=”side_nav_report”>

<div>@Resources.SelfServicePortalResources.PoweredBy :</div>

<img src=”~/Content/images/PrivateCloud_logo1.png” alt=”Private Cloud” style=”max-width: 12em;” />

<br /><br />

I COMMENTED OUT THE DEFAULT TEXT HERE:    <!–<div>@Resources.SelfServicePortalResources.CantFindSolution</div>–>

<!–<div>@Resources.SelfServicePortalResources.ContactUs</div>–>

I ADDED MY OWN TEXT HERE:     <div>Service Desk Contact Info:</div>

</div>

<div class=”row side_nav_phone”>

<span class=”icon-Phone icon-pos icon icon-medium”></span>

<span class=”icon-text icon-text-pos”>@System.Web.Configuration.WebConfigurationManager.AppSettings[“ITPhone”]</span>

</div>

<div class=”row side_nav_mail”>

<span class=”icon-Mail icon-pos icon icon-medium”></span>

<span class=”icon-text icon-text-pos”>@System.Web.Configuration.WebConfigurationManager.AppSettings[“ITEmail”]</span>

</div>


NOTE: Company logo image works best as 32×32.

NOTE: Powered by logo image works best as 36×26.

All images should be stored in: C:\inetpub\wwwroot\SelfServicePortal\Content\images

ICONS

In C:\inetpub\wwwroot\SelfServicePortal\Content\CSS you have to edit the main.css file.

In this file find the [class^=”icon-“].icon-medium{ section.

Here you will see all the font icons. You can add the font icons you want to be available for use in the portals CSS. In the following screenshot I have highlighted the fonts I have added.
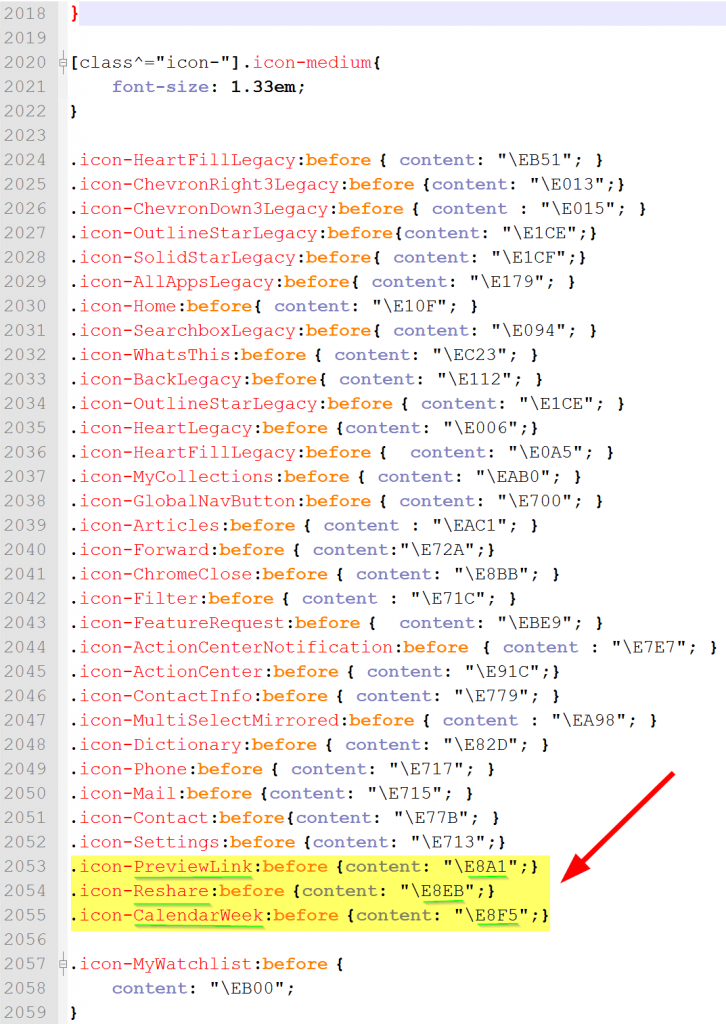
Iconsinmaincss

As stated on the Microsoft blog post you can find the icons that will work with the portal here:

http://modernicons.io/segoe-mdl2/cheatsheet

In the following section I will mark the font icon placement in custom links in blue. This way you can see how they would be used.

SIDE BAR LINKS

In my portal I added some custom sidebar links.
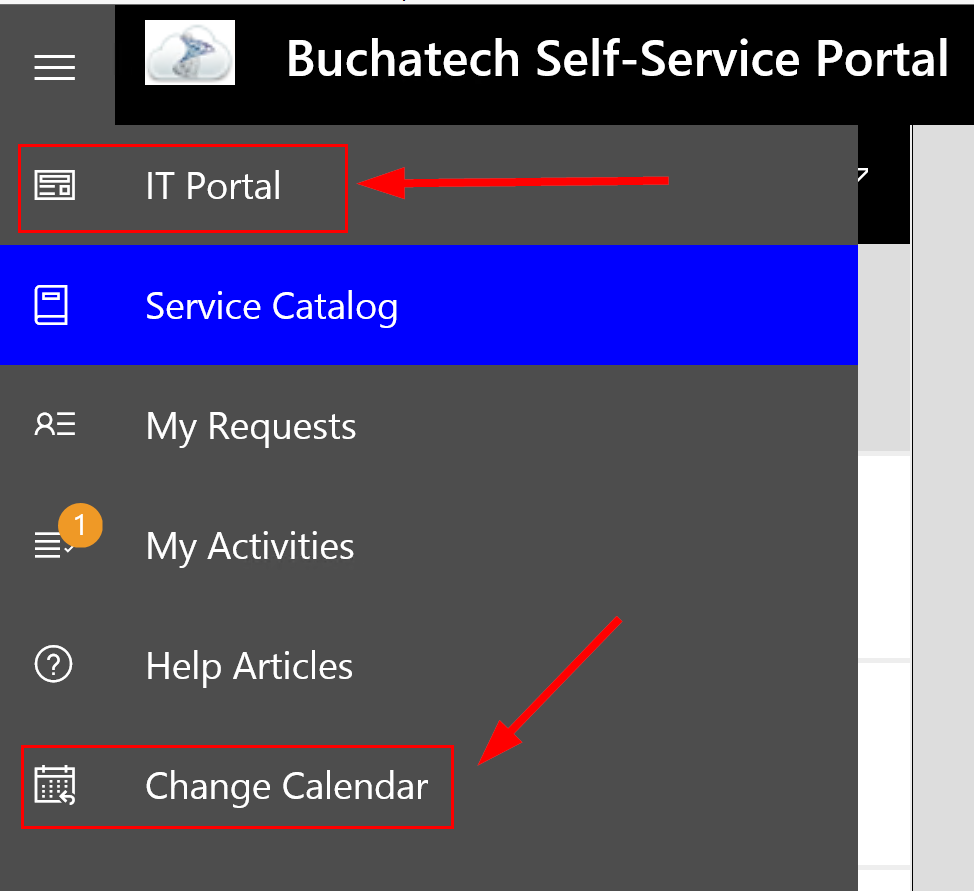
2016CustomlinksonBuchatechSSP02

In C:\inetpub\wwwroot\SelfServicePortal\Views\Shared

Modify the Sidebar.cshtml file.

In the file under “<div class=”side_nav_bar col side_menu”>”

I added the following:

<!– Custom IT Portal Link Begin –>

<div class=”row side_nav_IT Portal” accesskey=”I” tabindex=”4″ data-toggle=”tooltip” title=”IT Portal”>

<a href=”http://portal.buchatech.com” target=”_blank”>

<font color=”white”>

<span class=”icon-PreviewLink icon icon-pos icon-medium”></span>

</font>

</a>

</div>

<!– Custom IT Portal Link End –>

And

<!– Custom Change Calendar Link Begin –>

<div class=”row side_Change Calendar” accesskey=”C” tabindex=”9″ data-toggle=”tooltip” title=”Change Calendar”>

<a href=”http://portal.buchatech.com/_layouts/15/start.aspx#/Lists/Change%20Calendar/calendar.aspx” target=”_blank”>

<font color=”white”>

<span class=”icon-CalendarWeek icon icon-pos icon-medium”></span>

</font>

</a>

</div>

<!– Custom Change Calendar Link End –>


In the file under “<div class=”side_nav_bar_expand col side_menu”>”

I added the following:

<!– Custom IT Portal Link Begin –>

<div class=”row side_nav_IT Portal”>

<span class=”icon-PreviewLink icon-medium icon icon-pos”></span>

<span class=”icon-text icon-text-pos”><a href=”http://portal.buchatech.com” target=”_blank”><font color=”white”>IT Portal</font></a></span>

</div>

<!– Custom IT Portal Link End –>

And

<!– Steve Change Calendar Link Begin –>

<div class=”row side_nav_Change Calendar”>

<span class=”icon-CalendarWeek icon-medium icon icon-pos”></span>

<span class=”icon-text icon-text-pos”><a href=”http://portal.buchatech.com/_layouts/15/start.aspx#/Lists/Change%20Calendar/calendar.aspx” target=”_blank”><font color=”white”>Change Calendar</font></a></span>

</div>

<!– Steve Change Calendar Link End –>


Here is the Microsoft link for adding sidebar links:

https://blogs.technet.microsoft.com/techlazy/2016/03/13/service-manager-new-html5-portal-basic-customizations-55-new-sidebar-link/


COLORS LOOK AND FEEL

Custom Buchatech look and feel:
clip_image004.png

Default look and feel:

clip_image005.png

Read more
Cannot Edit SCSM 2012 R2 UR9 Exported Management Pack in Authoring Tool

I recently ran into a problem where I could not edit a SCSM 2012 R2 UR9 Exported Management Pack in the Service Manager Authoring tool.

When I tried to open my exported MP in the authoring tool it is looking for this file:

Microsoft.EnterpriseManagement.ServiceManager.UI.Authoring.mp

version:

7.5.3079.442

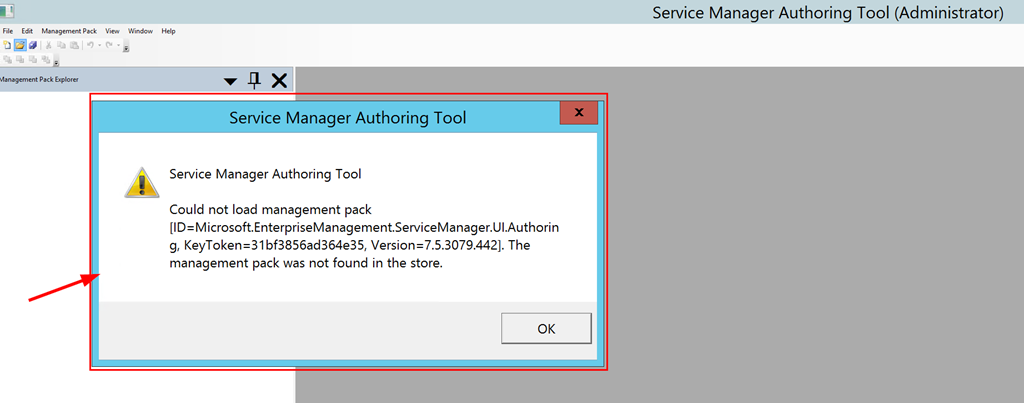
I got this error:

clip_image001.png
Click to enlarge image

The Microsoft.EnterpriseManagement.ServiceManager.UI.Authoring.mp file

does exist in the authoring tool directory here:

C:\Program Files (x86)\Microsoft System Center 2012\Service Manager Authoring\Library

but it is an old version of the Microsoft.EnterpriseManagement.ServiceManager.UI.Authoring.mp file.

The authoring tool has not been updated with the newer management pack files yet. To work around this I opened the exported management pack in Notepad ++ and I searched for the referenced MP “Microsoft.EnterpriseManagement.ServiceManager.UI.Authoring”.

It should find a section like this:

<Reference Alias=”UIAuthoring”>
<ID>Microsoft.EnterpriseManagement.ServiceManager.UI.Authoring</ID>
<Version>7.5.3079.442</Version>

Here I changed <Version>7.5.3079.442</Version> to <Version>7.5.1561.0</Version> and saved the MP.

7.5.1561.0 is an old version that is what the authoring tool is using.

After that I was able to open the MP in the authoring tool.

Read more
Service Manager vs. ServiceNow

I am often asked how does Service Manager compare to ServiceNow. I don’t have a solid canned response for this. I often respond that you really have to compare System Center to ServiceNow because you get the entire suite when you buy System Center not just Service Manager. Also it would be a bad decision to not consider using the other components such as Operations Manager, Orchestrator, and Configuration Manager given the tight out of the box integration with Service Manager and these components.

With ServiceNow you get an ITSM solution but have to pay additional monthly fee’s when you want to add on other functionality such as automation, event management (monitoring), CMDB, or asset management. With System Center you get all of this for the price of System Center and you simply have to turn and configure the additional functionality you want. One more point is that many organizations own and utilize Configuration Manager and or Operations Manager and will often already own the licensing they need to deploy Service Manager.

On December 9th 2015 System Center MVP’s Chris Ross and Pete Zerger held an awesome webinar on System Center + Cireson vs ServiceNow. This was a must see webinar. It covered the often asked about topic of “Service Manager vs ServiceNow“.

These guys did a great job covering the topic. One of the most important areas they covered was Real-world Total Cost of Ownership (TCO) Comparison. TCO is one of the top data points that matter to businesses when they are considering a new ITSM solution.

In this blog post I am going to look at some of the key topics that stuck out to me from the webinar in regards to Service Manager vs ServiceNow. Keep in mind that these comparisons also include Cireson’s software.

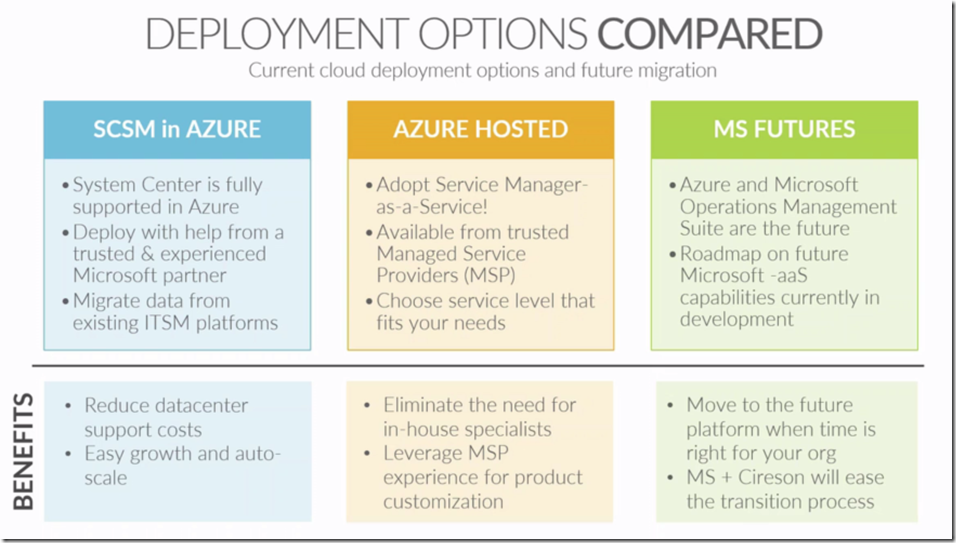
One of the setbacks for some organizations on going with Service Manager is that they believe there is no cloud option for it. That is wrong Service Manager can be deployed in Azure cloud. Also there are a couple of companies that have a SaaS offering for Service Manager. The following graphic looks at the different types of Service Manager deployments and their options.

clip_image001

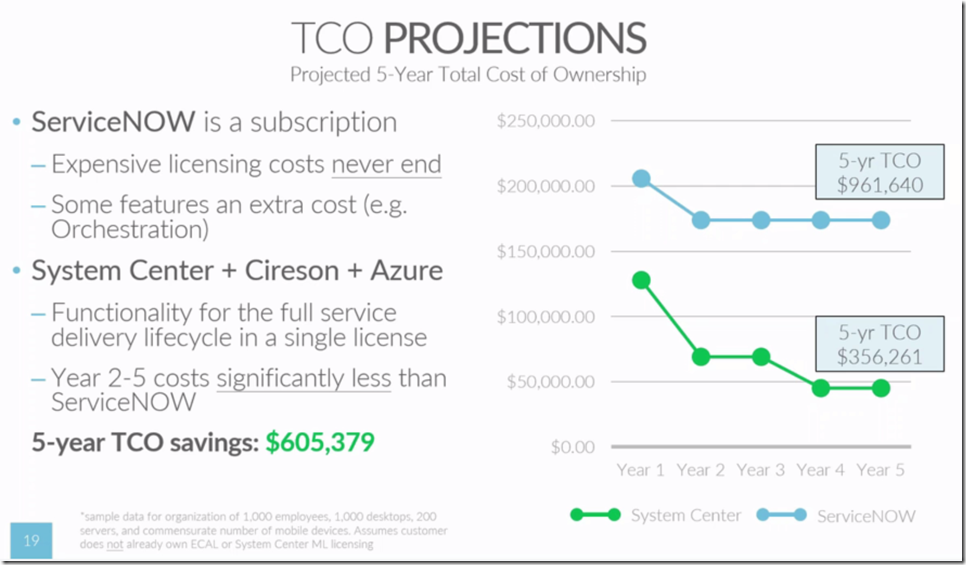
This first chart looks the numbers of the TCO of Service Manager vs ServiceNow if you don’t already own the System Center ECAL licensing.

clip_image002

You will notice that over a 5 year period System Center including Cireson and Azure is lower TCO over ServiceNow. Wow. If this did not include Cireson or Azure the TCO of System Center would be even lower compared to ServiceNow.

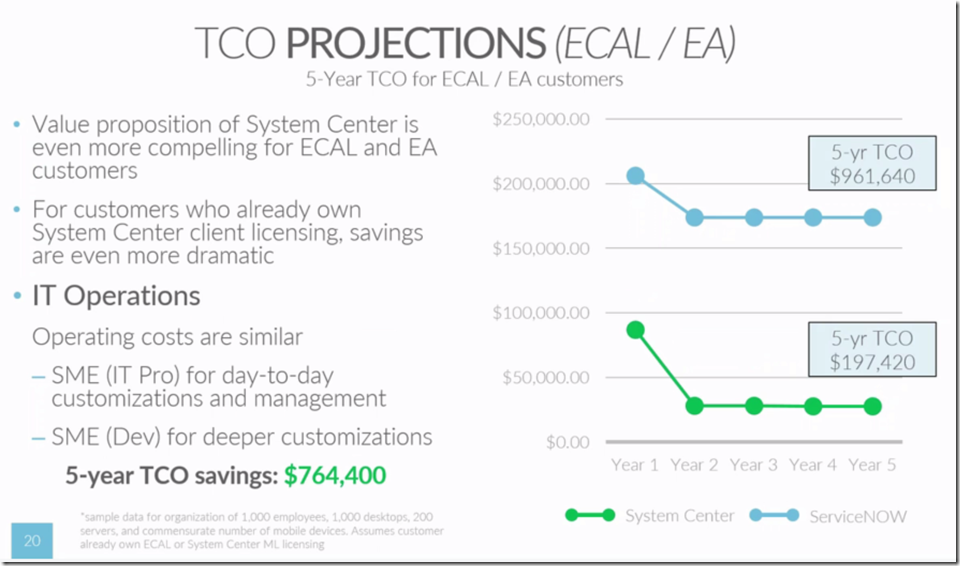
This next chart looks at the TCO of System Center vs ServiceNow if your organization already owns the ECAL licenses or has an Enterprise Agreement (EA) with Microsoft.

clip_image003

This has even deeper savings compared to the first chart. Now remember this includes Cireson software and having Service Manager deployed in Azure.

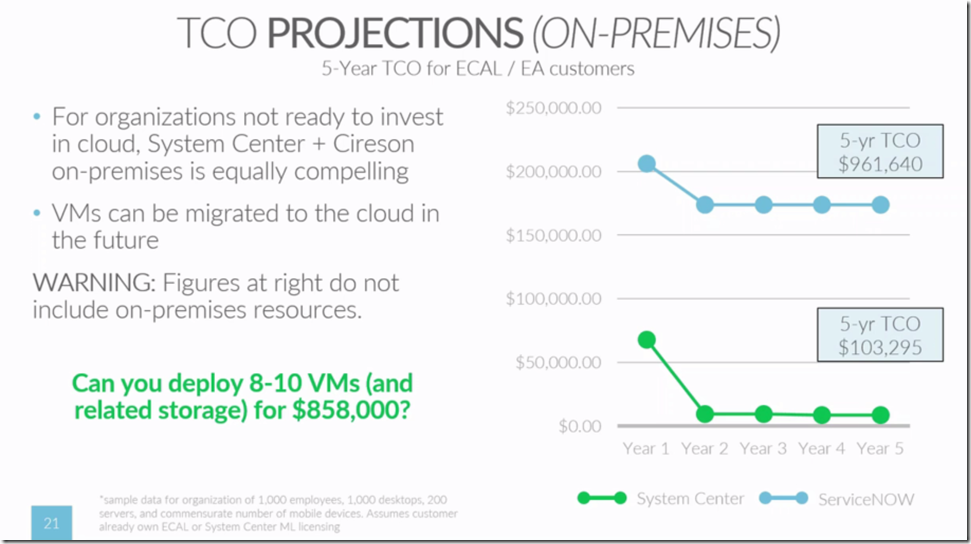
This chart looks at the TCO of System Center vs ServiceNow with System Center being deployed on-premises.

clip_image004

Again the TCO savings with System Center goes even lower. This chart still includes Cireson with System Center. This does not include the cost of the data center fabric storage, VM’s etc… which would typically already be in place before deploying System Center.

The following table compares feature sets of System Center and ServiceNow.

clip_image005

Notice ServiceNow does offer features such as automation and system management but they come at an additional monthly cost. One more item to point out from this slide is that System Center offers functionality that ServiceNow does not such as enterprise and cloud backup through Data Protection Manager and Virtualization and Private cloud Management through Virtual Machine Manager and Azure Pack. ServiceNow does offer Event Management it requires an additional purchase and plugin install.

So I pulled out information from the webinar that stuck out to me. There is much more information in the webinar and context behind each of the charts I included in this blog post. I recommend you watch the full webinar. You can watch the entire webinar right here:

System Center + Cireson versus ServiceNow: A Head-to-Head Comparison from Team Cireson on Vimeo.

NOTE: Below is a link to another blog that covers Service Manager vs ServiceNow.

http://blog.navantis.com/reduce-it-spend-and-increase-performance-choosing-the-right-it-service-desk-tool/

Read more
What is Microsoft Azure Backup Server?

Want to have DPM without having to buy System Center? Now you can. It is called Microsoft Azure Backup Server (MABS). Well MABS is not really a full DPM but a scaled back DPM. Microsoft released Microsoft Azure Backup Server on October 7th, 2015. In this post I am going to break down what Microsoft Azure Backup Server is.

clip_image001

Microsoft Azure Backup Server’s goal is to solve some problems that have existed with Azure backup for a while. These problems are:

  • -No centralization of protected servers with Azure Backup. Historically if you did not have DPM and you only had Azure Backup but needed to protect on premises server you would install the Microsoft Azure Recovery Services Agent (MARS) agent on your on premises servers. They would then be protected up to Azure.
  • -Without DPM Azure Backup can only backup files and folders. To protect workloads like SQL, Exchange up to Azure you needed to protect with DPM first and then send the data up to Azure.
  • -Purchasing a System Center license is not economical for some organizations.

Microsoft Azure Backup Server solves these issues because it is an on premises backup server. Under the hood it is a scaled back DPM so it gives you similar functionality. It lets you protect the same workloads as DPM to disk on premises first and then up to Azure or you can backup directly to Azure. Essentially it gives you two types of protection:

  • – Disk (D2D), giving high RTOs for tier 1 workloads
  • – Azure (D2D2C) for long term retention

Tape protection with Microsoft Azure Backup Server is not possible. This is not included in the product.

MABS also gives you a centralized location on premises to backup your on prem servers to, manage the backup agent of your on prem servers and see the status of their protection. MABS does this without the cost of a System Center license. It can be used when you subscribe to Azure Backup. MABS will require you to provide backup vault credentials during the setup.

From the Microsoft site on MABS pricing: “Microsoft Azure Backup Server will continue to bill customers as per their existing Azure offers (e.g. Pay-as-you-go, EA, Open).” You can learn about Azure Backup pricing here: https://azure.microsoft.com/en-in/pricing/details/backup/

Now to get Microsoft Azure Backup Server you can either go download it directly here:

https://www.microsoft.com/en-us/download/details.aspx?id=49170

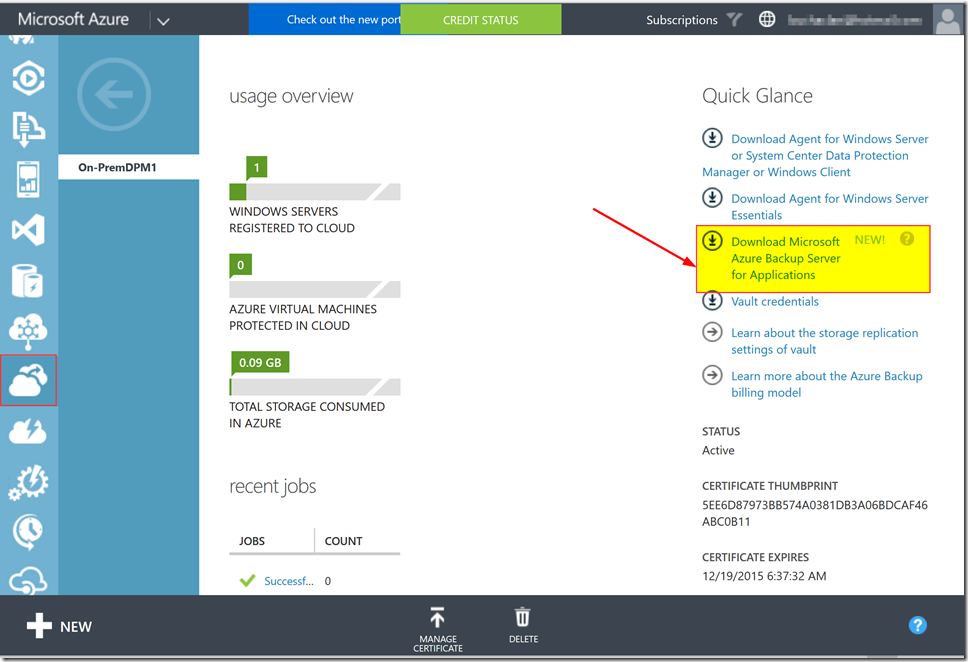
Or you can download from the Azure portal. Go to:

clip_image002

Then click on the “Download Microsoft Azure Backup Server for Applications” link as shown in the following screenshot.

clip_image003

Microsoft Azure Backup Server is great for organizations that need a backup solution without the cost of the entire System Center suite. Keep in mind this does not provide tape backup. However backup up to Azure for offsite is a cost effective solution and also now gives you on premises backup to disk as well.

Here is an official blog post on Microsoft Azure Backup Server along with “how to” videos. These videos will help you install and configure Microsoft Azure Backup Server. https://azure.microsoft.com/en-us/blog/announcing-microsoft-azure-backup-server/

Read more
Patch Management Integration with Service Manager & ConfigMgr

Back in November I presented a session on automation at MMS 2015 with Natascia Heil. The session was “Real world Automation with Service Manager and Azure Automation”.

As a part of this session Natascia Heil demo’d how to patch servers in SCCM via Service Manager! Essentially she was able to create a change request in Service Manager pulling in a software update and device collection into the change request and then Orchestrator talked to SCCM to apply the patch to the server.

This is awesome because it brings ITIL into the patching process and gives you a way to document applied patches and who applied the patch.

As a follow up to our session she has published a step by step post on the solution from the demo, the files used in the demo, and a complete video demoing the solution. This is another example of great community involvement in the System Center space as well as the kind of content you will see at MMS. Thanks Natascia for sharing this with the community.

Watch the video here:

Visit her blog post here:
https://systemcentertipps.wordpress.com/2015/12/18/orchestrator-2012-start-server-patching-from-service-manager/

Download the solution files here:
https://gallery.technet.microsoft.com/Patch-servers-with-SCSM-20ff1c66?tduid=%281b41a0287eb092bdef4fbcdd40d042b0%29%28256380%29%282459594%29%28TnL5HPStwNw-P.Z5y4TYC73yMs5ovpkyAA%29%28%29

Read more
Backup Summary Report Update v2

So recently Sebastien Weiland reached out to me and wanted to help update the DPM Backup Summary Report. A HUGE THANKS to him for diving in and looking at the tape issues and time issues. The report has been updated. Here are the changes:

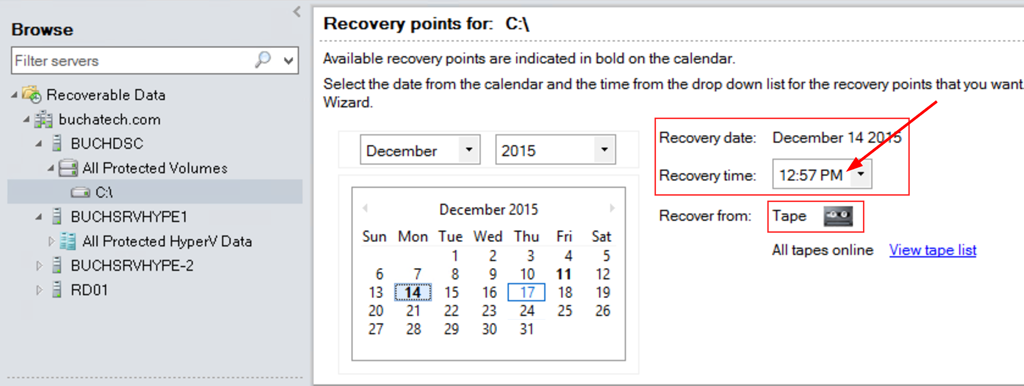
  1. The report has been changed from UTC time to local time. So now the time on the report will match up exactly to the time of the recovery points in the DPM console. See the following screenshots:

In the DPM console:

clip_image001.png

On the report:

clip_image002.png

  1. Tape information is now showing properly in the report. Protection Groups with Disk +Tape will show data or Protection Groups with only Tape will show in the report. You have the option to select only tape or disk + tape as shown in the following screenshot.

clip_image003.png

Here is a screenshot of the full v2 report.

clip_image004.png

This is the perfect example of community coming together to work on a solution that benefits all! I have not had the time to dive in and adjust the SQL to resolve these few issues so Sebastien volunteered to take this on with me testing and verifying things. I want to give one more thanks to Sebastien for helping out. More info about him: Sebastien Weiland is the Head of IT at a Hospital located France. His LinkedIn profile can be found here: https://fr.linkedin.com/in/sebastienweiland. 

Here is a link to download the v2 report:

https://gallery.technet.microsoft.com/DPM-Backup-Summary-Report-4533bcc6

Happy Reporting!

NOTE: This is a community report. This report is not officially supported by Microsoft. Use at your own Risk. It is still recommended to use the official Microsoft Enhanced Reporting. Check out this link for a post on the DPM Enhanced Reporting: https://www.buchatech.com/2015/05/deploy-configure-dpm-enhanced-reporting/

Read more
SCSM HTML 5 Portal Hotfix (KB3124091)

On December 11th 2015 Microsoft released a hotfix for a bunch of issues with the new SCSM HTML 5 portal along with some new features. Here is the link to this: https://www.microsoft.com/en-us/download/details.aspx?id=50362

In this post I will explore some of the new features in PART 1 and describe my experience applying the hotfix in PART 2.

PART 1

New features include:

Nested enumeration lists are now supported inside the Request offering forms

NOTE: This was a feature I asked for and I am very happy to see this. When I setup Service Manager notifications I typically pull in the portal URL for certain things such as request offerings or work items. This makes it really easy for the end user to reach what they need right from an email. Below I will show some examples of what the direct links look like.

Portal now allows you to share and access different objects inside the portal with direct URLs. You can refer individual items inside the portal with following URL formats –

Request Offerings:
https://[website_name]/Home/Makeform?BMEID=[bme_id]

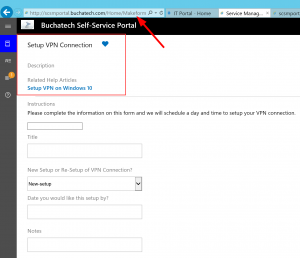
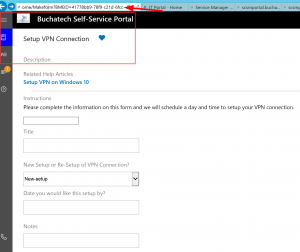
NOTE: Notice in the screenshot I am linked directly to http://scsmportal.buchatech.com/Home/Makeform?BMEID=41778bb9-78f9-c21d-6fcc-000069f87c13 vs the default http://scsmportal.buchatech.com/Home/Makeform. I could send someone this link and bring them directly to the RO.

Without Direct Link Direct Link
 SCSMSSPHF1  SCSMSSPHF2

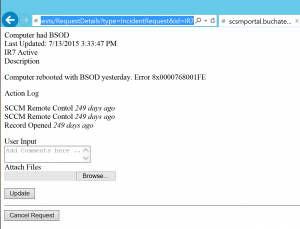
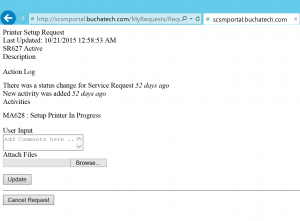
NOTE: Notice the two following screenshots show a direct link for an Incident and Service Request. These do not contain the side navigation of the portal.

Incident type requests:
https://[website_name]/MyRequests/RequestDetails?type=IncidentRequest&id=[incident_id]

SCSMSSPHF3

Service Request type requests:
https://[website_name]/MyRequests/RequestDetails?type=ServiceRequest&id=[service_request_id]

SCSMSSPHF4

Manual Activities:
https://[website_name]/ MyActivities/ActivityDetails?type=ManualActivity&id=[manual_activity_id]

Review Activities:
https://[website_name]/ MyActivities/ActivityDetails?type=ReviewActivity&id=[review_activity_id]

Help Articles:
https://[website_name]/KnowledgeBase/article/[id_of_knowledge_article]

Fixes include:

  • Affected user and Created by user is getting set to the service account
  • Query type form element is not working for the Incident and User classes
  • Request Offering forms are failing to load if a Query type form element is part of the form
  • Username token is not passing values to the mapped field
  • Cancelling request form does not work
  • Text is overlapping for long strings inside the list in the middle pane
  • Related activities inside My Requests always show state as active
  • Filters inside My Requests and My Activities is not working for some languages
  • Announcement is showing “Invalid Date” in Expired Date column for some languages
  • Comments in the request are using incorrect class
  • Required (mandatory) restriction is not working on query type form element
  • Query form element allows multiple selection even when it is configured for single item selection
  • Scroll bar does not work on some lower screen resolutions
  • Double scroll bar appears while browsing Help Articles
  • Some areas of portal are not rendering in Mozilla Firefox web browser
  • My Activities shows 0 instead of removing the notification sticker when no activity is in progress
  • With SSL enabled, the browser regularly prompts the message “Only secure content is displayed” with a button to “Show all content” while browsing the portal
  • “Added by” inside the action logs show domain\username instead of the display name of the user

NOTE: There are some outstanding issues. The Service Manager team is going to have the remaining issues fixed with the next Update Rollup release.


PART 2

My Experience:

In this post I will describe my experience applying the SCSM HTML 5 Portal (KB3124091) Hotfix.

I first took a complete backup of my SelfServicePortal directory and stored this somewhere safe. This directory can be found in <DRIVE>\inetpub\wwwroot\SelfServicePortal\.

Downloaded the hotfix and ran the executable on my portal server. This was an easy click through of a wizard. There was no errors with this.

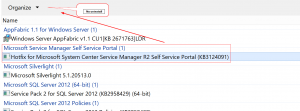
After this completed I verified that the hotfix was applied by checking for Hotfix for Microsoft System Center Service Manager R2 Self Service Portal (KB3124091) in Programs and Features>Installed Updates in Control Panel.

NOTE: I noticed that when the hotfix was highlighted it did not have an option to uninstall.

SCSMSSPHF10

I then restarted my portal server.

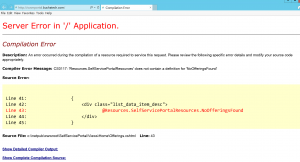
When the server came backup I went to access my portal and was receiving the following error.

SCSMSSPHF5

From the image you can see that it was basically telling me I did not have any Service Offerings. This was not true. I went to my Service Manager to double check and make sure that my Service Offerings were still intact and they were. I saw it was looking for the Service Offerings in the Offerings.cshtml file.

Next I went to my backup in SelfServicePortal\Views\Home and copied the Offerings.cshtml file to SelfServicePortal\Views\Home on the portal server. I ran an iisreset from an elevated command prompt after that my portal was working again.

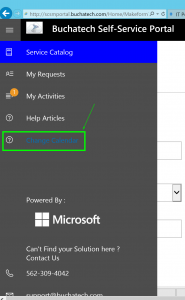
First thing I did was check my navigation as I had a custom navigation link and it was still there along with my custom look and feel. See the following screenshot.

SCSMSSPHF6

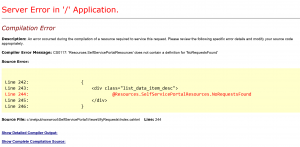
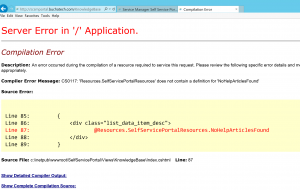
Even though the home page of my Service Catalog was working when I clicked on anything such as My Requests, Help Articles, my Service Offerings I received messages that these things were missing. See the following screenshots with the errors I received.

My Requests erroring out:

SCSMSSPHF7

Help Articles erroring out:

SCSMSSPHF8

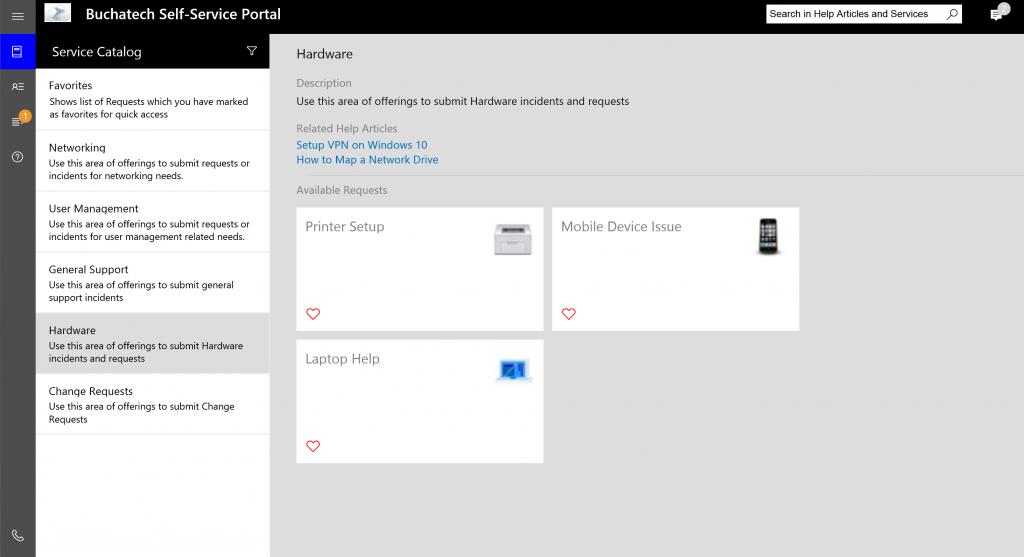
I started fixing these one by one by copying in the source files from my backup. Everything was broken so I decided to copy in all the folders from backup in the SelfServicePortal\Views folder to the portal server. I then ran an iisreset checked the portal and everything was working.

SCSMSSPHF9

NOTE: I did not copy over _ViewStart.cshtml or Web.Config.

So the point of this post is backup your old SelfServicePortal directory before you apply the hotfix. And after you apply the hotfix you may need to copy the subfolders from the SelfServicePortal\Views folder if you run into errors.

Read more
Service Manager Service Desk Ticker

Have you ever wanted a way with Service Manager to send out a notification to end users? Yes you can do this via email or some other method but how about displaying the notification directly on their computer so that they cannot ignore it. Well Cireson has created a Service Desk Ticker app that does this. Here is the official description of the app from their site:

Out of the box, Service Manager allows you to create announcements, such as “Email is down, Internet is not working, maintenance in Building 2, Floor 4”, but doesn’t actually let you communicate those announcements to your organization in any way. The Service Desk Ticker app enables an analyst to create an announcement within Service Manager and communicate those announcements directly to an employee’s computer in real-time.

This is pretty cool and the best part is that this app is free. One of my recent clients needed such a tool so I try out this app. The app consists of three files and a very easy install process:

Cireson.Ticker.App.Setup.msi – A client MSI that needs to be installed on end user computers. This is what displays the notification to the end users.
Cireson.Ticker.App.Admin.mpb – Is the management pack that needs to be imported into your Service Manager.
Cireson.Ticker.App.Workflows.dll – This needs to be copied to your Service Manager server.

You can even do a silent install of the client MSI file using a tool such as SCCM. Here is the syntax for that:

Cireson.Ticker.App.Setup.msi CONFIGPATH=”\\yourserver\yourshare\your folder” CHECKINTERVAL=60 /q

Here is my install experience:

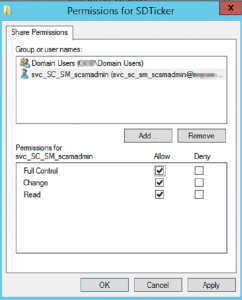
I created a share for the SD Ticker app like \\ServerName\SDTicker and gave it the following permissions I gave domain users read access and the SCSM Workflow account full rights on the share.

SDTicker1

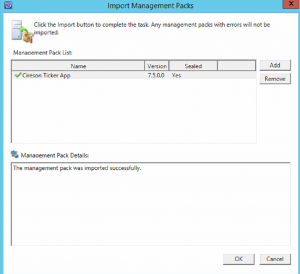
I imported the (Management Pack) MPB file into my Service Manager.

SDTicker2
I copied the Cireson.Ticker.App.Workflows.dll to C:\Program Files\Microsoft System Center 2012 R2\Service Manager on my Service Manager management server.
I closed the SCSM console and launched it again.
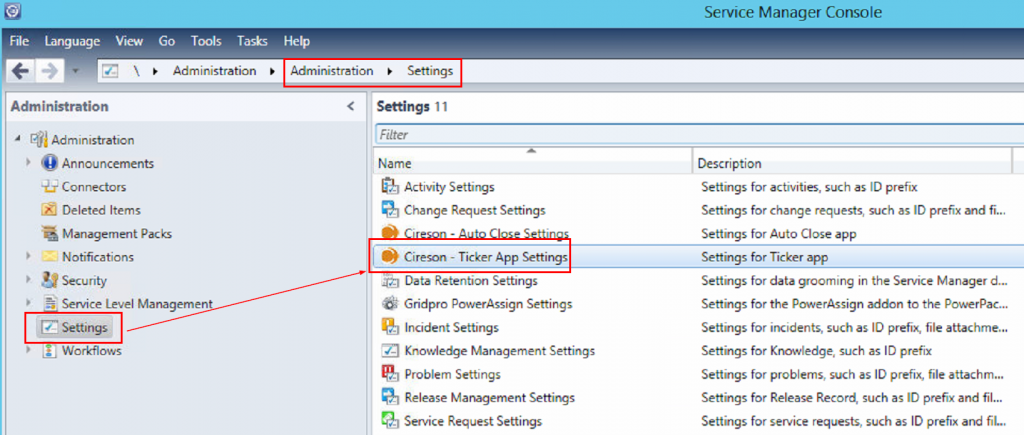
I then went to Administration>Settings and opened Cireson Ticker App Settings.

SDTicker3

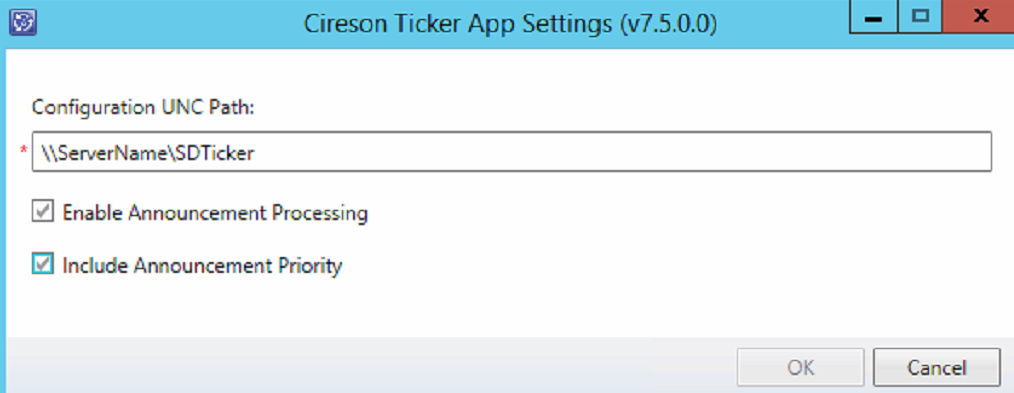
The following screenshot is what the Cireson Ticker App Settings look like. Be sure to put in your share path here and tick the Enable Announcement Processing as this is what makes your Service Manager announcements show up on the end users’ desktop. Also check the Include Announcement Priority if you want to include the priority level with announcements.

SDTicker4

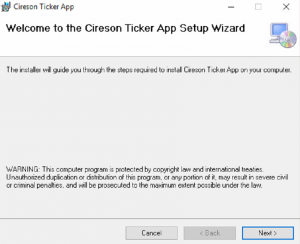
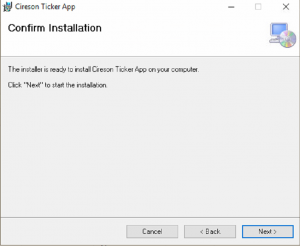
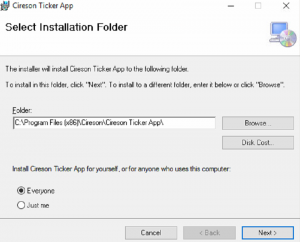
Now on a client computer I went and installed the Cireson.Ticker.App.Setup.msi. Here is what this looked like:

SDTicker5

SDTicker6

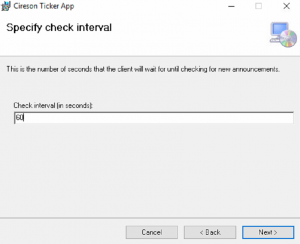
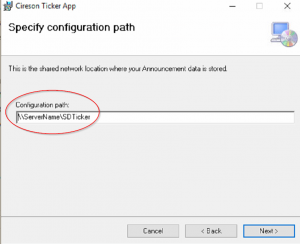
On this next screen I had to put in the path to the share I setup earlier. This is where it will definitely be faster and more efficient to deploy the client using the silent install.
SDTicker7

SDTicker8

SDTicker9

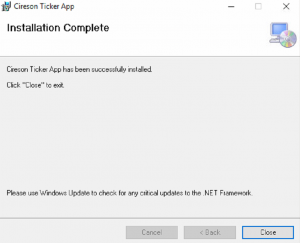
And the install should finish successfully.

SDTicker10

Testing the App:

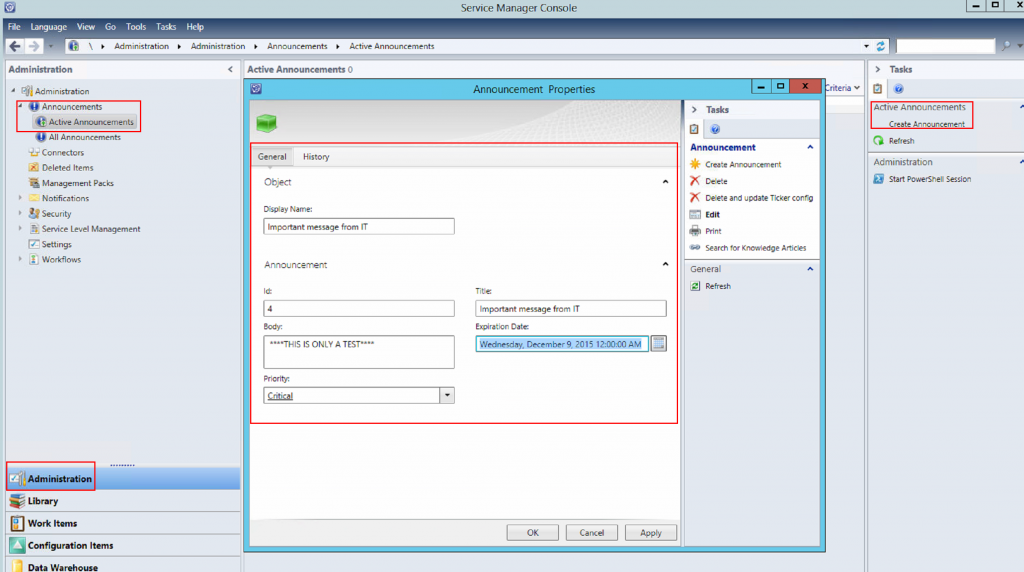
Then I went back to Service Manager and created a new announcement to test the ticker app. To do this from the SCSM console go to Administration>Announcements>Active Announcements and click on Create Announcement.

SDTicker11

After the announcement is created it will display on the end users computer when the workflow runs on the next 60 second interval.

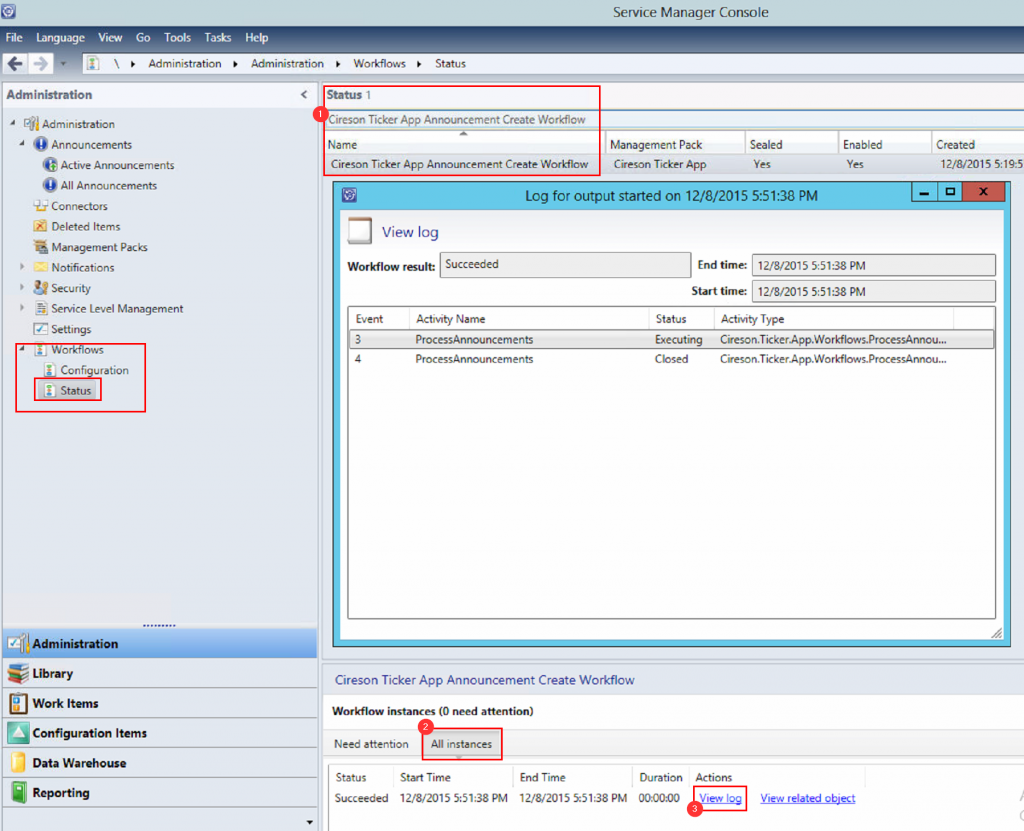
To check the workflow go to SCSM Console>Administration>Workflows>Status. Filter on “Cireson Ticker App Announcement Create Workflow“. In the bottom of the workflow pane click on All Instances and then click on View log. This will open up the status about the workflow so you can make sure it is running. You will be able to see the last time it ran.
SDTicker12

Boom there it is, the announcement on my client.

SDTicker13

In case this is not working for you here are some troubleshooting steps:

  • Make sure you are seeing this “Cireson.Ticker.App.Announcements.xml” file in your share.
  • Double check your permissions are correct on the file share.
  • Double check the share path is correct both in Service Manager in the Cireson App Ticker Settings and in your client.
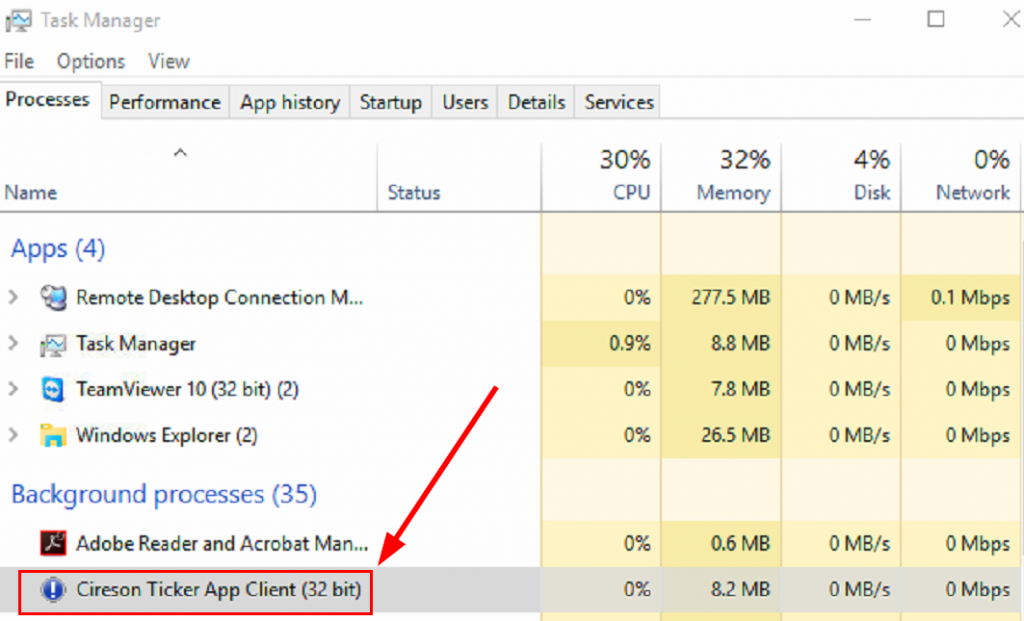
  • Make sure the client app is running on the client computer and monitoring for announcements. You should see Cireson Ticker App Client running as a process in Task Manager in the task bar.

SDTicker14

  • If it is not running you can click on the app’s .exe here: C:\Program Files (x86)\Cireson\Cireson Ticker App to launch it. NOTE: It does automatically start at Windows logon.

SDTicker15
Well I hope you enjoyed this post.

You can download the free Service Desk Ticker App here:

http://cireson.com/apps/service-desk-ticker/

Read more