When working with Containers a common need is to store Container images somewhere. Container Registries are the go-to for this. Docker hub is an example of a Container Registry and it is the most well-known Container Registry.
What is a Container Registry?
A Container Registry is a group of repositories used to store container images. A container repository is used to manage, pull or push container images. A Container Registry does more than a repository in that it has API paths, tasks, scanning for vulnerabilities, digital signature of images, access control rules and more.
Container registries can be public or private. For example, a public registry is Docker Hub and anyone can access its container repositories to pull images. A private registry is one that you would host either on-premises or on a cloud provider. All of the major cloud providers including Azure has a Container Registry offering.
Integrate ACR with AKS
With AKS it is a good idea to use a private container registry to host your container images. The process is used Docker to build your image>push the image to your Azure Container Registry>Pull the image from the registry when deploying a Pod to your AKS cluster.
There are 3 ways to integrate AKS with Azure Container Registry. I typically only use one way and will focus on that in this blog post.
2 of the ways you can integrate AKS with Azure Container Registry. The first is through an Azure AD service principal name (SPN) that assigns the AcrPull role to the SPN. More on this here. You would use this first way in scenarios where you only have one ACR and this will be the default place to pull images from.
The second is to create a Kubernetes ServiceAccount that would be used to pull images when deploying pods. With this you would add “kind: ServiceAccount” to your Kubernetes cluster and it would use the ACR credentials. Then in your pods yaml files you would need to specify the service account for example “serviceAccountName: ExampleServiceAccountName”.
The way I like to integrate AKS with Azure Container Registry is to use Kubernetes Secret of type docker-registry. With this option basically, you create a secret in the Kubernetes cluster for your Azure Container Registry. You then specify the secret in your pod yaml files. This allows you to have multiple container registries to pull from. This option is also quick and easy to setup. Ok.
To get started you need to build your Docker image and push it up to your Azure Container Registry. In this blog post, I will not cover deploying ACR, or building the Docker image assuming you have already done these things. Now let’s set up the ACR and AKS integration using a docker-registry Kubernetes secret.
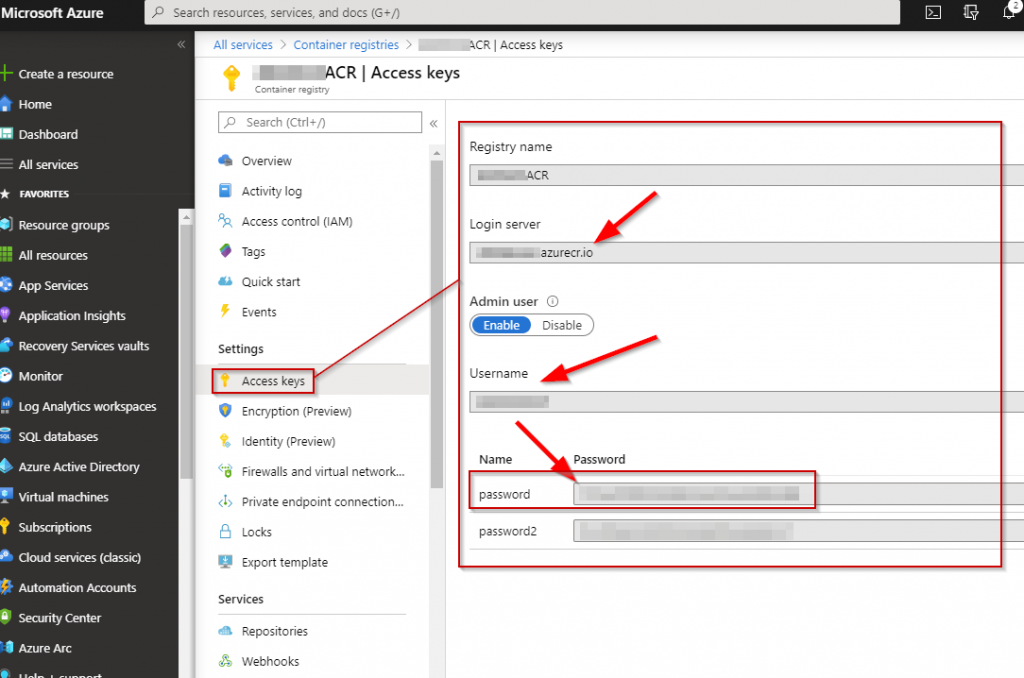
1. For the first step, you will need the credentials to your Azure Container Registry. To get this go navigate to:
Azure Portal (portal.azure.com) > Container registries > YOURCONTAINERREGISTRY | Access keys
2. The second step push your Docker image up to your ACR.
# Log into the Azure Container Registry
docker login ACRNAMEHERE.azurecr.io -u ACRUSERNAMEHERE -p PASSWORDHERE

# Tag the docker image with ACR
docker tag DOCKERIMAGENAMEHERE ACRNAMEHERE.azurecr.io/DOCKERIMAGENAMEHERE:v1

# Push the image to ACR
docker push ACRNAMEHERE.azurecr.io/DOCKERIMAGENAMEHERE:v1
3. The third step create the docker-registry Kubernetes secret by running following syntax from Azure Cloud Shell:
kubectl create secret docker-registry NEWSECRETNAME --docker-server ACRNAMEHERE.azurecr.io --docker-username ACRUSERNAMEHERE --docker-password YOURPASSWORDGOESHERE4. The fourth step is to create the Yaml file for your pod. The following is an example:
apiVersion: v1
kind: Pod
metadata:
  name: myapp
spec:
  containers:
  - name: myapp
    image: ACRNAMEHERE.azurecr.io:myapp:v1
  imagePullSecrets:
  - name: NEWSECRETNAME
The following is an example of a yaml file with a service, deployment, and pod:
apiVersion: v1
kind: Service
metadata:
  name: eotdservice
spec:
  type: LoadBalancer
  ports:
    - port: 80
      targetPort: 80
  selector:
    app: eotd
---
apiVersion: apps/v1
kind: Deployment
metadata:
  name: eotddeployment
  labels:
    app: eotd
spec:
  replicas: 4
  selector:
    matchLabels:
      app: eotd
  template:
    metadata:
      labels:
        app: eotd
    spec:
      containers:
      - name: eotd
        image: ACRNAMEHERE.azurecr.io/eotd:v1
        imagePullPolicy: Always
        ports:
        - containerPort: 80
      imagePullSecrets:
       - name: NEWSECRETNAME
5. The fifth and final step is to deploy the pod to your AKS cluster by running the following syntax from Azure Cloud Shell.
kubectl apply -f YOURPODNAME.yamlThat wraps up this blog post. Thanks for reading and happy containerizing!
