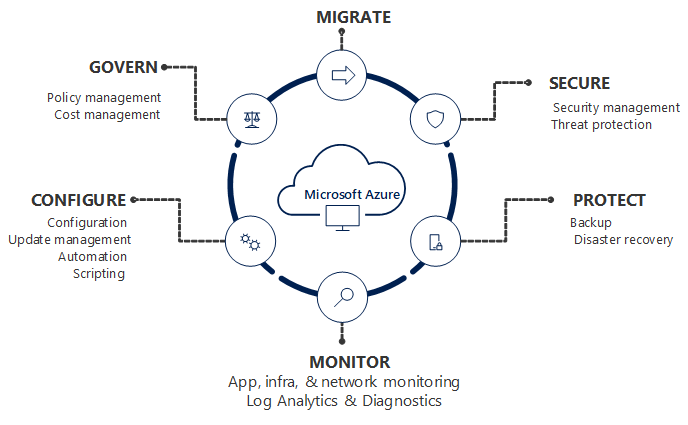
Migrating to Azure is a big task and should not be taken lightly. It is important to do your due diligence when embarking on this journey. There have been tools available for a while to assist in migrating to public clouds both for Microsoft Azure and non-Microsoft. Some of the tools out there have been designed and built for Azure migrations and some originally for backup and or disaster recovery but work well helping to migrate workloads. Also with cloud there is IaaS, PaaS, and even SaaS. When looking to migrate from on-premises those are the types that you look at moving to. In this blog post I will talk about migrating to IaaS on Azure and will take a look at the newly announced migration tool from Microsoft. This new migration tool from Microsoft is called Azure Migrate. It was announced here: https://azure.microsoft.com/en-us/blog/announcing-azure-migrate and it is still in a limited preview. The most common type of migration project from on-premises to Azure is known as a Lift and Shift to IaaS. This is the standard approach including the tooling:
Stage 1: Discover and assess on-premises environment and workloads that will be moved to Azure.
Stage 2: Stage targeted environments in Azure.
Stage 3: Replicate servers up to Azure.
Stage 4: Optimize migrated workloads i.e. security, backup, sizing, performance, and cost.
The typical tooling used mapped to each stage is as follows:
Stage 1: Azure Migrate or 3rd party (Manual, Movere, Cloudamize, DynaCenter, CloudEndure, Unitrends, Stratozone, CloudAtlas and more)
Stage 2: Azure portal, PowerShell, ARM
Stage 3: Azure Site Recovery (ASR)
Stage 4: Security Center, Azure Backup, ASR, OMS, and Cloudyn
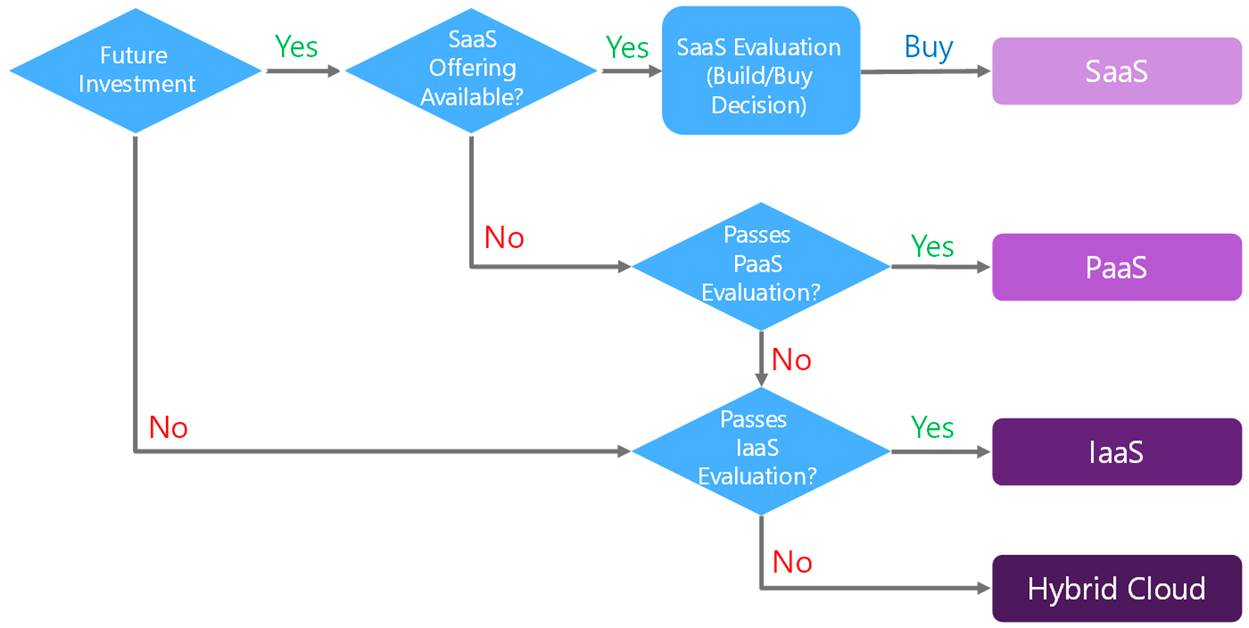
Now it is common in stage 1 to assess workloads that can move to SaaS or PaaS. Below is a Workload Cloud Migration Decision Tree that can be used to help determine the placement of workloads as you look at migrating to the Azure:
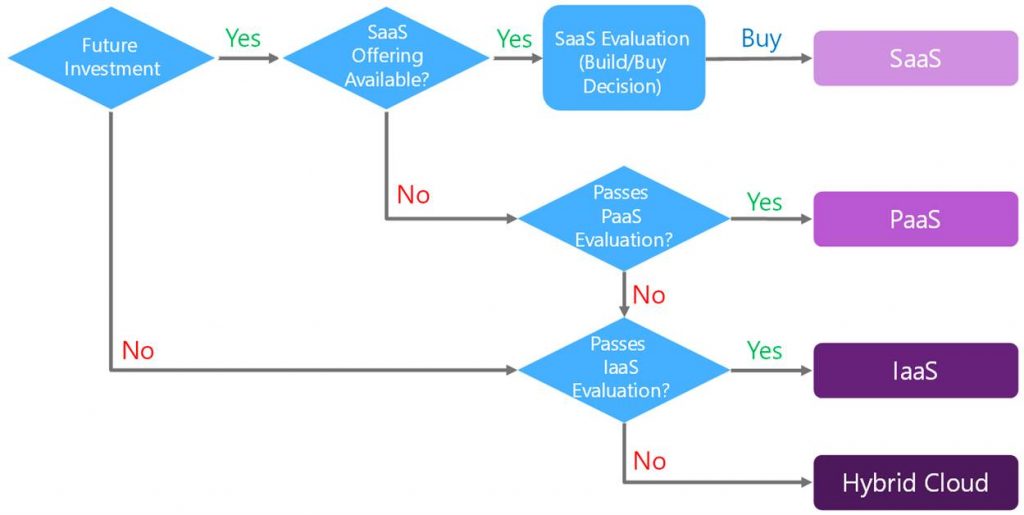
This decision tree flow is from the Azure Operationalized session MVP Natascia Heil and myself delivered in 2017 at MMS. Notice in the Workload Cloud Migration Decision Tree that SaaS is first then PaaS, then IaaS and finally Hybrid Cloud. That is the order workloads should be targeted in as the top typically has the lowest cost and greatest amount of savings when moving to cloud. Also take note that Hybrid Cloud is Azure Stack.
Reminder in this blog post we are only talking about IaaS as that is what the Azure Migrate tool can help with as of now. This may change later expanding to cover PaaS and I hope it does!
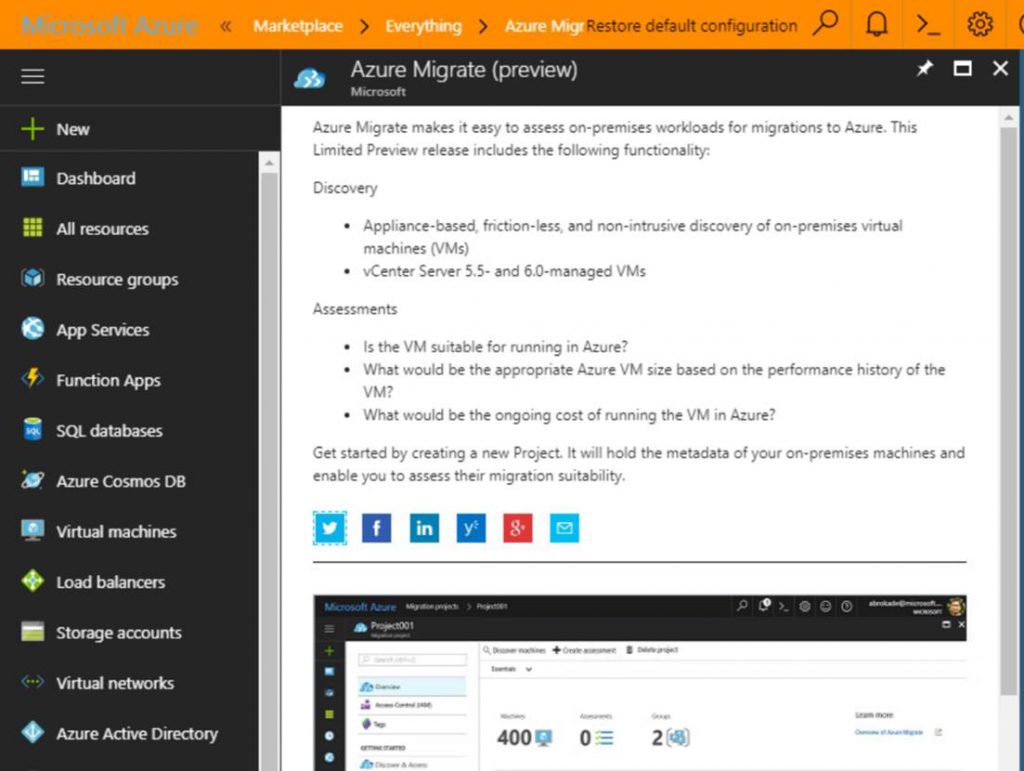
Azure Migrate was announced at Ignite 2017. It is still in a limited preview. I am fortunate to have access to it and was given the green light to blog about it. Azure Migrate can help with stage 1 of an Azure migration project. Azure Migrate helps eliminate a fair amount of the manual work needed in Azure migration projects. Currently Azure Migrate only evaluates environments and workloads running in VMWare vSphere. Later the goal is to add Hyper-V and physical servers as platforms that can also be assessed.
Azure Migration helps you assess Azure readiness, Size recommendations, Monthly cost estimate, and visualizing dependencies. These breakdown as:
– Azure readiness of on-premises virtual machines. This looks at things such as the type of BIOS, OS version.
– Size recommendations gives you a recommended Azure IaaS VM sized based on the VM’s on-premises performance history.
– Monthly cost estimate is the total cost you will incur running your servers in Azure. This is broken down as compute and storage costs.
– Visualizing dependencies is basically utilizing Service Map to visualize dependencies between servers so you can scope out servers that make up a workload at the application level and quickly determine any potential issues with migrating.
The Azure Migrate tool looks at the following items as a part of the assessment:
Target location
The Azure location to which you want to migrate.
Storage redundancy
The storage option that Azure VMs will use after migration. Currently, Azure Migrate supports only Locally redundant storage (LRS) only.
Pricing plans
The assessment takes into account whether you’re enrolled in Software Assurance and can use the Azure Hybrid Use Benefit, and whether you have any Azure offers that should be applied. It also allows you to specify any subscription type.
Pricing tier
Azure Migrate allows you to specify the pricing tier (basic/standard) of the Azure VMs. This helps you migrate to the right Azure VM family, based on whether your on-premises environment is in production or not.
Performance history
By default, Azure Migrate evaluates on-premises machine performance using a month of history, with a 95% percentile value. This can be modified.
Comfort factor
Azure Migrate considers a buffer (comfort factor) during assessment. This buffer is applied on top of the utilization data of VMs (for CPU, memory, disk and network). The comfort factor is added to account for matters such as seasonal usage, short performance history, and likely increases in future usage. For example, normally a 10-core VM with 20% utilization will result in a 2-core VM.
Note: Above list is from the limited preview user guide and subject to change once Azure Migrate is out of preview.
Overall I found Azure Migrate easy to setup, configure and use. Now let’s check out the tool.
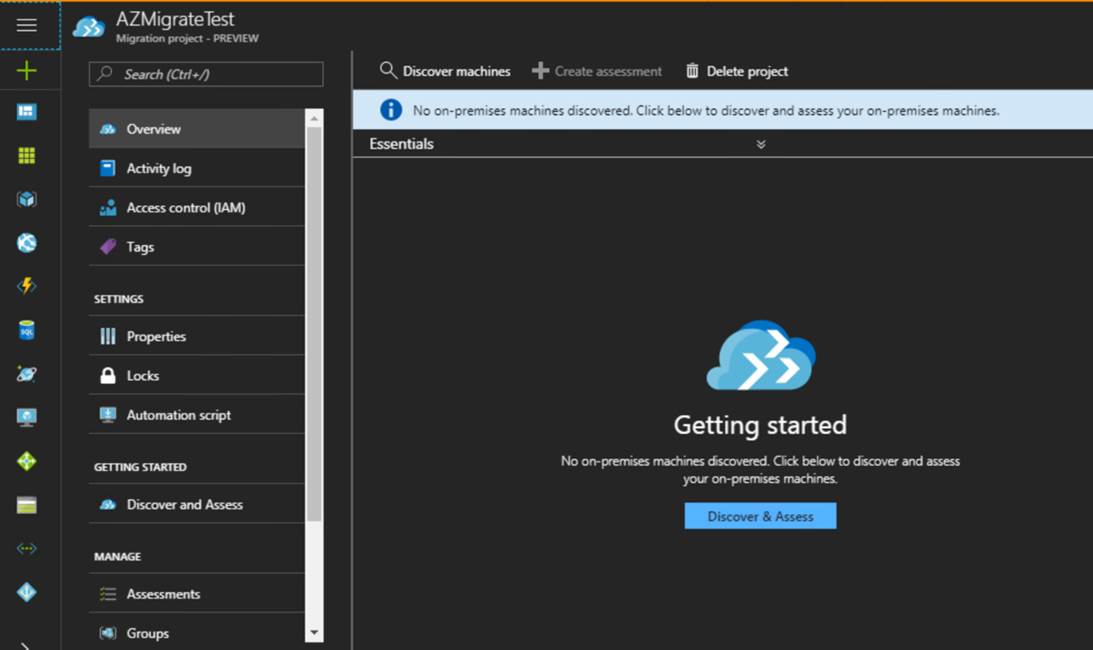
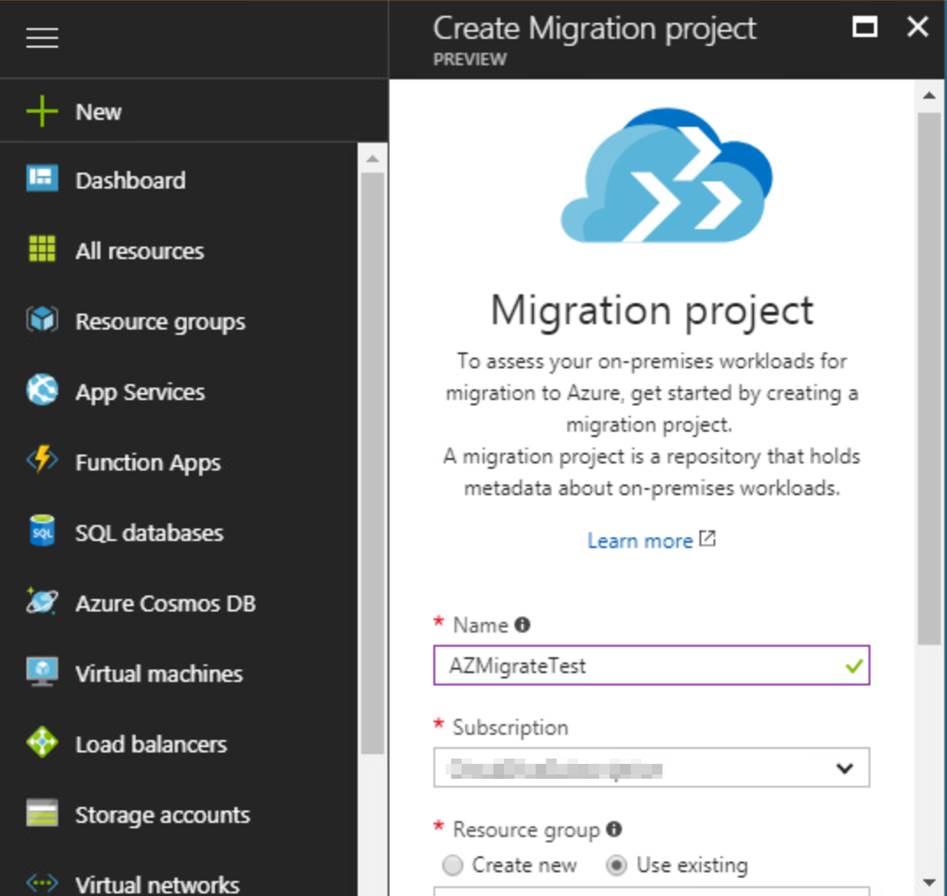
When you go into the Azure portal you basically create a new migration project. This is stored in it’s own resource group. You can create multiple of these.
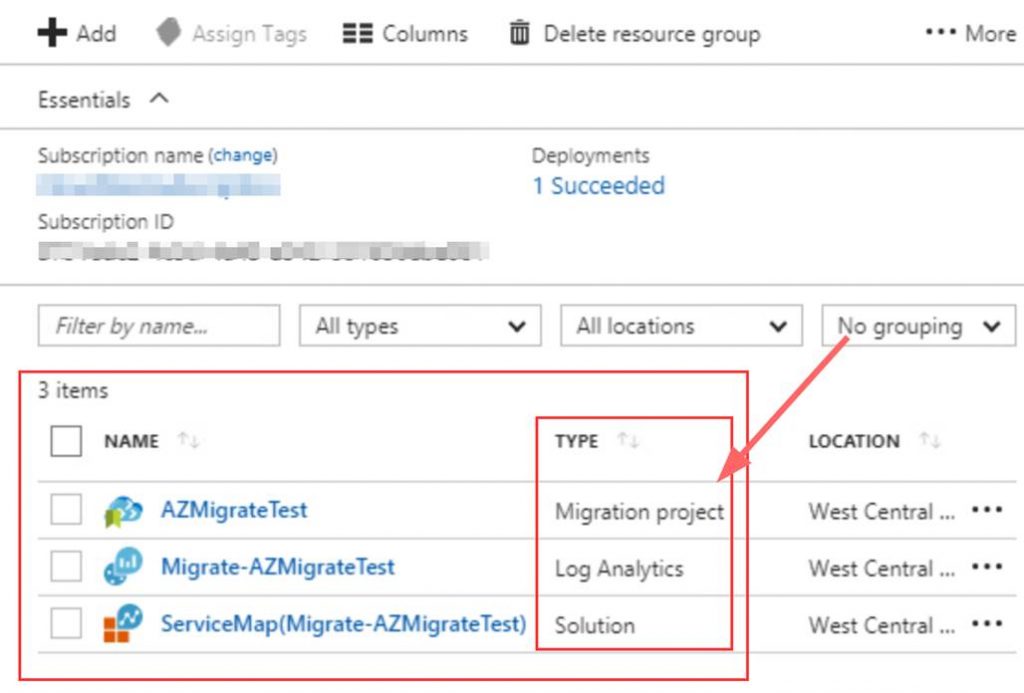
When you create an Azure migration project it creates an OMS workspace and deploys the Service Map solution. This can be seen in the following screenshot.
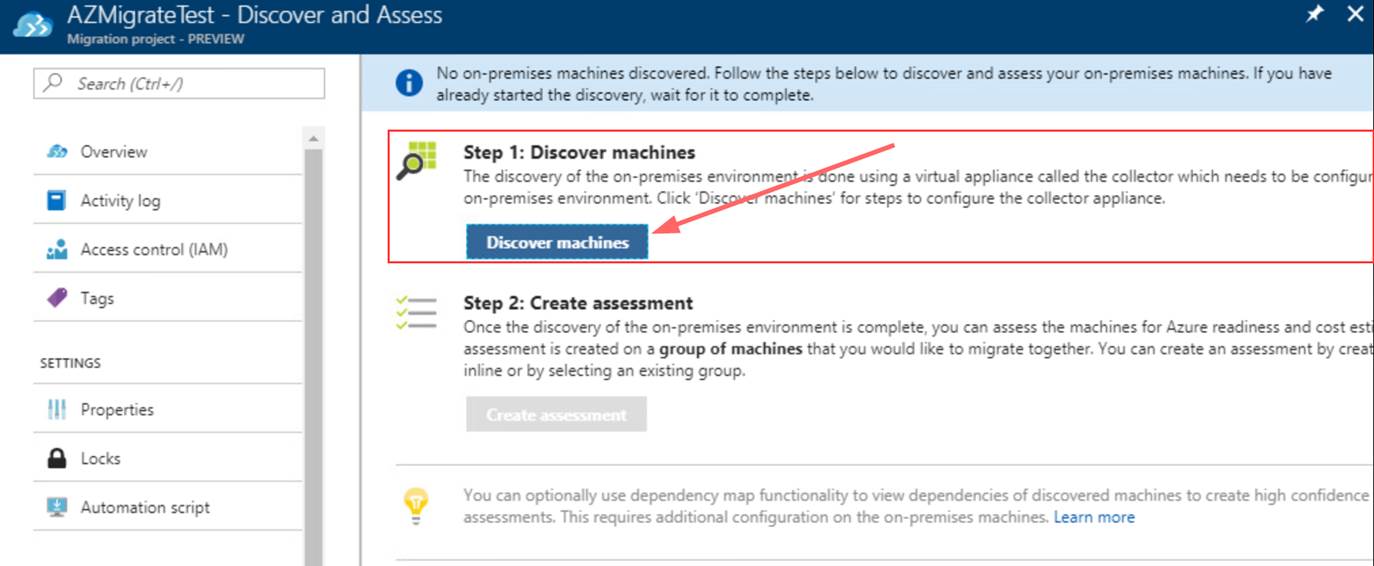
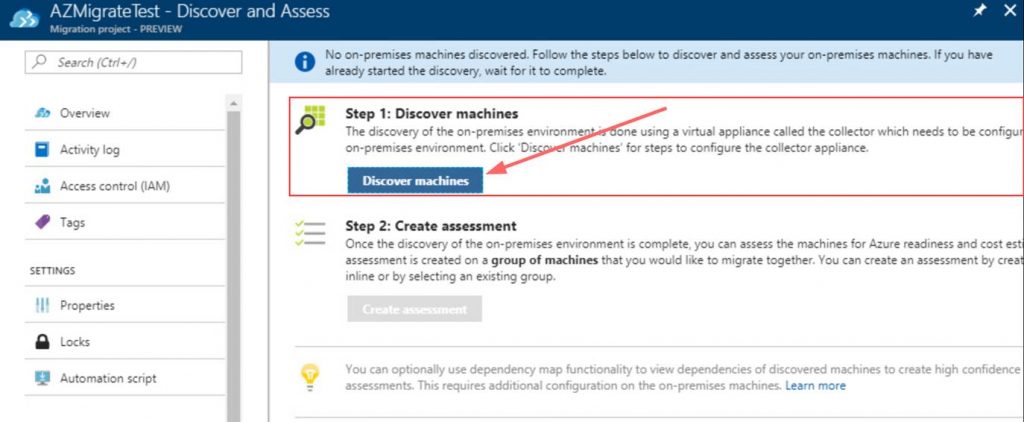
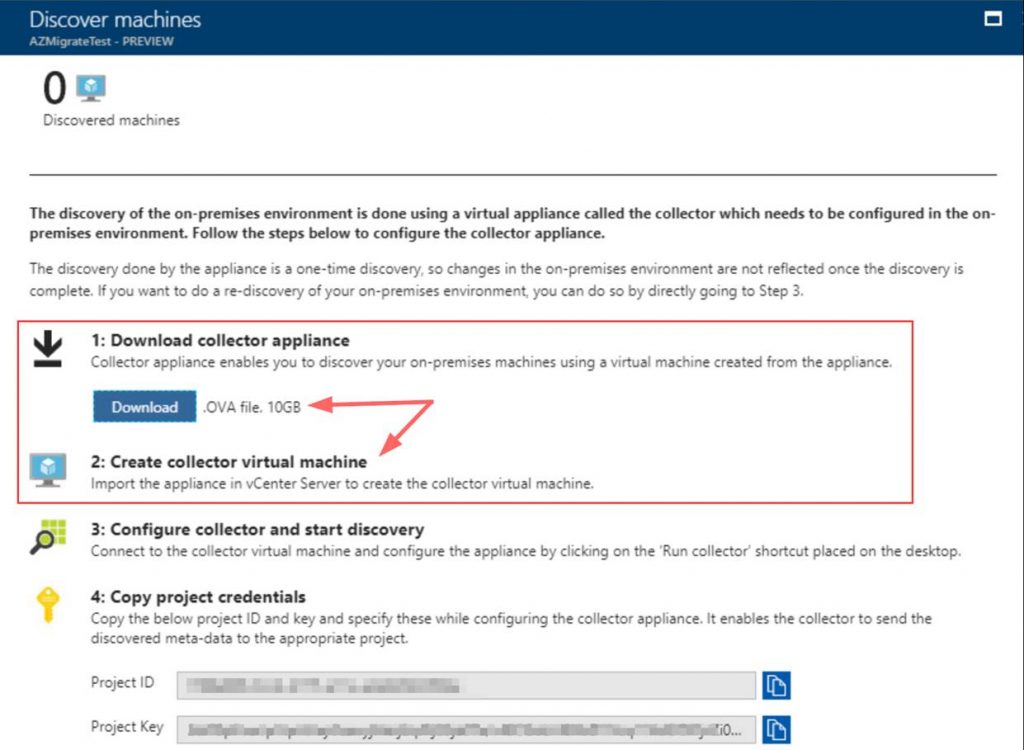
After creating the project you then need to perform the discovering and assessment.

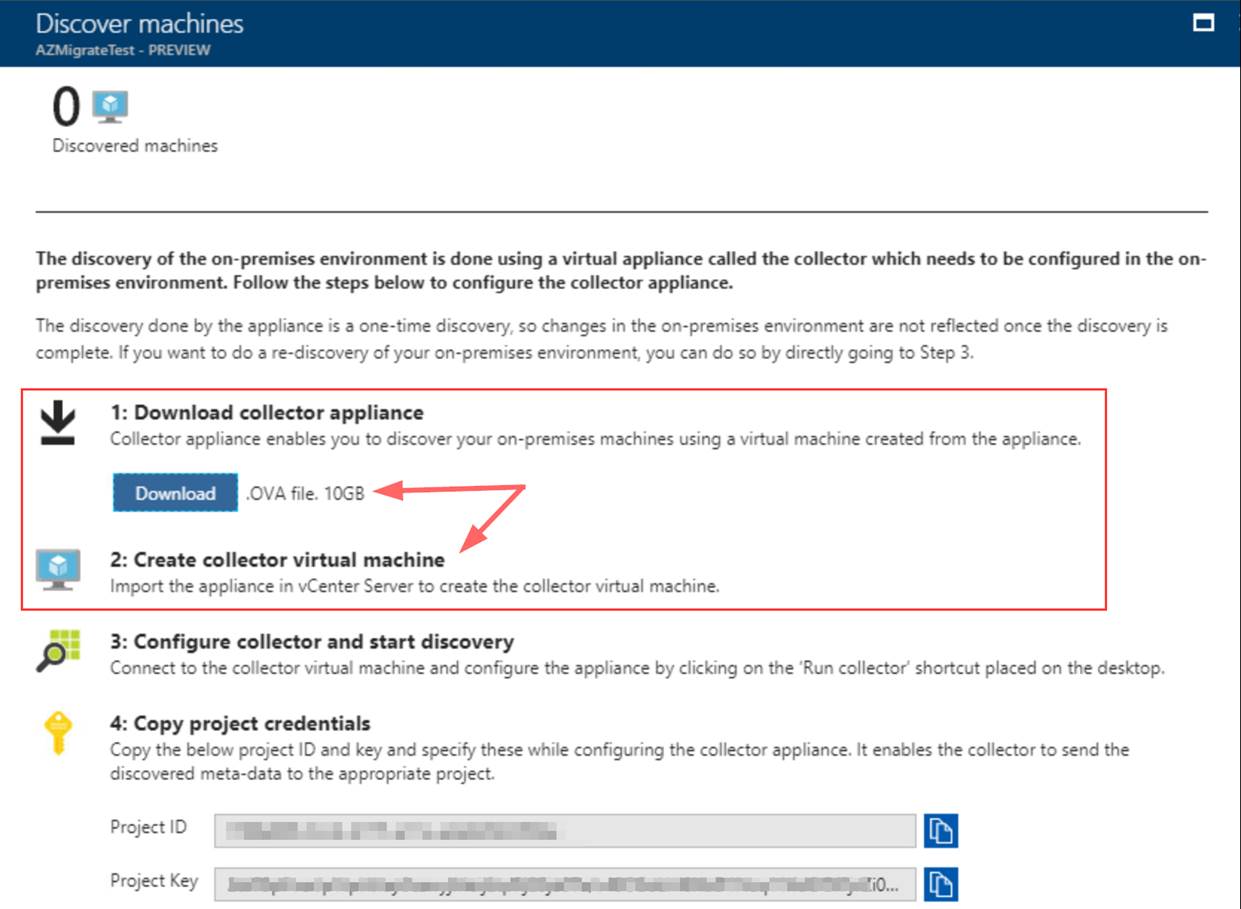
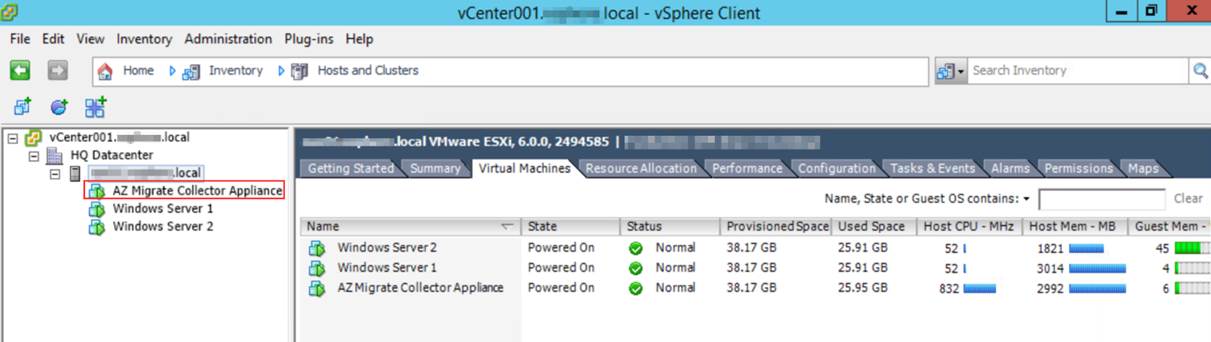
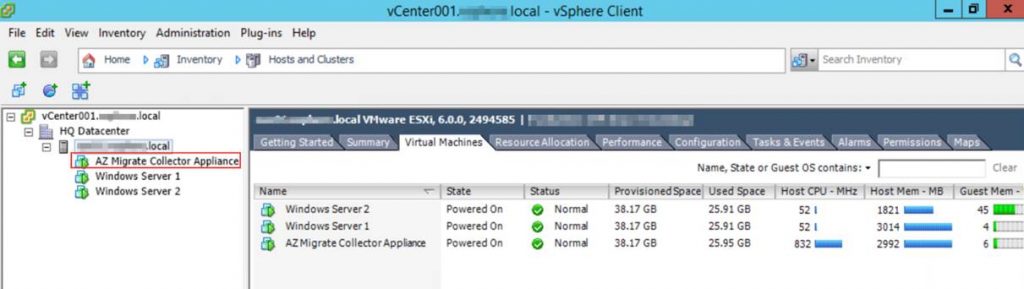
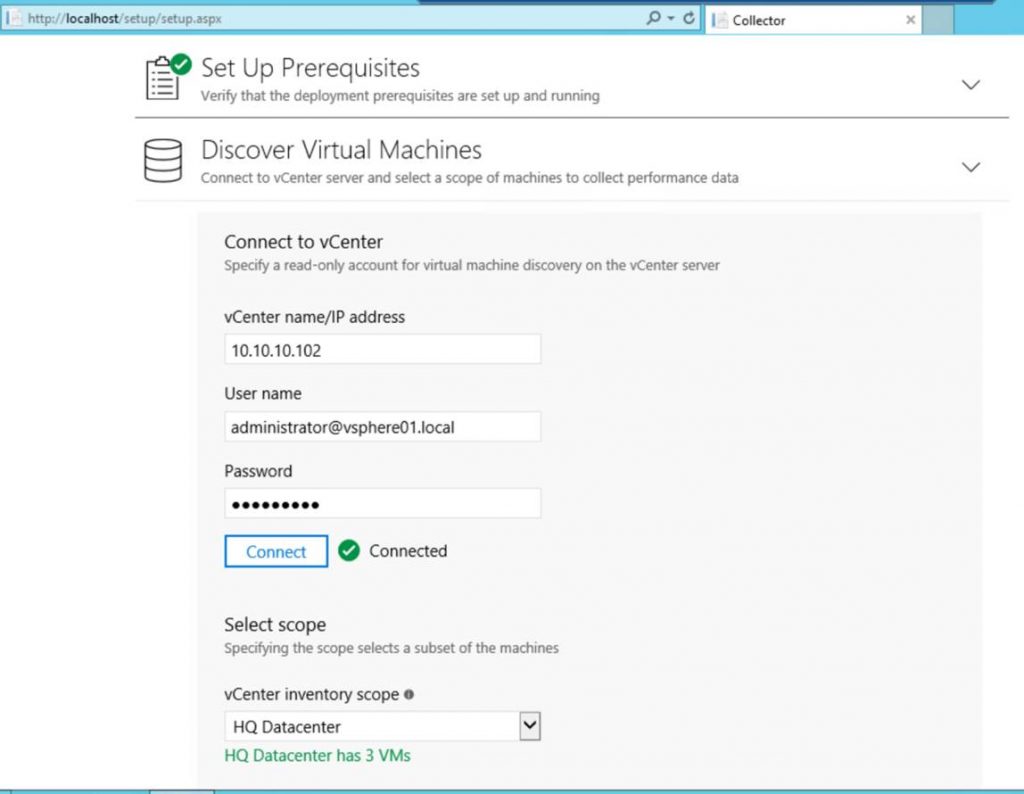
To perform the discovery Microsoft gives you a appliance in the form of a VMware virtual machine image. This is the migration collector. You spin it up in your vSphere environment, connect it to your VMWare environment and let it collect data on all or a specified set of virtual servers.
In the following screenshot you can see the collector running.
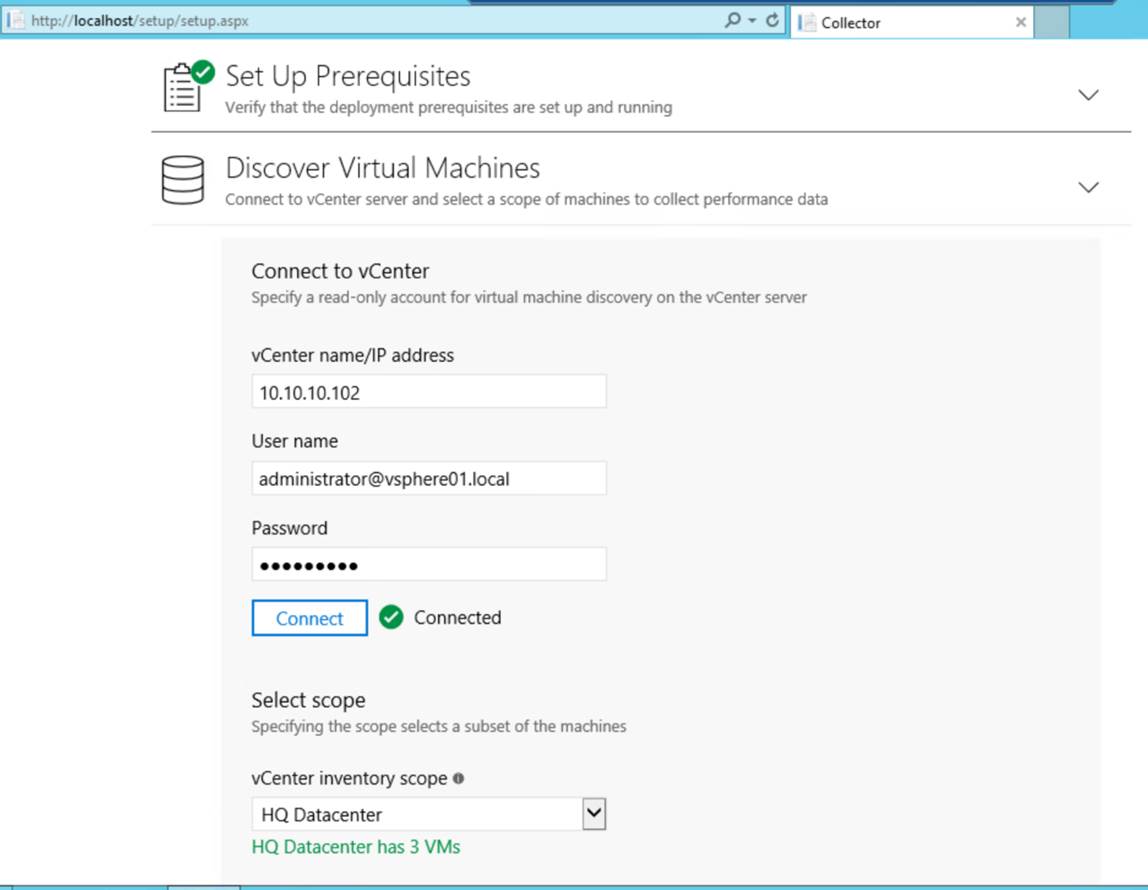
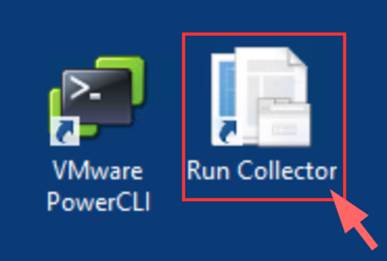
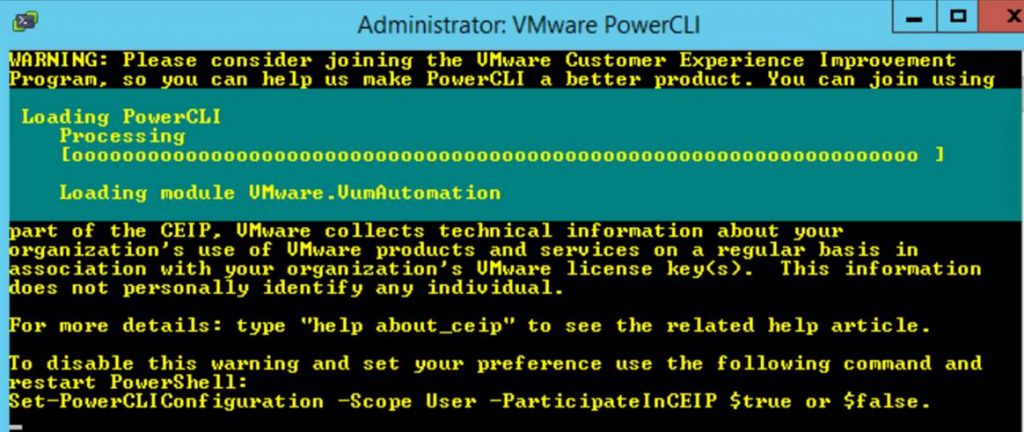
After it is running you need to log into it via the VMWare console or RDP. You need to ensure the VMware PowerCLI module is installed and then you run the Azure Migrate collector wizard. On the desktop of the collector machine’s desktop you wil see the VMWare PowerCLI for installing it and the collector wizard.
This is a screenshot of the VMWare PowerCLI install.
Below in the following screenshots is what the collector wizard looks like. On the first screen accept the pre-reqs and click continue. On the second section you are going to point the collector at your VMWare environment to collect either or specific VM’s that you plan to migrate to Azure.
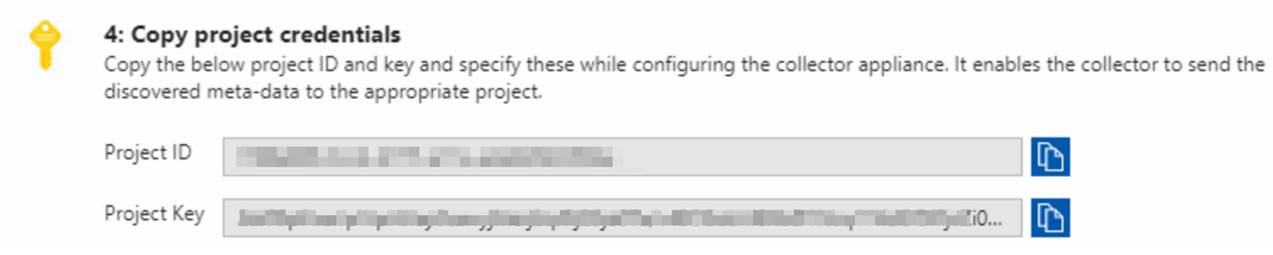
Next you need to input credentials for the Azure Migration project that you created in Azure. Below is a screenshot of the ID and Key.
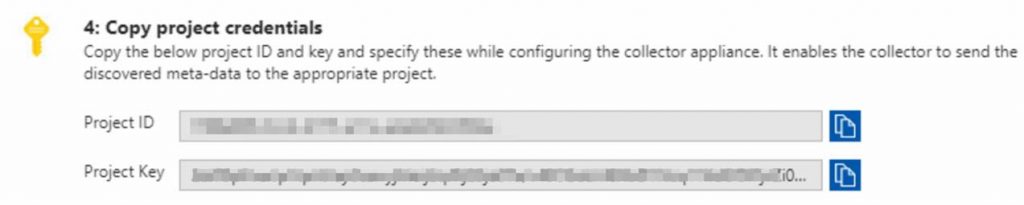
Input the ID and key as shown in the screenshot below.
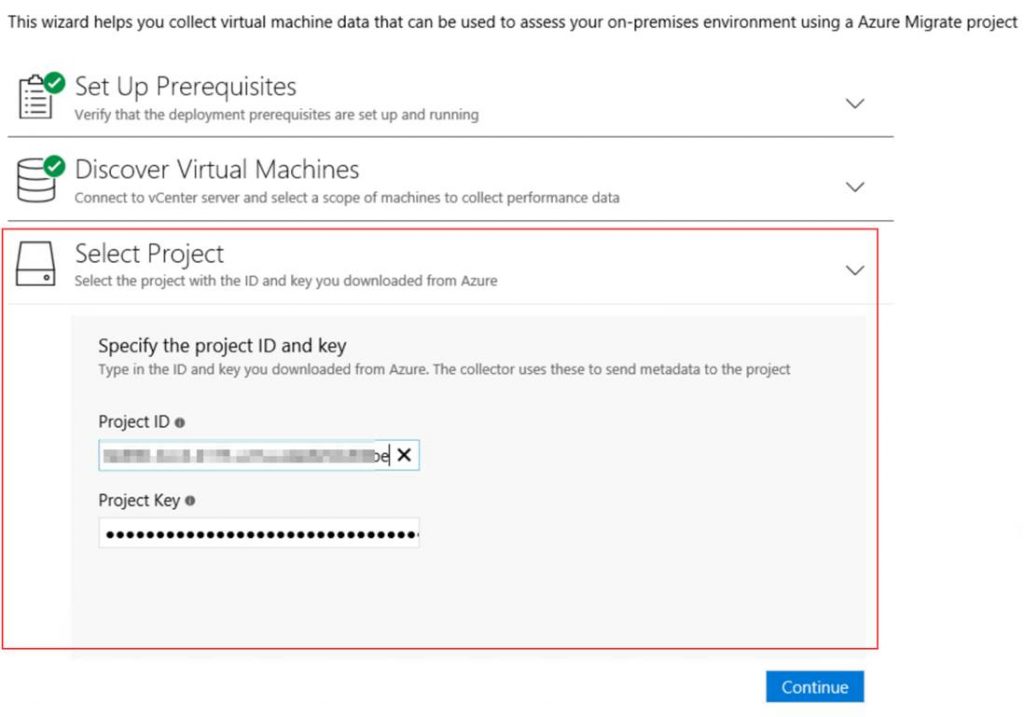
After you click continue the wizard will discover the machines and upload the date to your Azure Migration project. This can take a while so go get some coffee at this point.


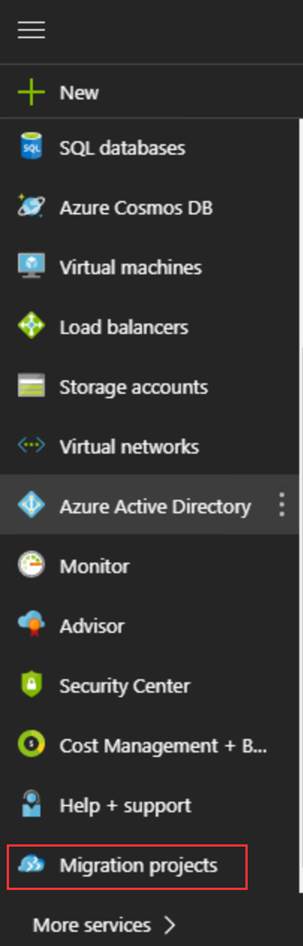
After it is done go back to the Azure portal and go to Migration projects. This is where you will see the Azure migration project you created and the details of your assessment.
Below are two screenshots one without assessments and one with assessments.
Without any assessments
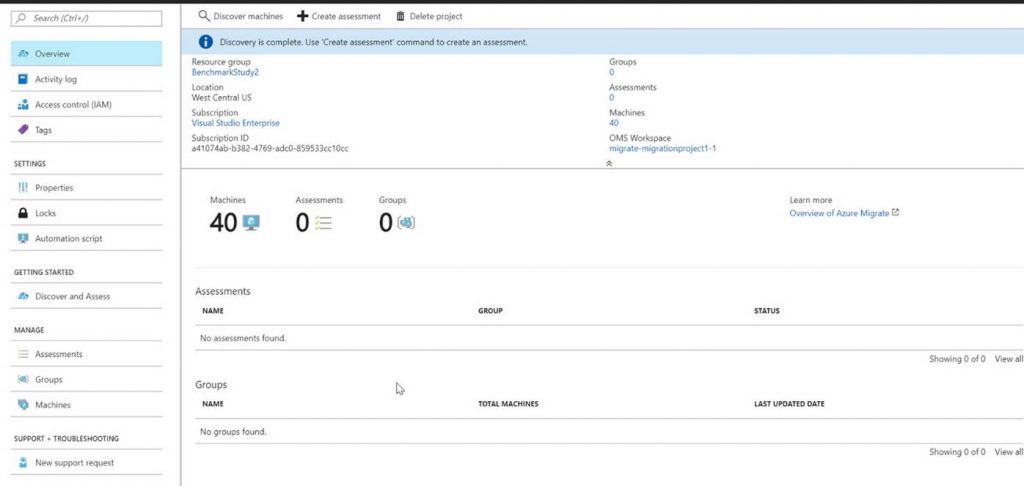
With some assessments

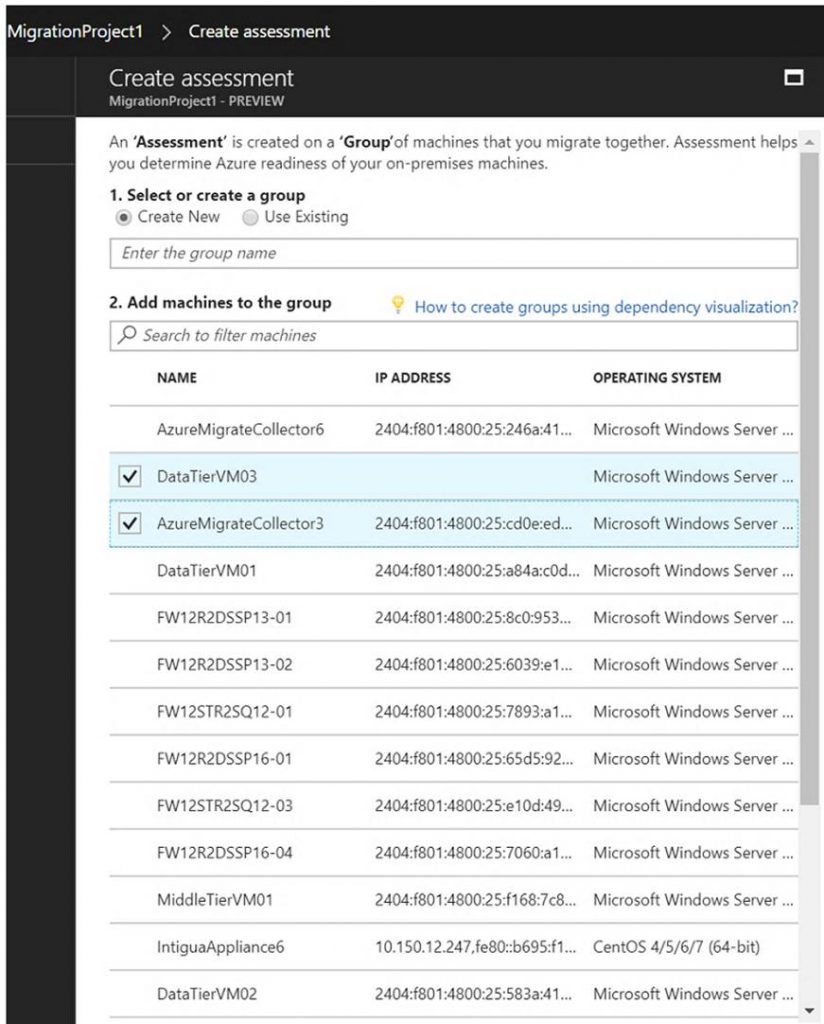
On the left hand side under manage you can click on assessments to create an assessment. You can create a new group or select an existing group for the machines to belong to.
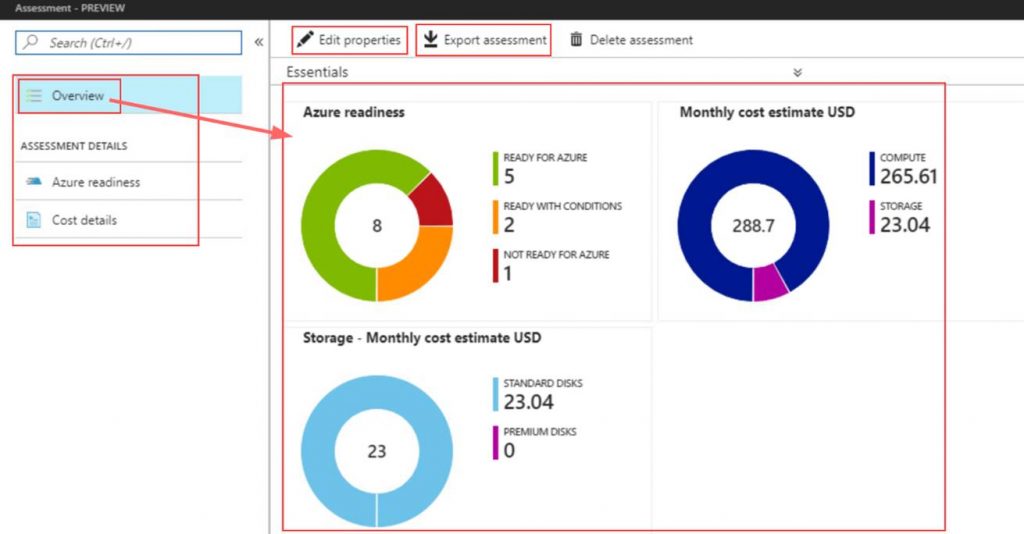
The following screenshot is what the assessment overview will look like.
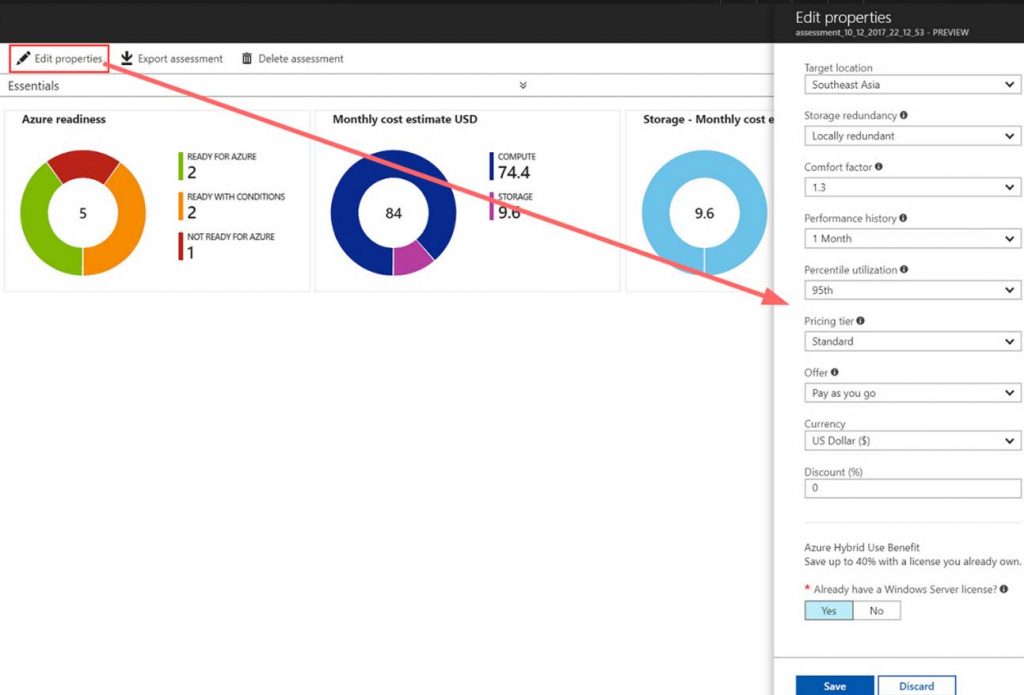
You can change many important things for your migration by clicking on Edit properties. Here you can change the target location for the VM’s storage type, offer type, use of hybrid user benefit and much more. There is a property here names comfort factor. If the comfort factor is set to of 1 the migrate tool will provide only exactly what is needed if this is set higher for example to a comfort factor of 2 then the migrate tool will double the VM size recommended by Azure migrate.
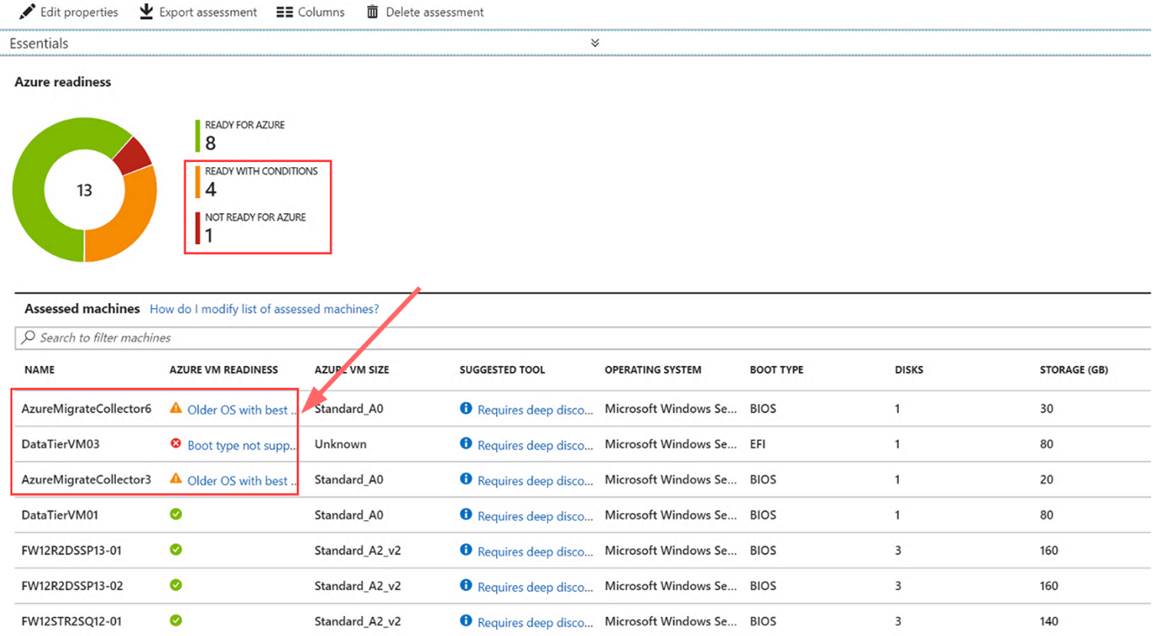
If you click on Azure readiness it will show you the migration readiness details about your VM’s. Here you will see any machines that will have migrations issues and what those issues are so that you can remediate them. After you remediate this will update.

If you click on a machine it will give you details about that specific VM.
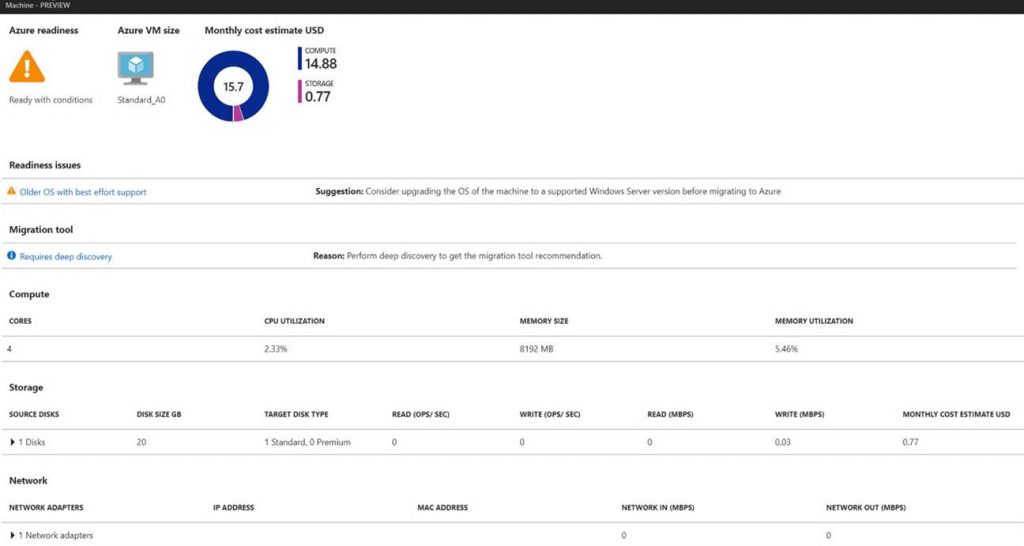
If you click on Cost details you will see a breakdown of monthly compute and storage costs. It will break this down per machine.

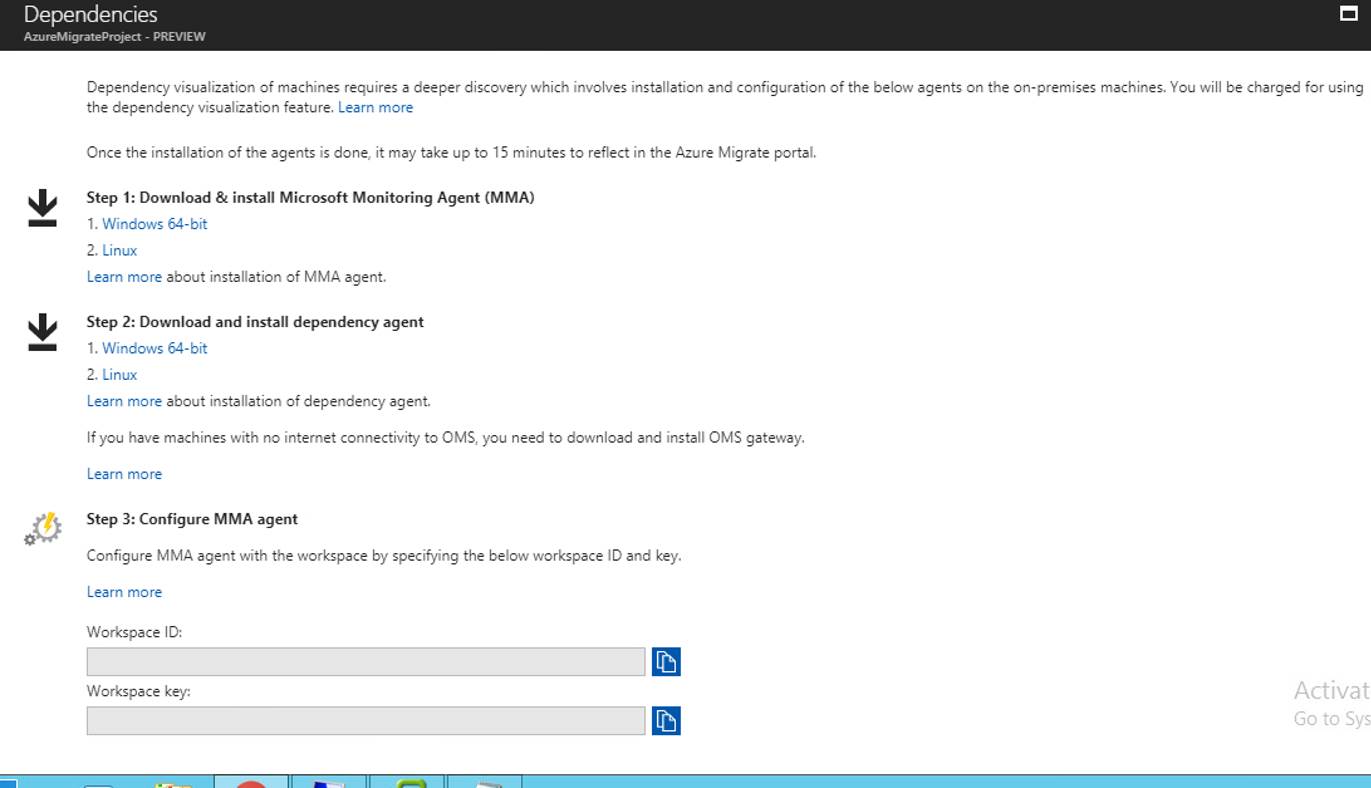
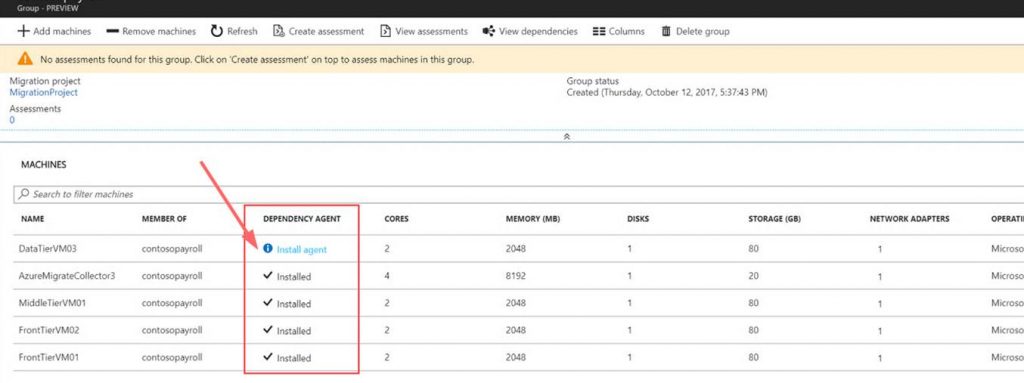
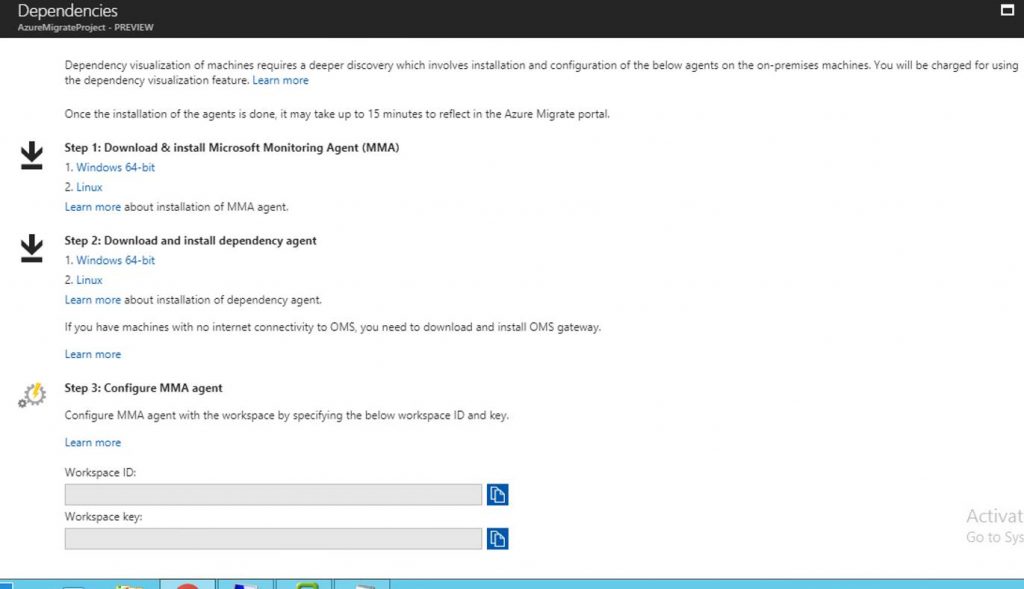
There is a feature in Azure Migration called Dependency visualization. Dependency visualization will map out the dependencies between servers and applications to help point out any potential issues up front. This feature leverages Service Map within OMS. In order for Service Map to pick up the dependencies on the machines we need to have the OMS MMA agent and the Service Map dependency agent installed on them. This has to happen even before they migrate.
The following screen shows the MMA agent and dependency agent install steps.
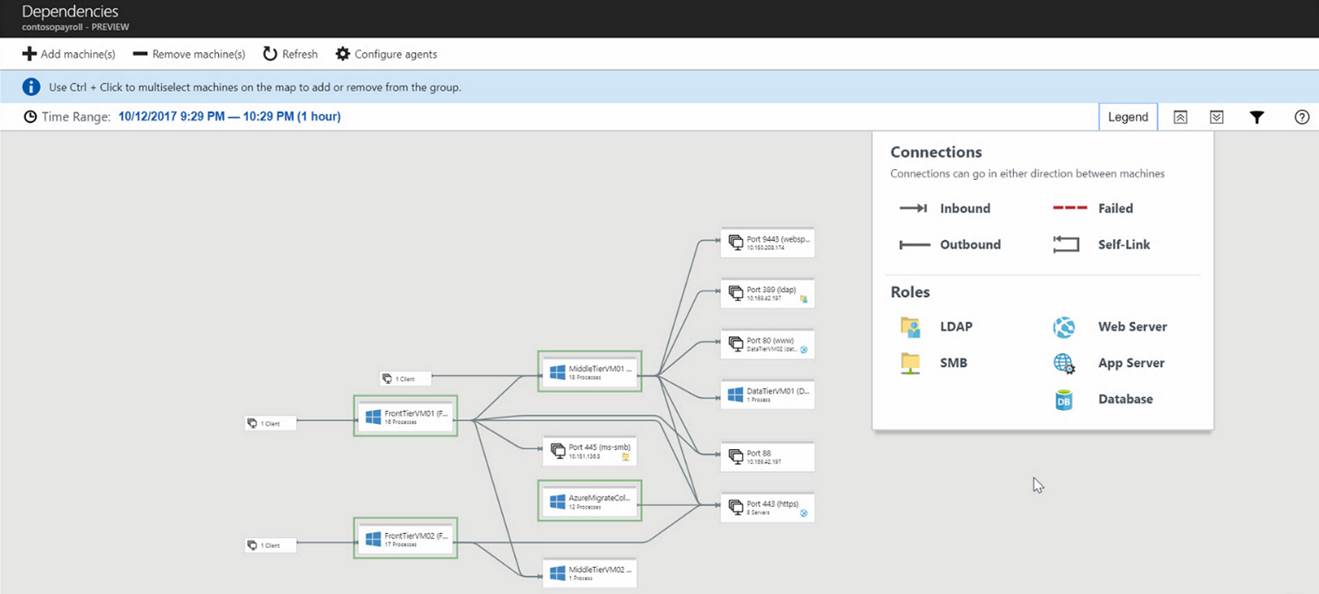
They way to access the dependency visualization screen is to drill down into a group and then click on View dependencies button as shown in the following screenshot.

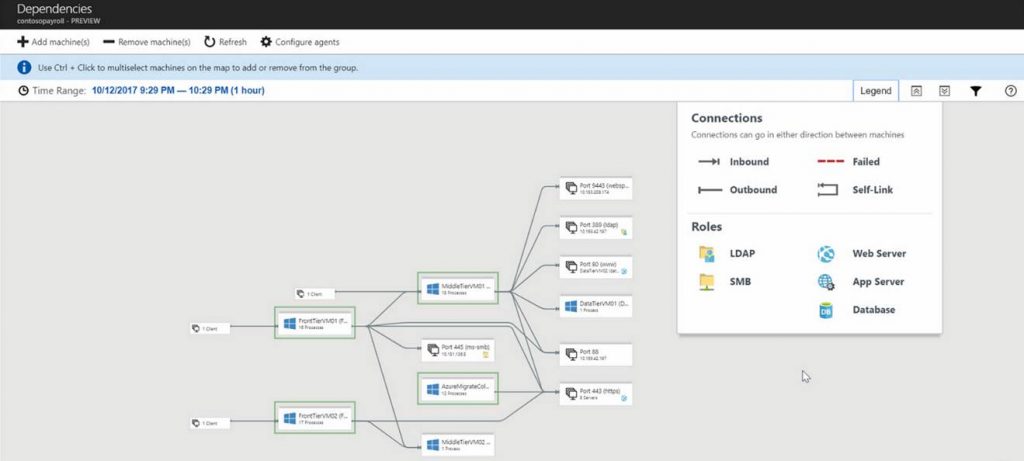
You will be brought to the Service Map dependencies screen where it shows the dependencies to help identify these before migration to Azure.
That concludes this blog post. Hopefully you found the information about Azure Migrations useful and enjoyed this early look overview of the new Azure Migrate tool.
Read more