Azure Stack POC Hardware

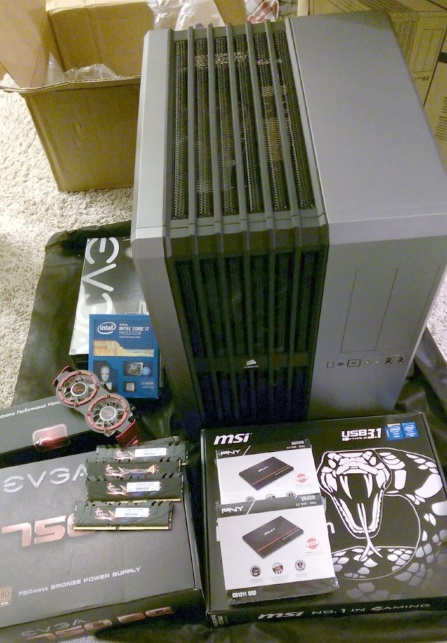
I have been asked several times what I use for my Azure Stack rig and where I got the hardware from. I am going to share in this post what I use to run my single node Azure Stack POC. I bought all parts from newegg.com. Here is a list of the parts:

  • Motherboard: MSI X99A SLI KRAIT EDITION LGA 2011-v3 Intel X99 SATA 6Gb/s USB 3.1 USB 3.0 ATX Intel
  • Video Card: EVGA GeForce 210 DirectX 10.1 512-P3-1310-LR 512MB 32-Bit DDR3 PCI Express 2.0 x16 HDCP Ready Low Profile
  • Power Supply: EVGA 750 BQ 110-BQ-0750-V1 80+ BRONZE 750W Semi Modular Includes Power On Self Tester
  • Processor: Intel Core i7-5820K Haswell-E 6-Core 3.3 GHz LGA 2011-v3 140W BX80648I75820K Desktop
    NOTE: I was not paying attention when I bought this. Azure Stack needs 12 cores. I am able to work around this and have not run into problems yet. When I get a chance and $$$ I will upgrade this.
  • 3 SSD Hard Drives: PNY CS1311 2.5″ 960GB SATA-III (6 Gb/s) TLC Internal Solid State Drive (SSD) SSD7CS1311-960-RB
    NOTE: I bought a couple of more Kingston brand SSD’s. I use these for the OS and general storage.
  • Memory: G.SKILL Ripjaws 4 Series 128GB (8 x 16GB) 288-Pin DDR4 SDRAM DDR4 2800 (PC4 22400) Intel X99 Platform Extreme Performance Memory Model F4-2800C15Q2-128GRKD
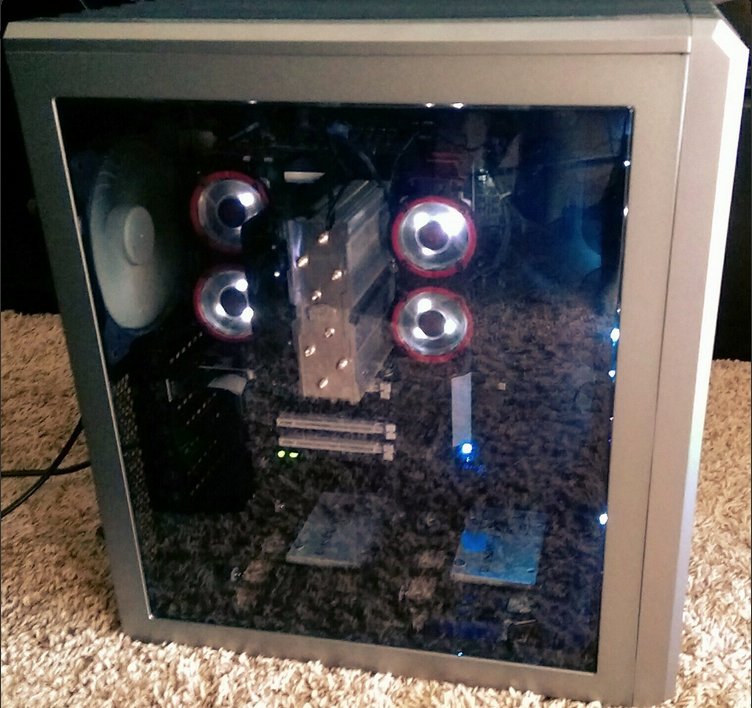
  • Case: Corsair Carbide Series Air 540 CC-9011034-WLED Silver Steel ATX Cube Computer Case

As you can see this is generic hardware. The cost of this hardware was just over $2k USD. I have been running Azure Stack since TP1 on this hardware and I am currently running TP3. This is a personal lab for just me and Azure Stack runs well on my hardware. Don’t let a lack of hardware stop you from diving into Azure Stack. As you can see from this post it does not take much to pick up some parts and get going.

I do also run another Azure Stack POC on much better hardware at work. I can’t wait to get a multi-node environment on one of the hardware providers (Cisco, Dell, Lenovo, or HP) platform.

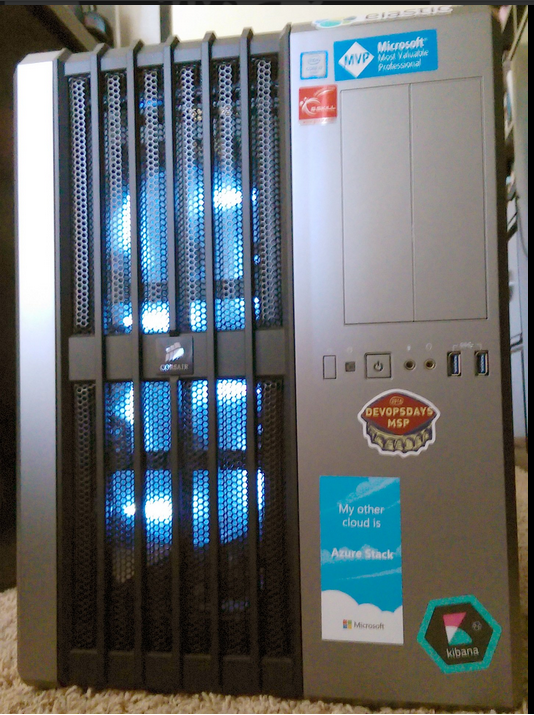
Here is what my rig looks like complete with Azure Stack and other stickers :-).

Before it was built:

After it was built and running:

Read more

Azure or Azure Stack “Write Once, Deploy Anywhere” Update

A while back I wrote a blog post about being able to take one IaaS VM Azure Resource Manager (ARM) template and deploy it to both Azure or Azure Stack. This blog post included a JSON file and the PowerShell to do this. The idea for that came from needing to set up a cool and working demo for MMS 2016 and the need to showcase the power of Microsoft’s HybridCloud. Here is a link to that original blog post:

Write once, deploy anywhere (Azure or Azure Stack)

Today I have finished updating the PowerShell and ARM template/JSON file to be more streamlined and to work with TP2. Here is the link to download these:Here are the updates:

https://gallery.technet.microsoft.com/Create-VM-on-Azure-or-3c6d0420

Here are the updates:

  • The JSON and PowerShell script have been modified to work with Azure Stack TP2.
  • This script now utilizes the connection PowerShell module AzureStack.Connect.psm1 from Azure Stack tools.
  • This is included with the download of this script and JSON file on TechNet Gallery.
  • The script is hard coded to look locally to import the AzureStack.Connect.psm1 module.
  • Streamlined the JSON file and PowerShell script.
  • The script no longer prompts for the publicDNS name. It is now automatically set to the same as the vmname.
  • The script no longer prompts for the storage account name. It is automatically set to vmnamestorage.
  • The script no longer prompts for the resourcegroup name. This is now automatically set to vmname-RG.
  • By default this script now uses a JSON file hosted on Github. This is set in the $templateFilePath variable as shown on the next line.
  • To keep it to the local directory just use the JSON file name.

GITHUB: $templateFilePath = “https://raw.githubusercontent.com/Buchatech/Azure-AzureStackVM/master/AzureandAzureStack.json”
LOCAL: $templateFilePath = “AzureandAzureStack.json

This will be my last blog post of 2016. See you next year folks…..

Happy Stacking!

Read more

Resource Group Clean-up in Azure Stack

If you are like me, you end up creating a ton of resource groups in Azure Stack when testing things out. I needed a way to delete them without having to click one each one via the portal. The best option of course is to leverage PowerShell. I threw together some PowerShell to handle this. I came up with two options #1 can be used to delete a bunch of RG’s that have a common name. For example, I had a bunch of VM00* resource groups. I use the script to go loop through and delete all resource groups with VMO in the name. Option #2 pop’s up a GUI window so I could select the RG’s I wanted to delete. It put them in an array and then looped through to delete them in one shot.

This is great because I can kick this off and go do something else. I will share both below in this blog post along with some screenshots. I won’t have a download for the PowerShell syntax so just copy from this post if you want to use it. Be sure to use AzureStack.Connect.psm1 for connecting to your Azure Stack environment before running any of the following code.

Code:
#1

#Create Variable of RG’s with common name
$Resourcegroups = Get-AzureRmResourceGroup | where {$_.ResourceGroupName -like (‘*VM0*’)}

#Create array of RG’s
$RGLIST = $Resourcegroups.ResourceGroupName

#Loop to remove each resource group in the array
ForEach(
$rg in $RGLIST
)
{
Get-AzureRmResourceGroup -Name $rg -ErrorAction SilentlyContinue | Remove-AzureRmResourceGroup -Force -Verbose
}

This image shows the array of RG’s that will be looped through. I highlighted vm003rg in the array and in the PowerShell status message.

rgcleanup-1

The following screenshot shows VM003RG being deleted in the Azure Stack portal.

rgcleanup-2

#2

#Create Variable of RG’s from GUI selection
$selectedrgs = (Get-AzureRmResourceGroup | Out-GridView ` -Title “Select ResouceGroups you want to remove.”` -PassThru).ResourceGroupName

#Loop to remove each resource group in the array
ForEach(
$rg in $selectedrgs
)
{
Get-AzureRmResourceGroup -Name $rg -ErrorAction SilentlyContinue | Remove-AzureRmResourceGroup -Force -Verbose
}

After running the Create Variable of RG’s from GUI selection part of the code a window as shown in the following screenshot will pop up. Select the RG’s you want to remove, click Ok and they will be placed into an array.

rgcleanup-3

Below if the output of the array. Run the Loop to remove each resource group in the array part of the code and each of the RG’s will be removed.

rgcleanup-4

I have also used this when a resource group would not delete from the portal. On some stubborn resource groups I have had to run this a couple of times. This is a short post. I hope this helps someone out!

Read more