Enhance Azure ARM Template Authoring in VS Code

For anyone working with Azure sooner or later, you will end up authoring Azure Resource Manager (ARM) Templates. Working with ARM templates, in the beginning, can seem painful but once you get the hang of them it is a great way to build out and deploy your Azure as code. In this blog post, I am not going to go into detail on authoring ARM Templates. In this blog post, I am going to list out the extensions that I use in VS Code to enhance the ARM Template authoring experience. Recently whenever I am demoing or showing others my ARM Templates in VS Code they ask me how they can also make their VS Code look like mine when working with ARM Templates. I figured it makes sense to write up a blog about how I have my VS Code configured for ARM Templates.

If you are not using VS code, you should change that and start using it today! I use it pretty much for any scripting such as PowerShell, coding, any time I need a text editor and more. I even use it to work directly with Azure via cloud shell and to work with Docker containers and Kubernetes clusters. Here is a quick snapshot of what VS Code is for anyone not familiar with it. VS Code is an open source – code editor developed by Microsoft that is cross-platform able to run on Windows, Linux and macOS.​ At a high level here is what VS Code includes:

  • Has support for hundreds of languages.​
  • Has Integrated Terminal.​
  • Powerful developer tool with functionality, like IntelliSense code completion and debugging. ​
  • Includes syntax highlighting, bracket-matching, auto-indentation, box-selection, snippets, and more.​
  • Integrates with build and scripting tools to perform common tasks making everyday workflows faster. ​
  • Has support for Git to work with source control systems such as Azure DevOps, Bitbucket and more.​
  • Large Extension Marketplace of third-party extensions.​

As you can see there is a ton of stuff you can do with VS Code. VS Code is a must have for anyone doing CloudOps work with Azure and more. Now let’s look at the VS Code extensions I use for ARM Templates. I am including the link for each extension I will talk about. You can also simply load these right in VS Code.

Azure Resource Manager Tools:   https://marketplace.visualstudio.com/items?itemName=msazurermtools.azurerm-vscode-tools​

The Azure Resource Manager Tools extension provides language support for ARM Templates and language expressions. It can be used to create and edit Azure Resource Manager templates. ​High-level features include:

  • ARM Template Outline.​
  • IntelliSense.​
  • Support for built-in ARM functions, Parameter references, Variable references, resourceGroup() properties, subscription() properties, and more.
  • Bracket matching, Errors/Warnings and more.​

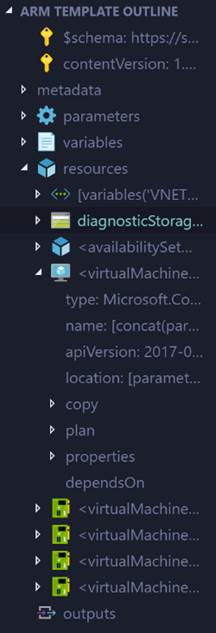
VS Code natively supports JSON. Azure Resource Manager Tools makes VS Code ARM Template aware. One of the biggest benefits it gives me is the ARM Template Outline making it much easier and faster to navigate the sections of an ARM Template. Here is what it looks like.

Next up is two extensions that both should be added. It is Material Theme and Material Theme Icons.

Material Theme –   https://marketplace.visualstudio.com/items?itemName=Equinusocio.vsc-material-theme

This extension gives you some very cool themes and works in combination with the Azure Resource Manager Tools extension to give you the new color coding of your ARM Template code. The color coding highlights different parts of the ARM Template code such as parameters, variables, functions and more making it much easier to read through all of the code in ARM templates. Here is an example:

Material Icons Themehttps://marketplace.visualstudio.com/items?itemName=PKief.material-icon-theme

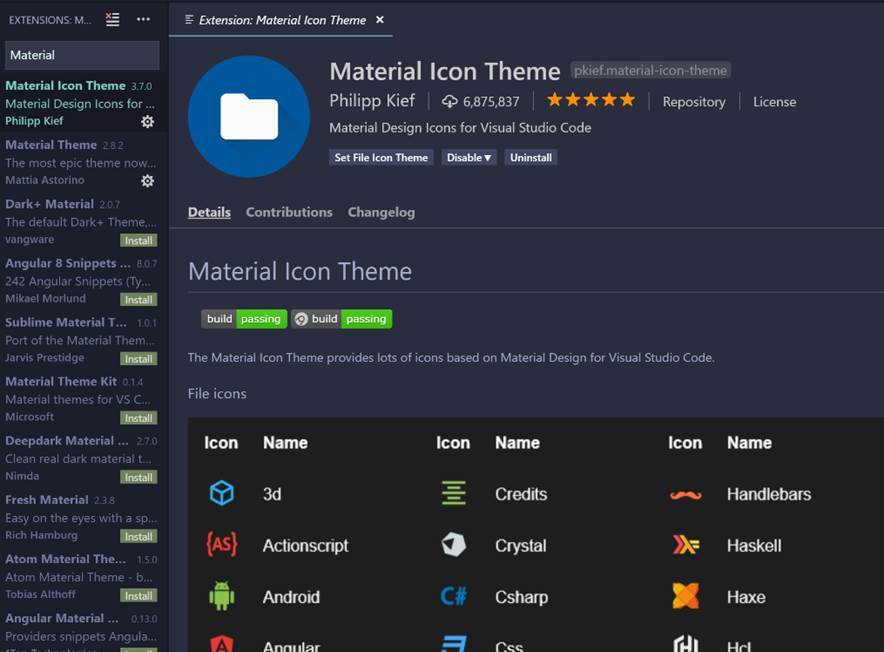
This extension adds a nice set of icons to your VS code. This extends beyond just ARM Templates. Again this makes it visually easier when navigating around VS code and ARM Templates. I typically use a PowerShell deployment script to deploy ARM Templates from VS Code into Azure. This icon them makes it easy to see ARM Template files and PowerShell files.

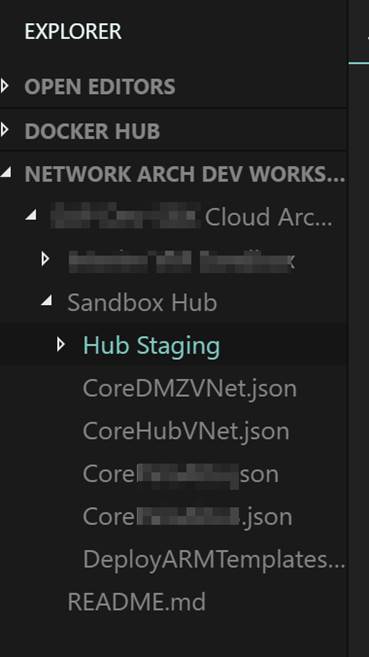
Here is a what it looks like without and with the Materials Icon Theme.

Without it:

With it:

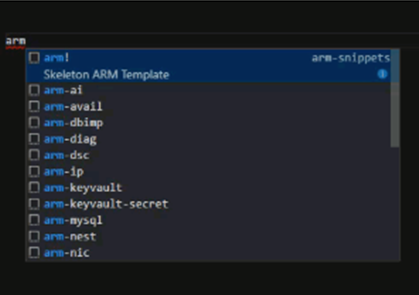
ARM Snippets –  https://marketplace.visualstudio.com/items?itemName=samcogan.arm-snippets

The final extension I want to cover is ARM Snippets. This extension was developed by Sam Cogan (@samcogan) a fellow Microsoft MVP. In addition to the aforementioned marketplace link for this extension, you can find Sam’s Github repo for it here https://github.com/sam-cogan/arm-snippets-vscode.

This extension adds snippets to VS Code for creating Azure Resource Manager Templates. This is helpful when you are working in VS Code and need to add something to your template for example a parameter, resource etc. You simply type arm and a menu appears with a list of the available snippets. For example if you want to add a virtual machine you could type arm-vm and a list of Windows and Linux VM resources snippets will appear. Click on the one you want and it will add the code block for you. This makes authroing templates much-much faster. This is shown in the following screenshot:

​The snippets include:​

  • Skeleton ARM Template​ (Note: This will load a skeleton for a fresh new ARM Template.)
  • Windows and Linux Virtual Machines​
  • Azure Web Apps​
  • Azure Functions​
  • Azure SQL​
  • Virtual Networks, Subnets and NSG’s​
  • Keyvault​
  • Network Interfaces and IP’s​
  • Redis​
  • Application Insights​
  • DNS​
  • Virtual Machines​
  • And more……

Note that the ARM Snippets extension is derived from the Cross Platform Tooling Samples. The Cross Platform Tooling Samples are a set of templates, snippets, and scripts for creating and deploying Azure Resource Management Templates in cross-platform environments. It sounds like this is updated more often and worth looking into loading. It does not have a friendly installer though like the ARM Snippets extension does though. Here is the link to the Cross Platform Tooling Samples Github repo: https://github.com/Azure/azure-xplat-arm-tooling

End Result:

Below is a screenshot of what your ARM Templates will look like after loading all of the extensions mentioned in this blog post into your VS Code.

That wraps up this blog post. I hope this is helpful to those out there working with ARM Templates in VS Code. If you have any additional tips to share please add a comment. Happy authoring!

Read more

Azure or Azure Stack “Write Once, Deploy Anywhere” Update

A while back I wrote a blog post about being able to take one IaaS VM Azure Resource Manager (ARM) template and deploy it to both Azure or Azure Stack. This blog post included a JSON file and the PowerShell to do this. The idea for that came from needing to set up a cool and working demo for MMS 2016 and the need to showcase the power of Microsoft’s HybridCloud. Here is a link to that original blog post:

Write once, deploy anywhere (Azure or Azure Stack)

Today I have finished updating the PowerShell and ARM template/JSON file to be more streamlined and to work with TP2. Here is the link to download these:Here are the updates:

https://gallery.technet.microsoft.com/Create-VM-on-Azure-or-3c6d0420

Here are the updates:

  • The JSON and PowerShell script have been modified to work with Azure Stack TP2.
  • This script now utilizes the connection PowerShell module AzureStack.Connect.psm1 from Azure Stack tools.
  • This is included with the download of this script and JSON file on TechNet Gallery.
  • The script is hard coded to look locally to import the AzureStack.Connect.psm1 module.
  • Streamlined the JSON file and PowerShell script.
  • The script no longer prompts for the publicDNS name. It is now automatically set to the same as the vmname.
  • The script no longer prompts for the storage account name. It is automatically set to vmnamestorage.
  • The script no longer prompts for the resourcegroup name. This is now automatically set to vmname-RG.
  • By default this script now uses a JSON file hosted on Github. This is set in the $templateFilePath variable as shown on the next line.
  • To keep it to the local directory just use the JSON file name.

GITHUB: $templateFilePath = “https://raw.githubusercontent.com/Buchatech/Azure-AzureStackVM/master/AzureandAzureStack.json”
LOCAL: $templateFilePath = “AzureandAzureStack.json

This will be my last blog post of 2016. See you next year folks…..

Happy Stacking!

Read more

WordPress as front-end for Azure Automation

With Azure Automation there are cases where you will need to have a form that end users can go fill out to kick off an automation runbook. Back with System Center Orchestrator we could use Service Manager’s self-service portal as the front end for our automations. This was a solution that worked well. With Azure Automation we do not have that luxury at least not yet we don’t. There is a community based Azure automation webhook Service Manager (SCSM) connector in the works. One of my colleagues Rob Plank is a part of this project and says it should ready to release very soon. This connector will allow you to use the SCSM portal as the frontend of Azure Automation via webhooks, know when a webhook expires, and see a runbooks job status. Here are some teaser screenshots of the  connector.

image001

image002

There also are a few posts out there on how to leverage other platforms as the frontend for Azure Automation these are “how to use SharePoint as the frontend of Azure Automation” by Anders Bengtsson and “how to use an ASP website as the frontend to Azure Automation” by a friend of mine and fellow Microsoft MVP Florent Appointaire. Well in this post I am going to show you how to use the popular platform WordPress as the frontend for Azure Automation. The cool thing here is that this is another instance of showcasing the ability to utilize Microsoft and Open Source technologies together. 🙂

Here are the steps at a high level

  • Have an Azure Automation account on Azure
  • Setup your runbook/s in Azure Automation
  • Setup a webhook on your runbook/s in Azure Automation
  • Have a WordPress instance
  • Install Ninja Forms plugin in the WordPress instance
  • Install the Webhooks add on for Ninja Forms
  • Setup your runbook frontend form/s
  • Configure the runbook frontend form/s to connect to the Azure Automation webhook

Let’s get started!

Step 1: Have an Azure Automation account on Azure

To get started with Azure Automation go here: https://azure.microsoft.com/en-us/documentation/articles/automation-intro. I am not going to cover this within this blog post.

Step 2: Setup your runbook/s in Azure Automation

For this testing this scenario and this post I grabbed a couple of Azure Automation runbooks built by the Microsoft AzureAutomationTeam and made available in the Azure Automation Runbook Gallery. These runbooks start and stop Azure virtual machines.

Runbook #1 Name:

Start-AzureV2VMs

Description:

This runbook connects to Azure and starts all VMs in an Azure subscription or resource group.

Runbook #2 Name:

Stop-AzureV2VMs

Description:

This runbook connects to Azure and stops all VMs in an Azure subscription or resource group.

Both runbooks have two parameters they need. These are:

param (

[Parameter(Mandatory=$false)]

[String]  $AzureConnectionAssetName = “AzureRunAsConnection”,

[Parameter(Mandatory=$false)]

[String] $ResourceGroupName

We need to pay attention to these when setting up the webhooks and these often become your fields on your front end form.

Step 3: Setup a webhook on your runbook/s in Azure Automation

Here are the steps to setup a webhook for an Azure Automation Runbook.

First off make sure your runbook/s are in a published authoring status.

image003

Within https://portal.azure.com Navigate to

YOURAZUREAUTOMATIONACCOUNT

Runbooks

YOURRUNBOOK (Start-AzureV2VMs)

Webhooks

From here click on the Add Webhook button.

image004

The Add Webhook blade will fly out. Here you will want to click on Create new webhook to make the next blade flyout.

Here you need to give your webhook a name, set to enabled, set when it will expire and COPY THE URL TO A SAFE PLACE.

NOTE: You will not be able to access the webhook URL after this.

image005

Click OK.

Next you need to click on Configure parameters and run settings. This is where you set the parameters from the runbook.

If your parameters are required you have to set them here. If they are optional you can leave them blank here and pass the data into the runbook from the frontend form via a $WebhookData object.

In my case I put AzureRunAsConnection directly in the webhook. I created a credentials asset in Azure Automation with the account containing the needed permissions to perform the actions from the runbook in my Azure account (Start/Stop VM’s).

I left the resourcegroupname blank as I will pass this in from the front end form. I left the Run Settings to run on Azure as I do not have a Hybrid Worker setup.

NOTE: A Hybrid Worker lets you run automation runbooks on premises in your data center.

image006

One you have the Webhook and parameters configured click on the Create button to actually create the webhook.

image007

You will now see your new webhook in the webhooks blade.

image008

Note that if you click on a webhook you will not see the URL. You can enable or disable the webhook, see when it expires, and access the parameters. This is shown in the following screenshot.

image009

Step 4: Have a WordPress instance

You can host WordPress on WordPress.org on a hosting account, internally or even on Azure. Here is a link to a tutorial on how to run WordPress on Azure. https://azure.microsoft.com/en-us/documentation/articles/app-service-web-create-web-app-from-marketplace.  I am not going to cover how to setup a WordPress instance within this blog post.

Step 5: Install Ninja Forms plugin in the WordPress instance

Here are the steps to install Ninja Forms WordPress plugin.

From within the WordPress admin dashboard click on Plugins.

Click on Add New.

image010

Search for Ninja Forms. Click on the Install button to add the plugin. Make sure you activate the plugin.

image011

You also could manually download and upload the plugin or load it directly into the plugins directory. I have shown you the steps for the easiest way to install it.

The Ninja Forms plugin page can be found here:

https://wordpress.org/plugins/ninja-forms

Step 6: Install the Webhooks add on for Ninja Forms

The Webhooks for Ninja Forms add on can be found here:

https://ninjaforms.com/webhooks-for-ninja-forms

This add on has to be purchased. It is $39 by itself for 1 WordPress instance.

After you buy it you will get the files for download. Again from within the WordPress admin dashboard click on Plugins.

Click on Add New. This time click on the Upload Plugin button and browse to your downloaded Webhooks for Ninja Forms zip folder.

After it is uploaded be sure to activate it.

The final step is to install the license for the add on. To do this Click on Forms>Settings>Licenses and input the key that Ninja Forms sent in the Webhooks Key field. Click on Save & Activate.

image013

Step 7: Setup your runbook frontend form/s

Next we need to build the actual form. To do this follow the list of steps.

Click on Forms>Add New. Give your form a Title.

Add a Textbox and put in the label of ResourceGroupName.

I like to make it Required.

image014

Add a Submit button to your form. I labeled it Start.

image015

In the following screenshot is what the form looks like. Note that I have both forms loaded on the same page.

image016

Step 8: Configure the runbook frontend form/s to connect to the Azure Automation webhook

Now is the last step. This is the step in which we configure the form to send data to the Auzre Automation webhook upon submission. This is doing it via POST method.

When editing the form click on the Email & Actions tab. Click on the Add New button.

Give this Action a name.

In the Type dropdown select Webhook.

Enter the Azure Automation webhook URL in the Remote Url field.

Select Post for the Remote Method.

For Args select enter the name of and select the field from your form of the parameters you need to send to the Azure Automation runbook.

You can see this all represented in the following screenshot.

image017

One of the cool things about this solution is we can test the webhook action before actually submitting it to make sure it will work as expected. This testing can be turned on by checking the Run in Debug Mode field. I have highlighted this in the screenshot in green. Checking this box and submitting the form will show debugging information like data sent and response.

Here is an example of what the result in Debug mode will look like:

image018

Make sure you uncheck the Run in Debug Mode field when you are ready to actually start your runbook/s.

Now let’s see what this looks like in Azure Automation when we submit the form.

I have a resource group named 6716vm with one VM in it named 6716vm. So I will enter 6716vm on the form. 6716vm will be passed to the runbook as the resourcegroupname.

image019

You can see the job running in Azure now.

image020

Within the job if you click on Input you can see it has 2 inputs. One is Webhookdata. This is where the 6716vm is located. The other is the Azureconnectionassetname. Remember we hardcoded this into the webhook itself. We can also see in the following screenshot that the job completed.

image021

If we look further at the webhookdata we can see several interesting things. We can see exactly where it put the 6716vm parameter for the resourcegroupname and we can see that this request came from my blog at www.buchatech.com.

image022

{“WebhookName”:”WPhook1″,”RequestBody”:”ResourceGroupName=6716vm”,”RequestHeader”:{“Accept”:”*/*”,”Accept-Encoding”:”deflate; q=1.0″,”Host”:”s1events.azure-automation.net”,”User-Agent”:”WordPress/4.5.3; https://www.buchatech.com”,”x-ms-request-id”:”0ae47ca6-46a4-4ba7-902e-6d33840add75“}}

Pretty cool right? Check out the VM now running:

image023

Now to shut it down I can go back to my WordPress and use the Stop Azure VM form. The possibilities here are endless. I know some of you may be thinking this is great but what if I want to control who can login to see this form and will it work with Active Directory. The answer is YES. WordPress has several plugins that integrate with Active Directly and even have SSO. A couple of these are Active Directory/LDAP Login for Intranet sites and Active Directory Integration. 

You can see that WordPress can make a great frontend for your Azure Automation runbooks. That is the end of the post. Happy automating!

Read more