Recently I was a guest on another podcast! This one is RunAsRadio.com.

Had a great time chatting with Richard Campbell about Infrastructure As Code and comparing Terraform with Azure ARM Templates & the new Bicep language. Check it out here:
Recently I was a guest on another podcast! This one is RunAsRadio.com.

Had a great time chatting with Richard Campbell about Infrastructure As Code and comparing Terraform with Azure ARM Templates & the new Bicep language. Check it out here:
Towards the end of 2019, I had the opportunity to be the sole Tech Reviewer on an Azure Azure Strategy and Implementation Guide. This is the third edition of this guide so it has really current Azure information. It was authored by former MVP and now Microsoft trainer Peter De Tender (@pdtit) and others.
This guide gives a step by step introduction to using Azure for your cloud infrastructure. The guide also covers an overview of Azure benefits and best practices for planning your migration, assistance with cloud architecture and design choices, and insight on how to manage and optimize your new cloud environment.
The best part is that this guide is free! Get your copy here:
https://azure.microsoft.com/en-us/resources/azure-strategy-and-implementation-guide-third-edition
At Experts Live Europe 2019 I presented a session titled “Master Azure with VS Code”. This was a fun session with an engaging audience that took to twitter after the session. There was some chatter asking this session was recorded. It was not. I did note that I planned to write a blog post on this topic.
Here is that blog post and it is the first one of 2020 for me! In this post, we are going to dive into how VS code is helpful when working with Azure and many extensions I find useful when working with Azure. This post is not set to be an end-all to using VS Code with Azure but from my experience. Use this post as a starting point or a reference for expanding your use of VS Code with Azure. Also, check out the many other community experts and Microsoft MVPs for their additional knowledge plus tips and tricks on this topic.
VS Code Overview
First off if you are not using VS Code stop reading this right now, go download it and install it then come back to finish reading. 🙂 VS Code is a must-have in your toolbox and it is free! For those that are new to VS Code, it is an open-source – code editor developed by Microsoft that runs on Windows, Linux, and macOS. Here is a shortlist of the many benefits of VS Code:
Note that yes, VS Code is for the “IT Pro”. Not just developers.
Azure Extensions in VS Code
VS Code has a ton of extensions in general. There are a number of Azure specific extensions and you can work with Azure directly from VS Code.
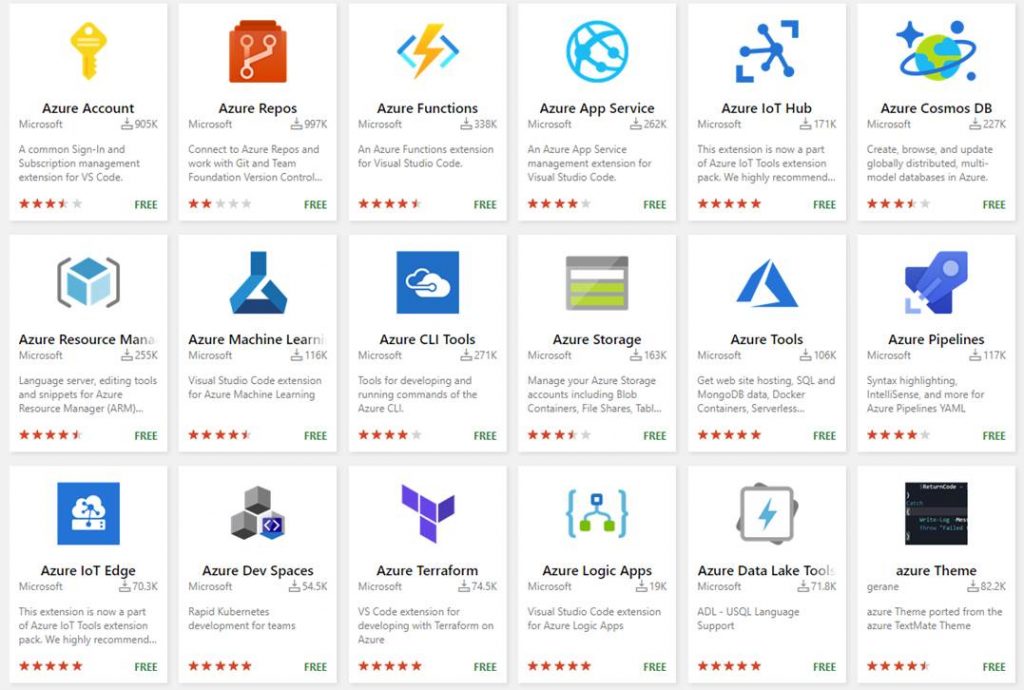
If you go to the VS Code Marketplace here: https://marketplace.visualstudio.com/vscode and search on Azure you will see results for many published by Microsoft and many community based extensions for Azure. As of the time of writing this blog post, there are 93. Here is a screenshot showing some of the results:
You can also go directly to the Azure Tools extension from Microsoft here:
https://marketplace.visualstudio.com/itemdetails?itemName=ms-vscode.vscode-node-azure-pack
Or the
Azure Extensions from Microsoft here:
https://code.visualstudio.com/docs/azure/extensions
In the rest of this post, I am going to share some key extensions I use with Azure. I will post the marketplace links at the end of each extension I talk about and if it is maintained by community or Microsoft.
Deploy to Azure using VS Code
It is important to note that not all of the Azure extensions available in VS Code can be used to deploy to Azure. Some can but most can’t here is a list of the services that you can deploy to from extensions in VS Code.
| Azure Service | Description |
| Azure Functions | Build and manage Azure Functions serverless apps directly in VS Code with the Azure Functions extension. |
| App Service | Manage Azure resources directly in VS Code with the Azure App Service extension. |
| Docker | Deploy your website using a Docker container. |
| Azure CLI | Create, deploy, and update a website using a terminal and the Azure CLI. |
| Static website | Create, deploy, and update a static website on Azure Storage. |
NOTE: This list is current at the time of writing this blog post. This will change over time.
Azure Cloud Shell in VS Code
Cloud Shell is something you should be using with Azure to make your life easier. It is an interactive command-line shell. You are authenticated to your Azure account when you launch it, It typically runs in the browser and is used for managing Azure resources. When you launch it you can choose the shell experience that best for you, either Bash or PowerShell. With VS Code you can launch Cloud Shell directly in VS Code!
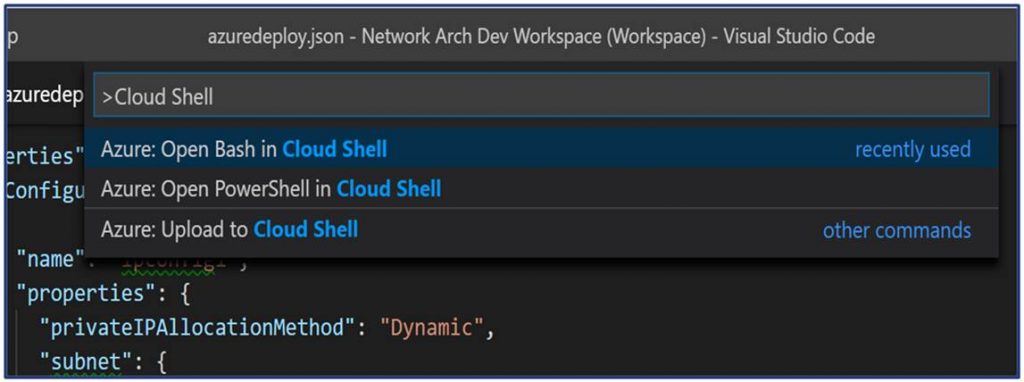
Cloud Shell is a part of the Azure Account extension. Here are some key points on using Cloud Shell with VS Code:
Azure and open-source Tooling in Cloud Shell:
| Azure Tools: blobxfer Azure CLI and Azure classic CLI Azure Functions CLI AzCopy Service Fabric CLI Batch Shipyard | Open-Source: Bash Terraform Packer Ansible Chef InSpec Puppet Bolt Docker Kubectl Helm DC/OS CLI iPython Client Cloud Foundry CLI |
PowerShell Modules in Cloud Shell
| You get the following PowerShell modules in Cloud Shell: Azure Modules (Az.Accounts, Az.Compute, Az.Network, Az.Resources, Az.Storage) Azure AD Management (Preview) Exchange Online (In development) MicrosoftPowerBIMgmt SqlServer |
Marketplace Link:
Azure Account: https://marketplace
Maintained By Microsoft
Recently Microsoft announced they have 13 million daily users in Teams outpacing Slack. You can read about this announcement here: https://www.theverge.com/2019/7/11/20689143/microsoft-teams-active-daily-users-stats-slack-competition. There are many reasons Microsoft Teams has seen tremendous growth since its launch. I use Teams daily across all of my projects. In this post, I am going to write about one that has been exciting and useful for me. In this post, I am going to explore the integration with Microsoft Teams and Azure DevOps.
Are you working on Azure? If so, you are probably working with ARM Templates for Infrastructure as Code (IaC). Azure DevOps can help you centralize DevOps teams IaC ARM Templates. In addition, you will want to use VS Code and Microsoft Teams. There are many extensions in VS Code for ARM Templates. With Teams, you can integrate with Azure DevOps to track commits, pull requests, and even 2-way integration with Kanban boards.
Within Microsoft Teams you can add what is called “Apps”. These Apps are how you extend Teams and or integrate with other systems. This is how you integrate with Azure DevOps. Before we dive into this there are two important prereqs to note.
#1 You can only integrate a Teams channel with Azure DevOps when they both exist in the same Azure Active Directory tenant organization.
#2 Your Teams needs to be a part of an Office 365 account. The free version of Teams does have an Azure Pipelines app but does not have the Azure DevOps app that gives you full 2-way integration. The Azure Pipelines app is for notifications while the Azure DevOps app is for full collaboration.
Here are the high-level steps to integrate a Teams channel with the Azure DevOps App.
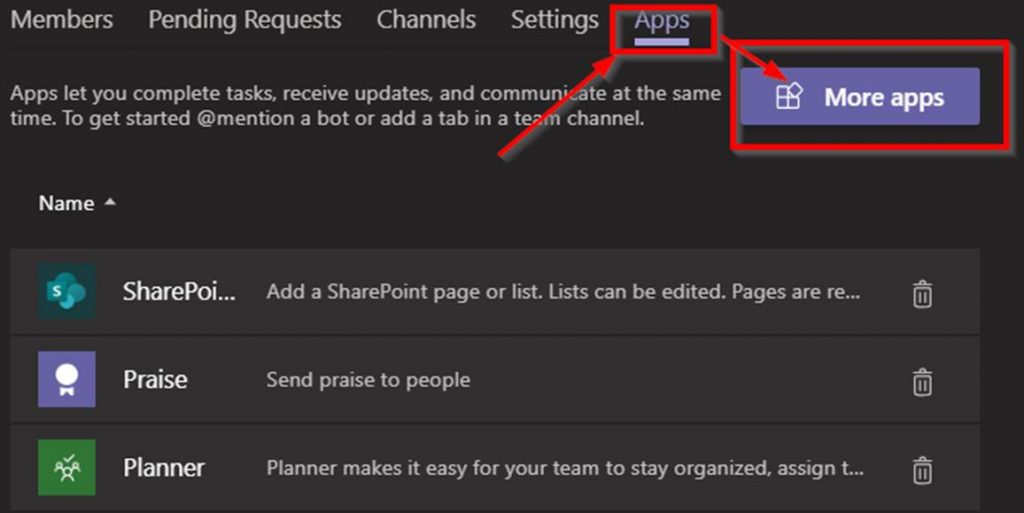
In your Teams channel go to Manage Team and then click on Apps.
Click on More Apps.
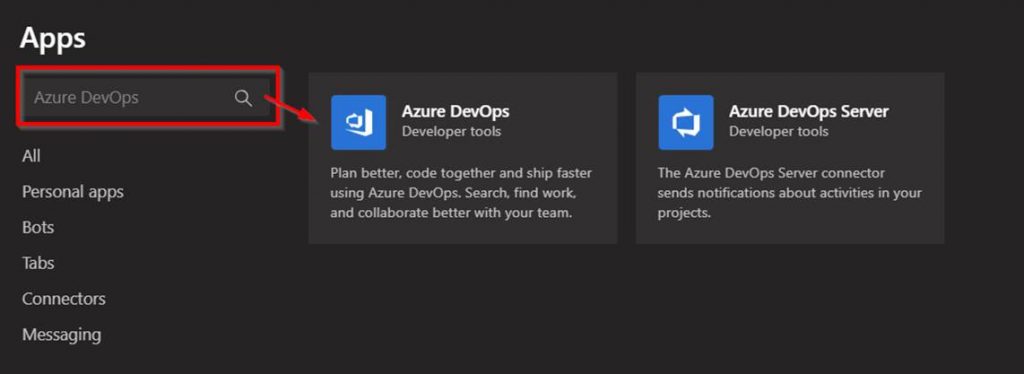
Search for Azure DevOps and click on it.
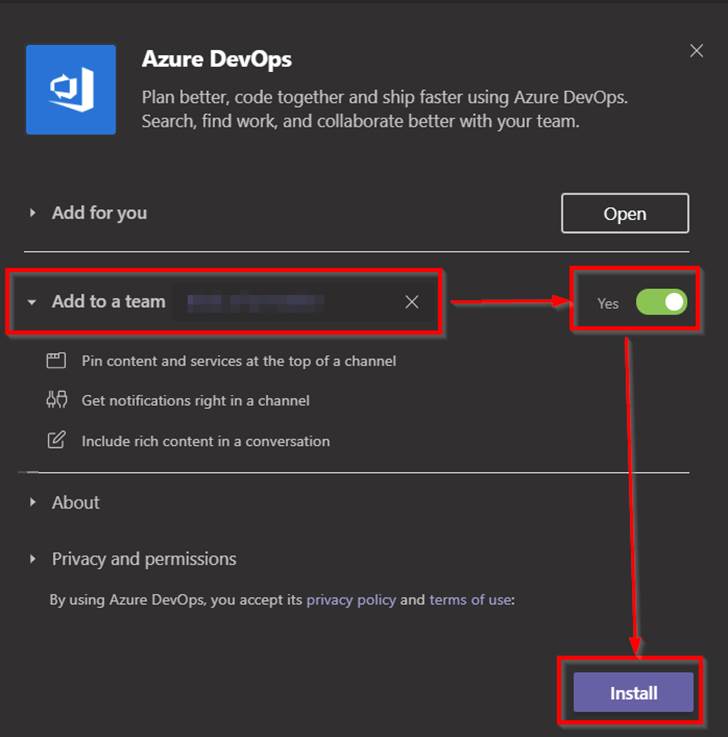
Input your Teams channel in the field next to Add to a team and then click on Install. This will load the Azure DevOps app into your teams’ channel. Note this needs to be done for each teams’ channel if you want this integration across multiple channels.
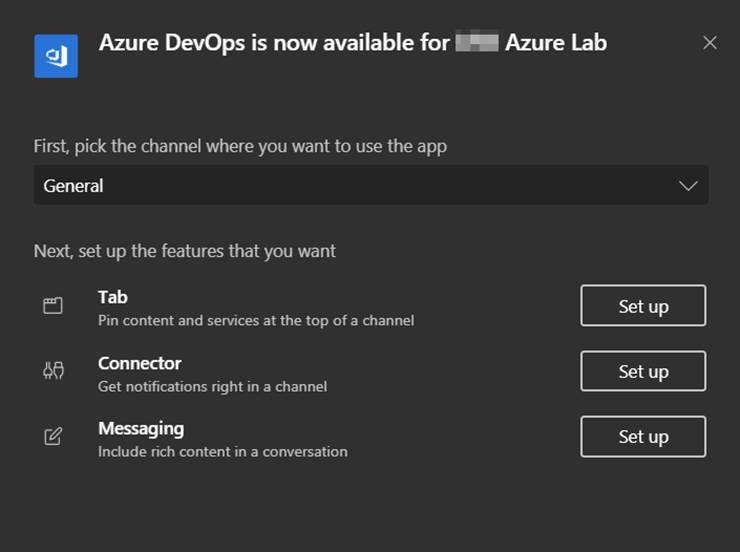
Next click the Set up button next to the feature you want to configure and use. The following screenshot shows the 3 features available.
For anyone working with Azure sooner or later, you will end up authoring Azure Resource Manager (ARM) Templates. Working with ARM templates, in the beginning, can seem painful but once you get the hang of them it is a great way to build out and deploy your Azure as code. In this blog post, I am not going to go into detail on authoring ARM Templates. In this blog post, I am going to list out the extensions that I use in VS Code to enhance the ARM Template authoring experience. Recently whenever I am demoing or showing others my ARM Templates in VS Code they ask me how they can also make their VS Code look like mine when working with ARM Templates. I figured it makes sense to write up a blog about how I have my VS Code configured for ARM Templates.
If you are not using VS code, you should change that and start using it today! I use it pretty much for any scripting such as PowerShell, coding, any time I need a text editor and more. I even use it to work directly with Azure via cloud shell and to work with Docker containers and Kubernetes clusters. Here is a quick snapshot of what VS Code is for anyone not familiar with it. VS Code is an open source – code editor developed by Microsoft that is cross-platform able to run on Windows, Linux and macOS. At a high level here is what VS Code includes:
As you can see there is a ton of stuff you can do with VS Code. VS Code is a must have for anyone doing CloudOps work with Azure and more. Now let’s look at the VS Code extensions I use for ARM Templates. I am including the link for each extension I will talk about. You can also simply load these right in VS Code.
Azure Resource Manager Tools: https://marketplace.visualstudio.com/items?itemName=msazurermtools.azurerm-vscode-tools
The Azure Resource Manager Tools extension provides language support for ARM Templates and language expressions. It can be used to create and edit Azure Resource Manager templates. High-level features include:
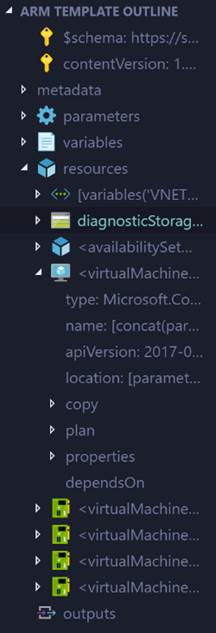
VS Code natively supports JSON. Azure Resource Manager Tools makes VS Code ARM Template aware. One of the biggest benefits it gives me is the ARM Template Outline making it much easier and faster to navigate the sections of an ARM Template. Here is what it looks like.
Next up is two extensions that both should be added. It is Material Theme and Material Theme Icons.
Material Theme – https://marketplace.visualstudio.com/items?itemName=Equinusocio.vsc-material-theme

This extension gives you some very cool themes and works in combination with the Azure Resource Manager Tools extension to give you the new color coding of your ARM Template code. The color coding highlights different parts of the ARM Template code such as parameters, variables, functions and more making it much easier to read through all of the code in ARM templates. Here is an example:

Material Icons Theme – https://marketplace.visualstudio.com/items?itemName=PKief.material-icon-theme
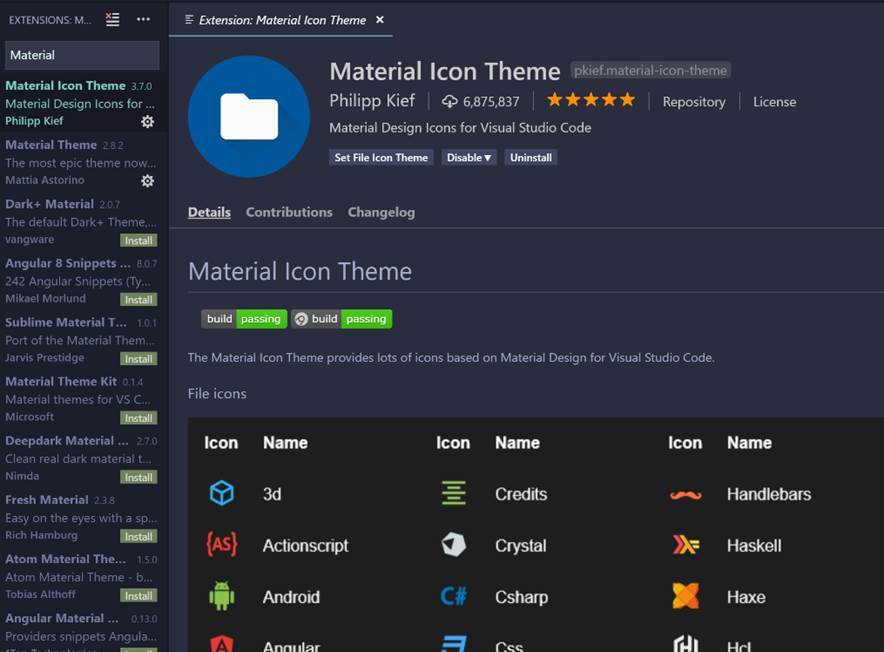
This extension adds a nice set of icons to your VS code. This extends beyond just ARM Templates. Again this makes it visually easier when navigating around VS code and ARM Templates. I typically use a PowerShell deployment script to deploy ARM Templates from VS Code into Azure. This icon them makes it easy to see ARM Template files and PowerShell files.
Here is a what it looks like without and with the Materials Icon Theme.
ARM Snippets – https://marketplace.visualstudio.com/items?itemName=samcogan.arm-snippets
The final extension I want to cover is ARM Snippets. This extension was developed by Sam Cogan (@samcogan) a fellow Microsoft MVP. In addition to the aforementioned marketplace link for this extension, you can find Sam’s Github repo for it here https://github.com/sam-cogan/arm-snippets-vscode.
This extension adds snippets to VS Code for creating Azure Resource Manager Templates. This is helpful when you are working in VS Code and need to add something to your template for example a parameter, resource etc. You simply type arm and a menu appears with a list of the available snippets. For example if you want to add a virtual machine you could type arm-vm and a list of Windows and Linux VM resources snippets will appear. Click on the one you want and it will add the code block for you. This makes authroing templates much-much faster. This is shown in the following screenshot:
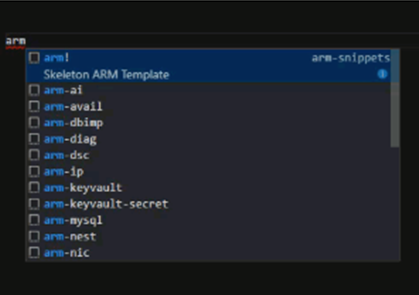
The snippets include:
Note that the ARM Snippets extension is derived from the Cross Platform Tooling Samples. The Cross Platform Tooling Samples are a set of templates, snippets, and scripts for creating and deploying Azure Resource Management Templates in cross-platform environments. It sounds like this is updated more often and worth looking into loading. It does not have a friendly installer though like the ARM Snippets extension does though. Here is the link to the Cross Platform Tooling Samples Github repo: https://github.com/Azure/azure-xplat-arm-tooling
End Result:
Below is a screenshot of what your ARM Templates will look like after loading all of the extensions mentioned in this blog post into your VS Code.

That wraps up this blog post. I hope this is helpful to those out there working with ARM Templates in VS Code. If you have any additional tips to share please add a comment. Happy authoring!
Lately I have been hearing a lot about a solution named Rancher in the Kubernetes space. Rancher is an open source Kubernetes Multi-Cluster Operations and Workload Management solution. You can learn more about Rancher here: https://www.rancher.com.
In short you can use Rancher to deploy and manage Kubernetes clusters deployed to Azure, AWS, GCP their managed Kubernetes offerings like GCE, EKS, AKS or even if you rolled your own. Rancher also integrates with a bunch of 3rd party solutions for things like authentication such as Active Directory, Azure Active Directory, Github, and Ping and logging solutions such as Splunk, Elasticsearch, or a Syslog endpoint.
Recently training opened up for some Rancher/Kubernetes/Docker training so I decided to go. The primary focus was on Rancher while also covering some good info on Docker and Kubernetes. This was really good training with a lot of hands on time, however there was one problem with the labs. The labs had instructions and setup scripts ready to go to run Rancher local on your laptop or on AWS via Terraform. There was nothing for Azure.
I ended up getting my Rancher environment running on Azure but it would have been nice to have some scripts or templates ready to go to spin up Rancher on Azure. I did find some ARM templates to spin up Rancher but they deployed an old version and it was not clear in the templates on where they could be updated to deploy the new version of Rancher. I decided to spend some time building out a couple of ARM templates that can be used to quickly deploy Rancher on Azure and add a Kubernetes host to Rancher. In the ARM template I pulled together it pulls the Rancher container from Docker Hub so it will always deploy the latest version. In this blog post I will spell out the steps to get your Rancher up and running in under 15 minutes.
First off you can find the ARM Templates here on my Github here: https://github.com/Buchatech/DeployRanchertoAzure.
The repository consists of ARM templates for deploying Rancher and a host VM for Kubernetes. NOTE: These templates are intended for labs to learn Rancher. They are not intended for use in production.
In the repo ARM Template #1 named RancherNode.JSON will deploy an Ubuntu VM with Docker and the latest version of Rancher (https://hub.docker.com/r/rancher/rancher) from Docker Hub. ARM Template #2 named RancherHost.JSON will deploy an Ubuntu VM with Docker to be used as a Kubernetes host in Rancher.
Node Deployment
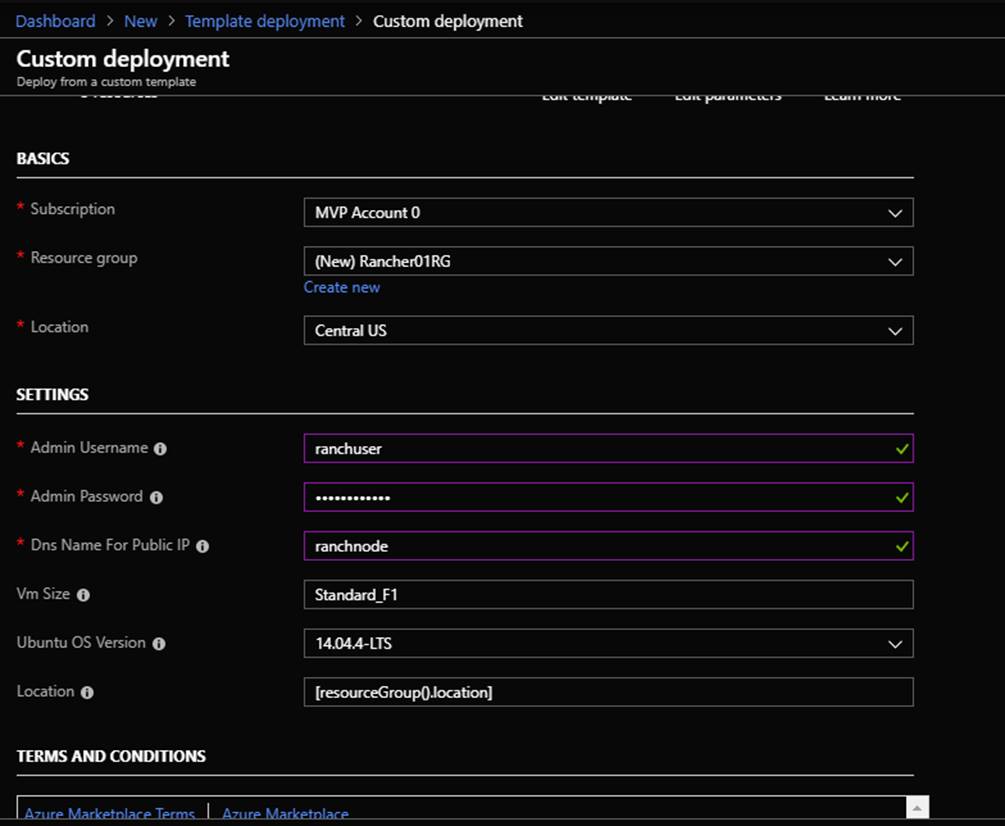
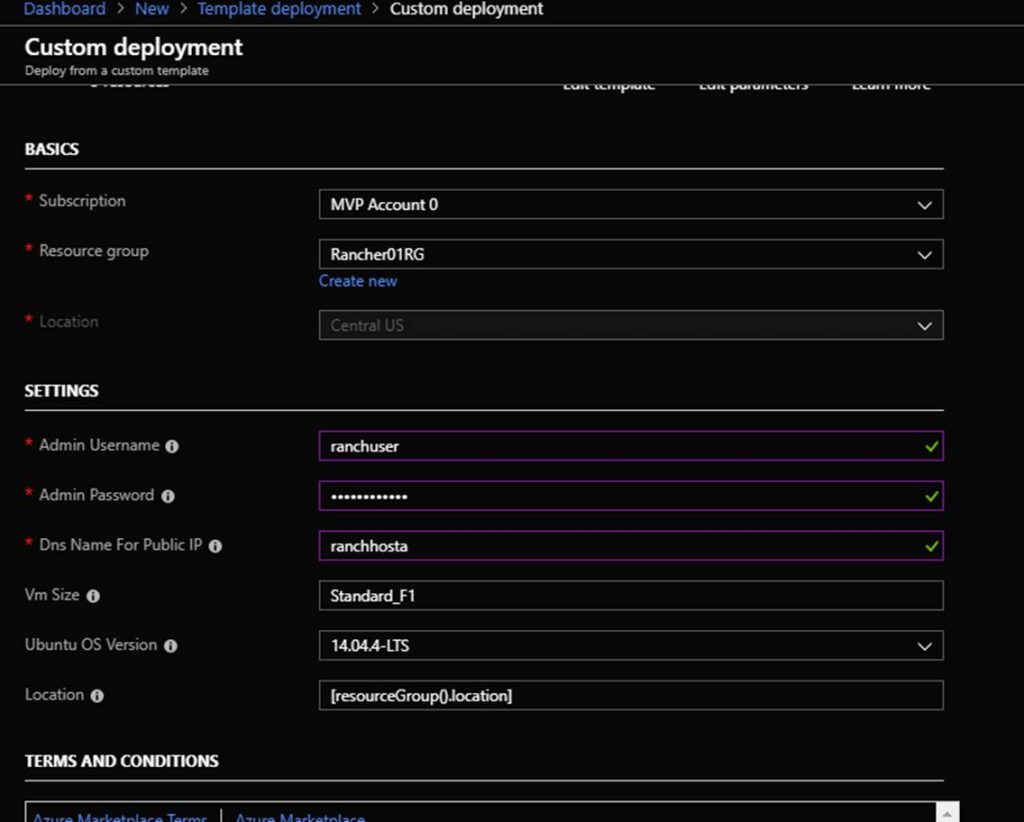
Deploy the RancherNode.JSON ARM template to your Azure subscription through “Template Deployment” or other deployment method. You will be prompted for the following info shown in the screenshot:
Host Deployment
Deploy the RancherHost.JSON ARM template to your Azure subscription through “Template Deployment” or other deployment method. Note that that should deploy this into the same Resource Group that you deployed the Rancher Node ARM template into. You will be prompted for the following info shown in the screenshot:
After the Rancher Node and Rancher Host ARM templates are deployed you should see the following resources in the new Resource Group:
| Name | Type |
| RancherVNet | Virtual network |
| RancherHost | Virtual machine |
| RancherNode | Virtual machine |
| RancherHostPublicIP | Public IP address |
| RancherNodePublicIP | Public IP address |
| RancherHostNic | Network interface |
| RancherNodeNic | Network interface |
| RancherHost_OSDisk | Disk |
| RancherNode_OSDisk | Disk |
Next navigate the Rancher portal in the web browser. The URL is the DNS name of the Rancher Node VM. You can find the DNS name by clicking on the Rancher Node VM in the Azure portal on the overview page. Here is an example of the URL:
https://ranchernode.centralus.cloudapp.azure.com
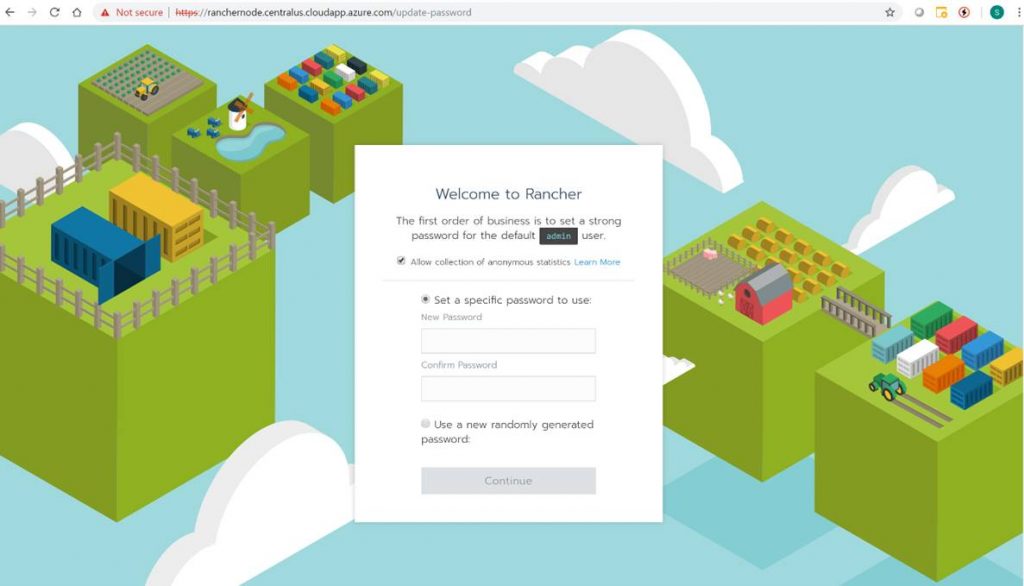
The Rancher portal will prompt you to set a password. This is shown in the following screenshot.
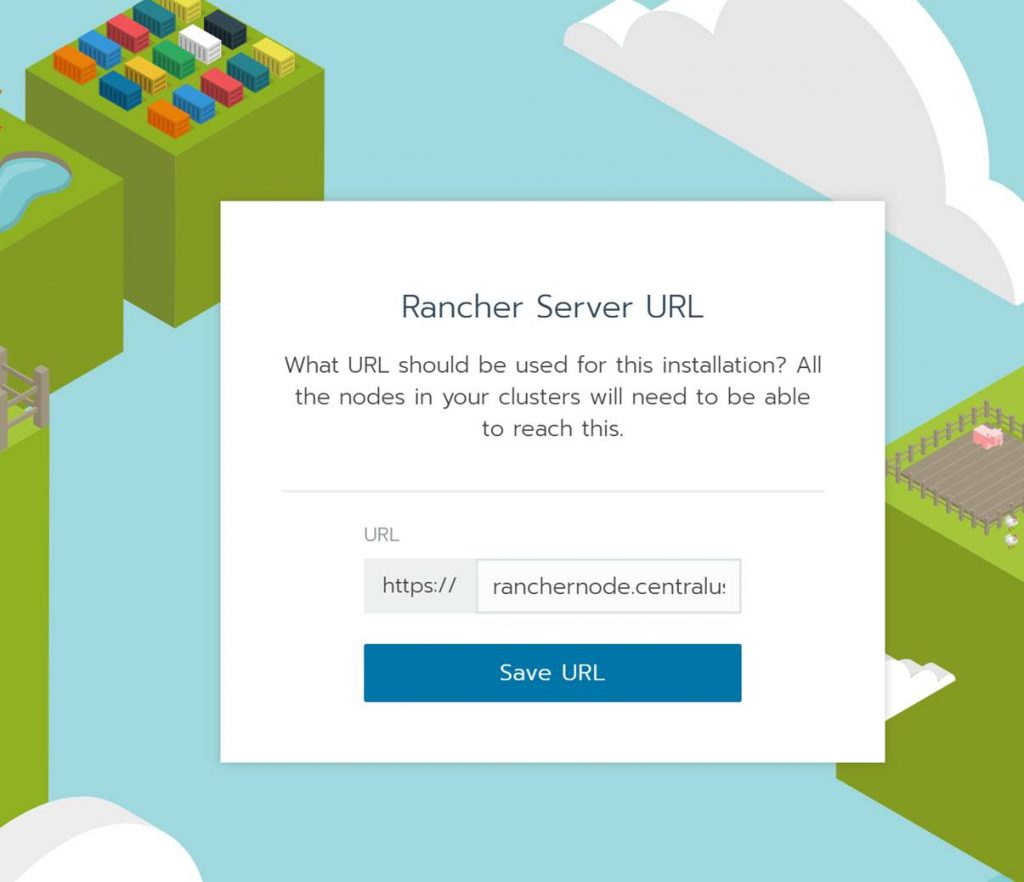
After setting the password the Rancher portal will prompt you for the correct Rancher Server URL. This will automatically be the Rancher Node VM DNS name. Click Save URL.
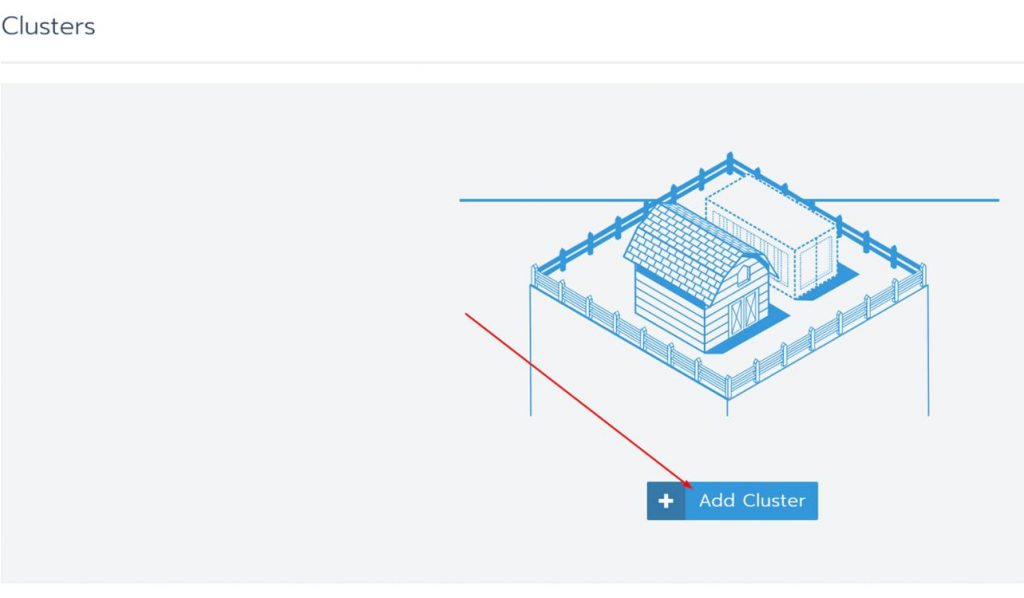
You will then be logged into the Rancher portal. You will see the cluster page. From here you will want to add a cluster. Doing this is how you add a new Kubernetes cluster to Rancher. In this post I will show you how to add a cluster to the Rancher Host VM. When it’s all said and done Rancher will have successfully deployed Kubernetes to the Rancher Host VM. Note that you could add a managed Kubernetes such as AKS but we won’t do that in this blog. I will save that for a future blog post!
Click on Add Cluster
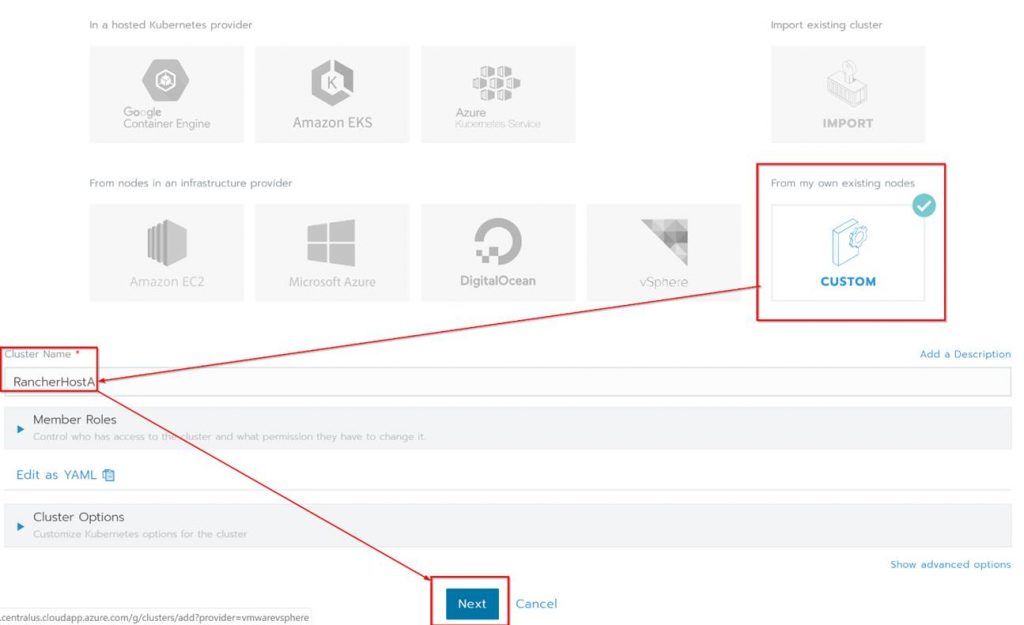
Under “From my own existing nodes” Click on custom, give the cluster a name and click Next.
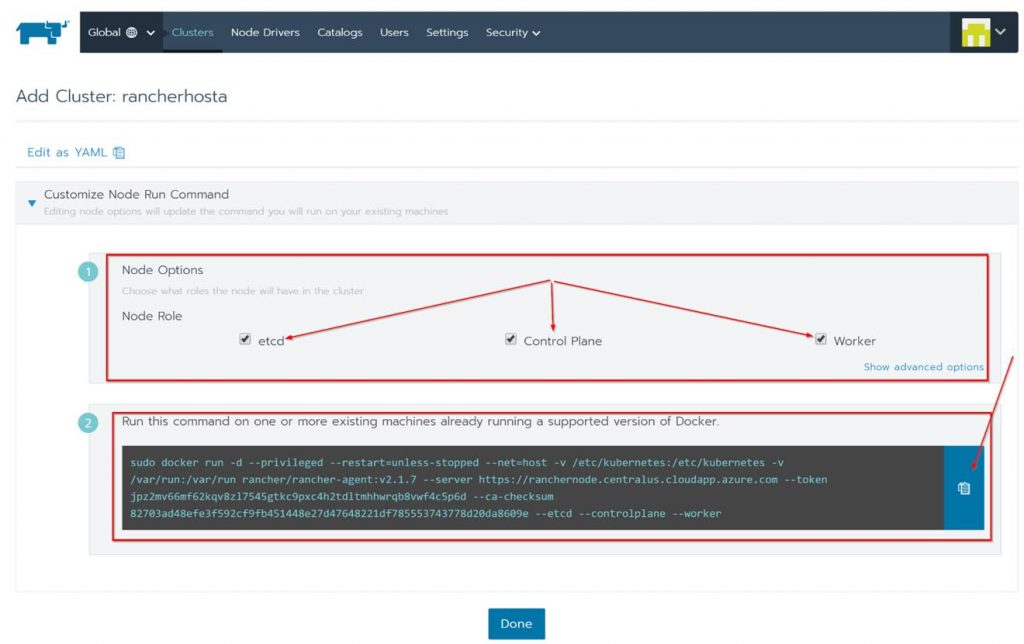
Next check all the boxes for the Node Options since all the roles will be on a single Kubernetes cluster. Copy the code shown at the bottom of the page, click done and run the code on the Rancher Host.
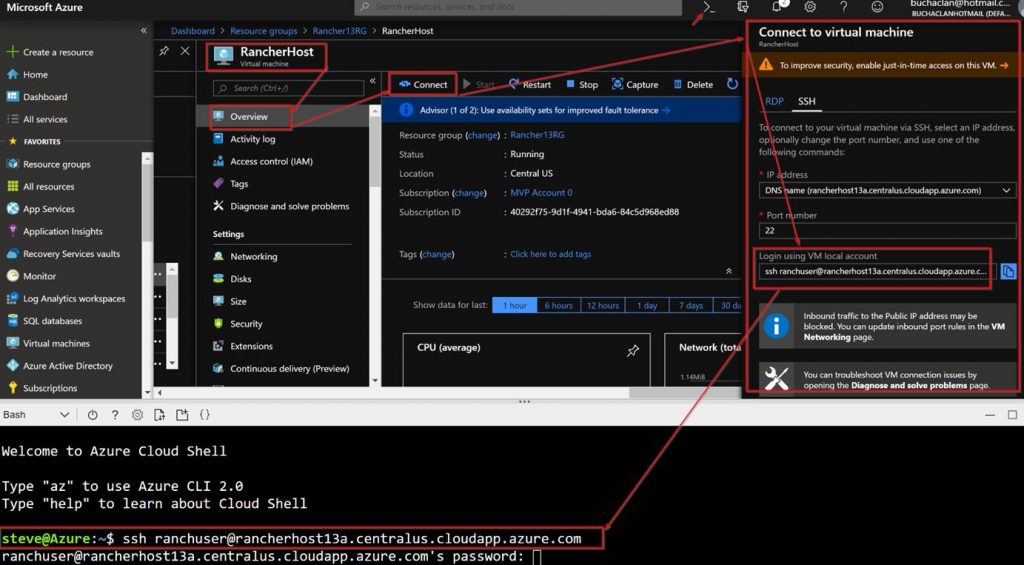
In order to run the code on the Rancher Host you need to SSH in and run it from there. To do this follow these steps:
Running the code will look like this:
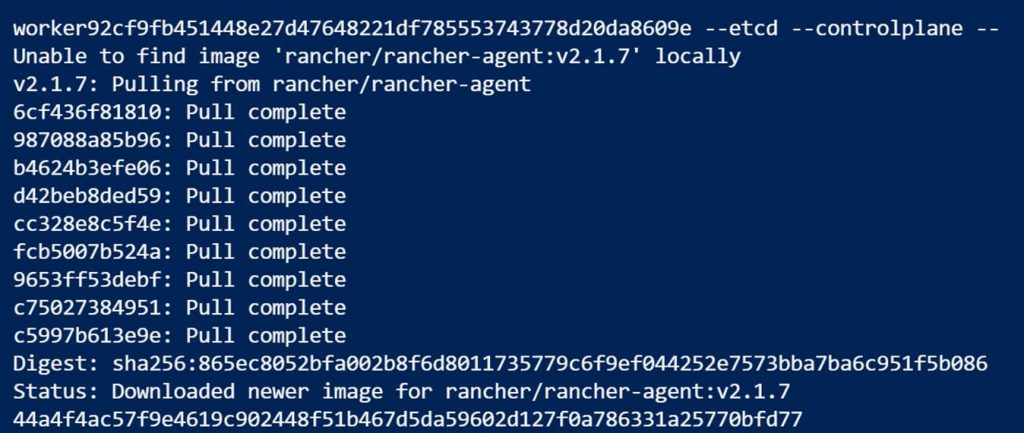
When done you can run Docker PS to see that the Rancher agent containers are running.

In the Rancher portal under clusters you will see the Rancher host being provisioned

The status will change as Kubernetes is deployed.
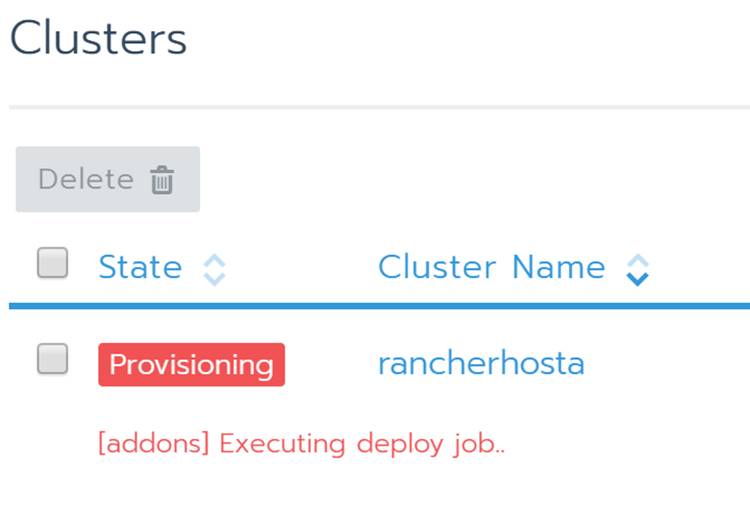
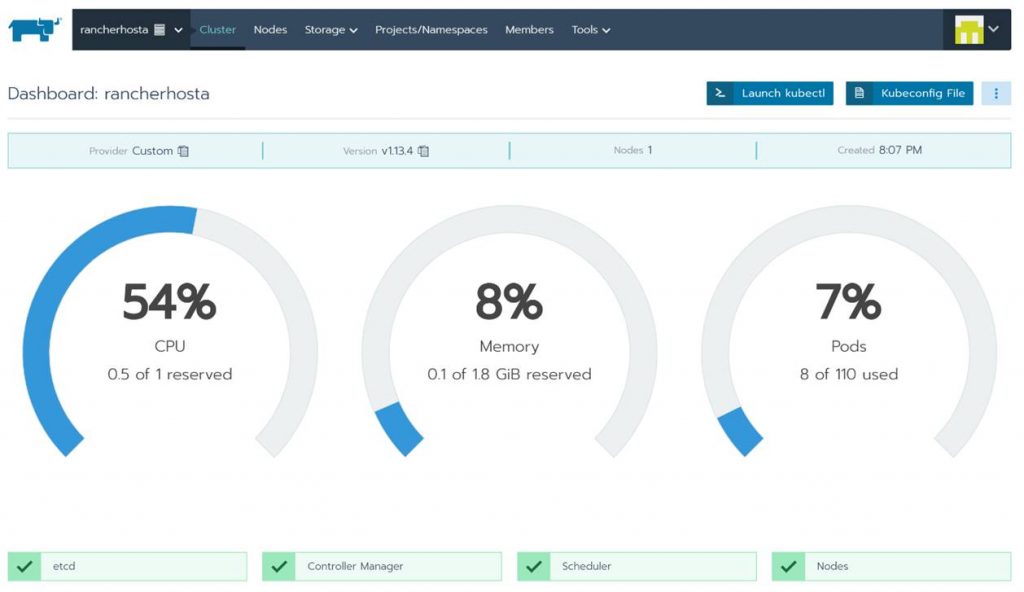
Once it’s done provisioning you will see your Kubernetes cluster as Active.

From here you can see a bunch of info about your new Kubernetes cluster. Also notice that you could even launch Kubectl right from hereand start running commands! Take some time to click around to see all the familiar stuff you are used to working with in Kubernetes. This is pretty cool and simplifies the management experience for Kubernetes.
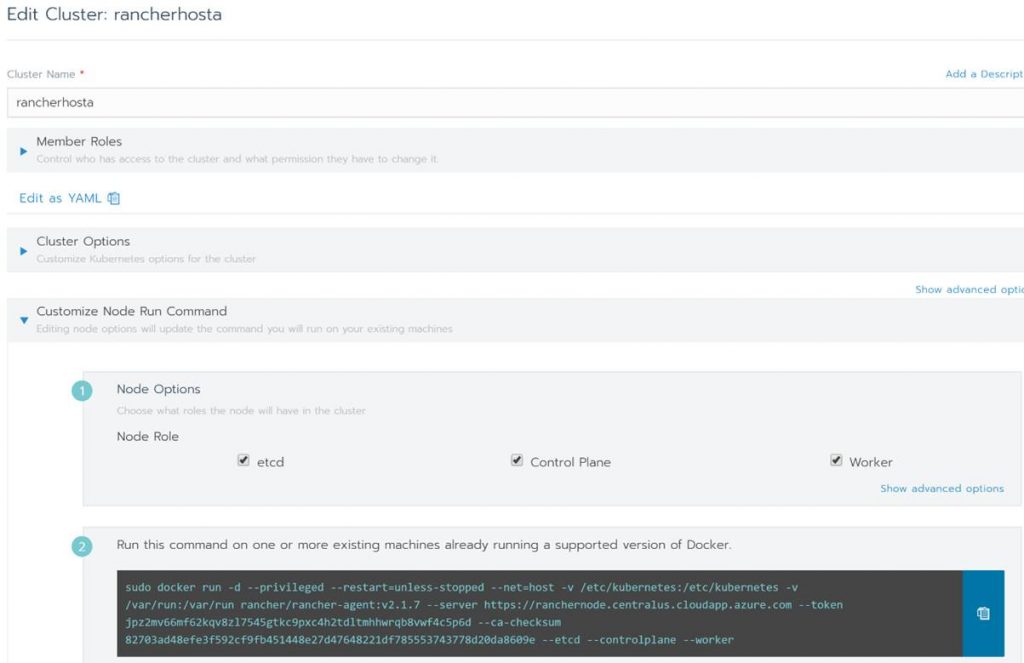
If you want to add more nodes or need the configuration code again just click the ellipsis button and edit.

In Edit Cluster you can change the cluster name, get and change settings and copy the code to add more VMs to the cluster.
That’s the end of this post. Thanks for reading. Check back for more Azure, Kubernetes, and Rancher blog posts.
Azure Policy can be used to enforce rules and effects on resources in your Azure subscriptions. It is a part of the Azure Governance and management toolbox native to Azure. I actually wrote a blog post all about Azure Policy here as a part of my native cloud management in azure blog series.
In this blog post I want to dig into Requiring Tags on Resource Groups via Azure Policy. There is a sample policy ARM Template to accomplish this here:
https://docs.microsoft.com/en-us/azure/governance/policy/samples/enforce-tag-on-resource-groups . What is not clear with the this policy template is how to add an enforce additional tags within the single ARM Template. This is important as you don’t want to have multiple templates to enforce multiple tags.
Well its actually pretty straight forward. You need to add the additional tags as Rules and Parameters. For example:
{
"not": {
"field": "[concat('tags[',parameters('Environment'), ']')]",
"exists": "true"
}
},
and
"Environment": {
"type": "String",
"metadata": {
"description": "Provides information on what the resource group is used for (useful for maintenance, policy enforcement, chargeback, etc.) Tag value: Dev, QA, Stage, Test, Prod. Example: Prod"
}
},
Be sure you add a parameter for every rule. Also in the example I gave I removed the “equals”: “[parameters(‘tagValue’)]” from the rules because I did not want to populate the tag value. I simply needed to require the tag and leave the value open for the person creating the resource to fill in. Here is the full example Policy ARM Template here:
{
  "mode": "all",
  "policyRule": {
    "if": {
      "allOf": [
        {
          "field": "type",
          "equals": "Microsoft.Resources/subscriptions/resourceGroups"
        },
        {
          "not": {
            "field": "[concat('tags[',parameters('BillTo'), ']')]",
            "exists": "true"
          }
        },
        {
            "not": {
              "field": "[concat('tags[',parameters('Functional Area'), ']')]",
              "exists": "true"
            }
          },
          {
            "not": {
              "field": "[concat('tags[',parameters('Environment'), ']')]",
              "exists": "true"
            }
          },
          {
            "not": {
              "field": "[concat('tags[',parameters('AppOwner'), ']')]",
              "exists": "true"
            }
          }
      ]
    },
    "then": {
      "effect": "deny"
    }
  },
  "parameters": {
    "BillTo": {
      "type": "String",
      "metadata": {
        "description": "Provides a charge code or cost center to attribute the bill for the resources too. Tag value: Cost Center. Example: team@domain.com"
      }
    },
    "Functional Area": {
        "type": "String",
        "metadata": {
          "description": "Provides information on department or team is responsible for administering/supporting the application. Tag value: Team name/email. Example: 1506548"
        }
      },
      "Environment": {
        "type": "String",
        "metadata": {
          "description": "Provides information on what the resource group is used for (useful for maintenance, policy enforcement, chargeback, etc.) Tag value: Dev, QA, Stage, Test, Prod. Example: Prod"
        }
      },
      "AppOwner": {
        "type": "String",
        "metadata": {
          "description": "The Business app owner to contact. Tag value: Business App owners’ email. Example: name@domain.com"
        }
      }
  }
}
After you create the Policy definition using the ARM template it will look like this:
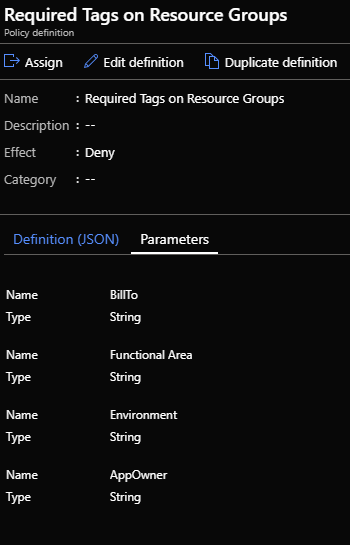
When you assign the policy you will need to complete the parameters:
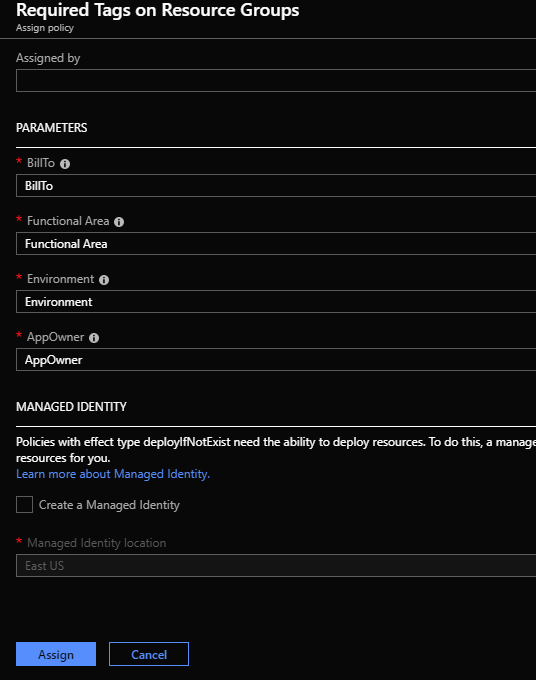
The next time someone deploys a resource group without the required tags in the subscription this policy is assigned to it will fail.
Thanks for reading!
Today as a part of the Azure Governance and management announcements at Microsoft Ignite 2018 Azure Blueprints Public Preview was announced. Azure Blueprints are a core part of the cloud governance and management story. They go hand and hand with Management Groups and will take the enterprise management story of Azure up a level. In this blog post I will take a deep dive into Azure Blueprints explaining what they are and give an example of how they can be used.
NOTE: This is a long blog post so I have also published this content as a whitepaper. The whitepaper PDF can be downloaded here.
BLUEPRINTS OVERVIEW
At a high-level Azure Blueprints help you meet organizational cloud standards, patterns, and requirements through governed subscriptions enabled and enforced by the grouping of artifacts like ARM templates, Azure policies, RBAC role assignments, and resource groups within a Blueprint.
Blueprints can be used to lay a cloud foundation, as cloud patterns, and group cloud governance frameworks. Blueprints are a one-click solution for deploying a cloud foundation, pattern, or governance framework to an Azure subscription. Think of an Azure Blueprint as re-usable design parameters for cloud that can be shared and used across an enterprise.
Azure architects typically map out and plan the many aspects of a cloud foundation for an organization such as access management, networking, storage, policy, security/compliance, naming conventions, tagging, monitoring, backup, locations, and more. Now Azure architects can step this designing a step further build these designs as Azure Blueprints and then apply them to subscriptions. The Blueprints give architects a way to orchestrate the deployment of grouped components to speed up the development and provisioning of new Azure environments ensuring they are meeting organizational compliance.
BLUEPRINTS ARE NOT AZURE POLICY
Azure policy is a service targeted to resource properties that exists or when being deployed with allow or explicit deny policies. It is used to ensure resources in an Azure subscription adhere to requirements and standards of an organization.
Azure policies can exist on their own or be a part of an Azure Blueprint. Blueprints do not replace Policy they are one of the Artifact types that make up a Blueprint.
THE MAKEUP OF A BLUEPRINT
A Blueprint consists of a Definition. The Definition is the design of what should be deployed it consists of the name of the Blueprint, the description and the Definition location. The Definition Location is the place in the Management Group hierarchy where this Blueprint Definition will be stored and determines the level assignment is allowed at. Currently you must have Contributor access to a Management Group to be able to save a Blueprint Definition to it. A Blueprint can be assigned at or below the Management Group it has set in its Definition Location. Here is a diagram to visualize Blueprint Assignment in relation to Management Group hierarchy:
The Definition is where Blueprint Artifacts are added. As of right now the following is a list of the Artifact types:
In my opinion the ARM Template artifact is the most impactful of the Blueprint artifact types because you can define such a variety of resources here. It opens the Blueprint to the power of ARM in general. Hopefully in the future we will see more scripting capability or the ability to load PowerShell scripts, runbooks, and or Functions.
There are two levels in the Artifacts. The first level is Subscription. The second level is Resource Group. Resource Group artifacts cannot be added to a Resource Group artifact. A Resource Group artifact can be created in a Subscription. An ARM Template artifact can only be created in a Resource Group artifact. A Policy Assignments or Role Assignments can be created at either the Subscription or Resource Group level.
After a Blueprint has been built it needs to be applied. Applying a Blueprint is known as Blueprint assignment. The assignment is essentially the “what was deployed” for a Blueprint. This is how the artifacts are pushed out to Azure and used to track and audit deployments in Azure.
When the assignment of a Blueprint is processed the default order of resource creation is:
When a blueprint includes multiple Azure Resource Manager templates there may be a need to customize the sequencing order in which the Blueprint will deploy artifacts during assignment. You customize the artifact deployment sequence by deploying a Blueprint from an ARM Template declaring a dependency within it or declaring a dependency within an ARM Template artifact in the Blueprint. You declare a dependency using the dependsOn property in JSON. This essentially is a string array of artifact names.
In cloud environments consistency is key. Naturally Azure Blueprints can also leverage resource locking in Azure. Blueprints have a Locking Mode. This Locking Mode can be applied to None or All Resources and is determined during the assignment of the Blueprint. The decision on cannot be changed later. If a locking state needs to be removed, then you must first remove the Blueprint assignment.
Some Blueprint artifacts create resources during assignment. These resources can have the following state:
Artifacts that become Resource groups get the state of Cannot Edit / Delete automatically but you can create, update, and delete resources within them.
The high-level stages of an Azure Blueprint are Create it, assign it to a scope, and track it.
Anatomy of a Blueprint:
Blueprint does have a REST API. I am not covering the REST API in this blog post as I have not had the opportunity to spend much time working with it yet.
Now let’s look at building and assigning an Azure Blueprint.
BUILD A BLUEPRINT
Now I am going to give an example of building and using an Azure Blueprint in a cloud foundation mock scenario. In my mock scenario I have 3 Azure subscriptions. Each subscription should have a Core services Resource Group consisting of a core VNet with 3 subnets, an NSG for each subnet, and the web subnet should be ready for DMZ traffic. For the core VNet and any additional VNet added to the Core Services Resource Group I need network watcher deployed to it.
Each subscription also should have a core storage account and a blob storage that is ready for general storage needs. I want a tag applied to any Blueprint assignment labeling it with the assignment name, so it is easy to track. The last requirement I have is that I need the CloudOps team to automatically be owner of all core services resources. To accomplish all of this I created the following Blueprint:
Now let’s walk through the parts of creating and assigning the Blueprint. The first step is to create the Blueprint Definition.
In the basics step I give it a meaningful name and meaningful description. I set the Definition Location to the root of my Management groups. Doing this will allow me to assign this Blueprint to all 3 subscriptions in turn creating the core services RG in each subscription.
Next the Artifacts need to be added. Note that when adding an Artifact at the Subscription level you have these options as types:
The Resource Group Artifact type is only available at the subscription level and the ARM template Artifact type is only available at the Resource Group level. I added the Resource Group that the core networking and core storage will be deployed into.
I looked for an existing ARM template that would create multiple Linux VM’s. I found only one that creates some in a scale set. The use case I was working with did not call for a scale set so I needed a different template.
I found a simple ARM template for creating multiple Windows VM’s on Azure here. It had exactly what I needed for my use case but did not cover Linux.
I modified the template and uploaded to Github in case this is helpful to anyone else. The repo has two templates. There is one for Ubuntu and one for SUSE. When you deploy the template it will need the following parameters:
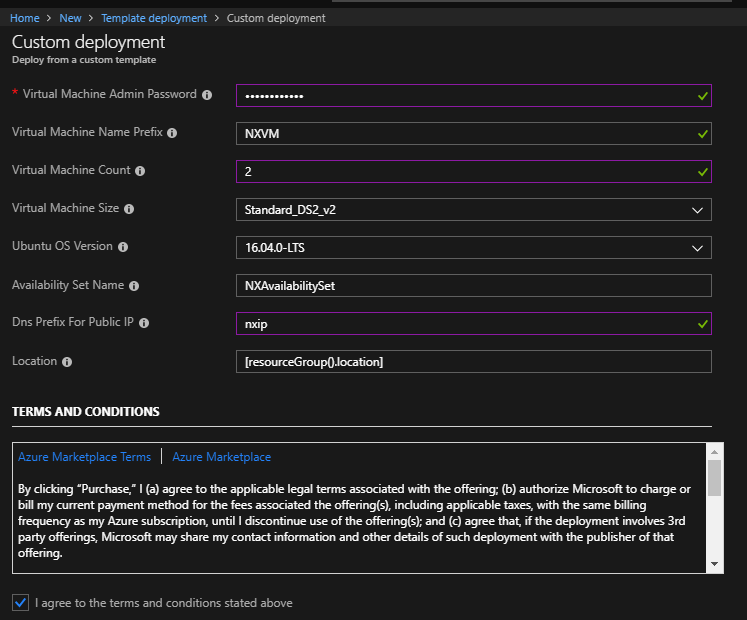
The ARM template will create an availability set (AS) with N number of VM’s put in that AS, network interfaces, and public IP’s for each VM along with a VNet and Subnet as shown in the following screenshot:
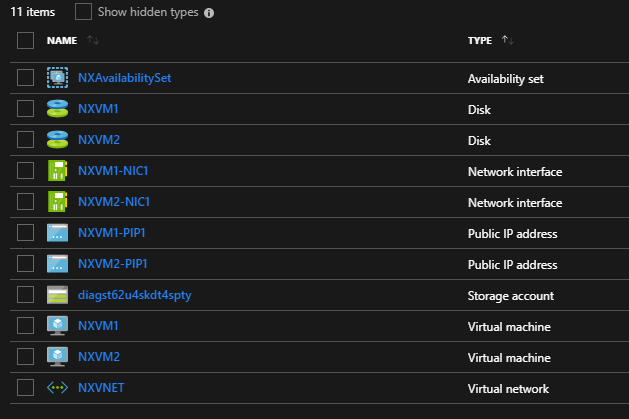
Here is the link to download the ARM Template:
https://github.com/Buchatech/Multiple-Linux-VM-Deployment-ARM-Template