Recently I was a guest on another podcast! This one is RunAsRadio.com.

Had a great time chatting with Richard Campbell about Infrastructure As Code and comparing Terraform with Azure ARM Templates & the new Bicep language. Check it out here:
Recently I was a guest on another podcast! This one is RunAsRadio.com.
Had a great time chatting with Richard Campbell about Infrastructure As Code and comparing Terraform with Azure ARM Templates & the new Bicep language. Check it out here:
Thanks to AzureCrazy.com for featuring me in an interview.
In the article we discussed being a Microsoft MVP, getting certified in Azure, the positive impact PowerShell can have on ones IT Career, getting started with Azure Kubernetes Service, Azure Stack Hub & more. Check it out here:

I am excited to announce that I am one of the experts in several Ask the Expert sessions during Microsoft Ignite 2020 this week.
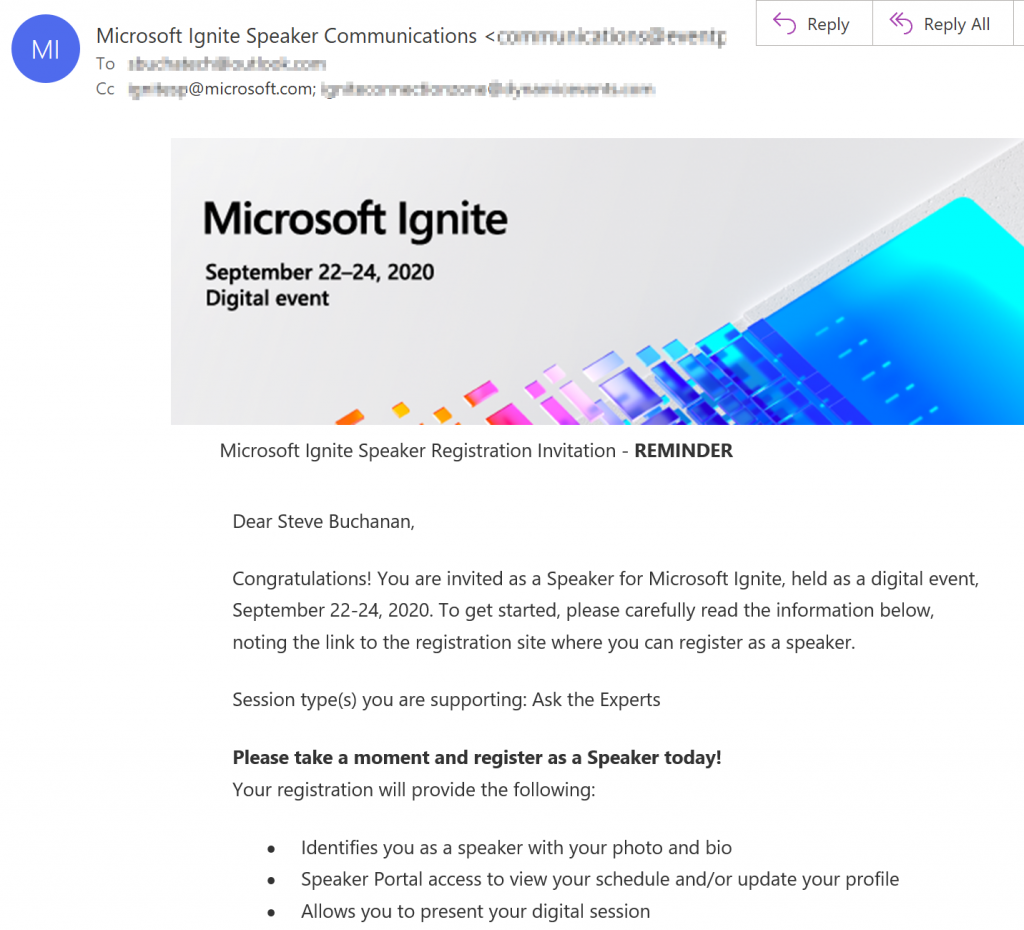
I will be a part of a variety of sessions with topics ranging from Linux and PowerShell on Azure, Kubernetes on Azure, Azure Migration, and Transforming Windows Server workloads in Azure.
My Speaker profile:
https://myignite.microsoft.com/speaker/ce1ea0e0-3f42-4986-90ab-aee809e3735d
The sessions are:
Here is the link to the Ignite home page myignite.microsoft.com. I hope to see you on the digital Ignite event and in one of the Ask the Expert Sessions!
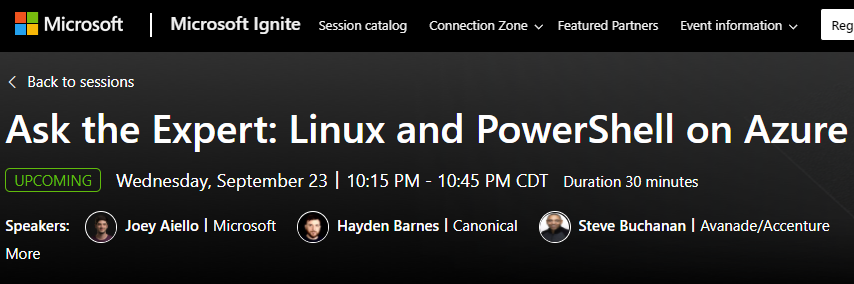
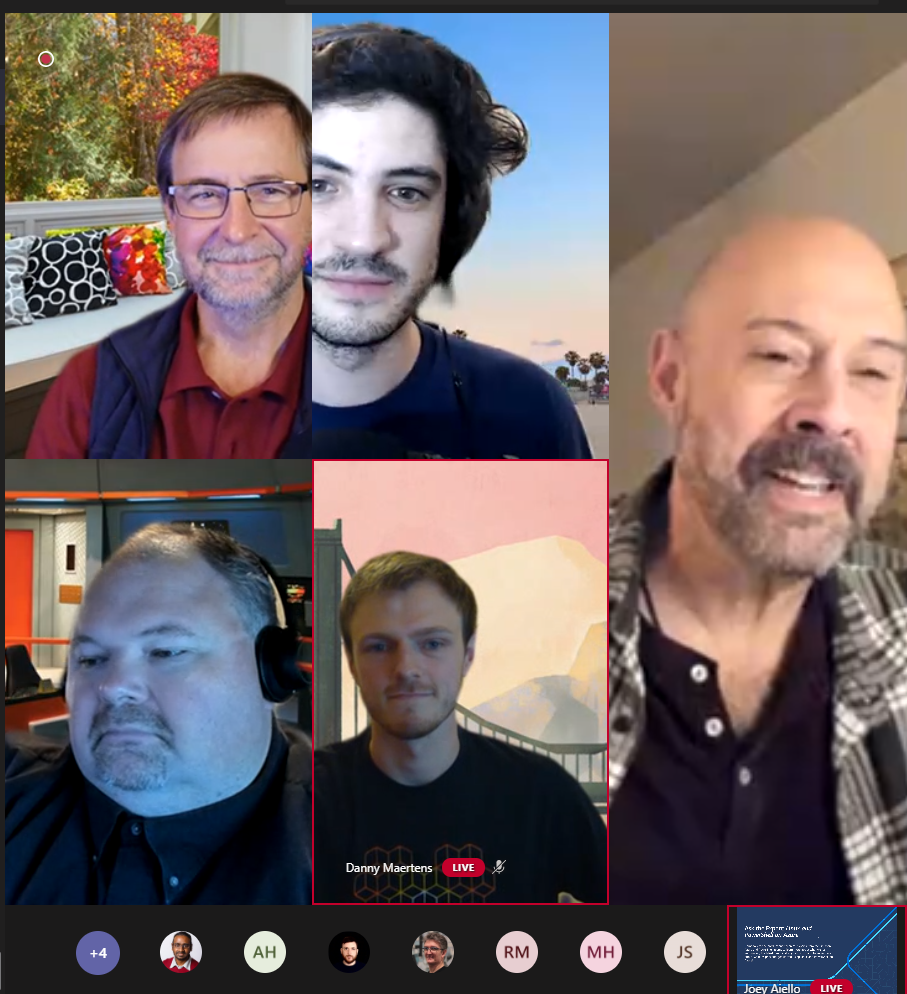
Being a part of several Ask the Expert sessions was really fun! My most memorable session was the Ask the Expert: Linux and PowerShell on Azure session.
This session was packed full of superstars from Microsoft product groups and fellow MVPs including; Jeffery Snover, Jason Helmick, Janaka Rangama, and Alexander Nikolić. Here is a screenshot from the session:
After the session, I tweeted about the session and shared some wisdom about PowerShell, and both Jeffery Snover and Jason Helmick retweet my tweet!


2020 is not all bad. It’s pretty cool when the inventor of PowerShell and the PowerShell Program Manager retweet you!
When working in my Azure labs I tend to end up with a lot of Azure App Registrations. Recently I had hundreds and hundreds of them in the directory. Its been a while since I cleaned this up. I needed to clean this out and did not want to do this manually through the portal. PowerShell to the rescue.
I pulled together a script that will place your app registrations in a variable. It will then loop through the app registrations to remove them. Note you will be prompted with a confirmation to remove each one.
You can download the script here: https://github.com/Buchatech/Delete-Azure-App-Registrations-
Last year I wrote a blog post on how to use the modify effect in Azure Policy to enforce multiple tags. Here is the link to that full walk-through post: https://www.buchatech.com/2019/09/walk-through-use-azure-policy-modify-effect-to-require-tags/
In that blog post, I called out an Azure Policy on-demand evaluation PowerShell script I wrote. This PowerShell script will trigger Azure Policy to run the evaluation right away so you don’t have to wait for the next time Azure Policy will run the evaluation.
This is especially helpful when you are developing Azure Policies and you want to see if they are working properly or not. You can run the on-demand evaluation PowerShell script in Azure Cloud Shell at https://shell.azure.com/.
Well, that brings us to the end of this blog post. I wanted to make a short blog post for this script so that it would be easier to find.
You can get the policy evaluation trigger script on my GitHub here: Az Policy evaluation Trigger v1.ps1
Moving an Azure VM from one virtual network (VNet) to another VNet is not a new problem. If you find yourself having to do this just know it is a pain. Anyone that has faced the Vnet-to-Vnet VM Move conundrum before knows that moving a VM to another subnet is a trivial task and would think a VM move to another VNet would be the same. However, when it comes to moving a VM to a new VNet there is no supported way to do this from Microsoft and that is by design. There are some workarounds to moving a VM to a new VNet but in the end these boil down to redeploying the VM. When moving a VM to a new VNet you will need to plan for downtime.
In this blog post, I am not going to go through the steps of the workarounds for moving a VM to a new VNet. There are plenty of other blog posts out there covering how to do this manually or using ASR. If you want to read up on this there is one article I keep bookmarked by Microsoft MVP Tim Warner that you can find here. In this blog post, I am going to share and talk about a PowerShell script I pulled together to make the Vnet-to-Vnet VM Migration less painful by automating it. Download link is at the end of this blog post. I put together the script to work with PowerShell 5 using the AzureRM Module and one that works with PowerShell 7 (Core) using the AZ module.
Again, in general, the script is not moving the VM. The script is facilitating a migration of sorts by creating a new VM in new VNet while retaining the original VMs configuration and data disks. Here are the steps that are performed in the script:
(1) Gathers info on existing VM, VNet, and subnet.
(2) Removes the original VM while saving all data disks and VM info.
(3) Creates VM configuration for new VM, creates nic for new VM, and new availability set.
(4) Adds data disks to new VM, adds nics to new VM, adds VM to the new VNet.
(5) Creates new VM and adds the VM to the new VNet.
Let’s look at some other general information about the script. The script is a single script that has code for both PowerShell 5 using the AzureRM Module and PowerShell 7 (Core) using the AZ module. When you run the script it prompts you to choose what Azure module you are using. The script is interactive so it will prompt you to log in and prompt you for your Azure subscription in case you are running multiple subscriptions. The script is intended to migrate a single VM. It assumes the VM is deployed into an availability set and will migrate to a new availability set or in the existing availability set. You can also migrate to a new resource group or place the new VM in the existing resource group. Ok. Let’s dive into running the script. Here is a walk-through of running the script.
Open PowerShell and run Vnet-to-Vnet VM migration.ps1.
You will first be prompted for the following information:
Enter the Resource Group of the original VM:
Enter the original VM name:
Enter the new VM name:
Enter the new availability set name:
Enter the new VNet resource group:
Enter the new VNet name:
Enter the new Subnet name:
Next, you will be prompted to select your PowerShell version and Azure module as shown in the following screenshot.

The main differences between PowerShell 5 using the AzureRM Module and PowerShell 7 (Core) using the AZ module are the interactive login methods as well as cmdlets. Here are screenshots of the different logins.
PowerShell 5 with AzureRM Module:
A window will pop up for you to log into your Azure account.
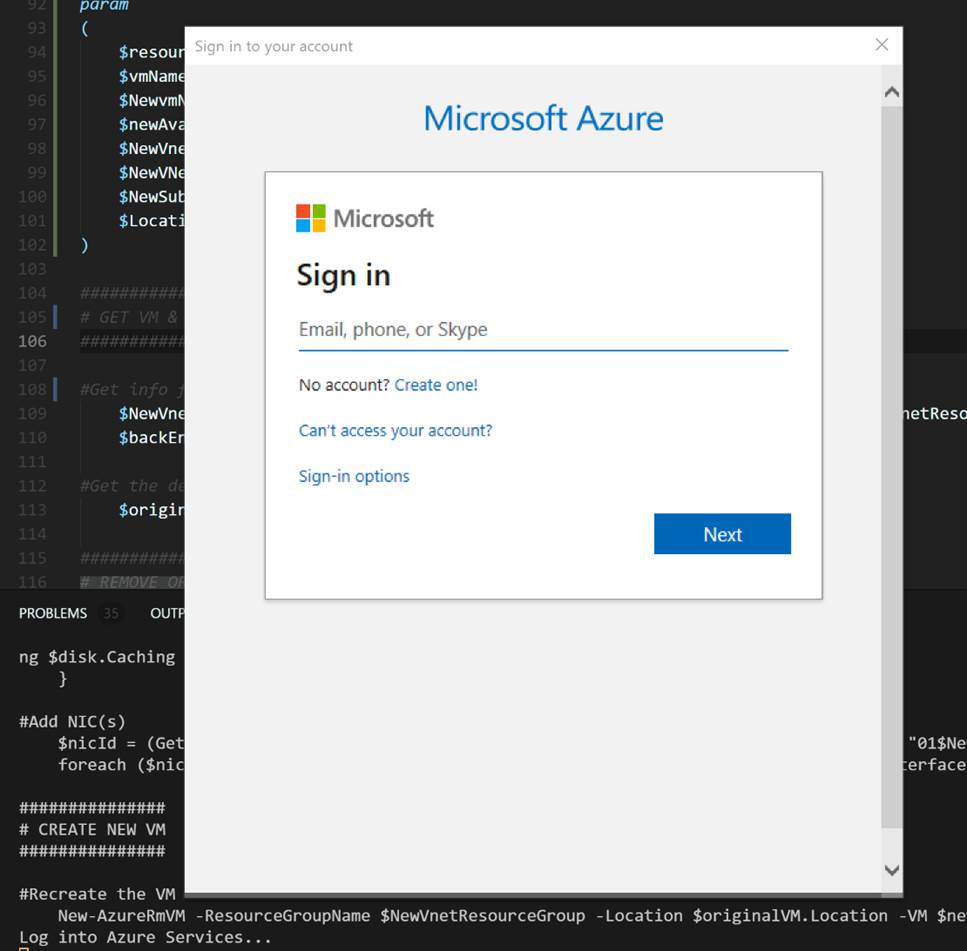
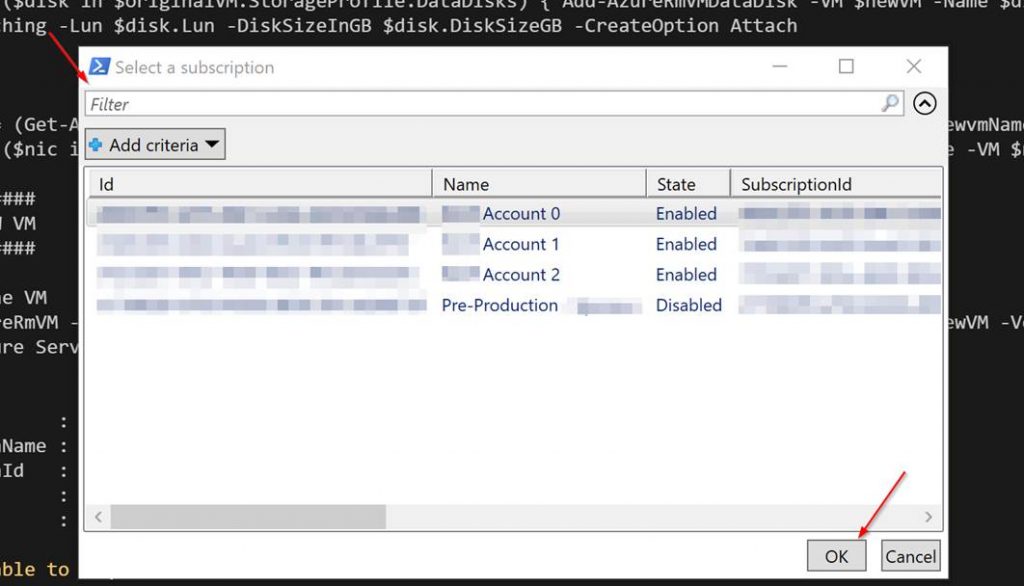
Next a grid will pop up for you to select your subscription from the list.
PowerShell 7 (Core) with AZ module:
A warning will pop up prompting you with the device login info. To log into Azure go to https://microsoft.com/devicelogin and entering the code the warning gave you as shown in the screenshot.

List of your subscriptions will output. Go ahead and copy the subscription ID you plan to use. NOTE* Ignore this if you only have one subscription.
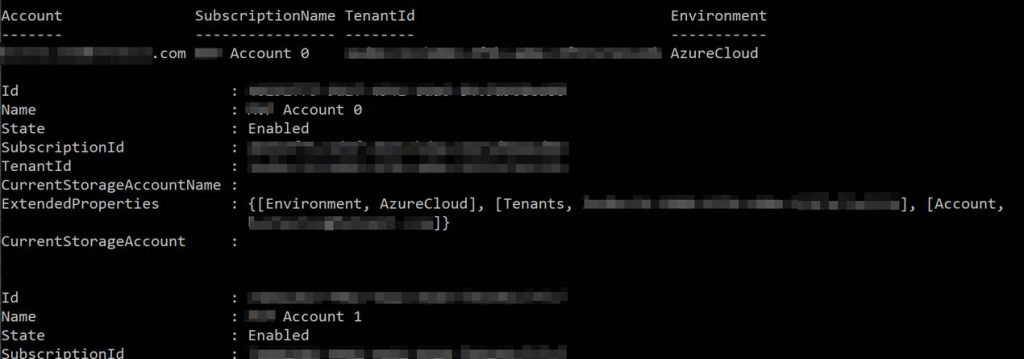
You are prompted to enter your subscription ID. This is to set the PowerShell session to the specified Azure subscription. Again ignore this if you only have 1 subscription. Note if you leave it blank and click enter it will error. Even with the error, it will finish the rest of the script just fine.

Next in both PS 5 or PS 7 you will see the following prompt confirming that you want to remove the specified original VM. Confirm yes and press enter.
Virtual machine removal operation
This cmdlet will remove the specified virtual machine. Do you want to continue?
[Y] Yes [N] No [S] Suspend [?] Help (default is “Y”): Y
NOTE* the rest of the script will run. It will take a while so be patient. As it runs you should see some output similar to this:
OperationId : a4299a3f-ea34-4c22-ba71-f6cc42ebbdff
Status : Succeeded
StartTime : 9/9/2019 5:33:14 PM
EndTime : 9/9/2019 5:50:30 PM
Error :
||
||
WARNING: Since the VM is created using premium storage or managed disk, existing standard storage account, diagstwfyhhi3jyz54e, is used for boot diagnostics.
VERBOSE: Performing the operation “New” on target “VMMove012”.
When it is all said and done if it was successful you will see:
RequestId :
IsSuccessStatusCode : True
StatusCode : OK
ReasonPhrase : OK
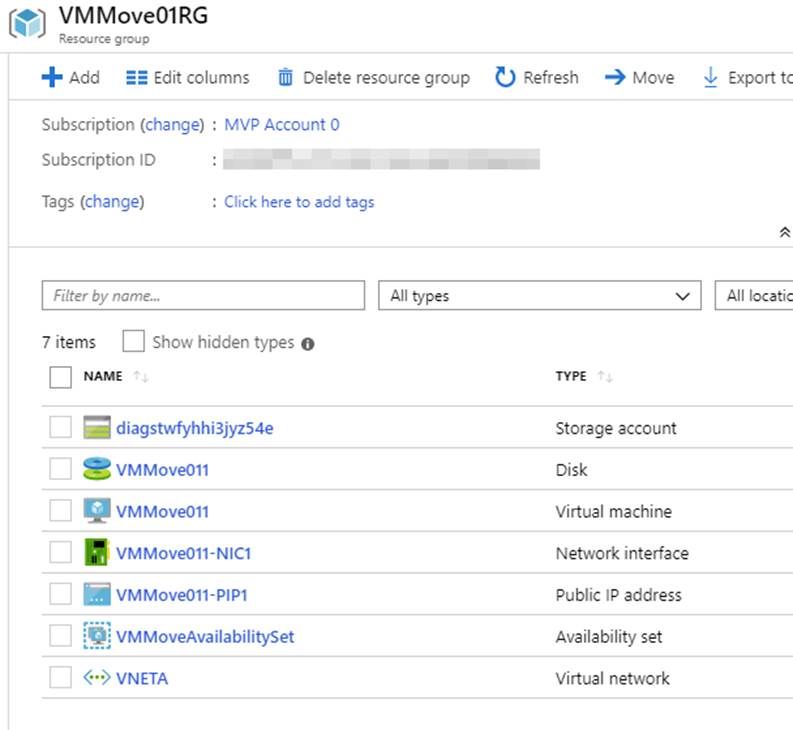
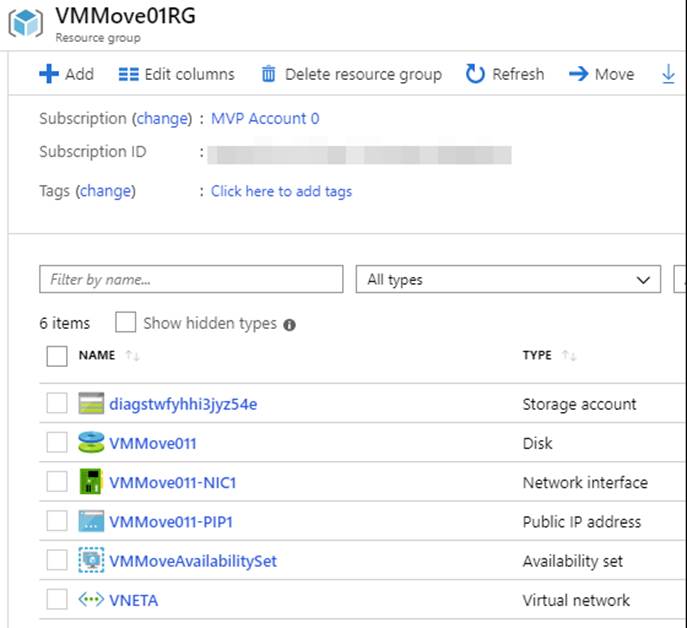
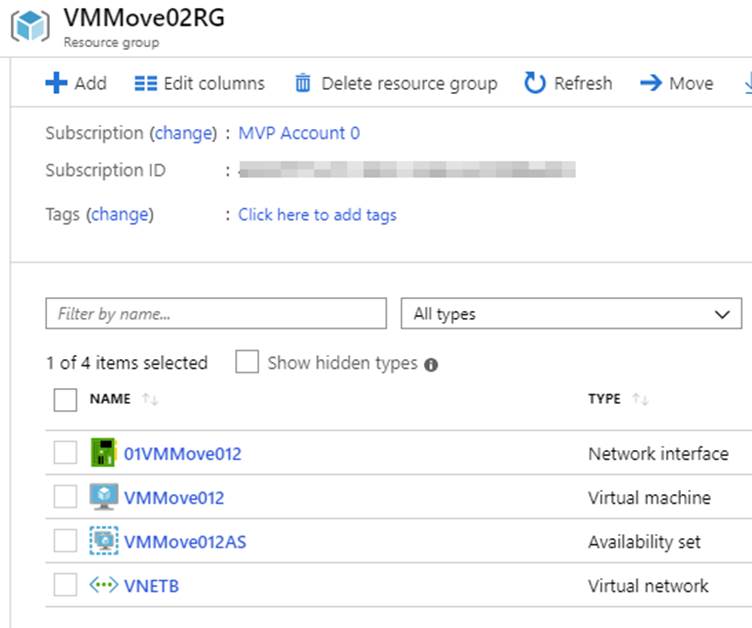
That’s it. Now go into the Azure portal and you will see that your VM is moved to a new VNet and will have the data disks still. Check out the following screenshots for an example showing what the resource groups look like before and after the script runs.
|
Before |
|
|
|
|
|
After |
|
|
|
|
I have used this script and it has saved me time and avoid a headache. The goal is this will be useful for others as well. You can download the version of the script released with this blog post here: https://gallery.technet.microsoft.com/VM-VNet-to-VNet-Migration-a7308ca2
If you want to contribute and enhance the script check it out on GitHub here: https://github.com/Buchatech/Azure-VM-VNet-to-VNet-Migration-Script
I wanted to monitor my Azure Stack environment with OMS. This would include only the Azure Stack fabric servers and the host. I did not want to manually install the OMS agent on all of these servers especially since the Azure Stack fabric is a set of known servers. So I decided to put together a quick PowerShell script to handle the install of the OMS agents including the workspace ID and key. Here are details for the script:
<#
.SYNOPSIS
This script can be used to install OMS agents on all of the Azure Stack Fabric servers. This has been tested with TP2.
.DESCRIPTION
This script can be used to install OMS agents on all of the Azure Stack Fabric servers. This has been tested with TP2. This script can be run from PowerShell ISE or a PowerShell console. It is recommended to run this from an elevated window. This script should be run from the Azure Stack host. Ensure you are logged onto the Azure Stack host as azurestack\azurestackadmin. This script allows you to input your OMS workspace ID and key. The Azure Stack Fabric servers that this script will attempt to install on is:
“MAS-Con01”,
“MAS-WAS01”,
“MAS-Xrp01”,
“MAS-SUS01”,
“MAS-ACS01”,
“MAS-CA01”,
“MAS-ADFS01”,
“MAS-ASql01”,
“MAS-Gwy01”,
“MAS-SLB01”,
“MAS-NC01”,
“MAS-BGPNAT01”
Fabric servers can be added or removed from the array list if desired. The script will look for the OMS agent (MMASetup-AMD64.exe) in C:\OMS\ on the Azure Stack host. Ensure you create an OMS folder on your Azure Stack host and download the OMS agent to it. This script also copies the OMS agent to C:\Windows\Temp on each Fabric server. Ensure there is enough free space on the C drive on all of your fabric servers.
.PARAMETER OMSWorkSpaceID
This is Guid ID for your OMS workspace, it can be found in the OMS portal at: https://mms.microsoft.com >> Overview >> Settings >> Connected Sources >> Windows Servers
.PARAMETER OMSKey
This is the OMS API key for your OMS workspace. You can use the primary or secondary key. These keys can be found in the OMS portal at:
https://mms.microsoft.com >> Overview >> Settings >> Connected Sources >> Windows Servers
.INPUTS
None
.OUTPUTS
None
.NOTES
Script Name: AzureStackFabrickOMSAgentInstall.ps1
Version: 1.0
Author: Cloud and Data Center Management MVP – Steve Buchanan
Website: www.buchatech.com
Creation Date: 1-1-2017
Purpose/Change: Install OMS agents on Azure Stack Fabric servers.
Updates: None
.EXAMPLE
.\AzureStackFabricOMSAgentInstall.ps1 -OMSWorkSpaceID “20d4dd92-53cf-41ff-99b0-7acb6c84beedsr” -OMSKey “aazedscsjwh52834u510350423tjjwgogh9w34thg2ui==”
#>
The script can be downloaded here:
https://gallery.technet.microsoft.com/Azure-Stack-Fabric-OMS-3dac666c
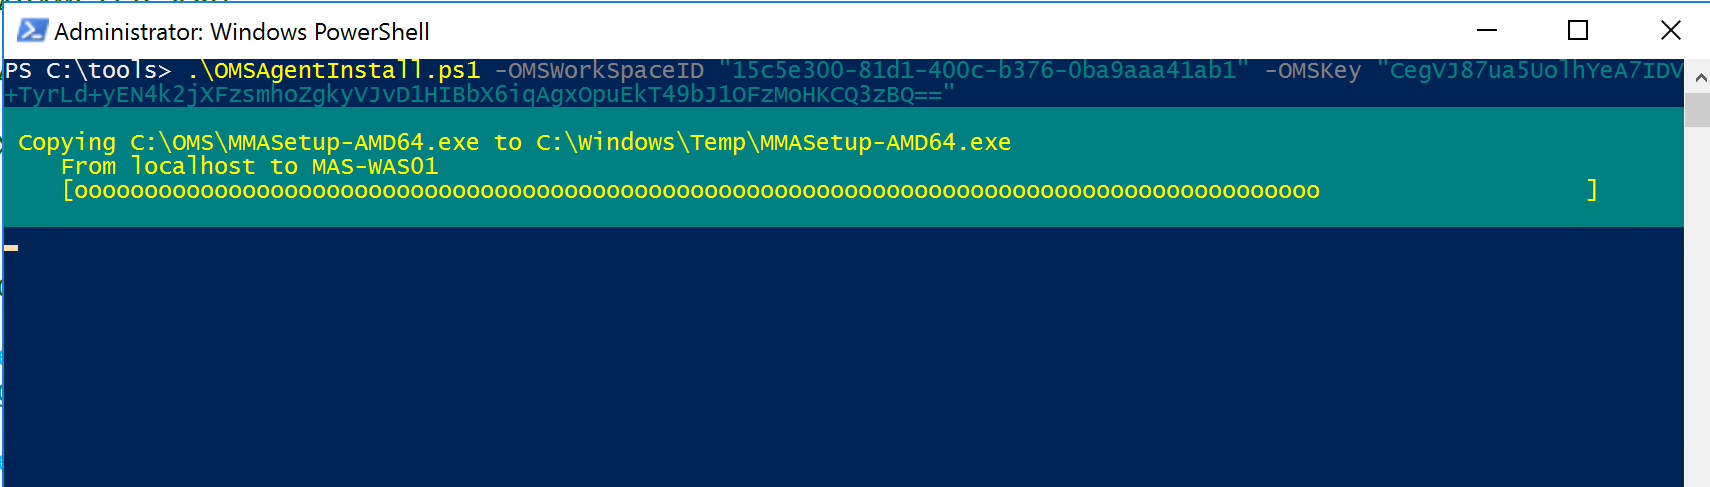
To kick off the script run from PowerShell ISE or a PowerShell console. If you run from ISE you will be prompted for the workspace ID and the key. If you run from a PowerShell console run this syntax to kick it off:
.\AzureStackFabricOMSAgentInstall.ps1 -OMSWorkSpaceID “YOURWORKSPACEID” -OMSKey “YOUROMSKEY”
The script will kick off, building an array of the Azure Stack VM’s, looping through each of them to copy over the OMS agent, and then install the OMS agent setting the OMS workspace ID and key.
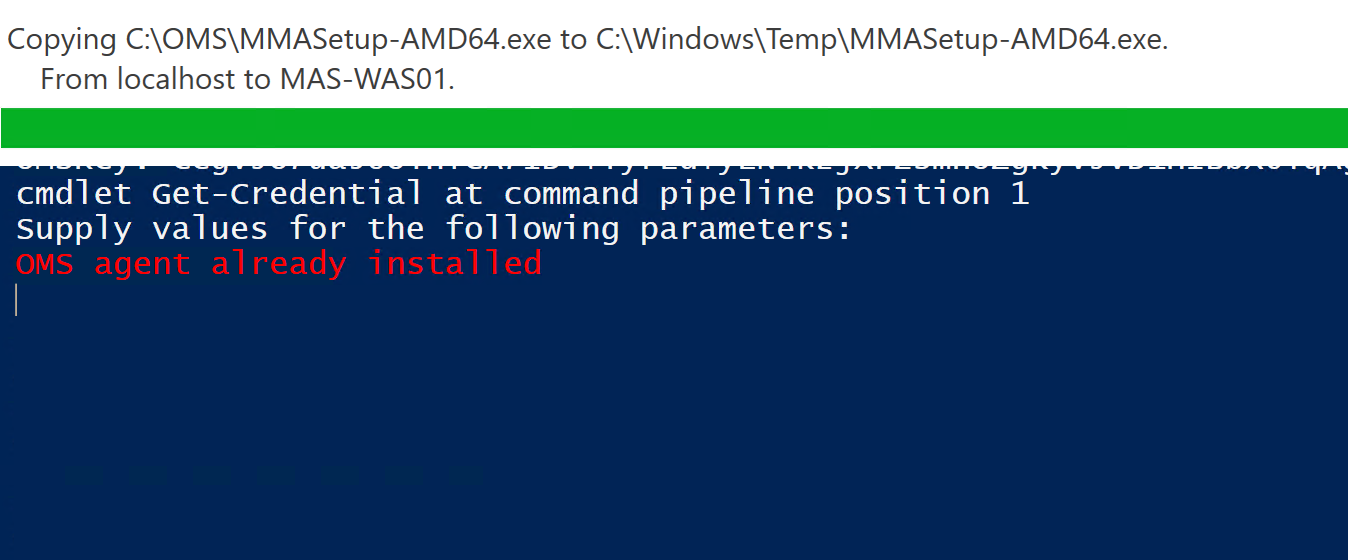
The script will detect if an OMS agent is already installed and will skip that server as shown in the following screenshot.
Otherwise the script will install the OMS agent as shown in the following screenshot.

The following screenshot shows the script running in a PowerShell console vs ISE.
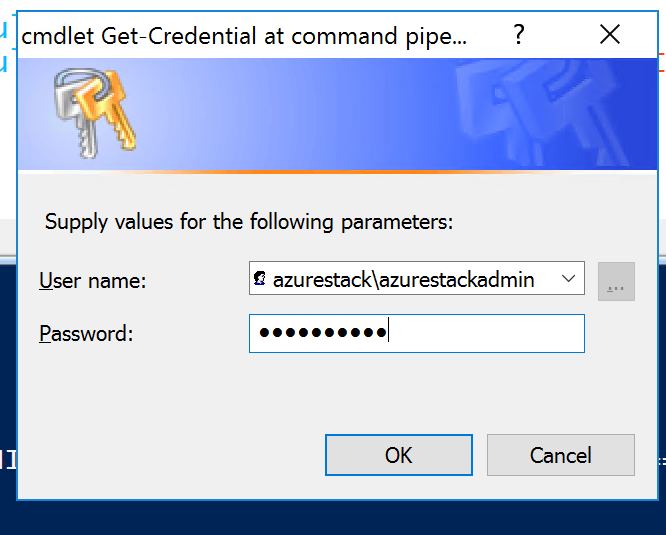
You will be prompted when running the script for credentials. Use Azurestack\azurestackadmin as shown in the following screenshot.
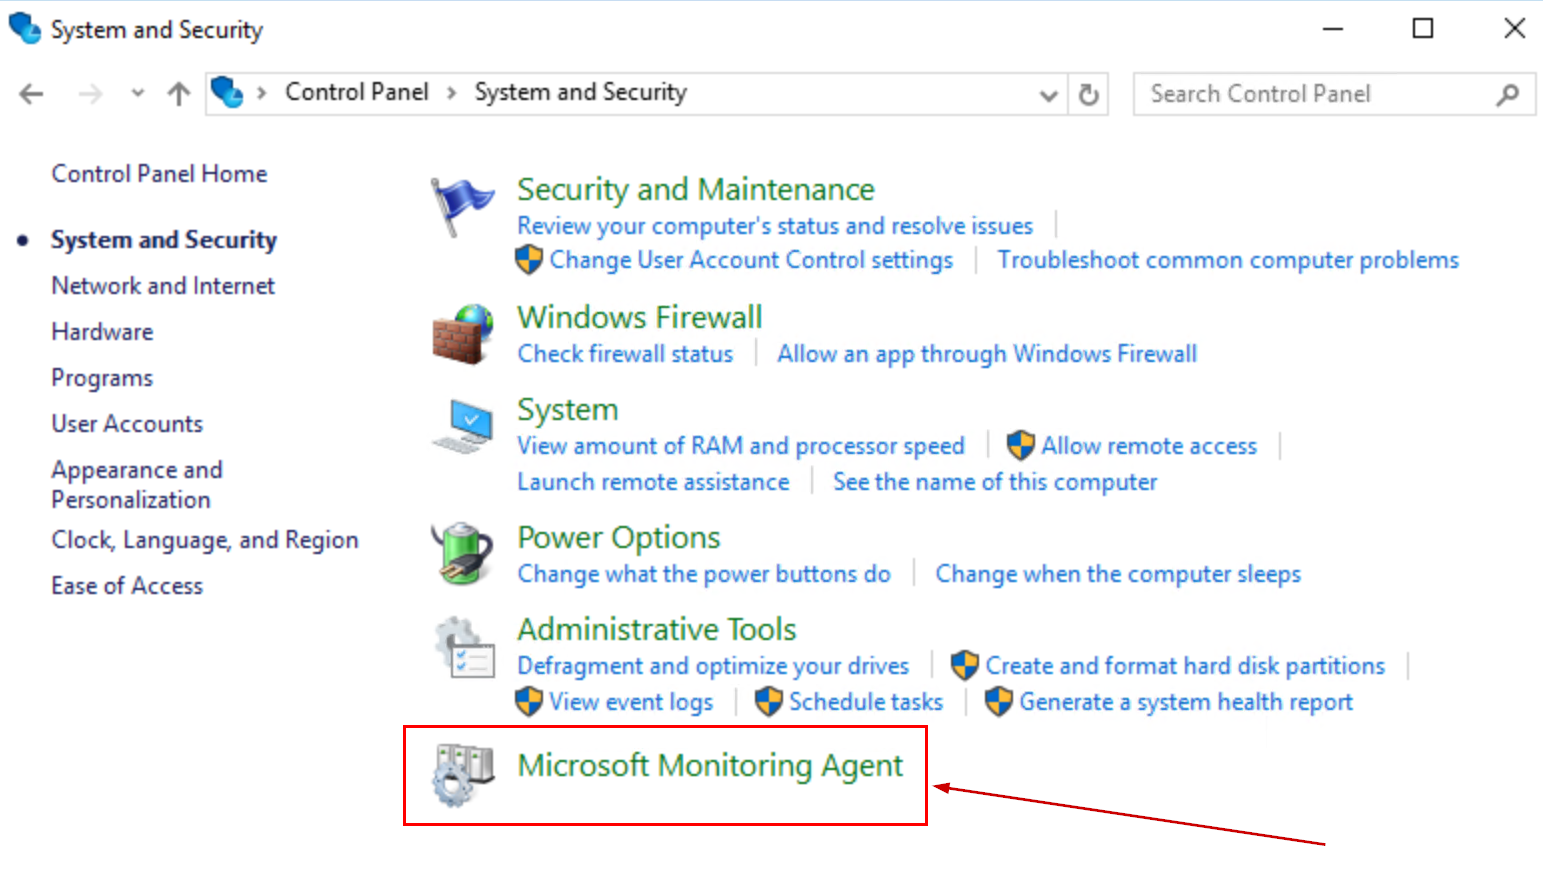
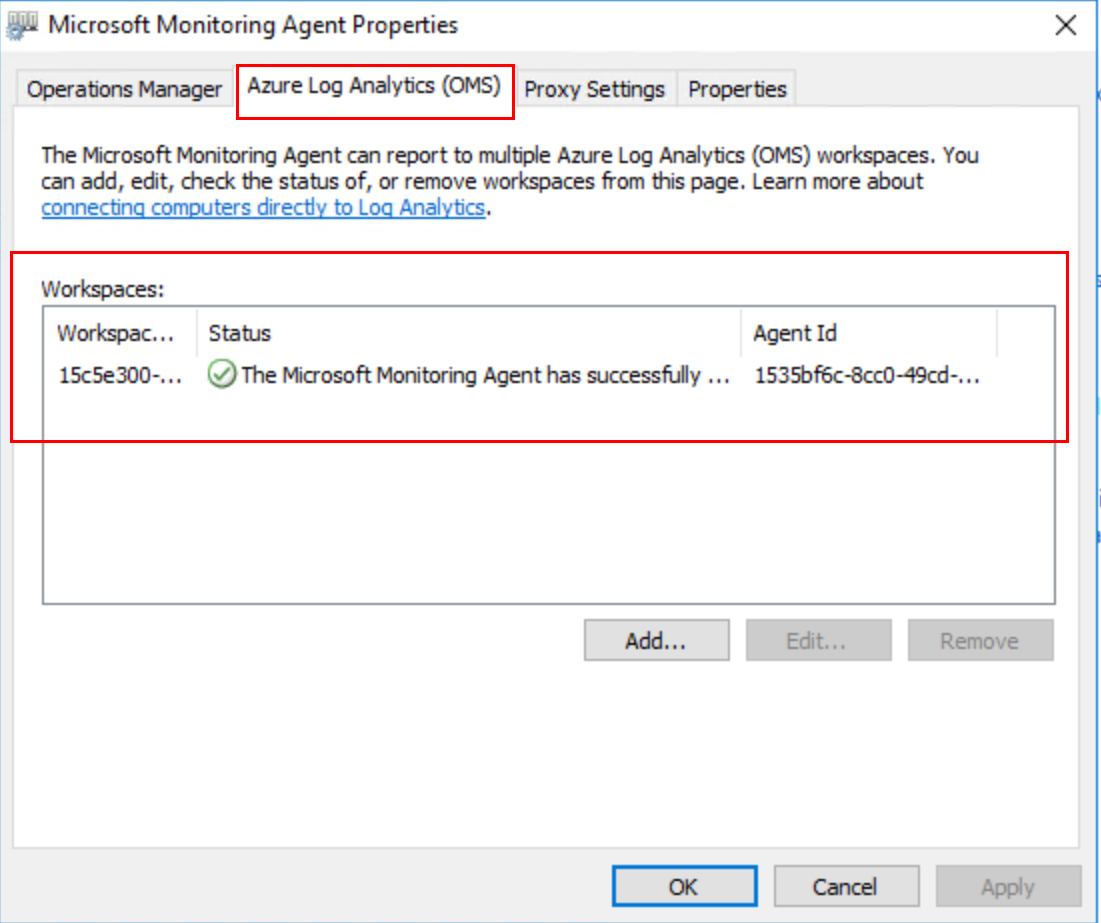
After the OMS agent is installed you should be able to log onto any of the Azure Stack VM’s and see the OMS agent in control panel as shown in the following screenshots.
You can also log onto OMS and see your Azure Stack servers listed under connected computers.

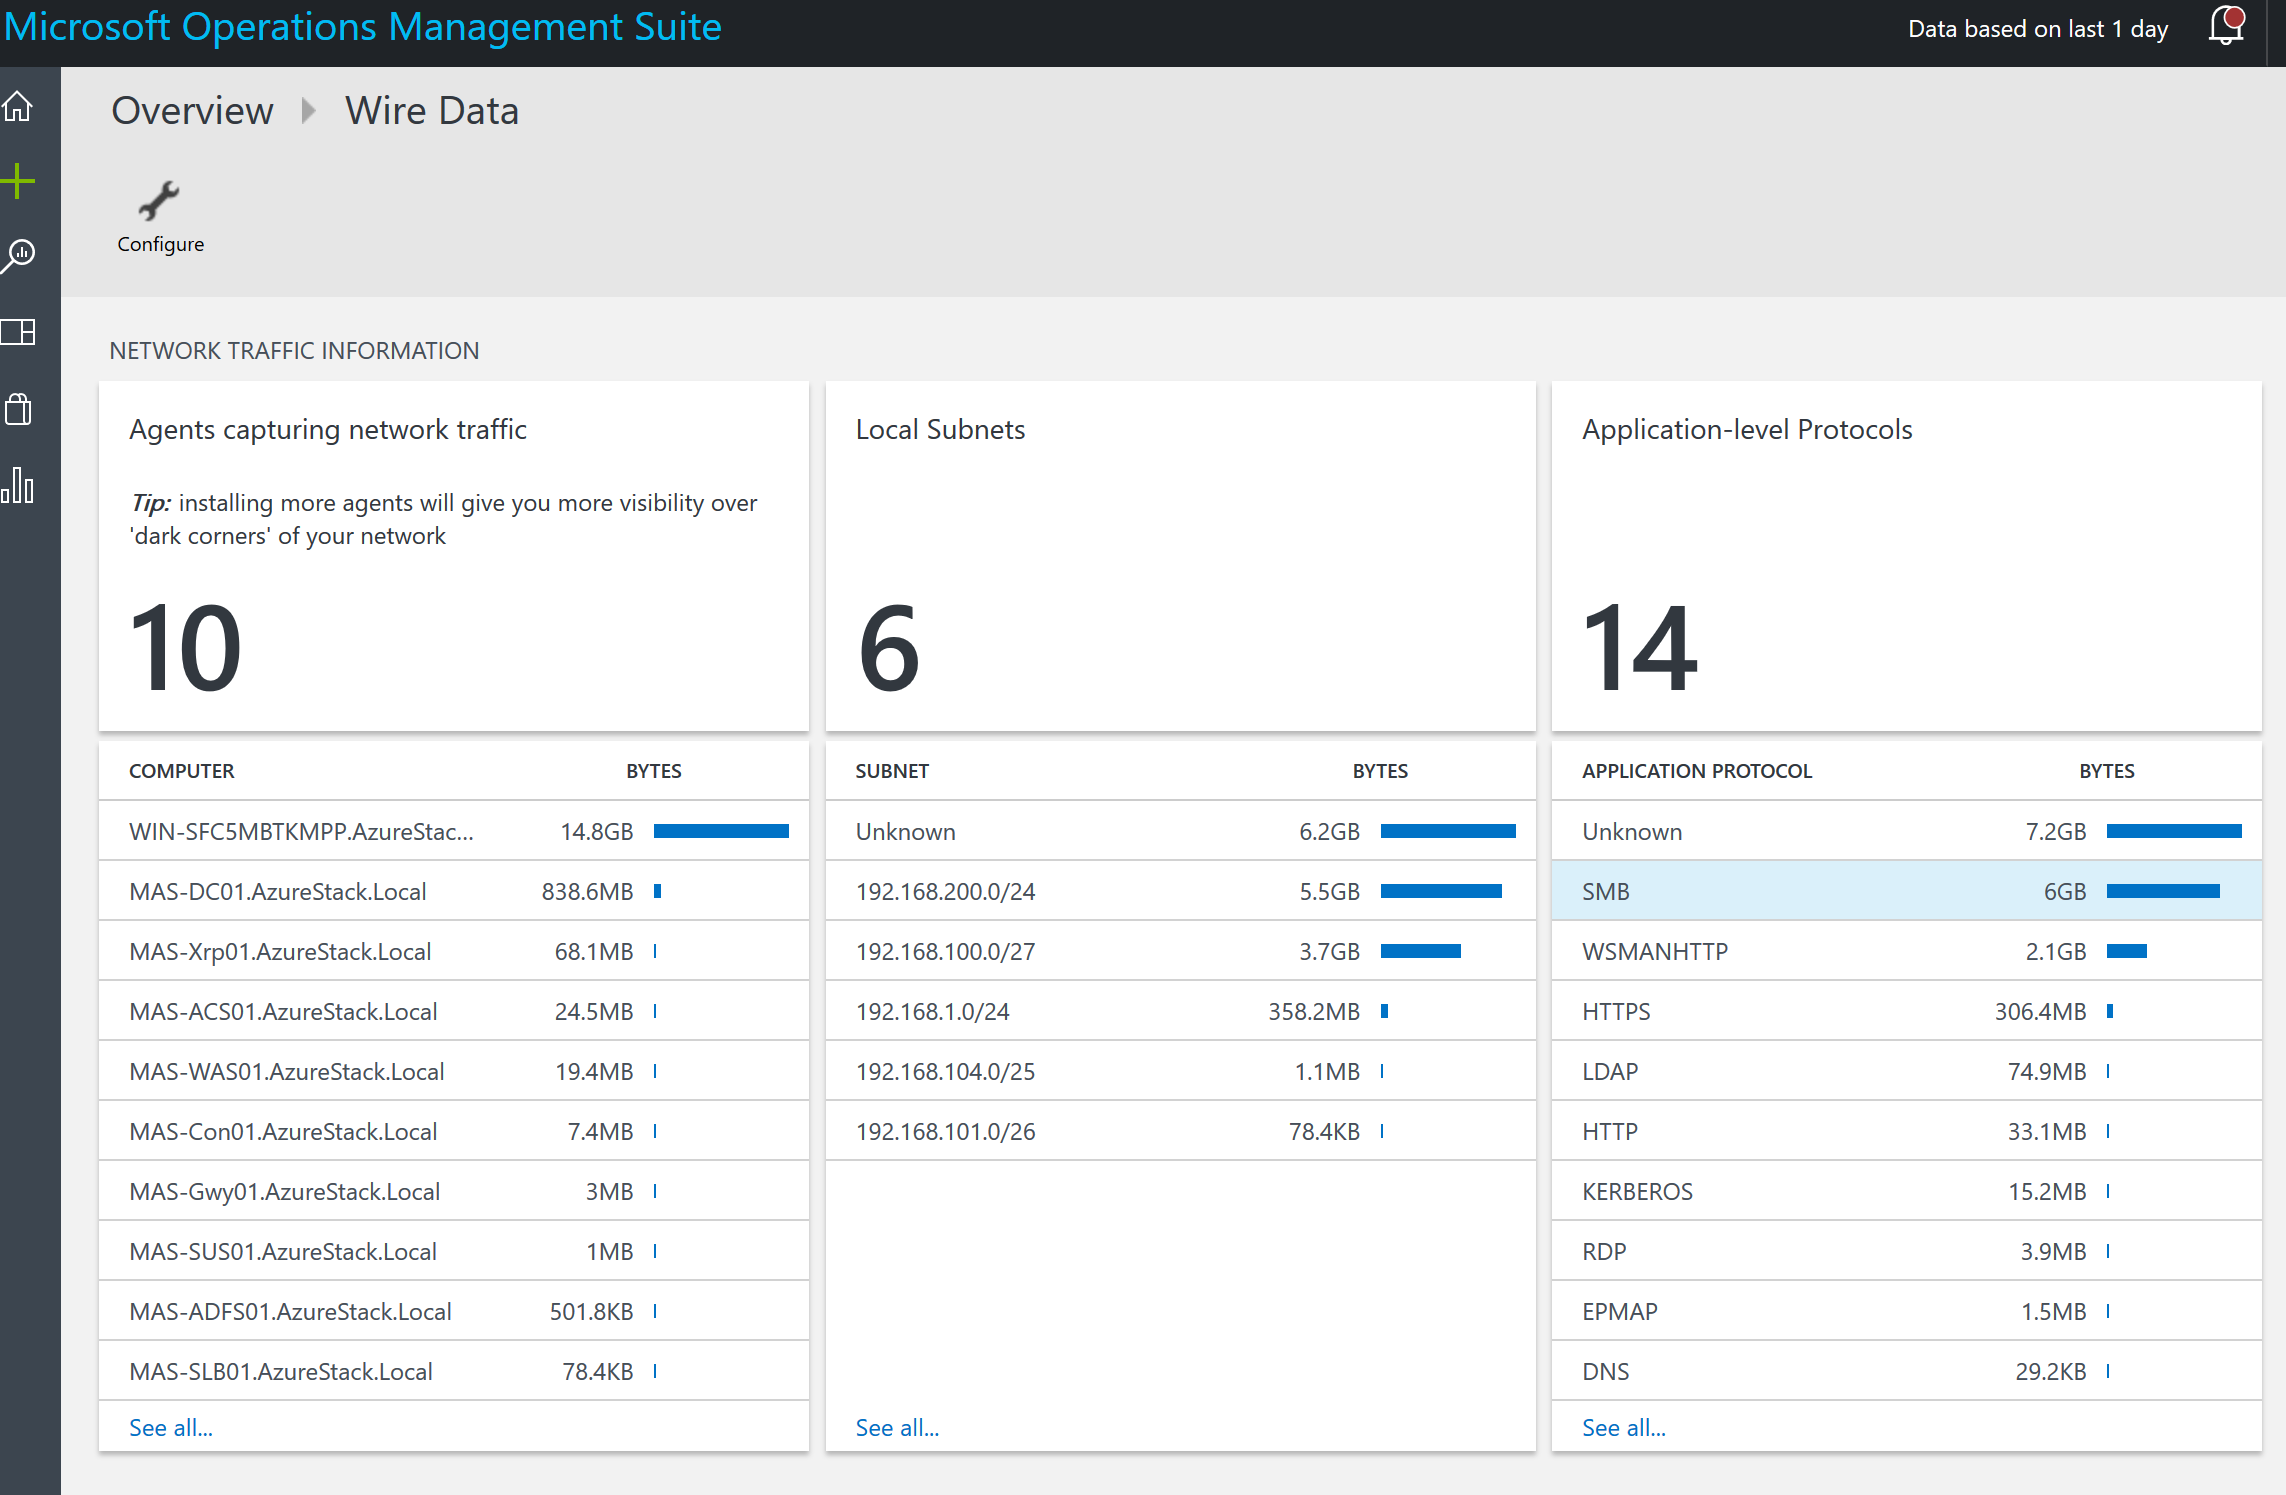
Azure Stack fabric servers wire data:
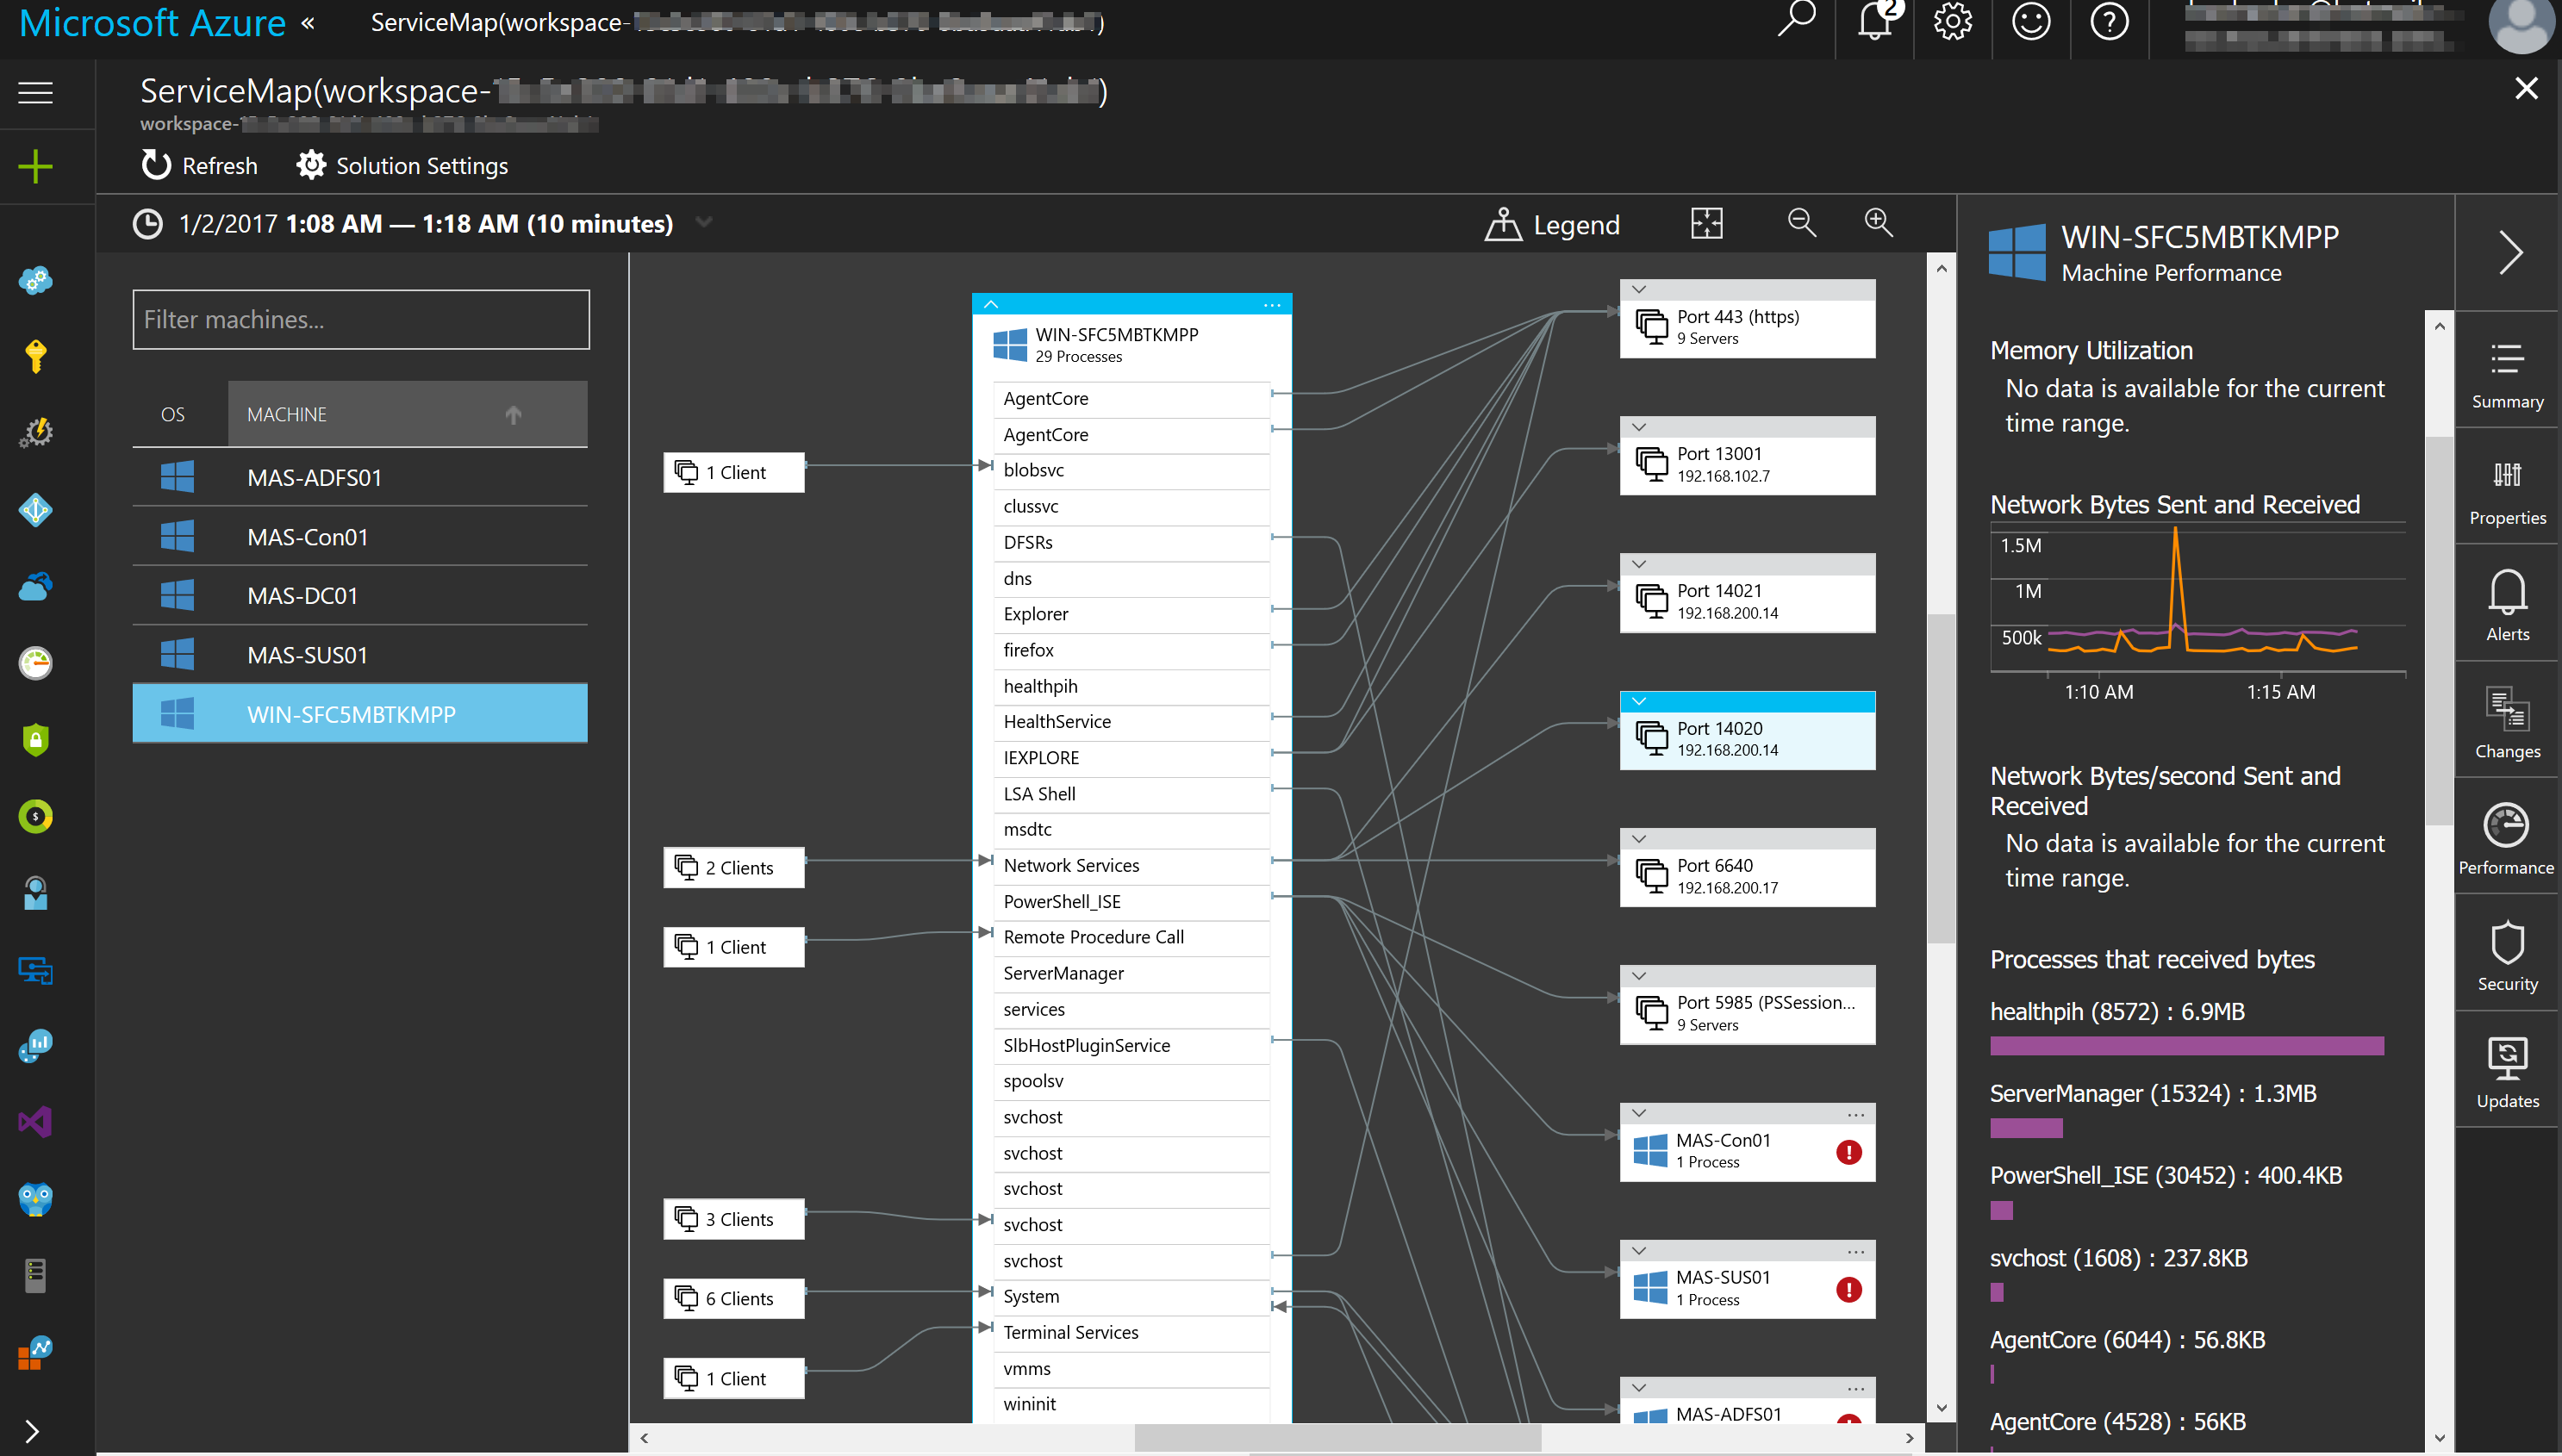
My Azure Stack host in OMS Service Map:
Happy Stacking and OMS’ing!
I recently built a PowerShell script that creates a discovery report for System Center Service Manager. The idea behind the script was to have something that I could run to gather all of the information I would want about a Service Manager deployment. I searched online and could not find anything so that’s when I decided to put something together.
This report can be used by consultants doing assessments or SCSM admins as an easy way to document what you have in your environment. This is a first pass at the report so it is version 1.1. I plan to add more information/functionality to the report in the future. Keep in mind I am not a PowerShell expert so feel free to take the script tweak it and share your updates with the community.
When the script is run it will output a report of System Center Service Manager in HTML format. This script should be run on a management server within your Service Manager’s management group. The script should be run with an account that has administrative access to Service Manager and the local server it will be running on.
The script will run on Service Manager 2012 SP1 and above. It uses SCSM 2012 SP1/R2 CMDLETS along with SMLets. If you don’t have the SMLets installed you can download them here: https://smlets.codeplex.com/
Discovered in the report:
These are the sections of information in the report.
Example Link:
This will take you to an online example of the report.
https://www.buchatech.com/wp-content/uploads/2015/03/Service-Manager-Discovery-Report.html
Example Output:
Here is a screenshot of the report.

Download It:
https://gallery.technet.microsoft.com/Service-Manager-Discovery-a25c7d80
NOTE: The PowerShell report is provided AS-IS without warranty of any kind. It is recommended to run in a lab environment before running it in a production environment.
Recently a colleague of mine Rob Plank brought some new CMDLets for Service Manager to my attention. These are a part of a PowerShell module that can be installed on your Service Manager server. They are the System Center Service Manager PowerShell Extensions also known as SCSMPx. Here is the official description for them:
“The ScsmPx module facilitates automation with Microsoft System Center Service Manager by auto-loading the native modules are included as part of that product and enabling automatic discovery of the commands that are contained within the native modules. It also includes dozens of complementary commands that are not available out of the box to allow you to do much more with your PowerShell automation efforts using the platform.”
This module contains hundreds of new commands for Service Manager.
The module was built by Kirk Munro (@Poshoholic) and sponsored by Provance.
The System Center Service Manager PowerShell Extensions ( SCSMPx) module can be found here: https://github.com/KirkMunro/ScsmPx.
The module requires:
The module is very easy to install and can be done so by running this syntax from PowerShell on a Service Manager management server:
& ([scriptblock]::Create((iwr -uri http://tinyurl.com/Install-GitHubHostedModule).Content)) -ModuleName ScsmPx,SnippetPx
Running that will download and install the SCSMPx and SnippetPx modules. This is for all users and requires being run from an elevated PowerShell console. This module will auto-load (PowerShell 3.0 and above) so there is no need to run Import-Module to load it.
Once this module is installed on a management server it also enables auto-loading of the native Service Manager CMDlets for Service Manager 2012 and later.
The commands included in the module are:
I recently was helping a client that needed to activate over 50+ servers after an OS upgrade. I did not want to do this one by one and they did not have a KMS. PowerShell to the rescue. I was able to put together a script that loops through an OU in Active Directory and activate all computers in that OU. This script will find only computers with “Windows Server” in the name. This script could be modified to find client operating systems instead.
When you run this script it will prompt you for the domain name, organizational unit, and Windows Server product key. I was able to use this in my new lab build as well. Here is the script:
<#
Name: ActivateWinComputersfrAD.ps1
Author: System Center MVP – Steve Buchanan
Date: 2/15/2015
Version: 1.0
Website: www.buchatech.com
Description:
This script can be used to loop through an OU in Active Directory and activate all computers in that OU.
This script will find only computers with “Windows Server” in the name.
Run this script using: powershell.exe -executionpolicy unrestricted -command .\ActivateWinComputersfrAD.ps1
#>
# Load the Active Directory PowerShell module
Import-Module -Name ActiveDirectory
# Prompt script runner for information to create variables
$domain = Read-host ‘Enter domain to be used. Format as such (DOMAINNAME)’
$computersou = Read-host ‘Enter the name of the OU to be searched.’
$Productkey = Read-host ‘Enter product key. Format as such (XXXXX-XXXXX-XXXXX-XXXXX-XXXXX)’
# Create a variable that holds all of the computers from Active Directory
$results = (Get-ADComputer -LDAPFilter “(OperatingSystem=*Windows Server*)” -SearchBase “OU=$computersou,DC=$domain,DC=com”)
# Loop through the results variable and activate all computers in that variable.
# NOTE: Dont forget to replace the $key variable with your own Windows key.
foreach ($i in $results)
{
$computer = gc env:computername
$service = get-wmiObject -query “select * from SoftwareLicensingService” -computername $i.Name
$service.InstallProductKey($Productkey)
$service.RefreshLicenseStatus()
}
Write-Host “The following servers have been activated:” -ForegroundColor Green
$results | Format-Table DNSHostName -HideTableHeaders
Pause
It can be downloaded here: https://gallery.technet.microsoft.com/Windows-Server-Activation-f1c534b6