Pluralsight Spotlight: Steve Buchanan on Upskilling, Hybrid and Multi-Cloud, & Impostor Syndrome

I recently had the honor to film an episode of Spotlight at the Pluralsight headquarters.

It was an awesome experience and fun talking with Adam Gunn.

In the episode, we talked about:

Tech skills you need to master for the future, including hybrid and multi-cloud, Kubernetes, AI, and more. We also touched on how I landed in tech and how to overcome impostor syndrome to become a successful professional.

You can check out the episode here:

Read more

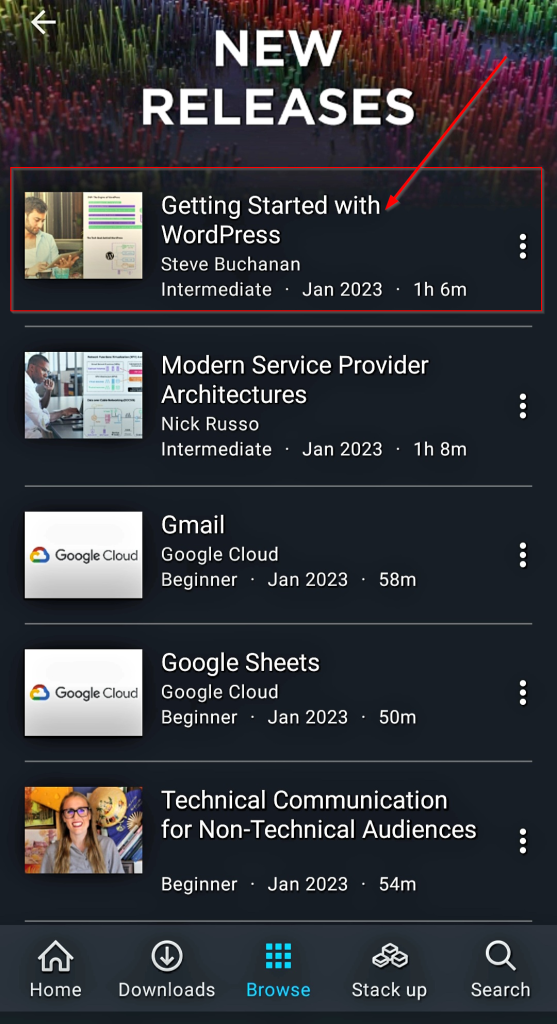
19th Pluralsight Course Published – “Getting Started with WordPress”

This week I published a second course on Pluralsight this year. This marks my 19th course! This course is titled “Getting Started with WordPress“. Startups, enterprises and more continue to adopt content management systems at a fast rate with WordPress owning a 60% market share. WordPress is the number one choice from startups to enterprises. It is being used for many uses from web apps, a marketing tool, e-commerce, or even a company’s main website.

I have been working with WordPress in various aspects for over sixteen years. I use WordPress for this blog, have used it for websites, hosted it for businesses, administered WordPress sites for customers, WordPress development for customers, and even managed the development of WordPress plugins. With all of my history with WordPress, I was excited when the opportunity came up to build a course about it.

This course is ideal for bloggers, entrepreneurs, Product Managers, Marketing managers, Marketing executives, Marketing consultants, Marketing employees, web developers, project managers, business analysts, web designers, graphic designers, UX/UI, designers, and anyone interested in content management systems specifically WordPress.

This course will take you from little to no knowledge of WordPress to a place where you can be confident enough to get started. Whether you want to create a personal blog, a business website, or an online store, WordPress is a skill you should have and this course has you covered.

In this course, Getting Started with WordPress, you’ll learn its many uses, features, tech stack, and you’ll also explore hosting it. Next, you’ll learn how to install it. Finally, you’ll discover its user interface and general configuration.

By the end of this course, you will have a better understanding of content management systems, & WordPress itself, its uses, features, & tech stack. As well as knowledge of how to get a domain name, hosting, and install WordPress along with a tour of its interface and general configuration.

Check out the “Getting Started with WordPress“ course here:

https://www.pluralsight.com/courses/wordpress-getting-started

I hope you find value in this new Getting Started with WordPress course. Be sure to follow my profile on Pluralsight so you will be notified as I release new courses

Here is the link to my Pluralsight profile to follow me:

https://www.pluralsight.com/authors/steve-buchanan

Read more

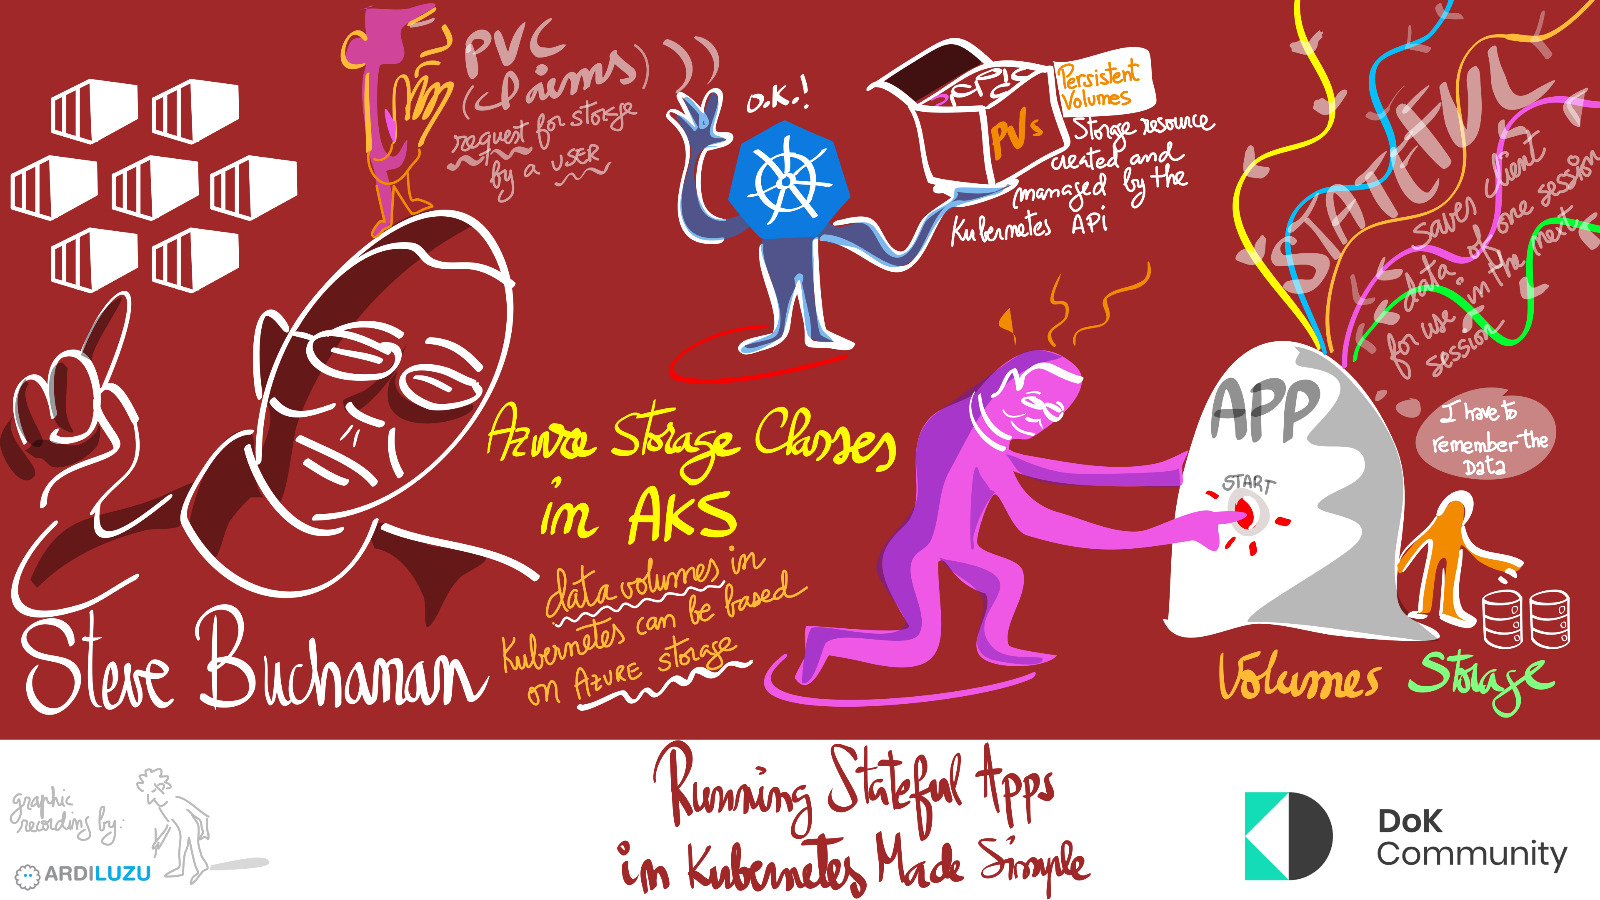
Dok Talks #121 – Running Stateful Apps in Kubernetes Made Simple

I am giving a talk for the Data on Kubernetes Community (DoKC) Community next week. They are a user group like community that focuses on how to build and operate data-centric applications on Kubernetes. Be sure to check them out! The DoK website is: https://dok.community.

My talk is titled: “Running Stateful Apps in Kubernetes Made Simple

ABSTRACT OF THE TALK

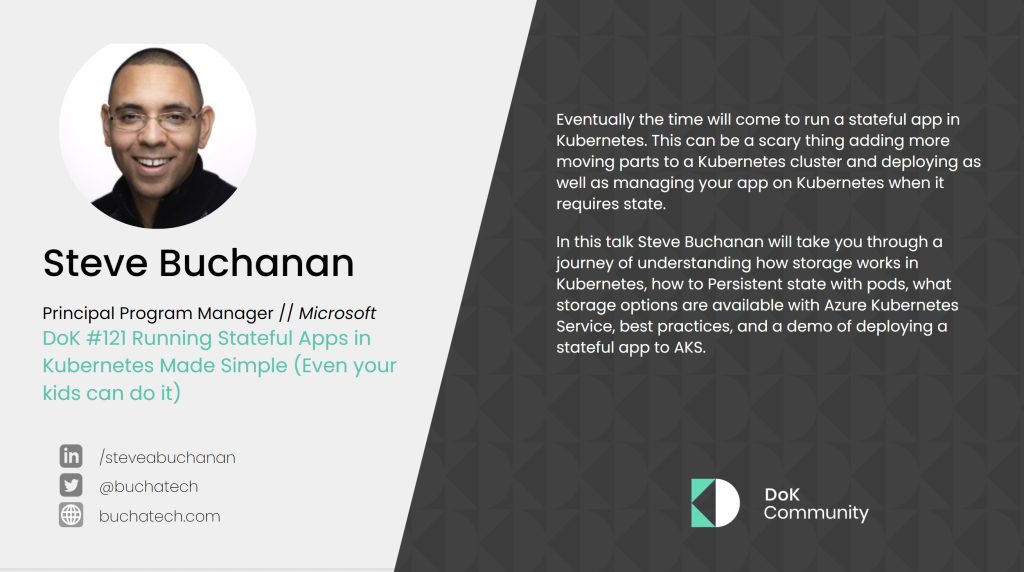
Eventually, the time will come to run a stateful app in Kubernetes. This can be a scary thing adding more moving parts to a Kubernetes cluster and deploying as well as managing your app on Kubernetes when it requires state.

In this talk, Steve Buchanan will take you through a journey of understanding how storage works in Kubernetes, how to Persistent state with pods, what storage options are available with Azure Kubernetes Service, best practices, and a demo of deploying a stateful app to AKS.

In the demo, I will show how to deploy stateful Worpress & Jenkins workloads on Azure Kubernetes Service using the GitOps model with Argo CD.

KEY TAKE-AWAYS FROM THE TALK

Overview of Storage in Kubernetes covering Storage Classes, Persistent Volumes, & Persistent Volume Claims. Overview of Azure Storage, Best Practices to running stateful apps in Kubernetes.

Register here:

https://www.meetup.com/Data-on-Kubernetes-community/events/284283907/

——-Update——-

If you missed the session you can stream it here:

Read more

Deploy MySQL and WordPress on Azure Kubernetes Service (AKS)

In this blog post I am going to walk through the steps for deploying WordPress to Azure Kubernetes Service (AKS) using MySQL and WordPress Docker images. Note that using the way I will show you is one way. Another way to deploy WordPress to AKS would be using a Helm Chart. Here is a link to the WordPress Helm Chart by Bitnami https://bitnami.com/stack/wordpress/helm. Here are the images we will use in this blog post:

MySQL WordPress
apiVersion: v1
kind: Service
metadata:
name: wordpress-mysql
labels:
app: wordpress
spec:
ports:
– port: 3306
selector:
app: wordpress
tier: mysql
clusterIP: None

apiVersion: v1
kind: PersistentVolumeClaim
metadata:
name: mysql-pv-claim
labels:
app: wordpress
spec:
accessModes:
– ReadWriteOnce
resources:
requests:
storage: 20Gi

apiVersion: apps/v1 # for versions before 1.9.0 use apps/v1beta2
kind: Deployment
metadata:
name: wordpress-mysql
labels:
app: wordpress
spec:
selector:
matchLabels:
app: wordpress
tier: mysql
strategy:
type: Recreate
template:
metadata:
labels:
app: wordpress
tier: mysql
spec:
containers:
– image: mysql:5.6
name: mysql
env:
– name: MYSQL_ROOT_PASSWORD
valueFrom:
secretKeyRef:
name: mysql-pass
key: password
ports:
– containerPort: 3306
name: mysql
volumeMounts:
– name: mysql-persistent-storage
mountPath: /var/lib/mysql
volumes:
– name: mysql-persistent-storage
persistentVolumeClaim:
claimName: mysql-pv-claim
apiVersion: v1
kind: Service
metadata:
name: wordpress
labels:
app: wordpress
spec:
ports:
– port: 80
selector:
app: wordpress
tier: frontend
type: LoadBalancer

apiVersion: v1
kind: PersistentVolumeClaim
metadata:
name: wp-pv-claim
labels:
app: wordpress
spec:
accessModes:
– ReadWriteOnce
resources:
requests:
storage: 20Gi

apiVersion: apps/v1 # for versions before 1.9.0 use apps/v1beta2
kind: Deployment
metadata:
name: wordpress
labels:
app: wordpress
spec:
selector:
matchLabels:
app: wordpress
tier: frontend
strategy:
type: Recreate
template:
metadata:
labels:
app: wordpress
tier: frontend
spec:
containers:
– image: wordpress:4.8-apache
name: wordpress
env:
– name: WORDPRESS_DB_HOST
value: wordpress-mysql
– name: WORDPRESS_DB_PASSWORD
valueFrom:
secretKeyRef:
name: mysql-pass
key: password
ports:
– containerPort: 80
name: wordpress
volumeMounts:
– name: wordpress-persistent-storage
mountPath: /var/www/html
volumes:
– name: wordpress-persistent-storage
persistentVolumeClaim:
claimName: wp-pv-claim

The first thing we need to do is save these files as mysql-deployment.yaml and wordpress-deployment.yaml respectively.

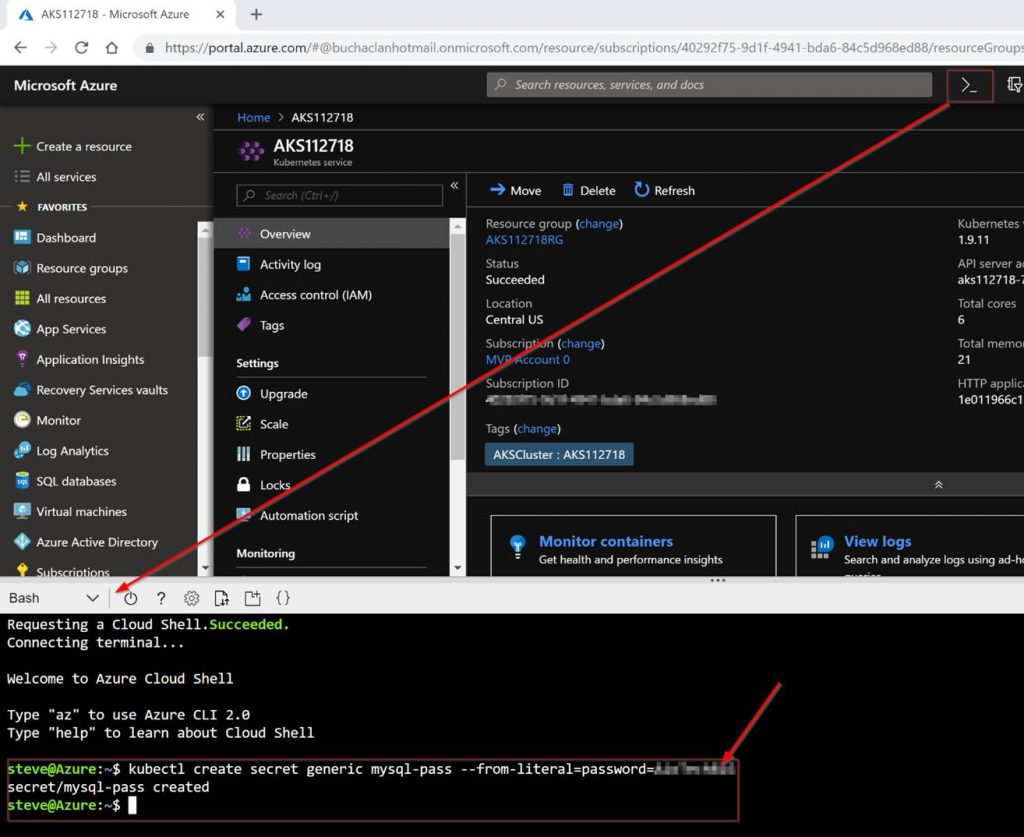
Next, we need to setup a password for our MySQL DB. We will do this by creating a secret on our K8s cluster. To do this launch the bash or PowerShell in Azure cloud shell like in the following screenshot and run the following syntax:

kubectl create secret generic mysql-pass –from-literal=password=”YOURPASSWORDHERE”

Note: Replace “PASSWORDHERE” in the syntax with your own password.

The secret is now created. To ensure it was created you can run the following syntax to list the secrets:

kubectl get secrets

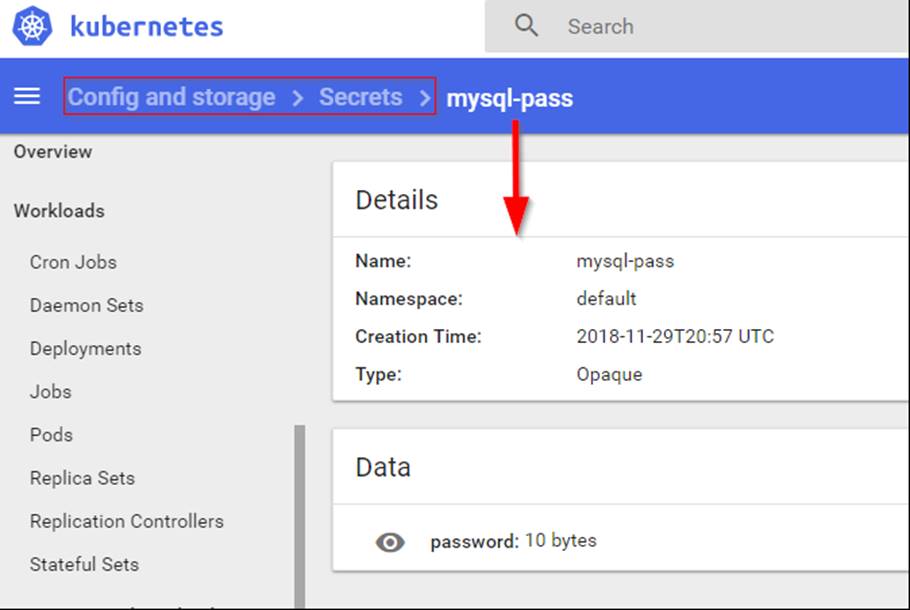
You also can see the secret in the Kubernetes dashboard as shown in the following screenshot.

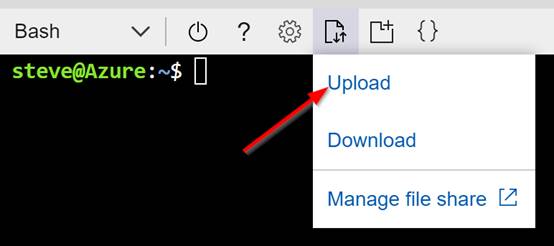
Next the mysql-deployment.yaml and wordpress-deployment.yaml files from the beginning of this post need to be uploaded to Azure cloudrive storage.

You can also do this in the Cloudshell as shown in the following screenshot.

Run ls in the shell to make sure the files are on your clouddrive.

You will need your home drive. Mine was. /home/steve. To see this, click on Download. It will show you what yours is.

Next create the MySQL Pod and service by running the following syntax.

kubectl apply -f /home/steve/mysql-deployment.yaml

NOTE: You could use kubectl create /home/steve/mysql-deployment.yaml instead of apply to create the MySQL pod and service. I use apply because I typically use the declarative object configuration approach. kubectl apply essentially equals kubectl create + kubectl replace. In order to update an object after it has been created using kubectl create you would need to run kubectl replace.

There are pros and cons to using each and it is more of a preference for example when using the declarative approach there is no audit trail associated with changes. For more information on the multiple Kubernetes Object Management approaches go here: https://kubernetes.io/docs/concepts/overview/object-management-kubectl/overview.

Note that in the mysql yaml file it has syntax to create a persistent volume. This is needed so that the database stays in tact even if the pod fails, is moved etc. You can check to ensure the persistent volume was created by running the following syntax:

kubectl get pvc

Also, you can run the following syntax to verify the mysql pod is running:

kubectl get pods

Deploying the WordPress Pod and service is the same process. Use the following syntax to create the WordPress pod and service:

kubectl apply -f /home/steve/wordpress-deployment.yaml

Again, check to ensure the persistent volume was created. Use the following syntax:

kubectl get pvc

NOTE: When checking right after you created the persistent volume it may be in a pending status for a while like shown in the following screenshot:

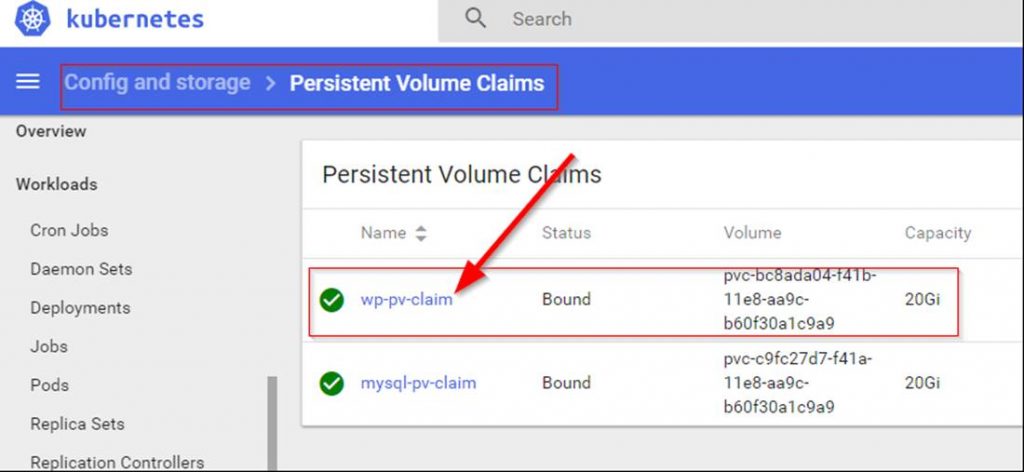
You can also check the persistent volume using the K8s dashboard as shown in the following screenshot:

With the deployment of MySQL and WordPress we created 2 services. The MySQL service has a clusterip that can only be accessed internally. The WordPress service has an external IP that is also attached to an Azure Load Balancer for external access. I am not going to expand on what Kubernetes services are in this blog post but know that they are typically used as an abstracted layer in K8s used for access to Pods on the backend and follow the Pods regardless of the node they are running on. For more information about Kubernetes services visit this link: https://kubernetes.io/docs/concepts/services-networking/service.

In order to see that the services are running properly and find out the external IP you can run the following syntax:

kubectl get services (to see all services)

or

kubectl get services wordpress (to see just the WordPress service)

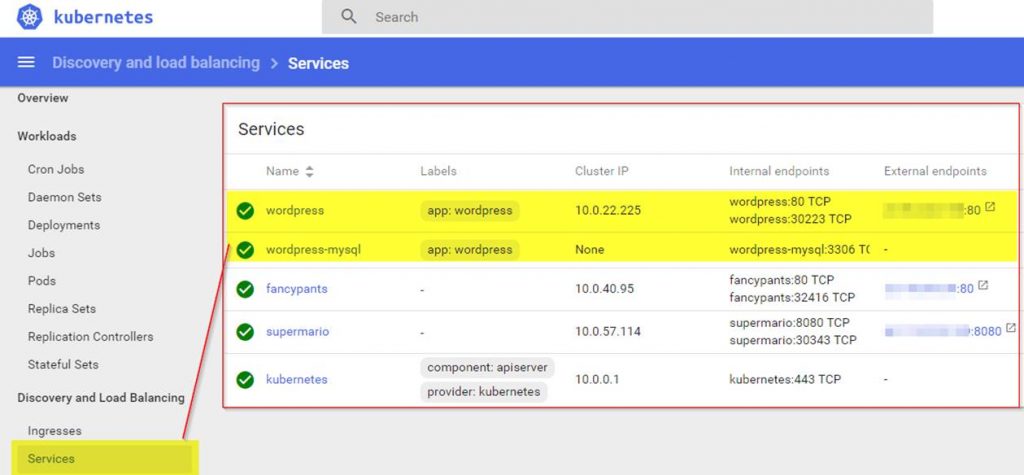
You also can view the services in the K8s dashboard as shown in the following screenshot:

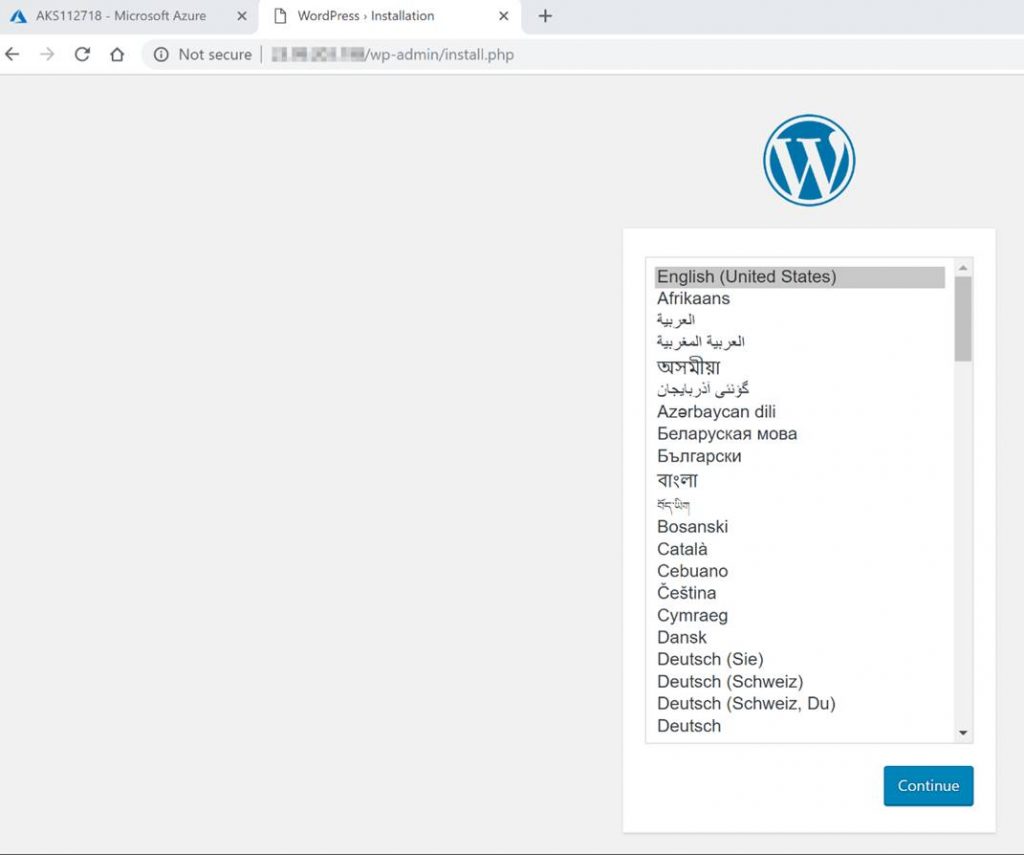
Well now that we have verified the pods and the services are running let’s check out our new WordPress instance by going to the external IP in a web browser.

Thanks for checking out this blog post. I hope this was an easy to use guide to get WordPress up and running on your Azure Kubernetes Service cluster. Check back soon for more Azure and Kubernetes/Container content.

Read more

WordPress as front-end for Azure Automation

With Azure Automation there are cases where you will need to have a form that end users can go fill out to kick off an automation runbook. Back with System Center Orchestrator we could use Service Manager’s self-service portal as the front end for our automations. This was a solution that worked well. With Azure Automation we do not have that luxury at least not yet we don’t. There is a community based Azure automation webhook Service Manager (SCSM) connector in the works. One of my colleagues Rob Plank is a part of this project and says it should ready to release very soon. This connector will allow you to use the SCSM portal as the frontend of Azure Automation via webhooks, know when a webhook expires, and see a runbooks job status. Here are some teaser screenshots of the  connector.
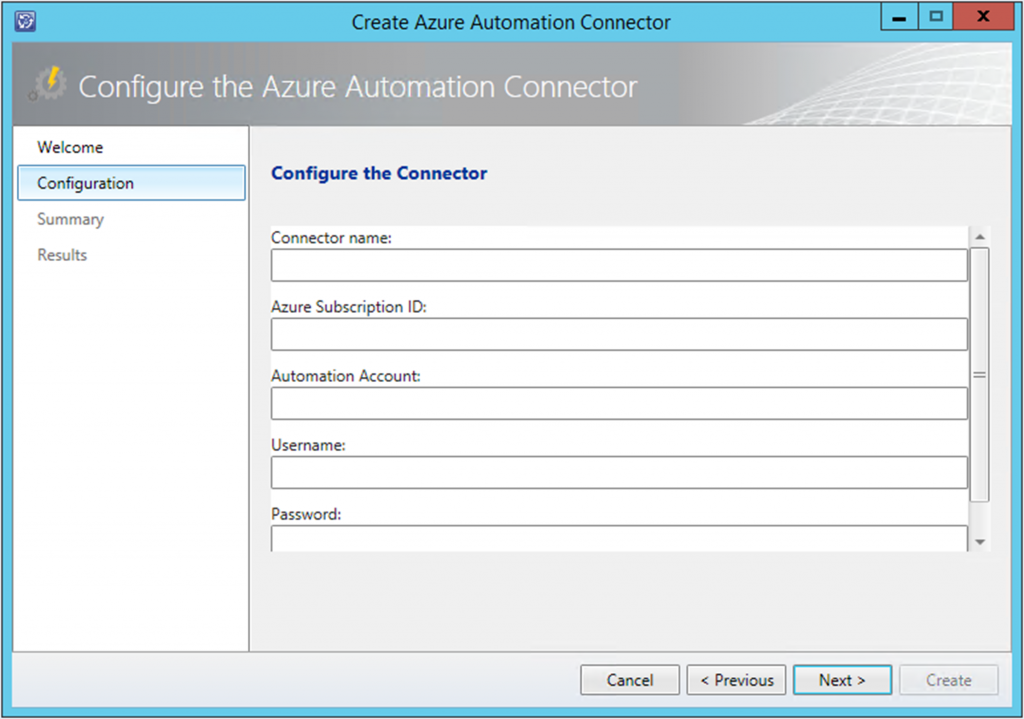
image001

image002

There also are a few posts out there on how to leverage other platforms as the frontend for Azure Automation these are “how to use SharePoint as the frontend of Azure Automation” by Anders Bengtsson and “how to use an ASP website as the frontend to Azure Automation” by a friend of mine and fellow Microsoft MVP Florent Appointaire. Well in this post I am going to show you how to use the popular platform WordPress as the frontend for Azure Automation. The cool thing here is that this is another instance of showcasing the ability to utilize Microsoft and Open Source technologies together. 🙂

Here are the steps at a high level

  • Have an Azure Automation account on Azure
  • Setup your runbook/s in Azure Automation
  • Setup a webhook on your runbook/s in Azure Automation
  • Have a WordPress instance
  • Install Ninja Forms plugin in the WordPress instance
  • Install the Webhooks add on for Ninja Forms
  • Setup your runbook frontend form/s
  • Configure the runbook frontend form/s to connect to the Azure Automation webhook

Let’s get started!

Step 1: Have an Azure Automation account on Azure

To get started with Azure Automation go here: https://azure.microsoft.com/en-us/documentation/articles/automation-intro. I am not going to cover this within this blog post.

Step 2: Setup your runbook/s in Azure Automation

For this testing this scenario and this post I grabbed a couple of Azure Automation runbooks built by the Microsoft AzureAutomationTeam and made available in the Azure Automation Runbook Gallery. These runbooks start and stop Azure virtual machines.

Runbook #1 Name:

Start-AzureV2VMs

Description:

This runbook connects to Azure and starts all VMs in an Azure subscription or resource group.

Runbook #2 Name:

Stop-AzureV2VMs

Description:

This runbook connects to Azure and stops all VMs in an Azure subscription or resource group.

Both runbooks have two parameters they need. These are:

param (

[Parameter(Mandatory=$false)]

[String]  $AzureConnectionAssetName = “AzureRunAsConnection”,

[Parameter(Mandatory=$false)]

[String] $ResourceGroupName

We need to pay attention to these when setting up the webhooks and these often become your fields on your front end form.

Step 3: Setup a webhook on your runbook/s in Azure Automation

Here are the steps to setup a webhook for an Azure Automation Runbook.

First off make sure your runbook/s are in a published authoring status.

image003

Within https://portal.azure.com Navigate to

YOURAZUREAUTOMATIONACCOUNT

Runbooks

YOURRUNBOOK (Start-AzureV2VMs)

Webhooks

From here click on the Add Webhook button.

image004

The Add Webhook blade will fly out. Here you will want to click on Create new webhook to make the next blade flyout.

Here you need to give your webhook a name, set to enabled, set when it will expire and COPY THE URL TO A SAFE PLACE.

NOTE: You will not be able to access the webhook URL after this.
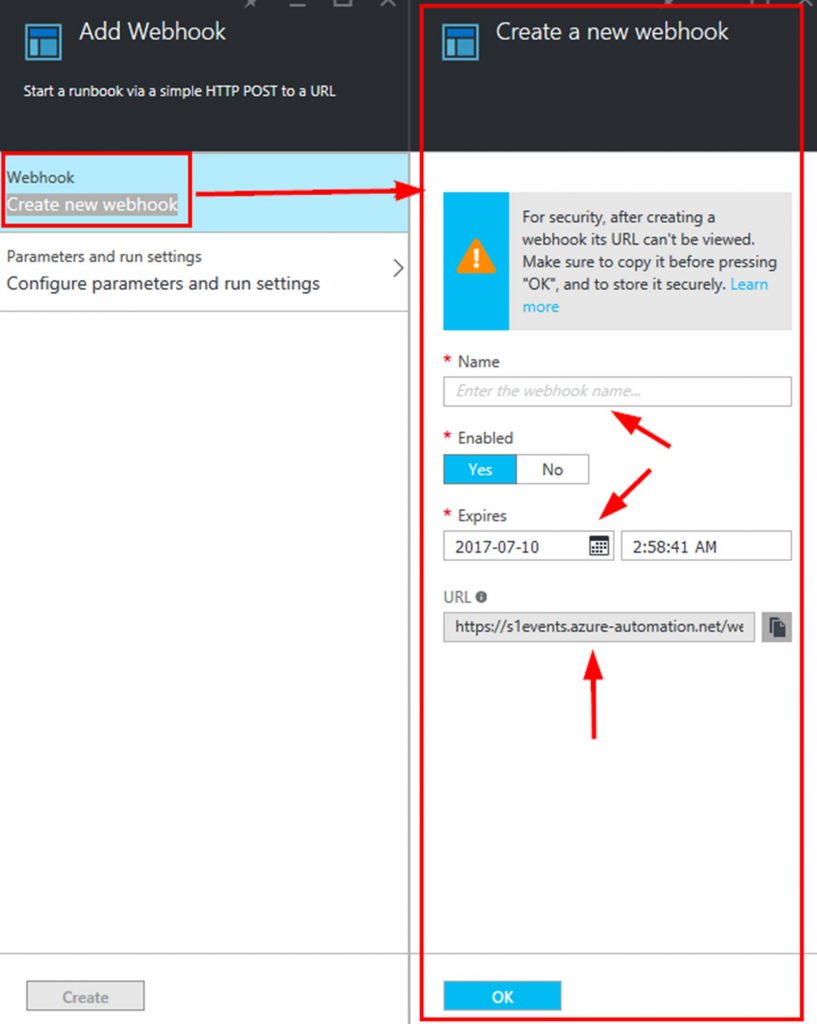
image005

Click OK.

Next you need to click on Configure parameters and run settings. This is where you set the parameters from the runbook.

If your parameters are required you have to set them here. If they are optional you can leave them blank here and pass the data into the runbook from the frontend form via a $WebhookData object.

In my case I put AzureRunAsConnection directly in the webhook. I created a credentials asset in Azure Automation with the account containing the needed permissions to perform the actions from the runbook in my Azure account (Start/Stop VM’s).

I left the resourcegroupname blank as I will pass this in from the front end form. I left the Run Settings to run on Azure as I do not have a Hybrid Worker setup.

NOTE: A Hybrid Worker lets you run automation runbooks on premises in your data center.
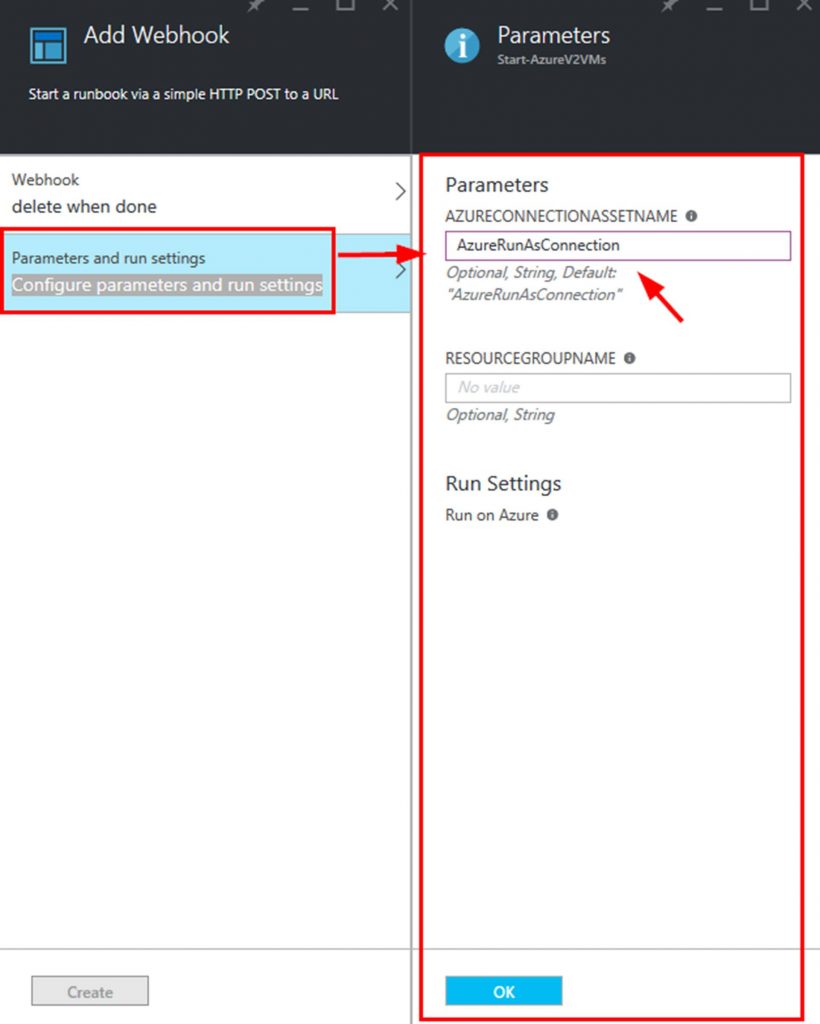
image006

One you have the Webhook and parameters configured click on the Create button to actually create the webhook.
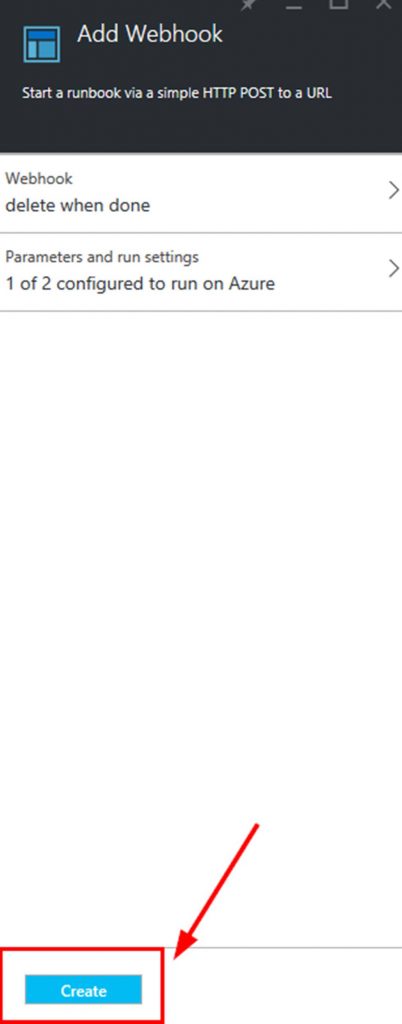
image007

You will now see your new webhook in the webhooks blade.
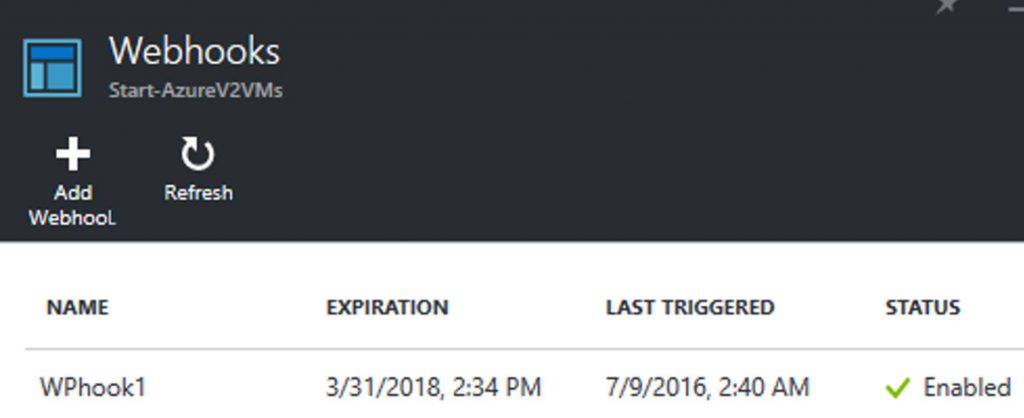
image008

Note that if you click on a webhook you will not see the URL. You can enable or disable the webhook, see when it expires, and access the parameters. This is shown in the following screenshot.
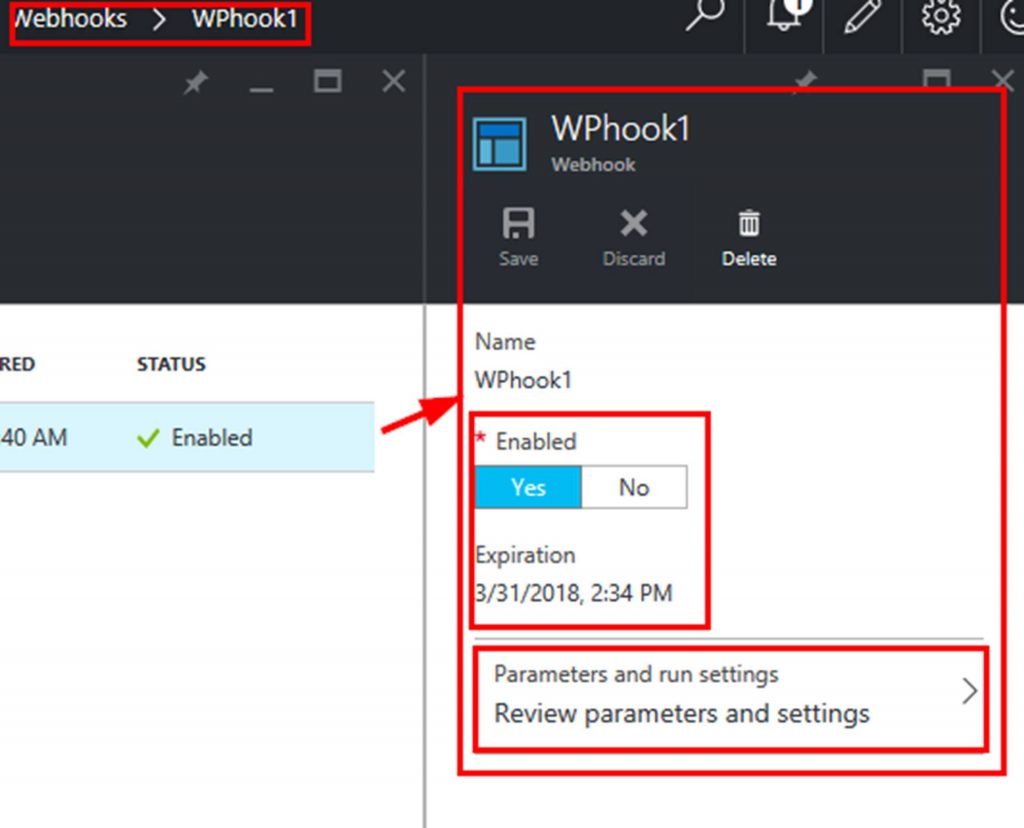
image009

Step 4: Have a WordPress instance

You can host WordPress on WordPress.org on a hosting account, internally or even on Azure. Here is a link to a tutorial on how to run WordPress on Azure. https://azure.microsoft.com/en-us/documentation/articles/app-service-web-create-web-app-from-marketplace.  I am not going to cover how to setup a WordPress instance within this blog post.

Step 5: Install Ninja Forms plugin in the WordPress instance

Here are the steps to install Ninja Forms WordPress plugin.

From within the WordPress admin dashboard click on Plugins.

Click on Add New.

image010

Search for Ninja Forms. Click on the Install button to add the plugin. Make sure you activate the plugin.
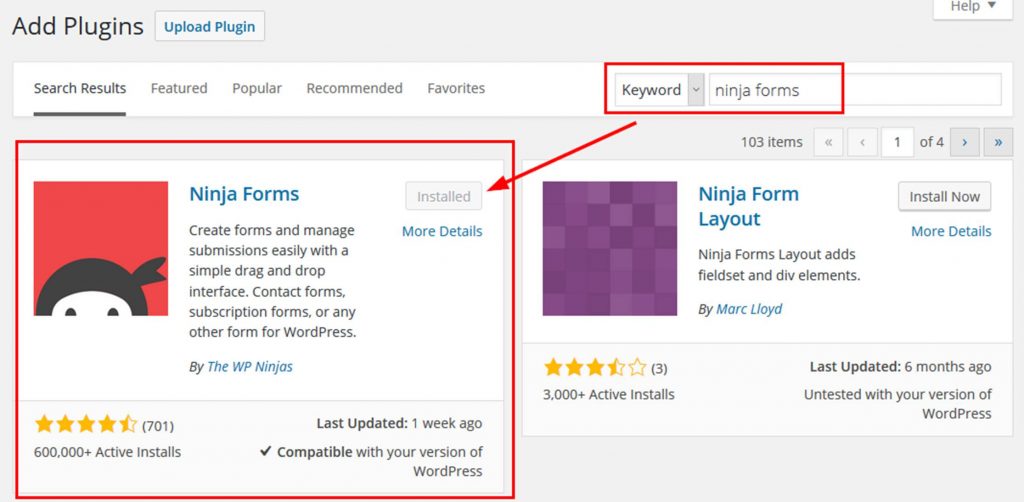
image011

You also could manually download and upload the plugin or load it directly into the plugins directory. I have shown you the steps for the easiest way to install it.

The Ninja Forms plugin page can be found here:

https://wordpress.org/plugins/ninja-forms

Step 6: Install the Webhooks add on for Ninja Forms

The Webhooks for Ninja Forms add on can be found here:

https://ninjaforms.com/webhooks-for-ninja-forms

This add on has to be purchased. It is $39 by itself for 1 WordPress instance.

After you buy it you will get the files for download. Again from within the WordPress admin dashboard click on Plugins.

Click on Add New. This time click on the Upload Plugin button and browse to your downloaded Webhooks for Ninja Forms zip folder.

After it is uploaded be sure to activate it.

The final step is to install the license for the add on. To do this Click on Forms>Settings>Licenses and input the key that Ninja Forms sent in the Webhooks Key field. Click on Save & Activate.
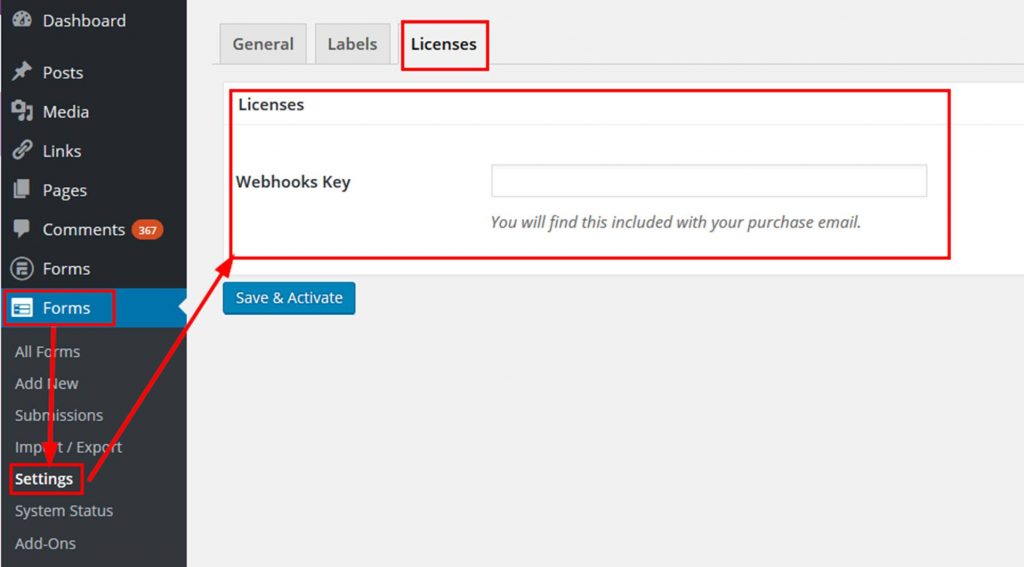
image013

Step 7: Setup your runbook frontend form/s

Next we need to build the actual form. To do this follow the list of steps.

Click on Forms>Add New. Give your form a Title.

Add a Textbox and put in the label of ResourceGroupName.

I like to make it Required.
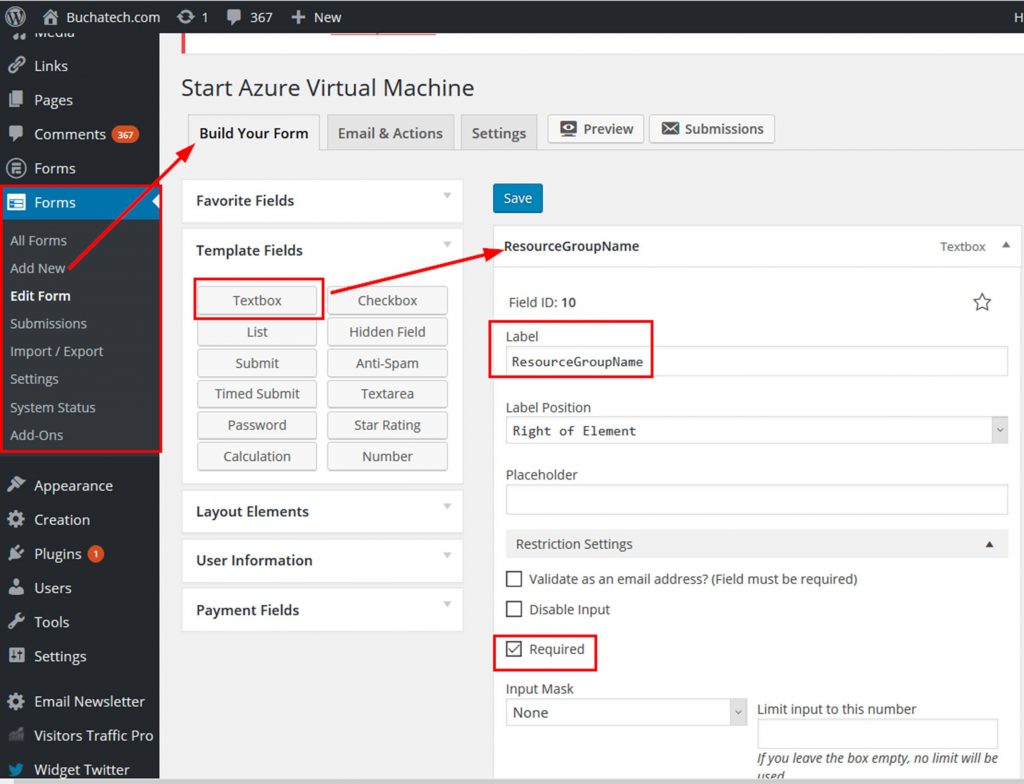
image014

Add a Submit button to your form. I labeled it Start.
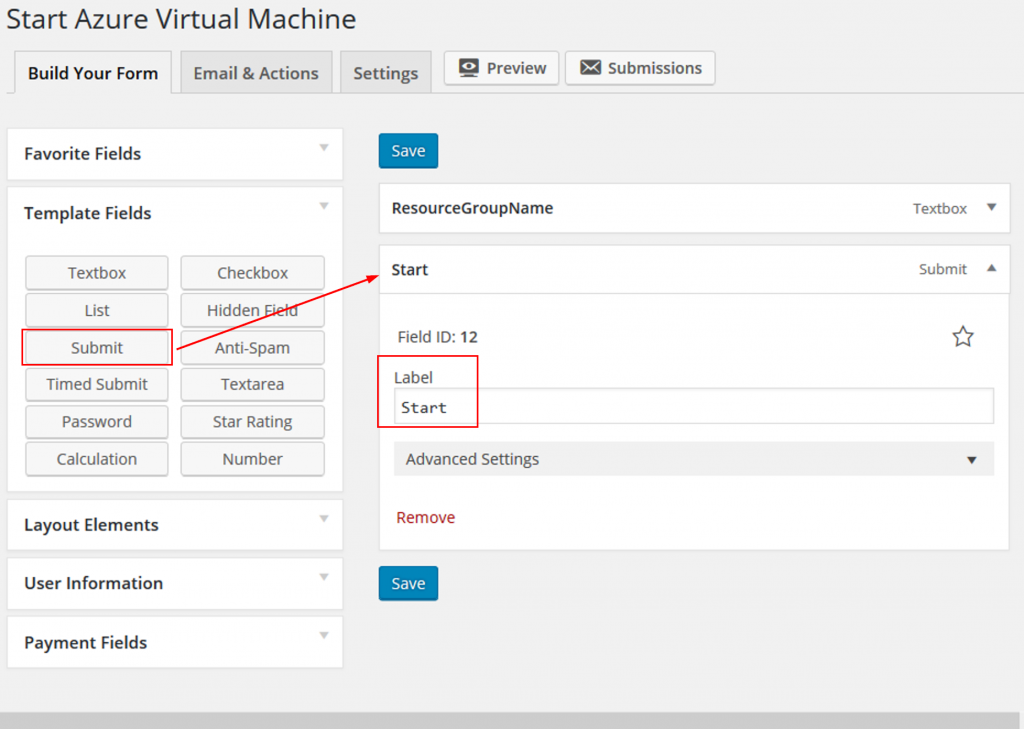
image015

In the following screenshot is what the form looks like. Note that I have both forms loaded on the same page.
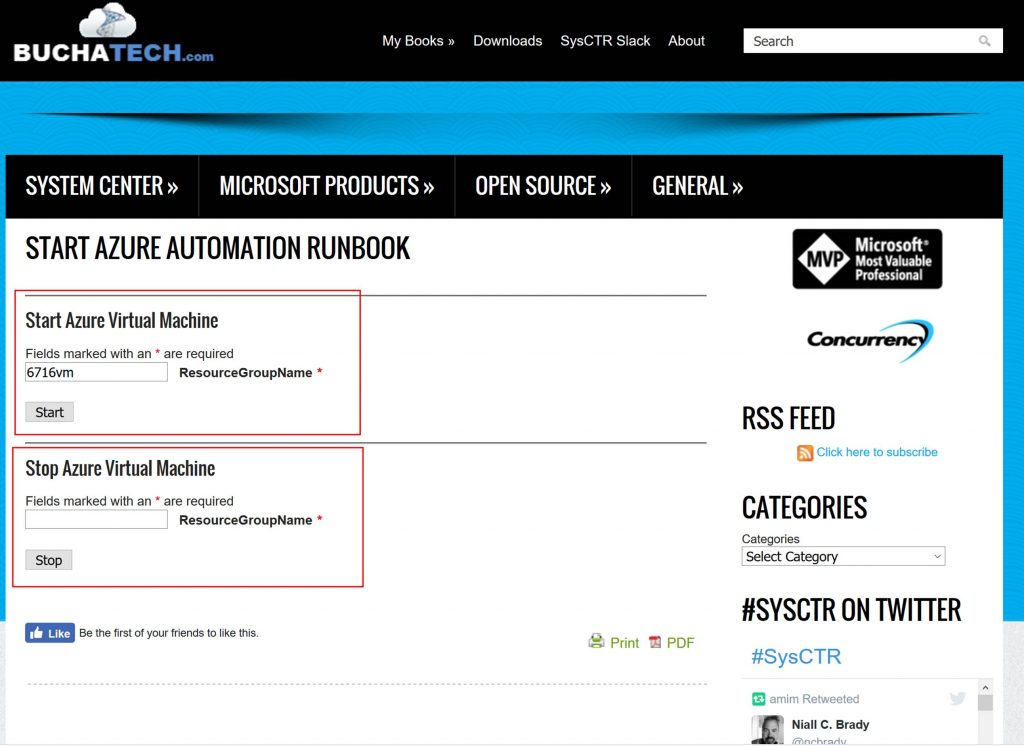
image016

Step 8: Configure the runbook frontend form/s to connect to the Azure Automation webhook

Now is the last step. This is the step in which we configure the form to send data to the Auzre Automation webhook upon submission. This is doing it via POST method.

When editing the form click on the Email & Actions tab. Click on the Add New button.

Give this Action a name.

In the Type dropdown select Webhook.

Enter the Azure Automation webhook URL in the Remote Url field.

Select Post for the Remote Method.

For Args select enter the name of and select the field from your form of the parameters you need to send to the Azure Automation runbook.

You can see this all represented in the following screenshot.
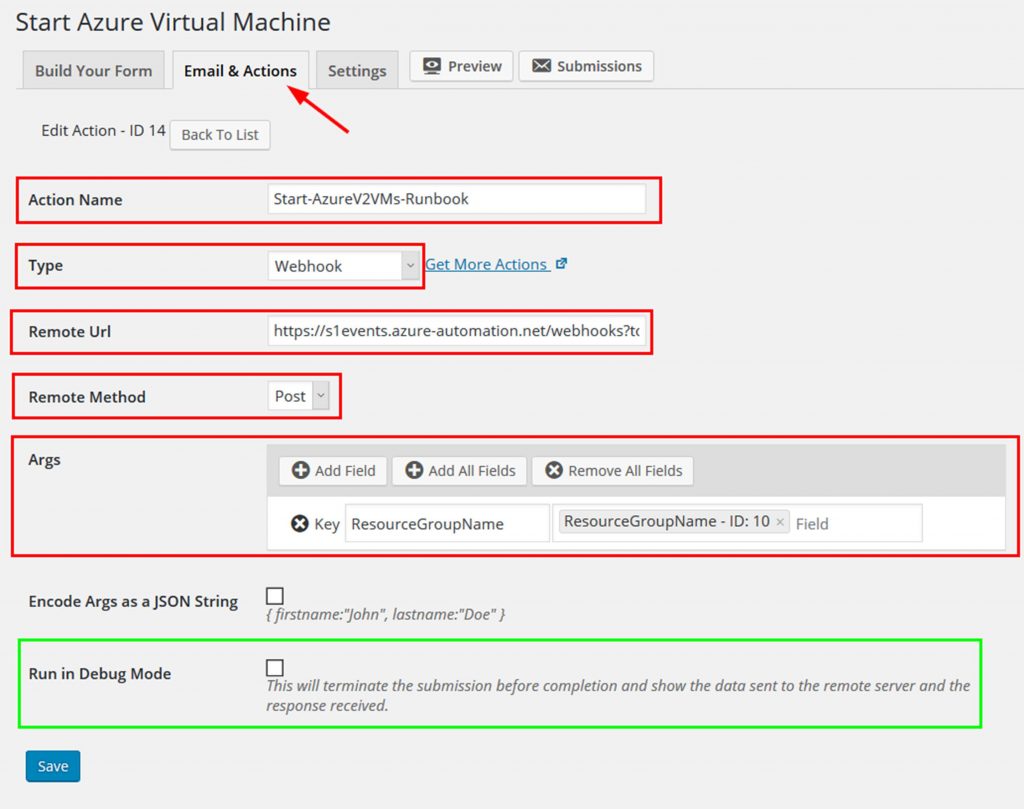
image017

One of the cool things about this solution is we can test the webhook action before actually submitting it to make sure it will work as expected. This testing can be turned on by checking the Run in Debug Mode field. I have highlighted this in the screenshot in green. Checking this box and submitting the form will show debugging information like data sent and response.

Here is an example of what the result in Debug mode will look like:
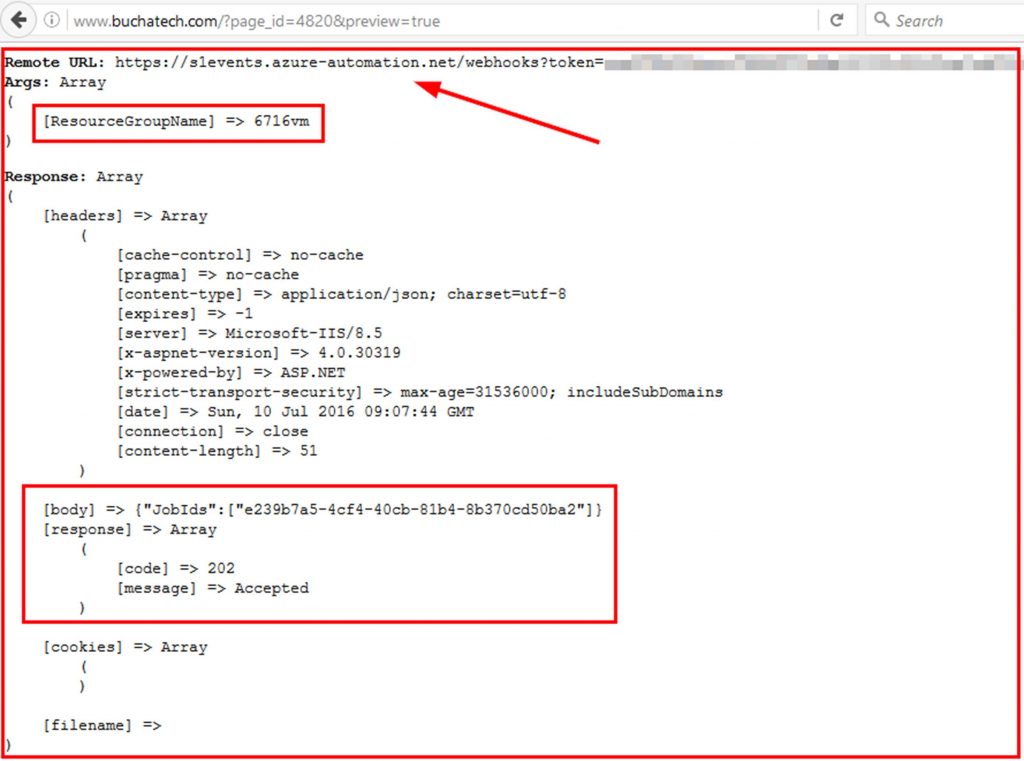
image018

Make sure you uncheck the Run in Debug Mode field when you are ready to actually start your runbook/s.

Now let’s see what this looks like in Azure Automation when we submit the form.

I have a resource group named 6716vm with one VM in it named 6716vm. So I will enter 6716vm on the form. 6716vm will be passed to the runbook as the resourcegroupname.
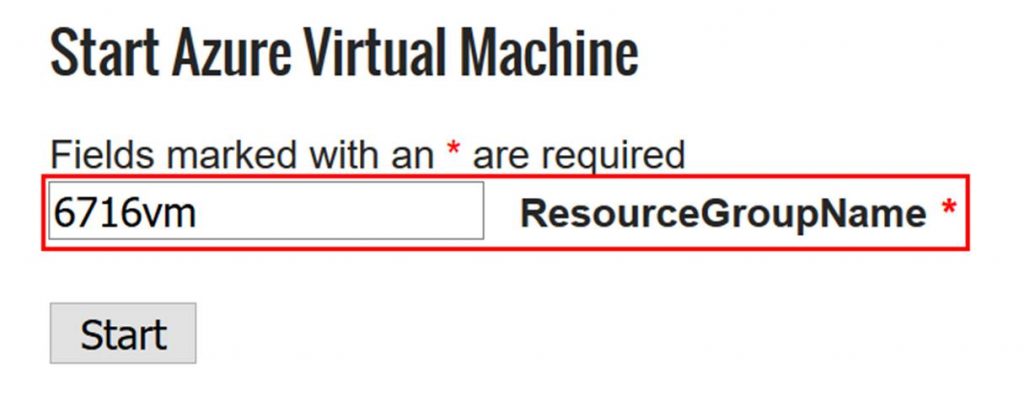
image019

You can see the job running in Azure now.
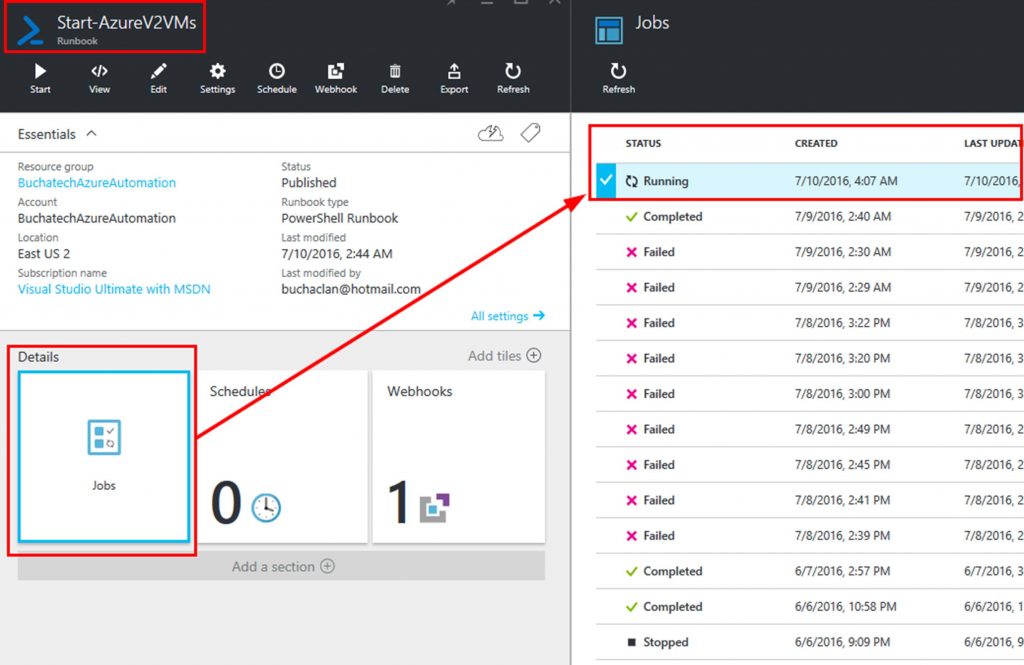
image020

Within the job if you click on Input you can see it has 2 inputs. One is Webhookdata. This is where the 6716vm is located. The other is the Azureconnectionassetname. Remember we hardcoded this into the webhook itself. We can also see in the following screenshot that the job completed.
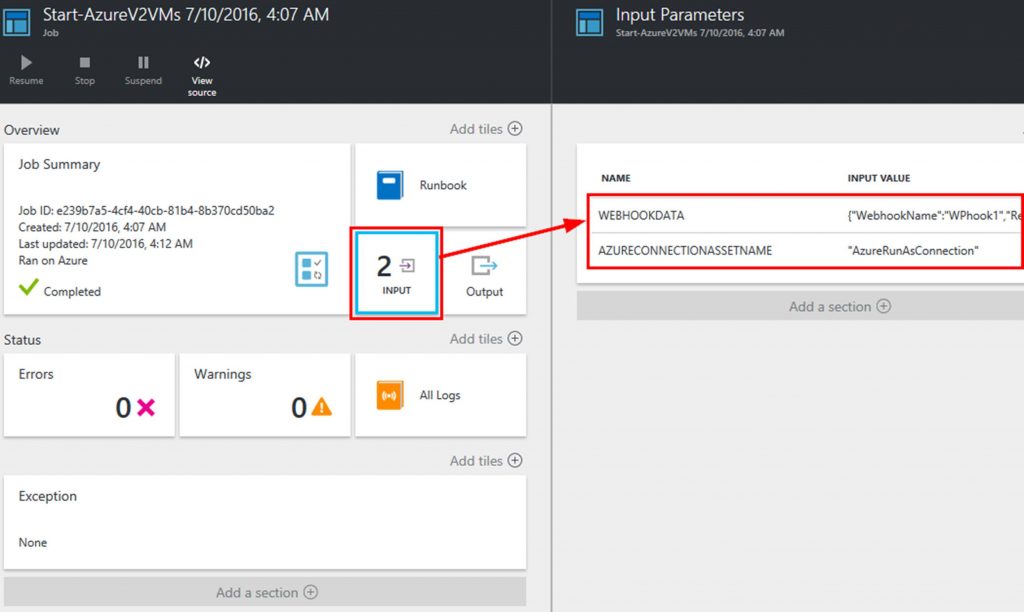
image021

If we look further at the webhookdata we can see several interesting things. We can see exactly where it put the 6716vm parameter for the resourcegroupname and we can see that this request came from my blog at www.buchatech.com.
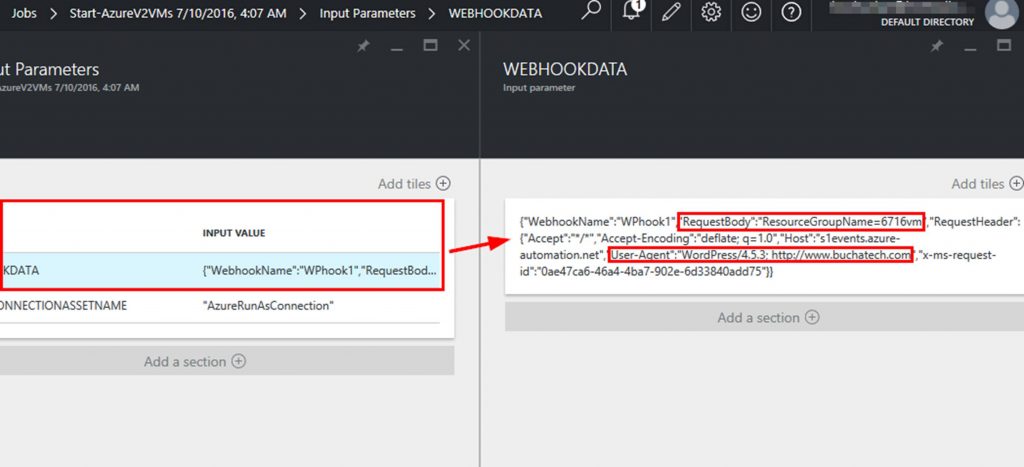
image022

{“WebhookName”:”WPhook1″,”RequestBody”:”ResourceGroupName=6716vm”,”RequestHeader”:{“Accept”:”*/*”,”Accept-Encoding”:”deflate; q=1.0″,”Host”:”s1events.azure-automation.net”,”User-Agent”:”WordPress/4.5.3; https://www.buchatech.com”,”x-ms-request-id”:”0ae47ca6-46a4-4ba7-902e-6d33840add75“}}

Pretty cool right? Check out the VM now running:
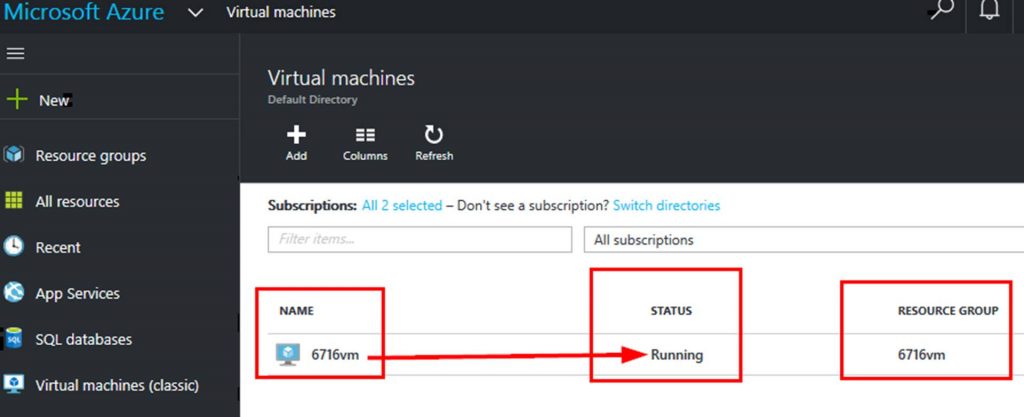
image023

Now to shut it down I can go back to my WordPress and use the Stop Azure VM form. The possibilities here are endless. I know some of you may be thinking this is great but what if I want to control who can login to see this form and will it work with Active Directory. The answer is YES. WordPress has several plugins that integrate with Active Directly and even have SSO. A couple of these are Active Directory/LDAP Login for Intranet sites and Active Directory Integration. 

You can see that WordPress can make a great frontend for your Azure Automation runbooks. That is the end of the post. Happy automating!

Read more

Use System Center Orchestrator to Backup a Hosted WordPress

I recently had some issues with my hosted WordPress (this blog) being hacked. So I wanted to start backing up a local copy and I did not want to do this all manually. A friend of mine (a fellow MVP Islam) also needed something like this for his blog because recently the hosting provider of his WordPress site deleted the entire thing!

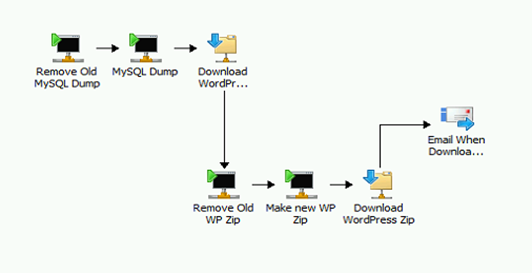
WordPress on the backend consists of a database and a folder with the actual site files in it. I needed a way to back up the database and the site files. My WordPress database runs on MySQL. I needed a way to do a MySQL Dump of the database. Then the dump needed to be placed into a specific folder before downloading it. So to sum this up I need to somehow backup the MySQL database for my site, place this somewhere so it can be downloaded, delete the previous database file so that disk space is not being wasted before future dumps, then zip my blog files and download both the zip and MySQL Dump.

I was excited about this project because when I set out to accomplish I knew I would look to System Center first to help me out. Just my luck I am able to accomplish everything I need with System Center Orchestrator (SCORCH).

Here is a summary of how SCORCH will accomplish the task:

  • SCORCH will connect to the web server via SSH
  • SCORCH will issue a command that will remove any previous MySQL backups of my database
  • SCORCH will issue a MySQL command to back up the database to a specific folder
  • SCORCH will check for a previous .zip of my blog files and remove it if it is there
  • SCORCH will create a new .zip of my website files
  • SCORCH will connect to the web server via FTP and download the database and download the .zip of my blog

Before doing this you need a couple of things setup on your web server and depending on your host some of these options may not be available. Here is what you need:

  • You need a static IP so that you can access SSH remotely (Some hosts will give you a FQDN to connect to instead)
  • Then you need SSH turned on and configured (Make sure this is secured.)
  • Create a folder for your MySQL database backups
  • You need an FTP account setup to access your MySQL backups and the website files remotely

Ok now let’s jump into the actual setup of this in SCORCH.

Go download and deploy the FTP Integration Pack for SCORCH.

Here is the link: http://technet.microsoft.com/en-us/library/hh295851.aspx

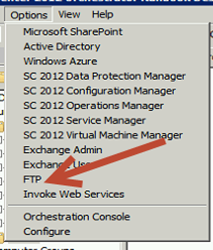
Register the integration pack and deploy it to your Runbook server. Once you have the FTP integration pack in your SCORCH go to the SCORCH Runbook designer and setup the FTP account for your host. This can be found under Options>>FTP.

clip_image001

You just need to click Add and then input your FTP settings. Click OK when done and your FTP connection will be listed under Configurations. Click Finish.

clip_image002

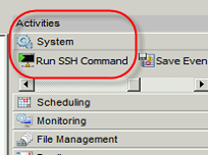
The next thing you need to do is create the Runbook. You will be using the System (Run SSH Command) and FTP (Download File) Activities.

clip_image003

clip_image004

Go ahead and setup your Runbook like so:

clip_image005

Read more