Azure Stack Deployment…No KVM…No Problem

When deploying Azure Stack (TP2) you may not have a KVM, a physical monitor, or maybe you just don’t want to use either with the host. Well there is a solution for this. You can utilize a Windows setup answer file for an unattended installation. What this will do is automate the Windows Setup for you. For Azure Stack you basically just need to input the administrator password. 🙂

Microsoft has put together an answer file and a PowerShell script that enables you to inject an answer file into CloudBuilder.vhdx before deploying Azure Stack. What this will do is enter info on the Windows setup screen for you so that you don’t have to have a KVM or physical monitor attached to the host.  You can just wait for the host to reboot and then RDP in. This unattended answer file and script is a part of the AzureStack-Tools. The AzureStack-Tools have some great resources in the repository and I will be blogging about more of them in the future.

There are basically 2 steps to inject this answer file into your Azure Stack VHDX. These are:

Step 1:

Go and download the Deployment tools files manually onto your Azure Stack host from here:

https://github.com/Azure/AzureStack-Tools/tree/master/Deployment

Or run this PowerShell from your Azure Stack host:

# Variables
$Uri = ‘https://raw.githubusercontent.com/Azure/AzureStack-Tools/master/Deployment/
$LocalPath = ‘YOURLOCATION:\AzureStack_TP2_SupportFiles’

# Create folder
New-Item $LocalPath -Type directory

# Download files
‘BootMenuNoKVM.ps1’, ‘PrepareBootFromVHD.ps1’, ‘Unattend.xml’, ‘unattend_NoKVM.xml’ | foreach { Invoke-WebRequest ($uri + $_) -OutFile ($LocalPath + ‘\’ + $_) }

Be sure to set $LocalPath to your location.

Step 2:

NOTE: You need to have the CloudBuilder.vhdx downloaded to your Azure Stack host and it cannot be mounted.

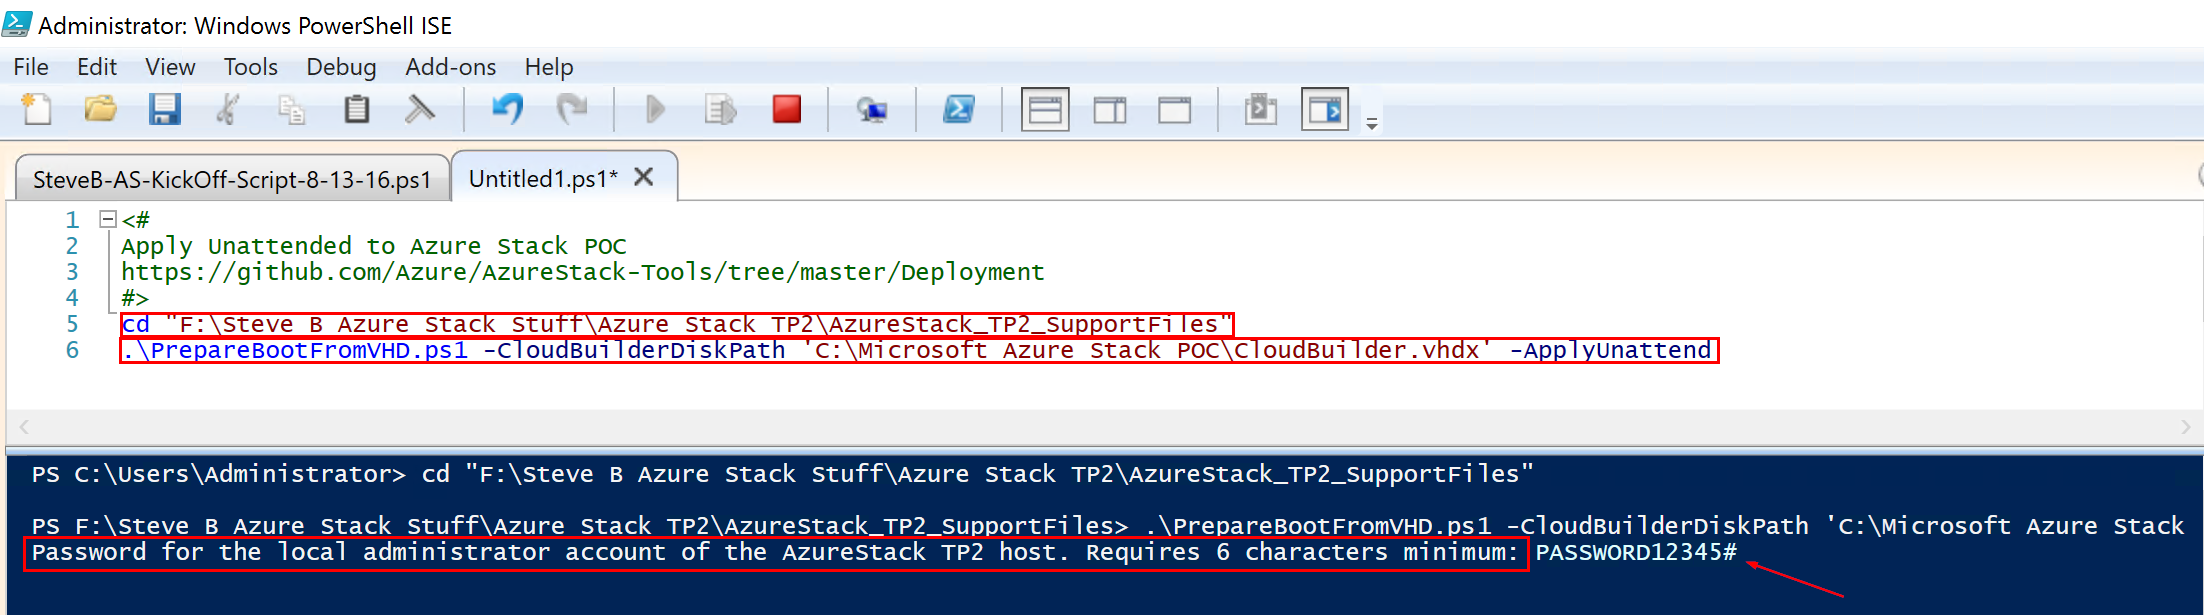
From within PowerShell navigate to the directory you downloaded the deployment tools to and run this

.\PrepareBootFromVHD.ps1 -CloudBuilderDiskPath YOURDRIVE:\CloudBuilder.vhdx -ApplyUnattend

Be sure to point the script to the location containing your CloudBuilder.vhdx before running this.

You will be prompted to enter the password you want to use for the local administrator account.

applyasunattended1

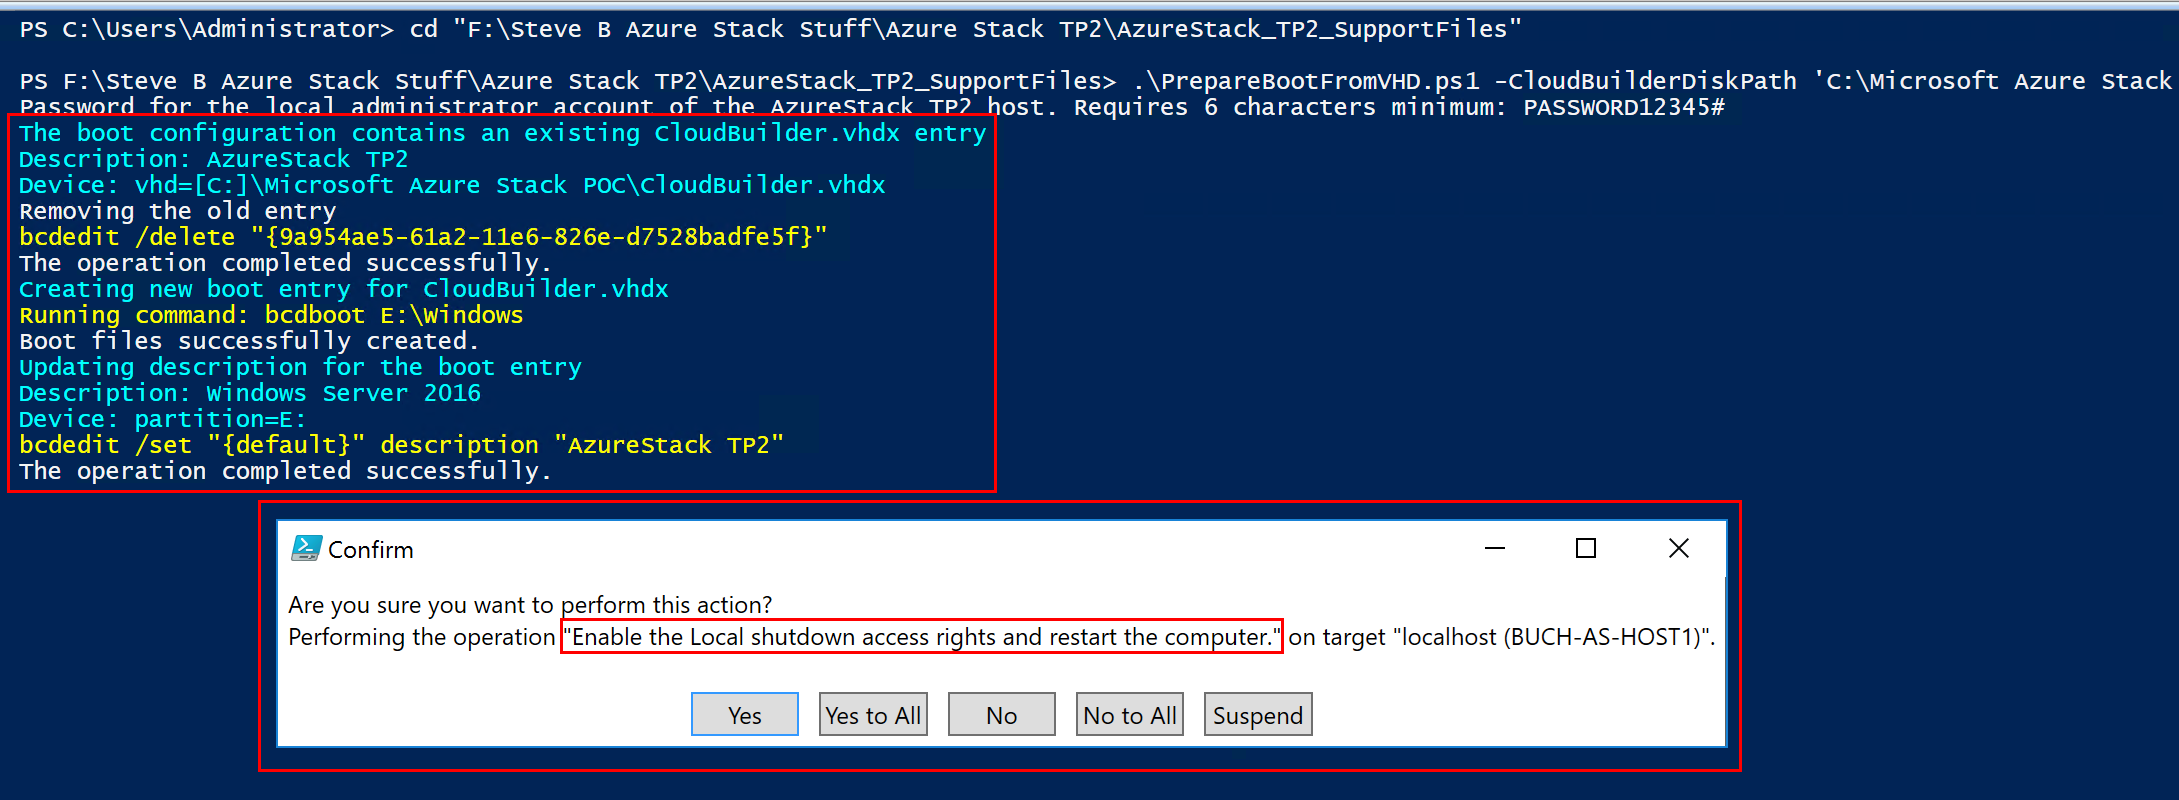
You will see the bcdedit command execution and output as shown in the following screenshot. This saves you the step of modifying the bcdedit. The CloudBuilder.vhdx will also be mounted. You will then be asked to confirm a reboot also as shown in the following screenshot.

applyasunattended2

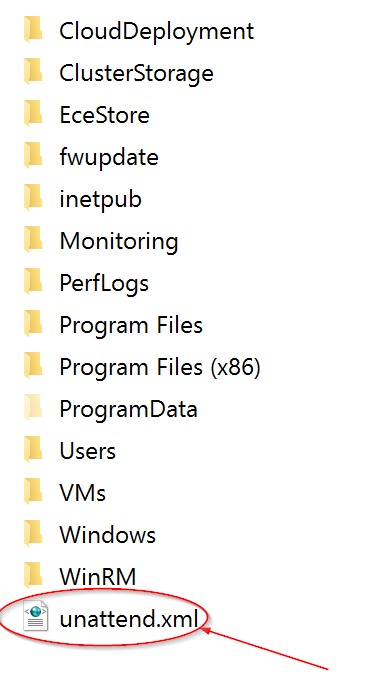
Before you reboot if you are interested you can go see the unattend.xml file that was created. This is the answer file that will be used. This is shown in the following screenshot.

applyasunattended3

The host will be rebooted. When it comes back online you will be able to RDP in. You will then be able to kick off the Azure Stack deployment.

Happy Azure Stacking!!!

Read more

Azure Stack TP2 deployment failure 60.120.123

I recently deployed the new Azure Stack TP2 release. This install is way better. I did run into one small issue during the deployment. Below is what I ran into and the solution.

Failure in Deployment log:

2016-11-18 02:18:36 Error    1> Action: Invocation of step 60.120 failed. Stopping invocation of action plan.

Finding the root of the failure:

When walking back the step index in the summary xml log the error landed on step 60.120.123.

-<Task EndTimeUtc="2016-11-18T08:15:23.1042963Z" Status="Error" StartTimeUtc="2016-11-18T08:10:40.5896841Z" ActionType="Deployment-Phase4-ConfigureWAS" RolePath="Cloud">

-<Action EndTimeUtc=”2016-11-18T08:15:23.1042963Z” Status=”Error” StartTimeUtc=”2016-11-18T08:10:40.5896841Z” Type=”Deployment-Phase4-ConfigureWAS” Scope=”Internal”>

-<Steps>

-<Step EndTimeUtc=”2016-11-18T08:15:23.1042963Z” Status=”Error” StartTimeUtc=”2016-11-18T08:10:40.5896841Z” Name=”(Katal) Configure WAS VMs” Description=”Configures Windows Azure Stack on the guest VMs.Index=”123“>

-<Task EndTimeUtc=”2016-11-18T08:15:23.1042963Z” Status=”Error” StartTimeUtc=”2016-11-18T08:10:40.5896841Z” RolePath=”Cloud\Fabric\WAS” InterfaceType=”Configure”>

-<Exception>

<Message>Function ‘ConfigureWAS’ in module ‘Roles\WAS\WAS.psd1’ raised an exception: Time out has expired and the operation has not been completed. at Stop-WebServices, D:\WAP\Setup\Scripts\Configure-AzureStackMasd.ps1: line 699 at Restart-WebServices, D:\WAP\Setup\Scripts\Configure-AzureStackMasd.ps1: line 712 at Invoke-Main, D:\WAP\Setup\Scripts\Configure-AzureStackMasd.ps1: line 649 at <ScriptBlock>, D:\WAP\Setup\Scripts\Configure-AzureStackMasd.ps1: line 738 at <ScriptBlock>, <No file>: line 21</Message>

<StackTrace> at CloudEngine.Actions.PowerShellHost.Invoke(InterfaceParameters parameters, Object legacyConfigurationObject, CancellationToken token) at CloudEngine.Actions.InterfaceTask.Invoke(Configuration roleConfiguration, Object legacyConfigurationObject, MultiLevelIndexRange indexRange, CancellationToken token, Dictionary`2 runtimeParameter)</StackTrace>

<Raw>CloudEngine.Actions.InterfaceInvocationFailedException: Function ‘ConfigureWAS’ in module ‘Roles\WAS\WAS.psd1’ raised an exception: Time out has expired and the operation has not been completed. at Stop-WebServices, D:\WAP\Setup\Scripts\Configure-AzureStackMasd.ps1: line 699 at Restart-WebServices, D:\WAP\Setup\Scripts\Configure-AzureStackMasd.ps1: line 712 at Invoke-Main, D:\WAP\Setup\Scripts\Configure-AzureStackMasd.ps1: line 649 at <ScriptBlock>, D:\WAP\Setup\Scripts\Configure-AzureStackMasd.ps1: line 738 at <ScriptBlock>, <No file>: line 21 at CloudEngine.Actions.PowerShellHost.Invoke(InterfaceParameters parameters, Object legacyConfigurationObject, CancellationToken token) at CloudEngine.Actions.InterfaceTask.Invoke(Configuration roleConfiguration, Object legacyConfigurationObject, MultiLevelIndexRange indexRange, CancellationToken token, Dictionary`2 runtimeParameter)</Raw>

</Exception>

</Task>

</Step>
Solution:

The first option is to re-run the deployment from the specific failed step. Do this by using the following syntax:

Import-Module C:\CloudDeployment\CloudDeployment.psd1 -Force

Import-Module C:\CloudDeployment\ECEngine\EnterpriseCloudEngine.psd1 -Force

Invoke-EceAction -RolePath Cloud -ActionType Deployment -Start 60.120.123 -Verbose

The second option for this specific issue is to re-run the deployment with network parameters included. Use the following Syntax:

.\InstallAzureStackPOC.ps1 -AdminPassword $adminpass -AADAdminCredential $aadcred -AADDirectoryTenantName X.onmicrosoft.com -NatIPv4Subnet 192.168.5.0/24 -NatIPv4Address 192.168.5.3 -NatIPv4DefaultGateway 192.168.5.1 -EnvironmentDNS 192.168.5.1 -Verbose

Read more

Download all Azure Stack Ignite 2016 decks

Mattias Fors has a post with a PowerShell script that can be used to download all Microsoft Ignite 2016 slide decks. The blog post is here: https://deploywindows.info/2016/09/30/download-ignite-2016-slidedecks,

You can use this script to download all the Azure Stack session decks.

2016-10-04-14_59_34-windows-powershell-ise

Just change if ($item.title –notlike “Re:*”) to if ($item.title -like “*Azure Stack*”) in the script and run it. It will place them in C:\Ignite2016Slidedecks.

2016-10-04-15_01_47-c__ignite2016slidedecks

Enjoy!

Read more

New Azure Stack Survival Guide

As shown this week at Microsoft Ignite 2016 Azure Stack has come along way. TP2 has been released with new functionality and a timeline for Azure Stack has been announced.

Also we have seen some new blogs on TP2, some third party solutions coming, vendors demoing it on their hardware, and some new scripts and tools.

There is so much movement now around Azure Stack both from Microsoft and the community. It can be hard to keep up with all the information and resources for Azure Stack. To help with this I have started an Azure Stack Survival Guide on TechNet. Please go contribute to this and use it as a reference. Here is the link:

http://social.technet.microsoft.com/wiki/contents/articles/35810.azure-stack-survival-guide.aspx

2016-09-29-01_28_55-clipboard

Read more

5th Year Microsoft MVP!

Today was a special day as I received an email from Microsoft stating I was awarded as an MVP for the 5th year! Here is the email:

5th Year Microsoft MVP

This marks a special year. Microsoft awards you the special 5 year chip to add to your award. Here is a picture of the chip:

5th Year Microsoft MVP Chip

I am humbled to make it this long in the MVP program. A huge thanks goes out to everyone in the community and Microsoft. And as always I am honored to still be a part of such a great group of people. I have made many friends all over the world with other MVP’s, community, and Microsoft. I am looking forward to another exciting year of contributing to the community.

I will continue to do all that I can in the System Center community this year. Something new you will see from me this year is I will be contributing as much as I can also in the OMS and Azure Stack space. I am very excited about the new opportunities that are coming out of the growth of cloud.

My Microsoft MVP Profile: http://mvp.microsoft.com/en-us/mvp/Steve%20Buchanan-4039736

Congrats to all the other new and renewed MVP’s!

Read more

Azure Stack Round Table Video

Microsoft MVP Lee Berg @LeeAlanBerg just finished the Azure Stack Roundtable video from MMS. This video has me and two other Microsoft MVP’s  Damian Flynn @damian_flynn and Mikael Nystrom @mikael_nystrom having a great discussion about many Azure Stack topics. In the video questions such as “does VMM still have a purpose in an Azure Stack?” world, “how is Azure Stack compared to Open Stack?”, and “how can an IT Pro get management to invest in DevOps and Azure Stack?”.

Check out the video here:

https://youtu.be/98fA4In9TSc

ASRoundtablepic

Here are links to Azure Stack sessions from MMS:

http://mms2016.sched.org/type/azure+stack

You can download all the slide decks.

Read more

Write once, deploy anywhere (Azure or Azure Stack)

This blog post is a follow up to the MMS 2016 session I recently delivered together with Microsoft Azure Stack PM Daniel Savage. The session title is “Future-proof your Career with Azure Stack in the New Hybrid Cloud World!” link here: https://www.buchatech.com/2016/04/presenting-at-mms-2016-azure-stack-backup-oms.

My demo is this session was titled “Write once, deploy anywhere“. The purpose of this demo was to show using a single ARM template (JSON file) and a single PowerShell script to deploy a VM regardless of deploying to Azure or Azure Stack. The demo was a success so yes this is really possible. In this post I will break down the JSON file, the PowerShell script, how it works and the download link for the files.

Getting the JSON file and the PowerShell script just right was a challenge as there are still some slight differences between the settings of Azure and Azure Stack. Note that this is the case with Azure Stack TP1 and I fully expect that this will change when it GA’s. In any case it is good to look at this stuff now to start to learn the ins and outs. In the end it was the combined Power of the ARM template and PowerShell to overcome any challenges. Let’s start off by taking a look at the differences in ARM between Azure and Azure Stack in the following table:

Property

Azure

Azure Stack

Location

Azure region (example: CentralUS)

local

blobStorageEndpoint

blob.core.windows.net

blob.azurestack.local

vmSize

Standard_D1

Standard_A1

vmName apiVersion

2015-06-15

2015-06-15

StorageAccountName apiVersion

2015-06-15

2015-06-15

nicName apiVersion

2015-06-15

2015-05-01-preview

vrtualNetworkName apiVersion

2015-06-15

2015-05-01-preview

networkSecurityGroupName apiVersion

2015-06-15

2015-05-01-preview

dnsNameForPublicIP apiVersion

2015-06-15

2015-05-01-preview

torageAccountName apiVersion

2015-06-15

2015-05-01-preview

NOTE: For the apiVersion on the resources Azure Stack requires 2015-05-01-preview. Resources in Azure ARM templates default to apiVersion 2015-06-15. So if we left the resources in the ARM template at apiVersion 2015-06-15 the deployment would fail on Azure Stack. However we are in luck as Azure will accept apiVersion 2015-05-01-preview. So I set vmName and StorageAccountName to apiVersion 2015-06-15 and the rest of the resources apiVersion to 2015-05-01-preview.

vmName and StorageAccountName use the same apiVersion for both Azure and Azure Stack. So Azure Stack accepts 2015-06-15 for both. Even those these are not different across Azure and Azure Stack I still wanted to list it anyway in the table.

If you have multiple subscriptions you will need to input the subscription ID. In my case my Azure has multiple subscriptions but my Azure Stack does not in this lab. In my script for Azure you need the subscription ID. In Azure Stack you do not. You may need to modify this behavior in the script if your scenario is different.

For the deployment it consists of two files. These files are:

Writeonceblog (1) AzureandAzureStack.json

CreateVMAzureorAzureStack.ps1

Here is what we have if we crack open the JSON file.

Writeonceblog (2)

A few things to note about the PowerShell script is that

  1. We prompt to identify if it is an Azure or Azure Stack deployment. We then run the appropriate block of code.
  2. In each of the deployment types (Azure or Azure Stack) we have some things hard coded in (for example blobStorageEndpoint and vmSize) and somethings pulled in dynamically by prompting for them during the script execution (for example subscriptionId and adminPassword).
  3. We are pulling in the parameter and variable values when using New-AzureRmResourceGroup and New-AzureRmResourceGroupDeployment.

NOTE: I am not a PowerShell expert. I am sure there are better more efficient ways to accomplish what I am doing here in the PowerShell script. Nothing was available to accomplish the write once, deploy anywhere goal so I put something together. Feel free to enhance the script and release back to the community.

Here is an example of the location parameter and variable in the JSON file.

The parameter:

Writeonceblog (3)

The variable:

Writeonceblog (4)

Referenced in the vmName resource:

Writeonceblog (5)

Here is an example of how we are leveraging this in the PowerShell script.

For Azure:

Writeonceblog (6)

For Azure Stack:

Writeonceblog (7)

Writeonceblog (8)

Writeonceblog (9)

Note that you can deploy VM’s to Azure or Azure Stack in many ways (Visual Studio, the portal etc..). I decided to leverage PowerShell to do the deployment’s as it gives me a great amount of flexibility. For the official article on using PowerShell to deploy VM’s to Azure Stack visit:

https://azure.microsoft.com/en-us/documentation/articles/azure-stack-deploy-template-powershell

Now let’s look at deploying a VM to both Azure and Azure Stack using a single PowerShell script and a single ARM template.

— AZURE —

Run the script and you are prompted for some of the VM info.

Writeonceblog (10)

Then you are prompted to log into your Azure account.

Writeonceblog (11)

Read more

Presenting at MMS 2016 – Azure Stack, Backup, & OMS

It’s almost time for MMS 2016. By the end of Friday 4-22-16 MMS registration will be closed as the event has sold out! This year I have the opportunity to present twice and help facilitate one of the pre-con sessions. Here is a breakdown of my sessions.

Session #1: My first session is on Azure Stack the new Hybrid solution from Microsoft! This session will include me and Daniel Savage an Azure Stack program manager from Microsoft! You never know what new never heard before stuff you might learn about in this session. I recommend you sign up. Here is the title, description, and link for this session:

TITLE: – Future-proof your Career with Azure Stack in the New Hybrid Cloud World! –

DESCRIPTION: “Write once, deploy anywhere”, “extension of Azure”, “cloud agility”, “Cloud in your data center” What do all these buzz words mean to you and your career? How does Azure Stack Microsoft’s Hybrid solution apply to you as an IT Pro? Does Hybrid Cloud really have a place in the enterprise?

Come to this session and let Azure Stack Program Manager Daniel Savage and MVP Steve Buchanan unpack it for you.

SPEAKER BIOS:

Future-proof your Career with AzureStack

LINK: http://sched.co/6Xjn

Session #2: In my second session I will be presenting with my good friend and fellow MVP Robert Hedblom. He is making the trip all the way across the pond from Sweden for this event. Our goal for this session is to save jobs! hahaha…. You don’t want to miss this session as we take you through the steps of designing your backup and restore strategies. Here is the title, description, and link.

TITLE: – Be a Hero or be Fired. Backup and Restore Strategy –

DESCRIPTION: Did you skip planning the backup strategy? If a disaster occurred could you restore or would you get fired?

Come see System Center MVP’s Steve Buchanan and Robert Hedblom walk you through building a bullet proof backup and restore strategy of your business services. These strategies can be used with Microsoft business continuity tools. Learn how to be a restore hero in the event of a disaster and keep your JOB!

SPEAKER BIOS:

Be a Hero or be Fired. Backup and Restor

LINK: http://sched.co/68×3

Session #3: The third session is actually a 4 hour pre-con session about Operations Management Suite (OMS). This is a session you don’t want to miss. This session will be jam packed with MVP and Microsoft rock-stars! It will be jam packed with deep knowledge and again you never know what new never heard before stuff you might learn about in here. In this session you will have direct access to the Microsoft product team that is behind OMS. I am honored to be a part of this session. I have the opportunity to help facilitate it. Here is the title, description, speaker bio’s and link for this session.

TITLE: OMS from “What is this?” to “Wow, it can do that?!” –

DESCRIPTION: This is a pre-con session where emcee’s Steve Buchanan and Cameron Fuller will facilitate a four hour session designed to explain what OMS is and what it can do for your organization.

In the first hour Bob Cornelissen (SCOMBob) and Cameron Fuller will provide an introduction to what OMS is and what benefits it can provide your organization.

In the second 1.5 hour session, join the Microsoft product team members as they dig in deep on IT automation within OMS.

In the final 1.5 hour session, join the Microsoft product team members as they dig in deep on Log Analytics & Security / Compliance.  

SPEAKER BIOS:

OMS Pre-con

LINK: http://sched.co/6MtU

See you at MMS 2016!

MMS

http://mmsmoa.com

Read more

How to add SUSE Linux image to Azure Stack

In Azure Stack you can publish your own images essentially virtual machines that can be used when deploying a new virtual machine. This is handy for publishing servers that need to be pre-configured in a certain way for consumers of your cloud. In order for your published images to show up as an option in compute within Azure Stack the images need to be added to the Platform Image Repository (PIR) within the Compute Resource Provider (CRP).

SUSE has recently published a pre-built SUSE Linux Enterprise Server 12 SP1 image that has been prepped specifically for Azure Stack. This image is ready to go and can be published to the CRP’s PIR without any needed prep of the virtual machine. In this blog post I am going to walk through the steps I took to add this image to my Azure Stack.

SUSE already has an image out there for Azure. The SUSE image used on Azure does not work right now on Azure Stack. As of right now Azure and Azure Stack have different “initialization code”. In the future I would expect these to be the same. The SUSE image also includes SUSE/azurectl a command line tool that helps you manage SUSE updates from a Linux VM hosted on Azure. More info on this here: https://github.com/SUSE/azurectl. To download the SUSE Azure Stack image go to https://download.suse.com and complete the fields as show in the following screenshot.

AS-Suse-1

You will be brought to a login page to access the download. If you do not have a SUSE account sign up for one and login. You will see the actual download at that point. Go ahead and download it onto your Azure Stack Host.

AS-Suse-2

Extract the SLE-12-SP1-Server-Azure-Stack-x86_64.vhd and copy it to C:\ClusterStorage\Volume1\Share\VM.

AS-Suse-3

Microsoft has the steps for adding images to Azure Stack’s Platform Image Repository (PIR). The process is essentially running a PowerShell script. The script is included with Azure Stack. The script creates the image directory needed in C:\ClusterStorage\Volume1\Share\CRP\PlatformImages, the JSON file in that directory, and makes a copy of the VHD in that directory. The JSON file contains the meta data about the image that shows in the Azure Stack Portal. Here is the link to the Microsoft document: https://azure.microsoft.com/en-us/documentation/articles/azure-stack-add-image-pir/

Here are the steps for running the script:

In PowerShell navigate to:

D:\CRP\VM\Microsoft.AzureStack.Compute.Installer\content\Scripts

Run this script in PowerShell:

.\CopyImageToPlatformImageRepository.ps1

NOTE: My DATAIMAGE drive letter was D. You may have a different letter.

You will be prompted for the following:

  • PlatformImageRepositoryPath use this \\SOFS\Share\CRP\PlatformImages\
  • ImagePath I put C:\ClusterStorage\Volume1\Share\VM\SLE-12-SP1-Server-Azure-Stack-x86_64.vhd
  • Publisher I put SUSE
  • Offer I put LinuxServer
  • Sku I put SUSE-Linux-Ent-12-SP1
  • Version I put 12.0.0
  • OsType I put Linux

AS-Suse-4

NOTE: These prompts are used to populate the JSON file for the image. Here is an example of the JSON file:

{

“Publisher”:”SUSE”,

“Offer”:”LinuxServer”,

“Sku”:”SUSE-Linux-Ent-12-SP1″,

“Version”:”12.0.0″,

“PlatformImage” :{

“OsDisk” : {

“OsType”:”Linux”,

“FileName”:”SLE-12-SP1-Server-Azure-Stack-x86_64″

}

}

}

Alternatively you could run the script as:

.\CopyImageToPlatformImageRepository.ps1 -PlatformImageRespositoryPath ‘\\SOFS\Share\CRP\PlatformImages’ -ImagePath ‘C:\ClusterStorage\Volume1\Share\VM\SLE-12-SP1-Server-Azure-Stack-x86_64.vhd’ -Publisher ‘SUSE’ -Offer ‘LinuxServer’ -Sku ‘SUSE-Linux-Ent-12-SP1’ -OsType ‘Linux’

As long as the script worked you should have the following as an end result in C:\ClusterStorage\Volume1\Share\CRP\PlatformImages:

AS-Suse-5

AS-Suse-6

If you have the Azure Stack portal open close out of the browser and go back in. It should be listed as an available image in Compute as shown in the following screenshot.

AS-Suse-7

Notice the difference between a Windows image and a Linux image. The Linux image gives you an authentication option of Password or SSH Key.

Windows Linux
 AS-Suse-8  AS-Suse-9

Read more