Azure Stack Development Kit (ASDK) Deployment Step by Step

At Microsoft Inspire Microsoft announced the Azure Stack Development Kit (ASDK) as a replacement to the POC and the general availability of the production Azure Stack named Azure Stack Integrated Systems. The Azure Stack Development Kit is here to stay. This will remain single node and should be used for trying out Azure Stack. You can develop your ARM templates and or applications on it and they will work on a production Azure Stack. The Azure Stack Integrated Systems are the ones that you buy from the OEM partners HP, Lenovo, Dell and soon to be Cisco, Avanade, and Huawei.

The ASDK install has improved 1,000 times over the previous TP’s of Azure Stack. I am going to detail the steps in this blog post. The steps start after you have downloaded the Azure Stack cloudBuilder.vhdx. Here we go:

PREPARE AZURE STACK HOST SERVER:

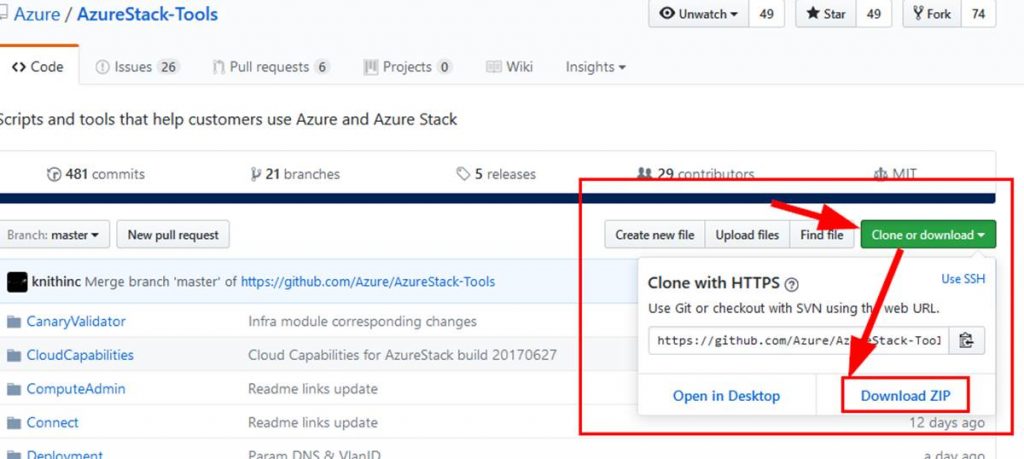
First off download the Azure Stack tools onto your Azure Stack host server. Just download all the tools as you will need all of them at some point. They can be found here: https://github.com/Azure/AzureStack-Tools

I put these in a folder on the C: drive named ASTools. I extract them and place them in the root.

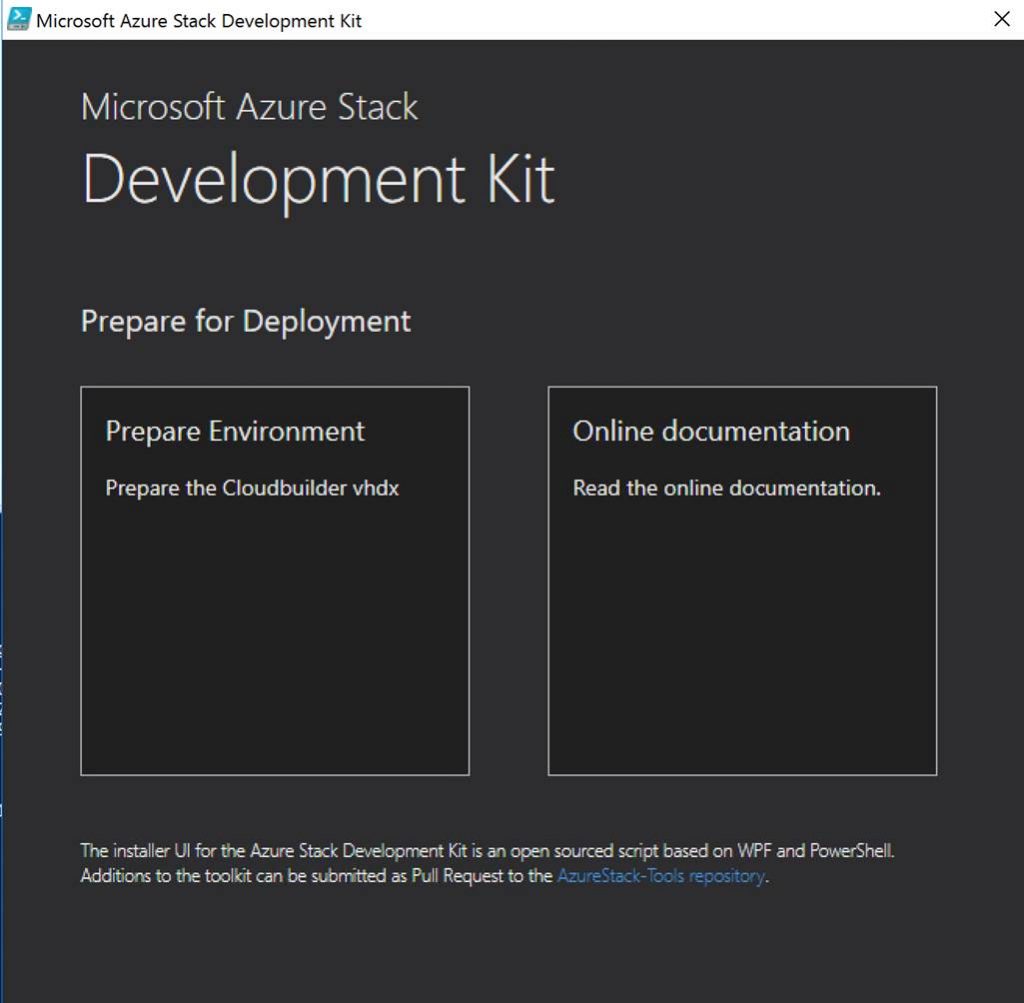
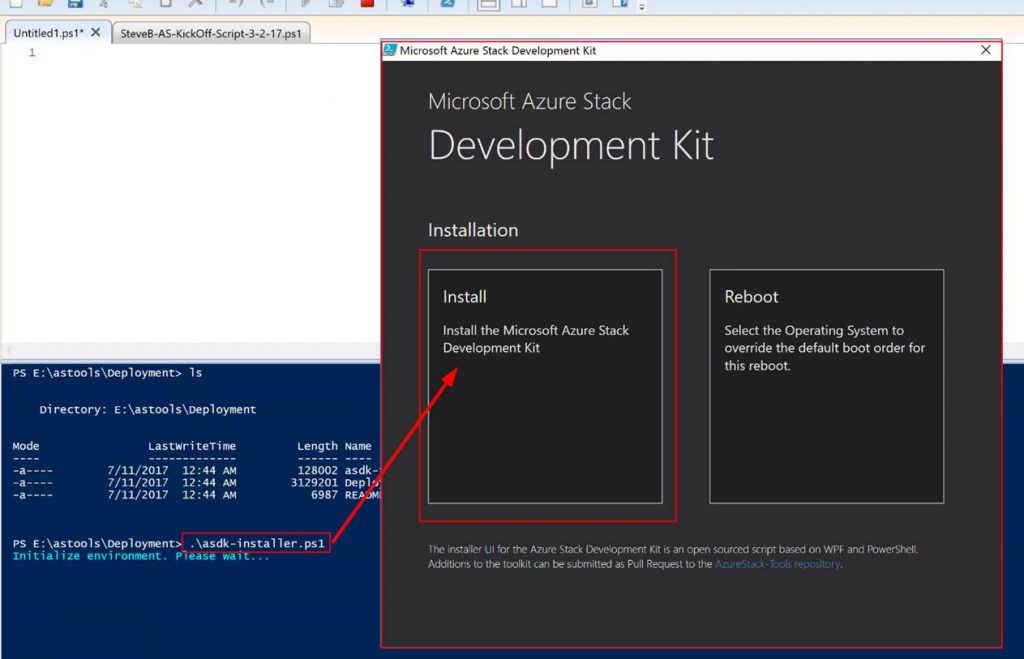
Open up an elevated PowerShell window, navigate to your Astools folder and run the asdk-installer.ps1 script. Next a GUI wizard will pop-up.

Click on Prepare Environment.

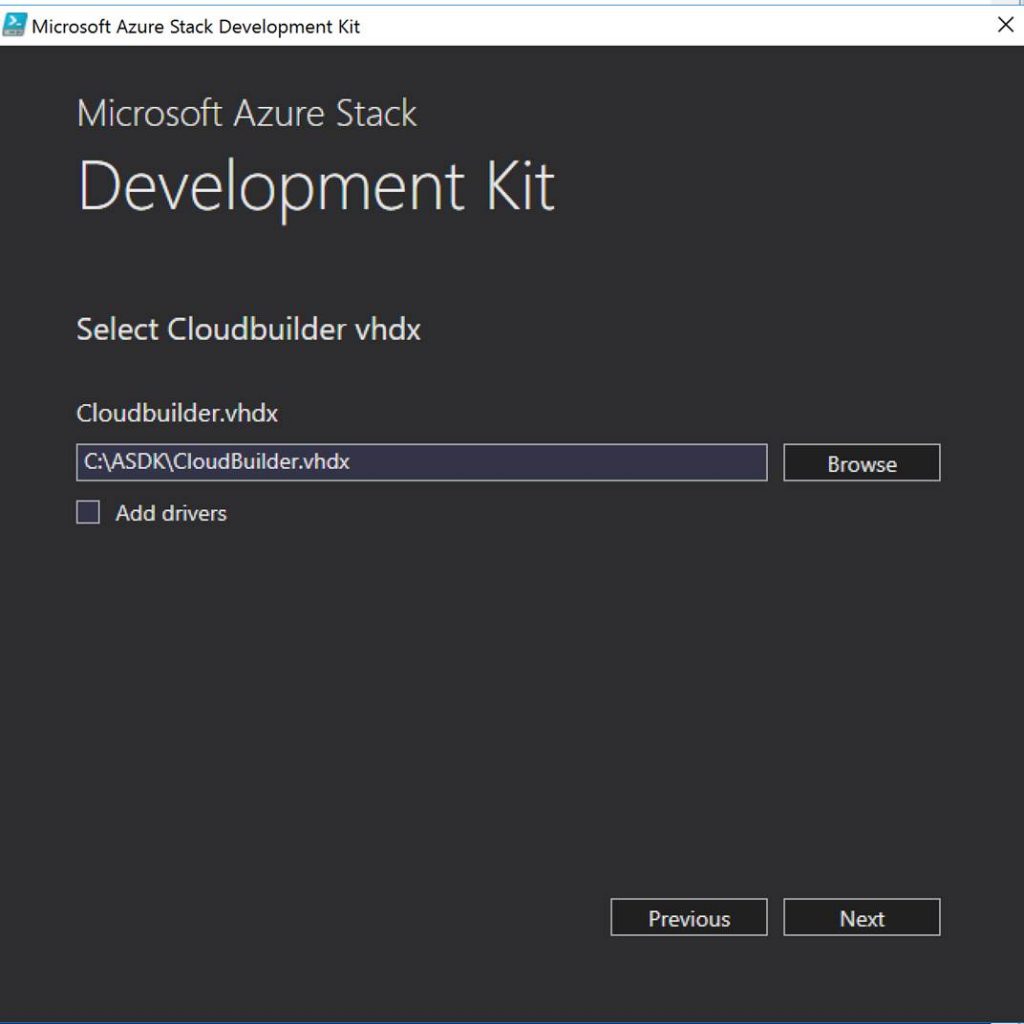
Point it to your cloudBuilder.vhdx and click Next.

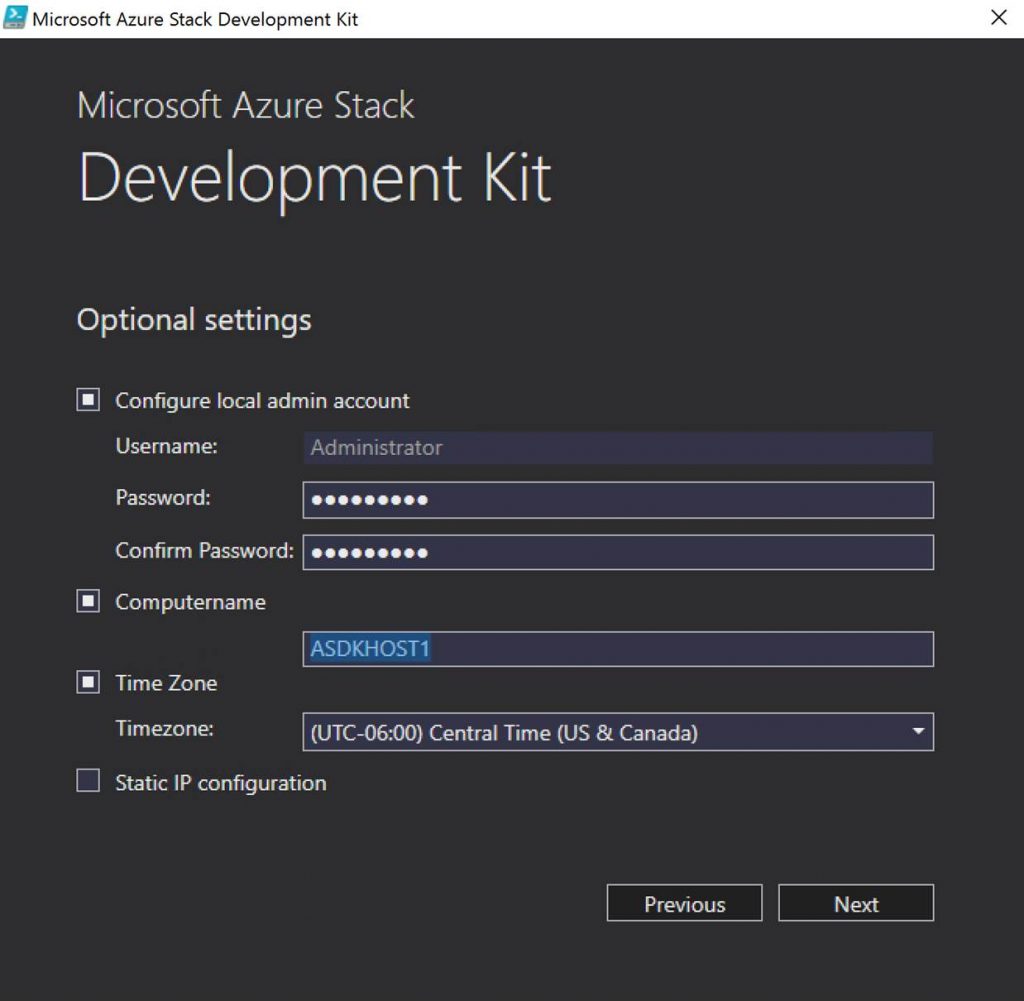
Put in the host servers local admin password. Make sure this matches the Azure account you plan to use.

Select the other options as you see fit.

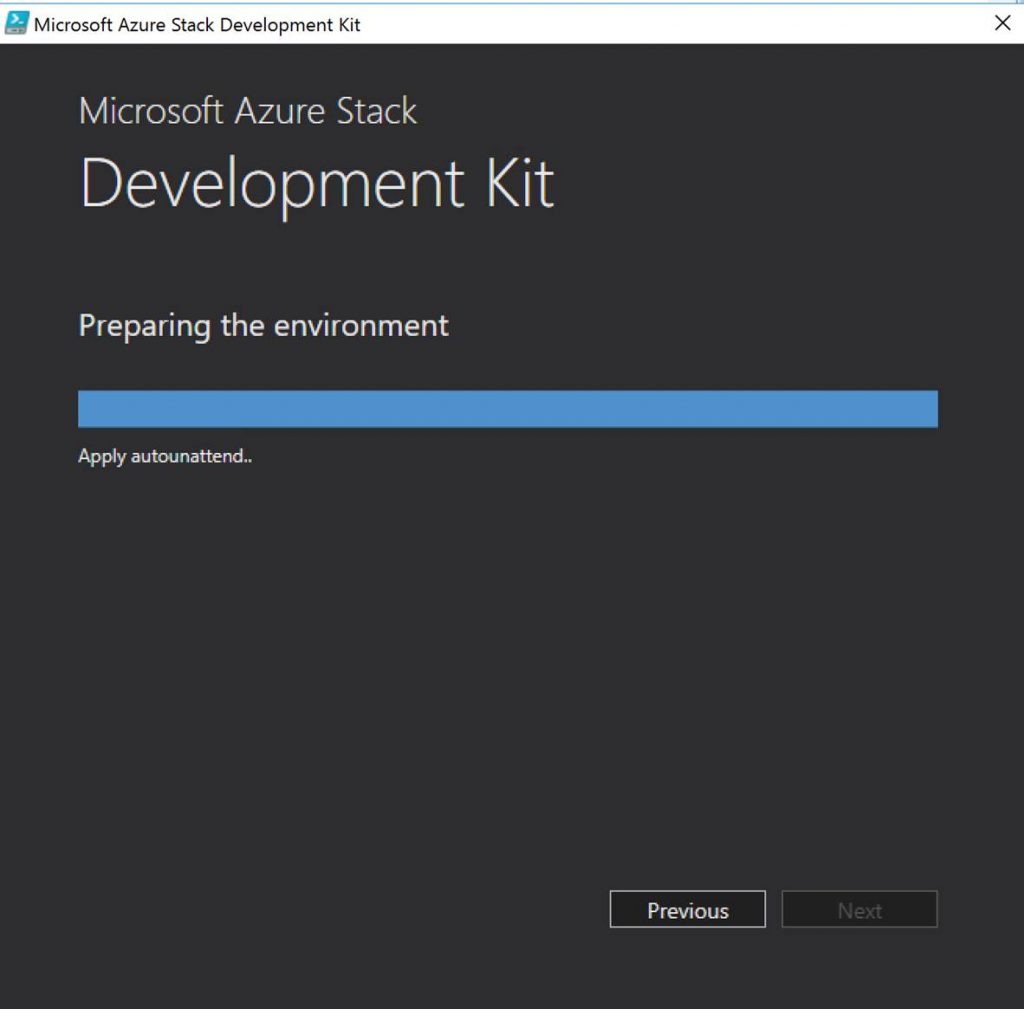
It will run for a while creating the unattended file for Windows Server 2016.

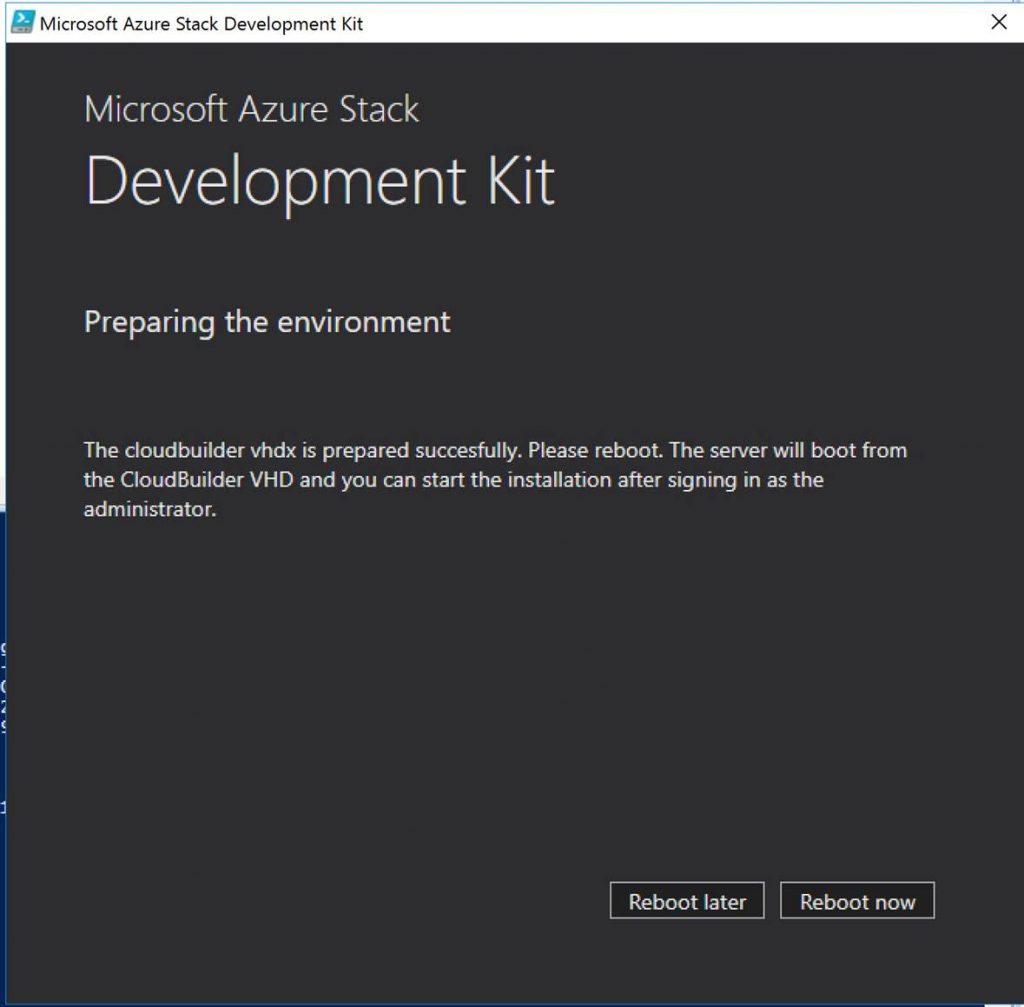
Once it is done click Reboot now.

DEPLOY AZURE STACK DEVELOPMENT KIT:

Next lets deploy Azure Stack. After the server has rebooted log onto your AS server. Use the localhost\administrator account and the password you set.

Once again from PowerShell run asdk-installer.ps1. A GUI wizard will come up. Click on Install.

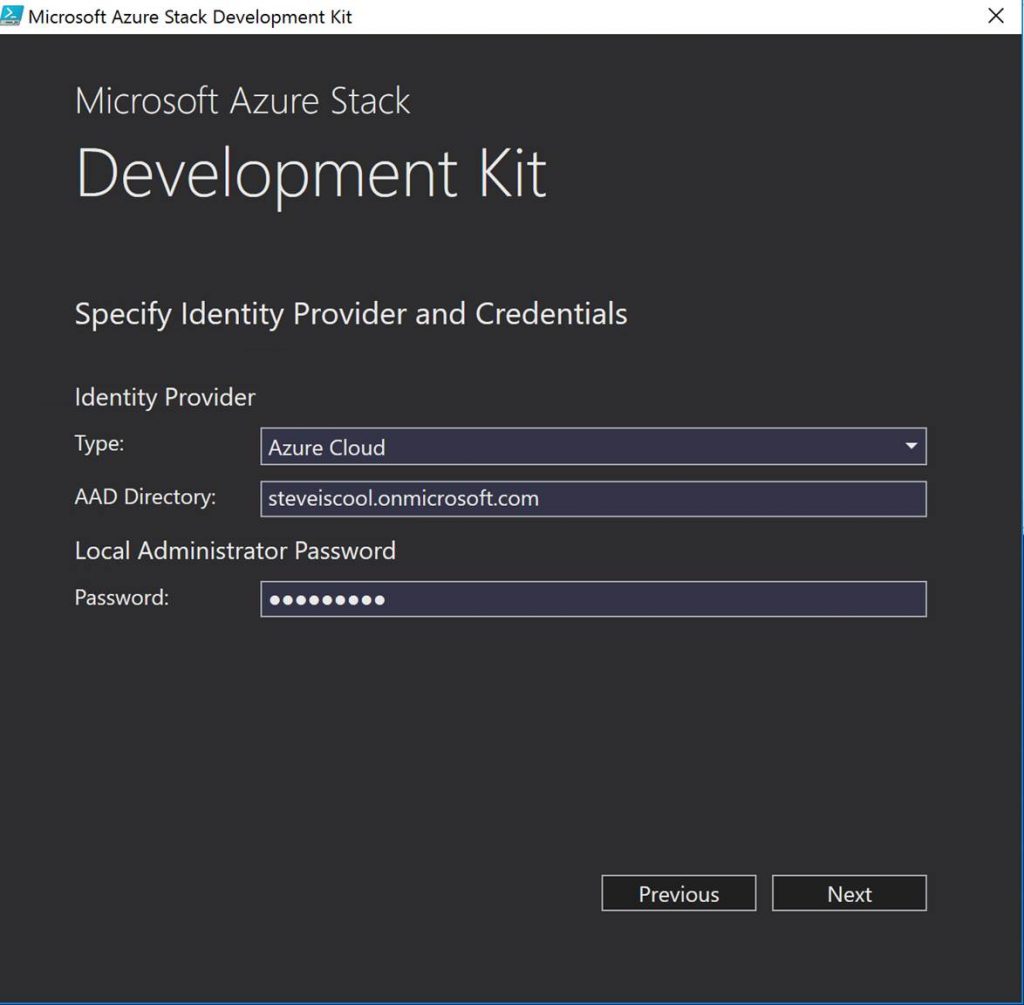
Select Azure Cloud (Azure Active Directory) or ADFS. Put in your directory and password.

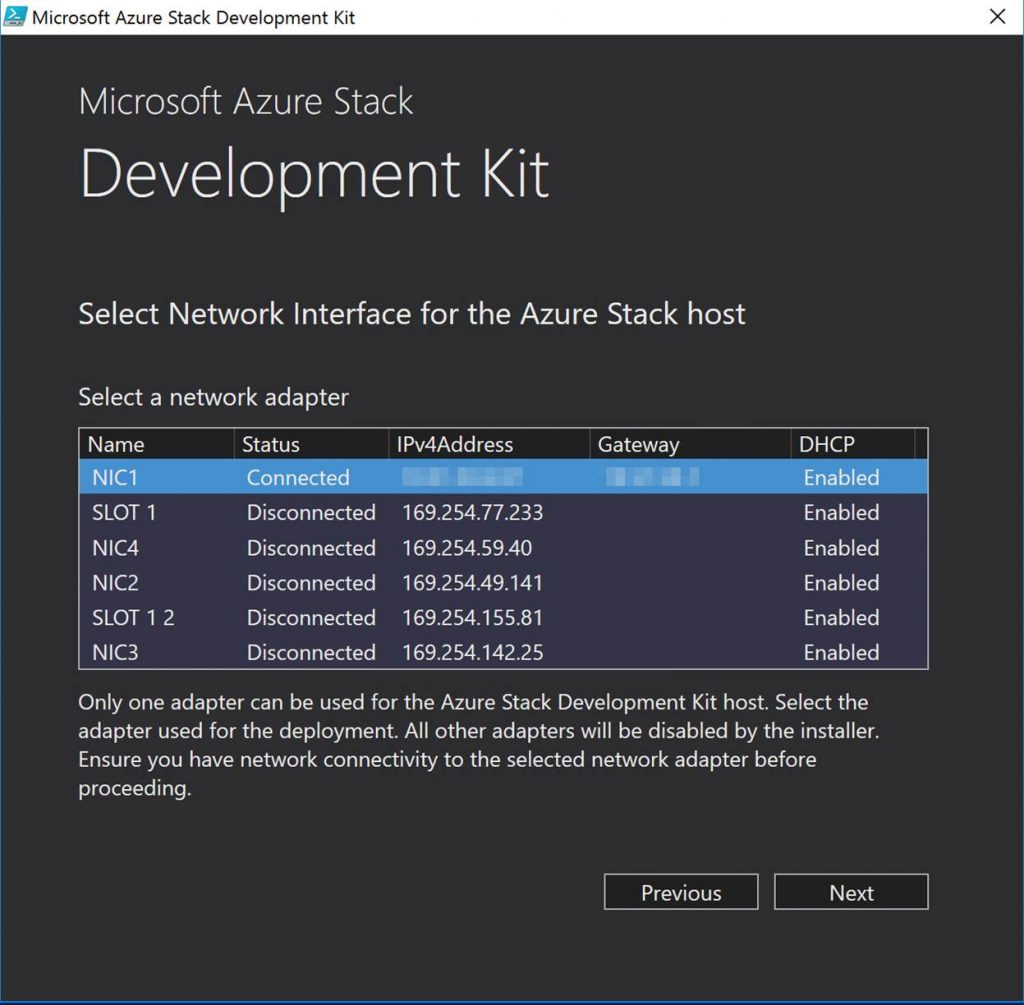
Verify and select the correct NIC.

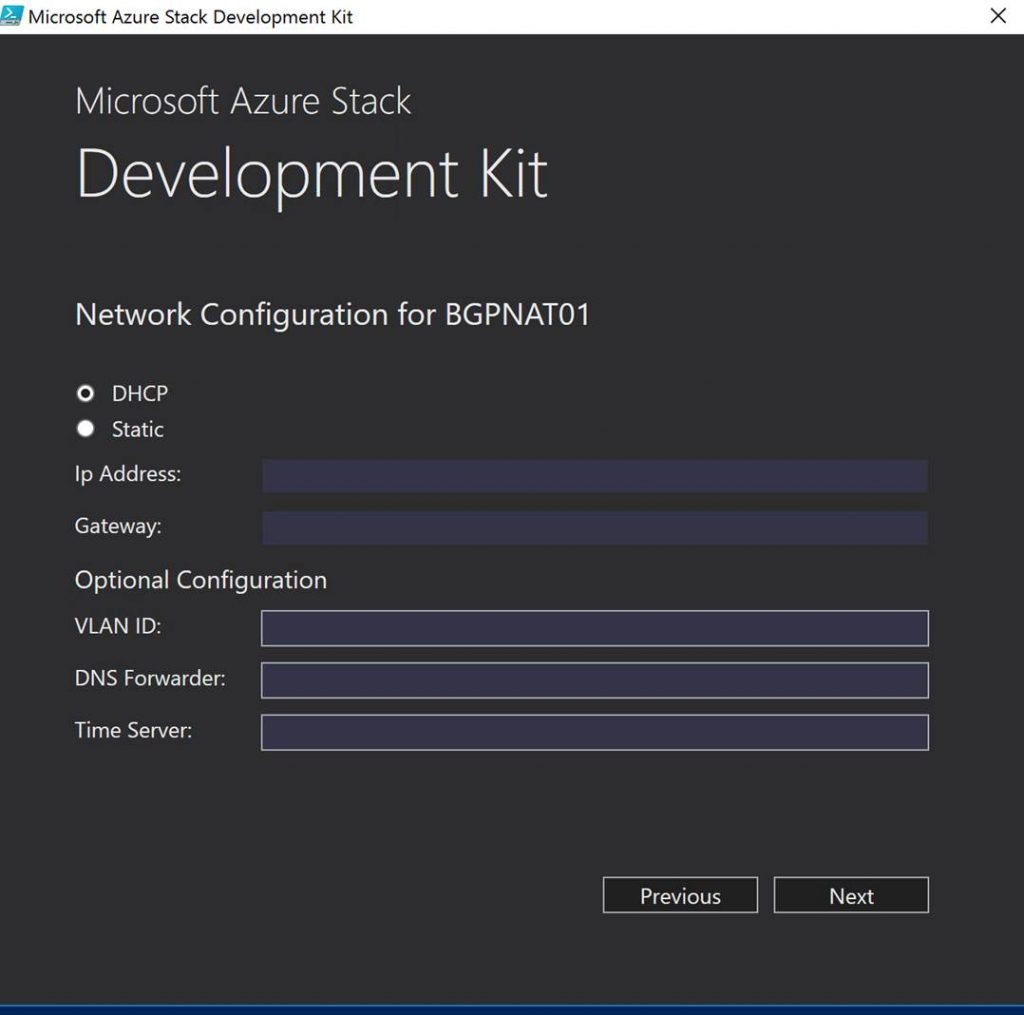
Select DHCP or put in your static IP settings.

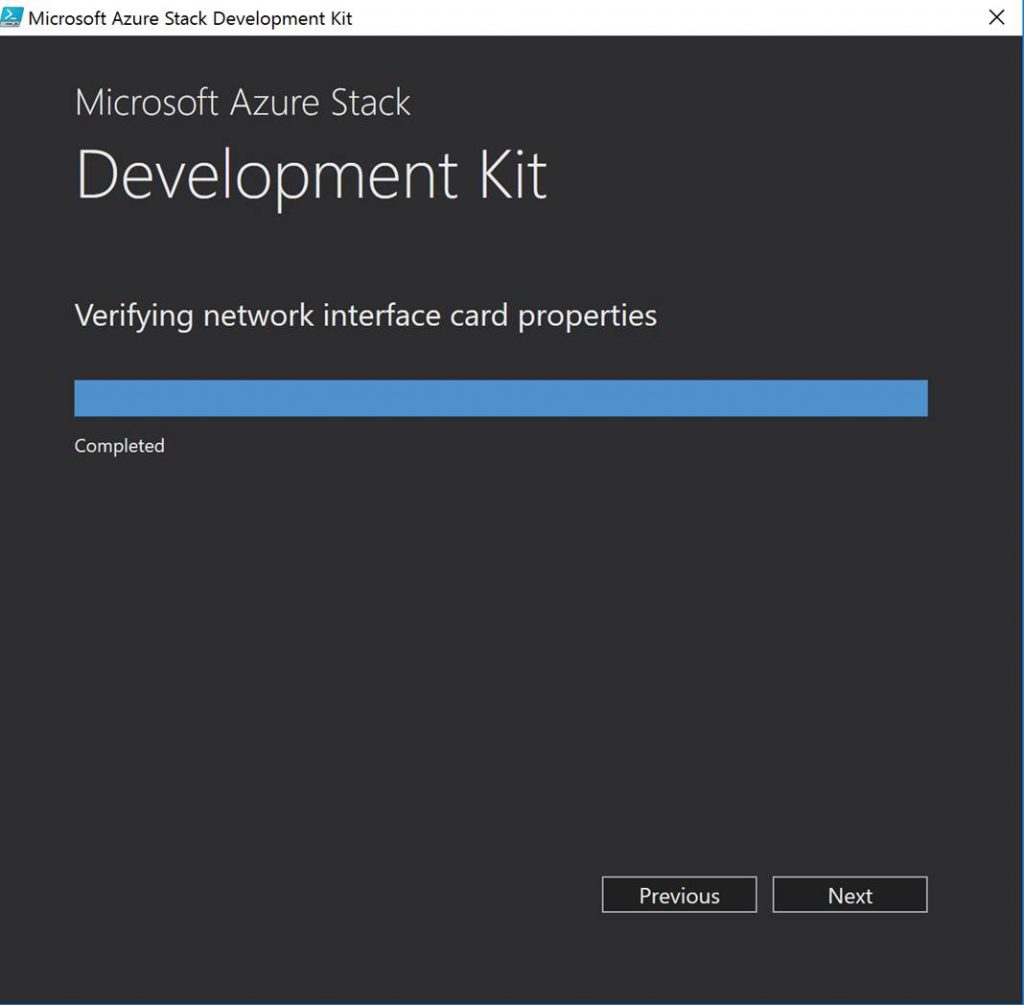
It will verify the network settings.

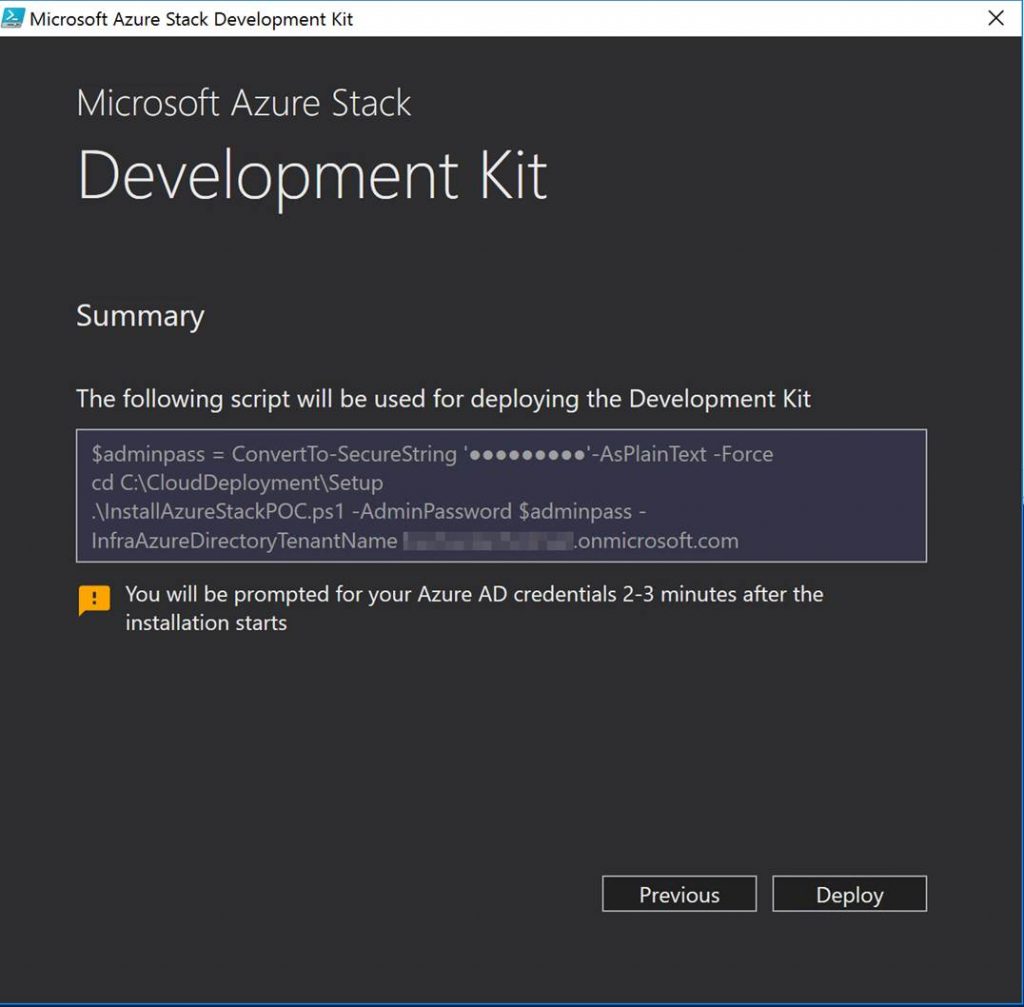
You will see the PowerShell deployment script that will be run. Click on Deploy!

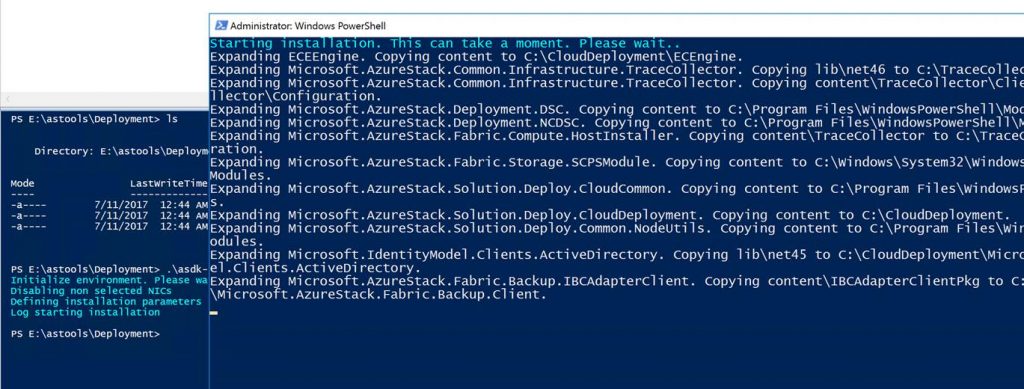
The PowerShell deployment will kick off in a PowerShell window.

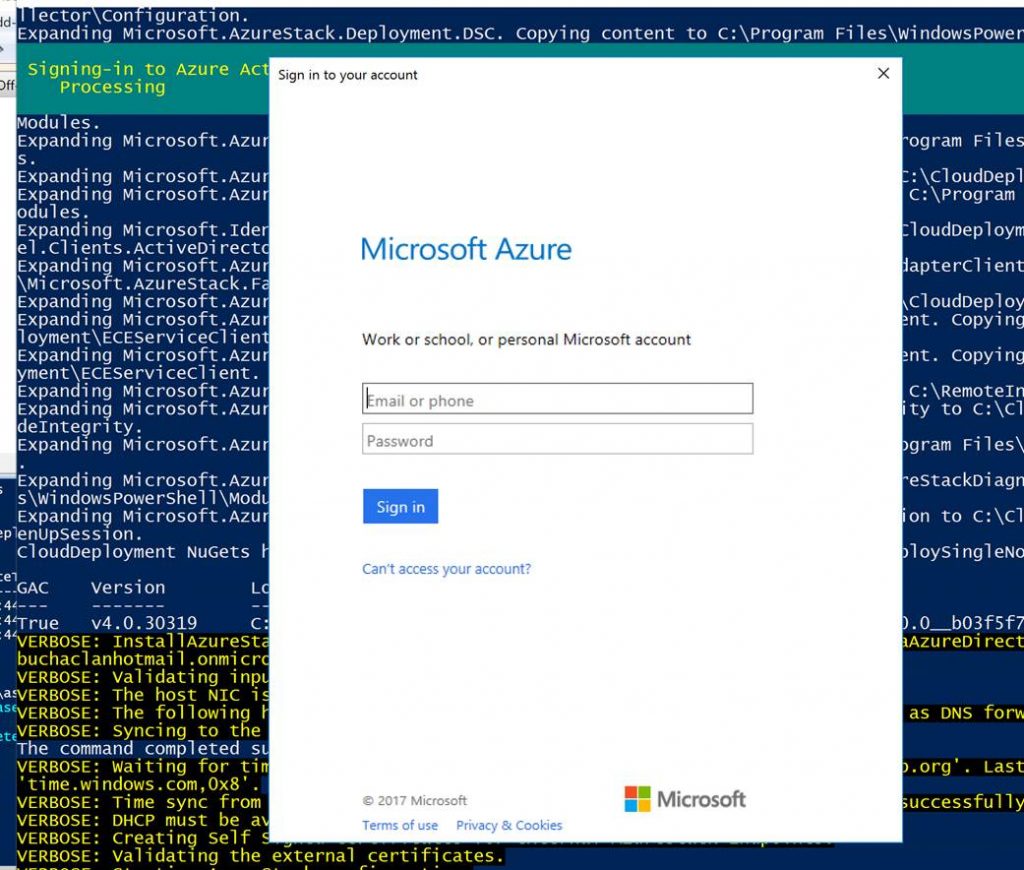
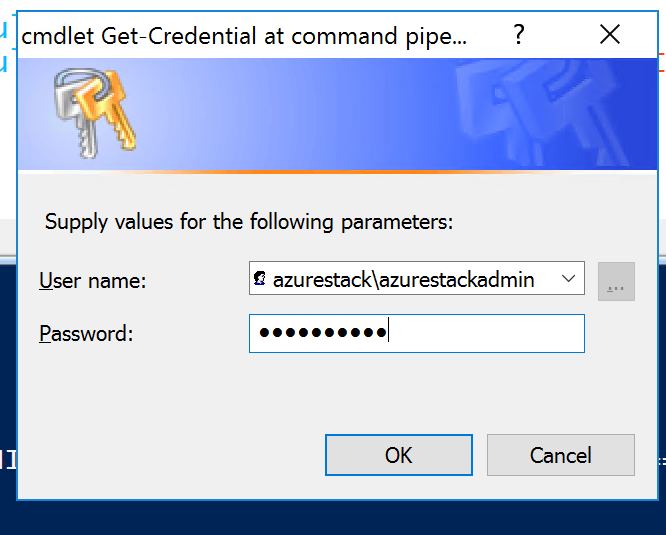
After a little bit (1-2 minutes) an Azure login window will ask for your Azure account creds. This is the account ASDK will be deployed under.

NOTE: We still have the log folder and files under CloudDeployment on the C drive.

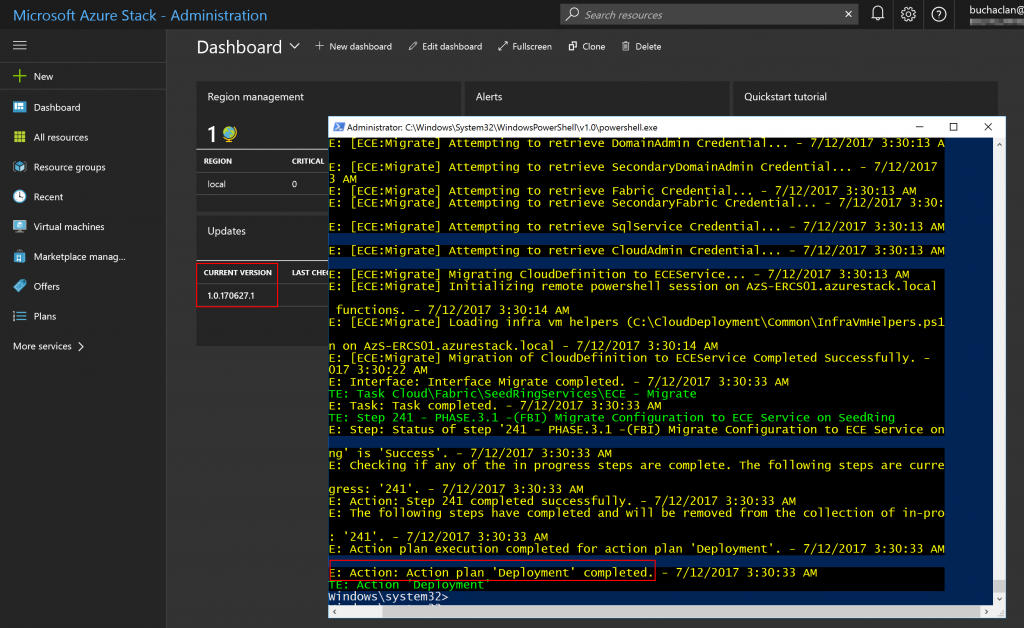
A few hours later and there it is successfully!

Having been involved with Azure Stack since TP1 and losing about a week to deploying Azure Stack TP1 this is a much….much better deployment experience. Nice work Microsoft Azure Stack team!!!

Read more

Speaking at OSCON and MMS May 2017

May is a busy month for me with the opportunity to speak at both OSCON – Open Source Convention (https://conferences.oreilly.com/oscon/oscon-tx) and MMS – Midwest Management Summit (https://mmsmoa.com)! OSCON is May 8th through the 11th in Austin Texas. MMS is May 15th through the 18th in Minnesota.

At OSCON I will be presenting on “How to Motivate Technical Employees” with friend and fellow Microsoft MVP Samuel Erskine – @samerskine. This will be on Thursday, May 11, 2017 at 4:15pm–4:55pm. This session is for CIOs, CTOs, IT directors, and IT managers and will cover how to retain your top talent and give you five ways to motivate technical employees. Come to this session to learn the secret sauce for keeping employee’s engaged!  Here is a link to the session: https://conferences.oreilly.com/oscon/oscon-tx/public/schedule/detail/57374

At MMS I will be presenting three sessions! These sessions are:

Awesomize your Azure Stack Deployments with Azure Stack Tools” with fellow MVP Mikael Nystrom -@mikael_nystrom.

Link: https://mms2017.sched.com/event/AUae/awesomize-your-azure-stack-deployments-with-azure-stack-tools

Azure Operationalized” with fellow MVP Natascia Heil – @NatasciaHeil.

Link: https://mms2017.sched.com/event/AUbn/azure-operationalized

Backup is Dead! Restore is Born in the Cloud!” with fellow MVP Robert Hedblom -@RobertandDPM.

Link: https://mms2017.sched.com/event/AUaR/backup-is-dead-restore-is-born-in-the-cloud

These conferences will be lots of great community fun! Hope to see you there.

Read more

Sys Admin to Cloud Admin…ITSM to CloudOps…On-Prem to Azure Stack/Azure

A while back I posted a blog titled “Surviving the future of IT as an IT pro”. In that blog post I set out to share my opinion on where IT is headed and what you should focus on as an IT pro going forward. I guess this post could be considered part 2 however in this post I will focus more on where things are heading as a whole.

So what is this blog really about? It is about “the Transition from ITOPS & ITSM to CloudOps via Azure Stack (Hybrid Cloud) powering DevOps and becoming core to the Digital Transformation of business” that is happening. Whew…..Ok, a lot was said in that previous sentence. J Let’s break it down.

Transition from ITOPS & ITSM to CloudOps

There has been this transition in IT for a while to increase the density in data centers. This was started with the wide adoption of the hypervisor (VMWare, Hyper-V, Citrix Xen etc…). The goal is to get more out of existing and less physical hardware. Think about 1 physical server hosting hundreds of virtual servers. Things have since accelerated at a fast pace. We now have containers, PaaS, and serverless. With these newer technologies, the density is even greater.

The real power behind cloud is software defined everything. With software, defined environments AKA cloud a new skillet and a different way of thinking about managing operations is needed. This new skillset and new way of thinking for the operationalization of cloud is known as CloudOps. IT Operations and IT Service Management do not go away with CloudOps. The evolution of ITOPS and ITSM become CloudOps. The best parts of ITOPS and ITSM (ITIL) funnel into CloudOps used for operating clouds.

Hybrid Cloud (Azure Stack)

Hybrid Cloud is going to be a huge part of cloud initiatives in many organizations for years to come. You can see this on the Gartner reports(http://www.gartner.com/newsroom/id/3354117), Right Scale reports (http://www.rightscale.com/blog/cloud-industry-insights/cloud-computing-trends-2017-state-cloud-survey) and based on the investments the major cloud players are making to build the best Hybrid Cloud solutions.

Hybrid Cloud Is the Preferred Enterprise Strategy, but Private Cloud Adoption Fell
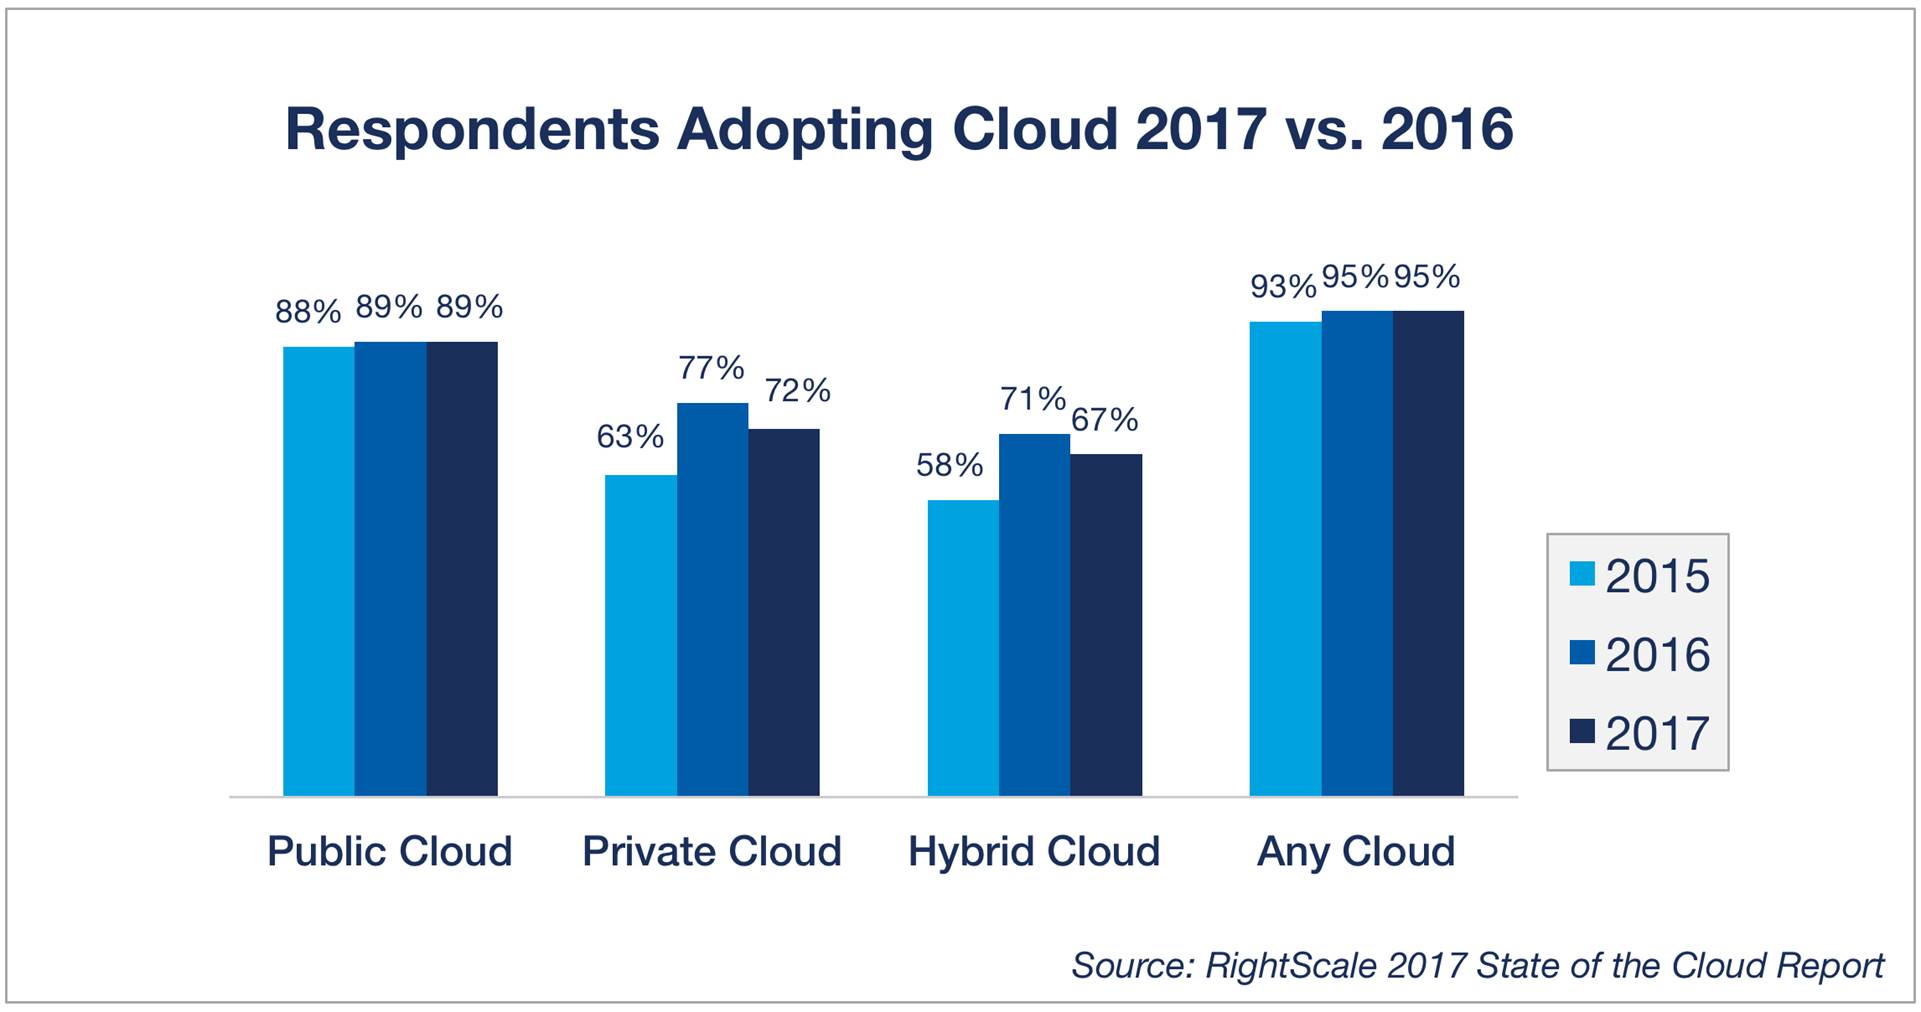
From Rightscale “Cloud Computing Trends: 2017 State of the Cloud Survey” Report:

http://www.rightscale.com/blog/cloud-industry-insights/cloud-computing-trends-2017-state-cloud-survey#hybrid-cloud

Recently IBM and Red Hat announced their launch into the Hybrid Cloud space.

(http://www.networkworld.com/article/3182989/cloud-computing/ibm-red-hat-an-open-source-hybrid-cloud.html)

A while back Amazon and VMWare announced their launch into the Hybrid Cloud space.

(http://www.businesswire.com/news/home/20161013006574/en/VMware-AWS-Announce-Hybrid-Cloud-Service-%E2%80%9CVMware>)

Microsoft was the first to jump into the Hybrid Cloud space and is the only company that has a 100% true Hybrid Cloud solution. Both VMWare/Amazon and IBM/Red Hat have solutions that run private cloud on public cloud. The private cloud solutions are being retrofitted to run in public cloud as the framework for their Hybrid Cloud solutions. These are not consistent cloud platforms running the same exact bits on bare metal on-premises and in the cloud like Microsoft’s Azure Stack solution. Azure Stack is the same bits in the public cloud and on-premises down to the bare metal.

IBM and Amazon jumping into the Hybrid Cloud space is more proof this will be a large area of growth in IT for years to come. I wonder if Google will decide to jump into the Hybrid Cloud space at some point and what their strategy will be.

DevOps powered by Azure Stack and CloudOps

Azure Stack serves as a catalyst to help move DevOps initiatives forward within organizations. With Azure Stack’s comes the native ability to run the environment using Infrastructure as code, continuous integration, continuous delivery, microservices, integration with source control systems, and more. All of the aforementioned are a part of DevOps.

Along with Azure Stack is the need to run the environment using a CloudOps model. Here is a list of concepts that drive CloudOps:

  • Extreme Hardware Standardization
  • Software Defined Everything
  • Extreme Automation
  • Focus on Zero Downtime
  • Self Service
  • Measured Service
  • Multitenancy

CloudOps is overall focused on business applications critical for running the business through the continuous operations of clouds. CloudOps leaves business unit projects to DevOps. CloudOps instead focuses on the delivery of the the cloud infrastructure to support self-service leveraged by DevOps teams.

David Armour of Microsoft often shares great information on CloudOps and what it means. You can follow him on twitter here: https://twitter.com/Darmour_MSFT

CloudOps supports DevOps and DevOps is core to Digital Transformation

Digital Transformation is the accelerating transformation of the way businesses do business from traditional ways often brick and mortar to the digital front through the use of digital technologies. Businesses are shifting to meet their customers and employees where they are today on digital platforms. In the business world, today it is well known that you must innovate and grow through the use of technology or become obsolete and left in the wake of disruptive companies that are leveraging technology to meet their customers on the digital front.

Examples of digitally transformed company’s vs non-digitally transformed companies are:

  • Netflix vs Blockbuster
  • Amazon vs Target, Best Buy, Macy’s
  • Airbnb vs Wyndom hotels
  • Uber vs Taxi Companies

Digital Transformation is critical to business and IT departments need to be a core driver to help organizations move forward on the digital transformation front. Digital Transformation is the new Industrial Revolution of business today with CloudOps/DevOps being the Assembly line that will bring innovation to the business.

Through DevOps businesses can bring digital services to the market at very fast rates and can pivot quickly as needed to beat and stay ahead of the competition meeting the customers’ demands in an agile way. CloudOps allows the scale and another point to pivot on at any time to redirect in a new direction as needed by the business in an agile manor.

Through a Hybrid Cloud solution like Azure Stack things IoT, Microservices, extreme automation, hyper-scale, and agility can be realized for the business empowering Digital Transformation from the core.

The transition of the IT Pro to Cloud Pro

Ok. That was a lot of information and background on CloudOps, DevOps, Digital Transformation and Hybrid Cloud. You may be asking yourself at this point where does the IT Pro fit into the picture? Let me answer that for you and take you on a tour of Azure Stack to prove why as an IT Pro you should start working with it today!

The path for an IT Professional when moving from traditional IT into a Hybrid Cloud world consists of:

  A cloud administrator can configure and manage resource providers, tenant offers, plans, services, quotas, and pricing.
A tenant purchases (or acquires) services that the service administrator offers. Tenants can provision, monitor, and manage services that they have subscribed to, such as Web Apps, Storage, and Virtual Machines.

Those cloud roles fit in a new world of CloudOps including Cloud architect, engineer, and administrator. Being a part of CloudOps requires a different mindset. Think about dynamic shifts such as software defined everything and extreme standardization. More concepts and technologies that a cloud role requires an understanding of are:

  • IaaS
  • PaaS
  • Software Defined Data Center technologies
  • Automation
  • Source Control Systems
  • Business Intelligence (Showback/Chargeback)
  • High Availability technologies
  • Backup and Disaster Recovery
  • Scaling technologies
  • Containerization
  • Server less technologies
  • Cloud Security
  • Both Linux and Windows
  • Self-Service (Service Catalog)
  • Multitenancy technologies
  • Tenant administration
  • And more

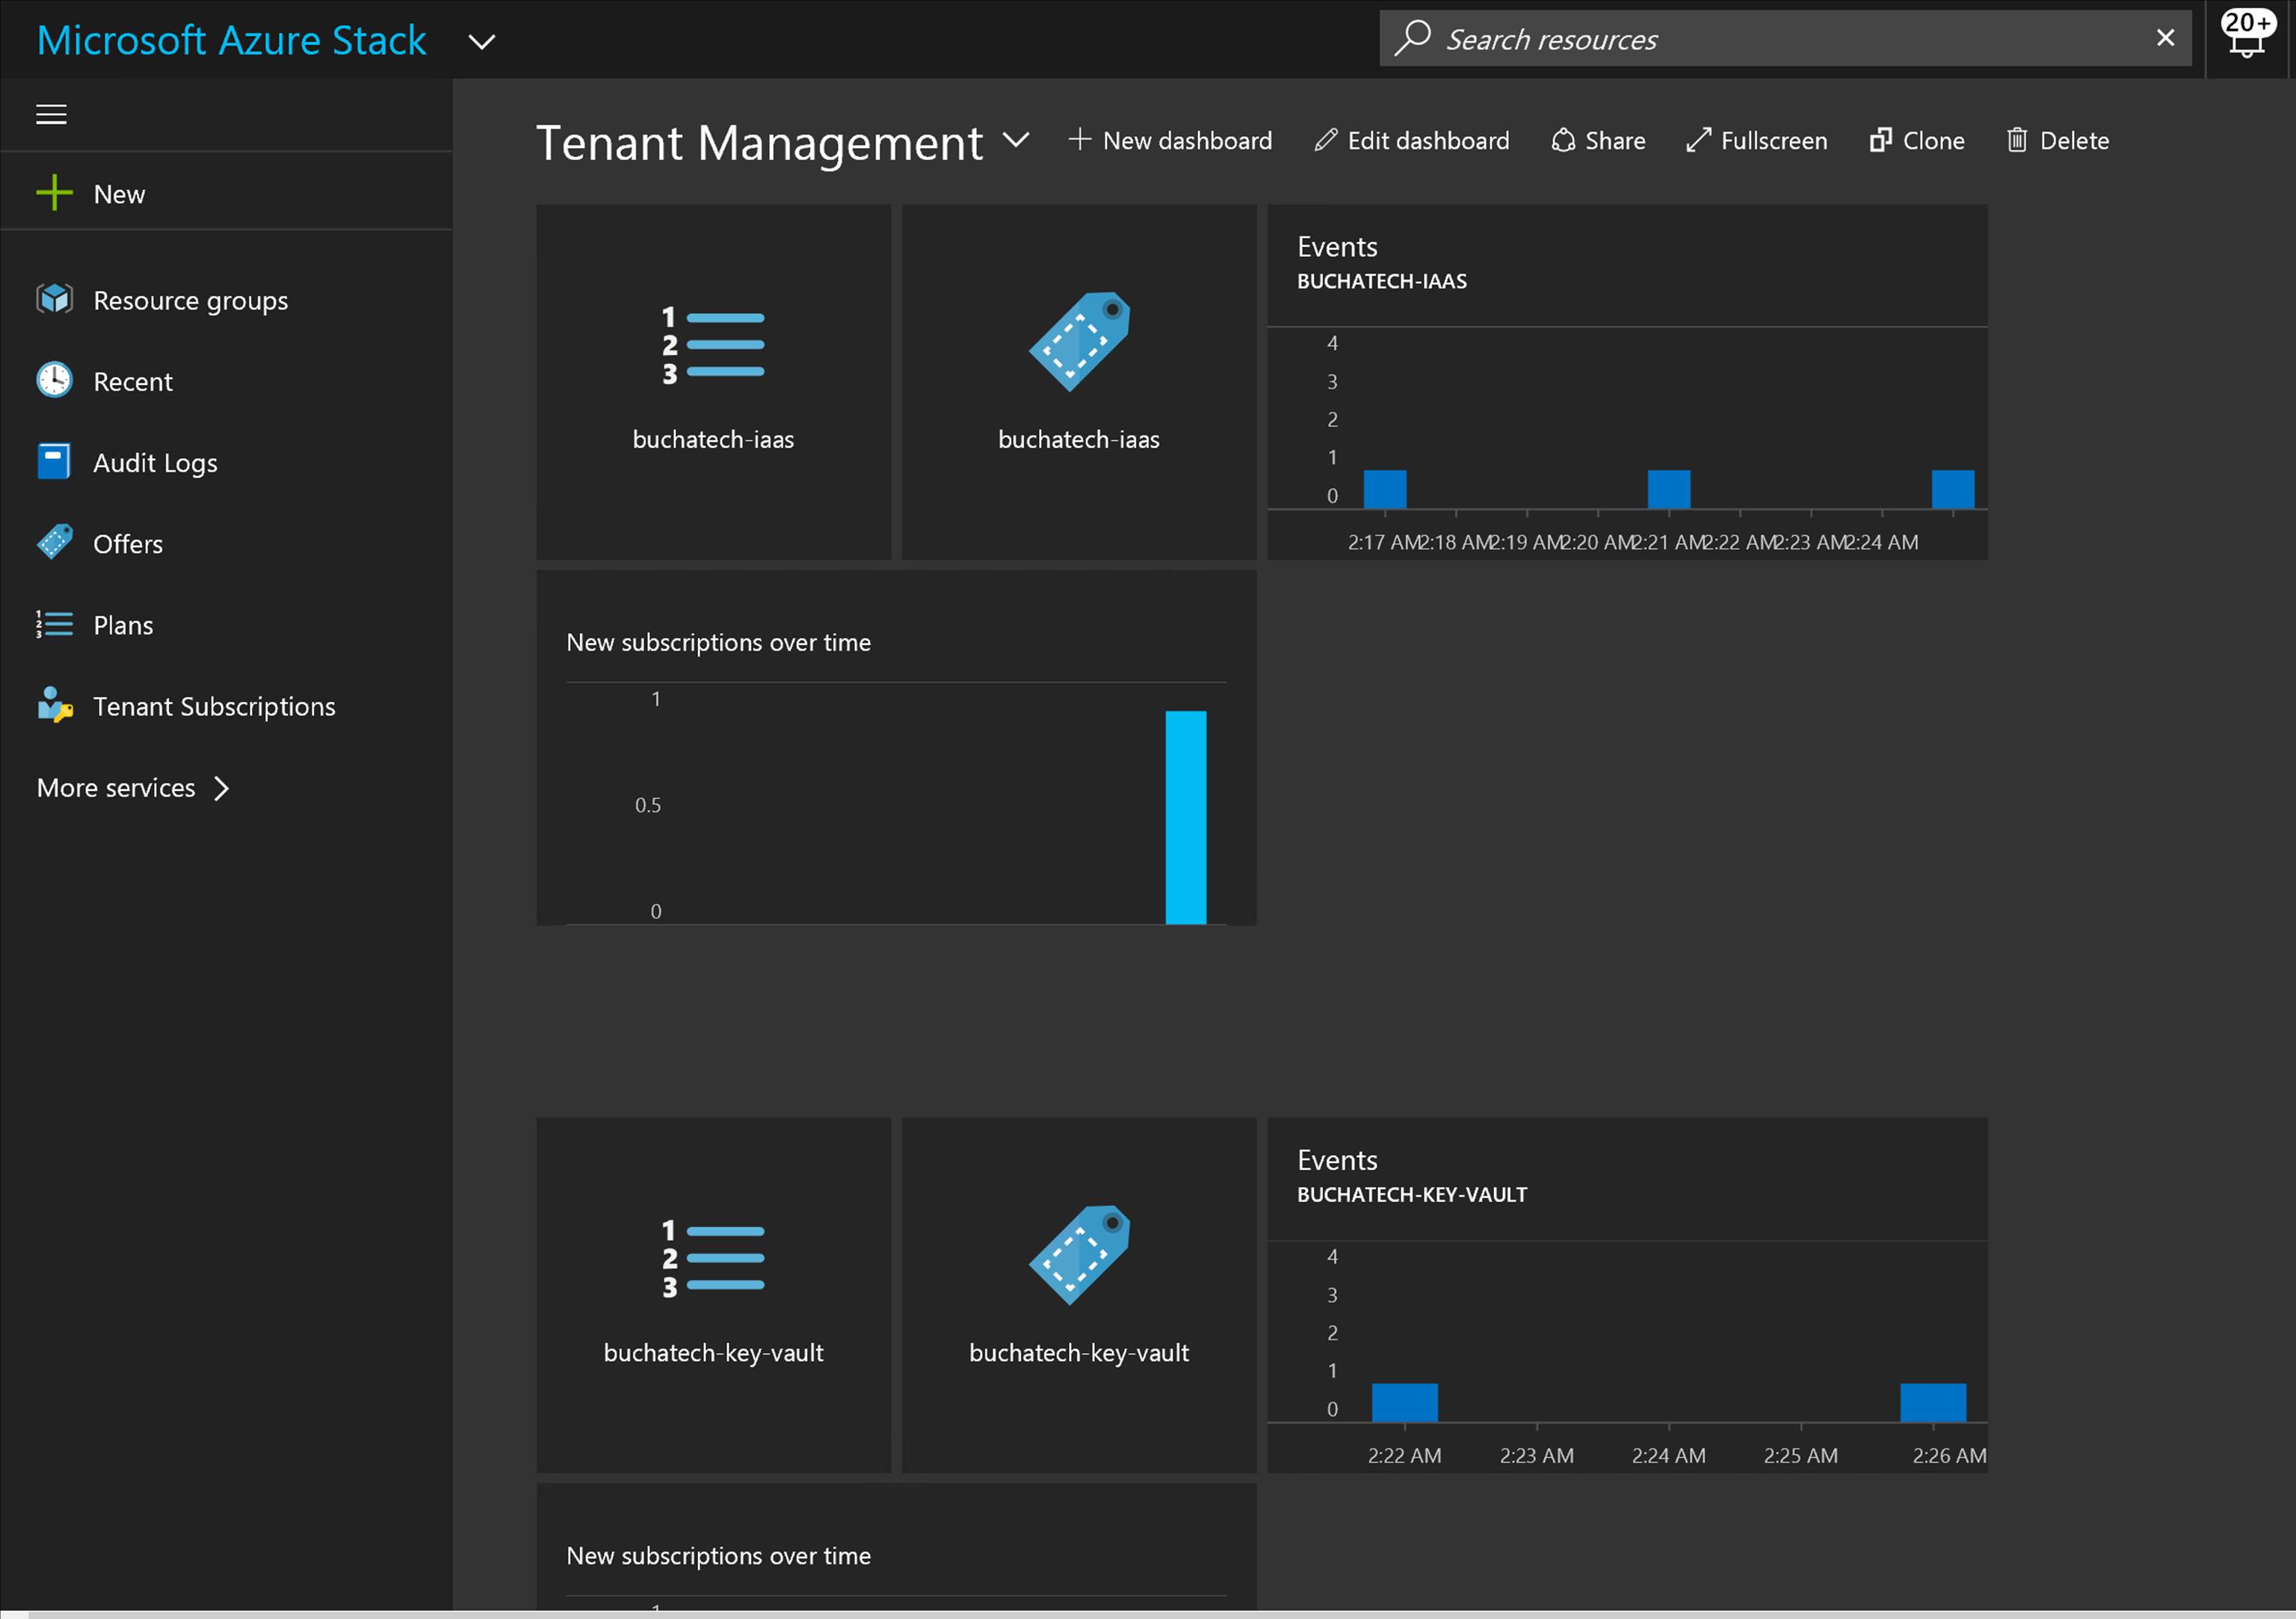
Ok. Now let’s jump into some example of CloudOps tooling in Azure Stack. First off, we as a cloud admin you need to know how to perform management of tenants (customers). Here is an example of a dashboard for doing this in Azure Stack:
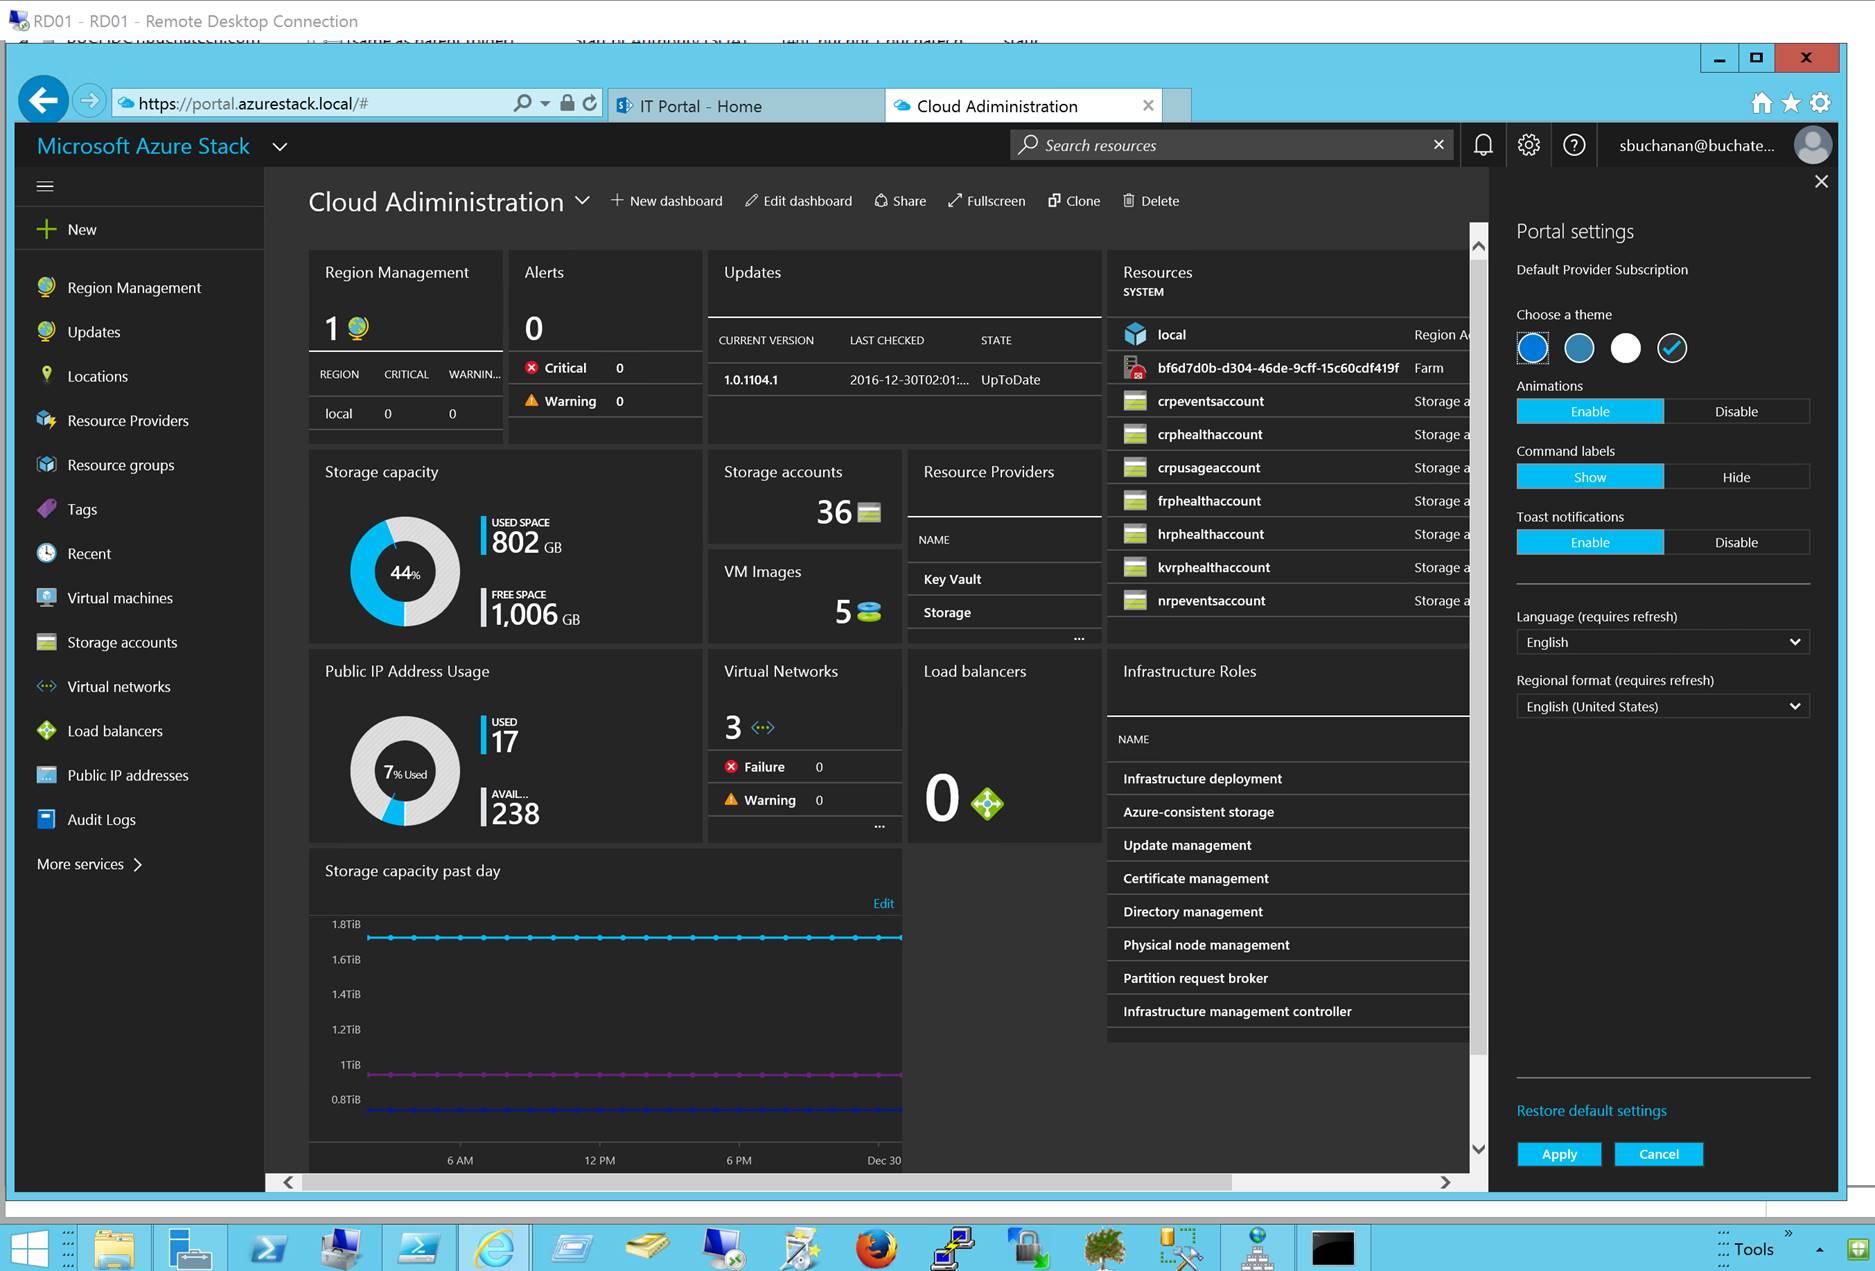
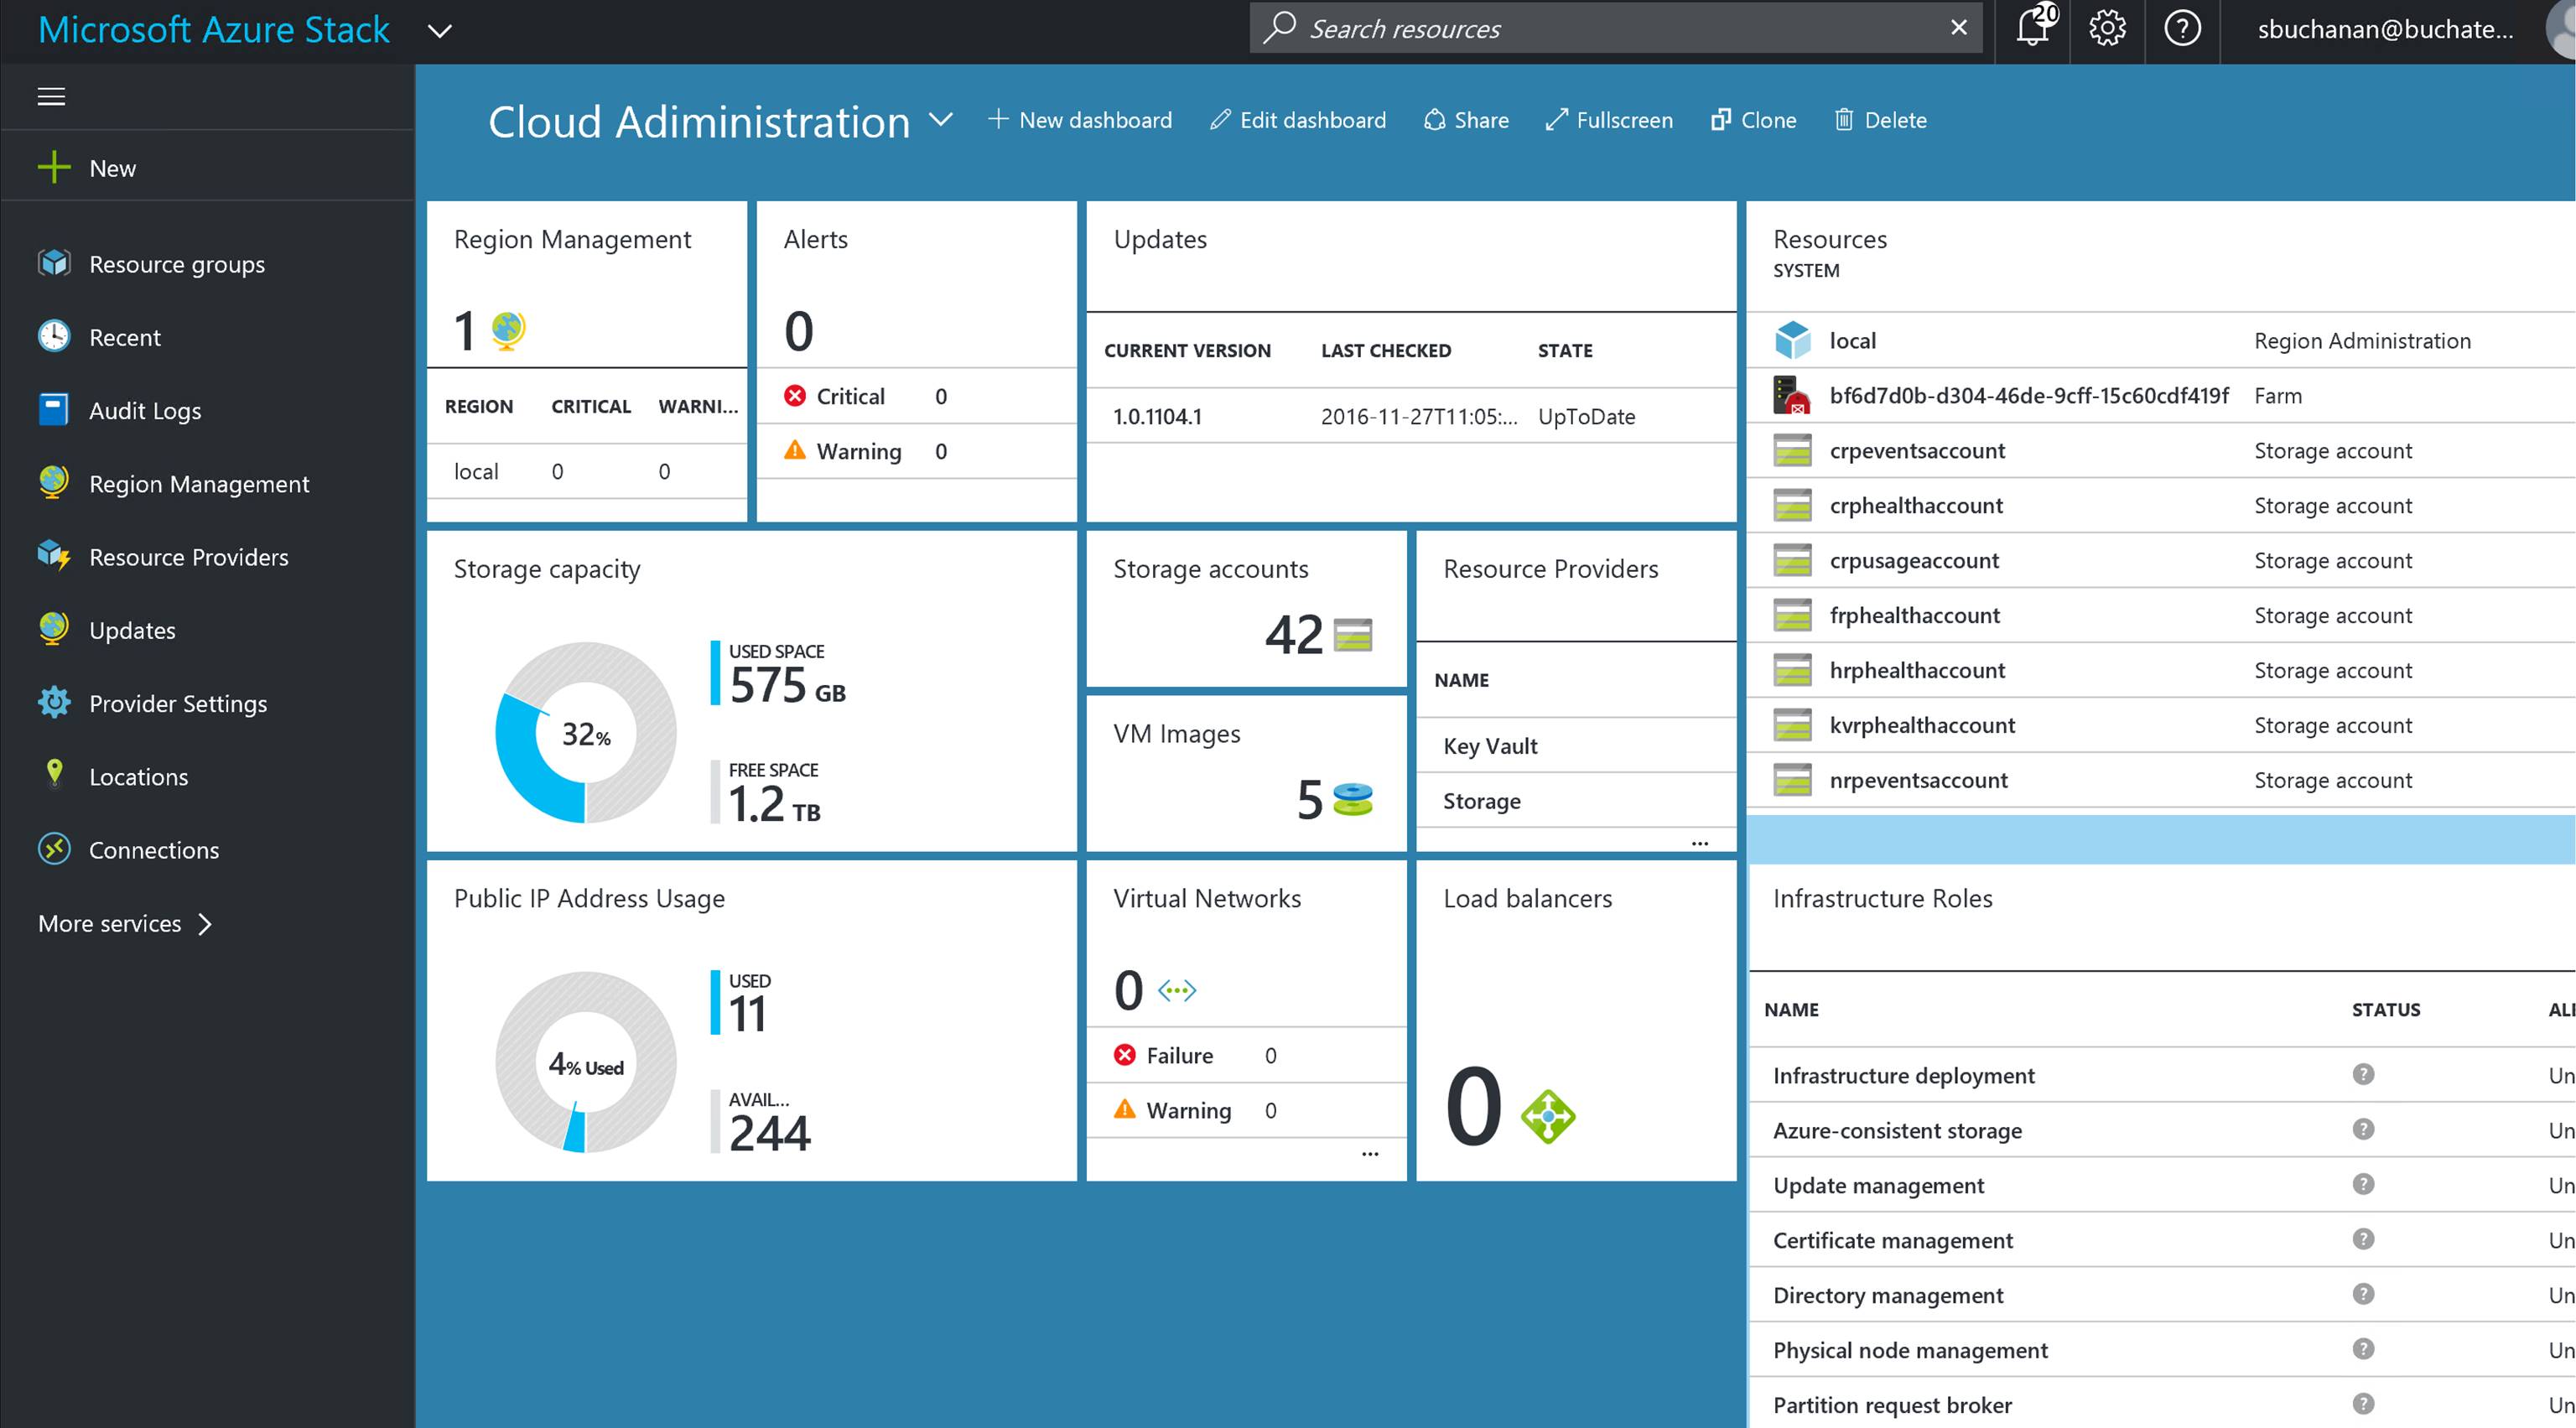
In Azure Stack, you will need to know and understand the administration of managing the cloud itself. This includes many things some of them being management of a region/s, resource providers that contain the services you can offer up to tenants, along with monitoring, high availability, and backup of the cloud. Below is an example of administration in Azure Stack at the cloud model layer of CloudOps.
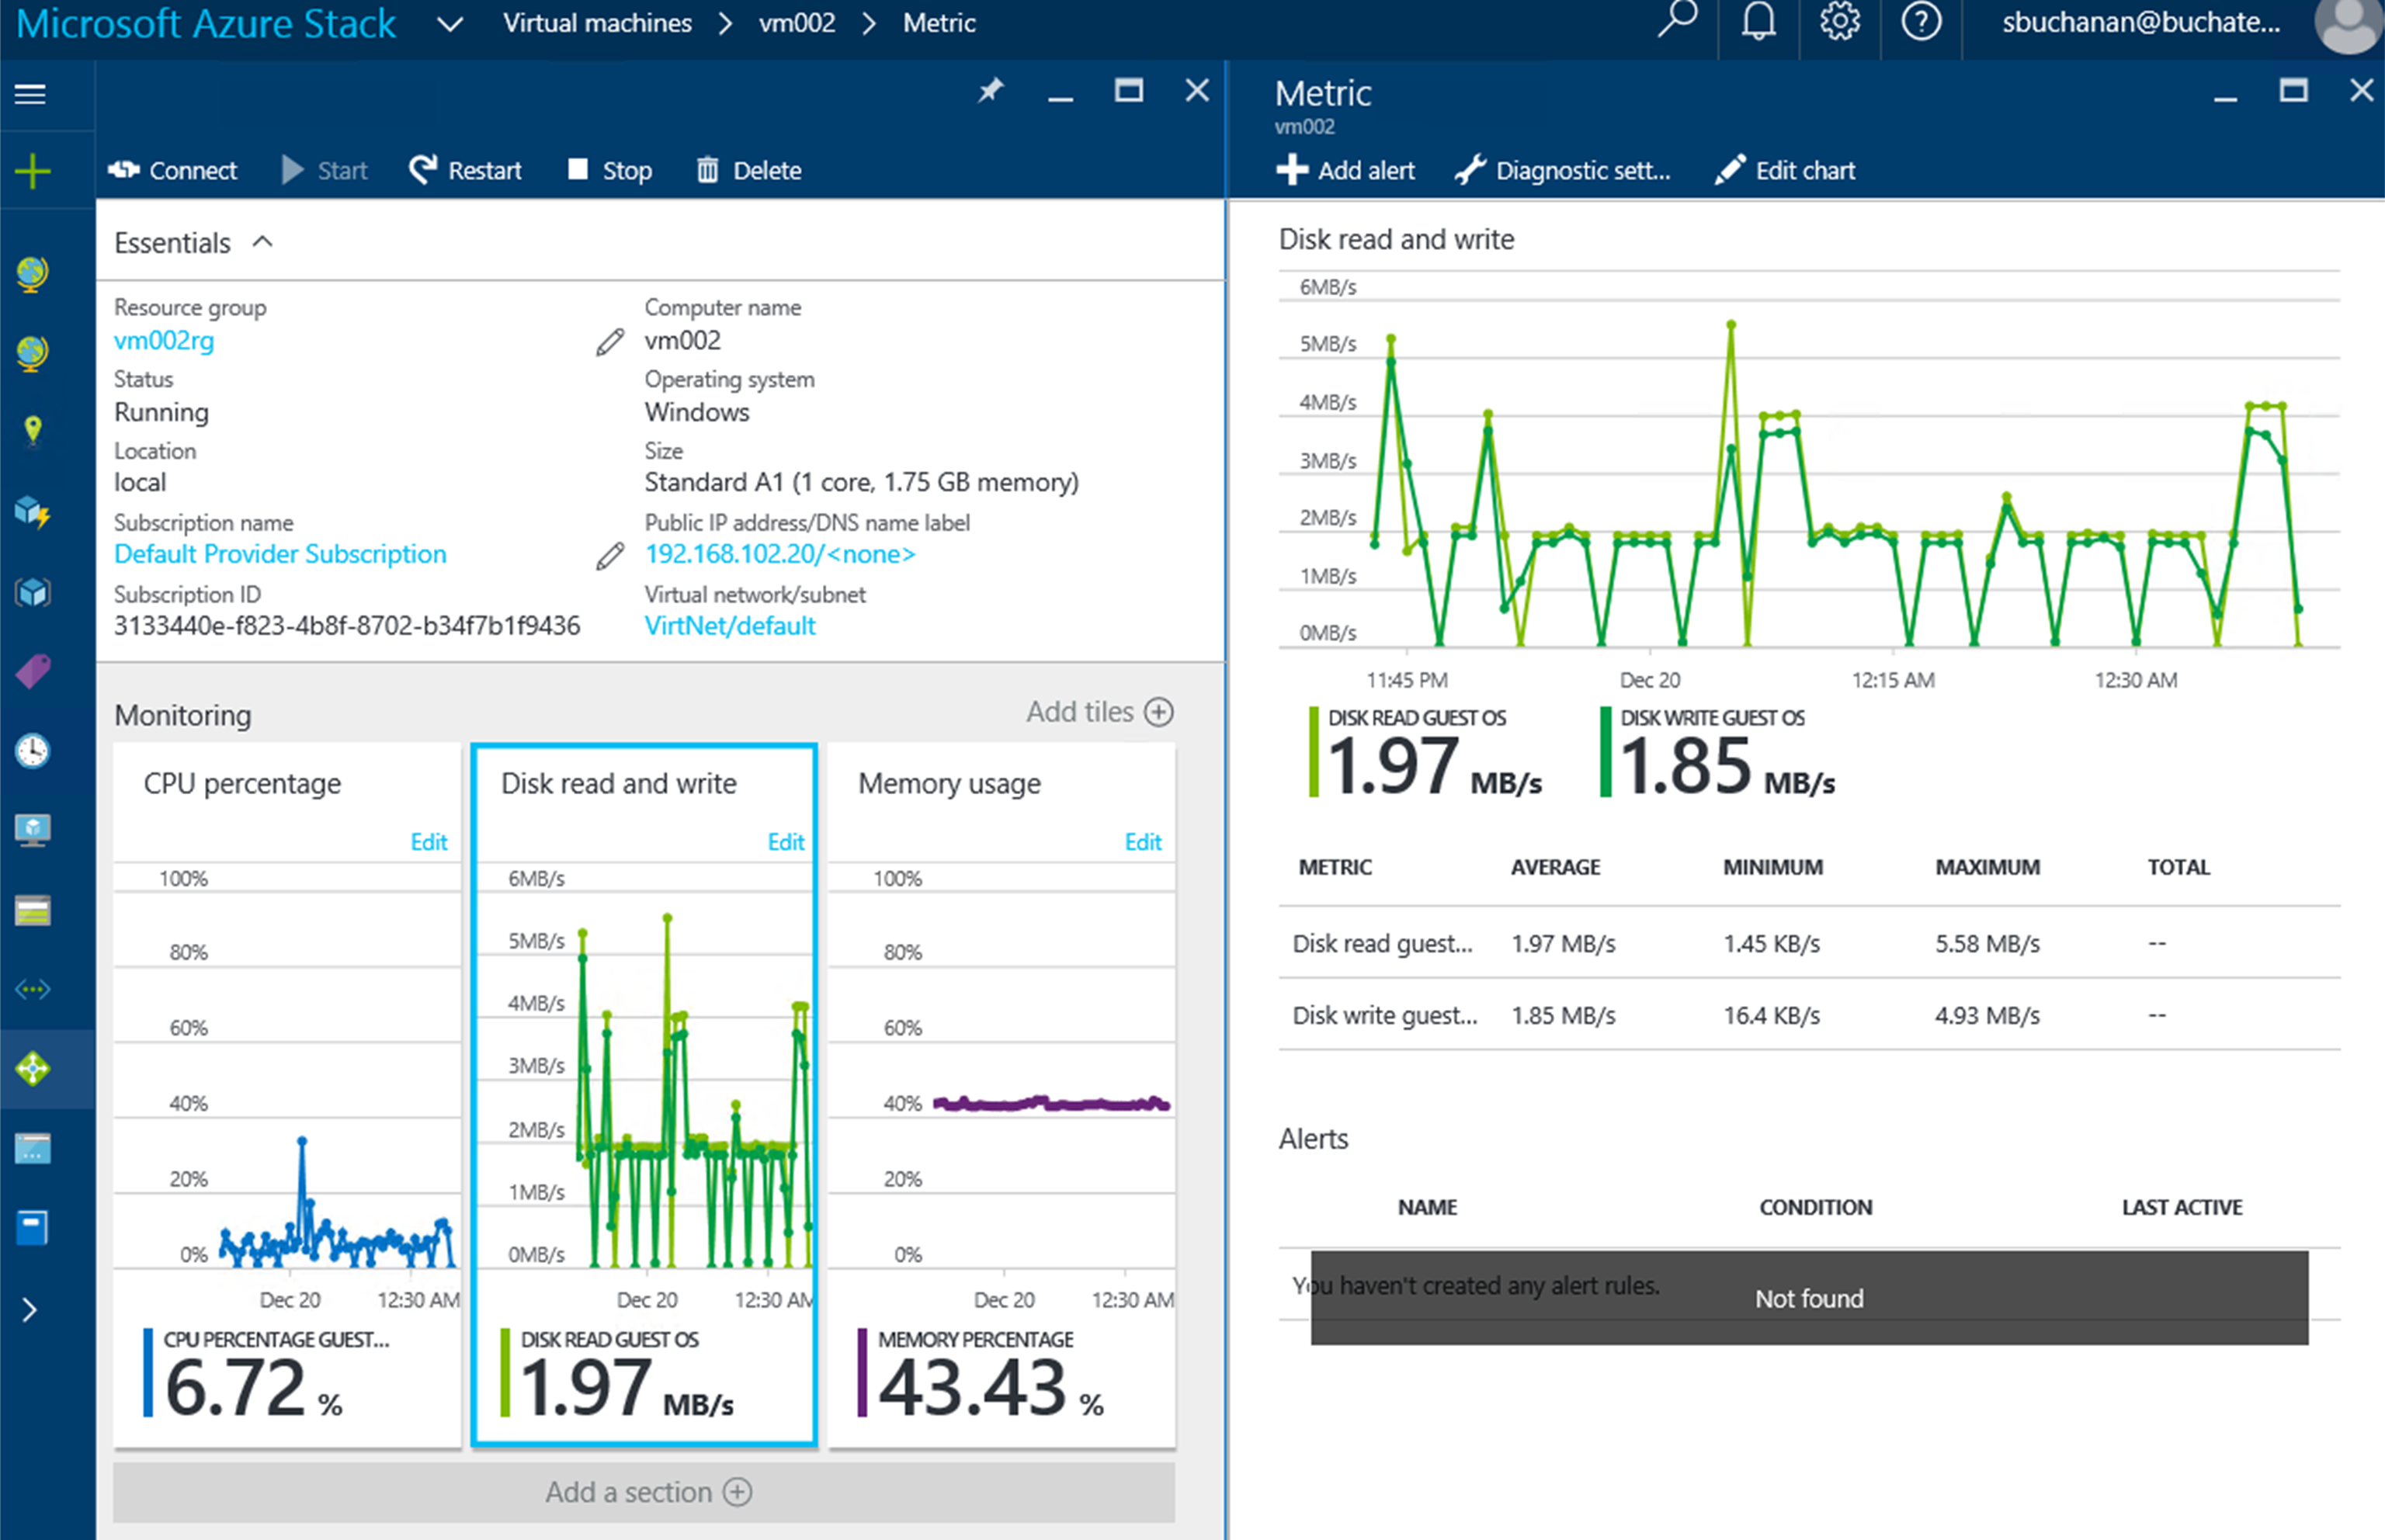
We already mentioned monitoring. There is monitoring of the cloud environment itself but there also is a need to monitor the resources being consumed by the tenants. One of the great things about Azure and Azure Stack is the out of the box monitoring and health diagnostics of IaaS virtual machines. I am a SCOM guy and have done a lot of SCOM projects. SCOM works well and serves a purpose but the out of the box monitoring in Azure and Azure Stack is amazing in the ease of turning it on. Once turned on it just works and has very nice visuals to see and work with as shown in the following screenshot. As a cloud administrator, you need technology to be easy so that you can move away from complex setups and troubleshooting the monitoring solution and move to monitoring the resources.
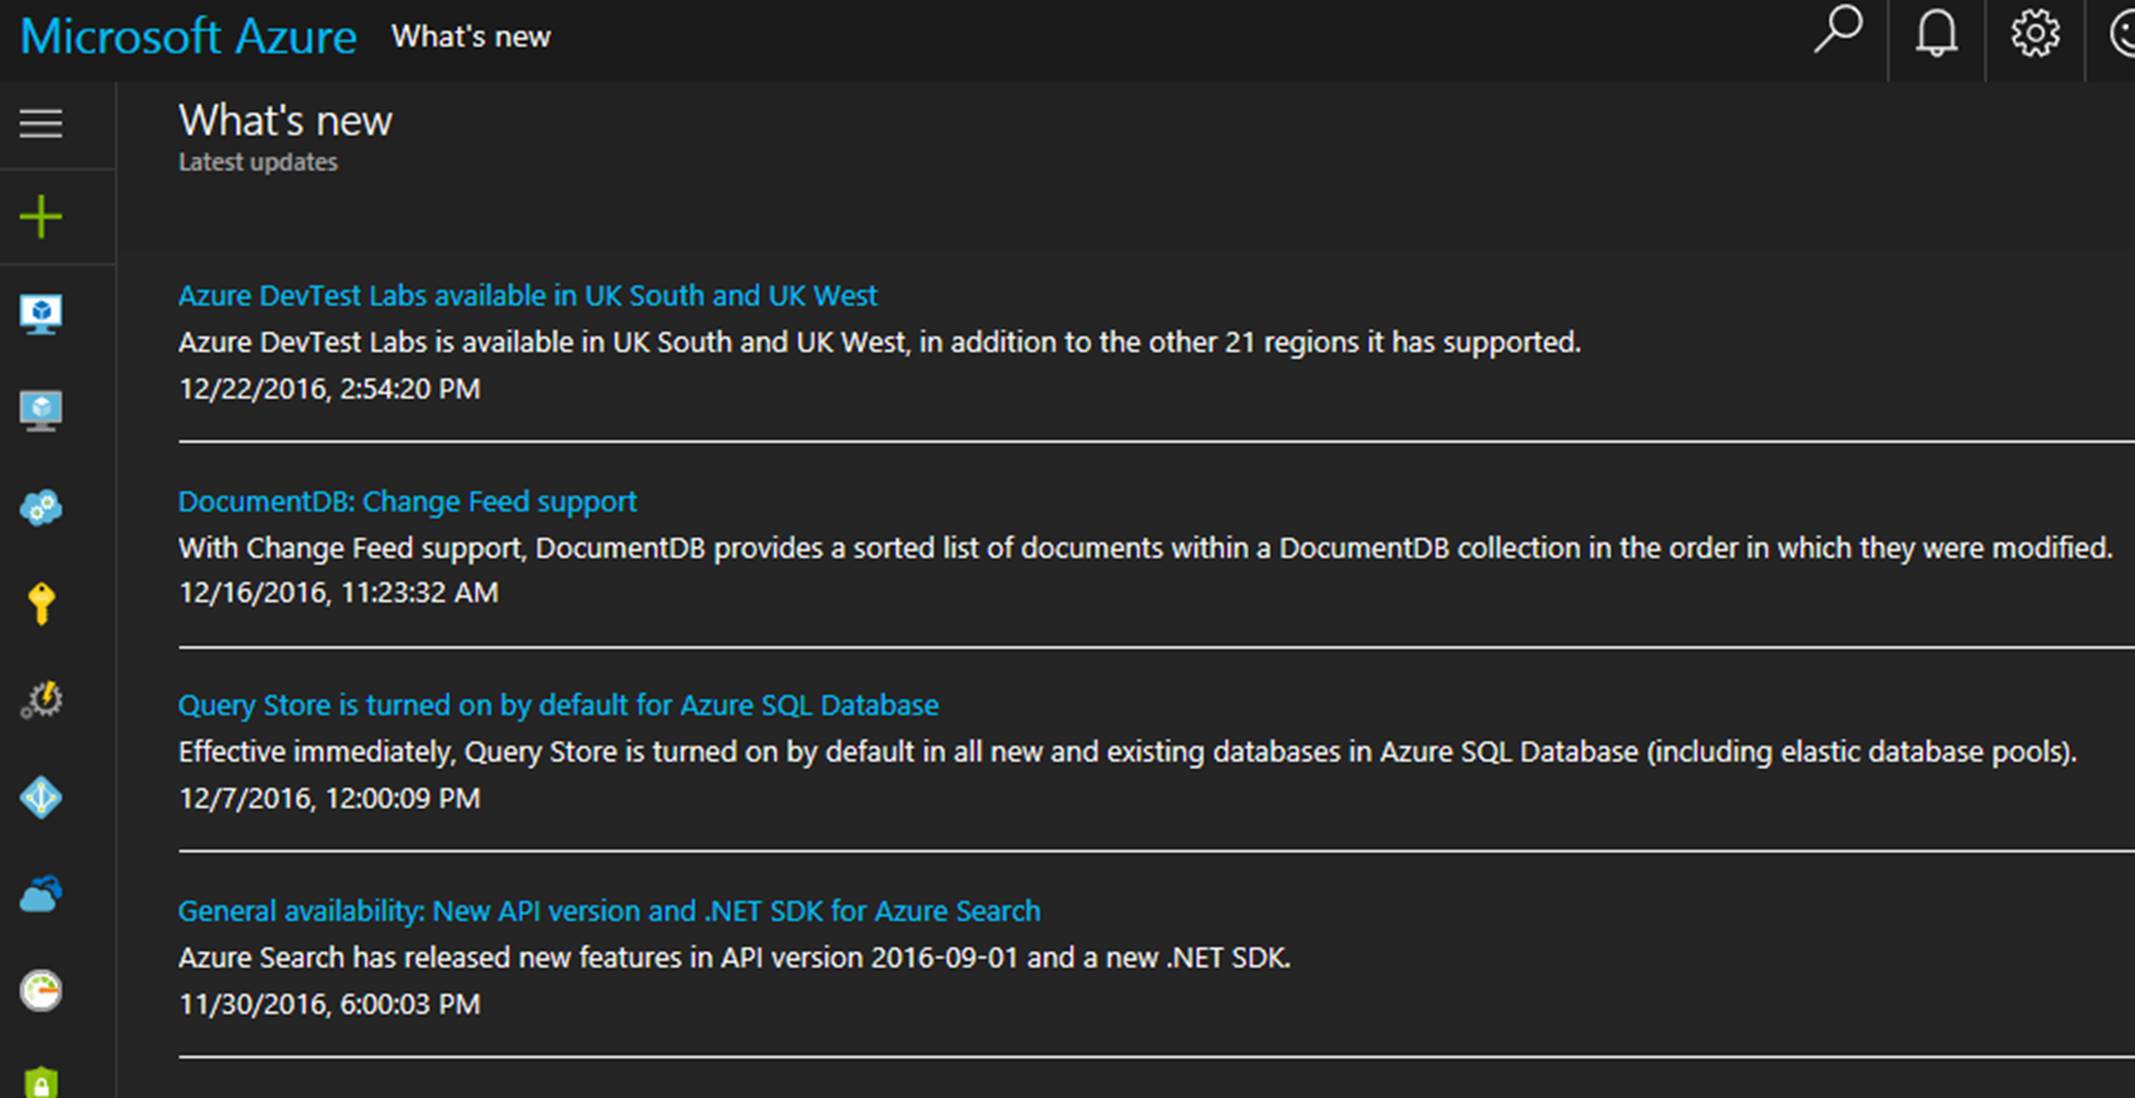
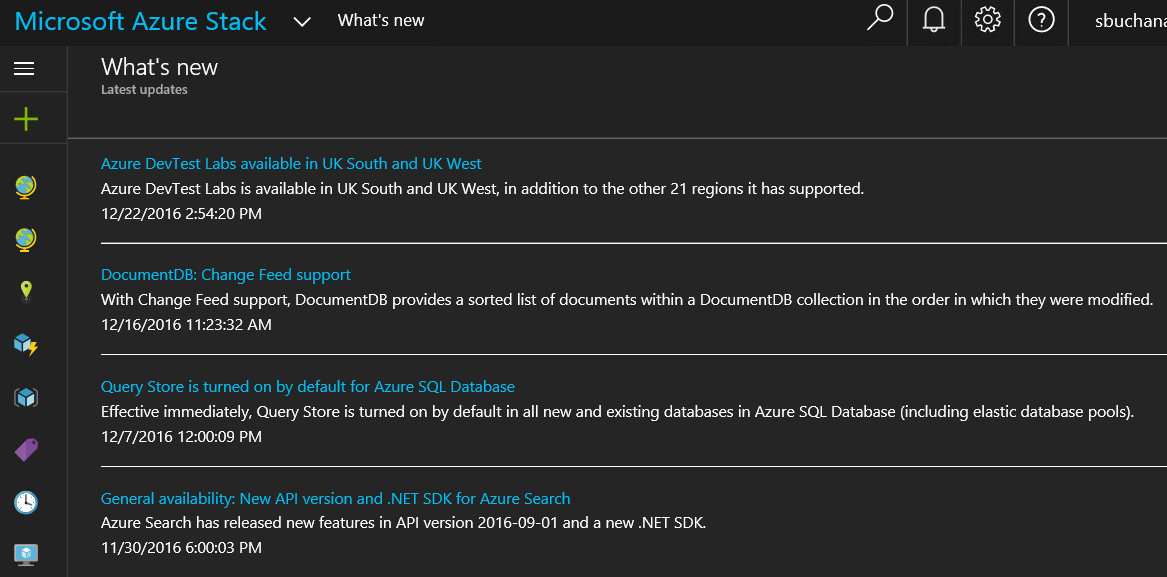
One of the best benefits about Hybrid Cloud is the consistency between public and on-premises cloud. In the following screenshot news updates on Azure and Azure stack are the same. 🙂 Another huge point of consistency between Azure and Azure Stack is the ability to view, deploy and run items from the Azure marketplace in Azure Stack. This is called marketplace syndication.


Azure


Azure Stack

Azure Stack is set to release in 2017. I want to highlight some of the services already in Azure Stack and more coming to Azure Stack that can be offered in your Service Catalog to tenants.

Already in Azure Stack as of TP3:

  • SQL PaaS
  • MySQL PaaS
  • Web Apps PaaS
  • Computer IaaS
  • Virtual Machines (Linux or Windows)
  • VM Scale Sets
  • Storage
  • Networking
  • PaaS: Storage
  • Key Vault
  • Management of Azure Pack virtual machines
  • Marketplace Syndication

Coming to Azure Stack at some point:

  • Microservices
  • Service Fabric
  • Cloud Foundry
  • Blockchain
  • Container Service
  • IoT

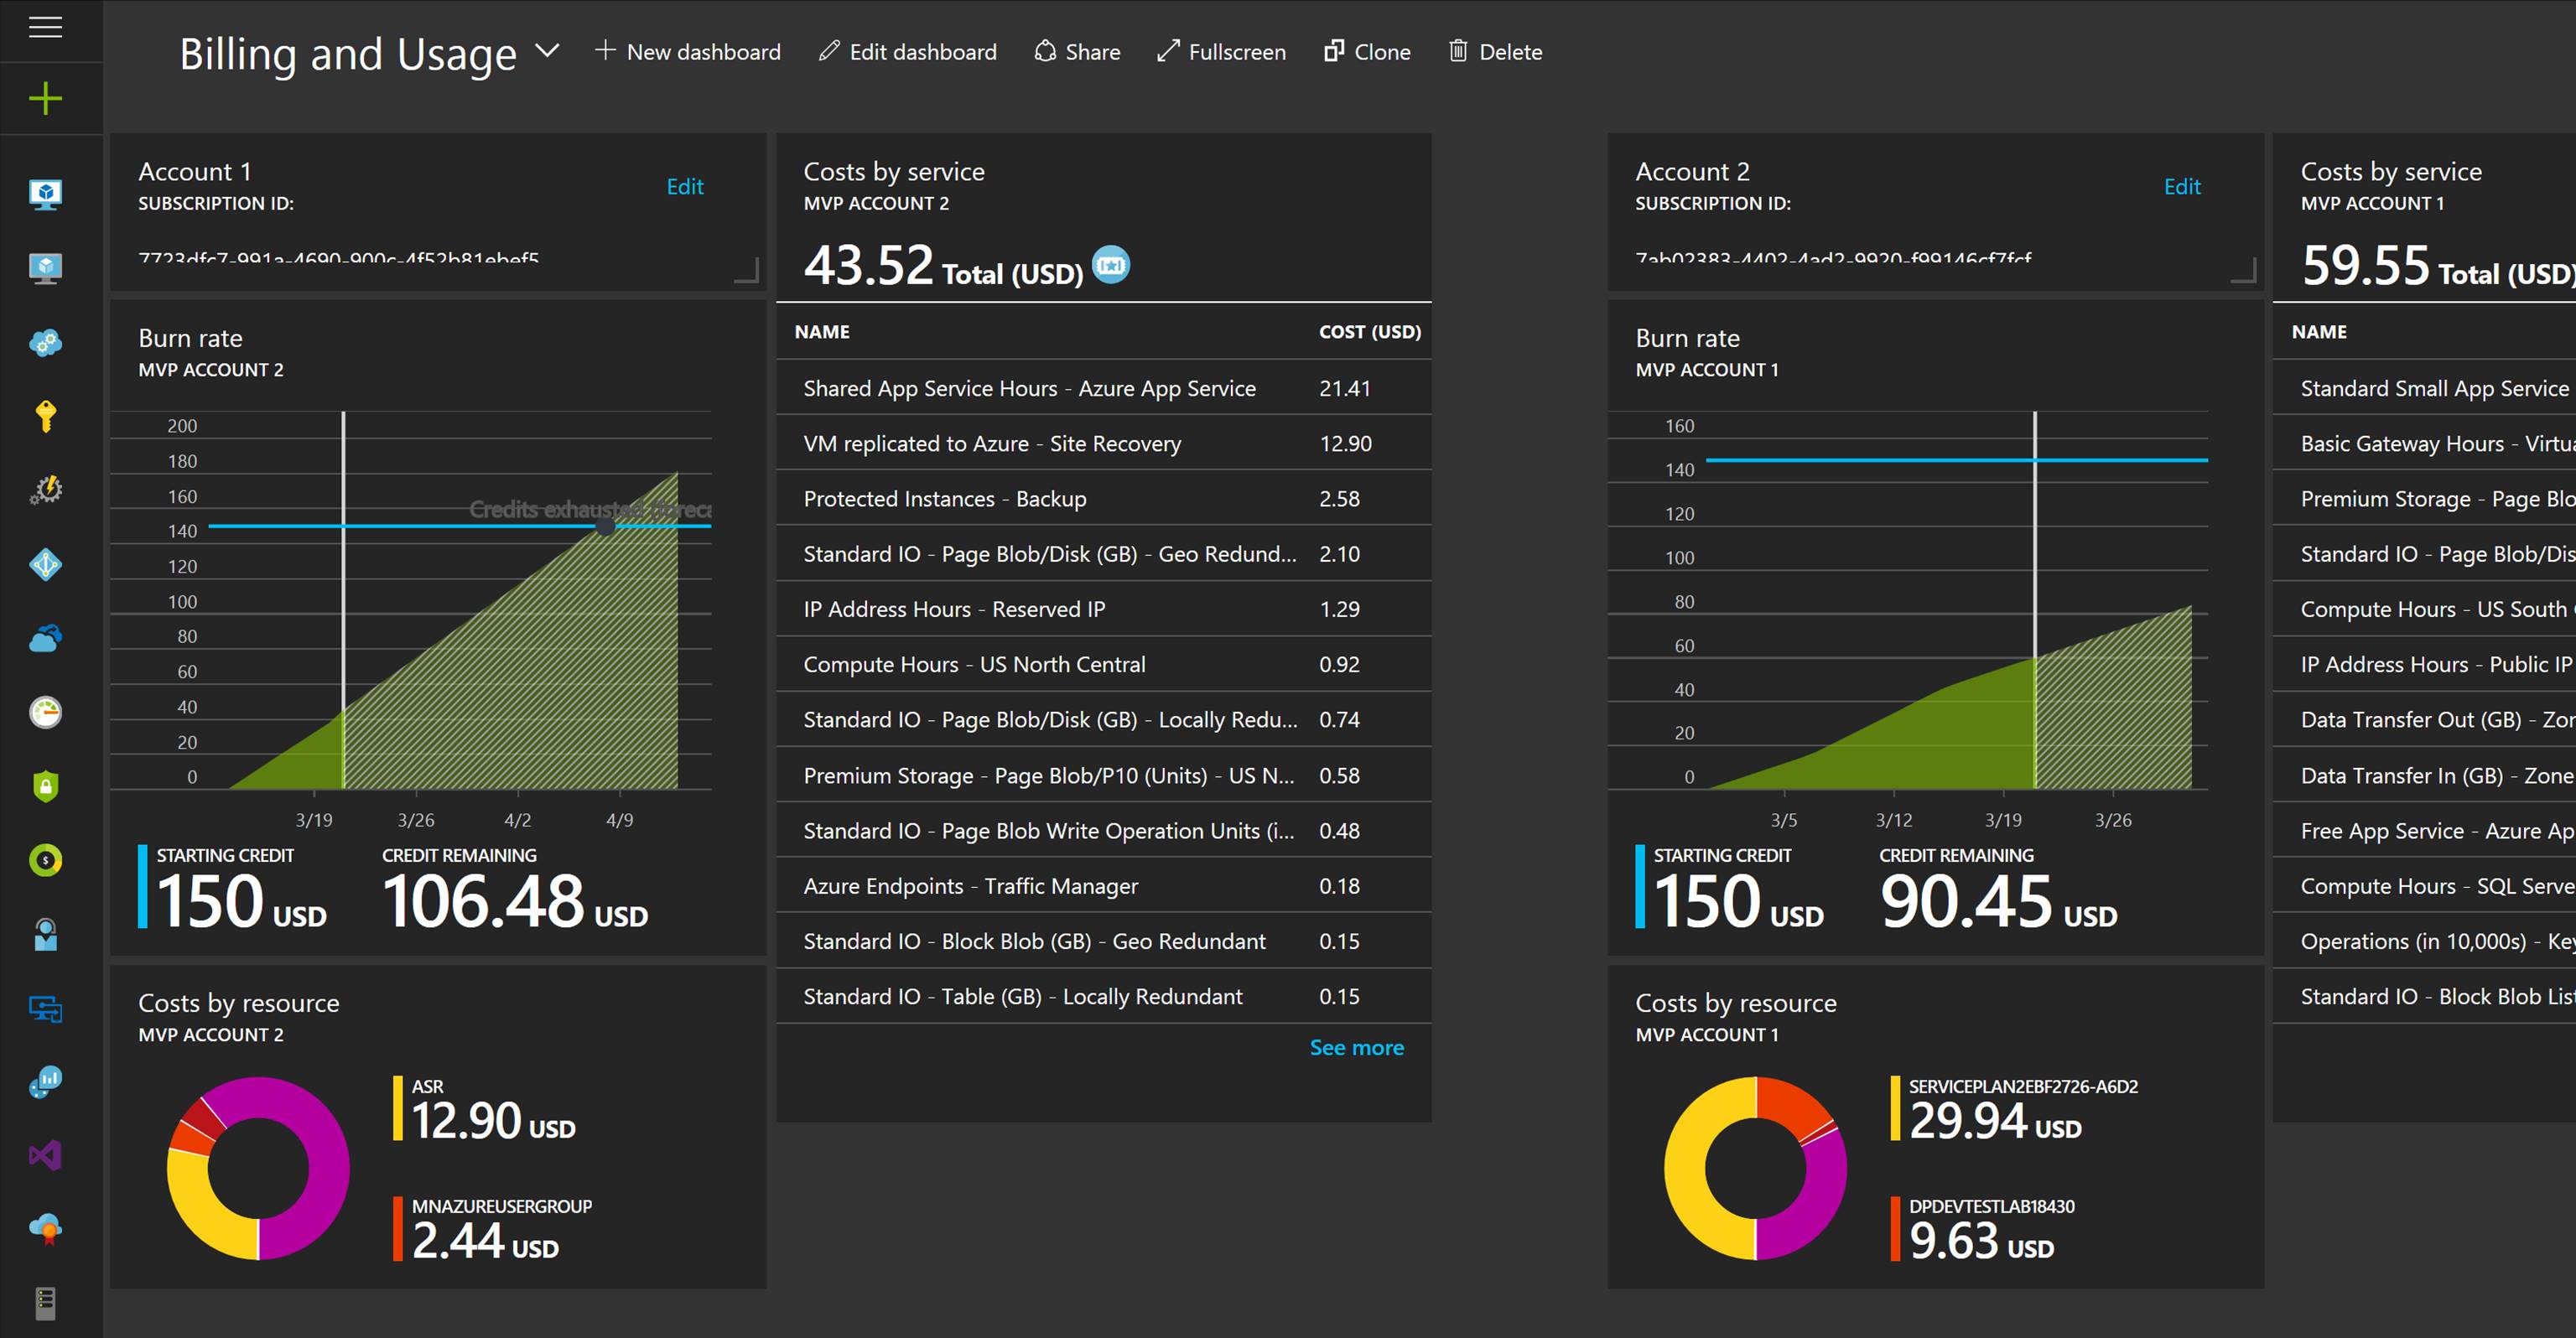
Another big part of CloudOps is being able to measured services that are being consumed. Measured Service can translate to show back or charge back. Measured Service is the ability to track the usage of resources down to the individual resource level. With Azure and Azure Stack resource management (ARM) model resources are carved out and placed into resource groups. In ARM, each resource has an associated cost that is tracked via the usage. There is full role based access around resources and resource groups. Resources and resource groups can be tagged and each resource or resource group’s usage can be tracked and displayed on business intelligence reporting or a dashboard like shown in the following screenshot.
That concludes this blog post. I hope I was able to shed some light on the transition from IT Pro to cloud pro, from IT Ops/ITSM to CloudOps and showcase the power of Hybrid Cloud via Azure Stack. Stay tuned for more exciting stuff coming from Azure Stack.

Read more

IT Unity Community Champ & 25 ITSM Experts Feature

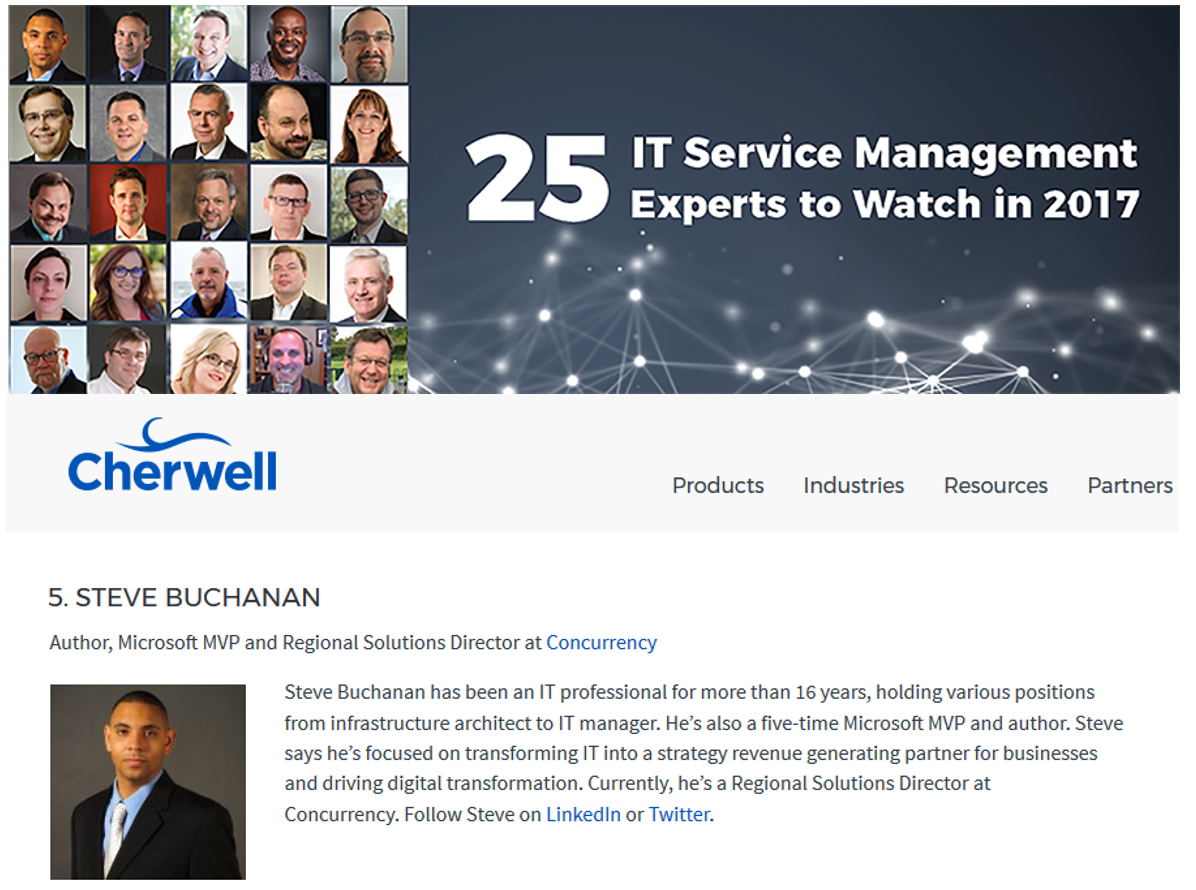
This has been an exciting year so far and an even more exciting week! I want to share that I am humbly honored to be featured twice this week. Once as an IT Community Champ by the highly respected Mary Jo Foley on www.petri.com and added to this years 25 ITSM Experts to watch list by Cherwell. 🙂 Again all of this was an unexpected surprise and I am honored to be included.  For information on both of these check out the links below:

Read more

Azure Stack POC Hardware

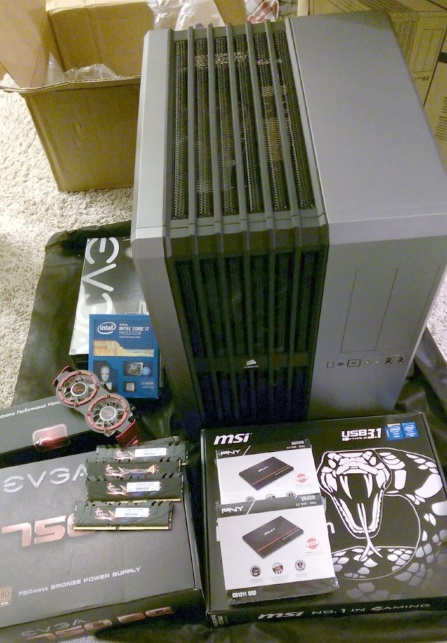
I have been asked several times what I use for my Azure Stack rig and where I got the hardware from. I am going to share in this post what I use to run my single node Azure Stack POC. I bought all parts from newegg.com. Here is a list of the parts:

  • Motherboard: MSI X99A SLI KRAIT EDITION LGA 2011-v3 Intel X99 SATA 6Gb/s USB 3.1 USB 3.0 ATX Intel
  • Video Card: EVGA GeForce 210 DirectX 10.1 512-P3-1310-LR 512MB 32-Bit DDR3 PCI Express 2.0 x16 HDCP Ready Low Profile
  • Power Supply: EVGA 750 BQ 110-BQ-0750-V1 80+ BRONZE 750W Semi Modular Includes Power On Self Tester
  • Processor: Intel Core i7-5820K Haswell-E 6-Core 3.3 GHz LGA 2011-v3 140W BX80648I75820K Desktop
    NOTE: I was not paying attention when I bought this. Azure Stack needs 12 cores. I am able to work around this and have not run into problems yet. When I get a chance and $$$ I will upgrade this.
  • 3 SSD Hard Drives: PNY CS1311 2.5″ 960GB SATA-III (6 Gb/s) TLC Internal Solid State Drive (SSD) SSD7CS1311-960-RB
    NOTE: I bought a couple of more Kingston brand SSD’s. I use these for the OS and general storage.
  • Memory: G.SKILL Ripjaws 4 Series 128GB (8 x 16GB) 288-Pin DDR4 SDRAM DDR4 2800 (PC4 22400) Intel X99 Platform Extreme Performance Memory Model F4-2800C15Q2-128GRKD
  • Case: Corsair Carbide Series Air 540 CC-9011034-WLED Silver Steel ATX Cube Computer Case

As you can see this is generic hardware. The cost of this hardware was just over $2k USD. I have been running Azure Stack since TP1 on this hardware and I am currently running TP3. This is a personal lab for just me and Azure Stack runs well on my hardware. Don’t let a lack of hardware stop you from diving into Azure Stack. As you can see from this post it does not take much to pick up some parts and get going.

I do also run another Azure Stack POC on much better hardware at work. I can’t wait to get a multi-node environment on one of the hardware providers (Cisco, Dell, Lenovo, or HP) platform.

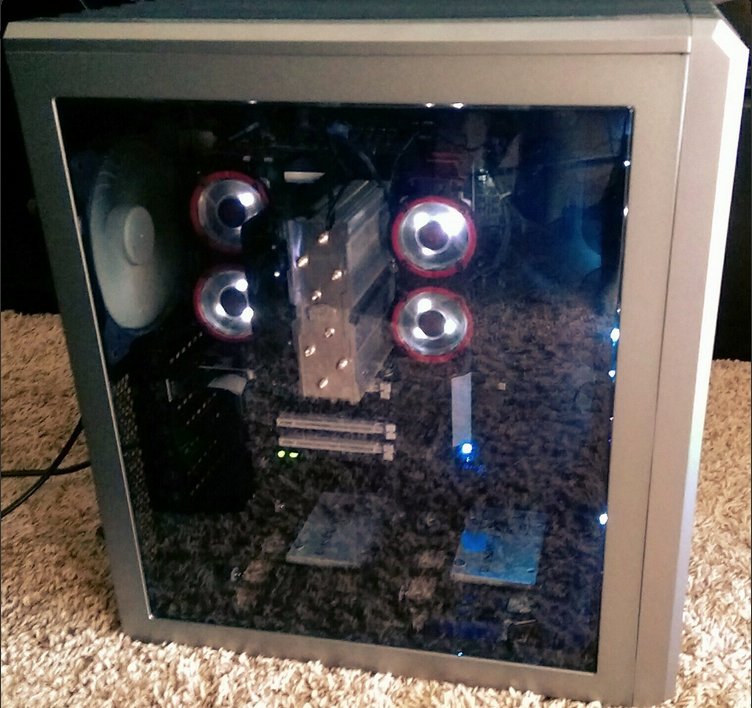
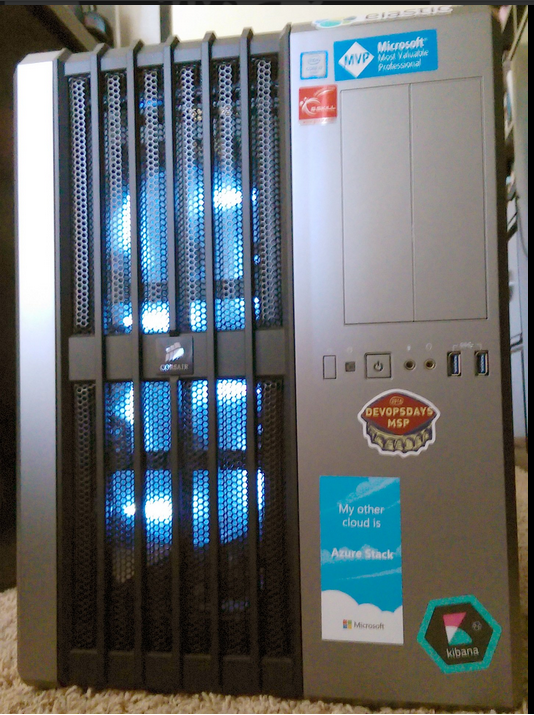
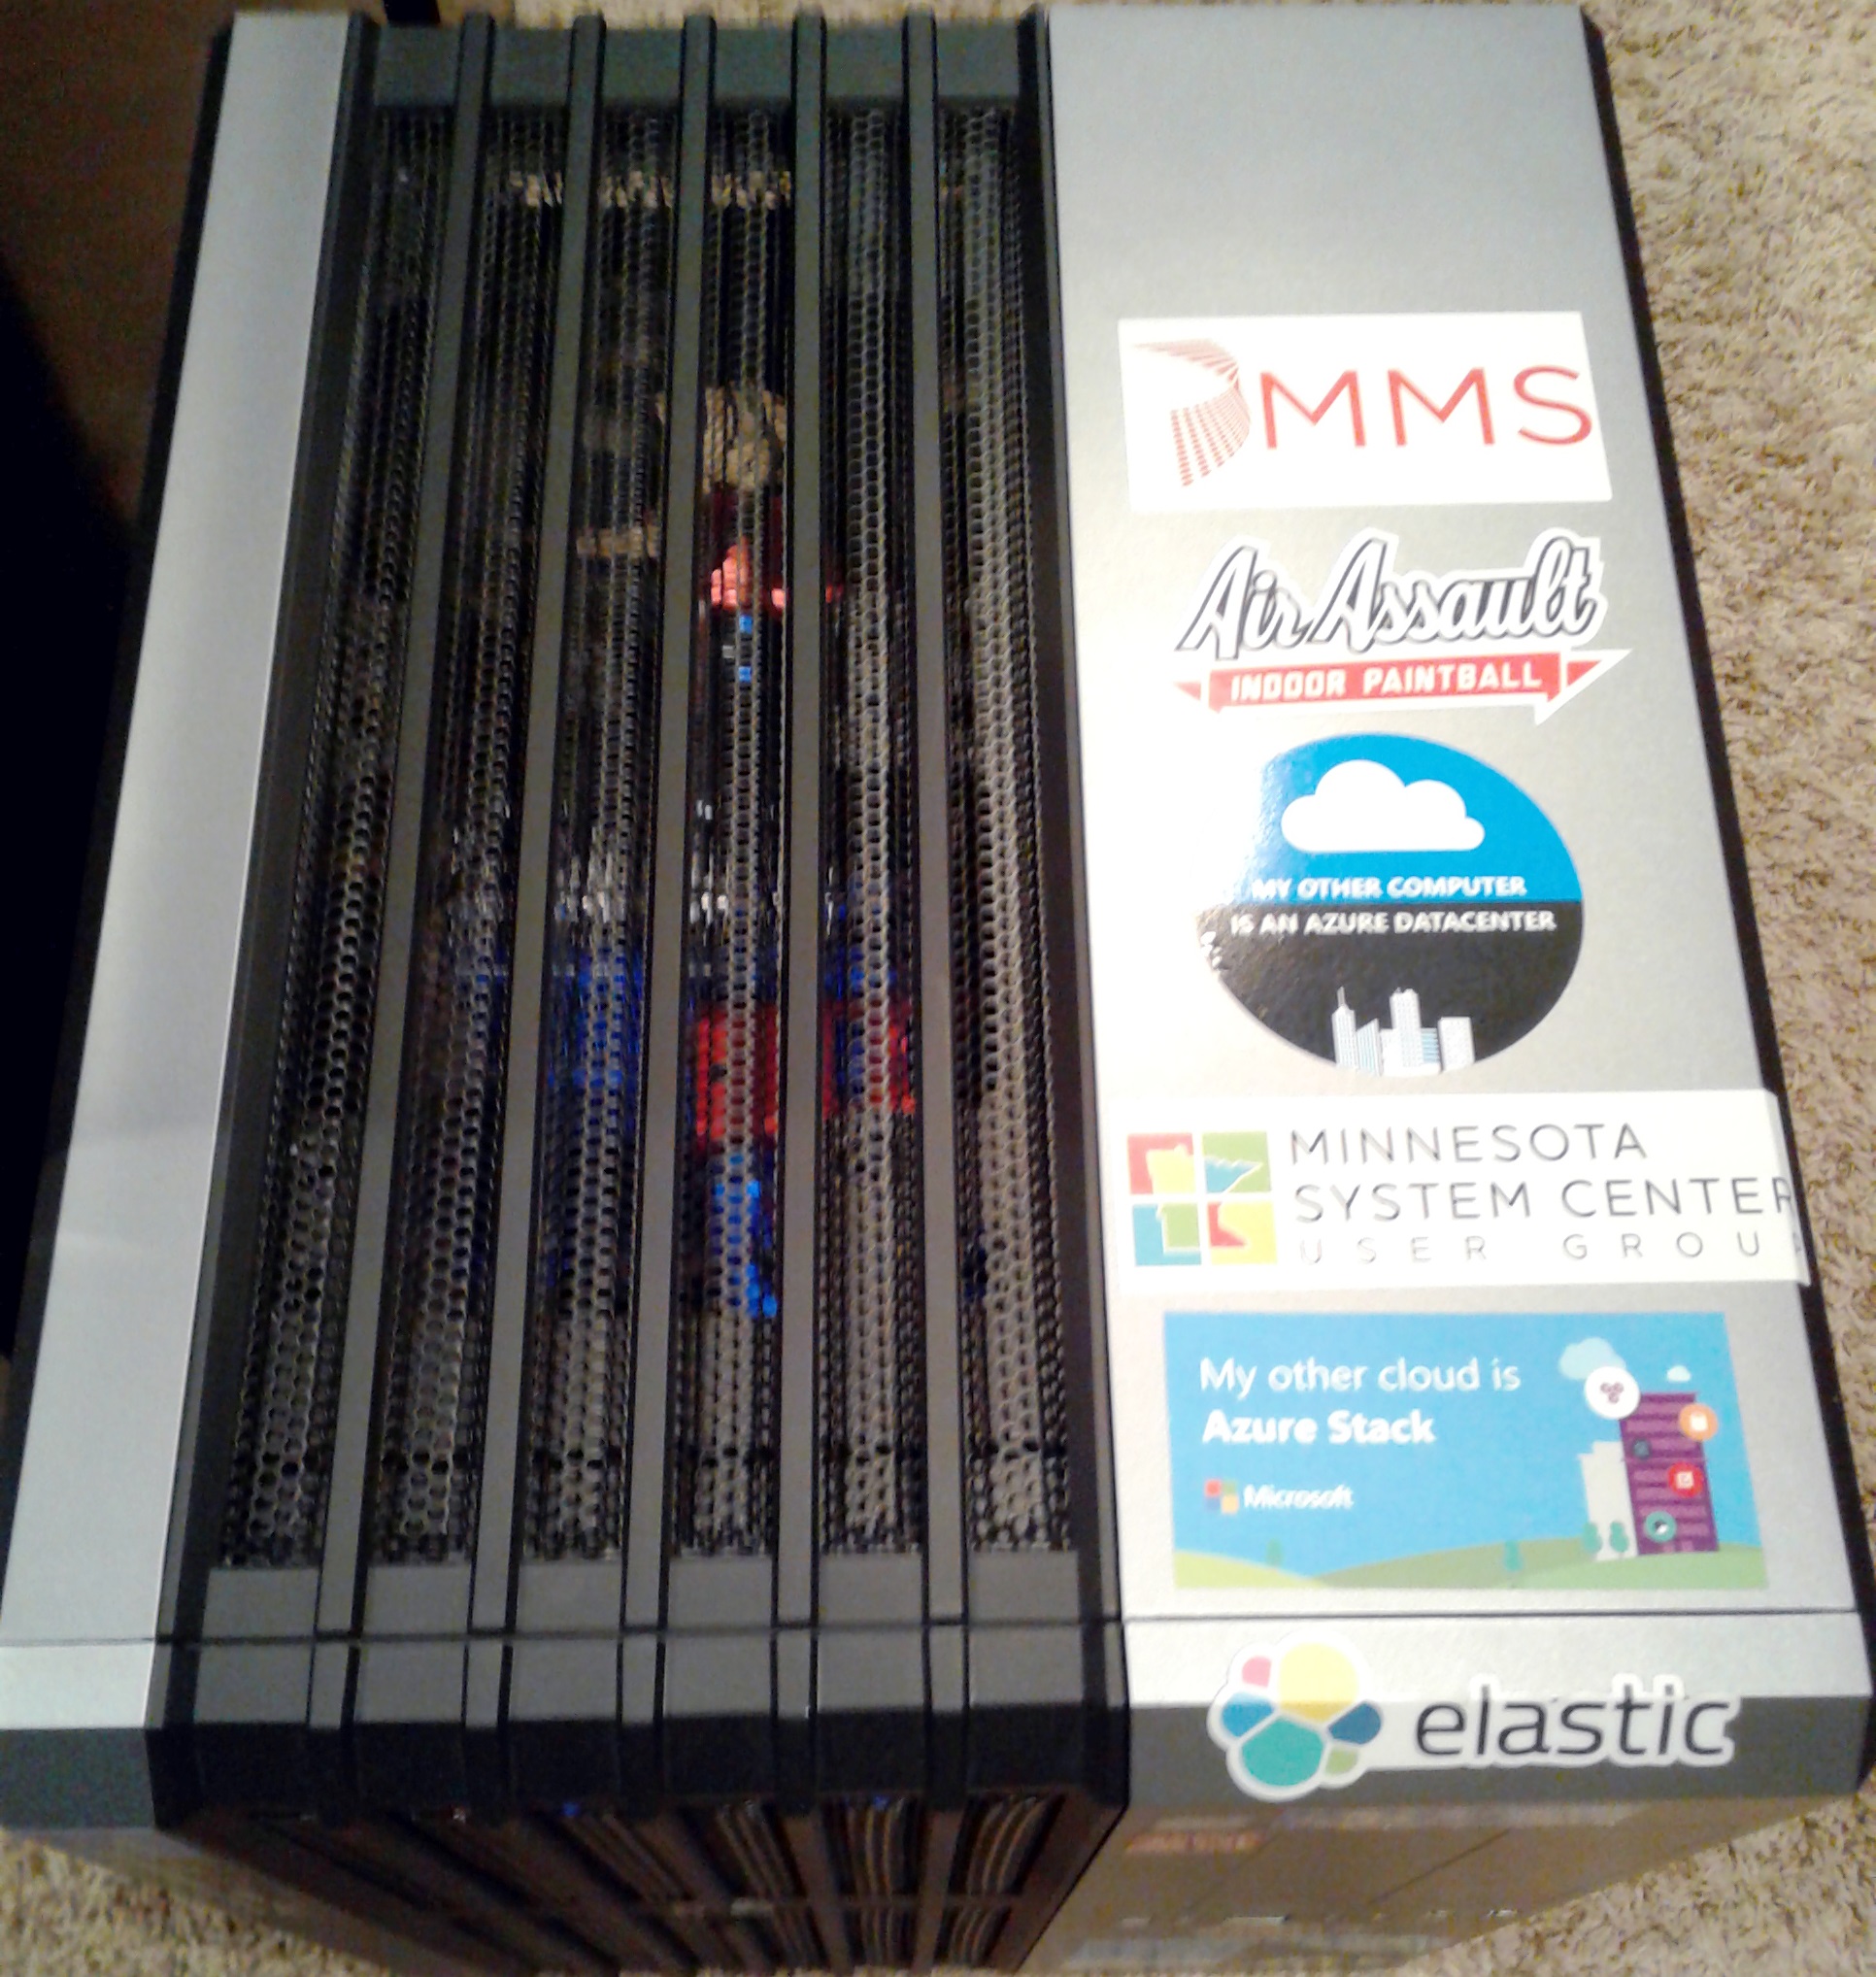
Here is what my rig looks like complete with Azure Stack and other stickers :-).

Before it was built:

After it was built and running:

Read more
Monitor Azure Stack Fabric with OMS

I wanted to monitor my Azure Stack environment with OMS. This would include only the Azure Stack fabric servers and the host. I did not want to manually install the OMS agent on all of these servers especially since the Azure Stack fabric is a set of known servers. So I decided to put together a quick PowerShell script to handle the install of the OMS agents including the workspace ID and key. Here are details for the script:

<#

.SYNOPSIS
This script can be used to install OMS agents on all of the Azure Stack Fabric servers. This has been tested with TP2.

.DESCRIPTION
This script can be used to install OMS agents on all of the Azure Stack Fabric servers. This has been tested with TP2. This script can be run from PowerShell ISE or a PowerShell console. It is recommended to run this from an elevated window. This script should be run from the Azure Stack host. Ensure you are logged onto the Azure Stack host as azurestack\azurestackadmin. This script allows you to input your OMS workspace ID and key. The Azure Stack Fabric servers that this script will attempt to install on is:

“MAS-Con01”,

“MAS-WAS01”,

“MAS-Xrp01”,

“MAS-SUS01”,

“MAS-ACS01”,

“MAS-CA01”,

“MAS-ADFS01”,

“MAS-ASql01”,

“MAS-Gwy01”,

“MAS-SLB01”,

“MAS-NC01”,

“MAS-BGPNAT01”

Fabric servers can be added or removed from the array list if desired. The script will look for the OMS agent (MMASetup-AMD64.exe) in C:\OMS\ on the Azure Stack host. Ensure you create an OMS folder on your Azure Stack host and download the OMS agent to it. This script also copies the OMS agent to C:\Windows\Temp on each Fabric server. Ensure there is enough free space on the C drive on all of your fabric servers.

.PARAMETER OMSWorkSpaceID
This is Guid ID for your OMS workspace, it can be found in the OMS portal at: https://mms.microsoft.com >> Overview >> Settings >> Connected Sources >> Windows Servers

.PARAMETER OMSKey
This is the OMS API key for your OMS workspace. You can use the primary or secondary key. These keys can be found in the OMS portal at:
https://mms.microsoft.com >> Overview >> Settings >> Connected Sources >> Windows Servers

.INPUTS
None

.OUTPUTS
None

.NOTES
Script Name: AzureStackFabrickOMSAgentInstall.ps1
Version: 1.0
Author: Cloud and Data Center Management MVP – Steve Buchanan
Website: www.buchatech.com
Creation Date: 1-1-2017
Purpose/Change: Install OMS agents on Azure Stack Fabric servers.
Updates: None

.EXAMPLE
.\AzureStackFabricOMSAgentInstall.ps1 -OMSWorkSpaceID “20d4dd92-53cf-41ff-99b0-7acb6c84beedsr” -OMSKey “aazedscsjwh52834u510350423tjjwgogh9w34thg2ui==”
#>

The script can be downloaded here:
https://gallery.technet.microsoft.com/Azure-Stack-Fabric-OMS-3dac666c

To kick off the script run from PowerShell ISE or a PowerShell console. If you run from ISE you will be prompted for the workspace ID and the key. If you run from a PowerShell console run this syntax to kick it off:

.\AzureStackFabricOMSAgentInstall.ps1 -OMSWorkSpaceID “YOURWORKSPACEID” -OMSKey “YOUROMSKEY”

The script will kick off, building an array of the Azure Stack VM’s, looping through each of them to copy over the OMS agent, and then install the OMS agent setting the OMS workspace ID and key.

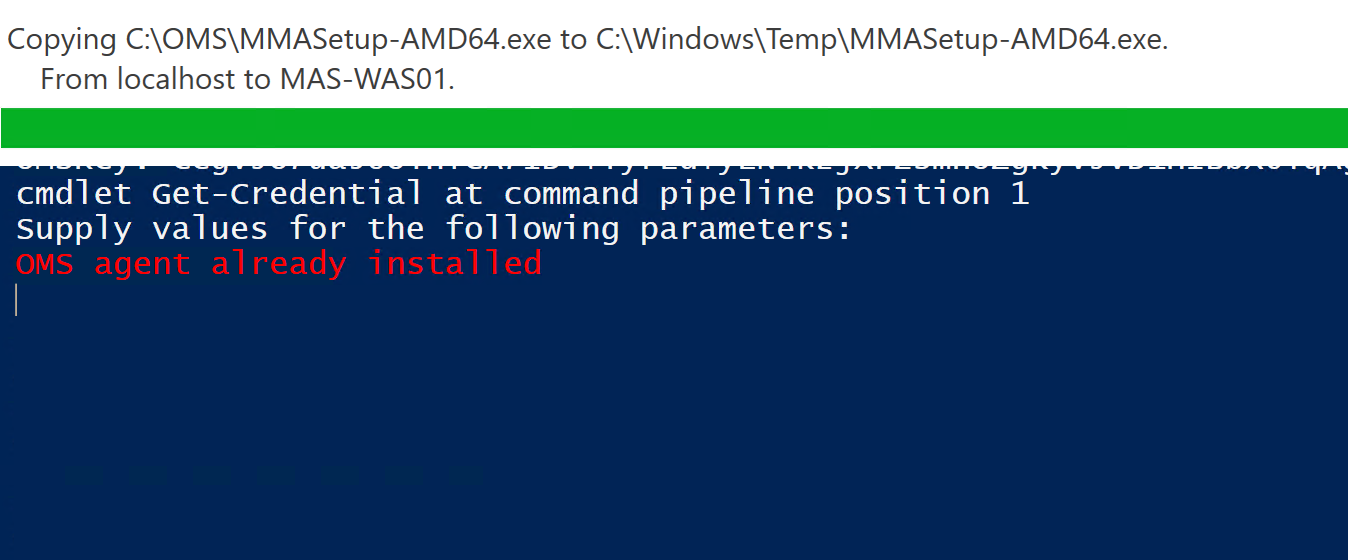
The script will detect if an OMS agent is already installed and will skip that server as shown in the following screenshot.

Otherwise the script will install the OMS agent as shown in the following screenshot.

The following screenshot shows the script running in a PowerShell console vs ISE.

You will be prompted when running the script for credentials. Use Azurestack\azurestackadmin as shown in the following screenshot.

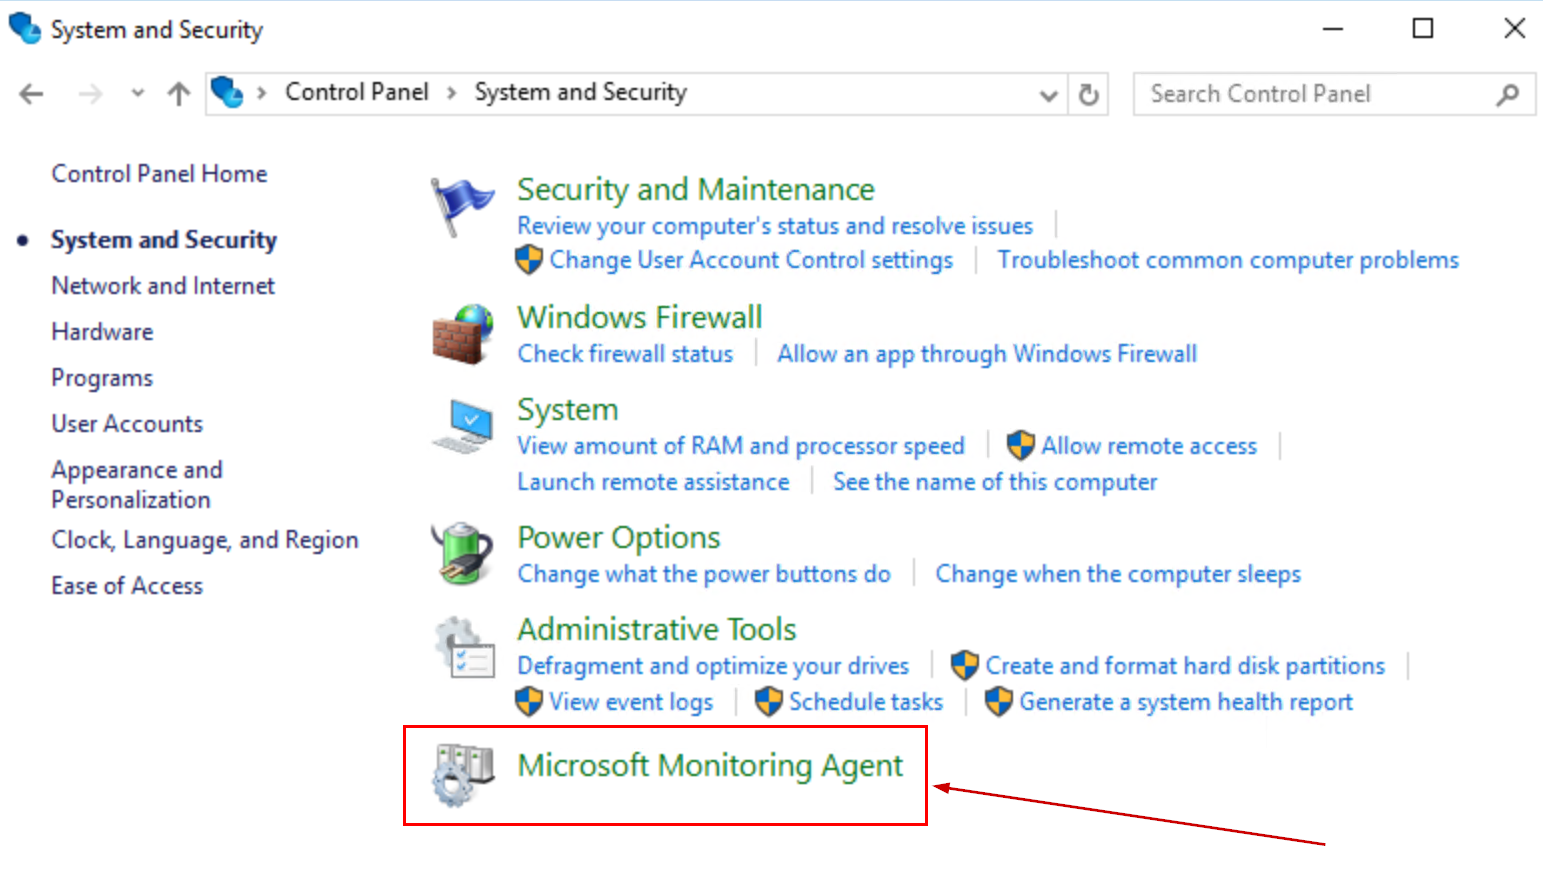
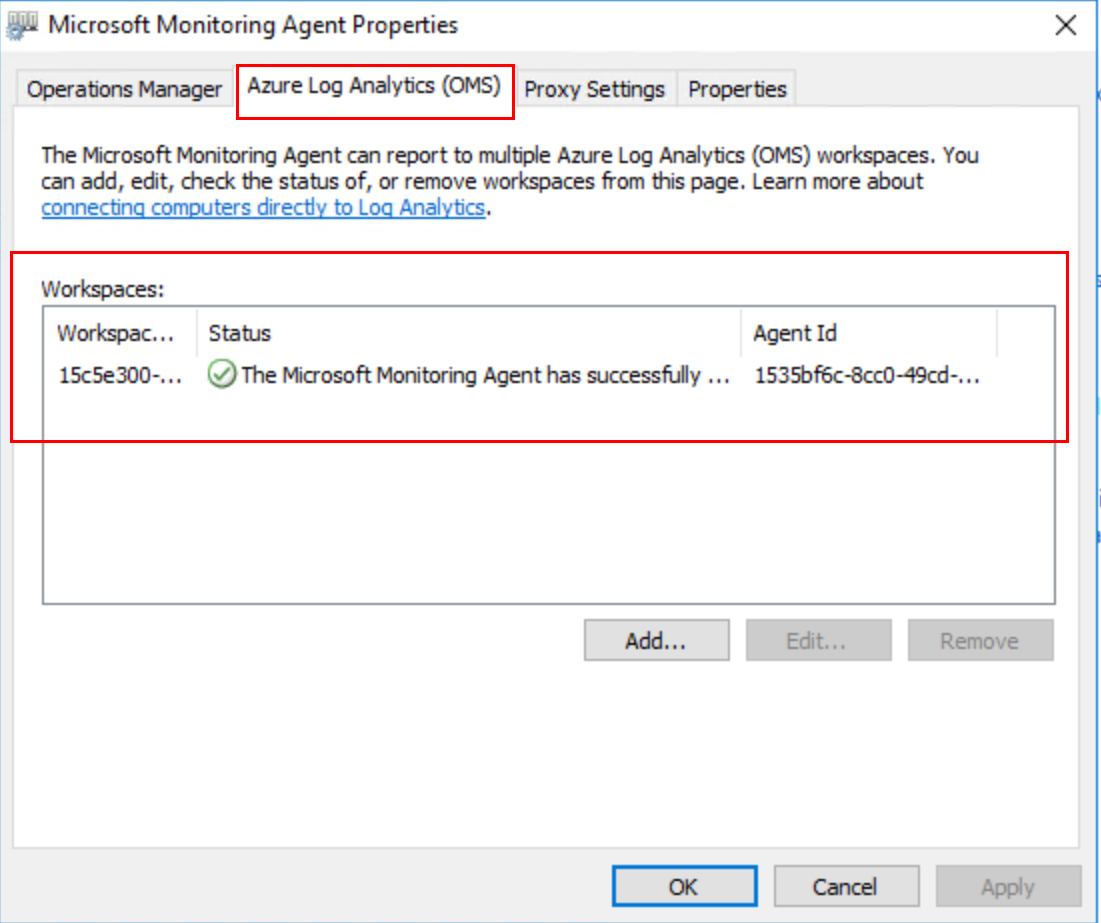
After the OMS agent is installed you should be able to log onto any of the Azure Stack VM’s and see the OMS agent in control panel as shown in the following screenshots.


You can also log onto OMS and see your Azure Stack servers listed under connected computers.

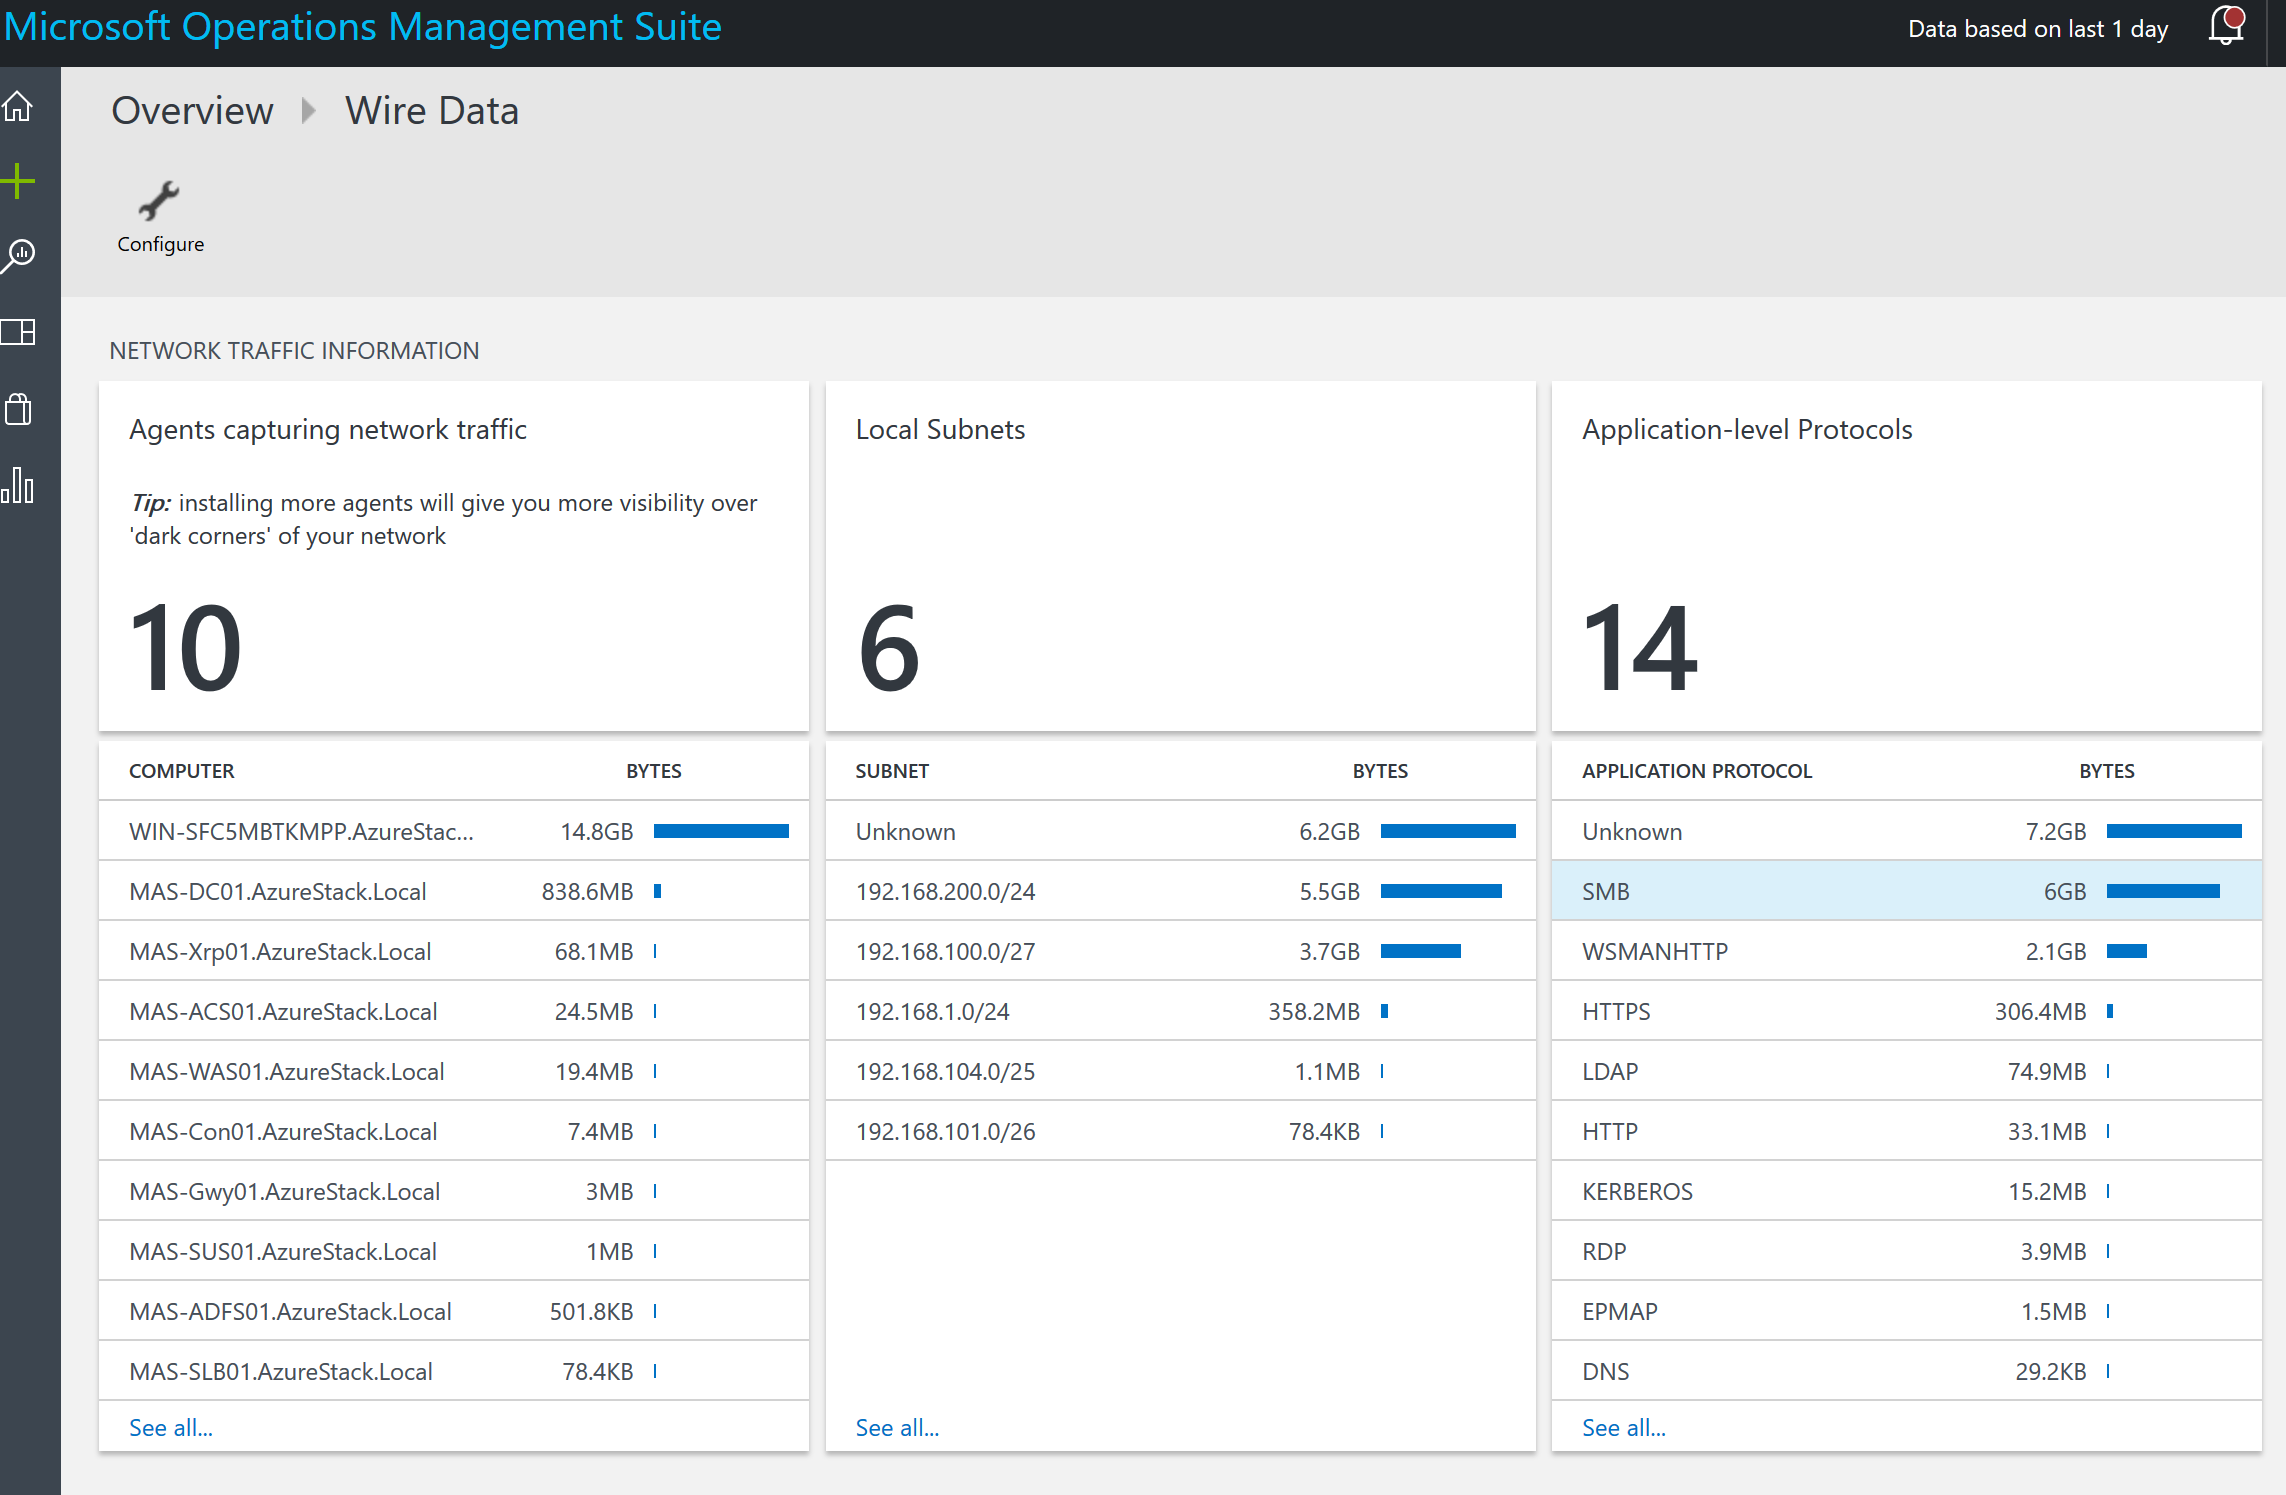
Azure Stack fabric servers wire data:

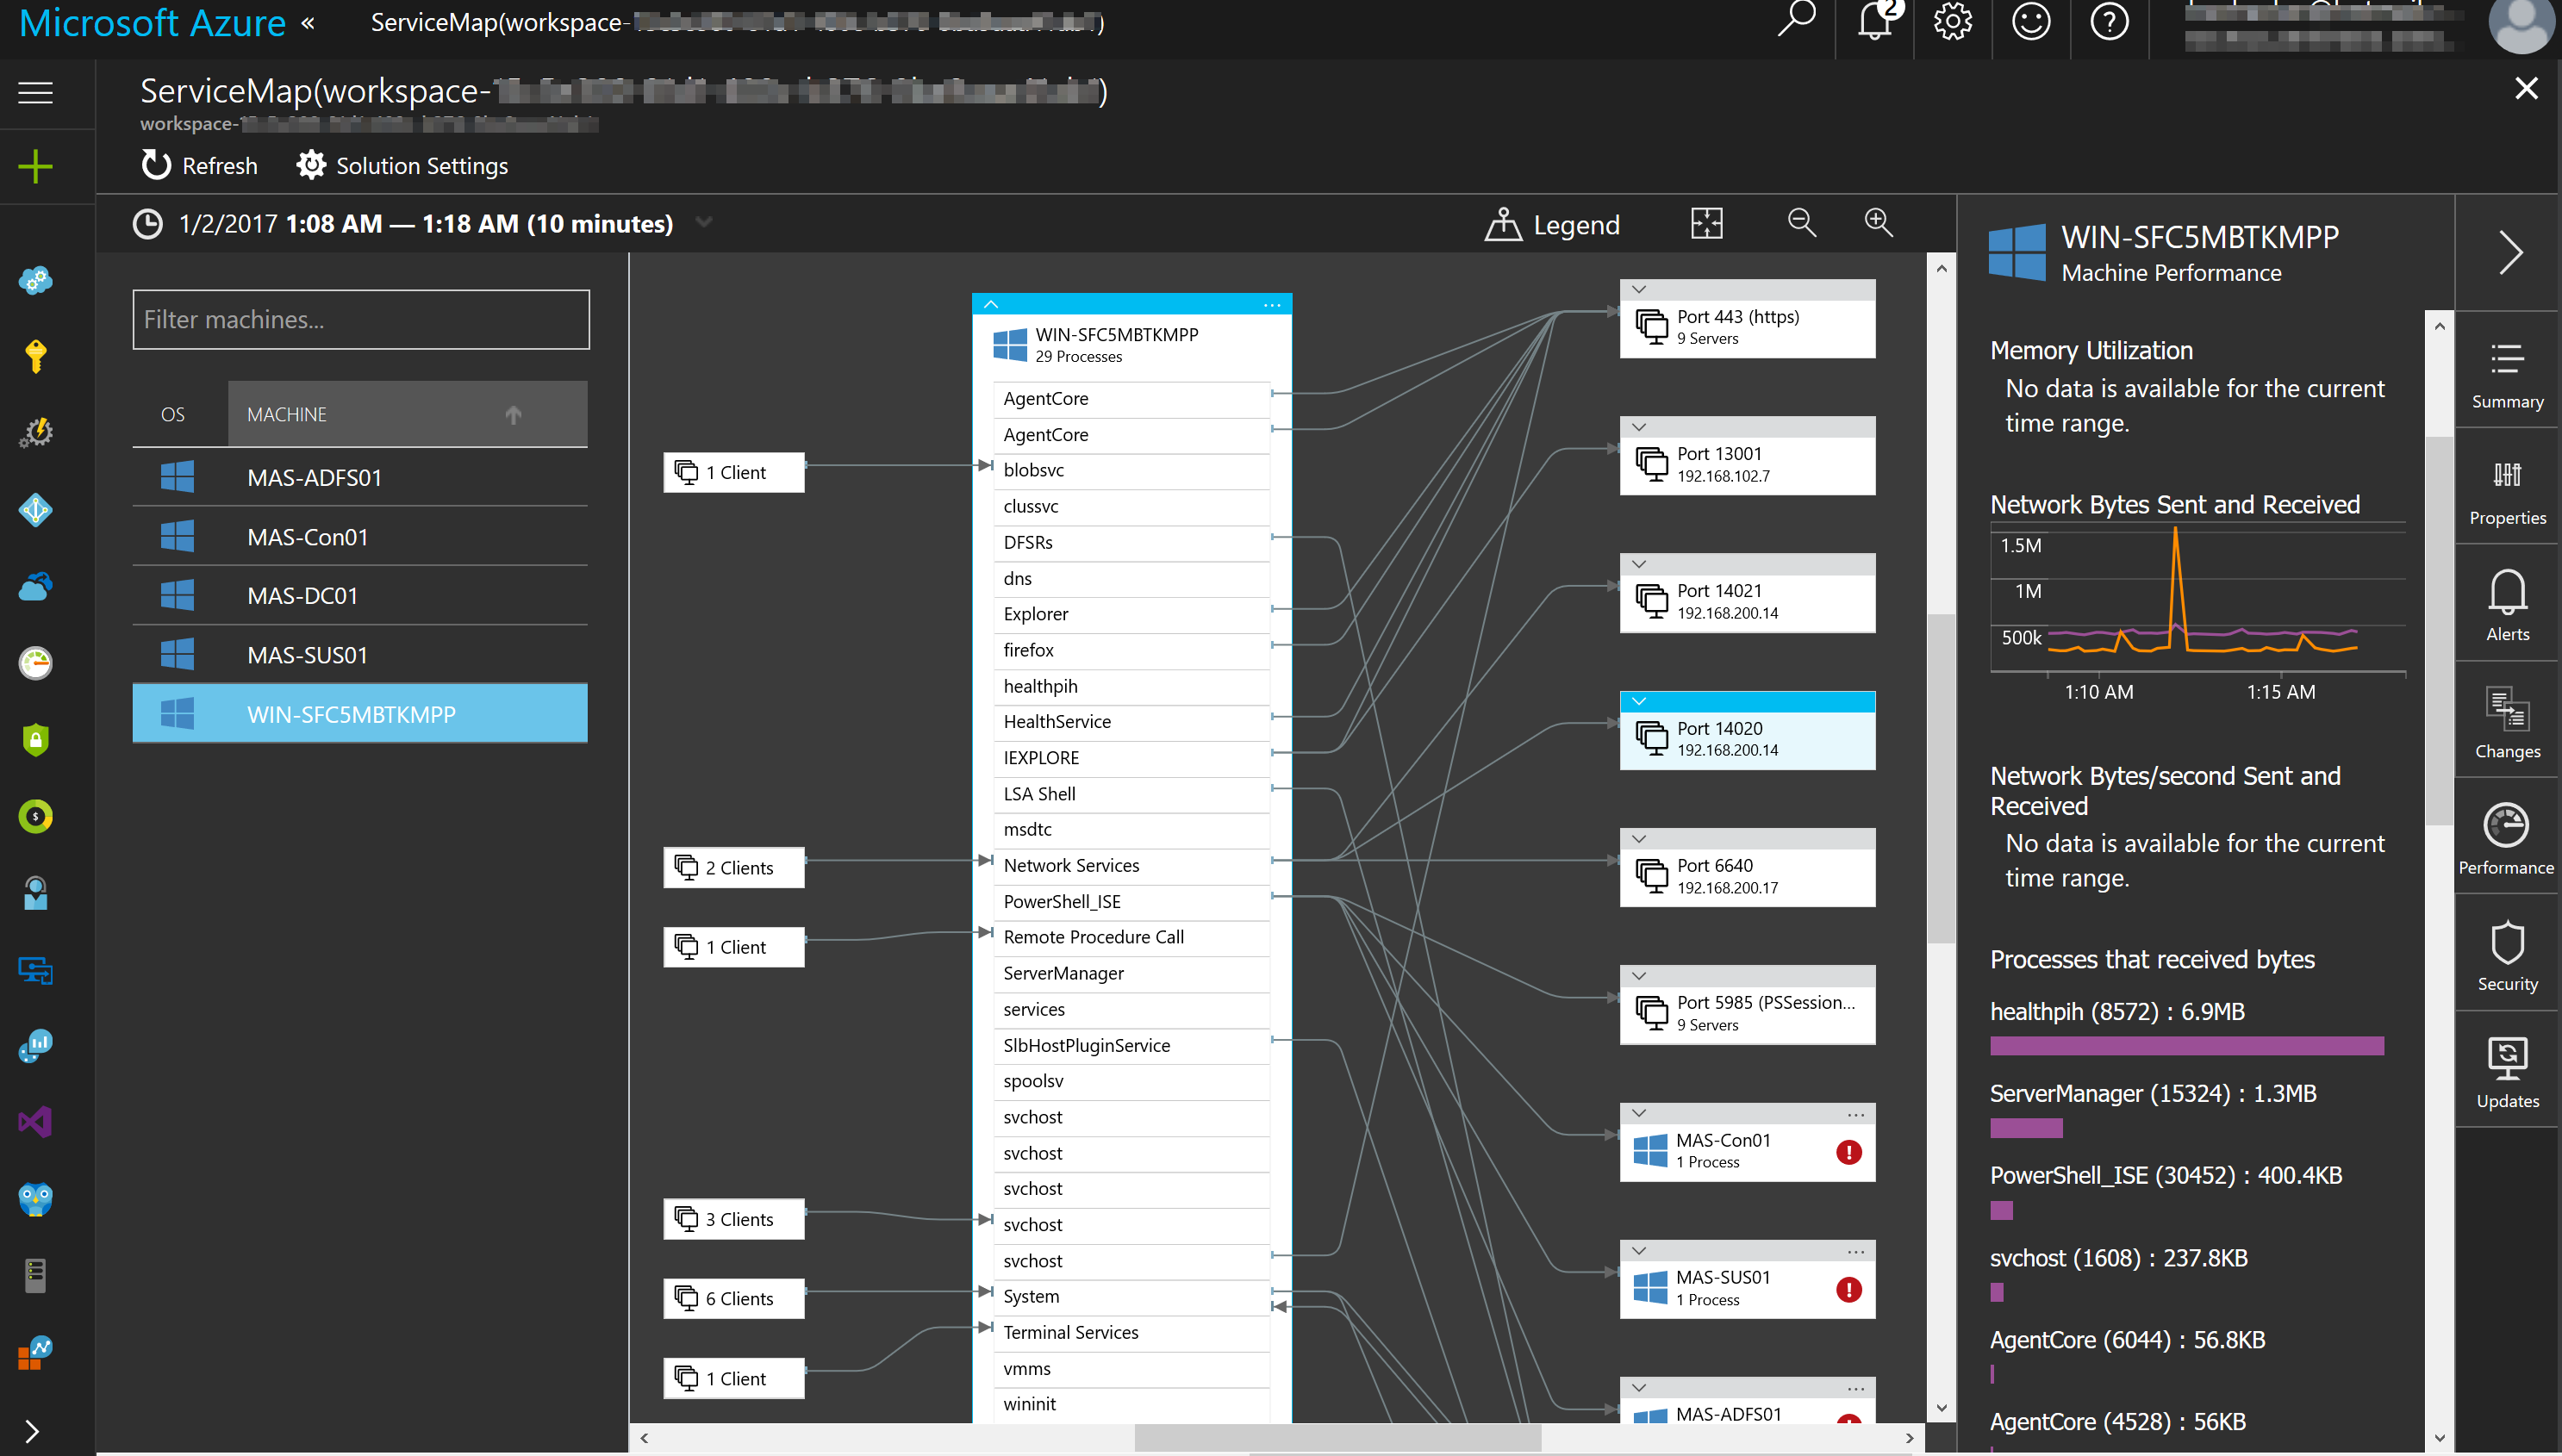
My Azure Stack host in OMS Service Map:

Happy Stacking and OMS’ing!

Read more
External Access to Azure Stack

Here is a little community gift for the new year (2017). Azure Stack expert Ruud Borst (@Ruud_Borst) recently published a blog post titled “Expose the Azure Stack Portal through NAT”. Ruud included a PowerShell script in this blog post that simplifies extending external access to Azure Stack.

The PowerShell script runs on your Azure Stack host and will make the IP mappings in NAT on MAS-BGPNAT01 to expose your Azure Stack instance externally to your network.

We no longer have to work through a bunch of tedious steps to give external access to Azure Stack. Thanks Ruud! Great example of community power. With Ruud’s script it can be done even if you already have Azure Stack deployed. The link to his blog post and script is here:

https://azurestack.eu/2016/12/expose-portal-azurestack-through-nat

Running the script is as easy as running something like this:

.\Expose-AzureStackPortal.ps1 -PortalExternalIP YOURFIRSTIPHERE -ACSExternalIP YOURSECONDIPHERE

Add -AppServiceAPIExternalIP if you are using the App Service RP you will need to specify a 3rd IP. SQL and MySQL both use the -PortalExternalIP so no need for an extra IP for these.

A successful run of the script should look like this:

VERBOSE: Created NAT external addresses 192.168.1.40 and 192.168.1.45 for Portal and ACS.

VERBOSE: Created Static NAT port mappings on 192.168.1.40 to 192.168.102.7 for Portal
VERBOSE: Created Static NAT port mappings on 192.168.1.40 to 192.168.102.12 for XRP
VERBOSE: Created Static NAT port mappings on 192.168.1.45 to 192.168.102.3 for ACS
VERBOSE: Created Static NAT port mappings on 192.168.1.40 to 192.168.102.14 for SQLrp
VERBOSE: Created Static NAT port mappings on 192.168.1.40 to 192.168.102.1 for MySQLrp

The last step in this process is to make sure you add the DNS records on your external network or to the host file on external servers or clients. Ruud explains this in his blog. I extended Azure Stack to my Buchatech lab environment so I went the DNS route.

For DNS entries I used a CSV file and PowerShell to import all of the DNS records I needed for Azure Stack. I used a PowerShell script from a fellow MVP. The blog post with that script can be found here:

http://www.lazywinadmin.com/2012/10/create-dns-entries-using-powershell-and.html

Here is what the CSV file should look like:

name ip type zone dnsserver
 portal 192.168.1.40 A azurestack.local dc.buchatech.com
 api 192.168.1.40 A azurestack.local dc.buchatech.com
 xrp.tenantextensions 192.168.1.40 A azurestack.local dc.buchatech.com
 keyvault.tenantextensions 192.168.1.40 A azurestack.local dc.buchatech.com
 health.adminextensions 192.168.1.40 A azurestack.local dc.buchatech.com
 compute.adminextensions 192.168.1.40 A azurestack.local dc.buchatech.com
 network.adminextensions 192.168.1.40 A azurestack.local dc.buchatech.com
 storage.adminextensions 192.168.1.40 A azurestack.local dc.buchatech.com
*.blob 192.168.1.45 A azurestack.local dc.buchatech.com
*.queue 192.168.1.45 A azurestack.local dc.buchatech.com
*.table 192.168.1.45 A azurestack.local dc.buchatech.com
sqlrp 192.168.1.40 A azurestack.local dc.buchatech.com
mysqlrp 192.168.1.40 A azurestack.local dc.buchatech.com
A azurestack.local dc.buchatech.com

Here is the CSV file I used so you don’t have to create it.

Azure Stack DNS Entries

Notice something different I did with my DNS is I did not add *.azurestack.local. I did not do this because it caused any of the storage DNS entries to respond with the PortalExternalIP instead of the ACSExternalIP. Here is a screenshot of my Azure Stack DNS zone in my Buchatech domain:

After adding the DNS records and installing the Azure Stack certificate in the trusted root authority store I was able to access the Azure Stack portal and connect via PowerShell or Visual Studio without VPN. 🙂

Here is a screenshot of me connecting to Azure Stack’s portal from my Buchatech.com domain on one of my utility servers.

A huge thanks to Ruud for building that PowerShell script. I am excited about bringing access to Azure Stack on my other lab network because this opens up all sorts of possibilities and will net some cool blog posts very soon!

Happy Stacking!

Read more
Azure or Azure Stack “Write Once, Deploy Anywhere” Update

A while back I wrote a blog post about being able to take one IaaS VM Azure Resource Manager (ARM) template and deploy it to both Azure or Azure Stack. This blog post included a JSON file and the PowerShell to do this. The idea for that came from needing to set up a cool and working demo for MMS 2016 and the need to showcase the power of Microsoft’s HybridCloud. Here is a link to that original blog post:

Write once, deploy anywhere (Azure or Azure Stack)

Today I have finished updating the PowerShell and ARM template/JSON file to be more streamlined and to work with TP2. Here is the link to download these:Here are the updates:

https://gallery.technet.microsoft.com/Create-VM-on-Azure-or-3c6d0420

Here are the updates:

  • The JSON and PowerShell script have been modified to work with Azure Stack TP2.
  • This script now utilizes the connection PowerShell module AzureStack.Connect.psm1 from Azure Stack tools.
  • This is included with the download of this script and JSON file on TechNet Gallery.
  • The script is hard coded to look locally to import the AzureStack.Connect.psm1 module.
  • Streamlined the JSON file and PowerShell script.
  • The script no longer prompts for the publicDNS name. It is now automatically set to the same as the vmname.
  • The script no longer prompts for the storage account name. It is automatically set to vmnamestorage.
  • The script no longer prompts for the resourcegroup name. This is now automatically set to vmname-RG.
  • By default this script now uses a JSON file hosted on Github. This is set in the $templateFilePath variable as shown on the next line.
  • To keep it to the local directory just use the JSON file name.

GITHUB: $templateFilePath = “https://raw.githubusercontent.com/Buchatech/Azure-AzureStackVM/master/AzureandAzureStack.json”
LOCAL: $templateFilePath = “AzureandAzureStack.json

This will be my last blog post of 2016. See you next year folks…..

Happy Stacking!

Read more
Detailed SQL RP Azure Stack TP2 Deploy & Config

Microsoft has made a new version of the SQL resource provider (RP) for Azure Stack TP2 available. It can be found here in the documentation: https://docs.microsoft.com/en-us/azure/azure-stack/azure-stack-sql-resource-provider-deploy. This RP is an add-on for Azure Stack and allows you to offer SQL as PaaS.

This is a great SQL self-service scenario for Hybrid Cloud. The aforementioned link contains documentation on how to deploy the SQL RP. There are some “Gotchas” with the RP and some other information that is important when deploying and configuring this RP.

I am going to walk through my deployment and configuring experience covering the “Gotchas” and other important information in this blog post. This post will be broken out into the following sections:

  • Deployment
  • RP Configuration
  • Offer/Plan Setup
  • Tenant provisioning of SQL PaaS

Ok. Now let’s dive into it.

– DEPLOYMENT –

Before you begin go to the document link and review the RP documentation. You can download the RP on this page from the Download the SQL Server RP installer executable file link.

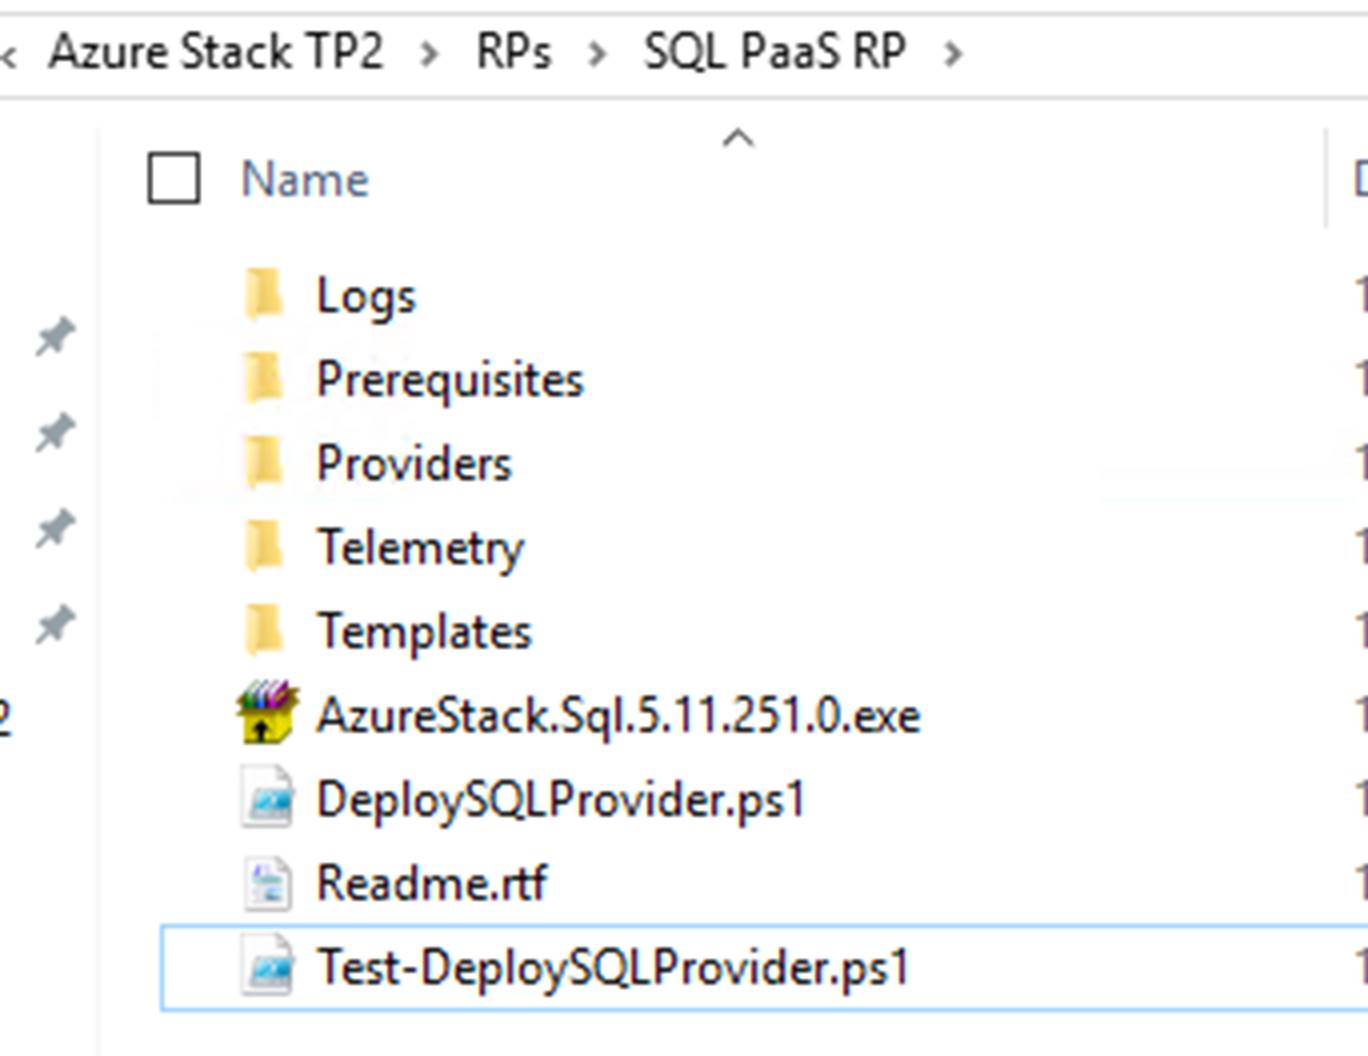
Once the RP is downloaded extract the files and scripts by running AzureStack.Sql.5.11.251.0.exe. You should have the following:

mastp2-sql-rp-1

Now from an elevated PowerShell window run DeploySQLProvider.ps1.

NOTE: Important this should not be run from PowerShell ISE. It fails when it is run from ISE and you may end up with a partial deployment that requires cleanup.

NOTE: Also you can specify a local location for the SQL 2014 SP1 Enterprise Evaluation ISO if you have it downloaded already. To do this run the script with a parameter of -DependencyFilesLocalPath. If not specified the ISO will be downloaded during deployment. I prefer to let the script download it as a part of the deployment.

This script will do the following:

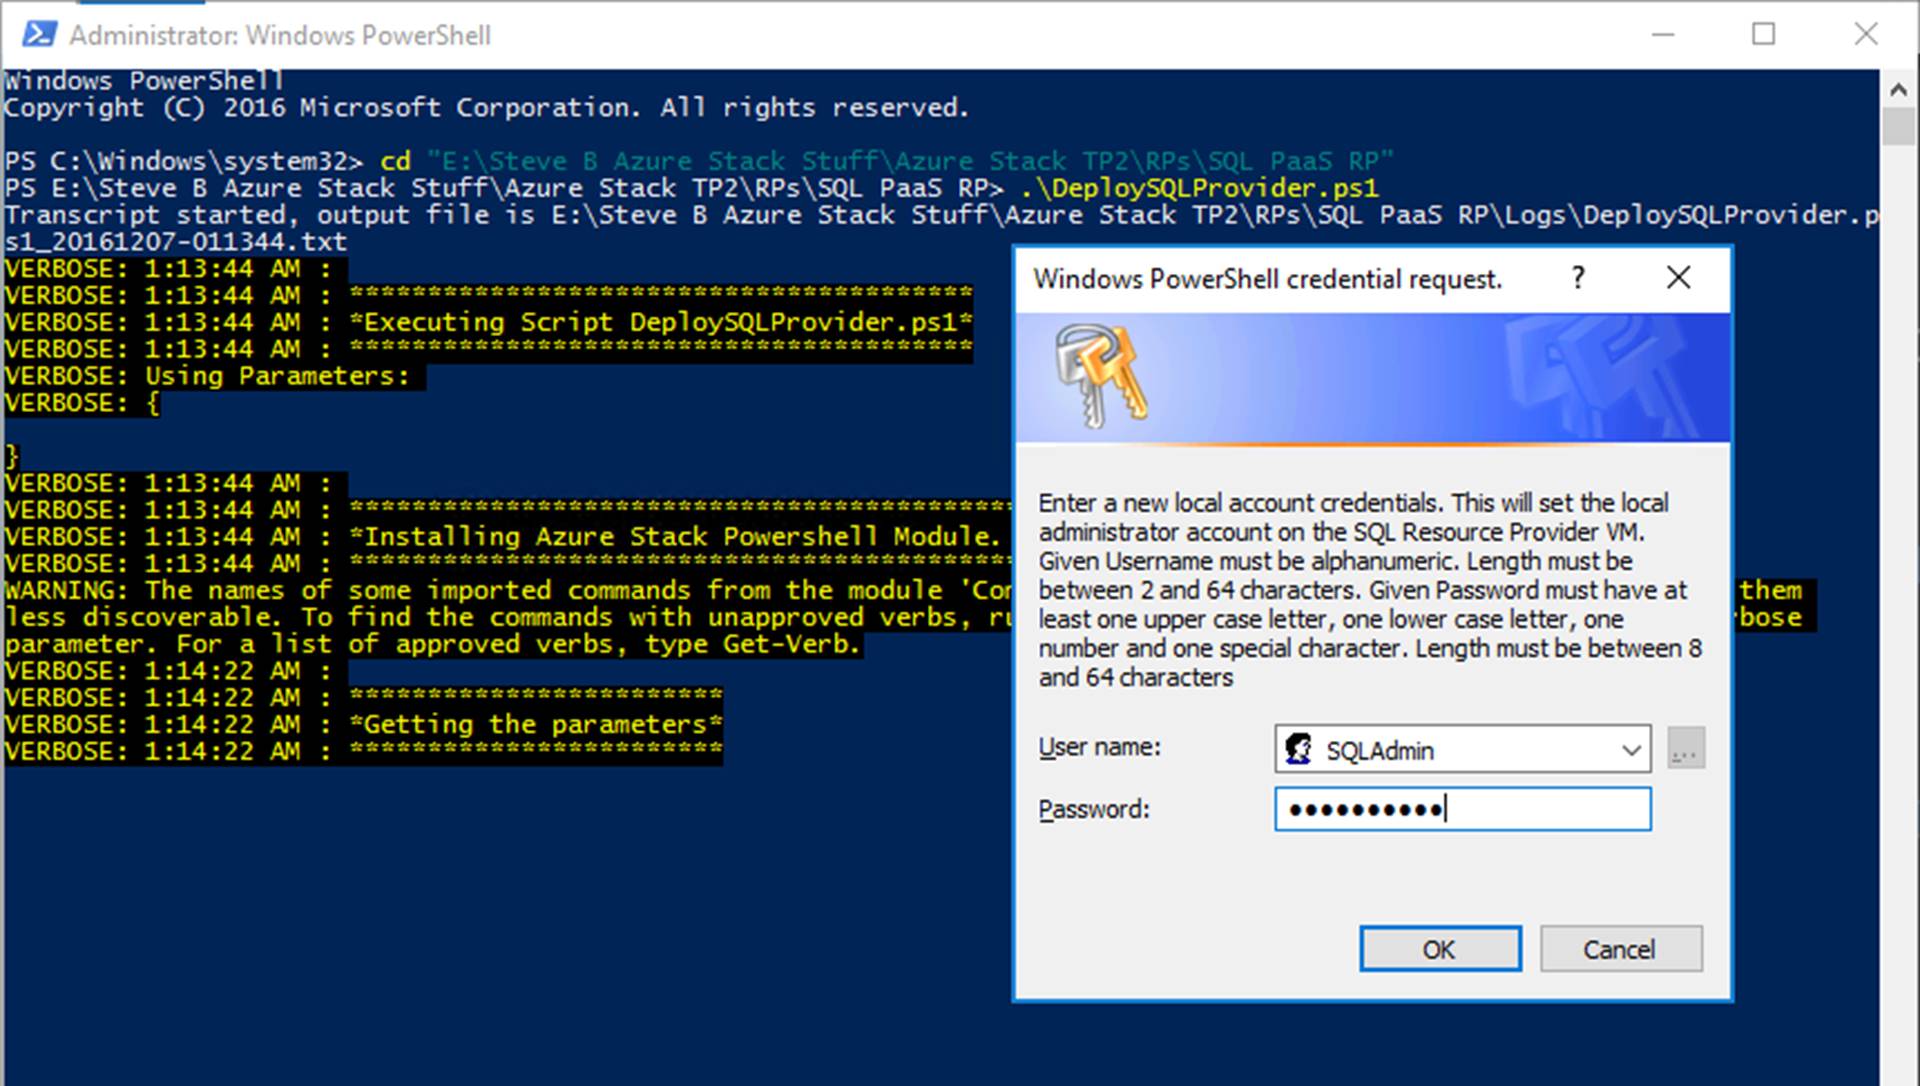
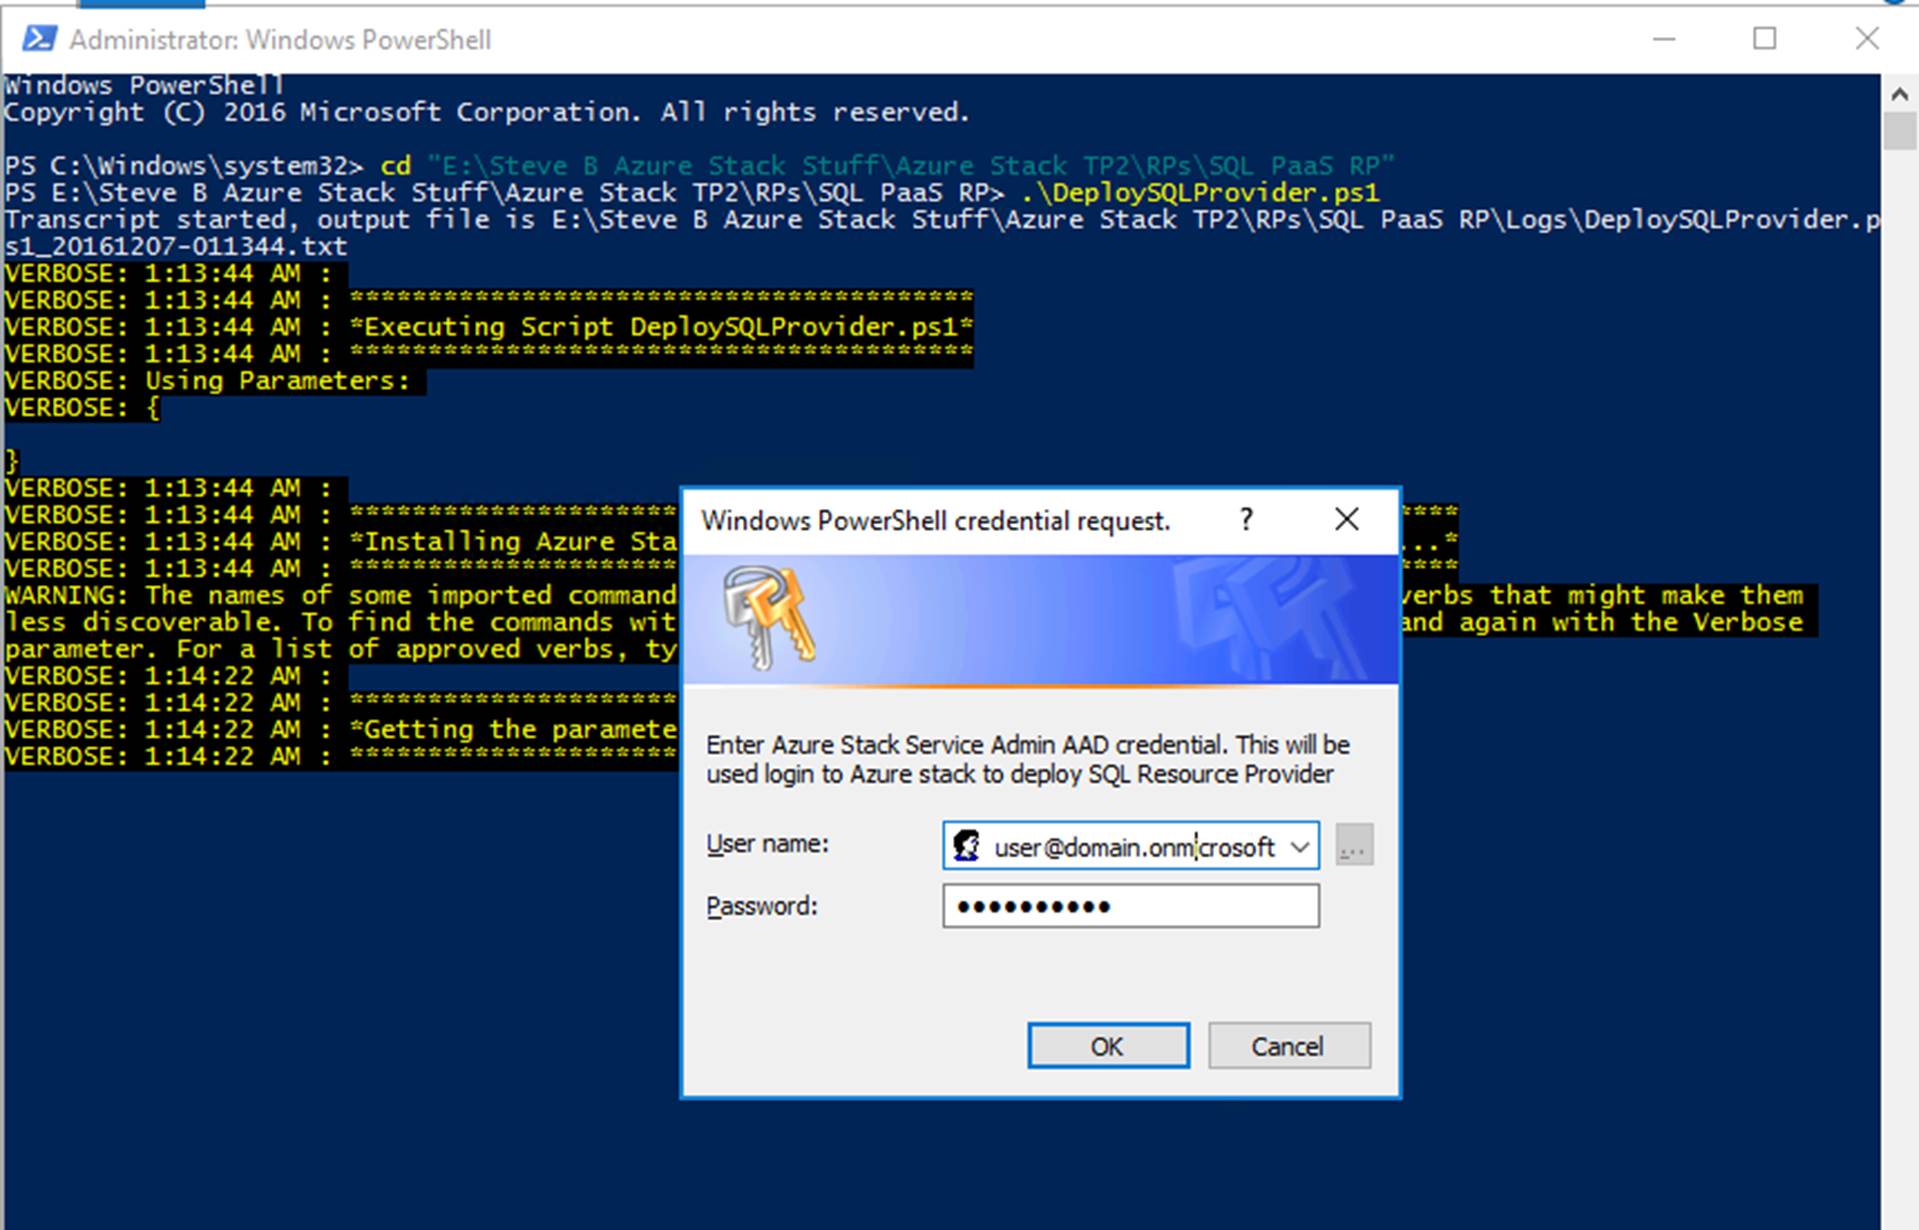
The script will prompt you to input local admin account info. Note that the password you input here will also be used for the SQL SA account.

mastp2-sql-rp-2

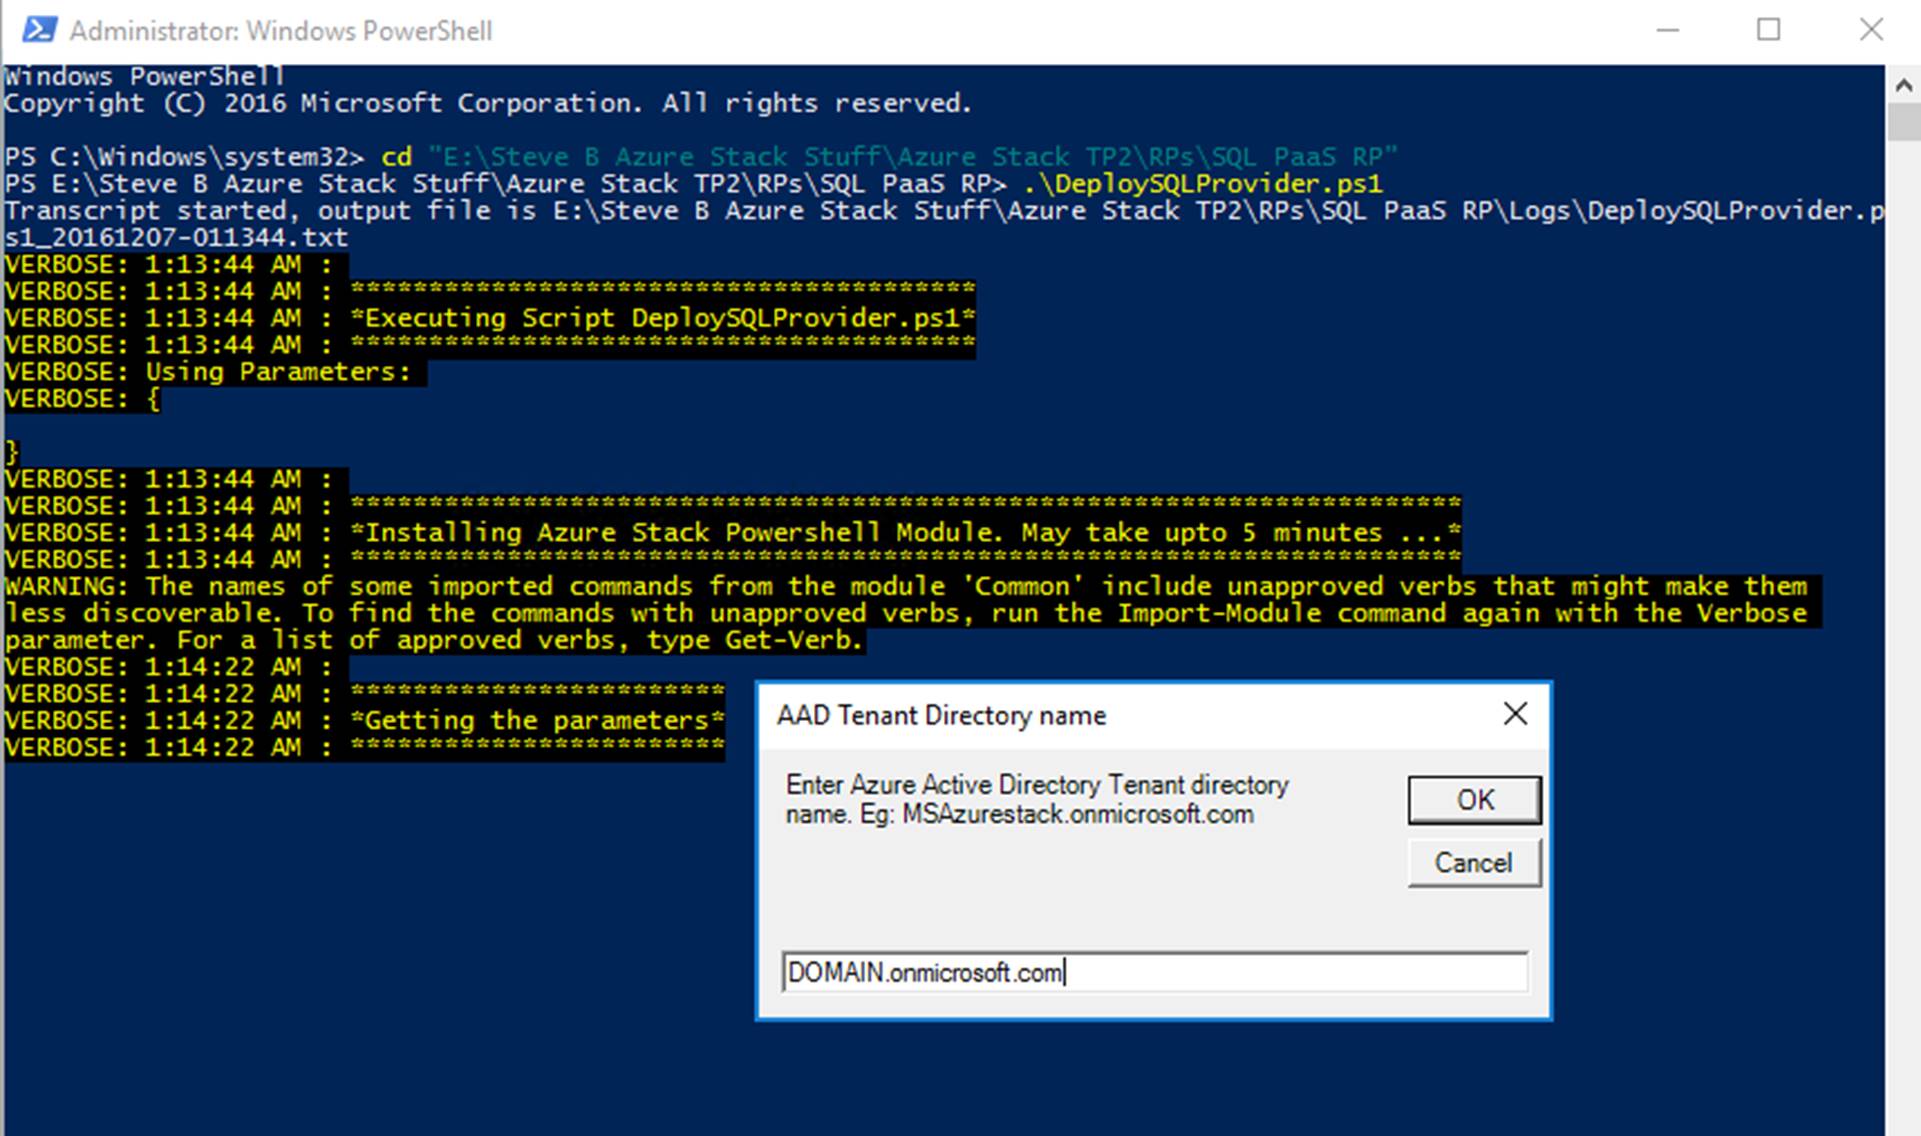
The script will then prompt you for your Azure Active Directory tenant name. This is YOURDOMAIN.onmicrosoft.com.

You will then be prompted for an Azure Active Directory account. This should be the account you deployed Azure Stack TP2 with. This will be used to access Azure Stack and create stuff such as the resource provider, resource group and other resources needed by the RP.

mastp2-sql-rp-4

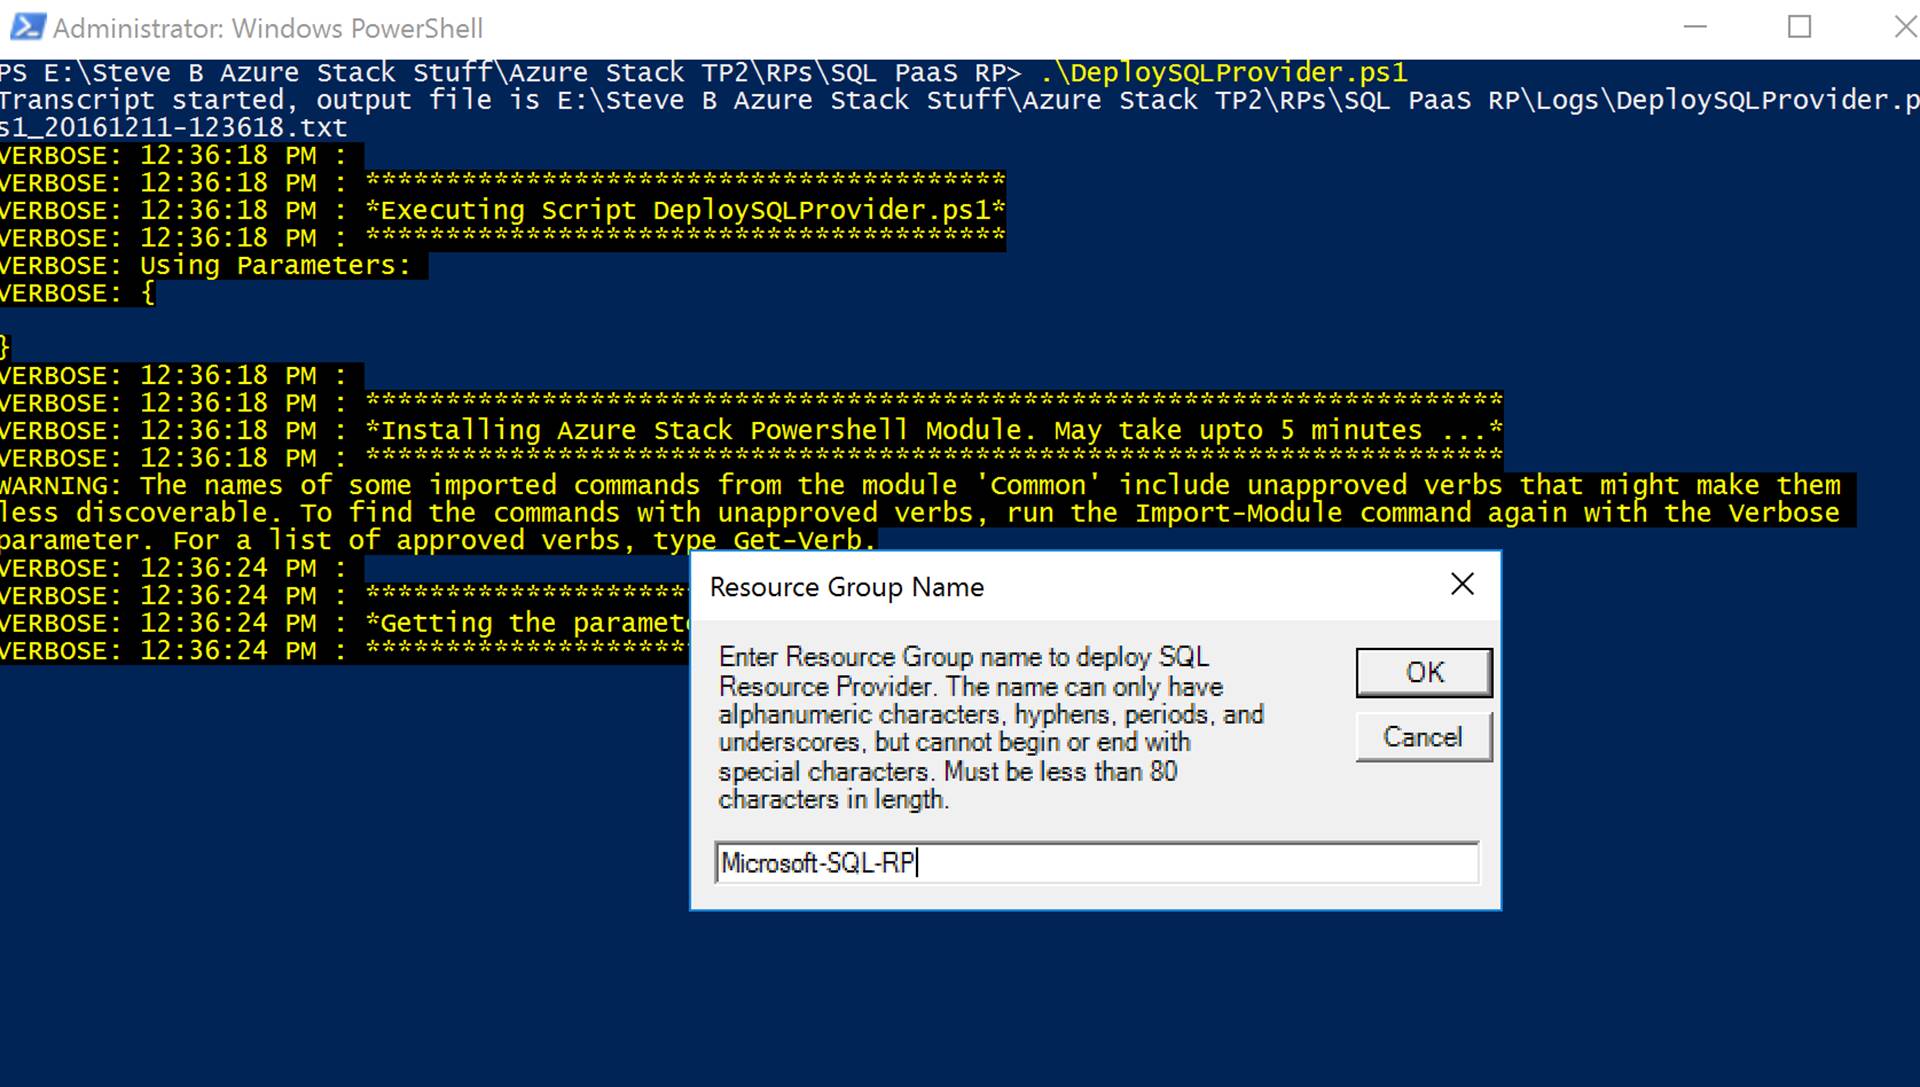
You need to enter a resource group name. You can leave the default if you want.

mastp2-sql-rp-5

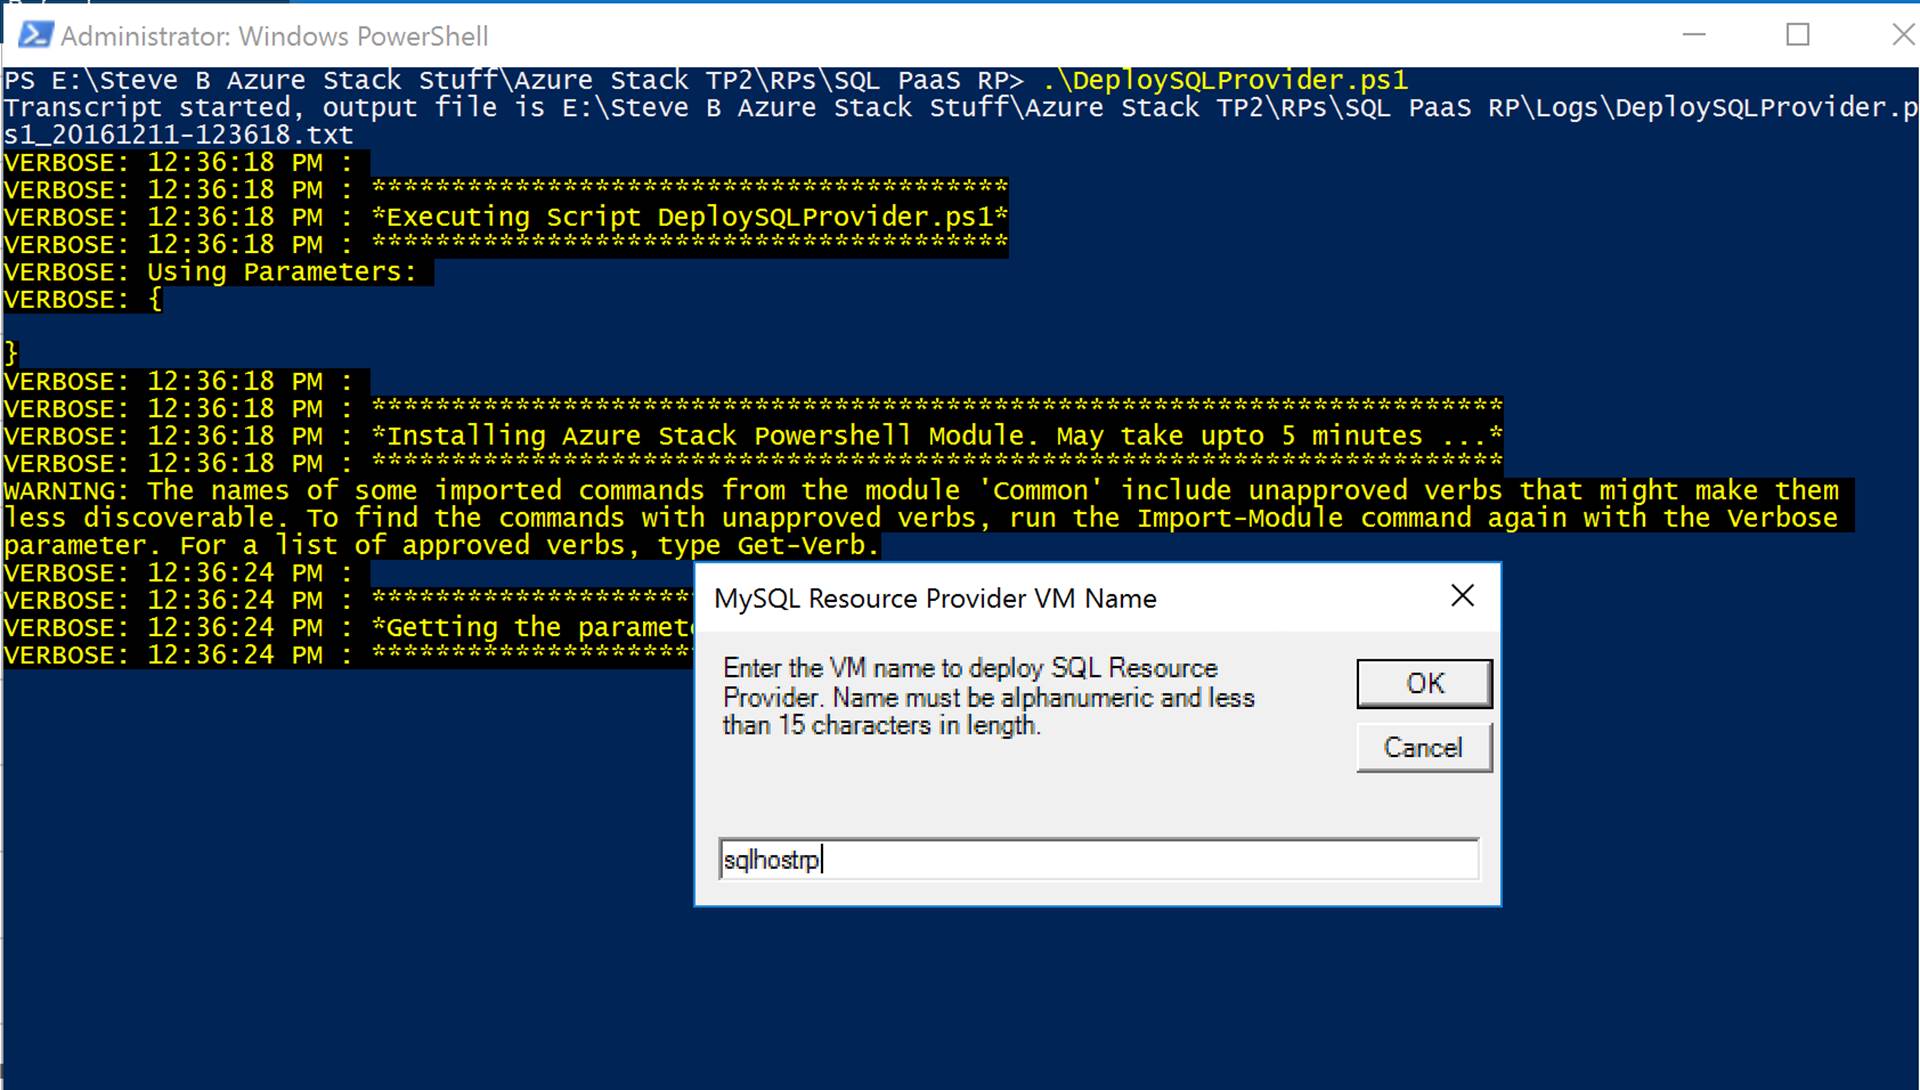
You will then be prompted for the SQL server VM Name. Ignore the title of the pop-up here.

mastp2-sql-rp-6

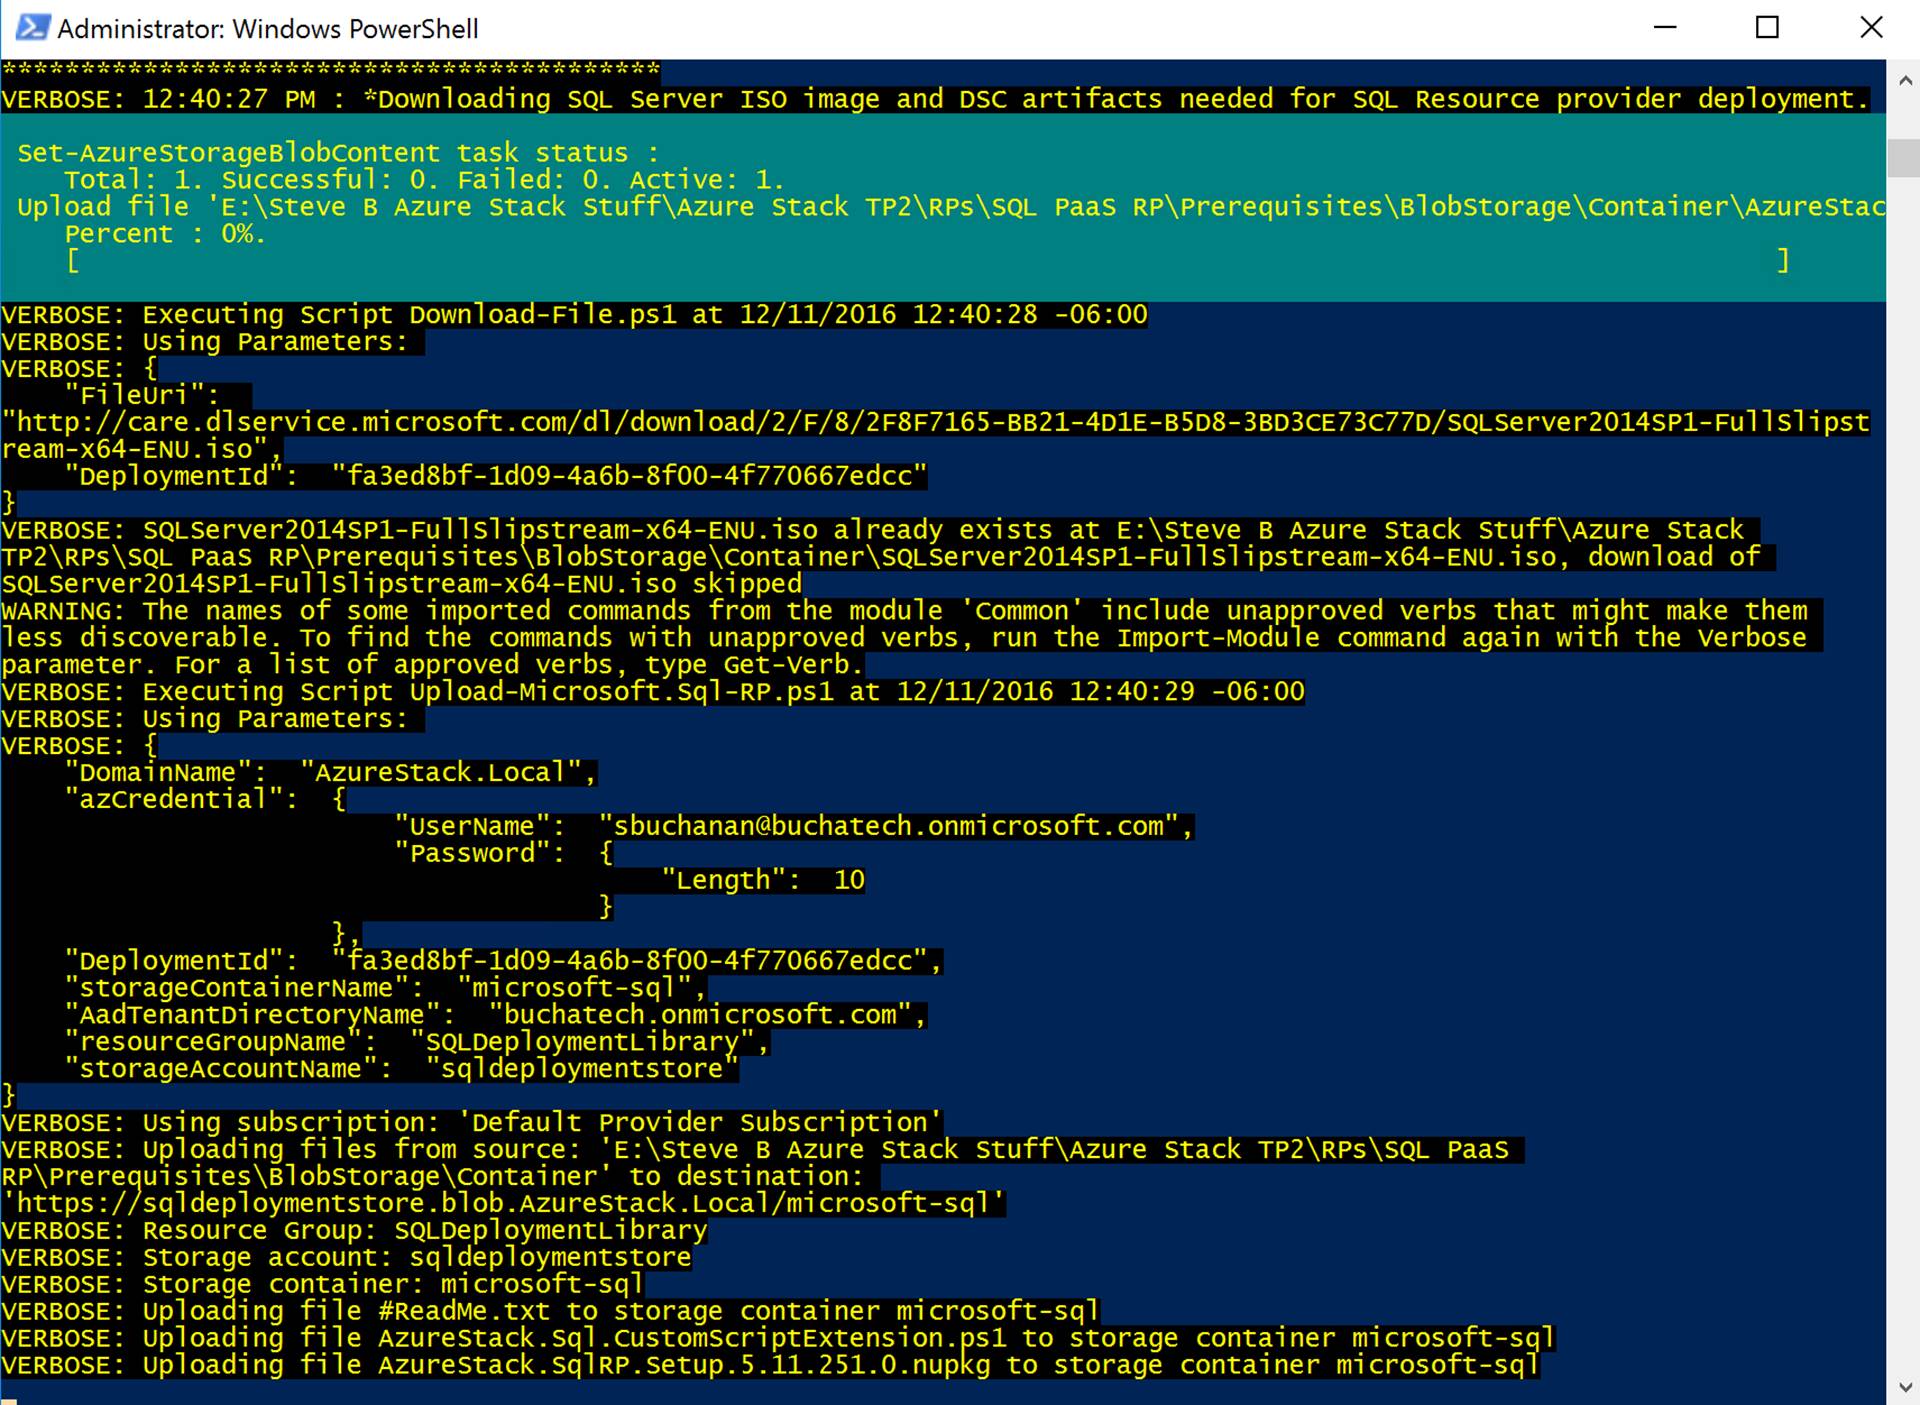
The script will then run through all of its steps. Here is what the script does as detailed in the official documentation:

  • If necessary, download a compatible version of Azure PowerShell.
  • Create a wildcard certificate to secure communication between the resource provider and Azure Resource Manager.
  • Download an evaluation build of SQL Server SP1 from the internet or from a local file share.
  • Upload the certificate and all other artifacts to a storage account on your Azure Stack.
  • Publish gallery package so that you can deploy SQL database through the gallery.
  • Deploy a VM using the default Windows Server 2012 R2 image that comes with Azure Stack.
  • Register a local DNS record that maps to your resource provider VM.
  • Register your resource provider with the local Azure Resource Manager.
  • Connect the resource provider to the SQL server instance on the RP VM

As the script runs you will see it run through each of the steps with detail and status. Be patient. I have had this take anywhere from 30 minutes to 45 minutes. Good time to go take a break.

mastp2-sql-rp-7

Once the script is done it will show that the installation is successful as shown in the following screenshot.

mastp2-sql-rp-8

NOTE: You could run the deployment script with the required parameters to avoid the prompts. For example:
DeploySQLProvider.ps1 -AadTenantDirectoryName “YOURDOMAIN.onmicrosoft.com” -AzCredential “user@YOURDOMAIN.onmicrosoft.com” -LocalCredential “username”

If for some reason the RP deployment fails you will need to view the logs to troubleshoot. Logging will be found in: LOCATIONOFYOURDOWNLOADEDRP\SQL PaaS RP\Logs in the following format DeploySQLProvider.ps1_20161205-171516.txt as shown in the following screenshot.

mastp2-sql-rp-9

– RP CONFIGURATION –

Read more
Resource Group Clean-up in Azure Stack

If you are like me, you end up creating a ton of resource groups in Azure Stack when testing things out. I needed a way to delete them without having to click one each one via the portal. The best option of course is to leverage PowerShell. I threw together some PowerShell to handle this. I came up with two options #1 can be used to delete a bunch of RG’s that have a common name. For example, I had a bunch of VM00* resource groups. I use the script to go loop through and delete all resource groups with VMO in the name. Option #2 pop’s up a GUI window so I could select the RG’s I wanted to delete. It put them in an array and then looped through to delete them in one shot.

This is great because I can kick this off and go do something else. I will share both below in this blog post along with some screenshots. I won’t have a download for the PowerShell syntax so just copy from this post if you want to use it. Be sure to use AzureStack.Connect.psm1 for connecting to your Azure Stack environment before running any of the following code.

Code:
#1

#Create Variable of RG’s with common name
$Resourcegroups = Get-AzureRmResourceGroup | where {$_.ResourceGroupName -like (‘*VM0*’)}
#Create array of RG’s
$RGLIST = $Resourcegroups.ResourceGroupName

#Loop to remove each resource group in the array
ForEach(
$rg in $RGLIST
)
{
Get-AzureRmResourceGroup -Name $rg -ErrorAction SilentlyContinue | Remove-AzureRmResourceGroup -Force -Verbose
}

This image shows the array of RG’s that will be looped through. I highlighted vm003rg in the array and in the PowerShell status message.

rgcleanup-1

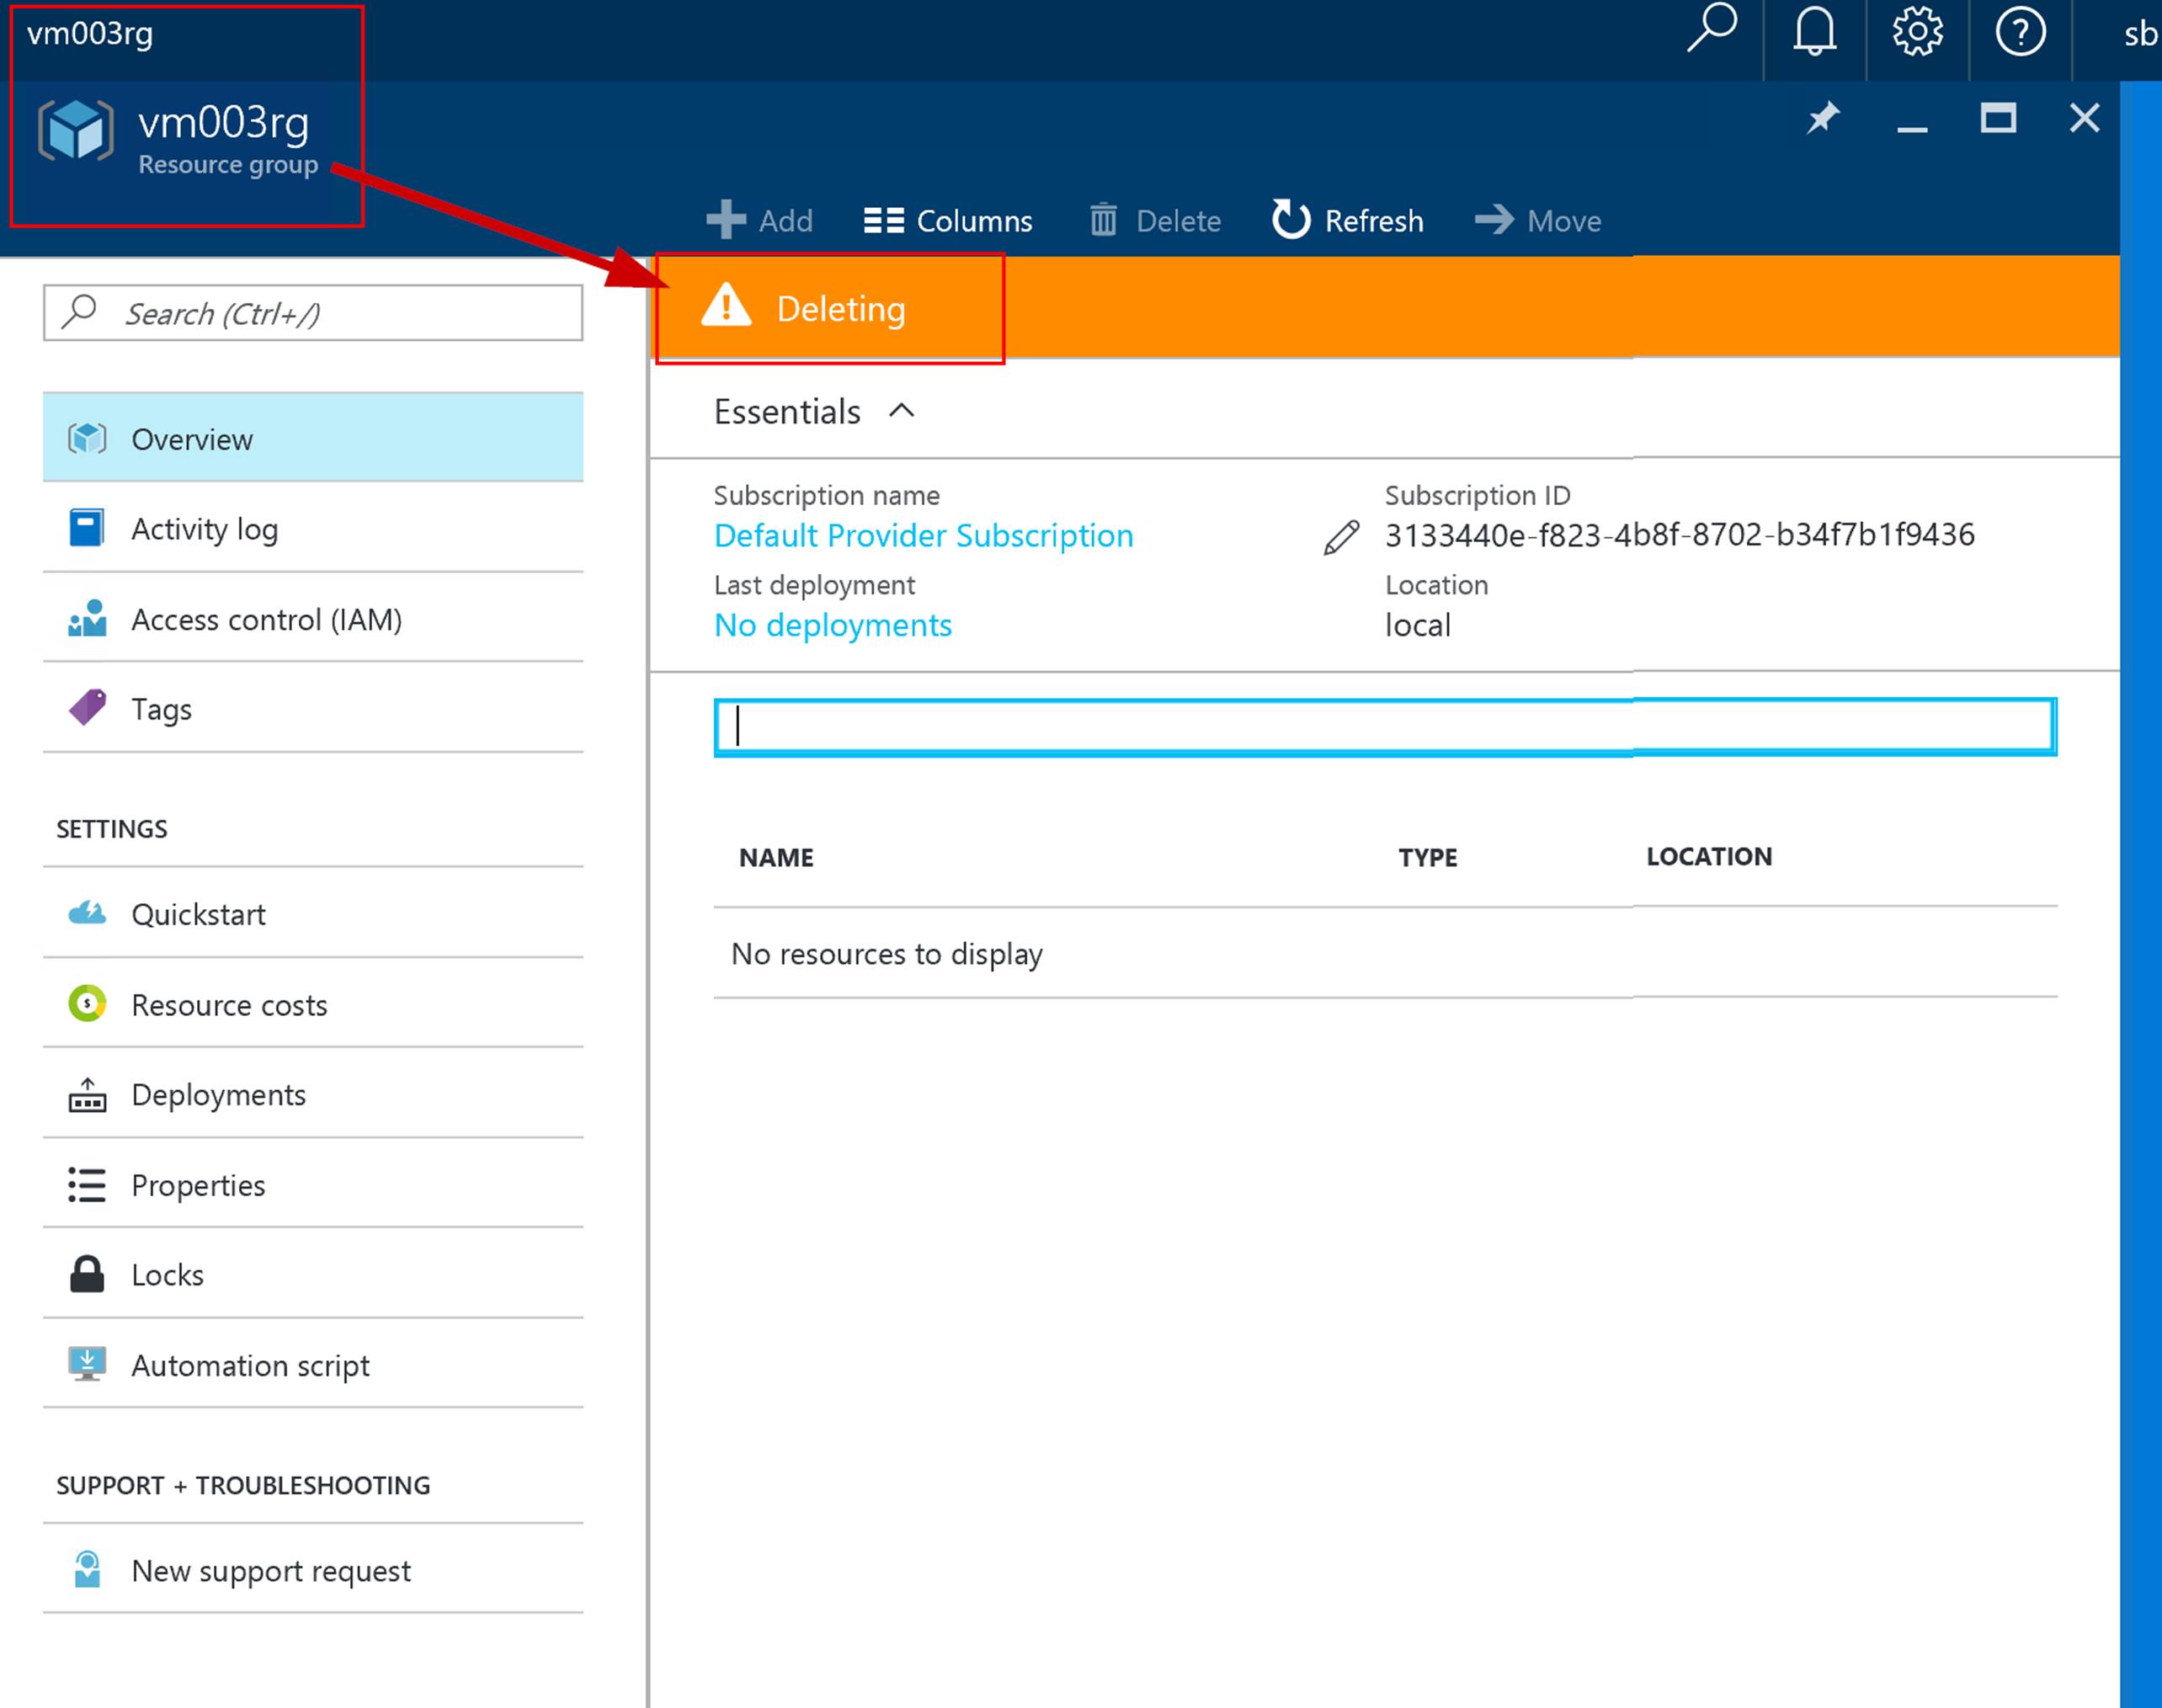
The following screenshot shows VM003RG being deleted in the Azure Stack portal.

rgcleanup-2

#2

#Create Variable of RG’s from GUI selection
$selectedrgs = (Get-AzureRmResourceGroup | Out-GridView ` -Title “Select ResouceGroups you want to remove.”` -PassThru).ResourceGroupName

#Loop to remove each resource group in the array
ForEach(
$rg in $selectedrgs
)
{
Get-AzureRmResourceGroup -Name $rg -ErrorAction SilentlyContinue | Remove-AzureRmResourceGroup -Force -Verbose
}

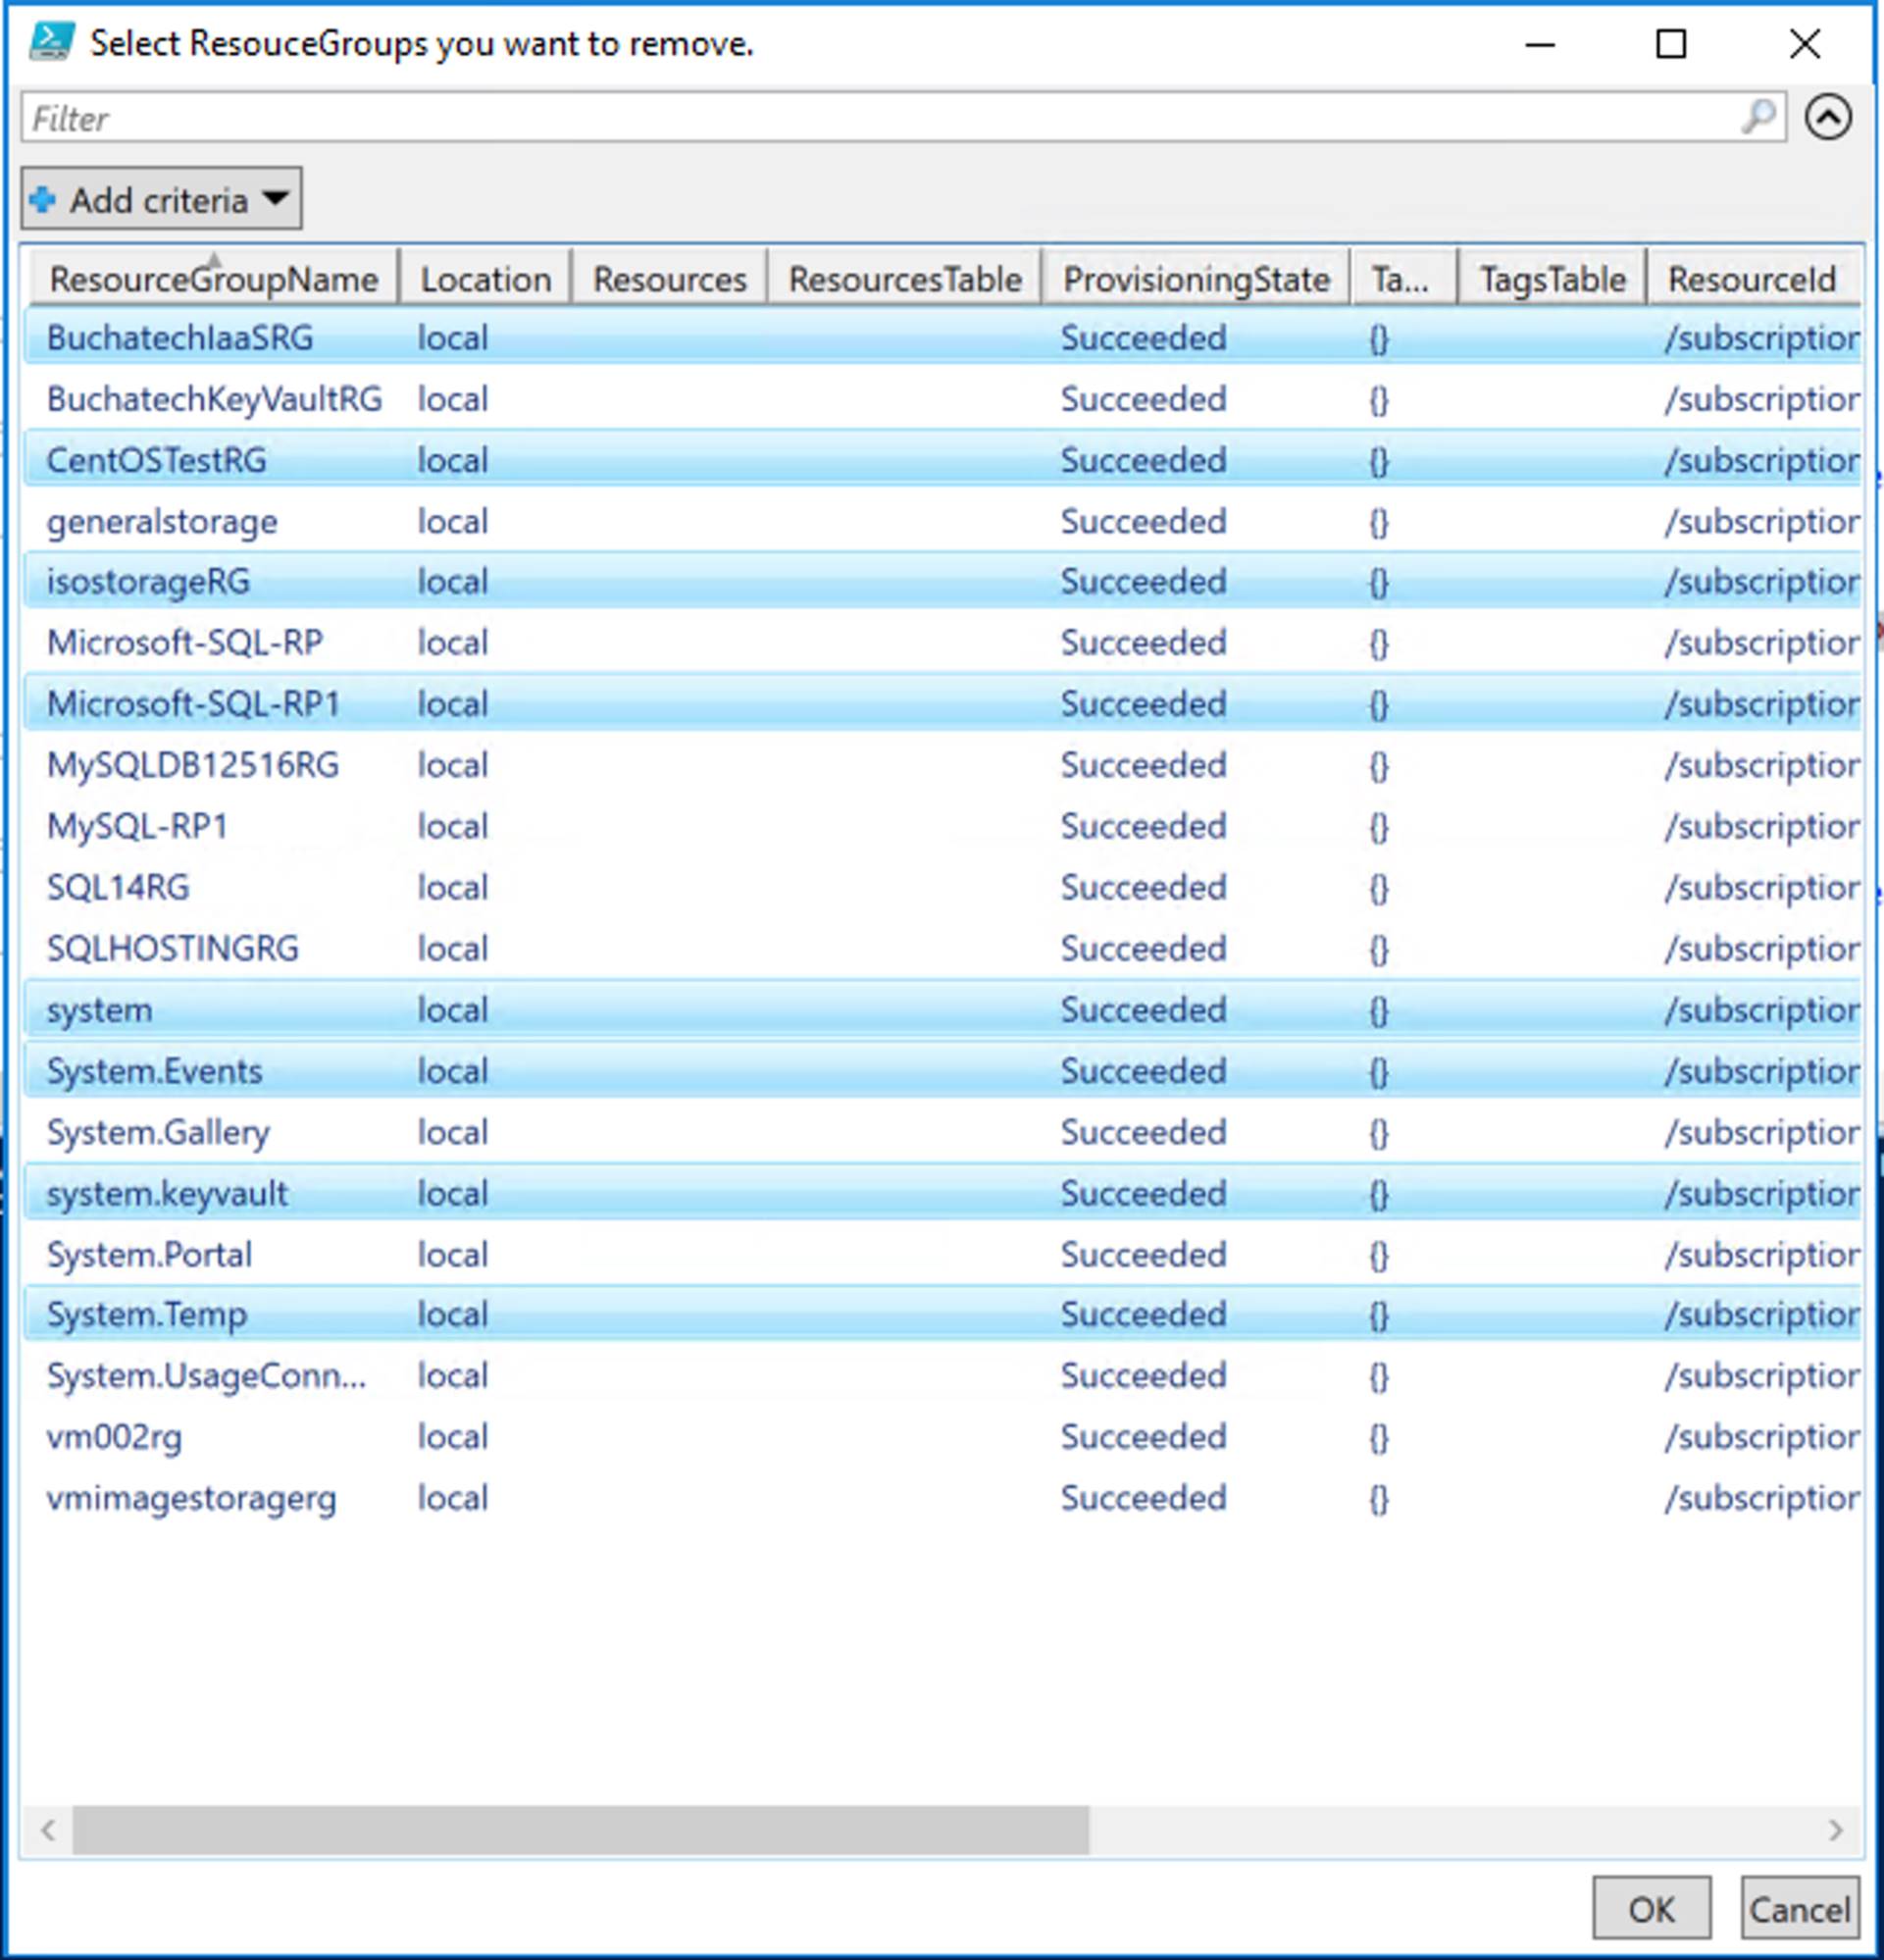
After running the Create Variable of RG’s from GUI selection part of the code a window as shown in the following screenshot will pop up. Select the RG’s you want to remove, click Ok and they will be placed into an array.

rgcleanup-3

Below if the output of the array. Run the Loop to remove each resource group in the array part of the code and each of the RG’s will be removed.

rgcleanup-4

I have also used this when a resource group would not delete from the portal. On some stubborn resource groups I have had to run this a couple of times. This is a short post. I hope this helps someone out!

Read more