WordPress as front-end for Azure Automation

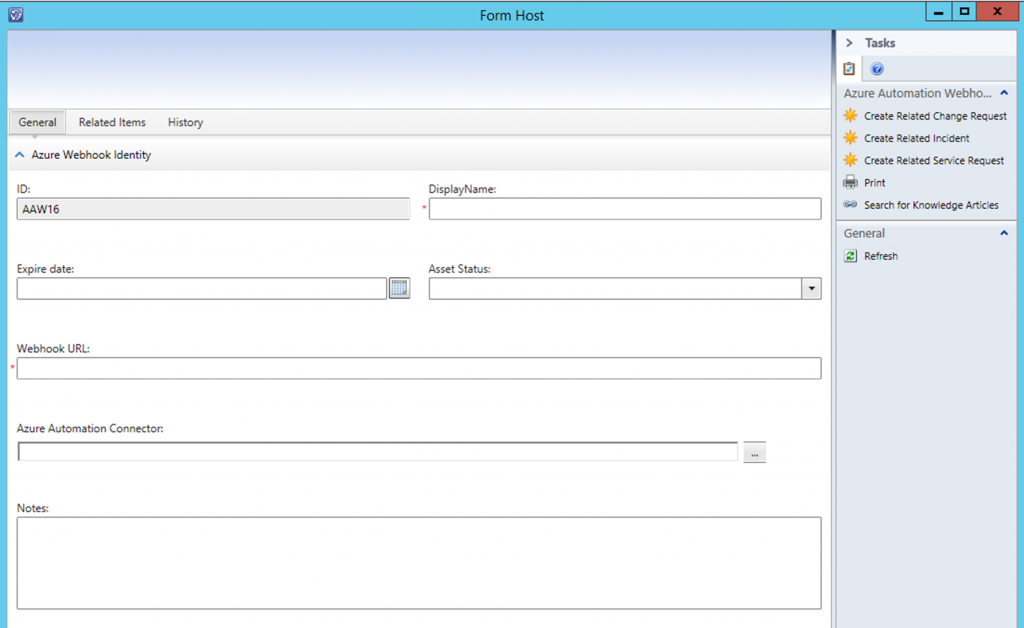
With Azure Automation there are cases where you will need to have a form that end users can go fill out to kick off an automation runbook. Back with System Center Orchestrator we could use Service Manager’s self-service portal as the front end for our automations. This was a solution that worked well. With Azure Automation we do not have that luxury at least not yet we don’t. There is a community based Azure automation webhook Service Manager (SCSM) connector in the works. One of my colleagues Rob Plank is a part of this project and says it should ready to release very soon. This connector will allow you to use the SCSM portal as the frontend of Azure Automation via webhooks, know when a webhook expires, and see a runbooks job status. Here are some teaser screenshots of the  connector.

image001

image002

There also are a few posts out there on how to leverage other platforms as the frontend for Azure Automation these are “how to use SharePoint as the frontend of Azure Automation” by Anders Bengtsson and “how to use an ASP website as the frontend to Azure Automation” by a friend of mine and fellow Microsoft MVP Florent Appointaire. Well in this post I am going to show you how to use the popular platform WordPress as the frontend for Azure Automation. The cool thing here is that this is another instance of showcasing the ability to utilize Microsoft and Open Source technologies together. 🙂

Here are the steps at a high level

  • Have an Azure Automation account on Azure
  • Setup your runbook/s in Azure Automation
  • Setup a webhook on your runbook/s in Azure Automation
  • Have a WordPress instance
  • Install Ninja Forms plugin in the WordPress instance
  • Install the Webhooks add on for Ninja Forms
  • Setup your runbook frontend form/s
  • Configure the runbook frontend form/s to connect to the Azure Automation webhook

Let’s get started!

Step 1: Have an Azure Automation account on Azure

To get started with Azure Automation go here: https://azure.microsoft.com/en-us/documentation/articles/automation-intro. I am not going to cover this within this blog post.

Step 2: Setup your runbook/s in Azure Automation

For this testing this scenario and this post I grabbed a couple of Azure Automation runbooks built by the Microsoft AzureAutomationTeam and made available in the Azure Automation Runbook Gallery. These runbooks start and stop Azure virtual machines.

Runbook #1 Name:

Start-AzureV2VMs

Description:

This runbook connects to Azure and starts all VMs in an Azure subscription or resource group.

Runbook #2 Name:

Stop-AzureV2VMs

Description:

This runbook connects to Azure and stops all VMs in an Azure subscription or resource group.

Both runbooks have two parameters they need. These are:

param (

[Parameter(Mandatory=$false)]

[String]  $AzureConnectionAssetName = “AzureRunAsConnection”,

[Parameter(Mandatory=$false)]

[String] $ResourceGroupName

We need to pay attention to these when setting up the webhooks and these often become your fields on your front end form.

Step 3: Setup a webhook on your runbook/s in Azure Automation

Here are the steps to setup a webhook for an Azure Automation Runbook.

First off make sure your runbook/s are in a published authoring status.

image003

Within https://portal.azure.com Navigate to

YOURAZUREAUTOMATIONACCOUNT

Runbooks

YOURRUNBOOK (Start-AzureV2VMs)

Webhooks

From here click on the Add Webhook button.

image004

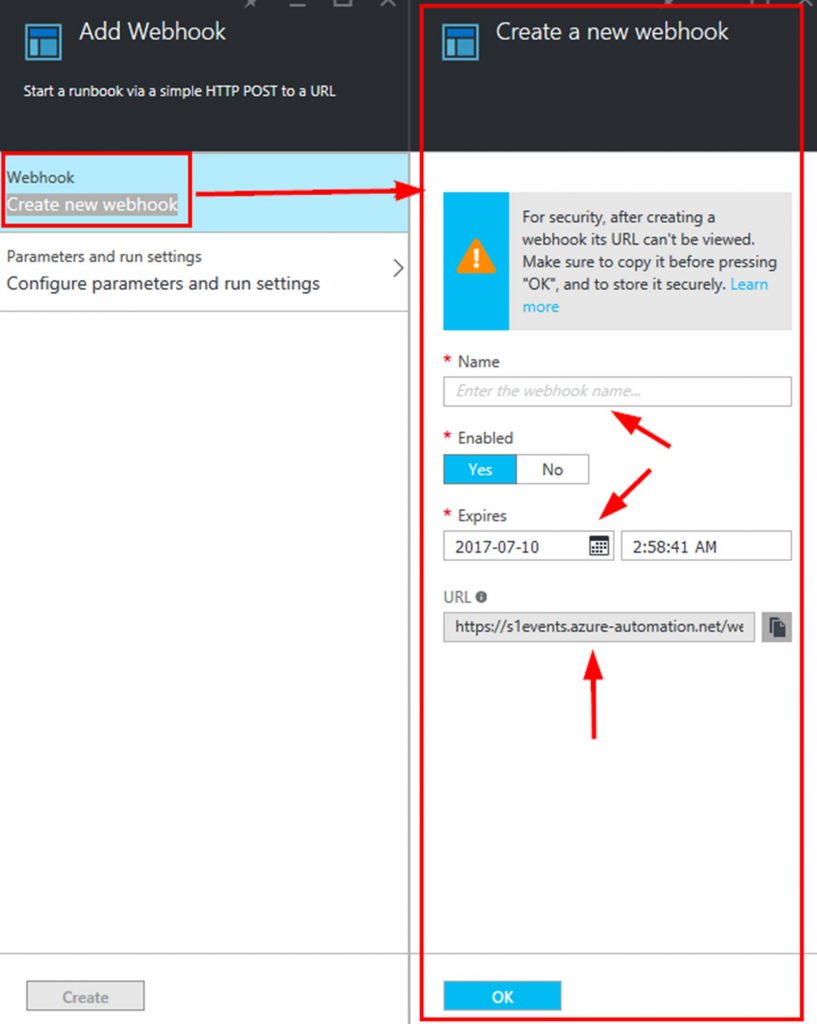
The Add Webhook blade will fly out. Here you will want to click on Create new webhook to make the next blade flyout.

Here you need to give your webhook a name, set to enabled, set when it will expire and COPY THE URL TO A SAFE PLACE.

NOTE: You will not be able to access the webhook URL after this.

image005

Click OK.

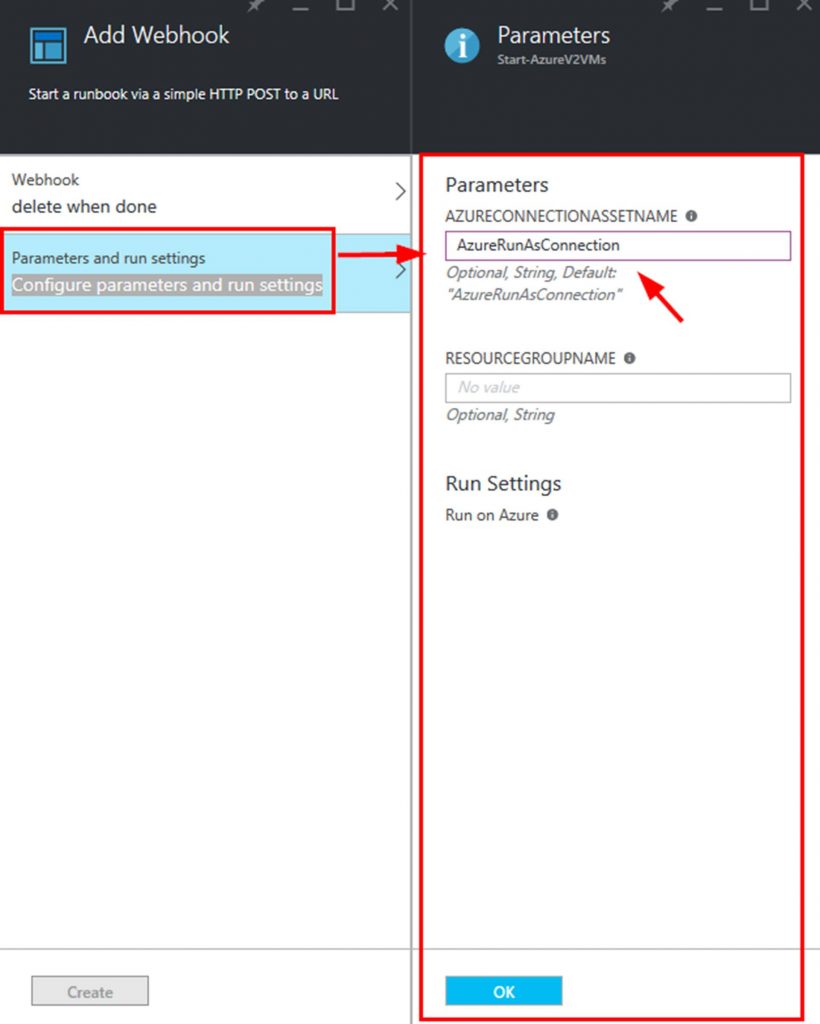
Next you need to click on Configure parameters and run settings. This is where you set the parameters from the runbook.

If your parameters are required you have to set them here. If they are optional you can leave them blank here and pass the data into the runbook from the frontend form via a $WebhookData object.

In my case I put AzureRunAsConnection directly in the webhook. I created a credentials asset in Azure Automation with the account containing the needed permissions to perform the actions from the runbook in my Azure account (Start/Stop VM’s).

I left the resourcegroupname blank as I will pass this in from the front end form. I left the Run Settings to run on Azure as I do not have a Hybrid Worker setup.

NOTE: A Hybrid Worker lets you run automation runbooks on premises in your data center.

image006

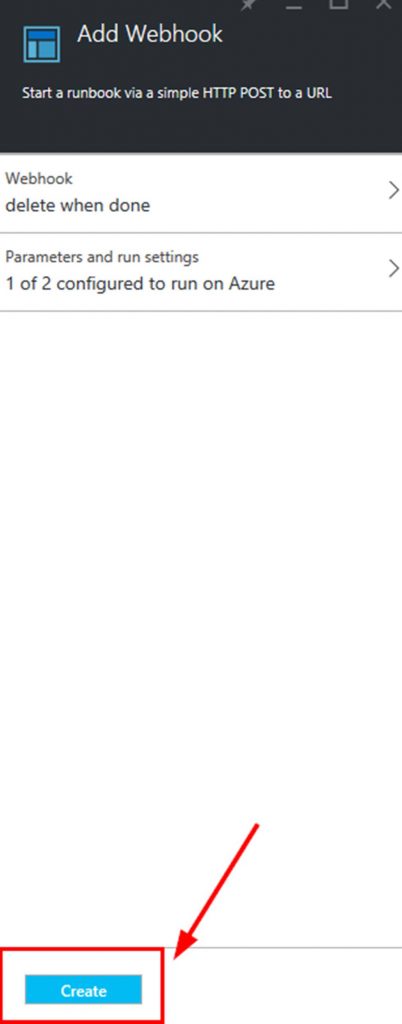
One you have the Webhook and parameters configured click on the Create button to actually create the webhook.

image007

You will now see your new webhook in the webhooks blade.
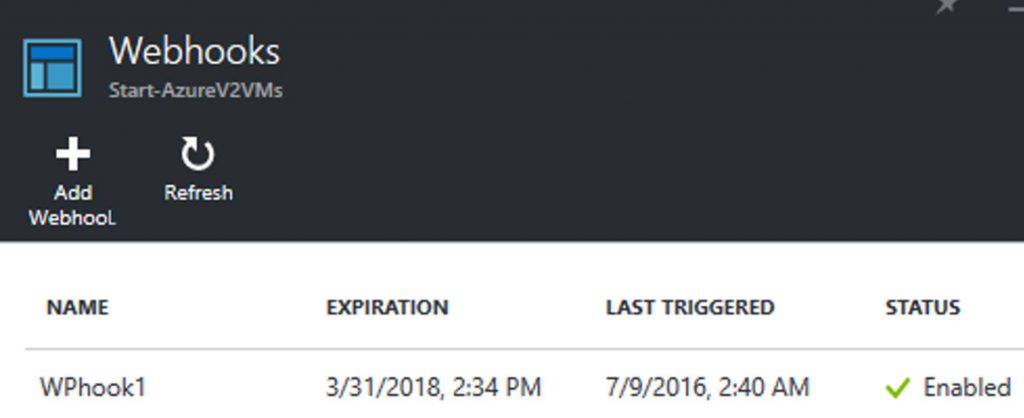
image008

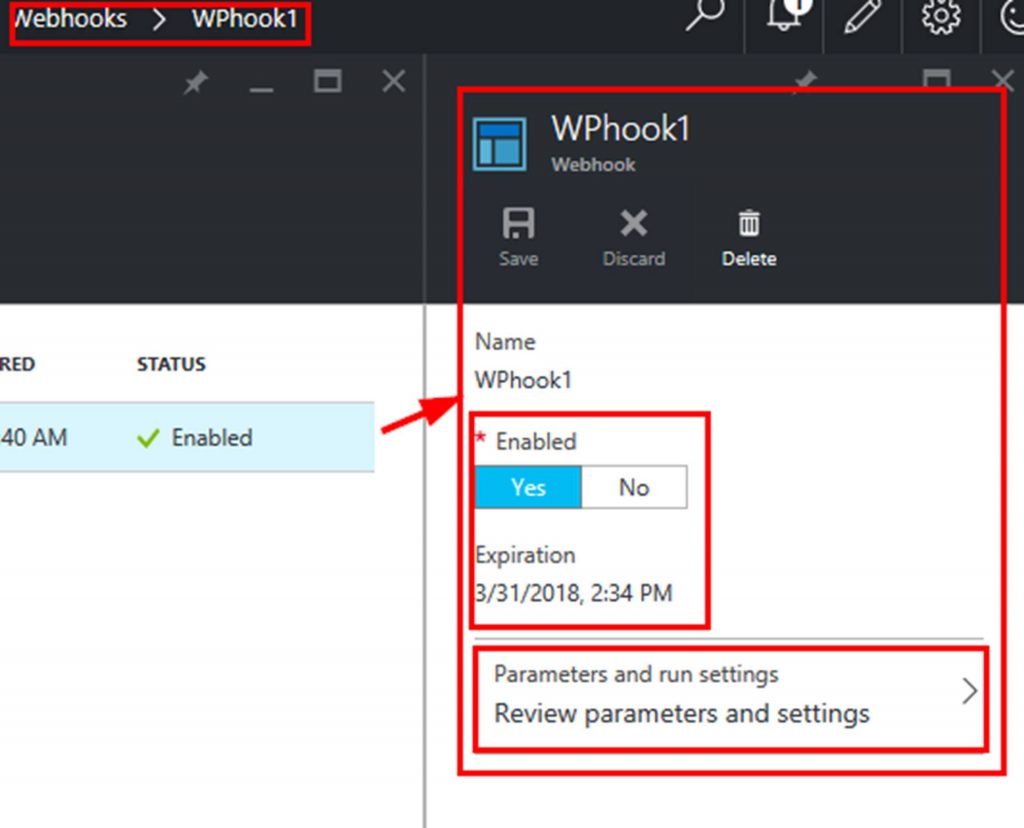
Note that if you click on a webhook you will not see the URL. You can enable or disable the webhook, see when it expires, and access the parameters. This is shown in the following screenshot.

image009

Step 4: Have a WordPress instance

You can host WordPress on WordPress.org on a hosting account, internally or even on Azure. Here is a link to a tutorial on how to run WordPress on Azure. https://azure.microsoft.com/en-us/documentation/articles/app-service-web-create-web-app-from-marketplace.  I am not going to cover how to setup a WordPress instance within this blog post.

Step 5: Install Ninja Forms plugin in the WordPress instance

Here are the steps to install Ninja Forms WordPress plugin.

From within the WordPress admin dashboard click on Plugins.

Click on Add New.

image010

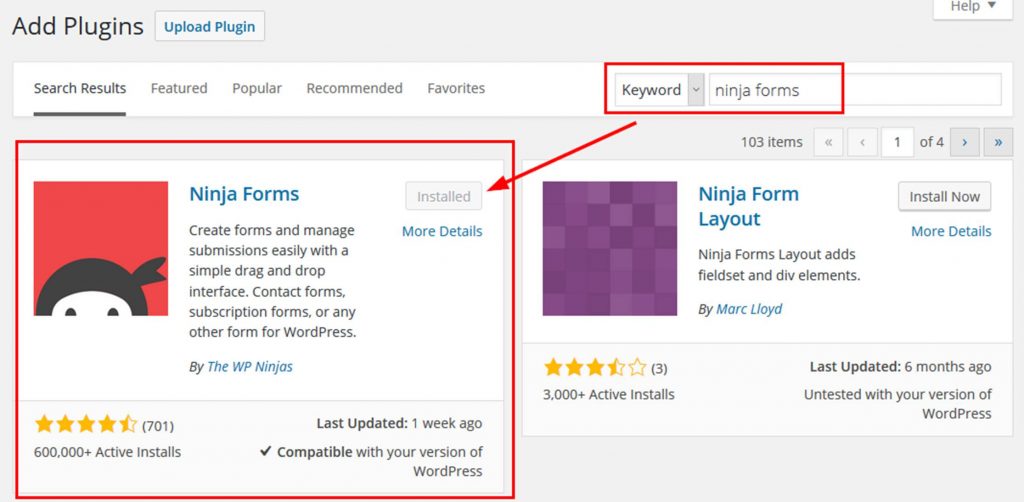
Search for Ninja Forms. Click on the Install button to add the plugin. Make sure you activate the plugin.

image011

You also could manually download and upload the plugin or load it directly into the plugins directory. I have shown you the steps for the easiest way to install it.

The Ninja Forms plugin page can be found here:

https://wordpress.org/plugins/ninja-forms

Step 6: Install the Webhooks add on for Ninja Forms

The Webhooks for Ninja Forms add on can be found here:

https://ninjaforms.com/webhooks-for-ninja-forms

This add on has to be purchased. It is $39 by itself for 1 WordPress instance.

After you buy it you will get the files for download. Again from within the WordPress admin dashboard click on Plugins.

Click on Add New. This time click on the Upload Plugin button and browse to your downloaded Webhooks for Ninja Forms zip folder.

After it is uploaded be sure to activate it.

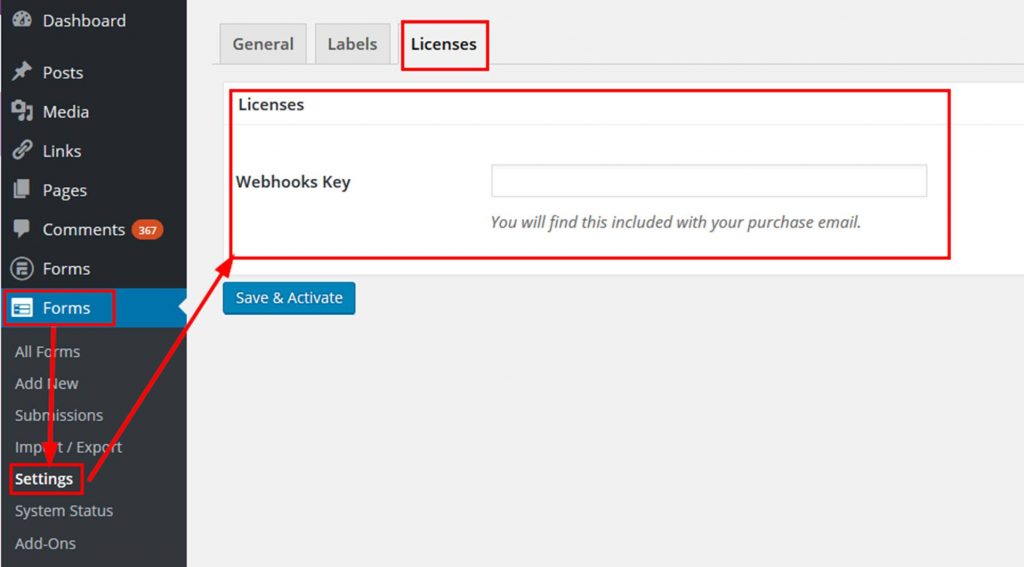
The final step is to install the license for the add on. To do this Click on Forms>Settings>Licenses and input the key that Ninja Forms sent in the Webhooks Key field. Click on Save & Activate.

image013

Step 7: Setup your runbook frontend form/s

Next we need to build the actual form. To do this follow the list of steps.

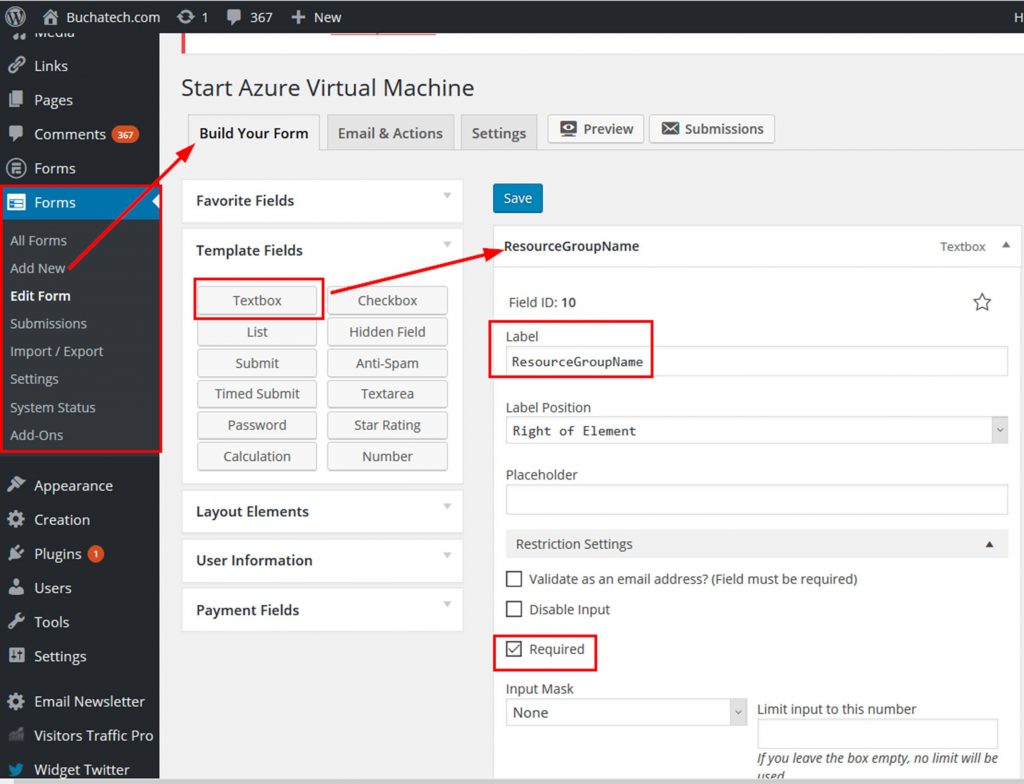
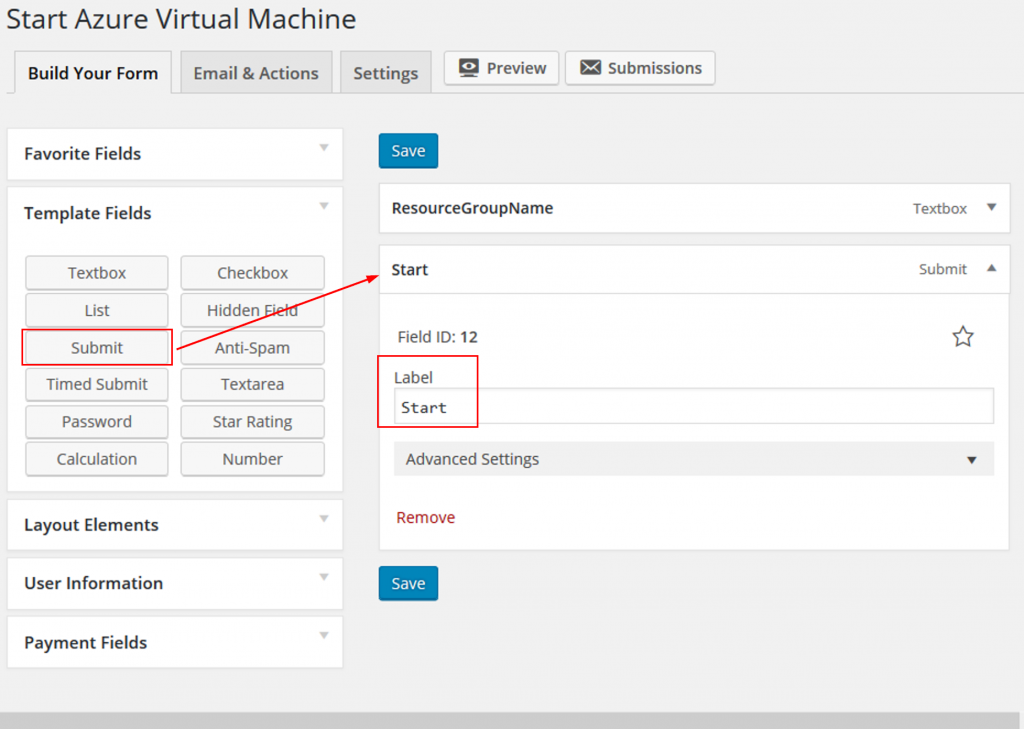
Click on Forms>Add New. Give your form a Title.

Add a Textbox and put in the label of ResourceGroupName.

I like to make it Required.

image014

Add a Submit button to your form. I labeled it Start.

image015

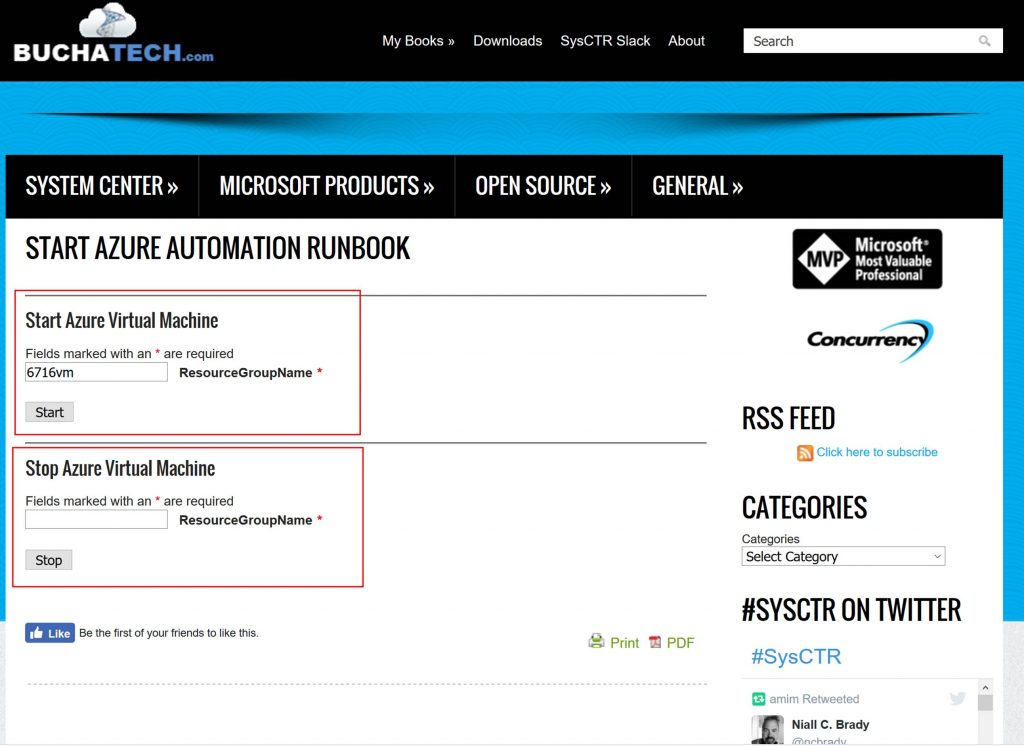
In the following screenshot is what the form looks like. Note that I have both forms loaded on the same page.

image016

Step 8: Configure the runbook frontend form/s to connect to the Azure Automation webhook

Now is the last step. This is the step in which we configure the form to send data to the Auzre Automation webhook upon submission. This is doing it via POST method.

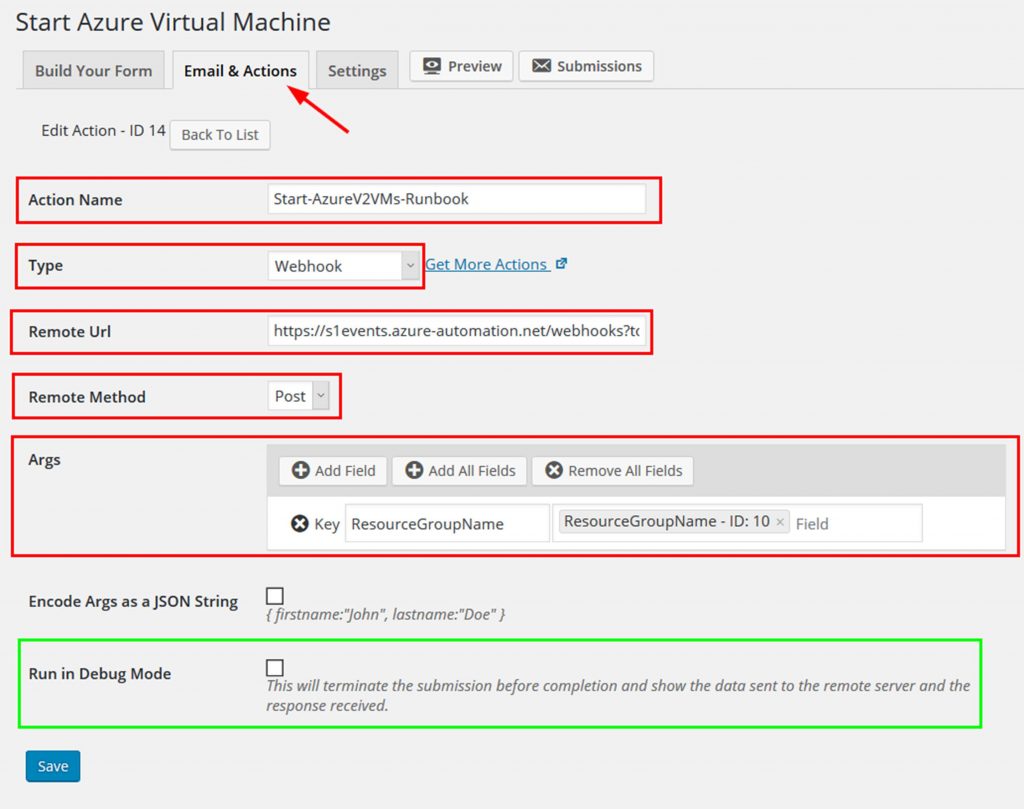
When editing the form click on the Email & Actions tab. Click on the Add New button.

Give this Action a name.

In the Type dropdown select Webhook.

Enter the Azure Automation webhook URL in the Remote Url field.

Select Post for the Remote Method.

For Args select enter the name of and select the field from your form of the parameters you need to send to the Azure Automation runbook.

You can see this all represented in the following screenshot.

image017

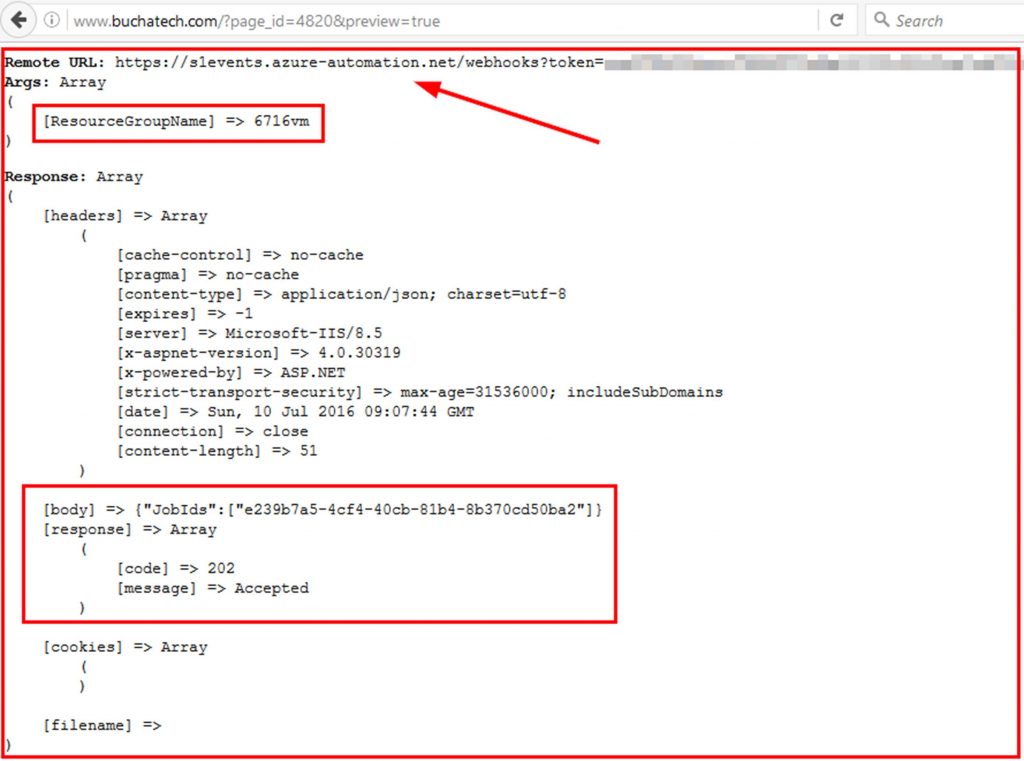
One of the cool things about this solution is we can test the webhook action before actually submitting it to make sure it will work as expected. This testing can be turned on by checking the Run in Debug Mode field. I have highlighted this in the screenshot in green. Checking this box and submitting the form will show debugging information like data sent and response.

Here is an example of what the result in Debug mode will look like:

image018

Make sure you uncheck the Run in Debug Mode field when you are ready to actually start your runbook/s.

Now let’s see what this looks like in Azure Automation when we submit the form.

I have a resource group named 6716vm with one VM in it named 6716vm. So I will enter 6716vm on the form. 6716vm will be passed to the runbook as the resourcegroupname.
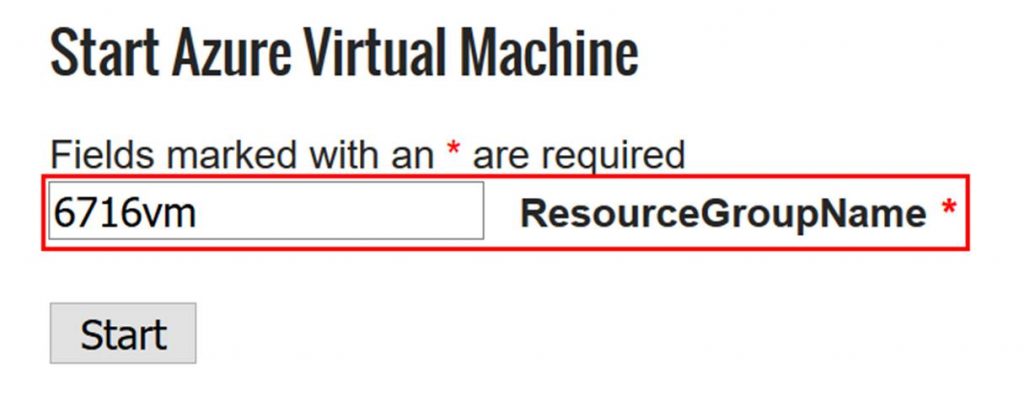
image019

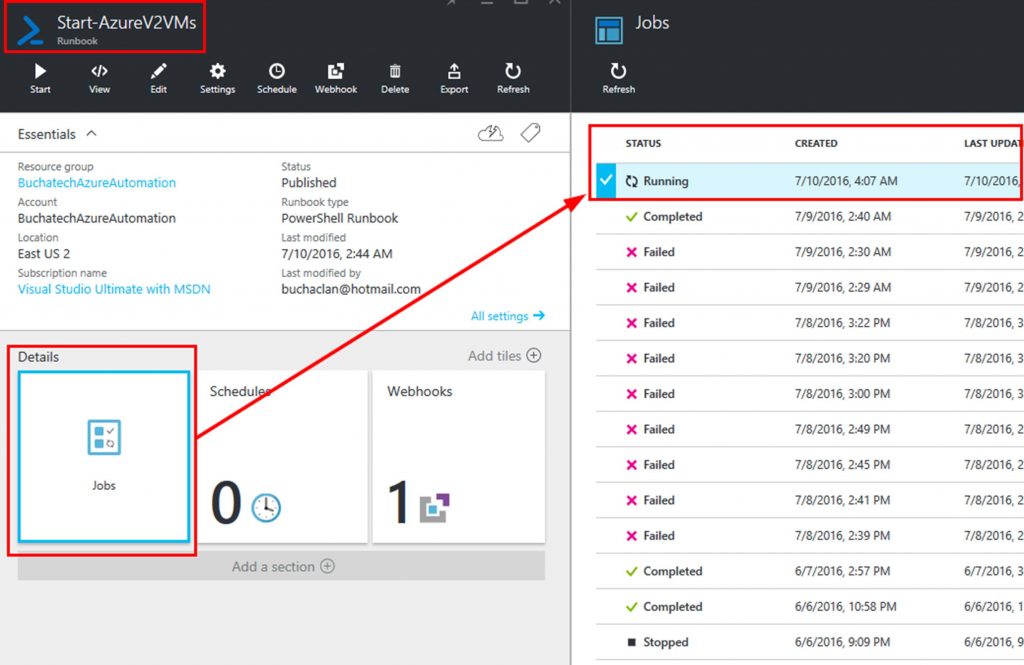
You can see the job running in Azure now.

image020

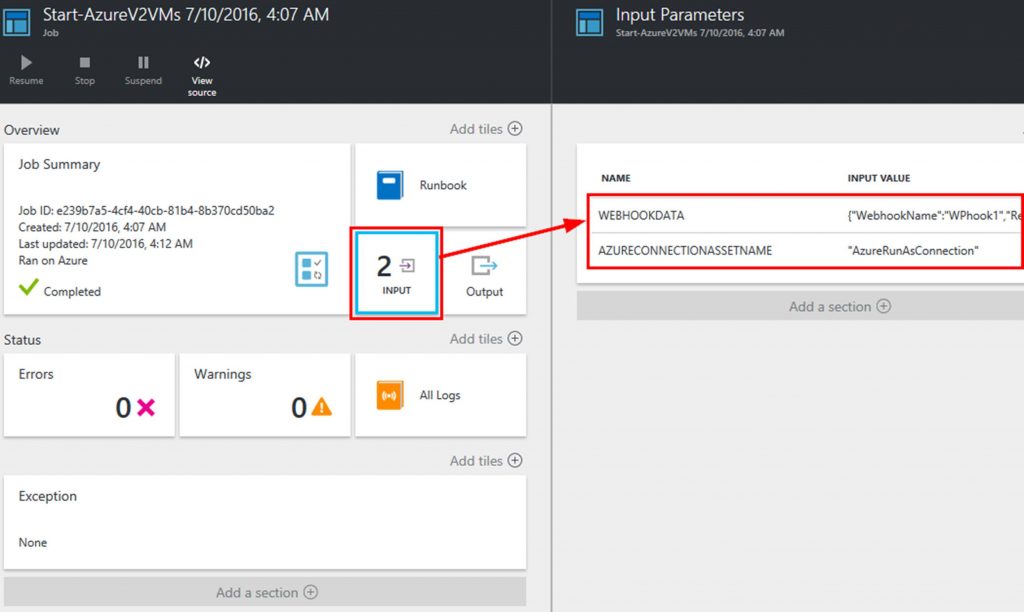
Within the job if you click on Input you can see it has 2 inputs. One is Webhookdata. This is where the 6716vm is located. The other is the Azureconnectionassetname. Remember we hardcoded this into the webhook itself. We can also see in the following screenshot that the job completed.

image021

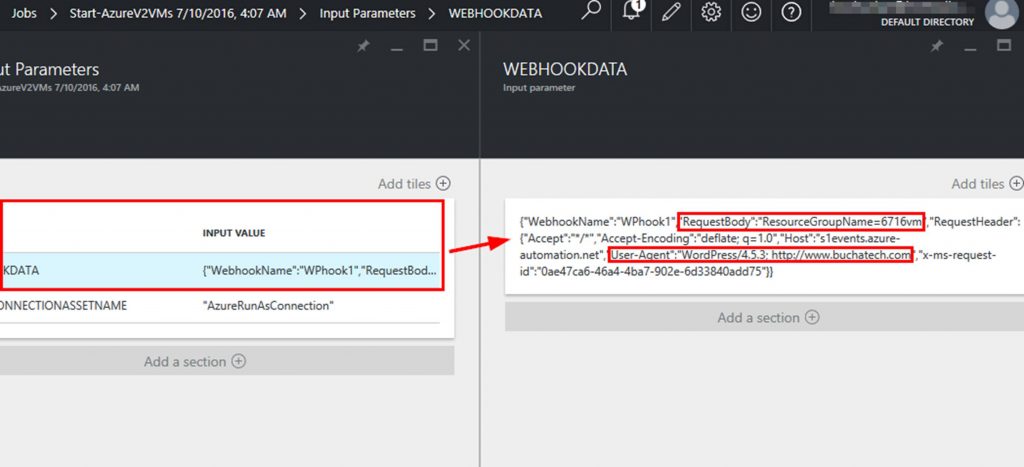
If we look further at the webhookdata we can see several interesting things. We can see exactly where it put the 6716vm parameter for the resourcegroupname and we can see that this request came from my blog at www.buchatech.com.

image022

{“WebhookName”:”WPhook1″,”RequestBody”:”ResourceGroupName=6716vm”,”RequestHeader”:{“Accept”:”*/*”,”Accept-Encoding”:”deflate; q=1.0″,”Host”:”s1events.azure-automation.net”,”User-Agent”:”WordPress/4.5.3; https://www.buchatech.com”,”x-ms-request-id”:”0ae47ca6-46a4-4ba7-902e-6d33840add75“}}

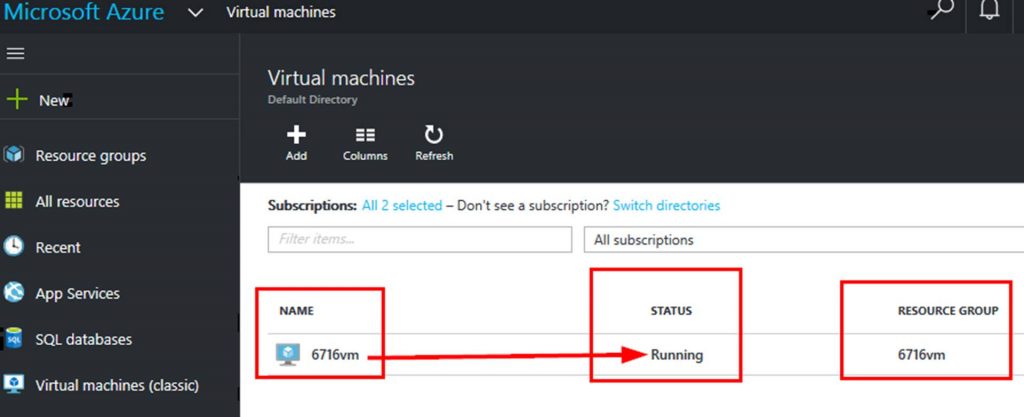
Pretty cool right? Check out the VM now running:

image023

Now to shut it down I can go back to my WordPress and use the Stop Azure VM form. The possibilities here are endless. I know some of you may be thinking this is great but what if I want to control who can login to see this form and will it work with Active Directory. The answer is YES. WordPress has several plugins that integrate with Active Directly and even have SSO. A couple of these are Active Directory/LDAP Login for Intranet sites and Active Directory Integration. 

You can see that WordPress can make a great frontend for your Azure Automation runbooks. That is the end of the post. Happy automating!

Read more

5th Year Microsoft MVP!

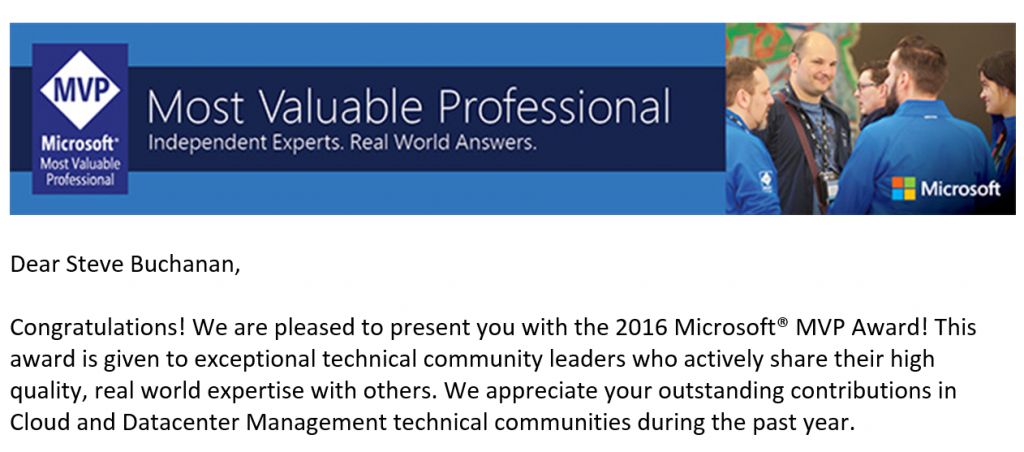
Today was a special day as I received an email from Microsoft stating I was awarded as an MVP for the 5th year! Here is the email:

5th Year Microsoft MVP

This marks a special year. Microsoft awards you the special 5 year chip to add to your award. Here is a picture of the chip:

5th Year Microsoft MVP Chip

I am humbled to make it this long in the MVP program. A huge thanks goes out to everyone in the community and Microsoft. And as always I am honored to still be a part of such a great group of people. I have made many friends all over the world with other MVP’s, community, and Microsoft. I am looking forward to another exciting year of contributing to the community.

I will continue to do all that I can in the System Center community this year. Something new you will see from me this year is I will be contributing as much as I can also in the OMS and Azure Stack space. I am very excited about the new opportunities that are coming out of the growth of cloud.

My Microsoft MVP Profile: http://mvp.microsoft.com/en-us/mvp/Steve%20Buchanan-4039736

Congrats to all the other new and renewed MVP’s!

Read more

Write once, deploy anywhere (Azure or Azure Stack)

This blog post is a follow up to the MMS 2016 session I recently delivered together with Microsoft Azure Stack PM Daniel Savage. The session title is “Future-proof your Career with Azure Stack in the New Hybrid Cloud World!” link here: https://www.buchatech.com/2016/04/presenting-at-mms-2016-azure-stack-backup-oms.

My demo is this session was titled “Write once, deploy anywhere“. The purpose of this demo was to show using a single ARM template (JSON file) and a single PowerShell script to deploy a VM regardless of deploying to Azure or Azure Stack. The demo was a success so yes this is really possible. In this post I will break down the JSON file, the PowerShell script, how it works and the download link for the files.

Getting the JSON file and the PowerShell script just right was a challenge as there are still some slight differences between the settings of Azure and Azure Stack. Note that this is the case with Azure Stack TP1 and I fully expect that this will change when it GA’s. In any case it is good to look at this stuff now to start to learn the ins and outs. In the end it was the combined Power of the ARM template and PowerShell to overcome any challenges. Let’s start off by taking a look at the differences in ARM between Azure and Azure Stack in the following table:

Property

Azure

Azure Stack

Location

Azure region (example: CentralUS)

local

blobStorageEndpoint

blob.core.windows.net

blob.azurestack.local

vmSize

Standard_D1

Standard_A1

vmName apiVersion

2015-06-15

2015-06-15

StorageAccountName apiVersion

2015-06-15

2015-06-15

nicName apiVersion

2015-06-15

2015-05-01-preview

vrtualNetworkName apiVersion

2015-06-15

2015-05-01-preview

networkSecurityGroupName apiVersion

2015-06-15

2015-05-01-preview

dnsNameForPublicIP apiVersion

2015-06-15

2015-05-01-preview

torageAccountName apiVersion

2015-06-15

2015-05-01-preview

NOTE: For the apiVersion on the resources Azure Stack requires 2015-05-01-preview. Resources in Azure ARM templates default to apiVersion 2015-06-15. So if we left the resources in the ARM template at apiVersion 2015-06-15 the deployment would fail on Azure Stack. However we are in luck as Azure will accept apiVersion 2015-05-01-preview. So I set vmName and StorageAccountName to apiVersion 2015-06-15 and the rest of the resources apiVersion to 2015-05-01-preview.

vmName and StorageAccountName use the same apiVersion for both Azure and Azure Stack. So Azure Stack accepts 2015-06-15 for both. Even those these are not different across Azure and Azure Stack I still wanted to list it anyway in the table.

If you have multiple subscriptions you will need to input the subscription ID. In my case my Azure has multiple subscriptions but my Azure Stack does not in this lab. In my script for Azure you need the subscription ID. In Azure Stack you do not. You may need to modify this behavior in the script if your scenario is different.

For the deployment it consists of two files. These files are:

Writeonceblog (1) AzureandAzureStack.json

CreateVMAzureorAzureStack.ps1

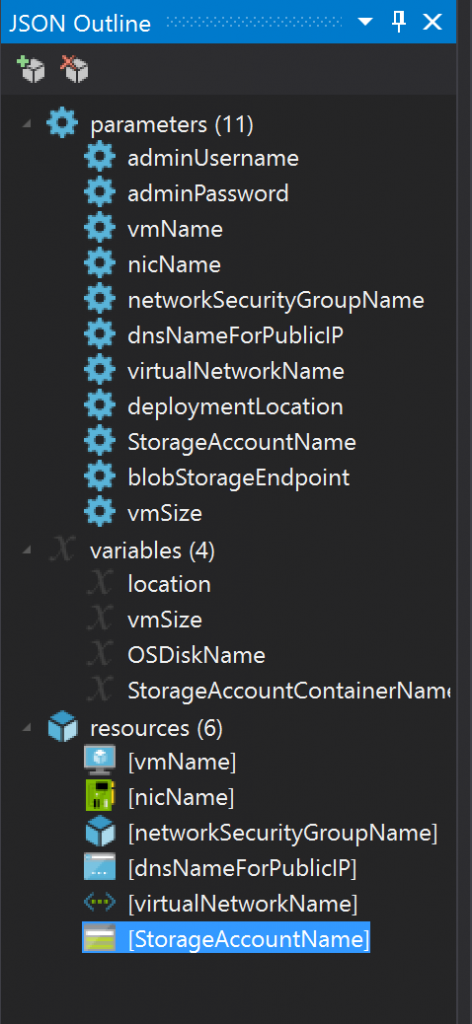
Here is what we have if we crack open the JSON file.

Writeonceblog (2)

A few things to note about the PowerShell script is that

  1. We prompt to identify if it is an Azure or Azure Stack deployment. We then run the appropriate block of code.
  2. In each of the deployment types (Azure or Azure Stack) we have some things hard coded in (for example blobStorageEndpoint and vmSize) and somethings pulled in dynamically by prompting for them during the script execution (for example subscriptionId and adminPassword).
  3. We are pulling in the parameter and variable values when using New-AzureRmResourceGroup and New-AzureRmResourceGroupDeployment.

NOTE: I am not a PowerShell expert. I am sure there are better more efficient ways to accomplish what I am doing here in the PowerShell script. Nothing was available to accomplish the write once, deploy anywhere goal so I put something together. Feel free to enhance the script and release back to the community.

Here is an example of the location parameter and variable in the JSON file.

The parameter:

Writeonceblog (3)

The variable:

Writeonceblog (4)

Referenced in the vmName resource:

Writeonceblog (5)

Here is an example of how we are leveraging this in the PowerShell script.

For Azure:

Writeonceblog (6)

For Azure Stack:

Writeonceblog (7)

Writeonceblog (8)

Writeonceblog (9)

Note that you can deploy VM’s to Azure or Azure Stack in many ways (Visual Studio, the portal etc..). I decided to leverage PowerShell to do the deployment’s as it gives me a great amount of flexibility. For the official article on using PowerShell to deploy VM’s to Azure Stack visit:

https://azure.microsoft.com/en-us/documentation/articles/azure-stack-deploy-template-powershell

Now let’s look at deploying a VM to both Azure and Azure Stack using a single PowerShell script and a single ARM template.

— AZURE —

Run the script and you are prompted for some of the VM info.

Writeonceblog (10)

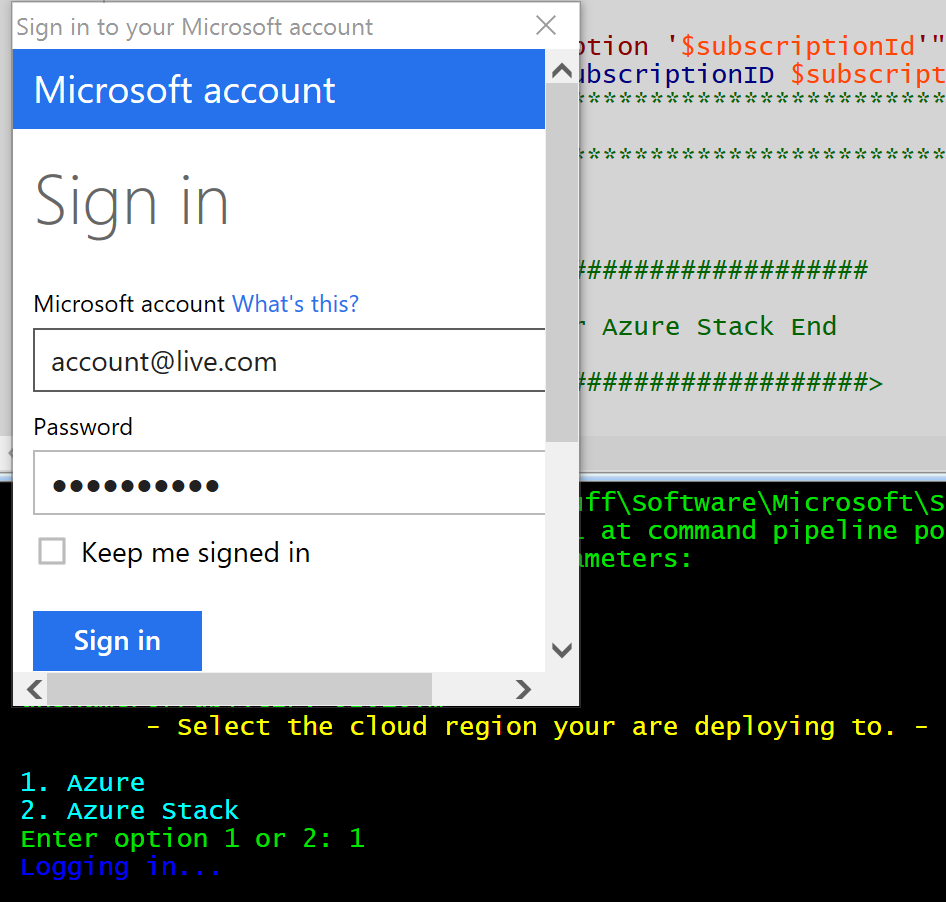
Then you are prompted to log into your Azure account.

Writeonceblog (11)

Read more

Surviving the Future of IT as an IT Pro

At MMS 2015 we had some interesting discussions in the Ask the Data center experts session. One of the discussions was centered around how IT is changing and how to adapt. For a while there has been a paradigm shift happening in IT. It is hard hitting for those on the front line especially IT Pro’s.

With the advent of many technologies moving to XaaS (x as a Service) based and the challenges for IT pro’s to move from strictly the ops side of IT to more of a DevOps model as well as becoming an internal technology consultant to the business IT Pros can feel lost in the paradigm shift.

The goal of this blog post is twofold. 1. I want to expand on this discussion with my opinion of how an IT Pro can remain relevant in the future of IT. 2. My friends over at Savision asked me to write a blog post and I thought this would be a great topic for it because they have some tools that can help with this transition.

Here are key points and additionally skills/mindset needed as an IT Pro moving into the future of IT:

  • Accepting Shadow IT….. Ability to manage anyway.

Shadow IT is the practice of business units spinning up their own IT solutions without organizational approval. With the expansion of cloud Shadow IT is becoming easier for business units to undertake.

  • Technology Budgets are no longer 100% controlled within IT anymore. Many departments own their own technology budget.
  • For so long IT has had the reputation of being “No People” and a dinosaur that takes forever to get things done. Embracing Shadow IT is about enabling the business, moving faster from conception to solution. Embracing Shadow IT will also change the reputation IT to “Yes People”.
  • This will cause the business to come back to IT first as internal SME’s to help them select the right outside solutions bringing internal IT Pros back into the loop.
  • Instead of focusing on how to stop business units for spinning up the technology solutions they need, help them. At the same time look for solutions that can help put governance and management around Shadow IT. A good example of this are three solutions from Microsoft such as Cloud App discovery (Discovery of cloud applications used in an organization), Azure Active Directory (Single Sign On, Centralized log on to cloud based applications and much more), and OMS (Management of cross platform clouds i.e. Amazon, Azure, Rackspace etc.).

Read more

2 Sessions at MMS 2015

I am late posting this but better late than not at all. Next week I will be presenting at MMS 2015 on November 9th and 11th. In this post I will break down what each session is about. This is the second year of the community powered MMS event. The Midwest Management Summit is a 3-day conference purposely capped to just 500 attendees so that nobody gets lost in the crowd. Almost 60 Microsoft MVP’s will be presenting on System Center, cloud, PowerShell topics and more.

Areas the speakers will be presenting on are Operations Management Suite (OMS), Enterprise Mobility Suite (EMS), Operations Manager, Configuration Manager, Orchestrator, Service Management Automation, Azure Automation, Service Manager, Data Protection Manager, Azure Backup, Azure Pack, Azure Stack, Hyper-V, Nano server, PowerShell, Desired State Configuration and more. I am lucky to be co-presenting with two awesome System Center experts Natascia Heil @NatasciaHeil and Chiyo Odika @mrchiyo. The first session I will be presenting is:

-Real world automation with Service Manager and Azure Automation-

Here is what to expect from this session:

Automation is not only requesting and building virtual machines through Service Manager and Orchestrator. Automation can do much more and Service Manager can be combined with Microsoft’s other automation tools such as SMA, Azure Automation, and DSC. This session will teach you how to identify areas of automation in your company. It will cover automation fits in the ITIL story. It will also show some real life automation examples utilizing Microsoft newest automation tool (Azure Automation) and Service Manager.

We have two demo’s planned for this session. The first demo will show how to use Service Manager and Azure Automation. The second demo will show automating patch management using SCCM, Orchestrator, and Service Manager’s change management.

clip_image001

Link to this session:

http://mms2015.sched.org/event/bc3ffcd6aaaaef9a5e765493a0e6527f?iframe=no#.VjsTBeJcxps

The second session I will be presenting is:

-OMS Strategies and Notes from the Field-

Here is what to expect from this session:

OMS is a comprehensive web-based cloud IT Management solution with monitoring, automation and other features and solutions that will provide you with greater control and new capabilities across your hybrid cloud.

In this session, you will learn about strategies for getting the most out of OMS, best-practices, and learn from our extensive experiences in the field, deploying, configuring, and troubleshooting OMS.

clip_image002

Link to this session:

http://mms2015.sched.org/event/a4fb2e8bd31e7cab0de55695f9ec48a1#.VjsTCOJcxps

For more information on MMS 2015 and a full list of speakers and sessions visit:

http://mmsmoa.com/

Read more