Tool for Logging outgoing SCSM email issues

Recently I was working on a Service Manager project and outgoing email was not working properly.

The SMTP channel was setup properly. I ran a telnet session and attempted to send an email via telnet. Well the telnet session would connect just fine to the Exchange server but then would disconnect as soon as I tried to run some telnet commands.

I knew this was odd as I have never seen this before. There must have been an issue on the Exchange  server or a policy to disconnect telnet sessions.

I needed a better way to troubleshoot this issue before I went back to the Exchange admin.

I ran across a freeware tool called SendSMTP that was a huge help.

The tool can run somewhere and send emails via a GUI or even via command line.

This tool also does not install the .exe just runs right from a folder on the server so it is portable and can be removed easily after you are done testing/troubleshooting.

It also lets you specify many settings such as host, authentication, timeout and more.

The reason this tool is super helpful is because it has some built in logging.

As you can see in the following screenshots you can set the logging levels you want.

SendSMTP1
After you test sending an email you can either view either of the two log files
by clicking on View Log or by clicking on the Log tab.

SendSMTP2

I loaded this tool on the SCSM server and then tested sending an email both anonymously and using authentication. Both failed.

Because of the logging I was able to determine that the connection keeps being reset by the Exchange server as there are some access denied issues.

You can see the log as shown on the tools Log tab in the following screenshot.

SendSMTP3

I was able to give this directly to the Exchange admin for further troubleshooting. 🙂

I wanted to share this on my blog as this tool might come in useful for someone else as well.

You can download SendSMTP here:

Read more

New Productivity Software Suite for Service Manager

Two good friends of mine Microsoft MVP Marcel Zehner and Dieter Gasser‘s company ITnetX has recently released a Productivity Pack for Service Manager. This is great news because these guys and their teams know Service Manager inside and out. They have been building apps for Service Manager for some time and I have even been using some of them.

This new software suite introduces many new components that fill several existing gaps in Service Manager. The suite has a paid version and also offers some components for free. So what’s in this new suite? Let’s break it down.

ITSM Portal – The itnetX ITSM Portal is HTML5 and is a fast and intuitive alternative for the out-of-box SCSM Self-Service Portal. It allows end users to browse your IT Service Catalog, create new requests, view and update open requests, and work on activities as part of ITSM workflows.

The full suite also includes the following components:

  •     Advanced View Editor
  •     BillableTime
  •     Checklist Activity
  •     CMDB Visualizer
  •     Desktop Alert
  •     Power Print
  •     PowerShell Activity
  •     PowerShell Tasks
  •     PowerShell Workflows
  •     Preview Forms
  •     Send Mail
  •     SMA Connector

Here is a list of the free components:

  •     Advanced View Editor for SCSM FREE
  •     Advanced Console Search for SCSM FREE
  •     Billable Time for SCSM FREE
  •     Clone User Role for SCSM FREE
  •     Email Template Tester for SCSM FREE
  •     Entity Explorer for SCSM FREE
  •     MPB Maker for SCSM FREE
  •     Send Mail for SCSM FREE
  •     Update Transfer for SCCM FREE

I use the email template tester and advanced editor, in almost every Service Manager deployment I do. I am especially excited about a few of the components, these are:

CMDB Visualizer for SCSM lets you visualize any object that lives in the CMDB including its relations to other objects.

ITnetX1

PowerShell Activity for SCSM introduces an activity which runs custom PowerShell scripts. Scripts are stored in the CMDB and are triggered from PowerShell Activity within your processes. PowerShell Activities can be used just like you use runbook activities and add them to your Service Request, Change Request, and Release Record templates

ITnetX2

and the suite has an SMA Connector for SCSM!

I recommend you go check out this new software suite. Here is the link:

http://bit.ly/1P27Tlf

Read more

SCSM HTML5 Portal Prereq Script

This has to be the shortest blog post I have ever done. 🙂 Well here it is.

Out on the deployment article for the SCSM HTML 5 portal here https://technet.microsoft.com/en-US/library/mt622142.aspx you will see there are a number of prerequisites that are needed before you can install the portal. A while back I made a simple PowerShell script that can be used to install all of the HTML5 based Self-Service Portal prerequisites. I thought it might be good to share it.

SCSMHTML5SSPPre-reqs

Here is the link to download the script:

https://gallery.technet.microsoft.com/SCSM-HTML5-Portal-Prereq-ddeb504a

Read more

Write once, deploy anywhere (Azure or Azure Stack)

This blog post is a follow up to the MMS 2016 session I recently delivered together with Microsoft Azure Stack PM Daniel Savage. The session title is “Future-proof your Career with Azure Stack in the New Hybrid Cloud World!” link here: https://www.buchatech.com/2016/04/presenting-at-mms-2016-azure-stack-backup-oms.

My demo is this session was titled “Write once, deploy anywhere“. The purpose of this demo was to show using a single ARM template (JSON file) and a single PowerShell script to deploy a VM regardless of deploying to Azure or Azure Stack. The demo was a success so yes this is really possible. In this post I will break down the JSON file, the PowerShell script, how it works and the download link for the files.

Getting the JSON file and the PowerShell script just right was a challenge as there are still some slight differences between the settings of Azure and Azure Stack. Note that this is the case with Azure Stack TP1 and I fully expect that this will change when it GA’s. In any case it is good to look at this stuff now to start to learn the ins and outs. In the end it was the combined Power of the ARM template and PowerShell to overcome any challenges. Let’s start off by taking a look at the differences in ARM between Azure and Azure Stack in the following table:

Property

Azure

Azure Stack

Location

Azure region (example: CentralUS)

local

blobStorageEndpoint

blob.core.windows.net

blob.azurestack.local

vmSize

Standard_D1

Standard_A1

vmName apiVersion

2015-06-15

2015-06-15

StorageAccountName apiVersion

2015-06-15

2015-06-15

nicName apiVersion

2015-06-15

2015-05-01-preview

vrtualNetworkName apiVersion

2015-06-15

2015-05-01-preview

networkSecurityGroupName apiVersion

2015-06-15

2015-05-01-preview

dnsNameForPublicIP apiVersion

2015-06-15

2015-05-01-preview

torageAccountName apiVersion

2015-06-15

2015-05-01-preview

NOTE: For the apiVersion on the resources Azure Stack requires 2015-05-01-preview. Resources in Azure ARM templates default to apiVersion 2015-06-15. So if we left the resources in the ARM template at apiVersion 2015-06-15 the deployment would fail on Azure Stack. However we are in luck as Azure will accept apiVersion 2015-05-01-preview. So I set vmName and StorageAccountName to apiVersion 2015-06-15 and the rest of the resources apiVersion to 2015-05-01-preview.

vmName and StorageAccountName use the same apiVersion for both Azure and Azure Stack. So Azure Stack accepts 2015-06-15 for both. Even those these are not different across Azure and Azure Stack I still wanted to list it anyway in the table.

If you have multiple subscriptions you will need to input the subscription ID. In my case my Azure has multiple subscriptions but my Azure Stack does not in this lab. In my script for Azure you need the subscription ID. In Azure Stack you do not. You may need to modify this behavior in the script if your scenario is different.

For the deployment it consists of two files. These files are:

Writeonceblog (1) AzureandAzureStack.json

CreateVMAzureorAzureStack.ps1

Here is what we have if we crack open the JSON file.

Writeonceblog (2)

A few things to note about the PowerShell script is that

  1. We prompt to identify if it is an Azure or Azure Stack deployment. We then run the appropriate block of code.
  2. In each of the deployment types (Azure or Azure Stack) we have some things hard coded in (for example blobStorageEndpoint and vmSize) and somethings pulled in dynamically by prompting for them during the script execution (for example subscriptionId and adminPassword).
  3. We are pulling in the parameter and variable values when using New-AzureRmResourceGroup and New-AzureRmResourceGroupDeployment.

NOTE: I am not a PowerShell expert. I am sure there are better more efficient ways to accomplish what I am doing here in the PowerShell script. Nothing was available to accomplish the write once, deploy anywhere goal so I put something together. Feel free to enhance the script and release back to the community.

Here is an example of the location parameter and variable in the JSON file.

The parameter:

Writeonceblog (3)

The variable:

Writeonceblog (4)

Referenced in the vmName resource:

Writeonceblog (5)

Here is an example of how we are leveraging this in the PowerShell script.

For Azure:

Writeonceblog (6)

For Azure Stack:

Writeonceblog (7)

Writeonceblog (8)

Writeonceblog (9)

Note that you can deploy VM’s to Azure or Azure Stack in many ways (Visual Studio, the portal etc..). I decided to leverage PowerShell to do the deployment’s as it gives me a great amount of flexibility. For the official article on using PowerShell to deploy VM’s to Azure Stack visit:

https://azure.microsoft.com/en-us/documentation/articles/azure-stack-deploy-template-powershell

Now let’s look at deploying a VM to both Azure and Azure Stack using a single PowerShell script and a single ARM template.

— AZURE —

Run the script and you are prompted for some of the VM info.

Writeonceblog (10)

Then you are prompted to log into your Azure account.

Writeonceblog (11)

Read more

Presenting at MMS 2016 – Azure Stack, Backup, & OMS

It’s almost time for MMS 2016. By the end of Friday 4-22-16 MMS registration will be closed as the event has sold out! This year I have the opportunity to present twice and help facilitate one of the pre-con sessions. Here is a breakdown of my sessions.

Session #1: My first session is on Azure Stack the new Hybrid solution from Microsoft! This session will include me and Daniel Savage an Azure Stack program manager from Microsoft! You never know what new never heard before stuff you might learn about in this session. I recommend you sign up. Here is the title, description, and link for this session:

TITLE: – Future-proof your Career with Azure Stack in the New Hybrid Cloud World! –

DESCRIPTION: “Write once, deploy anywhere”, “extension of Azure”, “cloud agility”, “Cloud in your data center” What do all these buzz words mean to you and your career? How does Azure Stack Microsoft’s Hybrid solution apply to you as an IT Pro? Does Hybrid Cloud really have a place in the enterprise?

Come to this session and let Azure Stack Program Manager Daniel Savage and MVP Steve Buchanan unpack it for you.

SPEAKER BIOS:

Future-proof your Career with AzureStack

LINK: http://sched.co/6Xjn

Session #2: In my second session I will be presenting with my good friend and fellow MVP Robert Hedblom. He is making the trip all the way across the pond from Sweden for this event. Our goal for this session is to save jobs! hahaha…. You don’t want to miss this session as we take you through the steps of designing your backup and restore strategies. Here is the title, description, and link.

TITLE: – Be a Hero or be Fired. Backup and Restore Strategy –

DESCRIPTION: Did you skip planning the backup strategy? If a disaster occurred could you restore or would you get fired?

Come see System Center MVP’s Steve Buchanan and Robert Hedblom walk you through building a bullet proof backup and restore strategy of your business services. These strategies can be used with Microsoft business continuity tools. Learn how to be a restore hero in the event of a disaster and keep your JOB!

SPEAKER BIOS:

Be a Hero or be Fired. Backup and Restor

LINK: http://sched.co/68×3

Session #3: The third session is actually a 4 hour pre-con session about Operations Management Suite (OMS). This is a session you don’t want to miss. This session will be jam packed with MVP and Microsoft rock-stars! It will be jam packed with deep knowledge and again you never know what new never heard before stuff you might learn about in here. In this session you will have direct access to the Microsoft product team that is behind OMS. I am honored to be a part of this session. I have the opportunity to help facilitate it. Here is the title, description, speaker bio’s and link for this session.

TITLE: OMS from “What is this?” to “Wow, it can do that?!” –

DESCRIPTION: This is a pre-con session where emcee’s Steve Buchanan and Cameron Fuller will facilitate a four hour session designed to explain what OMS is and what it can do for your organization.

In the first hour Bob Cornelissen (SCOMBob) and Cameron Fuller will provide an introduction to what OMS is and what benefits it can provide your organization.

In the second 1.5 hour session, join the Microsoft product team members as they dig in deep on IT automation within OMS.

In the final 1.5 hour session, join the Microsoft product team members as they dig in deep on Log Analytics & Security / Compliance.  

SPEAKER BIOS:

OMS Pre-con

LINK: http://sched.co/6MtU

See you at MMS 2016!

MMS

http://mmsmoa.com

Read more

How to add SUSE Linux image to Azure Stack

In Azure Stack you can publish your own images essentially virtual machines that can be used when deploying a new virtual machine. This is handy for publishing servers that need to be pre-configured in a certain way for consumers of your cloud. In order for your published images to show up as an option in compute within Azure Stack the images need to be added to the Platform Image Repository (PIR) within the Compute Resource Provider (CRP).

SUSE has recently published a pre-built SUSE Linux Enterprise Server 12 SP1 image that has been prepped specifically for Azure Stack. This image is ready to go and can be published to the CRP’s PIR without any needed prep of the virtual machine. In this blog post I am going to walk through the steps I took to add this image to my Azure Stack.

SUSE already has an image out there for Azure. The SUSE image used on Azure does not work right now on Azure Stack. As of right now Azure and Azure Stack have different “initialization code”. In the future I would expect these to be the same. The SUSE image also includes SUSE/azurectl a command line tool that helps you manage SUSE updates from a Linux VM hosted on Azure. More info on this here: https://github.com/SUSE/azurectl. To download the SUSE Azure Stack image go to https://download.suse.com and complete the fields as show in the following screenshot.

AS-Suse-1

You will be brought to a login page to access the download. If you do not have a SUSE account sign up for one and login. You will see the actual download at that point. Go ahead and download it onto your Azure Stack Host.

AS-Suse-2

Extract the SLE-12-SP1-Server-Azure-Stack-x86_64.vhd and copy it to C:\ClusterStorage\Volume1\Share\VM.

AS-Suse-3

Microsoft has the steps for adding images to Azure Stack’s Platform Image Repository (PIR). The process is essentially running a PowerShell script. The script is included with Azure Stack. The script creates the image directory needed in C:\ClusterStorage\Volume1\Share\CRP\PlatformImages, the JSON file in that directory, and makes a copy of the VHD in that directory. The JSON file contains the meta data about the image that shows in the Azure Stack Portal. Here is the link to the Microsoft document: https://azure.microsoft.com/en-us/documentation/articles/azure-stack-add-image-pir/

Here are the steps for running the script:

In PowerShell navigate to:

D:\CRP\VM\Microsoft.AzureStack.Compute.Installer\content\Scripts

Run this script in PowerShell:

.\CopyImageToPlatformImageRepository.ps1

NOTE: My DATAIMAGE drive letter was D. You may have a different letter.

You will be prompted for the following:

  • PlatformImageRepositoryPath use this \\SOFS\Share\CRP\PlatformImages\
  • ImagePath I put C:\ClusterStorage\Volume1\Share\VM\SLE-12-SP1-Server-Azure-Stack-x86_64.vhd
  • Publisher I put SUSE
  • Offer I put LinuxServer
  • Sku I put SUSE-Linux-Ent-12-SP1
  • Version I put 12.0.0
  • OsType I put Linux

AS-Suse-4

NOTE: These prompts are used to populate the JSON file for the image. Here is an example of the JSON file:

{

“Publisher”:”SUSE”,

“Offer”:”LinuxServer”,

“Sku”:”SUSE-Linux-Ent-12-SP1″,

“Version”:”12.0.0″,

“PlatformImage” :{

“OsDisk” : {

“OsType”:”Linux”,

“FileName”:”SLE-12-SP1-Server-Azure-Stack-x86_64″

}

}

}

Alternatively you could run the script as:

.\CopyImageToPlatformImageRepository.ps1 -PlatformImageRespositoryPath ‘\\SOFS\Share\CRP\PlatformImages’ -ImagePath ‘C:\ClusterStorage\Volume1\Share\VM\SLE-12-SP1-Server-Azure-Stack-x86_64.vhd’ -Publisher ‘SUSE’ -Offer ‘LinuxServer’ -Sku ‘SUSE-Linux-Ent-12-SP1’ -OsType ‘Linux’

As long as the script worked you should have the following as an end result in C:\ClusterStorage\Volume1\Share\CRP\PlatformImages:

AS-Suse-5

AS-Suse-6

If you have the Azure Stack portal open close out of the browser and go back in. It should be listed as an available image in Compute as shown in the following screenshot.

AS-Suse-7

Notice the difference between a Windows image and a Linux image. The Linux image gives you an authentication option of Password or SSH Key.

Windows Linux
 AS-Suse-8  AS-Suse-9

Read more

Azure Stack TP1 Deployment Issues

I recently deployed the Azure Stack POC TP1 bits on a Lenovo ThinkPad W530. The W530 has 32GB of ram, 2 x 500GB SSD’s and 8 cores. I deployed Azure Stack to a VM using nested virtualization. The VM only had 27GB of ram. It surprisingly is fast with the TP1 bits and works well as a small lab for testing. There are several blogs out there that detail deploying Azure Stack on lower hardware specs and with nested virtualization. Here is one of the posts: http://www.jofe.ch/install-azure-stack-poc-into-a-vm/

Also there is an issue with nested virtualization. The issue is the AS host VM crashes when you RDP into any of the AS fabric virtual machines. So if you deploy the lab this way it will be limited.

I did run into some issues during the deployment and will cover these in this post. They are:

Read more

All Work Item Assigned/Reassigned Notification

A few years ago I posted a blog about work item assignment/reassignment notification options in Service Manager. Here is the link to that previous post:

SCSM Assignment/Re-Assignment Notify Options

Recently I modified the management pack for the last option #4 “Community Work Item Assignment/Reassignment Notifications”. The Community Work Item Assignment/Reassignment Notifications management pack is originally from here: http://scsmsource.blogspot.com/2011/04/work-item-assignmentreassignment.html.

The management pack has been modified to include more work items and a notification template was created. This management pack now has one notification template to modify and will send out notifications on assignment and re-assignment for all work items. Work items it includes are:

  • Activity Assignments
  • Change Request Assignments
  • Incident Assignments
  • Problem Assignments
  • Release Record Assignments
  • Service Request Assignments

The notification template is generic so that it will fit all cases. The web link that is referenced in the notification template should be modified depending on the portal used in your Service Manager deployment.

Verified Service Manager Versions:

  • Service Manager 2012 SP1
  • Service Manager 2012 R2 (tested up to UR9)

Management Pack Name:

All.WorkItem.Assignment.Workflow.Library.xml

Version:

7.0.6555.1

Notification Template File Name:

All Work Item Assigned To Notification Template.html

Description:

Importing this Management Pack, will create 6 custom workflows:

6 workflows

The workflows cannot be modified in the Service Manager console. They can only be modified in XML in the management pack. They can be viewed in Service Manager at Administration\Workflows\Status.

And 1 new notification template:

  • All Work Item Assigned To Notification Template

Every time a work item gets assigned or re-assigned to someone, it will send the “assigned to” person an e-mail. The notification template looks like this:

all work items notification template

Feel free to modify the notification templates as you see fit after you have imported the management pack. The .html file for the notification template is also included for easy editing outside of Service Manager.

You can download this solution here:

https://gallery.technet.microsoft.com/All-Work-Item-AssignedReass-96fe40c7

Read more

Customizations in the Service Manager HTML 5 SSP

Microsoft has released a great blog post about customizations that can be done to the Service Manager HTML 5 self-service portal. This article covers the following areas:

  • Title
  • Logo
  • Colors and Tiles
  • Icons
  • New sidebar link

In the article they talk about what is supported and what is not for customizations. They key is that if you make unsupported customizations be sure to back up your customizations. This is because they might be overwritten when an update rollup is applied and Microsoft will not guarantee those customizations will stay intact. This is no big deal if you back your customizations up as you could simply reapply them after an update rollup.

Here is the link to Microsoft’s blog post on this:

https://blogs.technet.microsoft.com/servicemanager/2016/03/15/basic-ui-customization-in-new-self-service-portal-html5/

Now I am writing this blog post for few reasons. #1 There are other customizations that have been blogged about by the community that are not included in Microsoft’s article. #2 I want a central location to document all of the customization articles out there. #3 I am using this as a way to document some of the customizations that I have made for later reference.  Here is the list:


Customising the Service Manager HTML5 Portal

This a blog post on general customizations of the HTMK5 portal.

By System Center MVP Steve Beaumont: http://www.systemcenter.ninja/2015/12/customising-service-manager-html5-portal.html


HTML5 Portal: Search Query!

This covers changing the Refresh box to Search and adding text to the search input box.

By Ryan Ephgrave:

http://www.ephingadmin.com/service-manager-html5-portal-search-query/


HTML5 Portal: Larger Description Text Box

This covers making the text box on forms larger. I know this is a common ask. This is a great blog post to bookmark.

By Ryan Ephgrave:

http://www.ephingadmin.com/service-manager-html5-portal-larger-description-text-box/


Display “Must Vote” by the side of the user name on Change Request Activity in the portal

This can be done by doing following changes in Views\MyActvities\ActtvitiyDetails.cshtml (addition & removal) –

<div class=”name col span_6″ style=”padding:1px;”>@Resources.SelfServicePortalResources.Name</div>

<div class=”name col span_6″ style=”padding:1px;”>Must Vote</div>

<div class=”status col span_6″>@Resources.SelfServicePortalResources.Status</div>

<div class=”comment col span_7″>@Resources.SelfServicePortalResources.Comment</div>

<div class=”voted col span_6 grey-text”>@Resources.SelfServicePortalResources.VotedBy</div>

————————–

<div class=”name col span_6″ style=”padding:1px;”>@reviewerItem.Item1</div>

<div class=”name col span_6″ style=”padding:1px;”>@reviewerDetails[“MustVote”]</div>

<div class=”status col span_6″>@decision</div>

<div class=”comment col span_7″ style=”padding:1px;”>@reviewerDetails[“Comments”]</div>

@if (!reviewerItem.Item2.IsEmpty())

{

<div class=”voted col span_6 grey-text”>@reviewerItem.Item2</div>

}

https://social.technet.microsoft.com/Forums/systemcenter/en-US/8c3af275-820d-4663-8165-46364d6e0040/new-html-5-portal-change-control-user-to-approve-info?forum=portals&tduid=(bbc82b3a96d3ba9c69f8efad24f74430)(256380)(2459594)(TnL5HPStwNw-5ocTrJtqN7jv7JWlYxWHgQ)()


NOTE: When looking for the code to change search for:

@foreach (var item in formData)


Customizations By System Center MVP Steve Buchanan:

GENERAL

clip_image001.png

In the Web.config file change

<!– Customizable fields starts here –>

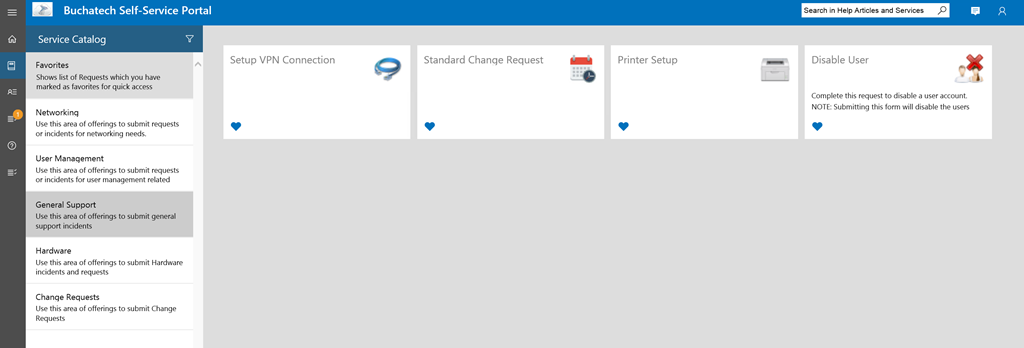
FOR TITLE CHANGE:<add key=”CompanyName” value=”Buchatech Self-Service Portal”/>

FOR PORTAL LOGO (COMPANY LOGO) CHANGE: <add key=”CompanyLogoLocation” value=”../Content/images/System Center_Cloud_Logo_Transparent.png”/>

FOR NUMBER CHANGE:<add key=”ITPhone” value=”562-309-4042″/>

FOR EMAIL CHANGE:<add key=”ITEmail” value=”support@buchatech.com”/>

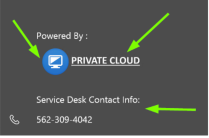
You will notice on my side menu I do not have email address and instead of an IT phone number I have “Service Desk Contact Info:” and my Powered By logo and text are custom.

clip_image002.png

To change these go to:

C:\inetpub\wwwroot\SelfServicePortal\Views\Shared

And modify the Sidebar.cshtml file.

Find “<div class=”side_nav_bottom”>” and modify:

<div class=”side_nav_report”>

<div>@Resources.SelfServicePortalResources.PoweredBy :</div>

<img src=”~/Content/images/PrivateCloud_logo1.png” alt=”Private Cloud” style=”max-width: 12em;” />

<br /><br />

I COMMENTED OUT THE DEFAULT TEXT HERE:    <!–<div>@Resources.SelfServicePortalResources.CantFindSolution</div>–>

<!–<div>@Resources.SelfServicePortalResources.ContactUs</div>–>

I ADDED MY OWN TEXT HERE:     <div>Service Desk Contact Info:</div>

</div>

<div class=”row side_nav_phone”>

<span class=”icon-Phone icon-pos icon icon-medium”></span>

<span class=”icon-text icon-text-pos”>@System.Web.Configuration.WebConfigurationManager.AppSettings[“ITPhone”]</span>

</div>

<div class=”row side_nav_mail”>

<span class=”icon-Mail icon-pos icon icon-medium”></span>

<span class=”icon-text icon-text-pos”>@System.Web.Configuration.WebConfigurationManager.AppSettings[“ITEmail”]</span>

</div>


NOTE: Company logo image works best as 32×32.

NOTE: Powered by logo image works best as 36×26.

All images should be stored in: C:\inetpub\wwwroot\SelfServicePortal\Content\images

ICONS

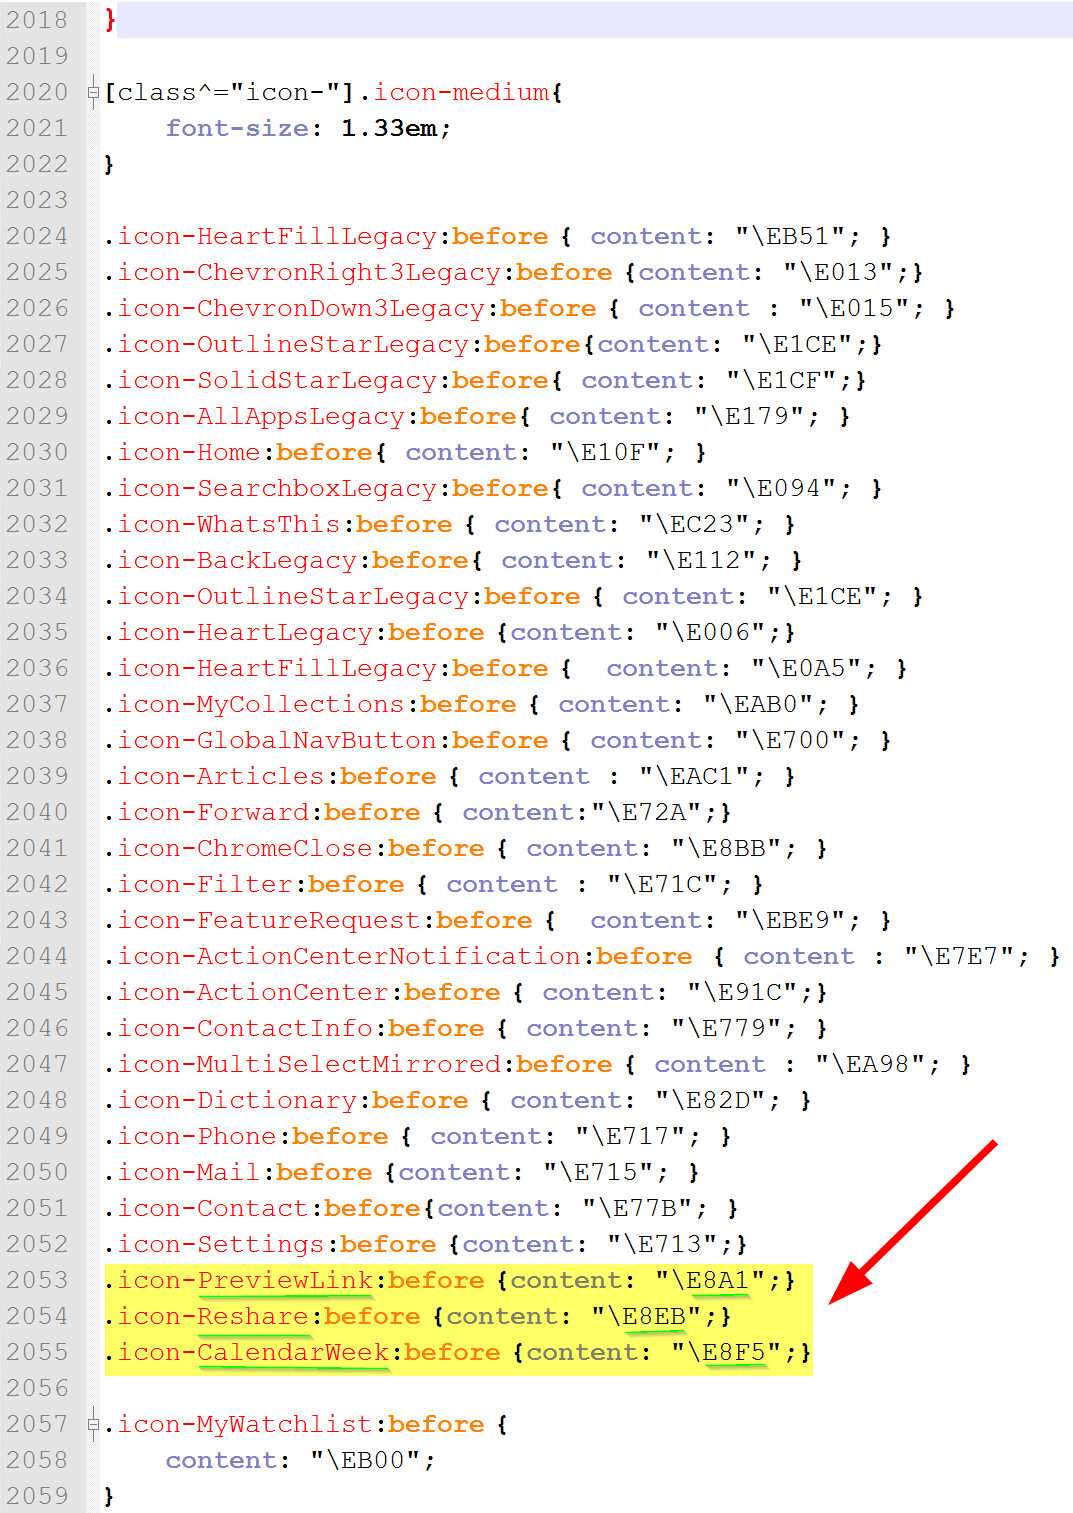
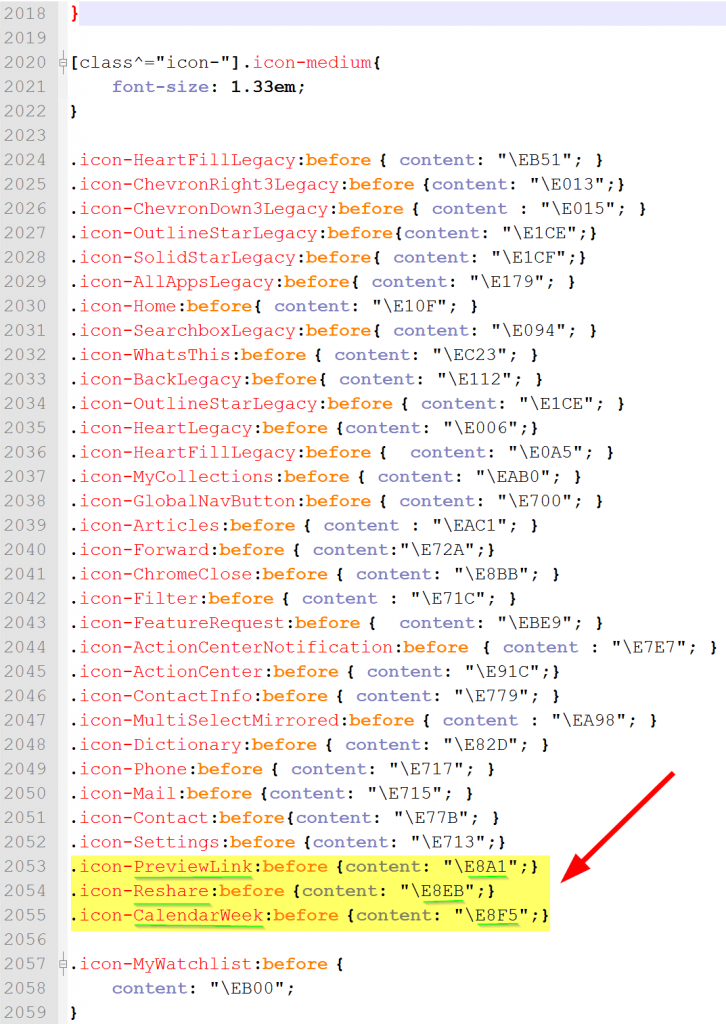
In C:\inetpub\wwwroot\SelfServicePortal\Content\CSS you have to edit the main.css file.

In this file find the [class^=”icon-“].icon-medium{ section.

Here you will see all the font icons. You can add the font icons you want to be available for use in the portals CSS. In the following screenshot I have highlighted the fonts I have added.

Iconsinmaincss

As stated on the Microsoft blog post you can find the icons that will work with the portal here:

http://modernicons.io/segoe-mdl2/cheatsheet

In the following section I will mark the font icon placement in custom links in blue. This way you can see how they would be used.
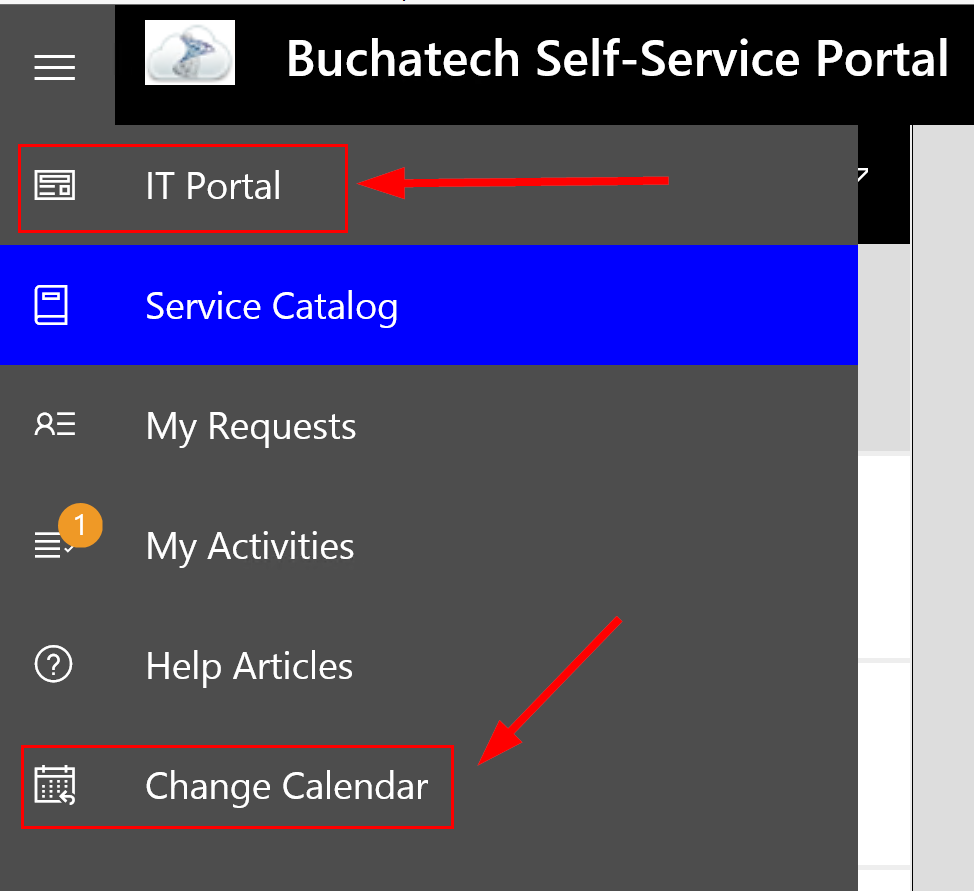
SIDE BAR LINKS

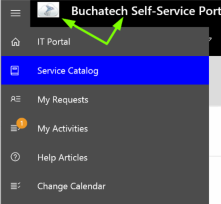
In my portal I added some custom sidebar links.

2016CustomlinksonBuchatechSSP02

In C:\inetpub\wwwroot\SelfServicePortal\Views\Shared

Modify the Sidebar.cshtml file.

In the file under “<div class=”side_nav_bar col side_menu”>”

I added the following:

<!– Custom IT Portal Link Begin –>

<div class=”row side_nav_IT Portal” accesskey=”I” tabindex=”4″ data-toggle=”tooltip” title=”IT Portal”>

<a href=”http://portal.buchatech.com” target=”_blank”>

<font color=”white”>

<span class=”icon-PreviewLink icon icon-pos icon-medium”></span>

</font>

</a>

</div>

<!– Custom IT Portal Link End –>

And

<!– Custom Change Calendar Link Begin –>

<div class=”row side_Change Calendar” accesskey=”C” tabindex=”9″ data-toggle=”tooltip” title=”Change Calendar”>

<a href=”http://portal.buchatech.com/_layouts/15/start.aspx#/Lists/Change%20Calendar/calendar.aspx” target=”_blank”>

<font color=”white”>

<span class=”icon-CalendarWeek icon icon-pos icon-medium”></span>

</font>

</a>

</div>

<!– Custom Change Calendar Link End –>


In the file under “<div class=”side_nav_bar_expand col side_menu”>”

I added the following:

<!– Custom IT Portal Link Begin –>

<div class=”row side_nav_IT Portal”>

<span class=”icon-PreviewLink icon-medium icon icon-pos”></span>

<span class=”icon-text icon-text-pos”><a href=”http://portal.buchatech.com” target=”_blank”><font color=”white”>IT Portal</font></a></span>

</div>

<!– Custom IT Portal Link End –>

And

<!– Steve Change Calendar Link Begin –>

<div class=”row side_nav_Change Calendar”>

<span class=”icon-CalendarWeek icon-medium icon icon-pos”></span>

<span class=”icon-text icon-text-pos”><a href=”http://portal.buchatech.com/_layouts/15/start.aspx#/Lists/Change%20Calendar/calendar.aspx” target=”_blank”><font color=”white”>Change Calendar</font></a></span>

</div>

<!– Steve Change Calendar Link End –>


Here is the Microsoft link for adding sidebar links:

https://blogs.technet.microsoft.com/techlazy/2016/03/13/service-manager-new-html5-portal-basic-customizations-55-new-sidebar-link/


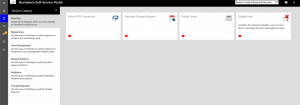
COLORS LOOK AND FEEL

Custom Buchatech look and feel:

clip_image004.png

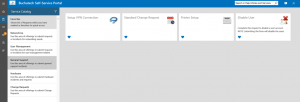
Default look and feel:

clip_image005.png

Read more