Unlink yourself from unused AAD directories

Working in the world of consulting I am often added to other Azure Active Directories that are managed by someone else. After a while these can pile up like in the following screenshot.

I like to clean these up as the inviting organizations typically don’t remove you. Here is a quick way to do this. In a browser go to https://myapps.microsoft.com. It will look like this:

Click on your name and select the directory you want to remove. Click on your name again and click on the cog for the settings.

You should then see the option to “Leave the organization”. Click the link.

You will see the following pop-up. Click on Leave.

That’s it. You will no longer see the directory you just removed listed in the Azure portal under your directory list.

Read more

Microsoft Professional Program for DevOps Finished!

I am a firm believer that no matter how old you are, how far along you are in your career, and regardless of the industry you are in it is important to continue educating yourself. This helps you expand your skillset, stay relevant, and sets you up for new opportunities as they come along. My field of information technology has been changing at a rapid pace and so for a while, I wanted a good way to ramp up on DevOps as a whole. A while back I found out that Microsoft added a new track to their Professional Program for DevOps. When I checked it out I found it to be very thorough and it was not just focused on Microsoft’s DevOps tooling but included non-Microsoft as well. I jumped in without hesitation and started learning.

I finally completed the program last week. Here is my certificate https://academy.microsoft.com/en-us/certificates/67284e84-8afe-4f13-b477-d7620949fb18. I am planning to dive into the program they have for cloud next. If you have not heard of Microsoft’s Professional Program DevOps before here more information about it:

“DevOps is the union of people, process, and products to enable continuous delivery of value to end users. This program helps the student learn about continuous integration and deployment, infrastructure as code, testing, databases, containers, and application monitoring: skills necessary for a DevOps culture in today’s workplace. This program focuses on Microsoft DevOps technologies as well as some OSS (Open Source Software) DevOps tools. Some of the Microsoft DevOps technologies covered in this course consist of Azure, Azure Resource Manager, IaaS, PaaS, IIS, Azure App Service, DevTest labs, Desired State Configuration (DSC), Azure Automation, OMS, Application Insights, SQL, Nuget, TFS, VSTS, and Visual Studio. Some of the OSS DevOps tools covered in this course consist of Jenkins, Git, Github, New Relic, Nagios, Chef, Docker, DC/OS, swarm, and Kubernetes.”

Here is a link to it:  https://academy.microsoft.com/en-us/tracks/devops

This program consists of 8 required courses. Each course runs for three months and starts at the beginning of a quarter. In the end, there is a capstone that has to be completed. This capstone course is the 8th one. You have four weeks to complete the capstone. The capstone is a bunch of hands-on stuff you have to do. Courses average 16-32 hours per course to complete and are taken via the edX.org platform https://www.edx.org/microsoft-professional-program-devops.

Here is a list of all of the DevOps program courses:

      • Introduction to Dev Ops Practices
      • Infrastructure as Code
      • Continuous Integration and Continuous Deployment
      • Configuration Management for Containerized Delivery
      • DevOps Testing
      • DevOps for Databases
      • Application Monitoring and Feedback Loops
      • Microsoft Professional DevOps Capstone Project
      • The DevOps Capstone Project contains:
        • Automation
          • Use ARM templates to deploy and configure Infrastructure in Azure
        • Continuous Integration
          • Implement Continuous Integration solution using Visual Studio Team services (VSTS)
        • Continuous deployment
          • Implement Continuous Deployment solution using Visual Studio Team Services (VSTS)
        • Testing
          • Implement Unit tests
          • Implement Testing in Production
        • Application Monitoring
          • Implement application monitoring solution using Application Insights

As you can see from that list this program is not just all about VSTS. There is a lot of Azure baked in as well as other non-Microsoft DevOps tooling. I highly recommend this course for anyone jumping into DevOps, or CloudOps and especially for folks with an IT pro background. If CloudOps is foreign to you here are a couple of blogs related to this topic: Sys Admin to Cloud Admin…ITSM to CloudOps…On-Prem to Azure Stack/Azure and Native Cloud Management in Azure.

My personal opinion is that Microsoft should move away from the certifications as they are and to this format. This format combines training and testing. When Microsoft first started the Professional Program for they only had a track for data scientists. They have added more and more tracks over time. Today there are tracks also for Big Data, Web Development, Software Development, AI, IT Support, and Cloud Administration.

Here is a link for all the tracks so you can check them out: https://academy.microsoft.com/en-us/professional-program/tracks. These programs are a great way to expand your learning. Check them out!

Read more

Native Cloud Management in Azure

For those that know me know that I have been a System Center expert for some time focused on helping organizations manage their IT along with their ITSM needs. I have been working with Azure since it was released off and on but started to get serious about Azure after Microsoft’s move to resource manager. And even more recently I have re-focused completely to Azure and DevOps along with ITSM in the context of the cloud. I consider this combination CloudOps.

CloudOps is important when it comes to cloud and supporting DevOps. A part of CloudOps is cloud management. More specifically the tooling name for cloud management is often referred to as Cloud Management Platform (CMP).  CMP’s can be a CloudOps architect and engineers best friend or worst nightmare. There are many CMP solutions out there in the market that can be used to manage Azure and other clouds as well. Microsoft has done a nice job building and bringing in native solutions that can be used to manage Azure. The following image depicts the areas of cloud management that are in focus for Microsoft.

I am sure the plan for native cloud management will change and expand over time as Azure and its management needs continue to grow. The native set of cloud management tools in Azure can be viewed as a CMP. I am going to put together a group of blogs that at a high level cover the native solutions that exist for managing and securing Azure. There are so many areas in this topic that it has to be broken out into a blog series. This is the first time I am doing a blog series. It will cover the following:

Check back on this post soon. As I create more blog posts in this series they will be linked on the list above.

Read more

Azure Cost Management (Cloudyn)

IT financial management (ITFM) is an important part of IT operations as business dependency on IT continues to grow in the age of digital transformation. ITFM is a part of ITIL as a Service Strategy element in the framework. ITFM is a key part of CloudOps as well because spending in the cloud is based on an OPEX model and every single cost is tracked. ITFM and cost management in the cloud should be used to effectively and concisely connect the dollars spent on IT to the value delivered to the business. We can do this with Azure Cost Management. In this post, I am going to give an overview of Azure cost management highlighting many of the things you can do with it. Let’s dive into the solution now.

Overview

In June of 2017, Microsoft acquired Cloudyn a startup that had tooling for cloud monitoring and analytics tools focused on cloud financial management. Cloudyn’s solution is multi-cloud covering Azure, Azure Stack, AWS, and GCP. Through the acquisition of Cloudyn Microsoft was able to bring the tooling into the Azure ecosystem giving Azure customers an enhanced way to track and control cloud spend improving the improving the Azure cloud governance story.  As of right now, there is a free level and a paid level for Azure cost management. The following table lists what features are available with each level.

FREE capabilities:

Reporting Report on cost and usage
Data enrichment Categorize by resource tags
Budgets Create and manage cost and usage budgets
Alerting Create alerts on cost and usage budgets
Recommendations Eliminate idle cloud resources

Right-size cloud resources

PAID capabilities:

Chargeback features including cost markup, redistribution, and custom charges
Import external budgets
Customize recommendation thresholds
Categorize costs with custom meta-tags

Since the acquisition, Microsoft has added a link to the Cloudyn portal directly in Azure and integration with your Azure subscriptions giving you the ability to launch a new Cloudyn account that is tied to your subscription. Microsoft added Cost Management in Azure and this is where you will find Cloudyn and sign up. As shown in the following screenshot you can see the “Go to Cost Management” button. After clicking on that you will go the Cloudyn portal and will be able to add your various cloud accounts.  The thing that I really like about Azure cost management is that there is a ton of data and dashboards that are available right out of the box after adding a cloud account. There is not a bunch of configuration that you need to do to get the default dashboards and optimization tools.

After you are all signed up and have your cloud accounts added your dashboards will start to show data. The next two screenshots show a couple of the default dashboards.

The management dashboard gives a good summary of your cloud financials on one pane of glass.


The cost controller dashboard shows cost trends, some forecasting info, a breakdown of costs and more.

As you can see from the previous screenshots there are several other dashboards with other content. You can modify any of these dashboards adding or removing widgets. You also can create your own dashboard adding whatever widgets you want to it.

In Azure cost management, you can add cost centers known as Cost Entities. Entities are intended to mirror your organization’s hierarchical structure such as business units, divisions, departments, or teams within your organization some examples are engineering, R&D, development, marketing etc. The goal of the entities is to give you a way to track cloud spend by the entities. Keep in mind the cost entities can be anything that fits the way you want to structure and track cloud costs. You also can leverage tags, add budgets, and then associate costs and or budgets to the cost entities into cost models. Cost models give you a way to distribute and allocate costs. You can track costs back to these cost entities and you can track costs against budgets for showback or chargeback scenarios. Below is a screenshot of the cost entities screen. Keep an eye out for a detailed blog from me walking through how to structure and set up this part of Azure cost management. This area of Azure cost management warrants its own dedicated blog.

Here is an example of a budget set on a cost entity.

Read more

Azure Policy

A key component of cloud governance in Azure is being able to apply policies across cloud resources. In Azure, there is a  service called Azure Policy that can be used to define policies and enforce them across your cloud resources. Azure Policy can be used to create, assign and, manage, and apply policy definitions. Azure Policy can be set to just evaluate when resources are out of compliance or remediate when resources are out of compliance. These two modes are known as audit effect and deny effect.

Azure policies can be applied to Management Groups, subscriptions, or resources.

Azure Policy has been around for a while but recently it has revamped to make it enterprise ready. Azure Policy is in preview but it won’t be long before it will go GA and can be used to help manage your Azure. There is no pricing yet while Policy is in preview.

Azure Policy is not RBAC. RBAC deals with user access and user actions such as what users can access what resources and what they can do with them. Azure Policy deals with existing resources and resource properties during the deployment of them.

In Azure Policy you have something known as definitions. Definitions are essentially compliance rules that can be assigned to Azure resources. These definitions can just check to see if items are compliant or not and can enforce compliance. Definitions can be used to set conventions for resources, for example, all resources in a subscription should have a certain tag when created. Definitions are also used to evaluate something and take an action based on the result of the evaluation. A good example of this is that you could use a policy definition to evaluate if virtual machines are using managed disks or not. Azure Policies are used to help control costs and manage resources across your Azure subscriptions.

There are two types of definitions called Policy and Initiative. A Policy definition is a single definition. An Initiative definition is a group of Policy definitions. Initiative definitions are used to help achieve larger compliance need. To gain a better understanding of Initiative definitions you can look at Security Center as it leverages Initiative definitions. Security Center has a built-in Initiative definition named [Preview]: Enable Monitoring in Azure Security Center. This built-in Initiative definition for Security Center contains 13 Policy definitions related to security as shown in the following screenshot.

In Azure policy there are built-in and custom definitions. The built-in definitions have been created by Microsoft and are ready to be used to help with common needs in cloud. There are 36 built-in policy definitions today. Custom definitions are built by you. All Azure policies are JSON so writing custom polices is similar to writing ARM templates. Templates for Azure policies can be found in the Repository for Azure Resource Policy samples here: https://github.com/Azure/azure-policy. You can use these samples as a starting point when building your own. Here is an example of an Azure policies JSON:

Read more

Azure Management Groups

If your company is like most organizations that are using the cloud, then you have many subscriptions floating around. This is often due to “shadow IT”. However, sometimes organizations simply use many subscriptions as a way to put boundaries around cloud services for departments, teams or other reasons.

Microsoft has built a new service in Azure to help with the governance of your cloud. This new service is called Management Groups. Management Groups is still in preview but it is something I highly recommend you start trying out or using now as it is going to be as big for cloud as group policy was for on-premises AD based environments.

Management Groups sit above subscriptions. This allows Management Groups to be at the highest level in the chain so they can be used to effectively manage access, policies, and compliance for any subscriptions that belong to your organization. Within Management Groups you can set access controls (RBAC) and Azure policy to be applied to subscriptions. Subscriptions are organized in logical containers and the containers are the “management groups”. Your governance conditions are then applied to the management groups. This is the much-needed enterprise level type of management that has been needed in Azure for a while.

Management Groups will eventually become the starting point of governance when organizations embark on the cloud. Management Groups also can be used for organizations that are already in the cloud. I am going to dive into Management Groups giving you a high-level tour but first I need to give some more background on the components of Management Groups.

Each directory has a “root management group”. This root management group is at the top level of the management group hierarchy. All other management groups and subscriptions fold up to the root management group. Access and policies can be applied at the directory level via this root management group.

A couple of other things to note about management groups are that you can only have up to 10,000 management groups in a single directory, a management group tree can go six levels deep not including the root management group, and each management group can have multiple children management groups but only one parent management group.

Now let’s explore how I have structured my management groups to give some examples of how this works. Note that all the examples I show in this blog post are for my Azure environments but yours will be different based on many factors such as your organizational structure of departments, teams, etc.

You can find management groups under All Services>>Management Groups.

When you first access Management Groups you will need to create a root MG. Note that the root MG cant deleted or moved. You can rename the root MG. In the following screenshot, I am showing the creation of a sub MG in my root MG. Also, notice on the left-hand side you can set Access controls (RBAC) on this MG.

In order to configure Azure Policies and apply it to a management group, you do that within the Azure Policy itself. You can see in the following screenshot that I have an Azure policy and I am scoping it to the Prod01 MG. Whatever subscription/s and resources in those subscriptions will inherit the policy unless an exclusion is set in the policy or I am breaking inheritance at the resource group level.

In the following screenshot, I am showing the addition of an existing resource. The resources you can add are other MG’s or subscriptions.

In the following screenshot, you can see that I am going to add one of my subscriptions to my Dev01 management group. After doing this I can configure development related access and development related policies to this subscription. I also can do the same thing with my production environments/subscriptions.

Here is what my Management Groups hierarchy looks like:

In my hierarchy I have 3 subscriptions I split into two for production and 1 for development. I have created a root management group and placed all other management groups in it. I created a parent management group for my prod subscriptions and 1 for my development subscriptions in case I add more in the future. I then created a prod01 and prod02 pulling a subscription into each one. Doing this allows me to have separate access and policies per subscription. One thing you could do is pull multiple subscriptions into a single management group.

Note that I also could apply access and policies at the root level or at one of my environment management groups i.e. Prod_Env/Dev_Env and the sub-management groups would inherit the access and policies that are set at the environment management group level.

Also if you need to you can move management groups to a new parent management groups.

Thanks for reading this post. As I mentioned at the beginning of this post Azure Management Groups are currently in preview but they are worth checking out and potentially using now as these are going to become a critical part of the Azure governance story.

Read more

Azure Mobile App

Microsoft has a mobile Azure mobile app for Android and IOS. At first I was skeptical about the need of a mobile app for cloud but I found myself actually using it a few times for various tasks that I did not want to log onto my computer to do. In this blog post I am going to give one example. Before I jump into the example let’s explore the app.

First off you can load the app from Itunes or Google Play. You also can check it out here: https://azure.microsoft.com/en-us/features/azure-portal/mobile-app/ and here: https://play.google.com/store/apps/details?id=com.microsoft.azure&hl=en.

With the app in general you can see your Azure resources, their metrics, their health along with alerts, and diagnose and fix some issues through some actions you can perform on the resources via the mobile app. Some of the actions you can perform are Restart a web app or connect to a VM. Something else you can do with the app is access the Azure cloud shell. It supports Bash and PowerShell.  The following are some screenshots from the app.

Here is the app on my Android:

After the app launches for the first time you will be prompted to log into your subscription. Once you are logged in you will see all of your resources.

You can actually click on the filter icon to scope down to a specific type of resources.

The last screenshot here is of the Azure cloud shell in the mobile app.

Now lets talk about one reason you may use the app. I host an Azure user group website on WordPress on Azure. I have an availability monitor in Application Insights monitoring the site. If the site goes down I get an email from Application Insights as shown in the following screenshot.

I also get a notification in the UG board Slack channel by Logic Apps if the site is down. Well one day I got the notification from Slack on my phone.

I was not at my computer and did not want to go to it just to see what was going on with the site. I checked and sure enough the site was down.

Instead of logging onto my computer to troubleshoot I just used the app on my phone. Logging in I was able to see the site was up.

After clicking on the web app I was able to quickly restart it. It was up after that and I did it all from my phone.

I know restarting a web app is a basic thing. It saves time not having to log all the way into a computer to do this. I recommend trying out the mobile app. You never know when it might come in handy for a quick way to get info about one of your Azure resources and even help you troubleshoot something.

Read more

Setup CI/CD pipeline with VSTS & Azure Stack

We all know that DevOps brings together people, processes, and technology. In the Microsoft DevOps world A large part of the technology piece is utilizing Visual Studio Team Services (VSTS) for continuous deployment of workloads to Azure.

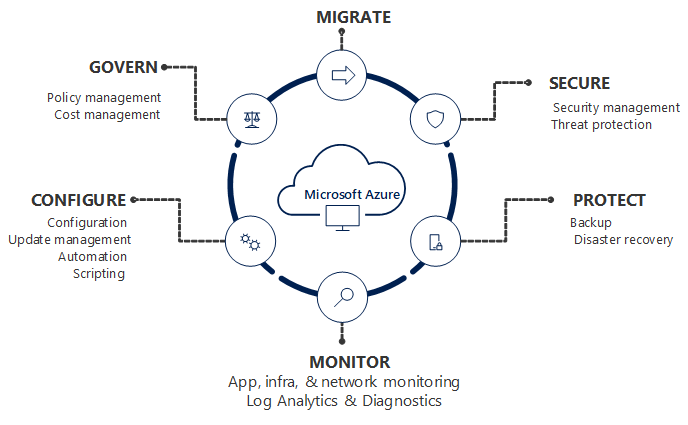
Microsoft launched their Hybrid Cloud on July 10th 2017. Azure Stack is the secret sauce of Microsoft’s the Hybrid Cloud. Microsoft’s offering is the only one true Hybrid Cloud in the market bringing Azure to on-premises data centers.

As Microsoft continues to move their Hybrid Cloud forward the DevOps integration and capabilities we have for Azure extend to Azure Stack. Again I was fortunate to participate in a preview of the VSTS integration with Azure Stack. I was happy to see Microsoft putting a priority on this functionality because DevOps on Azure Stack is a HUGE need. Cloud is often the catalyst to helping organizations adopt a DevOps culture fostering digital transformation. Some organizations not being able to put all workloads in public cloud Azure Stack is a good way for them to get the same cloud capabilities on-premises DevOps integration being one of them. The setup and integration between VSTS and Azure Stack is working nicely. The team at Microsoft has given me permission to share about this topic via my blog.

In this blog post I am going to cover setting up VSTS to work with Azure and setting up a continuous-integration and-continuous deployment (CI/CD) pipeline to Azure Stack. With Microsoft DevOps you can utilize the pieces of VSTS that make sense for you to use leaving the control up to you. Through VSTS you can use many other DevOps tools such as Jenkins, Octopus deploy, GitHub, Bitbucket etc into your pipeline making Azure Stack just as flexible as Azure is. Let’s Jump in!

Steps to prep Azure Stack for Visual Studio Team Services (VSTS)

#1 Ensure you have installed the Azure Stack PowerShell and Azure PowerShell modules.

Details can be found here:

https://docs.microsoft.com/en-us/azure/azure-stack/azure-stack-powershell-install

#2 Add the Azure Stack environment using the following syntax

# Navigate to the downloaded folder and import the **Connect** PowerShell module

Set-ExecutionPolicy RemoteSigned

Import-Module PATH\AzureStack.Connect.psm1

# Register an AzureRM environment that targets your Azure Stack instance

Add-AzureRMEnvironment `

-Name “AzureStackAdmin” `

-ArmEndpoint “https://adminmanagement.local.azurestack.external

# Set the GraphEndpointResourceId value

Set-AzureRmEnvironment `

-Name “AzureStackAdmin” `

-GraphAudience “https://graph.windows.net/

# Get the Active Directory tenantId that is used to deploy Azure Stack

$TenantID = Get-AzsDirectoryTenantId `

-AADTenantName “YOURDOMAIN.onmicrosoft.com” `

-EnvironmentName “AzureStackAdmin”

# Sign in to your environment

Login-AzureRmAccount `

-EnvironmentName “AzureStackAdmin” `

-TenantId $TenantID

NOTE: You will need the environment name and the tenant ID for the next script.

#3 Create SPN

Original SPN creation script can be found here:

https://github.com/Microsoft/vsts-rm-documentation/blob/master/Azure/SPNCreation.ps1

Documentation on creating an SPN can be found here:

https://www.visualstudio.com/en-us/docs/build/concepts/library/service-endpoints#sep-azure-rm

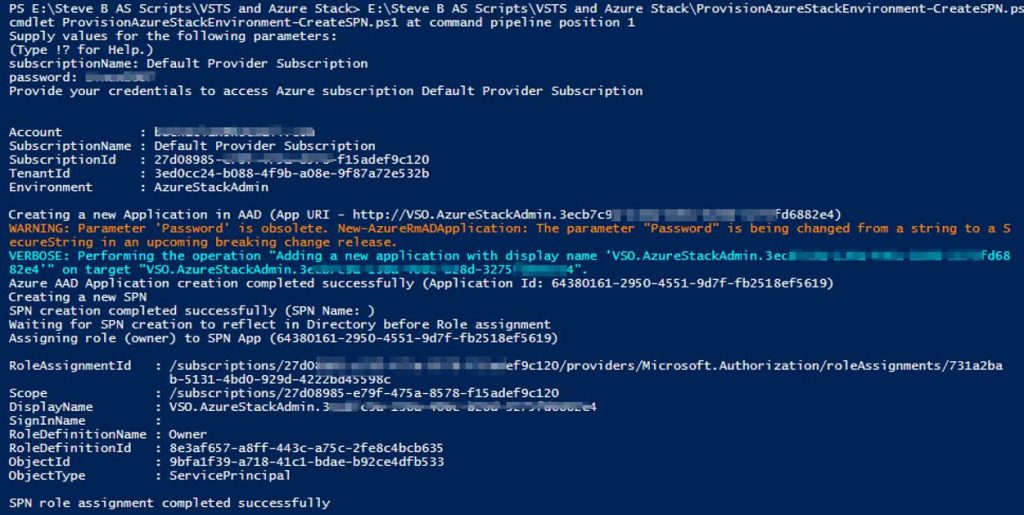
Below I will display the script I used. Note that you will need the following parameters for the script:

$subscriptionName

“Enter Azure Stack Subscription name. You need to be Subscription Admin to execute the script”)]

$password

“Provide a password for SPN application that you would create”

$environmentName

“Provide Azure Stack environment name for your subscription”

$AzureStackTenantID

“Provide tenant ID from when Azure Stack enviroment was added”

EXAMPLE:

.\CreateSPN.ps1 -subscriptionName “Default Provider Subscription” -password PASSWORDHERE -environmentName AzureStackAdmin -AzureStackTenantID ID HERE

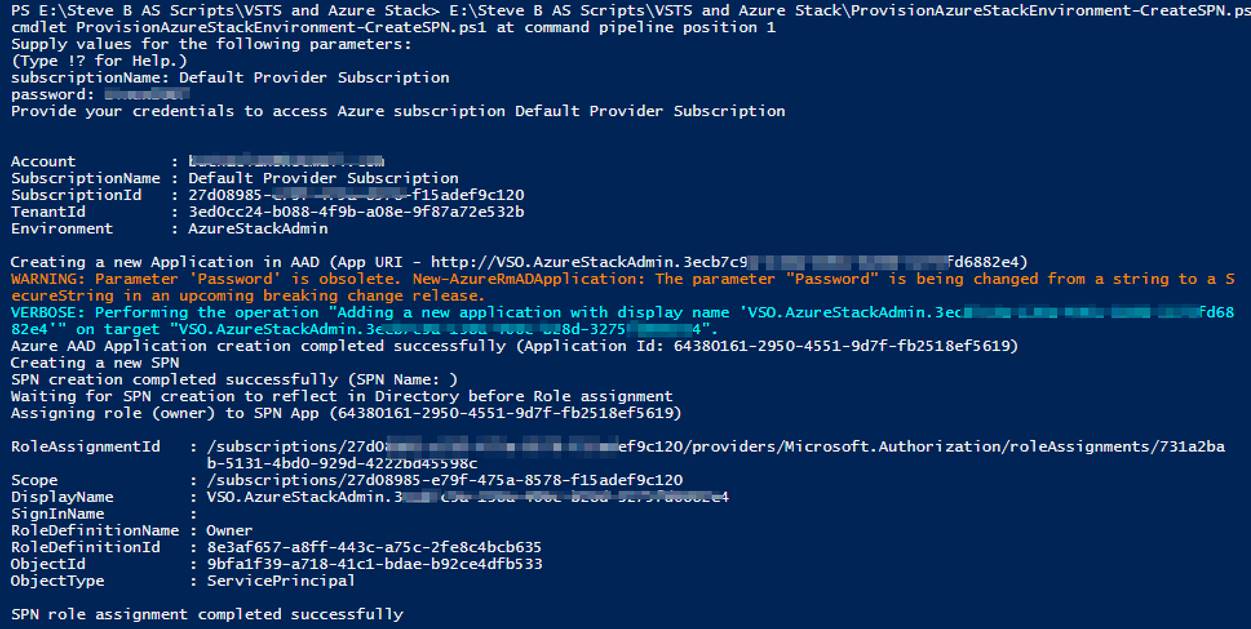
Here is the script I used that you can run:

param

(

[Parameter(Mandatory=$true, HelpMessage=”Enter Azure Stack Subscription name. You need to be Subscription Admin to execute the script”)]

[string] $subscriptionName,

[Parameter(Mandatory=$true, HelpMessage=”Provide a password for SPN application that you would create”)]

[string] $password,

[Parameter(Mandatory=$false, HelpMessage=”Provide a SPN role assignment”)]

[string] $spnRole = “owner”,

[Parameter(Mandatory=$false, HelpMessage=”Provide Azure Stack environment name for your subscription”)]

[string] $environmentName,

[Parameter(Mandatory=$false, HelpMessage=”Provide tenant ID from when Azure Stack enviroment was added”)]

[string] $AzureStackTenantID

)

#Initialize

$ErrorActionPreference = “Stop”

$VerbosePreference = “SilentlyContinue”

$userName = $env:USERNAME

$newguid = [guid]::NewGuid()

$displayName = [String]::Format(“VSO.{0}.{1}”, $userName, $newguid)

$homePage = “http://” + $displayName

$identifierUri = $homePage

#Initialize subscription

$isAzureModulePresent = Get-Module -Name AzureRM* -ListAvailable

if ([String]::IsNullOrEmpty($isAzureModulePresent) -eq $true)

{

Write-Output “Script requires AzureRM modules to be present. Obtain AzureRM from https://github.com/Azure/azure-powershell/releases. Please refer https://github.com/Microsoft/vsts-tasks/blob/master/Tasks/DeployAzureResourceGroup/README.md for recommended AzureRM versions.” -Verbose

return

}

Import-Module -Name AzureRM.Profile

Write-Output “Provide your credentials to access Azure subscription $subscriptionName” -Verbose

Login-AzureRmAccount -SubscriptionName $subscriptionName -EnvironmentName $environmentName -TenantId $AzureStackTenantID

$azureSubscription = Get-AzureRmSubscription -SubscriptionName $subscriptionName

$connectionName = $azureSubscription.SubscriptionName

$tenantId = $azureSubscription.TenantId

$id = $azureSubscription.SubscriptionId

#Create a new AD Application

Write-Output “Creating a new Application in AAD (App URI – $identifierUri)” -Verbose

$azureAdApplication = New-AzureRmADApplication -DisplayName $displayName -HomePage $homePage -IdentifierUris $identifierUri -Password $password -Verbose

$appId = $azureAdApplication.ApplicationId

Write-Output “Azure AAD Application creation completed successfully (Application Id: $appId)” -Verbose

#Create new SPN

Write-Output “Creating a new SPN” -Verbose

$spn = New-AzureRmADServicePrincipal -ApplicationId $appId

$spnName = $spn.ServicePrincipalName

Write-Output “SPN creation completed successfully (SPN Name: $spnName)” -Verbose

#Assign role to SPN

Write-Output “Waiting for SPN creation to reflect in Directory before Role assignment”

Start-Sleep 20

Write-Output “Assigning role ($spnRole) to SPN App ($appId)” -Verbose

New-AzureRmRoleAssignment -RoleDefinitionName $spnRole -ServicePrincipalName $appId

Write-Output “SPN role assignment completed successfully” -Verbose

#Print the values

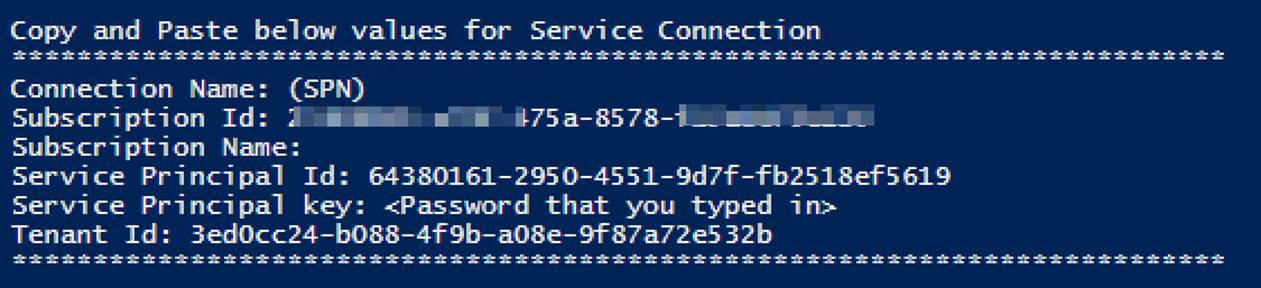
Write-Output “`nCopy and Paste below values for Service Connection” -Verbose

Write-Output “***************************************************************************”

Write-Output “Connection Name: $connectionName(SPN)”

Write-Output “Subscription Id: $id”

Write-Output “Subscription Name: $connectionName”

Write-Output “Service Principal Id: $appId”

Write-Output “Service Principal key: <Password that you typed in>”

Write-Output “Tenant Id: $tenantId”

Write-Output “***************************************************************************”

Output should be similar to this:

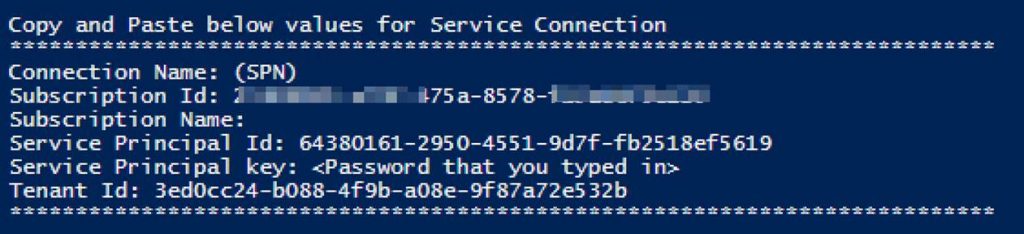
You will use information from the Service Connection output in the next step.

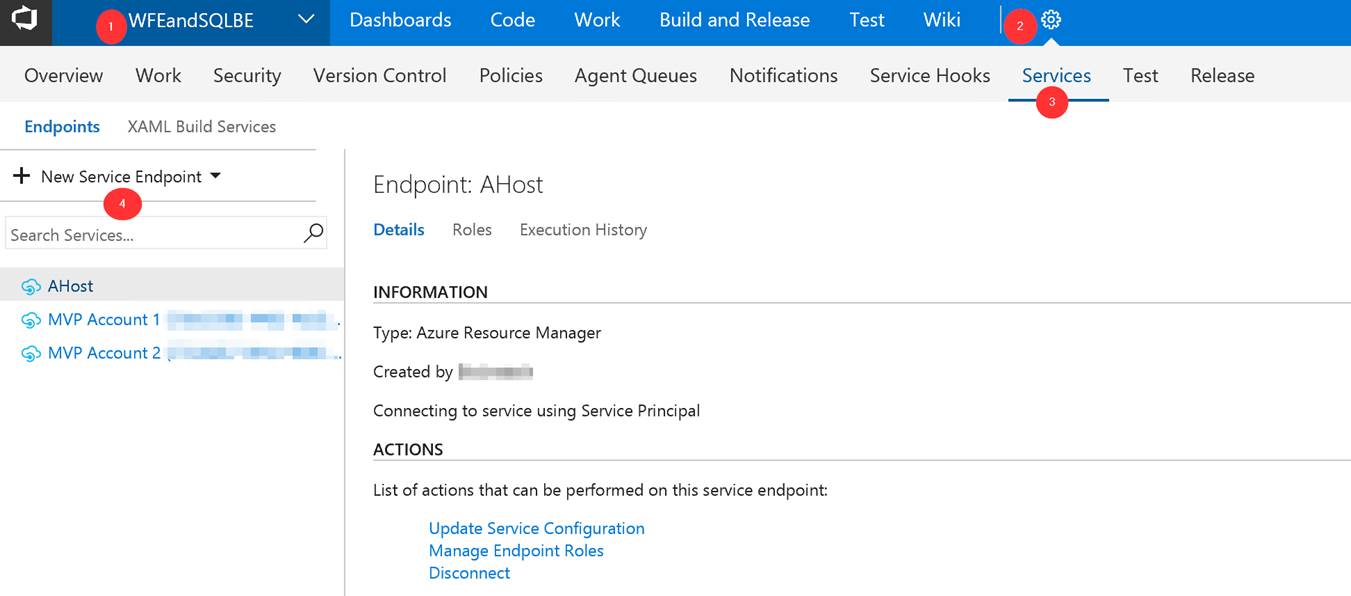
Steps to configure Azure Stack as a Service Endpoint in VSTS

Log into your VSTS account at visalstudio.com

Navigate to one of your projects.

Go into Settings.

Click on Services.

Click on New Service Endpoint

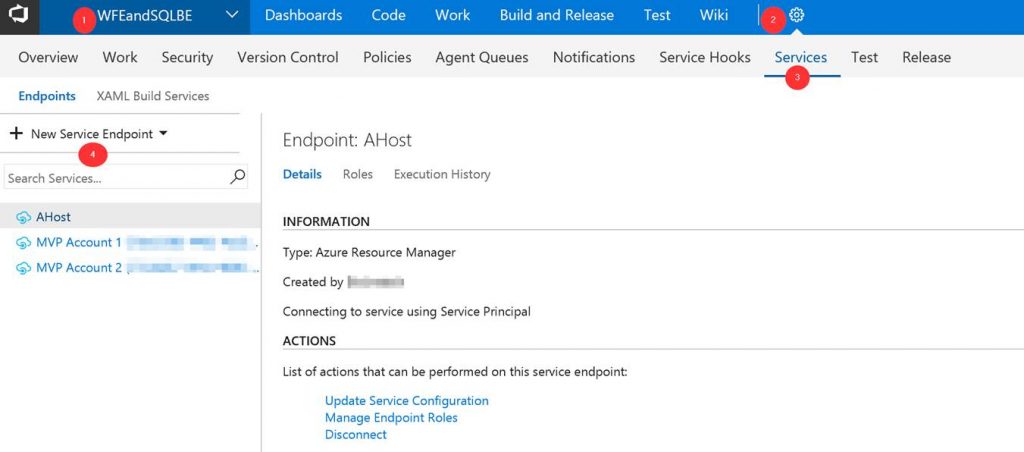
A window will pop up. Click on “use full version of the endpoint dialog.”

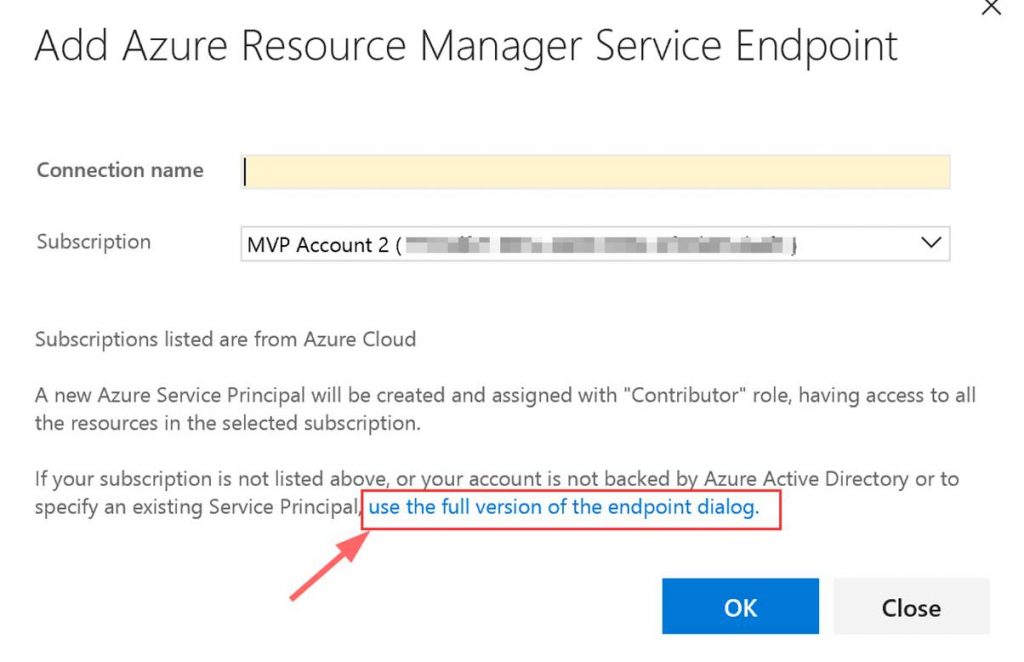
Next input the needed data. This data comes from the Service Connection info that you copied.

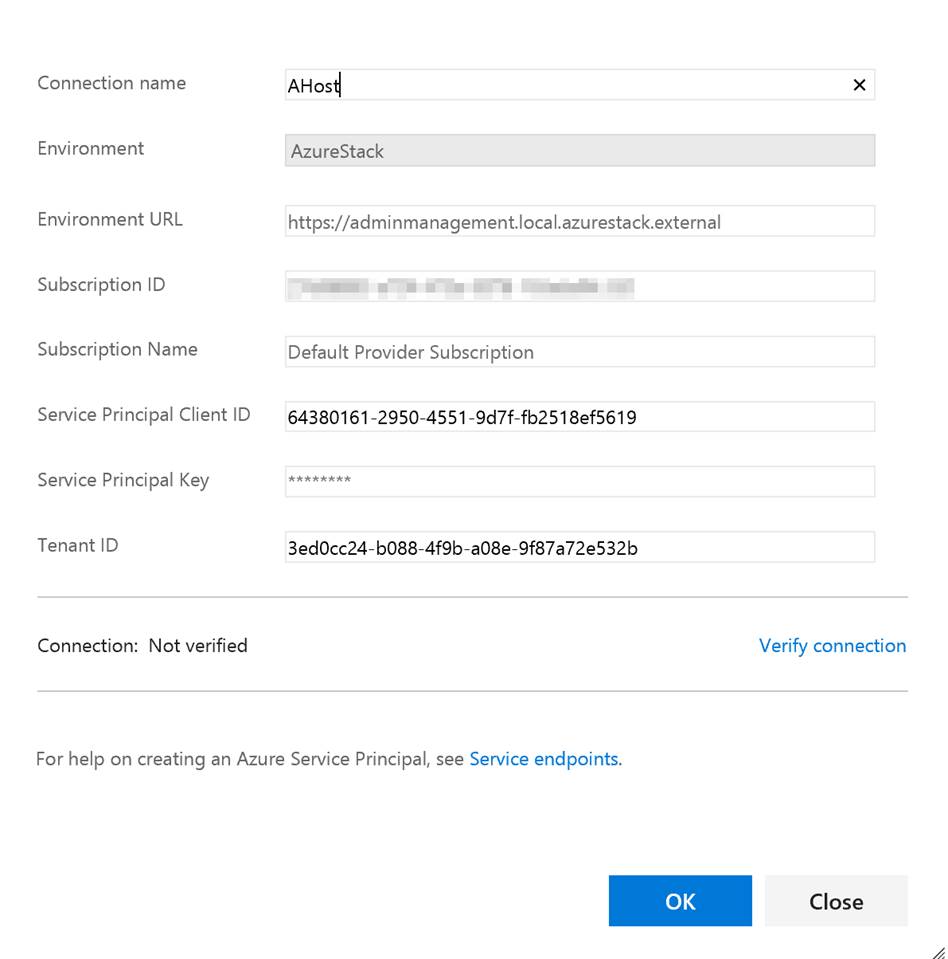
You can put whatever you want in the Connection name and the Subscription Name. Note do not verify the connection. It will not succeed as VSTS cannot access your private Azure Stack yet. Click OK when done.

Setup build agent on Azure Stack host

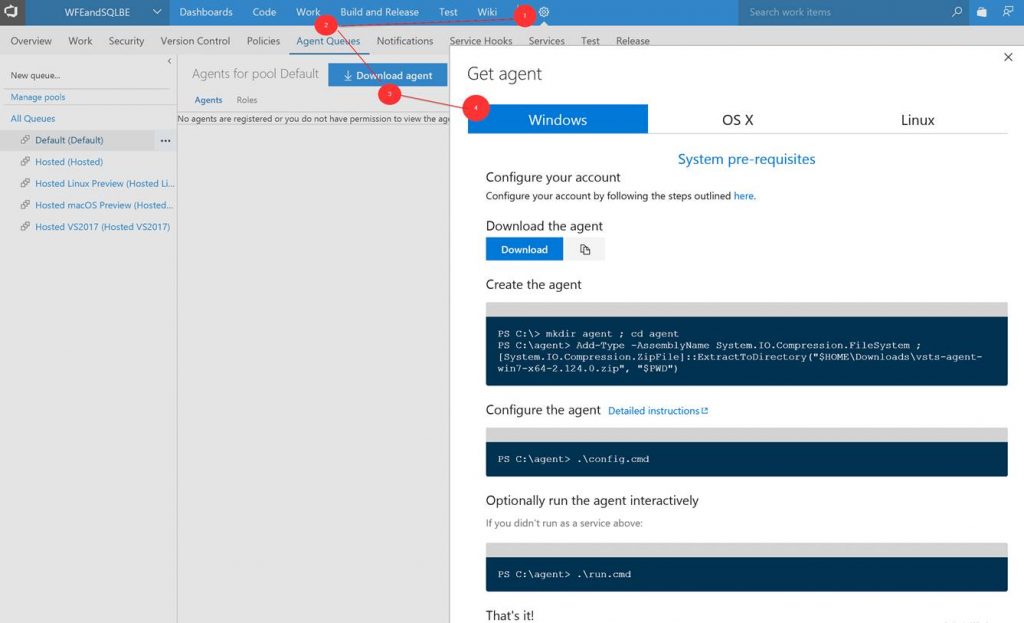
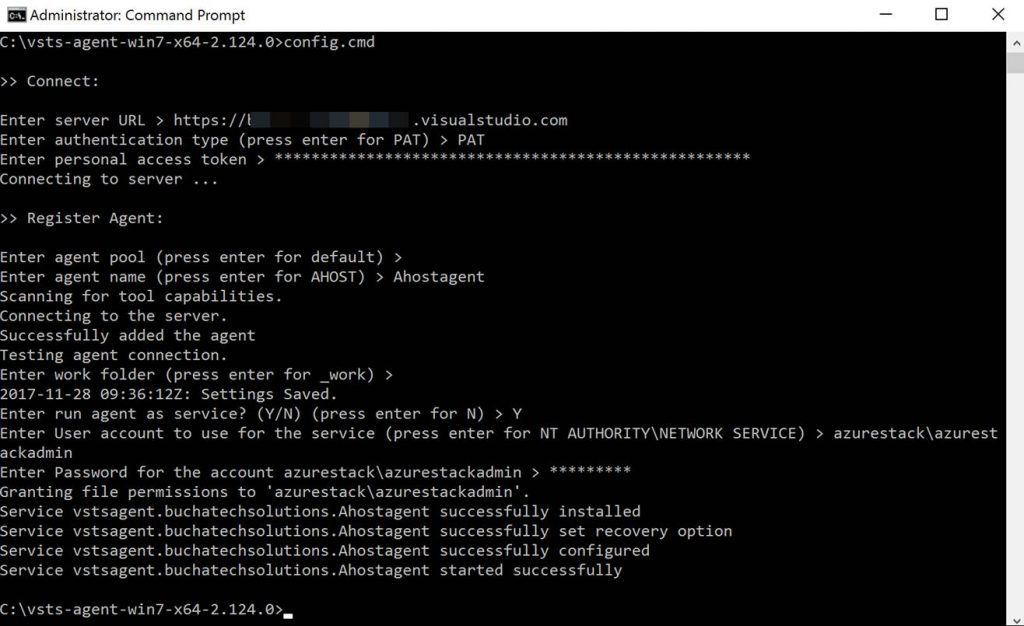
Next you need to setup the build agent on the Azure Stack host. (Note: In this post I am using the ASDK.) From within VSTS download the Windows agent. Extract the download to a local folder.

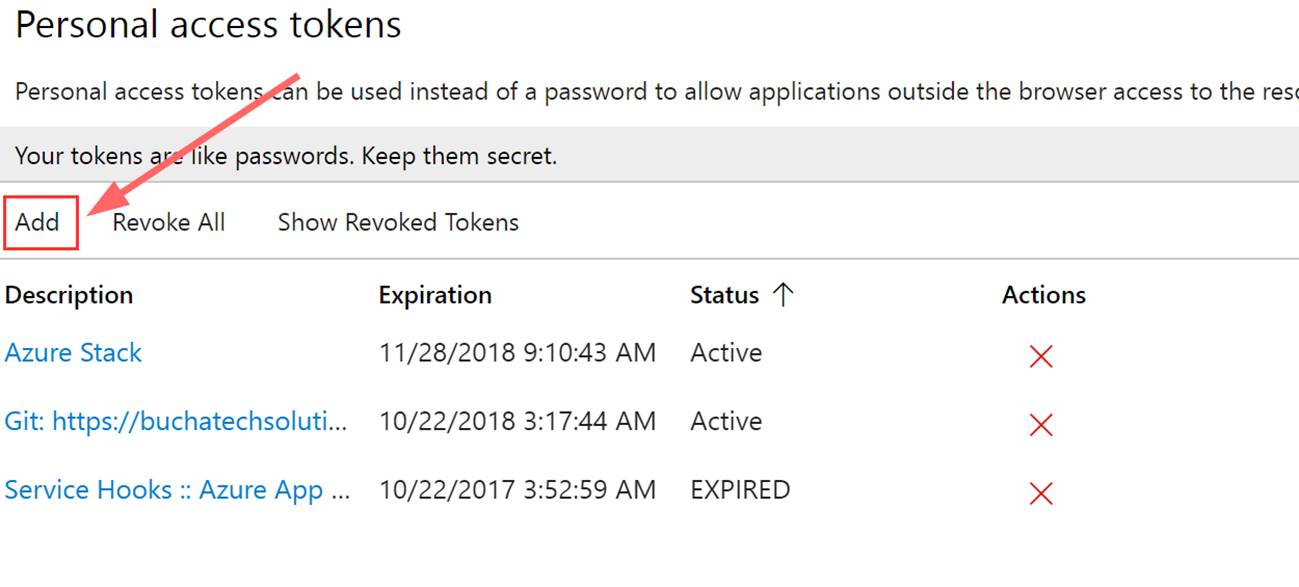
Go to Security under your profile in VSTS.

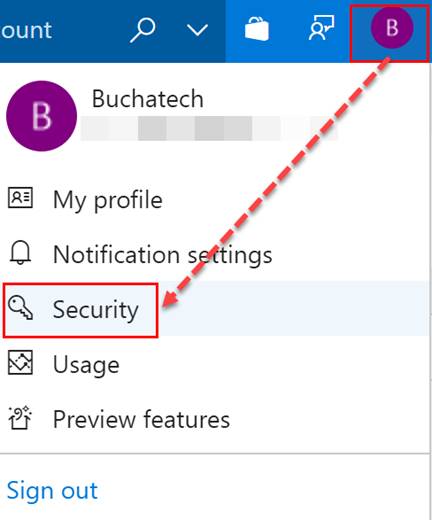
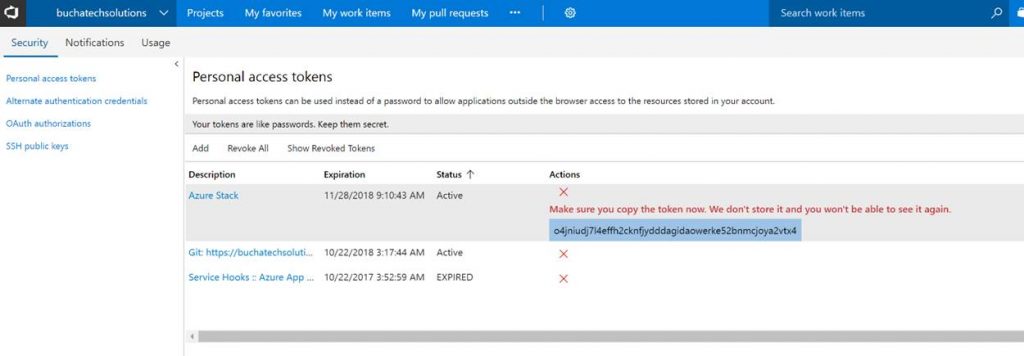
Next add a Personal access token (PAT) for Azure Stack.

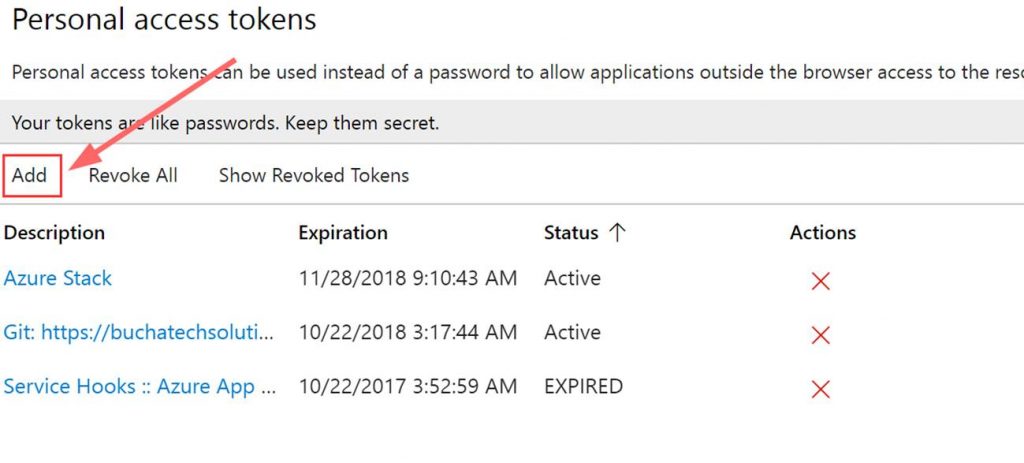
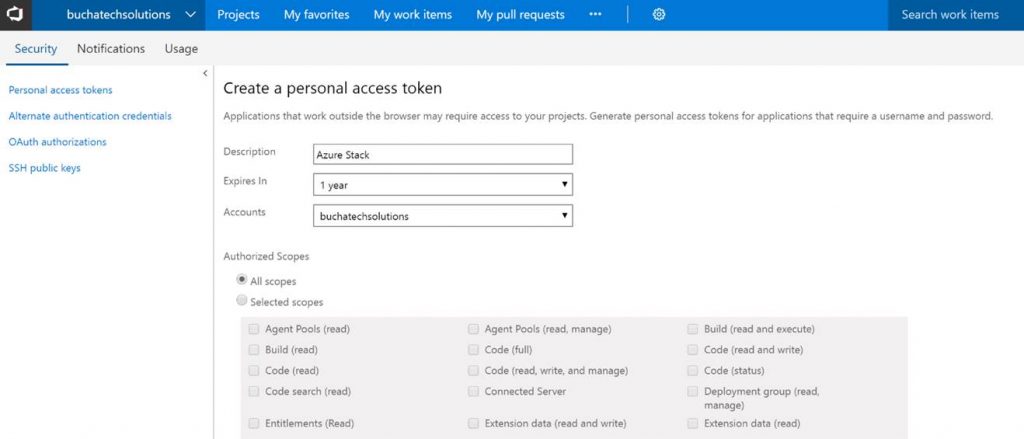
Copy the token. Note it will not be shown again ever after you leave this screen.

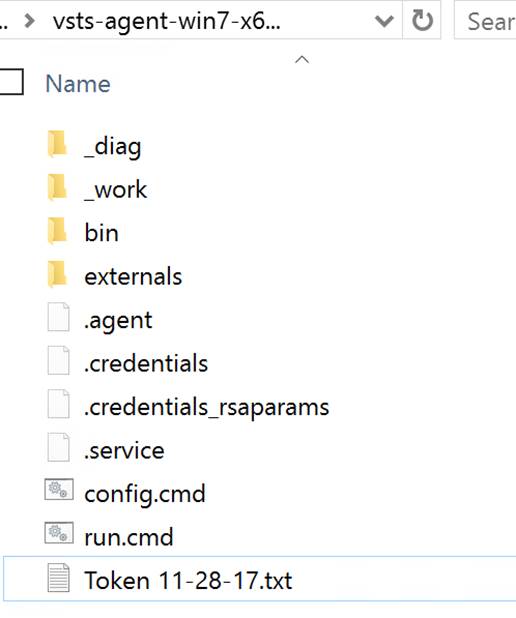
In the folder with the extracted build agent you will see the following. We need to run the run.cmd file from an elevated command prompt.

Here is a screenshot of running the run.cmd. I recommend deploying the build agent as a service. You will use your personal access token (PAT) here and the azure stack admin account.

After the run.cmd finished the folder with the extracted contents should look like the following:

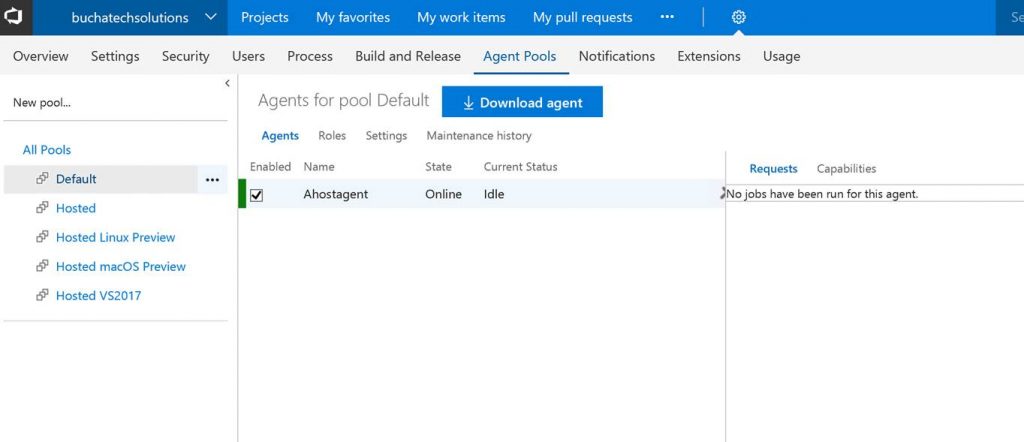
You can now see the agent in VSTS.

That’s it for the setup for connecting VSTS to Azure Stack. Next let’s look at setting up a continuous-integration and-continuous deployment (CI/CD) pipeline for VM-deployment to Azure Stack.


THE BUILD

What I cover here is focused on infrastructure as code (IaC) using ARM templates. If you need to set up CI/CD to Azure Stack for Web Apps, Mobile Apps, Containers, etc the process is the same as it is on Azure with the only difference being that you point to Azure Stack. Also note that in this post I am using the ASDK not multi-node.

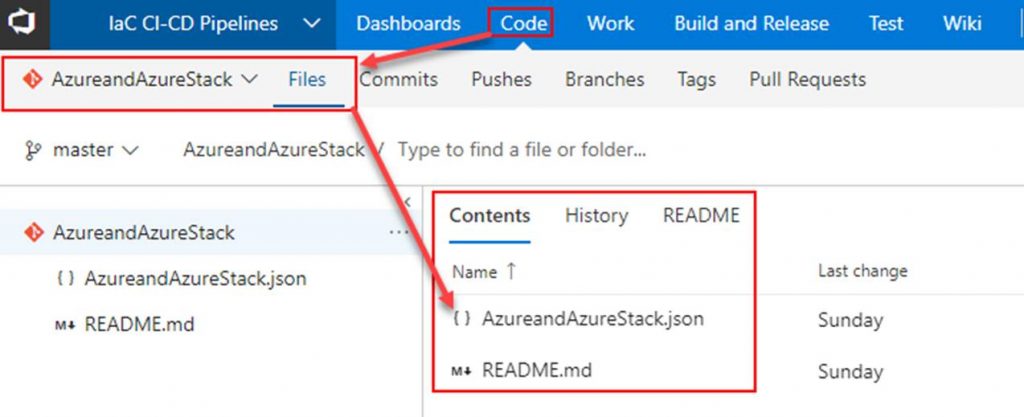
Within VSTS create a new repository and place your ARM template in it.

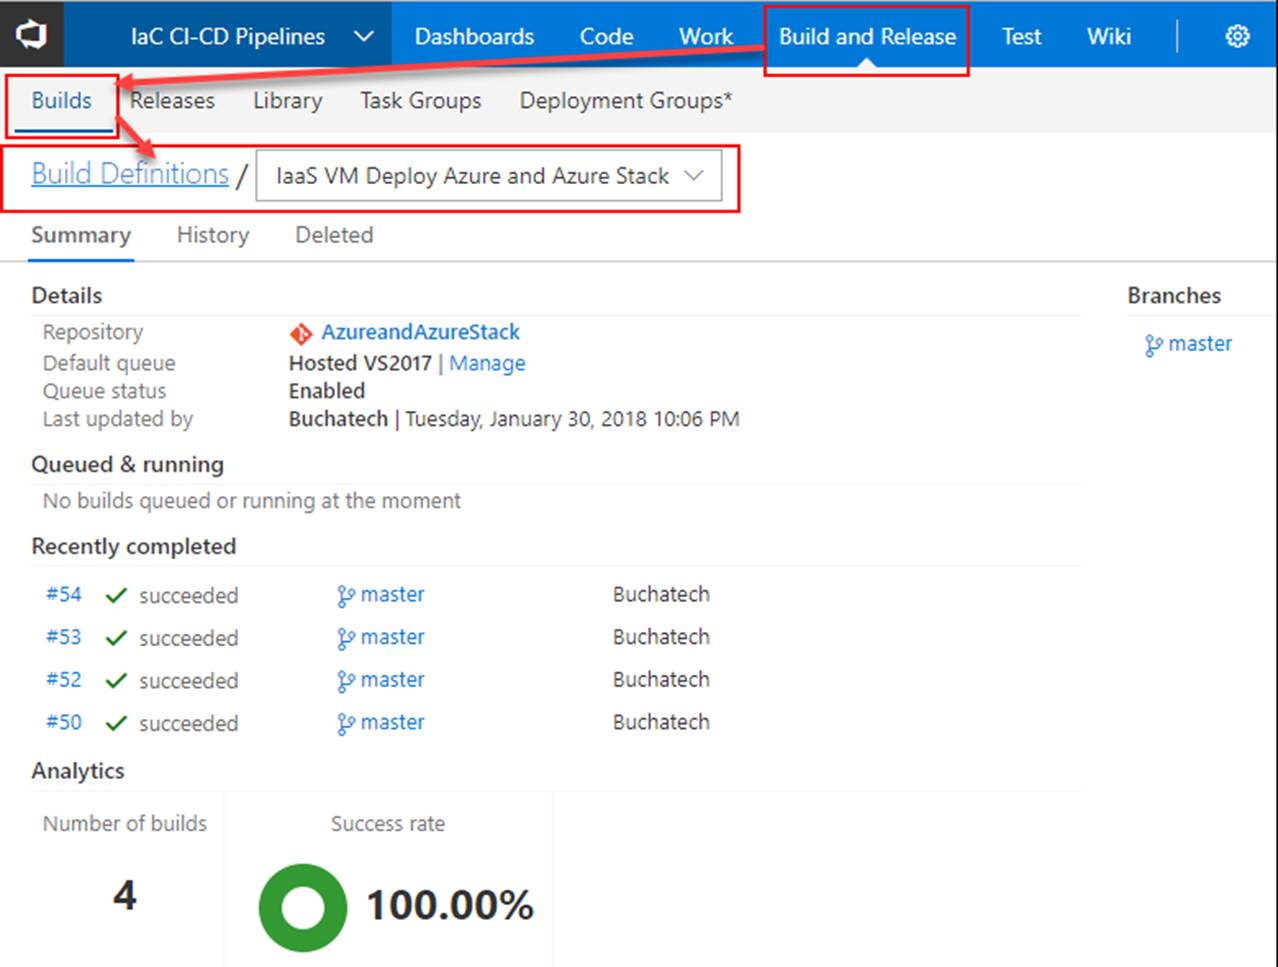
Next click on Build and Release. Create a new Build Definition.

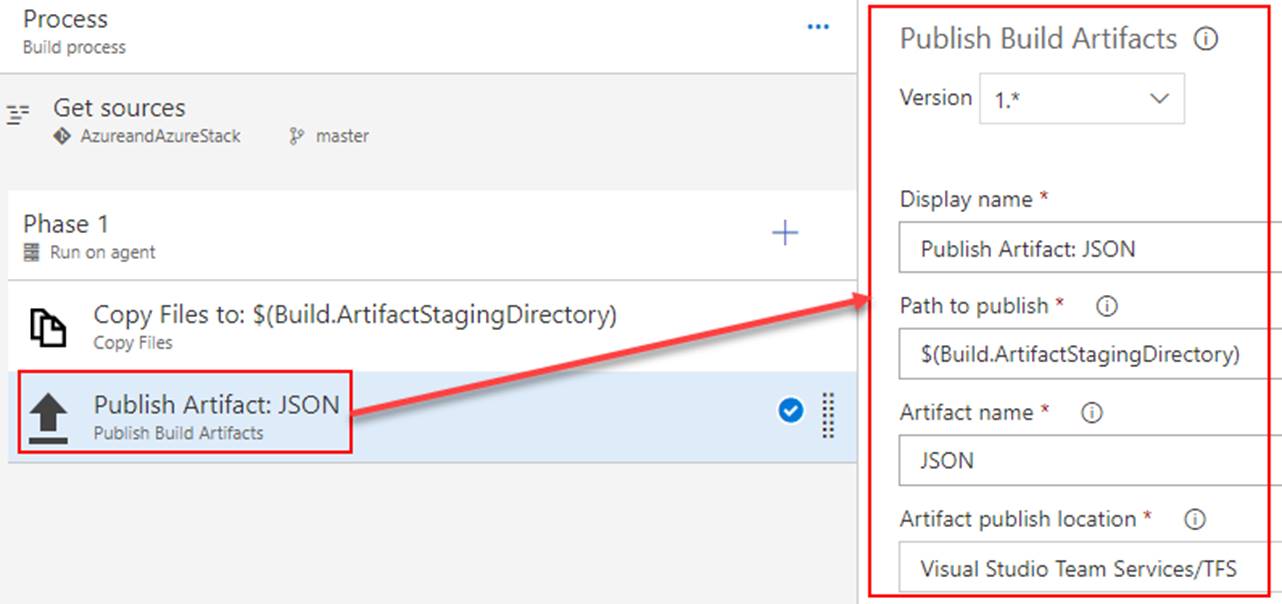
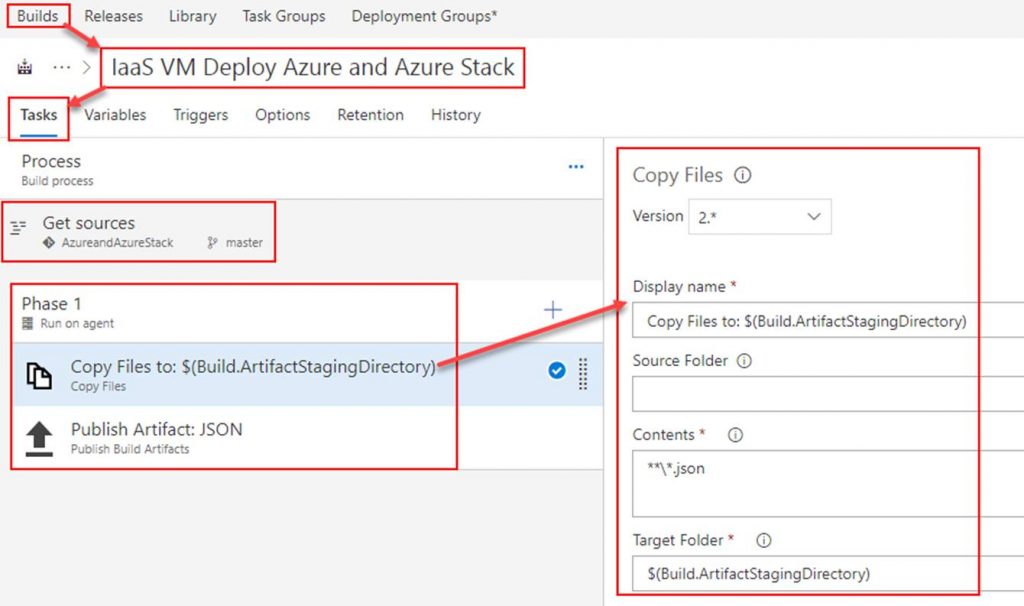
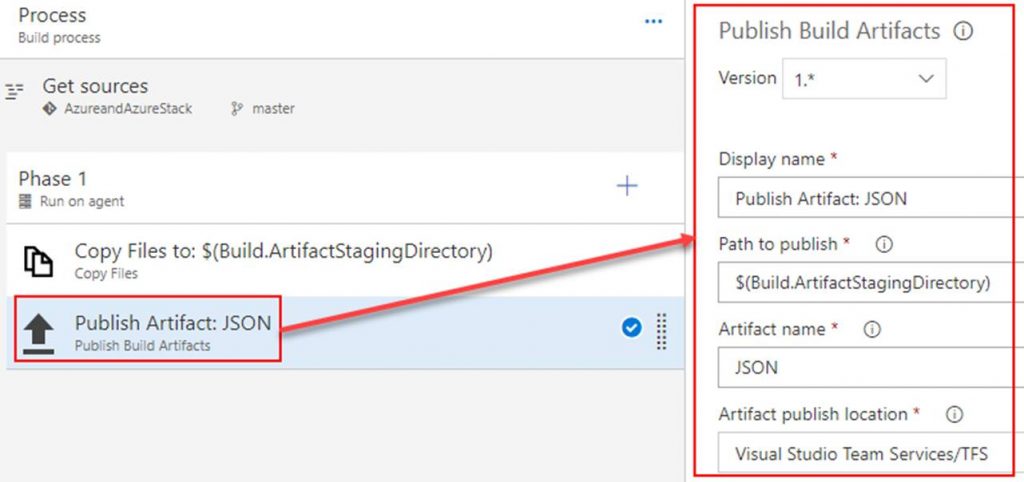
In the build definition. Point the Get sources to the repository you just created. Add 2 tasks under Phase 1. The first task will copy the ARM template to the build staging directory. The second task will publish the ARM template so that a release definition can pick it up. Both tasks are shown in the following screenshots.

Copy Files to task

Publish Artifact task

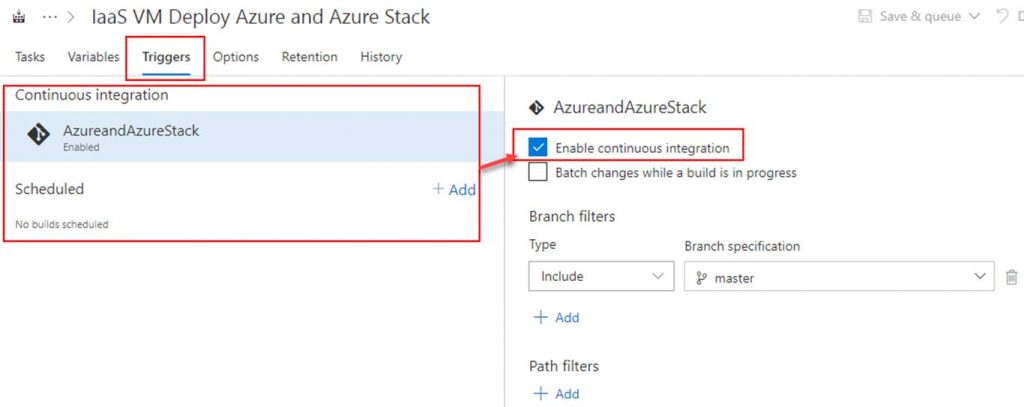
OPTIONAL: To setup continuous integration click on Triggers. Here you can set a schedule to run the builds or you can click on the repository as shown in the screenshot and then check Enable continuous integration. By checking the box next to Enable continuous integration it tells VSTS that anytime content in the repo is changed to run a build.

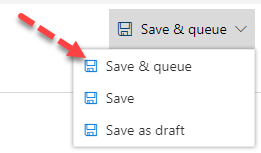
Click on Save & queue. This will start the build.

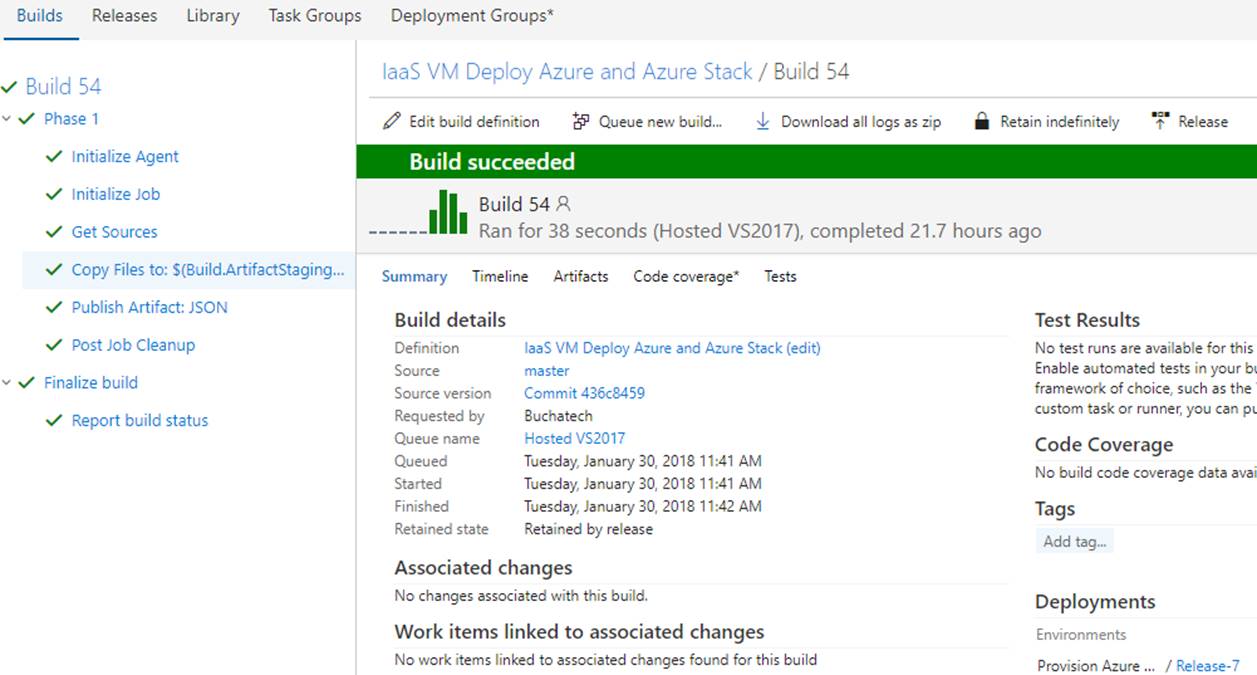
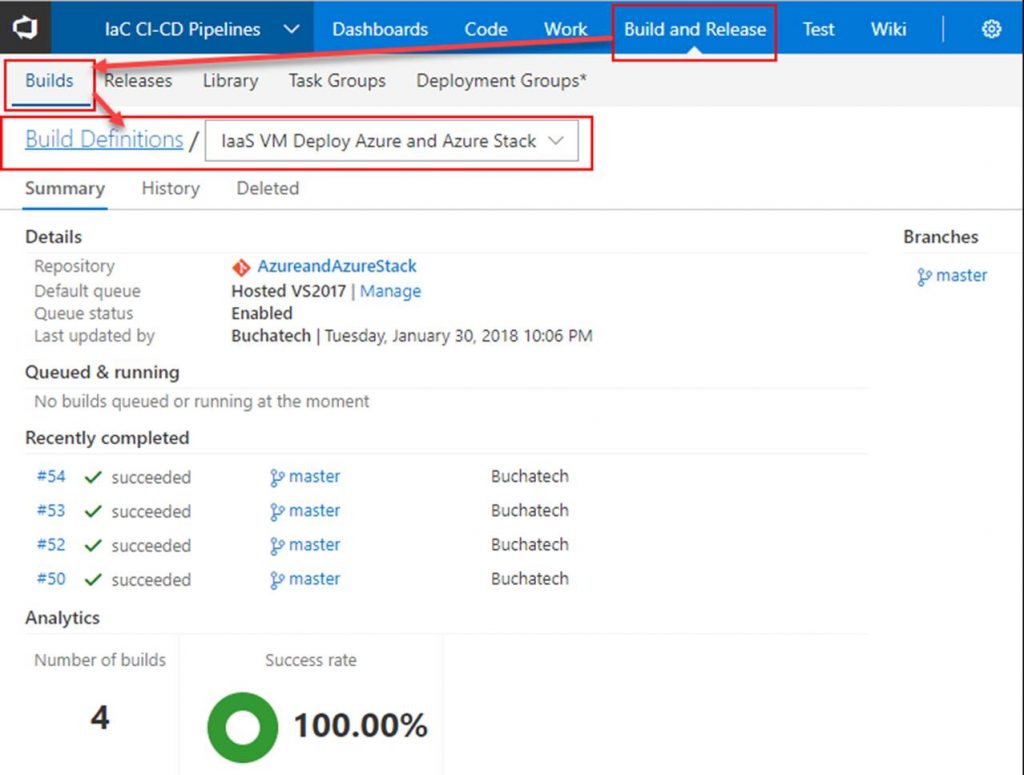
The build will start. As long as everything is setup properly within your build it will succeed as shown in the following Screenshot.

That’s all for our build. Next up we need to create a release definition (RD) pipeline. The RD will take the build artifacts and deploy to an environment/s you specify.

Read more

Monitor Azure WebJobs Status with Application Insights

Within the Azure App Service is something called WebJobs that enables developers to run a script or program in the background within the same context as a web app, API app, or mobile app. Wejobs are included in app service with no extra cost. Webjobs are often used to run regular jobs and batch work as background services. Webjobs exist to make it easier to develop, run background tasks, and scale your web applications.

Webjobs have been around for a while and are considered a part of the serverless computing available on Azure. Today Azure Functions another newer and improved serveless technology service the evolution of WebJobs. When developers need serverless today Azure Functions is typically chosen over webjobs. There are certain cases and scenarios when webjobs are still used instead of Azure Functions and I will not be diving into that topic in this blog post. For more information on when to use what serverless technology on Azure check out the following links:

– A comparison between WebJobs and Functions: Choose between Flow, Logic Apps, Functions, and WebJobs.

– Minnesota’s Azure user group meeting from December 2017 covered comparing the various serverless technologies in Azure. It was presented by Joe Koletar. The meeting notes and PowerPoint download can be found here:

http://www.mnazureusergroup.com/2017/12/22/december-2017-meeting-serverless-computing-notes-and-download

For more information on Azure WebJobs check out these two links:

– Run Background tasks with WebJobs in Azure App Service

https://docs.microsoft.com/en-us/azure/app-service/web-sites-create-web-jobs

– Develop and deploy WebJobs using Visual Studio – Azure App Service

https://docs.microsoft.com/en-us/azure/app-service/websites-dotnet-deploy-webjobs

I recently needed to setup monitoring for Azure webjobs status. In this environment there was a mix of continuous webjobs along with some triggered webjobs. Monitoring WebJobs is different compared to monitoring other Azure App Services such as web apps. Web apps can easily be monitored for up/down status and performance for things like in/out traffic, usage, and errors. Background services like WebJobs does not have a defined start or end to the work they do. WebJobs either run continuously or for short amounts of time to perform a task. In this case performance was not a concern but the status of the WebJobs was needed. You can see the status of the WebJobs in the Azure portal as shown in the following screenshot.

The problem here is this is not on a monitoring dashboard, you have to navigate here to see it, you need to click the refresh button for an update, and there is no alert setup when the status is in a non-desired state.

WebJobs does come with a logs website that shows the status of all of your WebJobs and more. This logs site is shown in the following screenshot:

The logs site is nice but the issue with it is that you have to be on the site to see the status of the WebJobs along with the previously mentioned issues viewing the status in the Azure portal. A good solution for monitoring the WebJobs would be a way to check the heartbeat of the WebJobs, the status, and alert you if one of the WebJobs is in a non-desired state. The good news is that this can be accomplished utilizing Application Insights. This is not new but does take some effort to setup.  I am going to detail how to set this up. Here is a summary of what needs to be done.

  1. Need an instance of Application Insights
  2. Need an authorization header from the WebJobs REST API.
  3. Need to create a webtest manually or using Visual Studio enterprise.
  4. Create a multi-step availability test in the Application Insights instance utilizing the webtest file.
  5. Create an alert on the availability test to notify when a WebJob is in a non-desired state.
  6. Add the results of the WebJobs availability test to a dashboard in Azure.

Let’s get started.

Read more

5th Book Published! Azure Stack Book!

The latest book project I have be a part of has completed and recently published. Back in August in this blog post (https://www.buchatech.com/2017/08/azure-stack-book-coming-soon-training) I mentioned this book was on its way. It is a book about Azure Stack that was officially published on December 21, 2017 by Pearson publishing. This book release has been very exciting as it is a part of the Unleashed series and this one marks the 5th book I have published. Here is a screenshot of all 5 from my Amazon author page:

In total I have published 2 books on System Center Data Protection Manager, 2 books on System Center Service Manager, and now this book covering Microsoft’s Hybrid Cloud with Azure and Azure Stack. This book also comes at the right time as I recently made a transition to a new company (Avanade) with a new focus on Cloud (Azure/Azure Stack) and DevOps. 2018 and beyond look to be exciting times as I “Hit Refresh” on my career focus.

Books like this require a team effort. On this book I was honored to work with an expert team of authors. All of the authors are fellow Microsoft MVP’s. The other authors are: Kerrie Meyler,‎ Mark Scholman,‎ Jakob Gottlieb Svendsen,‎ Janaka Rangama. Me and the other authors are pictured below + a former Microsoft MVP Nirmal.

A part of the books team also included some members of the Azure Stack product group and Azure CAT team. We lucked out having Daniel Savage Principal PM Manager from the Azure Stack team write the foreword and Marc van Eijk Senior Program Manager from the Azure CAT team serve as our technical reviewer keeping us authors in line. 🙂

Each of us authors had so much to contribute and added much value across a variety of topics for Azure Stack. In this book I focused on bringing the readers into the cloud journey, showing the value of ITIL applied to cloud as well as the value of DevOps and then bringing ITIL and DevOps together applying them to Hybrid Cloud, took a deep dive into resource providers and management of Azure Stack through a CloudOps perspective.

Other topics covered in the book consist of preparing for Azure Stack deployments both with the development kit and integrated system, deep dive into the architecture of Azure Stack including the development kit and integrated system, data center integration with Azure Stack, configuring Azure Stack including delegation and for tenants, provisioning in Azure Stack, using OMS/DSC/VM extensions with Azure Stack, Customizing Azure Stack, automating in Azure Stack, and much more.

This book gives you the information you need around Azure Stack single and multi-node. It is a great place to start as you venture into the world of Microsoft Hybrid Cloud. The plan is to update this book as Microsoft continues to mature Azure Stack so this book will continue to be relevant.

Here is the book cover:

Here is the official description for the book:

“Microsoft Hybrid Cloud Unleashed brings together comprehensive and practical insights into hybrid cloud technologies, complete CloudOps and DevOps implementation strategies, and detailed guidance for deploying Microsoft Azure Stack in your environment.

Written by five Microsoft Cloud and Datacenter Management MVPs, this book is built on real-world scenarios and the authors’ extraordinary hands-on experiences as early adopters. Step by step, the authors help you integrate your optimal mix of private and public cloud, with a unified management experience that lets you move workloads at will, achieving unprecedented flexibility.

The authors also guide you through all aspects of building your own secure, high-performance hybrid cloud infrastructure. You’ll discover how Azure Stack enables you to run data centers with the same scalability, redundancy, and reliability as Microsoft’s Azure data centers; how to integrate Azure infrastructure and platform services with internal operations; and how to manage crucial external dependencies. The book concludes with a deep dive into automating and customizing Azure Stack for maximum reliability, productivity, and cost savings.

Detailed information on how to

  •     Run a private/hybrid cloud on your hardware in your data center, using APIs and code identical to public Azure
  •     Apply ITIL and DevOps lifecycles to your hybrid cloud implementation
  •     Gain a deep understanding of Azure Stack architecture, components, and internals
  •     Install and configure Azure Stack and master the Azure Stack Portal
  •     Integrate and utilize infrastructure, core, and custom resource providers
  •     Effectively provision, secure, and manage tenants
  •     Manage, monitor, troubleshoot, and back up Azure Stack with CloudOps
  •     Automate resource provisioning with PowerShell, the Azure CLI, templates, and Azure Stack’s API
  •     Write your own Azure Resource Manager templates
  •     Centrally automate cloud management and complex tasks connected to external systems
  •     Develop customized, production-ready Azure Stack marketplace items”

Here is a link to the book:

https://www.amazon.com/Microsoft-Hybrid-Cloud-Unleashed-Azure/dp/0672338505

Happy Azure Stacking!

Read more