Architect your Cloud with Azure Blueprints

Today as a part of the Azure Governance and management announcements at Microsoft Ignite 2018 Azure Blueprints Public Preview was announced. Azure Blueprints are a core part of the cloud governance and management story. They go hand and hand with Management Groups and will take the enterprise management story of Azure up a level. In this blog post I will take a deep dive into Azure Blueprints explaining what they are and give an example of how they can be used.

NOTE: This is a long blog post so I have also published this content as a whitepaper. The whitepaper PDF can be downloaded here.

BLUEPRINTS OVERVIEW

At a high-level Azure Blueprints help you meet organizational cloud standards, patterns, and requirements through governed subscriptions enabled and enforced by the grouping of artifacts like ARM templates, Azure policies, RBAC role assignments, and resource groups within a Blueprint.

Blueprints can be used to lay a cloud foundation, as cloud patterns, and group cloud governance frameworks. Blueprints are a one-click solution for deploying a cloud foundation, pattern, or governance framework to an Azure subscription. Think of an Azure Blueprint as re-usable design parameters for cloud that can be shared and used across an enterprise.

Azure architects typically map out and plan the many aspects of a cloud foundation for an organization such as access management, networking, storage, policy, security/compliance, naming conventions, tagging, monitoring, backup, locations, and more. Now Azure architects can step this designing a step further build these designs as Azure Blueprints and then apply them to subscriptions. The Blueprints give architects a way to orchestrate the deployment of grouped components to speed up the development and provisioning of new Azure environments ensuring they are meeting organizational compliance.

BLUEPRINTS ARE NOT AZURE POLICY

Azure policy is a service targeted to resource properties that exists or when being deployed with allow or explicit deny policies. It is used to ensure resources in an Azure subscription adhere to requirements and standards of an organization.

Azure policies can exist on their own or be a part of an Azure Blueprint. Blueprints do not replace Policy they are one of the Artifact types that make up a Blueprint.

THE MAKEUP OF A BLUEPRINT

Definition

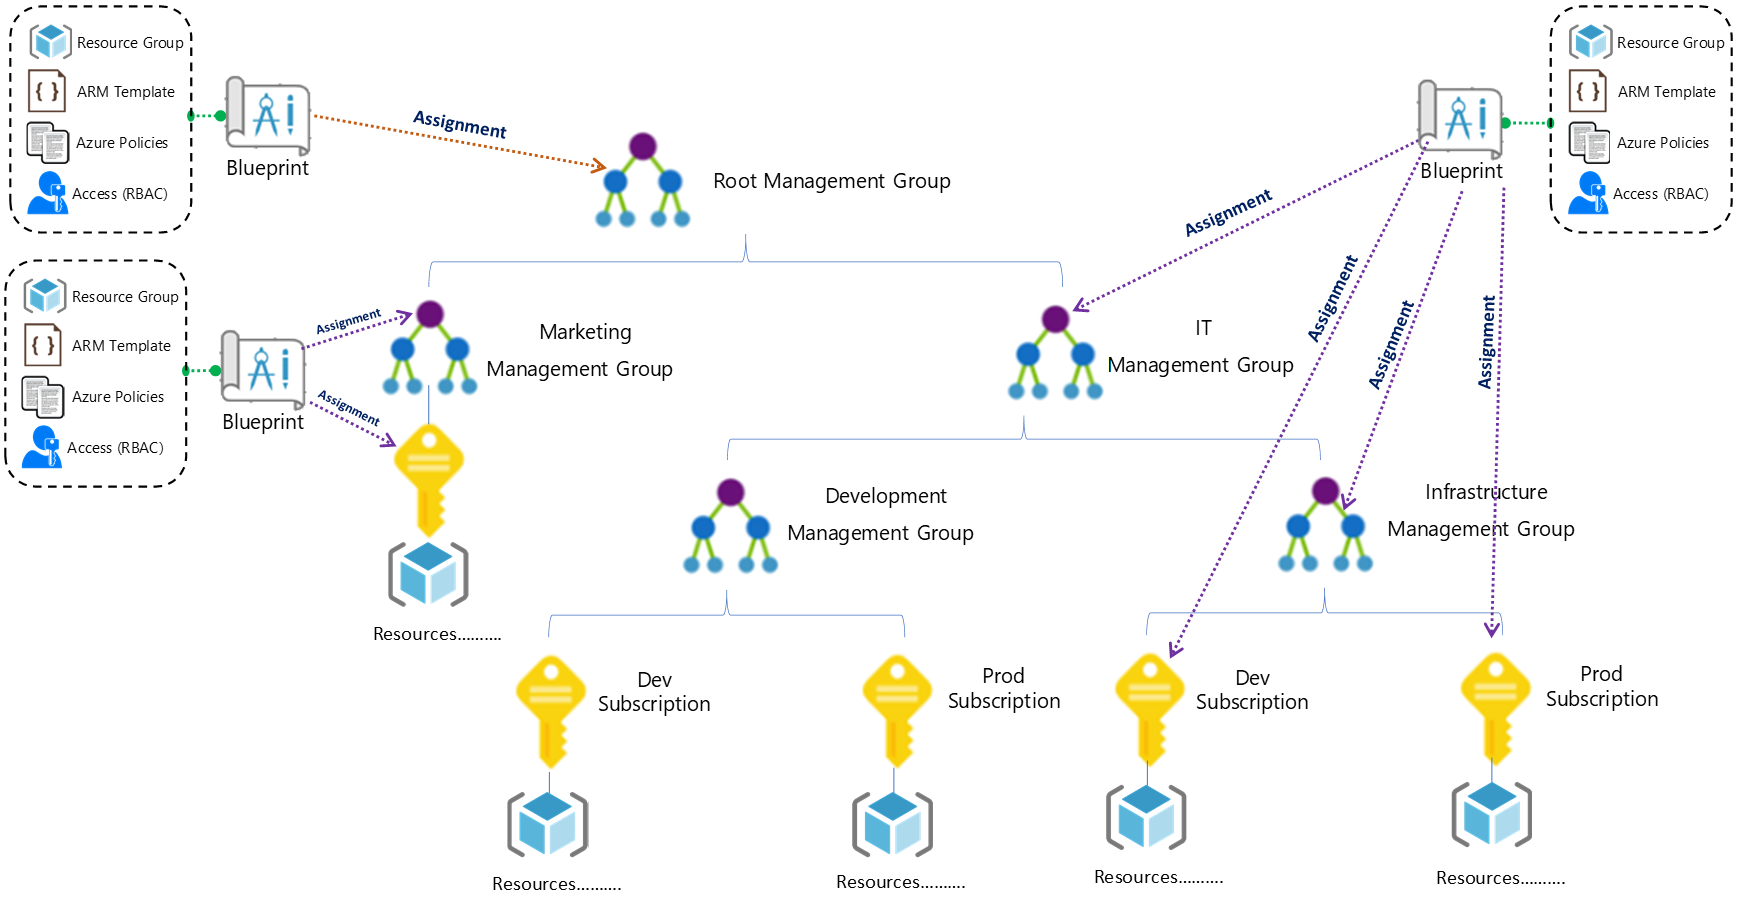
A Blueprint consists of a Definition. The Definition is the design of what should be deployed it consists of the name of the Blueprint, the description and the Definition location. The Definition Location is the place in the Management Group hierarchy where this Blueprint Definition will be stored and determines the level assignment is allowed at. Currently you must have Contributor access to a Management Group to be able to save a Blueprint Definition to it. A Blueprint can be assigned at or below the Management Group it has set in its Definition Location. Here is a diagram to visualize Blueprint Assignment in relation to Management Group hierarchy:

Azure Blueprint Assignment

Artifacts

The Definition is where Blueprint Artifacts are added. As of right now the following is a list of the Artifact types:

  • Policy Assignments – Lets you add an Azure Policy. This can be a built-in or custom policy.
  • Role Assignments – Lets you add a user, app, or group and set the role. Only built-in roles are currently supported.
  • Azure Resource Manager templates – Lets you add an ARM Template. This does not let you import a parameters file. It does let you pre-set the parameters or set the parameters during assignment of the Blueprint.
  • Resource Groups – Lets you add a Resource Group to be created as a part of this Blueprint.

In my opinion the ARM Template artifact is the most impactful of the Blueprint artifact types because you can define such a variety of resources here. It opens the Blueprint to the power of ARM in general. Hopefully in the future we will see more scripting capability or the ability to load PowerShell scripts, runbooks, and or Functions.

There are two levels in the Artifacts. The first level is Subscription. The second level is Resource Group. Resource Group artifacts cannot be added to a Resource Group artifact. A Resource Group artifact can be created in a Subscription. An ARM Template artifact can only be created in a Resource Group artifact. A Policy Assignments or Role Assignments can be created at either the Subscription or Resource Group level.

Assignment

After a Blueprint has been built it needs to be applied. Applying a Blueprint is known as Blueprint assignment. The assignment is essentially the “what was deployed” for a Blueprint. This is how the artifacts are pushed out to Azure and used to track and audit deployments in Azure.

Sequencing

When the assignment of a Blueprint is processed the default order of resource creation is:

  • Role assignment artifacts at the Subscription level
  • Policy assignment artifacts at the Subscription level
  • Azure Resource Manager template artifacts at the Subscription level
  • Resource group artifacts and its child artifacts (role assignment, policy assignment, ARM Templates) at the Resource Group level

When a blueprint includes multiple Azure Resource Manager templates there may be a need to customize the sequencing order in which the Blueprint will deploy artifacts during assignment. You customize the artifact deployment sequence by deploying a Blueprint from an ARM Template declaring a dependency within it or declaring a dependency within an ARM Template artifact in the Blueprint. You declare a dependency using the dependsOn property in JSON. This essentially is a string array of artifact names.

Resource Locking

In cloud environments consistency is key. Naturally Azure Blueprints can also leverage resource locking in Azure. Blueprints have a Locking Mode. This Locking Mode can be applied to None or All Resources and is determined during the assignment of the Blueprint. The decision on cannot be changed later. If a locking state needs to be removed, then you must first remove the Blueprint assignment.

Some Blueprint artifacts create resources during assignment. These resources can have the following state:

  • Not Locked – Can be changed. Can be deleted.
  • Read Only – Can’t be changed and can’t be deleted.
  • Cannot Edit / Delete – Create, update, and delete within the resource group.

Artifacts that become Resource groups get the state of Cannot Edit / Delete automatically but you can create, update, and delete resources within them.

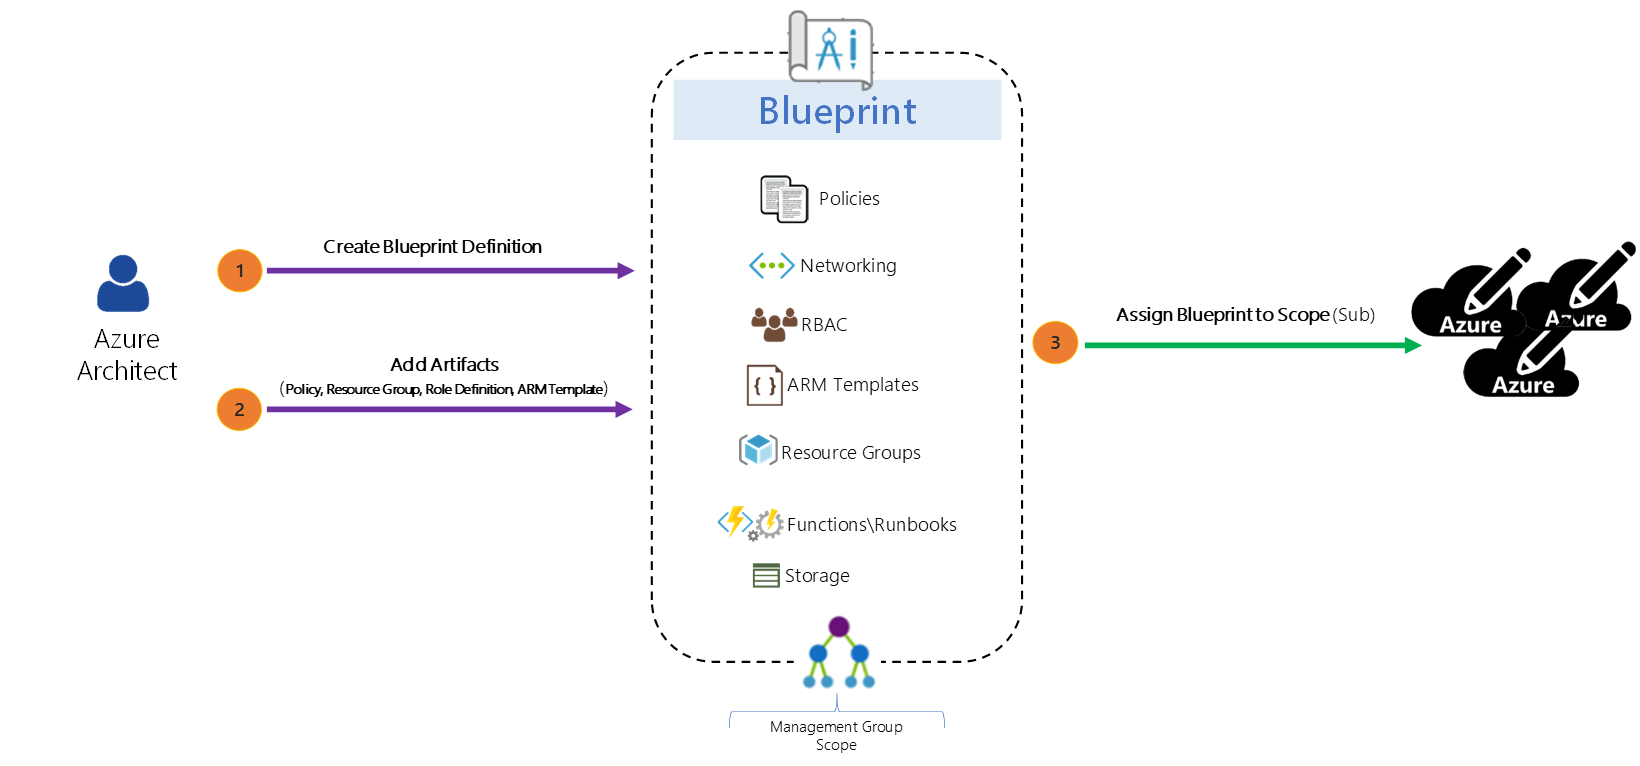
The high-level stages of an Azure Blueprint are Create it, assign it to a scope, and track it.

Anatomy of a Blueprint:

Azure Blueprint Anatomy


Blueprint does have a REST API. I am not covering the REST API in this blog post as I have not had the opportunity to spend much time working with it yet.

Now let’s look at building and assigning an Azure Blueprint.

BUILD A BLUEPRINT

Now I am going to give an example of building and using an Azure Blueprint in a cloud foundation mock scenario. In my mock scenario I have 3 Azure subscriptions. Each subscription should have a Core services Resource Group consisting of a core VNet with 3 subnets, an NSG for each subnet, and the web subnet should be ready for DMZ traffic. For the core VNet and any additional VNet added to the Core Services Resource Group I need network watcher deployed to it.

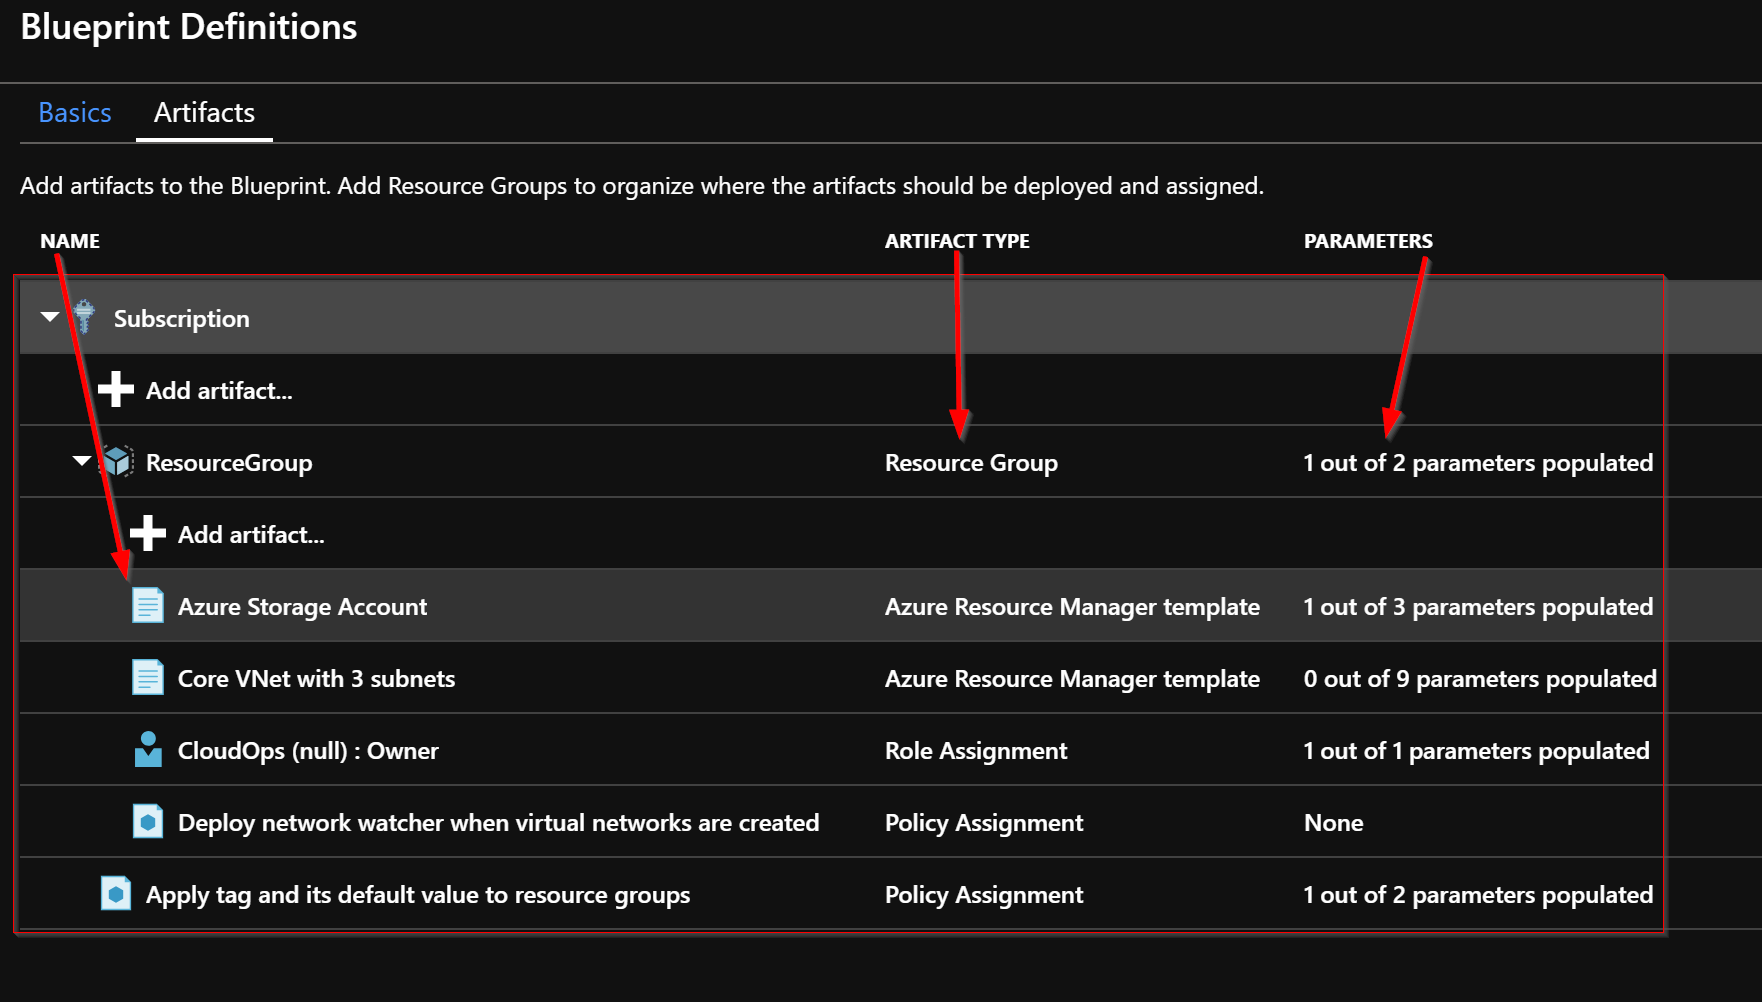
Each subscription also should have a core storage account and a blob storage that is ready for general storage needs. I want a tag applied to any Blueprint assignment labeling it with the assignment name, so it is easy to track. The last requirement I have is that I need the CloudOps team to automatically be owner of all core services resources. To accomplish all of this I created the following Blueprint:

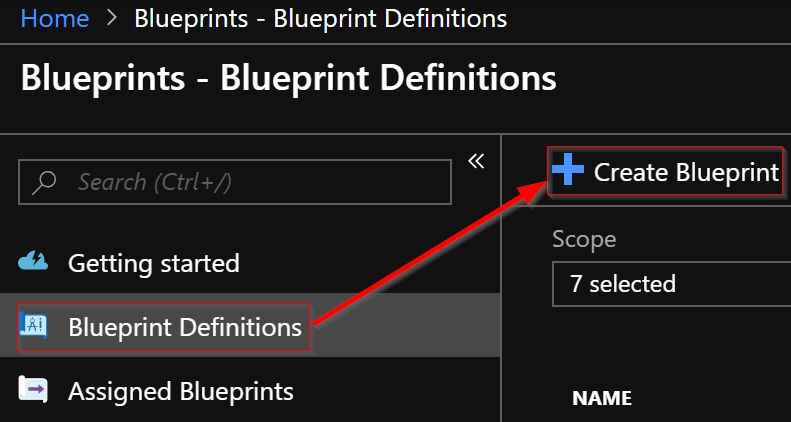
Now let’s walk through the parts of creating and assigning the Blueprint. The first step is to create the Blueprint Definition.

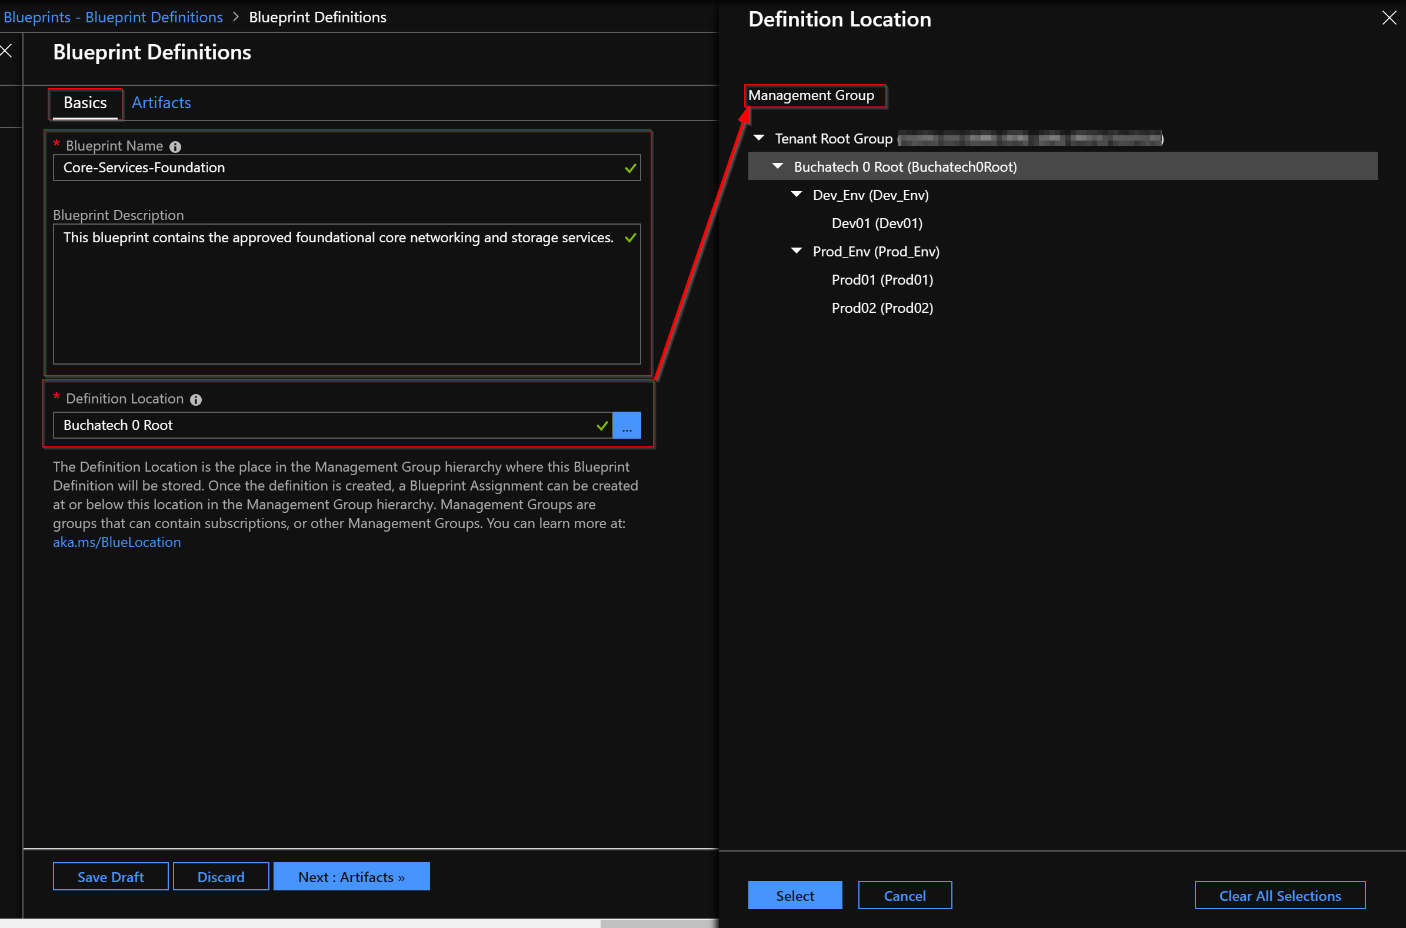
In the basics step I give it a meaningful name and meaningful description. I set the Definition Location to the root of my Management groups. Doing this will allow me to assign this Blueprint to all 3 subscriptions in turn creating the core services RG in each subscription.

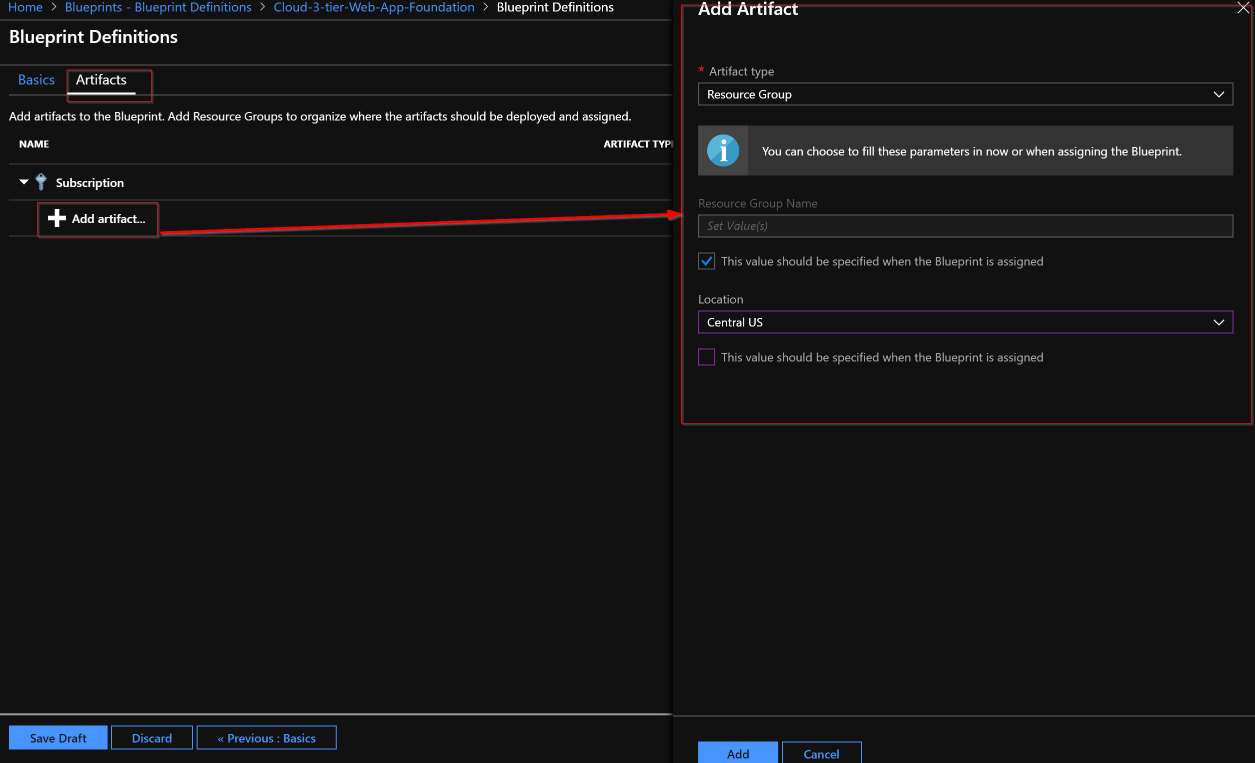
Next the Artifacts need to be added. Note that when adding an Artifact at the Subscription level you have these options as types:

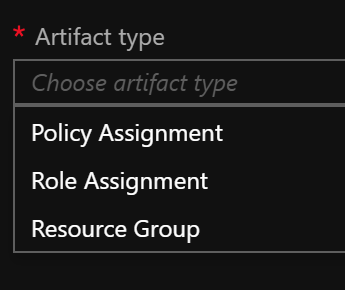
The Resource Group Artifact type is only available at the subscription level and the ARM template Artifact type is only available at the Resource Group level. I added the Resource Group that the core networking and core storage will be deployed into.

Read more

Cloud Security via Security Center

Another critical part of managing any cloud is security. In Azure Microsoft has a service called Security Center. I am going to cover Security Center at a high level here in this post as Security Center itself is a big topic and is frequently changing with new improvements. This provides continuous assessment of your clouds security posture. Security Center gives you a central place to monitor and manage your security. Security Center can even covers Hybrid Cloud with the ability to extend on-premises. With Security Center you can apply security policies to your cloud workloads and respond to attacks that occur.

Security Center has a “free” tier that can be used with any Azure subscription. In fact if you are running Azure you should at a minimum be utilizing the free tier of Security Center. The tiers are:

Not covered = not monitored by Security Center.

Basic Coverage = subscriptions under this “free” tier are under the limited, free level of Security Center.

Standard Coverage =  subscriptions under this “standard” tier have the maximum level coverage by Security Center.

Key features in Security Center are:

– Security policy, assessment, and recommendations / free / Security Center performs continuous assessment and recommendations based on security policies that are set. This is the core feature of Security Center.

– Event collection and search / standard / Security Center can store security events in a Log Analytics (LA) workspace. The events also are available in the LA workspace for searching.

– Threat Protection / standard / visibility into any detected security alerts and their severity level.

– Just in time VM access / standard / Just in time VM access locks down inbound traffic to IaaS VM’s. With this feature users are required to request access to the VM for a specified amount of time. A firewall rule is opened on an NSG allowing the access and then the ports are closed after the allotted window of access time. This can reduce the attack surface on VM’s.

NOTE: (Automate Just In Time VM Access Request With PowerShell – https://github.com/CharbelNemnom/Power-MVP-Elite/tree/master/Request%20JIT%20VM%20Access by Microsoft MVP Charbel Nemnom)

– Adaptive application controls / standard /  This feature allows you to choose what applications are allowed to run on your VMs. This feature uses machine learning to analyze the applications running in the VM and then you whitelist the ones you want to allow to run.

– Custom alerts / standard /  Security Center has a bunch of default alerts. Alerts fire when a threat, or suspicious activity occurs. You can find the list of the default alerts here: security alerts. Security Center also has custom alerts that you can setup. With these you define the conditions upon which an alert is fired.

– Threat intelligence  / standard /  this feature watches for known bad actors using threat intelligence data from Microsoft’s global products and services such as Azure, Office 365, Microsoft CRM online, Microsoft Dynamics AX, outlook.com, MSN.com, and Microsoft’s Digital Crimes Unit (DCU) and Microsoft Security Response Center (MSRC) .

It is important to note that Security Center leverages many other Azure services to power its services. Some of these other Azure services include:

  • Azure Policy
  • Log Analytics
  • Logic Apps
  • Machine Learning

Now that we looked at key features of Security Center let’s take a tour of Security Center. The best way to navigate Security Center is via the navigation on the left hand side and that is the way I will break it down. The menu sections are shown in the following table:

When you first click into Security Center you will see the Overview. Overview is also the first section under “General”. Here is a screenshot of the overview pain.

Essentially the overview pane gives you a summary of your security posture pulling in data from several sections in Security Center. Getting started is where you can launch a 60 day trial on the standard plan. Events brings you to a log analytics workspace dashboard to give you another display and search capabilities on your security data. Search will bring you directly to the log analytics search screen where you can search on your security data.

Read more

Multiple Linux VM Deployment ARM Template

I looked for an existing ARM template that would create multiple Linux VM’s. I found only one that creates some in a scale set. The use case I was working with did not call for a scale set so I needed a different template.

I found a simple ARM template for creating multiple Windows VM’s on Azure here. It had exactly what I needed for my use case but did not cover Linux.

I modified the template and uploaded to Github in case this is helpful to anyone else. The repo has two templates. There is one for Ubuntu and one for SUSE. When you deploy the template it will need the following parameters:

The ARM template will create an availability set (AS) with N number of VM’s put in that AS, network interfaces, and public IP’s for each VM along with a VNet and Subnet as shown in the following screenshot:

Here is the link to download the ARM Template:

https://github.com/Buchatech/Multiple-Linux-VM-Deployment-ARM-Template

Read more

Azure & Azure Stack Resource Group Cleanup Script

When building things in Azure & Azure Stack I tend to create a lot of temporary resources groups. I like to remove these when I am done. I have been using a PowerShell script for a while to help make this easier. I have decided to upload this script hoping others will find it useful as well. The script is named CleanupResourceGroups.ps1 and can be downloaded here:
https://gallery.technet.microsoft.com/Cleanup-Azure-Resource-d95fc34e

The script can be used two ways:

#1 the script can be run using -Like with an expression like where {$_.ResourceGroupName -like (‘*MySQL*’) in which the script would remove any resource group with MySQL in it. To use this option just un-comment the code in SECTION 1- Uses -Like, change MySQL to whatever you want, comment SECTION 2- Interactive RG selection code, and then run the script.

#2 the script can be run interactively allowing you to select multiple resource groups you want to remove. By default the SECTION 2- Interactive RG selection code is un-commented. If you run the script it will run interactively as shown in the following steps/screenshots.

After running the script it will prompt you to select an Azure subscription.

Next the script will give you a list of resource groups in the subscription you selected. Select the resource groups you want to remove and click Ok.

The script will loop through and remove the resource groups you selected. Note that script is using -Force so it will not prompt to ensure you intend to remove the resource groups. Make sure you want to remove the resource groups before running this script.

NOTE: When running this for Azure Stack ensure you are logged into the Azure Stack environment. For info on how to do this visit: https://bit.ly/2LkvddG

That is it. It is a simple script to make removing many resource groups easier. I hope you find this script useful as I have!

Read more

The “argument is null or empty” error in Azure Automation Runbook

I was recently working on an Azure Automation runbook that provisions an empty resource group in Azure. I was running into an issue when the runbook ran that the variable being used with New-AzureRmRoleAssignment was null. The errors I was receiving are:

New-AzureRmRoleAssignment : Cannot validate argument on parameter ‘SignInName’. The argument is null or empty. Provide
an argument that is not null or empty, and then try the command again.
At line:96 char:39
+ New-AzureRmRoleAssignment -SignInName $RequesterSignIn -RoleDefinitio …
+ ~~~~~~~~~~~~~~~~
+ CategoryInfo : InvalidData: (:) [New-AzureRmRoleAssignment], ParameterBindingValidationException
+ FullyQualifiedErrorId :
ParameterArgumentValidationError,Microsoft.Azure.Commands.Resources.NewAzureRoleAssignmentCommand

and

New-AzureRmRoleAssignment : Cannot validate argument on parameter ‘ObjectId’. Specify a parameter of type ‘System.Guid’
and try again.
At line:97 char:37
+ New-AzureRmRoleAssignment -ObjectID $RequesterID -RoleDefinitionName  …
+                                     ~~~~~~~~~~~~
+ CategoryInfo          : InvalidData: (:) [New-AzureRmRoleAssignment], ParameterBindingValidationException
+ FullyQualifiedErrorId :
ParameterArgumentValidationError,Microsoft.Azure.Commands.Resources.NewAzureRoleAssignmentCommand

It turned out to be a permission issue with AzureRM.Resources CMDLETS not being able to talk to AAD specifically Get-AzureRmADUser that I was using for a variable.

To fix this I had to give the following permissions for the AAD directory to the AzureServicePrincipal Run As Account:

Windows Azure Active Directory (AAD)
Application Permissions

·       Read/Write directory data
·       Read directory data

Delegated Permissions
·       Read directory data
·       Read all users’ full profiles
·       Read all users’ basic profiles

Microsoft Graph
App Permissions
·       Read directory data

In your runbook code you will typically have

# Authenticate to Azure resources
$connectionName = “AzureRunAsConnection”

# Get the connection “AzureRunAsConnection “
$servicePrincipalConnection = Get-AutomationConnection -Name $connectionName
“Logging in to Azure…”
Login-AzureRmAccount `
-ServicePrincipal `
-TenantId $servicePrincipalConnection.TenantId `
-ApplicationId $servicePrincipalConnection.ApplicationId `
-CertificateThumbprint $servicePrincipalConnection.CertificateThumbprint

You may have a some differences like the connection variable and the name of the runasconnection. The point here is that the runas connection is what needs to have the proper permissions. You can find this account here to get the name and ApplicationID:

To give the permissions go to Azure Active Directory>the directory you are using in this automation>App registrations>and search based on the ApplicationID. Don’t forget to select All apps in the drop down.

Click on Add first and add the AAD and then Microsoft Graph permissions.

After you add the proper permissions make sure you click on Grant Permissions. The permissions are not actually applied until you do this. Once you click on Grant permissions you will see the prompt shown in the screenshot. Click Yes.

Verify the permissions have been added properly. In AAD go to All applications>select All applications. Find your service principle application.

Click on the service principle applications permissions.

Verify the AAD and graph permissions are listed. If the AAD and graph permissions are listed then the runbook should be good to go.

Read more

Unlink yourself from unused AAD directories

Working in the world of consulting I am often added to other Azure Active Directories that are managed by someone else. After a while these can pile up like in the following screenshot.

I like to clean these up as the inviting organizations typically don’t remove you. Here is a quick way to do this. In a browser go to https://myapps.microsoft.com. It will look like this:

Click on your name and select the directory you want to remove. Click on your name again and click on the cog for the settings.

You should then see the option to “Leave the organization”. Click the link.

You will see the following pop-up. Click on Leave.

That’s it. You will no longer see the directory you just removed listed in the Azure portal under your directory list.

Read more

Made the cut. Microsoft MVP for 7th year!

Today was a very happy day for me and a sad day. It was a happy day because I once again have been renewed as a Microsoft MVP! It was sad because many MVP’s did not get renewed this go round and many of them are personal friends of mine. Shout out to all of you that did not get renewed. You folks are still community MVP’s. Keep doing all the great things you do and I will see you out in the tech community. Also congrats to all the new and renewed MVP’s!

Well, I made the cut. I am a Microsoft MVP for the 7th year! Here is the email and MVP site confirming my renewal:

This July is extra special. In fact, this award cycle ranks up there with the very first time I was awarded. I rank this 7th award so high because it was not easy to stay an MVP with so many not being re-awarded. I am one of the lucky ones that made it back in. Last year I made a conscious decision to shift my focus completely to Azure, Azure Stack, DevOps, and CloudOps. I like to think this shift of focus helped me get back in during this humbling award cycle.

Again this year I feel blessed to still be in the MVP program. I hope to continue to add value and remain an MVP. As always a huge thanks goes out to everyone in the community and Microsoft. Special thanks to Betsy Weber, David Armour, Joseph Chan, Ricardo Mendes, Tim Benjamin, Daniel Savage, and many other folks at Microsoft.

I will continue to do all that I can in the Azure, Azure Stack, CloudOps/DevOps communities this year.

My Microsoft MVP Profile: http://mvp.microsoft.com/en-us/mvp/Steve%20Buchanan-4039736

Read more

Native Cloud Management in Azure

For those that know me know that I have been a System Center expert for some time focused on helping organizations manage their IT along with their ITSM needs. I have been working with Azure since it was released off and on but started to get serious about Azure after Microsoft’s move to resource manager. And even more recently I have re-focused completely to Azure and DevOps along with ITSM in the context of the cloud. I consider this combination CloudOps.

CloudOps is important when it comes to cloud and supporting DevOps. A part of CloudOps is cloud management. More specifically the tooling name for cloud management is often referred to as Cloud Management Platform (CMP).  CMP’s can be a CloudOps architect and engineers best friend or worst nightmare. There are many CMP solutions out there in the market that can be used to manage Azure and other clouds as well. Microsoft has done a nice job building and bringing in native solutions that can be used to manage Azure. The following image depicts the areas of cloud management that are in focus for Microsoft.

I am sure the plan for native cloud management will change and expand over time as Azure and its management needs continue to grow. The native set of cloud management tools in Azure can be viewed as a CMP. I am going to put together a group of blogs that at a high level cover the native solutions that exist for managing and securing Azure. There are so many areas in this topic that it has to be broken out into a blog series. This is the first time I am doing a blog series. It will cover the following:

Check back on this post soon. As I create more blog posts in this series they will be linked on the list above.

Read more

Azure Cost Management (Cloudyn)

IT financial management (ITFM) is an important part of IT operations as business dependency on IT continues to grow in the age of digital transformation. ITFM is a part of ITIL as a Service Strategy element in the framework. ITFM is a key part of CloudOps as well because spending in the cloud is based on an OPEX model and every single cost is tracked. ITFM and cost management in the cloud should be used to effectively and concisely connect the dollars spent on IT to the value delivered to the business. We can do this with Azure Cost Management. In this post, I am going to give an overview of Azure cost management highlighting many of the things you can do with it. Let’s dive into the solution now.

Overview

In June of 2017, Microsoft acquired Cloudyn a startup that had tooling for cloud monitoring and analytics tools focused on cloud financial management. Cloudyn’s solution is multi-cloud covering Azure, Azure Stack, AWS, and GCP. Through the acquisition of Cloudyn Microsoft was able to bring the tooling into the Azure ecosystem giving Azure customers an enhanced way to track and control cloud spend improving the improving the Azure cloud governance story.  As of right now, there is a free level and a paid level for Azure cost management. The following table lists what features are available with each level.

FREE capabilities:

Reporting Report on cost and usage
Data enrichment Categorize by resource tags
Budgets Create and manage cost and usage budgets
Alerting Create alerts on cost and usage budgets
Recommendations Eliminate idle cloud resources

Right-size cloud resources

PAID capabilities:

Chargeback features including cost markup, redistribution, and custom charges
Import external budgets
Customize recommendation thresholds
Categorize costs with custom meta-tags

Since the acquisition, Microsoft has added a link to the Cloudyn portal directly in Azure and integration with your Azure subscriptions giving you the ability to launch a new Cloudyn account that is tied to your subscription. Microsoft added Cost Management in Azure and this is where you will find Cloudyn and sign up. As shown in the following screenshot you can see the “Go to Cost Management” button. After clicking on that you will go the Cloudyn portal and will be able to add your various cloud accounts.  The thing that I really like about Azure cost management is that there is a ton of data and dashboards that are available right out of the box after adding a cloud account. There is not a bunch of configuration that you need to do to get the default dashboards and optimization tools.

After you are all signed up and have your cloud accounts added your dashboards will start to show data. The next two screenshots show a couple of the default dashboards.

The management dashboard gives a good summary of your cloud financials on one pane of glass.


The cost controller dashboard shows cost trends, some forecasting info, a breakdown of costs and more.

As you can see from the previous screenshots there are several other dashboards with other content. You can modify any of these dashboards adding or removing widgets. You also can create your own dashboard adding whatever widgets you want to it.

In Azure cost management, you can add cost centers known as Cost Entities. Entities are intended to mirror your organization’s hierarchical structure such as business units, divisions, departments, or teams within your organization some examples are engineering, R&D, development, marketing etc. The goal of the entities is to give you a way to track cloud spend by the entities. Keep in mind the cost entities can be anything that fits the way you want to structure and track cloud costs. You also can leverage tags, add budgets, and then associate costs and or budgets to the cost entities into cost models. Cost models give you a way to distribute and allocate costs. You can track costs back to these cost entities and you can track costs against budgets for showback or chargeback scenarios. Below is a screenshot of the cost entities screen. Keep an eye out for a detailed blog from me walking through how to structure and set up this part of Azure cost management. This area of Azure cost management warrants its own dedicated blog.

Here is an example of a budget set on a cost entity.

Read more